1
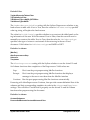
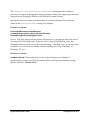
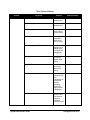
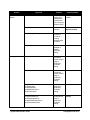
Stylizer
Administrator’s Manual
Levit & James, Inc.
Version 4.0 (March 23, 2009)
Copyright © 2009 Levit & James, Inc.
Levit & James, Inc.
50 Sycolin Rd. SE
Leesburg, VA 20175-4105
Fax 703-779-0304
Website: http://www.levitjames.com
E-mail: [email protected]
Sales: 703-771-1549
Technical Support: 703-771-8185
This manual was produced using ComponentOne Doc-To-Help.™
Contents
Introduction ............................................................................................................................. 1
Overview .................................................................................................................................. 2
How Stylizer Stores Configuration Data: Design Goals ......................................................................... 2
How Configuration Data Are Stored: Overview ...................................................................................... 3
How File Synchronization Occurs ............................................................................................................. 3
Un-Docked Users ................................................................................................................................... 4
Advanced Features for Special Requirements ..................................................................................... 4
File Structure Detail .................................................................................................................................... 5
Program Files Folder ............................................................................................................................. 5
Program Files Folder Structure ...................................................................................................... 5
Program Data Folder ............................................................................................................................. 7
User Profile Folder ................................................................................................................................. 8
User Profile Folder Structure.......................................................................................................... 9
Master Files Folder .............................................................................................................................. 10
Master Files Folder Structure ....................................................................................................... 11
Installing Stylizer .................................................................................................................. 12
Installing on Single Client Workstations ............................................................................................... 12
Installing with Network-Based Administration .................................................................................... 13
Step 1: Install STYLIZER on a Workstation........................................................................................ 13
Step 2: Establish the Master Files Folder ............................................................................................ 14
Step 3: Establish User Home Folder (Optional) ................................................................................. 14
Step 4: Edit STYADMIN.INI .................................................................................................................... 14
Step 5: Edit CWSEQLED.TXT (Optional) ................................................................................................ 15
Step 6: Create Custom Schemes (Optional)........................................................................................ 15
Step 7: Set Baseline Preferences (Optional) ........................................................................................ 15
Step 8: Prepare for the Software Distribution (Optional) .................................................................. 15
Step 9: Test File Synchronization ........................................................................................................ 16
Step 10: Distribute the STYLIZER Software ....................................................................................... 16
Step 11: Test the STYLIZER Configuration ........................................................................................ 18
Licensing and Configuration Files...................................................................................... 20
Licensing-Related Files ............................................................................................................................. 20
Configuration Files.................................................................................................................................... 20
ABOUT CONFIGURATION FILES .............................................................................................................. 20
STYADMIN.INI........................................................................................................................................ 21
Best Authority Administrator’s Guide
Contents • iii
STYADMIN.INI Settings................................................................................................................... 21
STYLIZER.INI .......................................................................................................................................... 22
STYLIZER.INI Settings ..................................................................................................................... 23
Schemes .................................................................................................................................. 37
Location of Scheme Files .......................................................................................................................... 37
Updating a Shared Scheme....................................................................................................................... 37
Logging ................................................................................................................................... 39
Stylizer Document Metadata ............................................................................................... 40
iv • Contents
Best Authority Administrator’s Guide
Introduction
This guide is intended for Stylizer administrators only. For detailed information on how
to use Stylizer, see the Stylizer User’s Guide. The content here
•
Explains how to install and configure Stylizer,
•
Discusses other aspects of Stylizer which administrators need to know.
If you have any questions about any information contained in this document, please
contact Levit & James technical support at (703) 771-8185 or [email protected].
Stylizer Administrator’s Guide
How Stylizer Stores Configuration Data: Design Goals • 1
Overview
How Stylizer Stores Configuration Data: Design Goals
We believe that we have developed an optimum design for storing Stylizer
configuration data. Our development goals have been:
•
To make things simple to understand and easy to use in any environment,
ranging from a sole practitioner’s desktop, to a large international organization
with multiple offices.
•
To make it possible and easy to lock down any functions which your
organization wishes to centralize.
•
To operate successfully in a Microsoft “Secure PC” environment, where the end
user is completely locked out from writing anything in the Program Files folder,
the Program Data folder, and/or in large portions of the Registry.
•
To make it very easy, and fast, to distribute updates of configuration data to endusers.
•
To make it possible for an end user to simply unplug from the network and to
leave the office with the latest data files, without needing to remember to first
download anything related to Stylizer.
Stylizer Administrator’s Guide
How Stylizer Stores Configuration Data: Design Goals • 2
How Configuration Data Are Stored: Overview
The STYLIZER Program Data Folder includes:
•
LICENSE.INI, a file supplied to you by Levit & James, Inc., which is digitally
signed.
•
STYADMIN.INI, which you maintain, and which:
•
Tells the software where other configuration data are stored.
•
Defines the user privileges required to run certain functions.
In a centrally administered system, this file can be made read-only for normal
users, and “pushed” via the organization’s normal procedures, whenever an
update is required.
All other configuration data (Preferences and Schemes) are stored in the User Profile
Folder, which by default is located in %APPDATA%\LEVIT & JAMES, INC\STYLIZER. (See
“STYADMIN.INI Settings” on page 21 for how this location can be changed.) The User
Profile Folder is segregated into two branches:
•
A PRIVATE subfolder, in which all user-modified data are stored.
•
A SHARED subfolder, in which centrally-supplied items are stored. The user will
retain Read/Write privileges to this folder, as that will be required for the
synchronization process. However, the various Stylizer program functions will
prevent or discourage users from storing their own information in this folder.
For a detailed listing of folder contents, see “File Structure Detail” on page 5.
How File Synchronization Occurs
In addition to the active configuration files described above, the STYADMIN.INI file
points to the location of a MasterFilesPath. This location is known as the Master Files
Folder. Each time Stylizer is launched, it checks the contents of the Master Files Folder,
and ensures that the user’s SHARED folder has been synchronized to its contents. This is
a “pull” process.
You have three options for the Master Files Folder:
•
By default (i.e., with no entry value in STYADMIN.INI), it will be the subfolder of
the STYLIZER Program Files folder, named SAMPLE MASTER FILES. Note: Levit &
Stylizer Administrator’s Guide
How Configuration Data Are Stored: Overview • 3
James will generally overwrite this folder on an upgrade, so if you are actively
synchronizing files, use a different folder. Also, in Windows Vista, this location
will generally be protected from changes even by a local administrator.
•
•
If you wish to centrally supply configuration data to users, then you will:
•
Make a copy of the original SAMPLE MASTER FILES folder as supplied by Levit
& James, in a central, accessible location; you’ll probably also want to rename
it to something else, such as STYLIZER MASTER FILES.
•
Modify the contents of that folder to contain the data you require (e.g.,
Schemes you have developed).
•
Edit STYADMIN.INI and set MasterFilesPath=, to point to the central location.
•
Push the updated STYADMIN.INI to user desktops (or place it in the same
folder as the Stylizer installer executable, at the time you’re doing the install).
Set MasterFilesPath=SKIP to disable synchronization from any folder.
In the rare case that you only have one PC running Stylizer, but multiple users, it is
possible to point MasterFilesPath to a separate folder on a local hard drive.
Un-Docked Users
As described above, Stylizer synchronizes the data inside the SHARED subfolder of the
Master Files Folder, to the SHARED subfolder of the User Profile Folder, each time that it
is launched. Because all files required are located either (a) in that profile, (b) in the
Program Data Folder or (c) in the user’s Program Files Folder, Stylizer can run without
problems, any time that the PC is un-docked from the network (provided only that it
was launched at least once by this user, before the un-docking took place).
Advanced Features for Special Requirements
As described in “Step 4: Edit STYADMIN.INI” on page 14, the MasterFilesPath setting in
STYADMIN.INI can include the name of one or more environment variables. This means
that different users can be pointed to different Master Files Folders, based on logic
executed in a Network Login script which sets that variable. Possible uses include:
•
Multi-office installations:
Point to either the user’s home office server, or to the closest server to the login
location, whichever is appropriate to your situation.
Stylizer Administrator’s Guide
How File Synchronization Occurs • 4
Example: MasterFilesPath=%HOMESERVER%\H\STYLIZER\LIVEMASTERFILES
•
Support for different User Groups, e.g.,
MasterFilesPath=\\SERV1\H\STYLIZER\%PRACTICEGROUP%
•
Support for Multiple Versions, testing, training. etc.:
You could be in a situation where you are gradually transitioning to a new
version of Stylizer, and/or you are simply releasing a new set of Schemes,
associated with some rollout. The Login script would set a variable whose
contents would determine which version of the files a user should synchronize
to.
File Structure Detail
When you run Stylizer, it uses files in these folders:
Program Files Folder
•
The STYLIZER Program Files folder contains all Stylizer application files. In a
default installation, the Program Files folder is C:\PROGRAM FILES\LEVIT & JAMES,
INC\STYLIZER.
In addition, the Program Files folder contains the SAMPLE MASTER FILES subfolder,
which is used as the default Master Files Folder (see “Master Files Folder” on page 10),
unless otherwise specified in the STYADMIN.INI file.
Program Files Folder Structure
APIGID32.DLL
HELP.BMP
LJADDININSTALLER.EXE
LJSPREP.DLL
LJSSRCH.DLL
STYABOUT.EXE
STYGRID.DLL
STYLIZER.DOT
STYLIZER.HLP
STYNAV64.BMP
DOCUMENTATION\
README.DOC
Stylizer Administrator’s Guide
File Structure Detail • 5
README.PDF
STYLIZER RELEASE NOTES.DOC
STYLIZER RELEASE NOTES.PDF
STYLIZER USER MANUAL.DOC
STYLIZER USER MANUAL.PDF
STYLIZER ADMINISTRATOR MANUAL.DOC
STYLIZER ADMINISTARTOR MANUAL.PDF
EULA.TXT
QUICK REFERENCE CARD.DOC
QUICK REFERENCE CARD.PDF
FONTS\1
COUR.TTF
COURBD.TTF
COURBI.TTF
COURI.TTF
SAMPLE MASTER FILES\2
STYLIZER.INI
SHARED\
CWSEQLED.TXT
SCHEMES\
(STYLIZER DEFAULT).INI
TRAINING DOCUMENTS \3
STYLIZER PREPROCESSOR DEMO.DOC
STYLIZER PARAGRAPH WIZARD DEMO.DOC
STYLIZER GRID MODE.DOC
Notes:
1. Installed with Fonts installation option.
2. For network-based administration, this folder and its contents should be copied
to the network Master Files Folder and then configured for setting up new users
and synchronizing files for existing users.
3. Training documents are installed read-only, so that you’ll always start out with a
fresh copy. You may wish to add some or all of them to your Document
Management System.
Stylizer Administrator’s Guide
File Structure Detail • 6
Program Data Folder
•
LICENSE.INI, which is provided by Levit & James, Inc., and is installed, along with
the software, by a privileged user account. This file is digitally signed by Levit &
James, and cannot be modified by any member of your staff.
•
STYADMIN.INI, which defines the location of other data, and determines which
privileges will be granted to which users. Because it includes settings to limit user
functionality Based on permissions, it should be made Read Only for restricted
users.
Stylizer Administrator’s Guide
File Structure Detail • 7
User Profile Folder
The STYLIZER User Profile Folder contains all files which are employed during the
execution of Stylizer. Although there may be other copies of these same files elsewhere
on the user’s computer and/or in a network location, it is the configuration files inside
the User Profile Folder which Stylizer reads from and, in some cases, writes to. Users
who detach their PCs from the network can therefore run Stylizer without having to
copy over any additional configuration files.
By default, the User Profile Folder is contained under the user’s private Application
Data directory:
%APPDATA%\LEVIT & JAMES, INC\STYLIZER
where %APPDATA% is the environment variable for the user’s application data
directory. As an example, for user ABC logged into domain XYZ, this path might be:
C:\DOCUMENTS AND SETTINGS\ABC.XYZ\APPLICATION DATA\LEVIT & JAMES,
INC\STYLIZER
This folder contains three kinds of data:
•
STYLIZER.INI, which stores the user’s Preference settings and usage data.
•
Private Data consisting of Schemes and Logs. The scheme data contain any
files which have been created or modified by the individual end user. The
files in the LOGS directory are generated by Stylizer and are created as
necessary.
•
Shared Data consisting of numbering data and Schemes. These contain
copies of files which you will maintain centrally in the Master Files Folder,
from where they are distributed to each user’s User Profile Folder. End users
will need the privilege to write to these folders, so that STYLIZER’s file
synchronization process can copy in any updated files. The files in this
folder should never be modified directly, because any changes will be
undone then next time STYLIZER runs and synchronizes with the Master
Files Folder.
Stylizer Administrator’s Guide
File Structure Detail • 8
User Profile Folder Structure
STYLIZER.INI
PRIVATE\
LOGS\
TRACE.LOG1
SCHEMES\
<Private Scheme files: *.INI>
2
SHARED\
CWSEQLED.TXT
SCHEMES\
(STYLIZER DEFAULT).INI
<Other shared Scheme files: *.INI>
Notes:
1. Is created if Trace Logging is enabled in STYLIZER Preferences settings.
2. Mirrored from the SHARED subdirectory of the Master Files Folder. Do not
directly modify any files in this directory!
Stylizer Administrator’s Guide
File Structure Detail • 9
Master Files Folder
All files and folders to be pulled into the User Profile Folder, except those in the
PRIVATE subfolder, are placed in the Master Files Folder. This has two implications:
1. The Master Files Folder will be used to contain the organization’s default
file/folder structure for establishing new User Profile folders, and
2. The Master Files Folder will be used to synchronize/update files and folders for
users with existing User Profile folders.
The Master Files Folder can be located anywhere on the network. Its location is
established through a setting in the STYADMIN.INI file which can be found in the
Program Data Folder (see “STYADMIN.INI Settings” on page 21).
In a default (local-only) installation, the Master Files Folder is defined as the SAMPLE
MASTER FILES subfolder of the STYLIZER Program Files folder. If you keep this default,
then any updates to the Shared Files supplied by Levit & James will be automatically
copied to your own User Profile for your use (for example, if we update the options in
one of our default Schemes).
In a centrally-administered network installation, the Master Files Folder is used to
distribute data from a centrally-controlled location. Every time the user starts up
Stylizer, the files inside the SHARED subfolder of their User Profile Folder are checked
against the Master Files, and are synchronized as necessary. Thus, if you need to make
an update (say, to CWSEQLED.TXT), you simply need to post the changed file(s) to the
Master Files Folder, and each user will automatically pull in the update the next time
they run Stylizer. You can also add/remove optional files (e.g., Scheme files) to/from the
users’ SHARED subfolders by adding/removing files from the Master Files Folder.
If the Administrator is configuring STYLIZER for synchronizing from a Master Files
Folder, a STYLIZER.INI file must be included in the root of the Master Files Folder. Doing
this has one, and only one purpose: to supply new users with a default version of
STYLIZER.INI when the user runs STYLIZER for the first time, at which point STYLIZER.INI
will be copied into the user’s newly-created User Profile Folder. In addition, the new
user’ PRIVATE subfolder will be created by Stylizer.
Stylizer Administrator’s Guide
File Structure Detail • 10
Master Files Folder Structure
STYLIZER.INI1
SHARED\
CWSEQLED.TXT
SCHEMES\
(STYLIZER DEFAULT).INI
<Other shared Scheme files: *.INI>
Notes:
1. If a Master Files Folder is being used, this file will be copied into each new
STYLIZER user’s User Profile Folder the first time (and only the first time) the
user runs STYLIZER.
Stylizer Administrator’s Guide
File Structure Detail • 11
Installing Stylizer
For an overview of the function of the various files and file locations referred to in this
section, please refer to “File Structure Detail” on page 5. For detailed discussions of each
configuration file’s settings, see “Configuration Files” on page 20.
The Stylizer installer is provided in two formats, STYLIZER SETUP.EXE and STYLIZER
SETUP.MSI. The .EXE version is more suitable for simpler installations, while the .MSI is
suitable for automated rollouts to a larger number of workstations.
The installation includes several components:
•
Stylizer Application Files
•
Core Components (always required)
•
Training Documents (optional)
•
Sample Master Files (optional)
•
Start Menu Program Group (optional)
•
Stylizer Template
(required unless STYLIZER.DOT will be copied to the appropriate Word Startup
folder via some other method)
•
Fonts (required unless fonts are known to be installed on destination machine)
During installation, you may select Typical, Complete, or Custom. The default Typical
option will install all components except the Document Management System
components. The Complete option will install all components. The Custom option allows
you to choose which components to install (but Stylizer Application must be selected).
The choices you make while running the installer are automatically saved in a file
SETUPCHOICES.TXT inside the STYLIZER Program Data Folder. Once created, this file can
be moved into the same directory as STYLIZER SETUP.EXE or STYLIZER SETUP.MSI, so that
the installer can be run in silent mode for installs onto other workstations (see “Step 10:
Distribute the STYLIZER Software” on page 16).
Installing on Single Client Workstations
Stylizer Administrator’s Guide
Installing on Single Client Workstations • 12
IMPORTANT NOTE FOR VISTA WORKSTATIONS
If you are installing Stylizer on a Windows Vista client workstation, you will need to
run a specific Windows Update to install WinHelp32 on the workstation. Without this
update, the online help will be unavailable.
To get this update, go to
http://go.microsoft.com/fwlink/?LinkID=82148
If you are just evaluating Stylizer, or if you plan to install Stylizer only on a few client
workstations, then you do not need to implement network-based configuration.
Installing Stylizer for a single user is simply a matter of executing either the STYLIZER
SETUP.EXE or STYLIZER SETUP.MSI setup kit.
Once completed, the following will be true:
•
Unless you are conducting a free, 30-day evaluation of Stylizer, you will need to
copy the LICENSE.INI file into the Stylizer Program Data Folder. (This will be done
automatically if LICENSE.INI has been co-located with STYLIZER SETUP.EXE when
executed.
•
The (STYLIZER DEFAULT) scheme will be available for use and modification.
•
The Master Files location for updating files will be set to C:\PROGRAM
FILES\LEVIT & JAMES, INC\STYLIZER\SAMPLE MASTER FILES.
Installing with Network-Based Administration
Step 1: Install STYLIZER on a Workstation
•
Obtain a LICENSE.INI file from Levit & James, Inc.
•
If you are using the .EXE version of the STYLIZER installer, collocate LICENSE.INI
with the installer, and run the installer on a workstation under an account that
has administrative privileges.
•
If you are using the .MSI version of the STYLIZER installer, run the installer, and
then separately copy LICENSE.INI into the newly-created STYLIZER Program Data
Stylizer Administrator’s Guide
Installing with Network-Based Administration • 13
Folder. On a Windows Vista system, by default, this location will be
C:\PROGRAM DATA\LEVIT & JAMES, INC\STYLIZER. On a Windows XP or 2000
system, by default, this location will be C:\DOCUMENTS AND SETTINGS\ALL
USERS\APPLICATION DATA\LEVIT & JAMES, INC\STYLIZER.
•
If you are running a supported Document Management System, be sure to select
the appropriate feature during the installation.
Step 2: Establish the Master Files Folder
•
Create a folder on the network to be used as the Master Files Folder (see “Master
Files Folder” on page 10), and assign proper permissions to this folder (see “Error!
Reference source not found.” on page Error! Bookmark not defined.).
•
Open the SAMPLE MASTER FILES subfolder of your STYLIZER Program Files folder
and copy its entire contents into the Master Files Folder. You will make further
changes and/or additions to the Master Files Folder in later steps.
•
On another workstation or another account which does not have admin
privileges, test to make sure that non-privileged users can read from, but not
write to, the Master Files Folder.
Step 3: Establish User Home Folder (Optional)
•
Optionally, create user-specific folders on the network for copying usergenerated files for administrative review and/or troubleshooting. This is referred
to as the User Home Folder.
Step 4: Edit STYADMIN.INI
•
Open the STYADMIN.INI file in your Program Data Folder with a text editor, and
change the settings in the [FileSync] section to reflect the folders you created in
Step 2 and (optionally) Step 3:
[FileSync]
MasterFilesPath=<Enter full path to the STYLIZER Master Files Folder>
UserHomePath=<Enter full path to the STYLIZER User Home Folder>
IncludeFileMasksForUpload=*.LOG,*.INI
ExcludeFileMasksForUpload=
•
Very Important: The paths can contain any other environment variable, in the
form %ENVVAR%.
Stylizer Administrator’s Guide
Installing with Network-Based Administration • 14
This means that things can be re-directed by any logic which is invoked by the
Network Login script.
If you do not wish to synchronize Stylizer files, you should employ the
following setting:
[FileSync]
MasterFilesPath=SKIP
UserHomePath=
If MasterFilesPath is left blank, STYLIZER will perform the synchronization from
the Sample Master Files subfolder of the STYLIZER Program Files folder.
•
Review and adjust the remaining settings in the STYADMIN.INI file.
Step 5: Edit CWSEQLED.TXT (Optional)
•
This file (Shared User folder) is used for specifying leading text strings for special
numbering recognition. Review the list of leading text strings in this file and add
any strings that may exist in your documents.
Step 6: Create Custom Schemes (Optional)
•
Optionally, run STYLIZER and generate one or more custom Scheme file (*.INI)
via using the Paragraph Wizard and/or the Whole Document Wizard. See the
Stylizer User’s Guide for details. As you create a new Scheme, first use the Save As
Scheme… command to save it in the Private Schemes folder.
•
Copy the new Scheme file(s) into the SHARED\SCHEMES subfolder of the Master
Files Folder.
Step 7: Set Baseline Preferences (Optional)
•
Optionally, modify the STYLIZER.INI file, either by running Stylizer or editing the
file directly in the User Profile folder.
•
Open your User Profile Folder, and copy your modified STYLIZER.INI into the root
of the Master Files Folder, replacing the one that’s already there.
Step 8: Prepare for the Software Distribution (Optional)
•
Run the STYLIZER installation on a target workstation, using all the choices you
wish to enforce on the client workstations. Locate SETUPCHOICES.TXT inside the
Stylizer Administrator’s Guide
Installing with Network-Based Administration • 15
STYLIZER Program Data Folder on the target workstation, and copy it into the
same directory as your installer program.
Step 9: Test File Synchronization
•
Create a small test text file and copy it into the SHARED subfolder of the Master
Files Folder
•
Run Stylizer, and then exit Stylizer.
•
Check the SHARED subfolder of your User Profile Folder to ensure that the test
file has been automatically pulled down from the Master Files Folder. If it was
not, check STYADMIN.INI to make sure that the path specified in MasterFilesPath
is correct, and that it is accessible, and retest.
•
Delete the test file in the Master Files folder. Then run and exit Stylizer one more
time. Check to ensure that this file no longer exists in the Shared subfolder of the
User Profile folder.
Step 10: Distribute the STYLIZER Software
Procedures in this step will vary according to your method of software distribution.
•
•
You may (and, in most cases, should) co-locate any or all of the following files in
the folder which contains the .exe or .msi installer:
•
SETUPCHOICES.TXT (see “Step 8: Prepare for the Software Distribution (Optional)”
on page 15). If present, all of the options chosen during the example install
will be used for the client setup (including target path, components, All
Users, etc.) If absent, then a default install will occur.
•
LICENSE.INI which is your license file. It will be copied to the STYLIZER
Program Data Folder.
•
STYADMIN.INI containing user permissions and parameters for the file
synchronization option, if used. It will be copied to the STYLIZER Program
Data Folder.
Install the STYLIZER software on each user’s workstation either by running the
Stylizer installer, or by otherwise installing and registering the necessary files
and components. Note: The Stylizer installer may contain additional features to
be installed on STYLIZER Administrator workstation. Therefore, a full
distribution may incorporate multiple distribution channels.
Stylizer Administrator’s Guide
Installing with Network-Based Administration • 16
To run STYLIZER SETUP.EXE from a command line or batch file:
The syntax is simple:
"<.EXE FILE>" /s
Example:
"P:\DISTRIBUTION\STYLIZER SETUP.EXE" /s
The “/s” parameter specifies silent-mode install.
If there is a copy of SETUPCHOICES.TXT in the folder with STYLIZER SETUP.EXE,
those install choices will take effect. Otherwise, a complete install will occur to
the default location, which is:
C:\PROGRAM FILES\LEVIT & JAMES, INC\STYLIZER
If you are running a silent-mode install from the command line for a number of
users, then the following will occur:
The installer will install Stylizer on those workstations where it is not currently
installed.
The installer will upgrade Stylizer on those workstations where an earlier
version is installed.
The installer will uninstall Stylizer on those workstations where the same version
is currently installed. This is because the installation is running in “Maintenance
Mode”, and because “Remove” is the default choice in that mode. To change the
default choice to “Reinstall/Repair”, add a NOUNINSTALLSILENT command
line parameter.
Example:
"P:\DISTRIBUTION\STYLIZER SETUP.EXE" /s NOUNINSTALLSILENT=TRUE
To run STYLIZER SETUP.MSI from a command line, batch file, or group policy
install:
Installation is done by MSIEXEC.EXE, as follows:
MSIEXEC.EXE /i "<.MSI FILE>"
CMDLINE="/s COLOPATH=""<FOLDER WITH
.MSI FILE>"""
Stylizer Administrator’s Guide
Installing with Network-Based Administration • 17
The COLOPATH parameter is required, and must point to the same folder which
contains the .MSI along with co-located files.
Example:
MSIEXEC.EXE /i "P:\DISTRIBUTION\STYLIZER SETUP.MSI"
CMDLINE="COLOPATH=""P:\DISTRIBUTION\"""
Note that there are two double-quotes after COLOPATH, and three doublequotes at the end—two to terminate the COLOPATH, and one to terminate the
CMDLINE.
•
If LICENSE.INI and/or STYADMIN.INI were not collocated with the installer, some
other means must be used to copy them to the STYLIZER Program Data folder
on each workstation. The default locations for the STYLIZER Program Data
folder are:
•
Windows Vista: %PROGRAMDATA%\LEVIT & JAMES, INC\STYLIZER
•
Windows XP/2000: %ALLUSERSPROFILE%\APPLICATION DATA\LEVIT &
JAMES, INC\STYLIZER
Note: Your distribution process must also contain a contingency for pushing out
updates to LICENSE.INI and STYADMIN.INI.
•
Set permissions for the STYLIZER Program Files and Program Data Folder. Of
most importance is the access to the STYADMIN.INI file. For restricted users, it is
perfectly reasonable to permit read-only access to the Program Files folder and
its contents and also to the Program Data folder. (See “Error! Reference source
not found.” on page Error! Bookmark not defined..)
Step 11: Test the STYLIZER Configuration
Test for:
•
Proper user configuration for regular users, testers, trainers, STYLIZER
Administrators, and other users with custom permissions and/or access to files.
•
Proper synchronization of updates to files in the Master Files Folder.
•
Proper upload of files to the STYLIZER User Home folder on the network (if you
are using this feature—see note under “Step 3: Establish User Home Folder
(Optional)” on page 14).
Stylizer Administrator’s Guide
Installing with Network-Based Administration • 18
•
Proper functioning of STYLIZER with un-docked users (see “Un-Docked Users”
on page 4).
Stylizer Administrator’s Guide
Installing with Network-Based Administration • 19
Licensing and Configuration Files
This section documents in detail the files related to licensing and configuration of
Stylizer. Before proceeding, make sure you understand the terms Program Files Folder,
Program Data Folder, User Profile Folder, and Master Files Folder; see “File Structure”
on page 5 for definitions of these terms).
Licensing-Related Files
There is one licensing-related file: LICENSE.INI.
The LICENSE.INI file is located in the STYLIZER Program Data Folder, and contains your
licensing information, including the number of licenses in your agreement. If this file is
missing or invalid, Stylizer will grant a grace period during which you may still run the
application.
Configuration Files
There are two primary configuration files: STYADMIN.INI and STYLIZER.INI.
ABOUT CONFIGURATION FILES
A configuration file is an ASCII text file that contains sections, keys, and values that can
be edited in any standard text editor (e.g., Notepad). Each of the key/value pairs is
commonly referred to as a “setting”. Stylizer adheres to a standard set of rules for
configuration files. The important rules are the following:
•
Each setting has a default value. Therefore, deleting a setting is equivalent to
changing the value for that key to the default value.
•
If a setting is not present in the configuration file it may be added. Doing so is
only necessary when using a non-default, valid value.
•
Comments may be added to the file by placing a semi-colon (“;”) in the first
column.
•
Within a section, settings are not order-dependent.
•
Sections are not order-dependent.
•
Settings are not case-sensitive.
Stylizer Administrator’s Guide
Licensing-Related Files • 20
STYADMIN.INI
STYADMIN.INI is located in the STYLIZER Program Data Folder. It contains
configuration settings which are administrative in nature and will not be modified
while Stylizer is running. Typically, this will include default folders, file
synchronization, and other application data. When setting up Stylizer for a firm,
administrators should pre-configure the STYADMIN.INI file and then distribute it to all
users (see “Installing with Network-Based Administration” on page 13).
Users must have at least read access to the STYADMIN.INI file. Only administrators
should have permission to modify it.
STYADMIN.INI Settings
[FileSync]
MasterFilesPath: Specifies the Master Files Folder from which to synchronize whenever a
user starts the STYLIZER application. All files in the Master Files Folder, and inside its
SCHEMES subfolder, will be synchronized from the indicated location to the
corresponding folder and/or subfolder in the SHARED subfolder of the STYLIZER User
Profile Folder.
Example: MasterFilesPath=\\FIRMSERVER\APPS\STYLIZER
If MasterFilesPath is not specified, it defaults to the SAMPLE MASTER FILES subfolder of
the STYLIZER Program Folder (e.g., C:\PROGRAM FILES\LEVIT & JAMES,
INC\STYLIZER\SAMPLE MASTER FILES).
If MasterFilesPath=SKIP, STYLIZER will not perform any file synchronization.
UserHomePath: If this path, which is known as the STYLIZER User Home Folder, is
specified (typically a mapped location on a network server which functions as the user’s
home directory), then selected STYLIZER log files, custom Scheme files, and/or custom
Dictionary overlay files created inside the STYLIZER User Profile Folder will be
synchronized to the specified path. The synchronization will occur at most once a day,
upon the user’s first use of STYLIZER on a given day. Default: none. Note: This feature
is only partially tested and implemented. If you wish to implement it, please contact
Levit & James, Inc.
Example: UserHomePath=H:\STYLIZER
IncludeFileMasksForUpload: A comma-delimited list specifying a series of filename-
matching patterns for STYLIZER log files, custom Scheme files, and/or custom
Stylizer Administrator’s Guide
Configuration Files • 21
Dictionary overlay files. If MasterFilesPath is specified, matching files will be
synchronized to the specified path. Default: none.
Example: IncludeFileMasksForUpload=*.LOG,*.INI
ExcludeFileMasksForUpload: One or more filenames or filename patterns which override
those listed in IncludeFileMasksForUpload. Default: none. Note: Setting this to
TRACE.LOG ensures that the debugging log will not be copied to the UserHomePath.
Example: ExcludeFileMasksForUpload=TRACE.LOG
[User Profile]
CustomAppDataPath: Defines an alternate path other than under the user’s APPLICATION
DATA folder (see “Program Data Folder
•
LICENSE.INI, which is provided by Levit & James, Inc., and is installed, along with
the software, by a privileged user account. This file is digitally signed by Levit &
James, and cannot be modified by any member of your staff.
•
STYADMIN.INI, which defines the location of other data, and determines which
privileges will be granted to which users. Because it includes settings to limit user
functionality Based on permissions, it should be made Read Only for restricted
users.
User Profile Folder” on page 7). If undefined, the default is: %APPDATA%\LEVIT &
JAMES, INC\STYLIZER.
CustomStylizerUserFolderPath: Specifies an explicitly-defined folder for the STYLIZER
User Profile folder. If included, this entry supersedes the CustomAppDataPath setting.
STYLIZER.INI
The STYLIZER.INI file is the primary location to store user Preference settings for loading
a session.
In a network-based installation which uses a Master Files Folder, a default STYLIZER.INI
file must be included in the root of the Master Files Folder. When a new user runs
STYLIZER for the first time, this STYLIZER.INI is copied into the user’s newly-created
STYLIZER User Profile Folder. Subsequent to the first STYLIZER run, each user retains
control of their own STYLIZER.INI file.
Stylizer Administrator’s Guide
Configuration Files • 22
Users must have read/write access to the STYLIZER.INI file, along with all the other
contents of the User Profile Folder.
STYLIZER.INI Settings
A summary of these setting is shown in Table 1.
[Wizards]
AllowNewStyles=False
AllowNewStyles=True
AllowModifyStyles=False
AllowModifyStyles=True
(Paragraph Wizard)
(Whole Document Wizard)
(Paragraph Wizard)
(Whole Document Wizard)
These settings dictate whether the user will be able to create new styles and/or modify
existing styles while running Stylizer. Defaults: as shown.
DefaultApplySelections: This setting specifies which boxes will be checked in either the
Apply New Style dialog of the Paragraph Wizard or for each paragraph group found in
the Grouping Results dialog of the Whole Document Wizard. To set the boxes, add the
values for each box to be checked (True) and enter it for this value. A value of 255
(default) selects ALL boxes. Values for each column are:
1 = Apply Selected (Whole Document Wizard only)
2 = Preserve Bold
4 = Preserve Italic
8 = Preserve Underline
16 = Delete Empty Paragraphs After
32 = Delete Empty Paragraphs Before
64 = Delete Leading Tabs
128 = Delete Leading Spaces
For example, to check by default the “Preserve Bold”, “Delete Empty Paragraphs
Before”, and “Delete Leading Spaces” boxes, set this value to 2 + 32 + 128 or 162.
Default: 0.
DefaultNewStyle: This setting specifies the default new style to be applied to a paragraph
when the paragraph group is not found in the current scheme. If set to “SameStyle”,
then the existing style will be loaded into the New Style column of the results grid.
Default: SameStyle.
Stylizer Administrator’s Guide
Configuration Files • 23
LeftIndentAppliesOnlyToMultiLineParas: (Paragraph Wizard only.) If this value is set to
True, then a paragraph will not be de-selected by the search engine based on their left
indent value if the paragraph is not a multi-line paragraph. Default: False.
ModifyStyleName=<<StyleName>>
NewStyleName=
These settings configure the Apply dialog in the Paragraph Wizard and the Grouping
Results dialog in the Whole Document Wizard. They will determine how the style name
is presented to the user in the native Word dialog box.
For example, if NewStyleName=New, then when the user clicks on the New button in
the Apply form, the word “New” will appear in the Style name textbox and the cursor
will appear after the “w”.
For the ModifyStyleName setting, anything may be entered. However, if the string
“<<StyleName>>“ appears in the setting value, then Stylizer will substitute this string
with the current style name of the paragraph. Defaults: As shown.
OmitFirstLineIndentForRightJustifiedParas: If this value is set to True, then first-line
indentation will not be considered when grouping by or searching for paragraphs with
right justification AND the paragraph alignment grouping/search flag is set to True
(checked). Default: True.
UseEffectiveFirstLineIndent: If this value is set to True, then Stylizer will combine leading
tabs, leading spaces, and paragraph first-line indent value to calculate an “effective”
first-line indent. For example, if one paragraph in the document has a first-line indent of
½” and another paragraph has no first-line indent but uses a ½” custom tab, then these
paragraphs will either be 1) grouped together in the Whole Document Wizard, or 2)
considered similar paragraphs in the Paragraph Wizard. Default: False.
[Whole Document Wizard]
ColorRowSelect: When a paragraph group is selected from the Grouping Results dialog,
Stylizer will, by default, select the first paragraph in the selected group. By using this
setting, you can configure Stylizer to display the paragraph in a color instead. When set
to False, Stylizer will simply select the first paragraph in the selected group. When set to
True, Stylizer will display the first paragraph in a “built-in” color determined by
Stylizer.
When set to a number, Stylizer will use the color mapped to that number; the number
corresponds to font color (long) for Word 2000 and later, font color index (integer) for
Stylizer Administrator’s Guide
Configuration Files • 24
Word 97. Valid values: Word 2000 and later – 0 to 16777215; Word 97 – 0 to 16. Default:
False.
DefaultScheme: This setting sets the default scheme. When you change the default
scheme in either the Paragraph Grouping or Group Results dialogs, this setting will be
changed. Default: (Stylizer Default).
KeepExistingParaGroups: This setting relates to situations in which a scheme is modified.
If KeepExistingParaGroups is set to True, then when the scheme is “overwritten”, the
paragraph groups in the new version of the scheme are merely appended to the old
version of the scheme. If KeepExistingParaGroups is set to False, the entire scheme is
erased and the scheme is then re-created with the new scheme data, including only the
paragraph groups in the new version of the scheme. Default: True.
SkipWelcome: This setting controls whether the Stylizer Welcome dialog is shown at
startup of the Whole Document Wizard. If the “Skip Welcome dialog at startup;
automatically Analyze Document” checkbox is checked, this value will be changed to
True. If set to True, then Stylizer will automatically analyze the document and present
the Group Results form using the Default Scheme. Default: False.
SnapFirstLineIndent=0
SnapFirstLineIndentUnits=(default measurement units)
SnapLeftIndent=0
SnapLeftIndentUnits=(default measurement units)
SnapRightIndent=0
SnapRightIndentUnits=(default measurement units)
SnapNumberPosition=0
SnapNumberPositionUnits=(default measurement units)
SnapTextPosition=0
SnapTextPositionUnits=(default measurement units)
These values set the default values on the Paragraph Grouping dialog and are used only
when the current scheme does not have saved snap values. The default measurement
units can be found in MS Word from the Tools>Options dialog; click on the General tab
and locate the Measurement Units dropdown near the bottom. If you wish to use a
measurement unit other than the machine default, choose a number from the following
list:
0:
1:
2:
3:
4:
inches
centimeters
millimeters
points
picas
Stylizer Administrator’s Guide
Configuration Files • 25
Defaults: As shown.
[Paragraph Wizard]
DefaultSearchSelections=3
DefaultNonNumberedSearchSelections=1183
This setting specifies which boxes will be checked in the Search by Example dialog of
the Paragraph Wizard . To set the boxes, add the values for each box to be checked
(True) and enter it for this value. Values for each column are:
1 = Style
2 = Number Format
4 = First-line Indent
8 = Left Indent
16 =
Right Indent
32 =
Space After
64 =
Space Before
128 =
Line Spacing
256 =
Leading Tabs
512 =
Leading Spaces
1024 =
Alignment
2048 =
Ignore Bracketing
4096 =
Font Name
8192 =
Font Size
Therefore, the default value for numbered paragraphs will set search criteria for Style
and Number Format and the default value for non-numbered paragraphs will set
search criteria for Style, Number Format, First-line Indent, Left Indent, Right Indent,
Line Spacing, and Alignment (1+2+4+8+16+128+1024 = 1183.) Defaults: As shown.
SnapFirstLineIndent=0
SnapFirstLineIndentUnits=(default measurement units)
SnapLeftIndent=0
SnapLeftIndentUnits=(default measurement units)
SnapRightIndent=0
SnapRightIndentUnits=(default measurement units)
SnapNumberPosition=0
SnapNumberPositionUnits=(default measurement units)
SnapTextPosition=0
SnapTextPositionUnits=(default measurement units)
These values set the default values on the Paragraph Grouping dialog and are used only
when the current scheme does not have saved snap values. The default measurement
units can be found in MS Word from the Tools>Options dialog; click on the General tab
Stylizer Administrator’s Guide
Configuration Files • 26
and locate the Measurement Units dropdown near the bottom. If you wish to use a
measurement unit other than the machine default, choose a number from the following
list:
0:
1:
2:
3:
4:
inches
centimeters
millimeters
points
picas
Defaults: As shown.
[TemplatesAndStyles]
StylesSelections=1
EnableStylesSelections=7
This setting controls which boxes are checked by default on the Templates and Styles
dialog using the Whole Document Wizard. Values for each checkbox are:
1 = Styles in Use
2 = All Styles in the Document
4 = Additional Styles from Attached Template
To check more than one box, use a bit-wise add, i.e.,
1 = Styles in Use
2 = All Styles in Document
3 = Styles in Use AND All Styles in Document
4 = Additional Styles from Attached Template
5 = Styles in Use AND Additional Styles from Attached Template
6 = NOT VALID – Styles in Use is always checked
7 = Styles in Use AND All Styles in Document AND Additional Styles from
Attached Template
Defaults: As shown.
TemplateOptions=1
EnableTemplateOptions=127
This setting specifies which template options are checked/selected in the Templates and
Styles dialog. To check/select more than one option, use a bit-wise add of the
appropriate values. Valid values are:
Stylizer Administrator’s Guide
Configuration Files • 27
1 = Do not attach (or unattach) a template
2 = Attach a template
4 = Copy styles from a template
8 = Update styles in document from attached template
16 =
Update styles from the attached template whenever document is opened
32 =
Template Path
(enabling only)
64 =
Template Path Browse
(enabling only)
Defaults: As shown.
TemplatePath: This setting specifies the full path to the default template when attaching
a template to the document or copying styles from a template in the Templates and
Styles dialog. Default: (Blank).
[Preprocessor]
PreserveWord2003Compatibility: This setting only applies if you are using Word 2007 or
later. If so, then when running the Preprocessor on a document opened in
“Compatibility Mode” (usually a document with a .doc extension), Stylizer will prompt
to save the new document in Compatibility Mode; otherwise, it will prompt to save the
new document in the new XML format. Default: False.
BaseStyle: Use this setting to specify the style for each paragraph in the new Word
document. Default: (Blank).
BaseTemplate: Use this setting to specify the full path to the template upon which the
new Word document is based. This may be used instead of attaching a template to get
custom/updated styles into the new document. Default: (Blank).
MainFormSettings=0
EnableMainFormSettings=131071
Use these settings to pre-set/enable options in the Preprocessor dialog when running in
single-document Preprocessor mode (i.e., from the Word toolbar button). To
check/select multiple options, add the values from the appropriate options below:
1=
2=
4=
8=
16 =
32768 =
Leave original document open
Automatically save new Word document
Prompt to save as new document profile or new version (iManage, PC
Docs only)
Automatically save as a new version (iManage, PC Docs only)
Automatically save as a new document (iManage, PC Docs only)
Options button
(enable only)
Stylizer Administrator’s Guide
Configuration Files • 28
65536 =
Template button
(enable only)
Defaults: As shown.
OptionsFormSettings=3841
EnableOptionsFormSettings=4095
Use these settings to pre-set/enable options in the Preprocessor Options dialog when
running in single-document Preprocessor mode (i.e., from the Word toolbar button). To
check/select multiple options, add the values from the appropriate options below:
1=
2=
4=
8=
16 =
32 =
64 =
128 =
256 =
512 =
1024 =
2048 =
Re-create bold, italic, and underline formatting
Re-create hidden paragraph marks
Re-create paragraph indentation and alignment
Re-create custom tabs
Re-create footnotes and endnotes
Re-create comments
Insert graphics tags
Re-create tables/insert table tags
Add footnotes and endnotes to Preprocessor summary table
Add comments to Preprocessor summary table
Add graphics to Preprocessor summary table
Add tables to Preprocessor summary table
Defaults: As shown.
[PreprocessorTable]
One of the most time-consuming parts of reformatting new documents after pasting as
unformatted text is the reconstruction of tables. The settings in this section allow you to
configure whether you wish for the Stylizer Preprocessor to help with this
reconstruction and how.
CellEndCharacter: This setting tells Stylizer what character to use for marking end of
cells for reconstructing tables in the new Word document. Can be either a character or a
number (long integer) specifying an ASCII character code.
IMPORTANT: This character is used as a cell delimiter. Therefore, you should not
specify a character that will be used in table cells.
Default: ~
LeaveInTableTags: If set to True, then the table tags showing the locations of the tables in
the new Word document will be left in the document.
Stylizer Administrator’s Guide
Configuration Files • 29
Default: False.
TagHardReturnsInTables=False
TagTablesOnly=False
TableReturnTag=<<HARD_RETURN>>
TableReturnType=HARD
The TagHardReturnsInTables setting tells the Stylizer Preprocessor whether to tag
hard returns in table cells. If set to True, then the value for TableReturnTag specifies
what tag string will replace the hard returns.
The value for TagTablesOnly specifies whether to re-construct the table based on the
tag information in the new Word document. If set to False, then the user will need to
manually re-construct the table. If set to True, then the value for TableReturnType
specifies what type of return to use instead of the return tag in the new Word
document. Valid values for TableReturnType are HARD or SOFT.
Defaults: As shown.
[MacPac]
AfterPreprocessor=Stop
Schemes=
Templates=
The AfterPreprocessor setting tells the Stylizer whether to run the Attach To and
Set Scheme functions after completion of the Preprocessor. Valid values are:
Stop:
Don’t run the post-preprocessing MacPac functions
Prompt:
Don’t run the post-preprocessing MacPac functions but display a
message to the user to run them from the MacPac interface
Continue: Run the post-preprocessing MacPac functions automatically
If running with AfterPreprocessor=Continue, then provide comma-delimited lists of the
schemes and their corresponding templates in order in the Schemes and Templates
settings. This will allow CrossWords to properly run the Attach To and Set Scheme
functions after preprocessing the document.
Defaults: As shown.
CenteredSchemes=
PreserveSoftReturnsInCenteredSchemes=False
Stylizer Administrator’s Guide
Configuration Files • 30
The PreserveSoftReturnsInCenteredSchemes setting specifies whether to
preserve soft returns in paragraphs using a centered scheme when applying a new style
using either the Paragraph Wizard or the Whole Document Wizard.
Specify the centered schemes for this feature as a comma-delimited list of scheme
names in the CenteredSchemes setting. For example:
Defaults: As shown.
PreserveSoftReturnsInCenteredSchemes
CenteredSchemes=Article1,Article2,Article3,Pleading1
PromptIfUsingMacPacHeadingStyles=False
If set to True, this setting tells the Stylizer Preprocessor to prompt the user if the user is
not using Word Heading styles. If the user is not using Word Heading styles, the
Paragraph Wizard will not show the styles Heading 1, Heading 2, etc., in the New Style
dropdown, but will show the MacPac scheme heading styles (e.g., Pleading1_L1,
Pleading1_L2, etc.)
Defaults: As shown.
SaveBeforePrompt: This setting instructs the Stylizer Preprocessor whether to
automatically save the new Word document before running the post-preprocessing
MacPac functions. Default: False.
Stylizer Administrator’s Guide
Configuration Files • 31
Table 1 Stylizer.ini Settings
Section
Wizards
Keyword
Purpose
Values (Default)
AllowNewStyles
Show new
styles button
True, False
AllowModifyStyles
Show modify
styles button
True, False
DefaultApplySelections
New Apply
Style options
to auto-select
0
DefaultNewStyle
New style to
auto-select
when none
can be found
SameStyle
LeftIndentAppliesOnlyToMultiLineParas
Option to
disregard Left
Indent option
for single-line
paragraphs
True, False
ModifyStyleName
Auto-fill name
for Word’s
Modify Style
dialog
<<StyleName>>
NewStyleName
Auto-fill name
for Word’s
New Style
dialog
(blank)
OmitFirstLineIndentForRightJustifiedParas
Autodeselects firstline
indentation as
a selection
criteria,
grouping
criteria for
right justified
paragraphs
True, False
UseEffectiveFirstLineIndent
Combines
spaces, tabs
and first-line
indent for
“effective”
first-line indent
True, False
Stylizer Administrator’s Guide
Configuration Files • 32
Section
Whole Document
Wizard
Paragraph Wizard
Keyword
Purpose
Values (Default)
ColorRowSelect
Uses color to
display first
paragraph in
selected row
from Grouping
Results dialog
True, False, <color
number>
DefaultScheme
Default
scheme
<<Scheme Name>>,
(Stylizer Default)
KeepExistingParaGroups
Choose
whether to
overwrite
existing
scheme when
modified
True, False
SkipWelcome
Choose
whether to
display
Welcome
dialog
True, False
DefaultSearchSelections
Pre-set
numbered
search criteria
flags in
Search by
Example
dialog
(number), 3
DefaultNonNumberedSearchSelections
Pre-set nonnumbered
search criteria
flags in
Search by
Example
dialog
(number), 1183
SnapFirstLineIndent
SnapLeftIndent
SnapRightIndent
SnapNumberPosition
SnapTextPosition
Pre-set snap
settings in
Search by
Example
dialog
(number), 0
SnapFirstLineIndentUnits
SnapLeftIndentUnits
SnapRightIndentUnits
SnapNumberPositionUnits
SnapTextPositionUnits
Pre-set
measurement
units in
Search by
Example
dialog
(number), (machine
default)
Stylizer Administrator’s Guide
Configuration Files • 33
Section
TemplatesAndStyles
Preprocessor
PreprocessorTable
Keyword
Purpose
Values (Default)
EnableStylesSelections
Enable/disable
styles settings
(number), 7
EnableTemplateOptions
Enable/disable
template
options
(number), 127
StylesSelections
Pre-set styles
selections
(number), 1
TemplateOptions
Pre-set
template
options
(number), 1
TemplatePath
Pre-set
template path
(blank)
BaseStyle
Style for
paragraphs in
new document
(blank)
BaseTemplate
Template for
new document
(blank)
EnableMainFormSettings
Enable/disable
settings on
main dialog in
single mode
131071
EnableOptionsFormSettings
Enable/disable
settings on
Preprocessor
Options dialog
in single mode
4095
MainFormSettings
Pre-set
options for
main dialog in
single mode
0
OptionsFormSettings
Pre-set
options for
Preprocessor
dialog in
single mode
3841
CellEndCharacter
Cell delimiter
~, (character),
(number)
LeaveInTableTags
Do not remove
table tags
after
True, False
Stylizer Administrator’s Guide
Configuration Files • 34
Section
Keyword
Purpose
Values (Default)
preprocessing
MacPac
TagHardReturnsInTables
Replace hard
returns with
tags
True, False
TableReturnTag
Tag string to
use when
replacing hard
returns
<<HARD_RETURN>>
TableReturnType
Re-set hard
returns to
either hard or
soft returns
SOFT, HARD
SelectAfter
Use for date
filtering
selected
documents
(date), 1/1/1969
SelectBefore
Use for date
filtering
selected
documents
(date), 12/31/2099
ShowResultsInQuietMode
Enables
Results dialog
True, False
ShowResultsPerFile
Shows
detailed file
results in
Results dialog
True, False
AfterPreprocessor
Run Attach To
and Set
Scheme
MacPac
functions after
Preprocessing
Stop, Prompt,
Continue
CenteredSchemes
List of
centered
MacPac
schemes for
preserving soft
returns
(blank)
PreserveSoftReturnsInCenteredSchemes
Preserves soft
returns in
specified
schemes
True, False
Stylizer Administrator’s Guide
Configuration Files • 35
Section
Keyword
Purpose
Values (Default)
when applying
styles
PromptIfUsingMacPacHeadingStyles
Prompts user
if not using
Word Heading
styles
True, False
SaveBeforePrompt
Saves new
Word
document
before
prompting
user for
MacPac
functions
True, False
Schemes
List of
schemes for
running postPreprocessing
MacPac
functions
(blank)
Templates
List of
templates for
running postPreprocessing
MacPac
functions
(blank)
Stylizer Administrator’s Guide
Configuration Files • 36
Schemes
STYLIZER employs Schemes to store user-entered data for re-use in subsequent
documents. Options in a Scheme are typically modified in order to comply with court
requirements, organizational standards, and attorney/user preferences.
All Scheme information is stored in a Stylizer Scheme file (*.INI), which can be placed
into either the Private or Shared Schemes folder for STYLIZER users. Typically,
administrators will create needed Schemes and copy them into the Master Files Folder,
where they are automatically distributed to all STYLIZER users.
Location of Scheme Files
When a user or administrator first creates a Scheme, it is automatically stored as a
private Scheme the PRIVATE\SCHEMES subfolder of that user’s User Profile Folder
(seeProgram Data Folder
•
LICENSE.INI, which is provided by Levit & James, Inc., and is installed, along with
the software, by a privileged user account. This file is digitally signed by Levit &
James, and cannot be modified by any member of your staff.
•
STYADMIN.INI, which defines the location of other data, and determines which
privileges will be granted to which users. Because it includes settings to limit user
functionality Based on permissions, it should be made Read Only for restricted
users.
User Profile Folder” on page 7). In order to make the file into a shared Scheme, the
administrator copies or exports it into the SHARED\SCHEMES subfolder of the Master
Files Folder (see “Master Files Folder” on page 10), so that it is automatically distributed
to all users (or, alternatively, it could be manually copied into the SHARED\SCHEMES
subfolder of each user’s User Profile Folder).
In general, users do not need to know about Scheme files, other than when they may
need to send a Scheme file to another user for use with a document.
Updating a Shared Scheme
To update a shared Scheme which is already in use:
•
Move the shared Scheme file into the PRIVATE\SCHEMES subfolder.
Stylizer Administrator’s Guide
Location of Scheme Files • 37
•
Launch Word, create or open a document, launch STYLIZER, and load the
Scheme.
•
Make modifications to the scheme by running the STYLIZER Paragraph Wizard
and/or Whole Document Wizard.
•
Save the Scheme (this saves it back into the PRIVATE\SCHEMES subfolder).
•
Move the Scheme from the PRIVATE\SCHEMES subfolder into the
SHARED\SCHEMES subfolder of the Master Files Folder on the network.
Stylizer Administrator’s Guide
Updating a Shared Scheme • 38
Logging
Stylizer can generate five types of logs which are useful in analyzing and debugging. By
default, these logs are kept in the LOGS subfolder in the user’s User Profile Folder, e.g.:
%APPDATA%\LEVIT & JAMES, INC\STYLIZER\LOGS\
TRACE.LOG is useful for STYLIZER technical support to help analyze the circumstances
surrounding a technical problem. It is enabled through the following settings in the
STYLIZER.INI file:
[Tracing]
Log=Trace.log
Level=15
You may specify a full path for the log setting. If, however, you do not (as is shown
above), the log file will be written to the Private Logs folder.
However, trace/debug logging should normally be disabled, because it has a significant
impact on application performance.
Stylizer Administrator’s Guide
Updating a Shared Scheme • 39
Stylizer Document Metadata
With one exception, STYLIZER stores no metadata in the documents it processes. I.e., it
adds no fields (except in one case), document variables, bookmarks (except in one case),
custom document properties, comments, or XML Schema.
The ONE exception: When running the STYLIZER Preprocessor, a hidden bookmark
named “_LJS_SummaryPage” is added to the new document and a MACROBUTTON
field is added to the new document. Both of these items are used to allow the user to
remove the summary page with the click of the macrobutton field. When this happens,
both the bookmark and the field are removed from the document along with the
summary page.
Stylizer Administrator’s Guide
Updating a Shared Scheme • 40