1
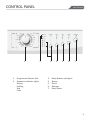
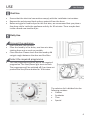
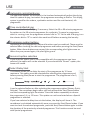
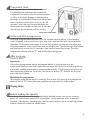
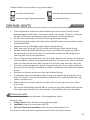
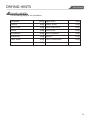
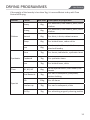
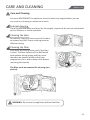
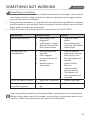
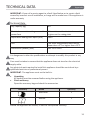
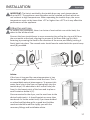
Installation
and Operating
Instructions
Models:
PT-F6-W
For your convenience, we recommend to attach
the serial number label HERE.
As part of Parmco Appliances commitment to improving and updating product ranges,
we reserve the right to alter, change and update technical specifications and appearance
attributes of all Parmco Appliances products. E&OE
727626042014
Dear Valued Customer,
Thank you and congratulations on purchasing your new Parmco appliance.
All Parmco products are made to the highest quality and design standards. We are
sure you will enjoy your new appliance.
As a note, please read through these instructions carefully, as these will assist you
in gaining a complete understanding of the functions and features offered by your
appliance.
Please take special note of all detailed technical information and installation
instructions. It is essential that you only allow a qualified technician to install this
appliance to ensure the safety and reliability of this appliance.
Furthermore, not using appropiate personnel to install this appliance may affect any
future warranty claims lodged, so please check with Parmco Appliances before any
installation is carried out.
We hope you enjoy your new appliance. If you would like to find out more about
this product or any other products in Parmco’s extensive range, visit us on the web
at www.parmco.co.nz.
Regards,
The Parmco Team
CONTENTS
Safety information..................................................................................1
Product description................................................................................4
Control panel..........................................................................................5
Use......................................................................................................... 6
Drying hints..........................................................................................10
Drying programmes..............................................................................12
Care and cleaning.................................................................................13
Something not working........................................................................14
Technical data.......................................................................................15
Installation............................................................................................16
Environment concerns.........................................................................19
Warranty..............................................................................................20
The following symbols are used in this manual:
Important information concerning your personal safety and
information on how to avoid damaging the appliance
General information and tips
Environmental information
SAFETY INFORMATION
Before Use
WARNING
Read and understand thoroughly these safety instructions before use. The items
indicated here are very important safety precautions, which must be followed. Any failure
and losses caused by ignoring the above mentioned items and cautions mentioned in the
manual are not covered by our warranty.
The appliance is not to be used by children or persons with reduced physical, sensory or
mental capabilities, or lack of experience and knowledge, unless they have been given
supervision or instruction. Children should be supervised so they do not play with the
appliance.
•
•
•
•
•
•
•
•
•
•
•
Possible electric shocks
Disassembly, repairs or modification must only be carried out by professional
technicians.
The household electrical supply system (the current, the voltage, the cable, the fuse)
should meet the specification requirements of the dryer under normal load.
The power plug must be connected to a three-core socket with an earth wire and is
grounded properly and reliably.
If the supply cord is damaged, it must be replaced by the manufacturer, its service
agents, or similarly qualified persons in order to avoid a hazard.
Do not disconnect the power plug by pulling on the supply cord. Hold the power plug
with your hand.
Do not use the supply cord when the connection between the power plug and the
supply cord is loose.
Do not touch the power plug with wet hands. Wipe off dust or water drops over the
power plug with a dry cloth.
Do not over-bend the supply cord or put it under heavy weight.
Do not use the supply cord/socket/power plug if it is damaged or broken.
Possible explosions
Do not put combustible liquid such as gasoline,
petrol and alcohol into the appliance or nearby.
Do not put clothes with that liquid into the
appliance.
Do not connect/disconnect the power plug when
leakage of gas or other combustible gas occurs.
1
SAFETY INFORMATION
•
•
•
•
•
•
•
•
•
Before Use
Fire accidents/short circuit or electric leakage may occur
Do not install the appliance close to fire sources or heat sources.
Do not rest any burning candles or cigarettes on the appliance.
Do not install the appliance in places with dampness
or suffering from rainfalls, to avoid igniting damages or
other accidents due to gathered waterdrops on electrical
components.
Do not install the dryer in places under direct sunshine
to avoid the plastic components and rubber components
becoming aged.
Do not shoot water at the appliance when cleaning it.
In order to avoid danger of fires caused by excessive
dryer, do not use the appliance to dry the following items:
cushions, quilts, etc, as these items accumulate heat.
Items that have been spotted or soaked with vegetable or cooking oil constitute a
fire hazard and should not be placed in the tumble dryer.
If you have washed your laundry with stain remover, you must conduct an extra rinse
cycle before loading your tumble dryer.
Please make sure that no gas lighters or matches have been accidentally left in
pockets of garments that are to be loaded into the appliance.
WARNING: Never stop a tumble dry before the end of the dryer cycle unless all
items are quickly removed and spread out so that the heat is dissipated.
•
•
•
•
Personal injury may occur
This machine is not intended for use by young children or infirm persons without
supervision.
The package materials may be dangerous to children. Put all package materials (eg,
the plastic bag) to places unreachable to children.
Do not touch laundries in the drying drum until the dryer stops working completely.
Do not keep children or pets nearby when the dryer is
working, as they may be trapped into the dryer. Please
check the drum carefully before closing the door.
2
SAFETY INFORMATION
•
•
•
•
•
•
•
•
•
•
•
•
•
•
•
•
•
•
Before Use
Other instructions
This appliance is designed for domestic use. It must not be used for purposes other
than those for which it was designed for.
Only wash fabrics that are designed to be machine dried. Follow the instructions on
each garment label.
Any electrical work required to install this appliance should be carried out by a
qualified electrician.
If the machine is situated on a carpet floor, please adjust the feet in order to allow
air to circulate freely under the appliance.
Do not climb onto the dryer, rest heavy objects/heavy devices, or items with water
or liquid leakage on the dryer to avoid deformation of the face panel and of plastic
components.
Any objects such as coins, safety pins, nails, screws, stones or any other hard, sharp
materials can cause extensive damage and must not be placed into the machine.
After installing the appliance, check that it is not pressing or standing on its electrical
supply cable or vent hose.
Items such as foam rubber (latex foam), shower caps, waterproof textiles, rubber
backed articles, and clothes or pillows fitted with foam rubber pads should not be
dried in the tumble dryer.
Always unplug the appliance after use, clean, and maintenance.
Do not overload the appliance. See the relevant section in the user manual.
Clothes that are dripping wet should not be placed in the dryer.
Garments which have been in contact with volatile petroleum products should not
be machine dried. If volatile cleaning fluids are used, care should be taken to ensure
that the fluid is removed from the garment before placing it in the machine.
Never use the tumble dryer if the power supply cable, the control panel, the working
surface, or the base is damaged so that the inside of the tumble dryer is accessible.
The tumble dryer is not to be used if industrial chemicals have been used for
cleaning.
The lint must not be allowed to accumulate around the tumble dryer.
Do not dry unwashed items in the tumble dryer.
Fabric softeners or similar products should be used as specified by the fabric softener
instructions.
The final part of a tumble dryer cycle occurs without heat (cool down cycle) to
ensure that the items are left at a temperature that ensures the items will not be
damaged.
3
PRODUCT DESCRIPTION
Before Use
1
2
3
4
5
76
1. Control Panel
2. Drum Light
3. Filter
4. Adjustable Feet
5. Side Vent Outlet
6. Vent Pipe Cover
7. Rear Vent Outlet
4
CONTROL PANEL
1
1. Programme Selector Dial
2. Sequence Indicator Lights
Drying
Cooling
End
Filter
Use Process
2
3
3.
4.
5.
6.
7.
4
5
6
7
Delay Button and Lights
Buzzer
Quick
Delicate
Start/Pause
5
USE
Use Process
First Use
•
•
•
Ensure that the electrical connections comply with the installation instructions.
Remove the polystyrene block and any material from the drum.
Before using your tumble dryer for the first time, we recommend that you place a
few damp cloths inside the appliance and dry for 30 minutes. There may be dust
inside a brand new tumble dryer.
Daily Use
•
•
•
•
Connect the appliance
Open the door (see picture).
Place the laundry in the drum, one item at a time,
shaking them out as much as possible.
Close the door. Please check that the laundry did
not get caught between the door and the filter.
Select the required programme
Turn the programme selector dial to the required
programme. The Start/Pause light starts to flash.
The programme will be switched off if you have not
pressed the Start/Pause button for 10 minutes.
The selector dial is divided into the
following sections:
• Cottons
• Synthetics
• Time
• Special
6
USE
Use Process
Automatic controlled drying
The appliance detects the moisture in the load and automatically adjust the drying
time for optimal drying. Just select the programme according to fabrics. This drying
system is good for the cottons, synthetics sections and the anti-bacterial, silk
programme.
Time controlled drying
Can be used to finish off drying if necessary. Select the 60 or 90 minute programme
for cottons or the 30 minute programme for synthetics. To cancel a programme
which is running, turn the programme selector dial to “O”. At the end of drying, turn
the selector dial to “O” to switch the machine off before removing the laundry.
Programme option buttons
Depending on the programme, different functions can be combined. These must be
selected after choosing the desired programme and before pressing the Start/Pause
button. When these buttons are pressed, the corresponding pilot lights come on.
When they are pressed again, the pilot lights go out.
Incorrect option selection
If you select an option that is not compatible with the programme you have
selected, the option will not be selected. If you selected the “Buzzer” option, the
buzzer will sound.
Select Delay Start
This button allows you to delay the start of the programme by 12 hours
maximum. This option must be selected after selecting the programme and
before pressing Start/Pause to start the programme. The programme is for 3,
6, or 12 hours.
It can be selected before or after selecting the programme option (Buzzer, Quick,
Delicate). The countdown begins after you have pressed the Start/Pause button
and the corresponding light illuminates. Press the button repeatedly to choose
the programme 3, 6, or 12 hours. This option can not be selected when a Special
programme is selected.
If you have selected a delay time via the button, the display will show it. The
countdown is calculated automatically once you press the Start/Pause button. If you
want to check the selected programme, press the Start/Pause button again to show
the duration of the previously selected programme. This function cannot be used
with Special programmes.
7
USE
Use Process
Select Buzzer
After turning on the appliance, the buzzer is off if there are no further actions.
The buzzer can be turned on or off during the process. By pressing the Buzzer
button, the buzzer goes off and the corresponding pilot light comes on. When
the buzzer is on, the signal will sound in the following cases:
• When pressing any button
• At the end of the programme
When the buzzer is on, press the Buzzer button again to switch it off.
Select Quick
The option can be selected in the following programme: Heavy, Strong,
Normal. By pressing this button, the drying time will be reduced by 3-5
minutes. The corresponding light illuminates. This option cannot be selected
together with the Delicate option.
Select Delicate
The option can be selected in the following sections: Cottons, Synthetics.
Pressing this button allows drying to be performed at a lower temperature for
delicate items. The corresponding pilot light comes on. This option can also be
used for time controlled dryer, but cannot be used with the Quick option.
Select Start/Pause
Press this button to start the dryer after selecting the programme and the options.
If the door of the appliance is opened while the programme is running, this button
must be pressed again after closing the door to restart the programme from the
point at which it was interrupted. In these cases, the light of the Start/Pause button
flashes to remind you that the start button needs to be pressed again.
Indicator lights
These lights indicate the following functions:
• Drying light
This light indicates that the appliance is in the drying phase.
• Cooling light
This light indicates that the appliance is in the cooling phase. At the end of
drying, there is a 5 or 10 minutes cooling phase to cool the laundry.
• End of programme light
This light is on at the end of the cooling phase, during the anti-creasing phase.
• Filter light
It comes on every cycle to remind you that the filter must be cleaned at the end
of the programme.
8
Thermostat reset
If during operation clothes have not dried
it is possible the overheat thermostat has
activated. This may be due to various reasons
i.e. filter is blocked, ducting is obstructed or
the dryer is overloaded. Once these items have
been checked, switch dryer to air dry for 20
minutes, once the unit has cooled press the
thermostat reset button at the rear of the unit.
If problems persist please call for service.
Thermostat reset button
At the end of the programme
All drying programmes end with a 5 or 10 minutes cooling phase. If the laundry
is not removed at the end of the cycle, the dryer performs an anti-creasing phase
(duration: 30 minutes maximum). If you do not remove the laundry, the dryer will
stop automatically at the end of the anti-creasing phase. The display light End shows
and the buzzer sounds for 15 seconds if you have selected the buzzer. Turn the
programme selector dial to “O” and all the lights will go out.
After each use
Clean the filter.
Important!
If the drying programme has to be stopped before it reaches the end, we
recommend that you turn the programme selector dial to Air Dry and wait until the
end of this cooling phase before removing the laundry. This will avoid a build-up of
heat inside the appliance. To do this, first turn the dial to “O”, then to Air Dry and
press the Start button.
Modifying the programme
To change a programme which is running, first cancel it by turning the programme
selector dial to “O”. Select the new programme and press the Start button.
Drying Hints
Before loading the laundry
Never tumble dry the following: particularly delicate items such as net curtains,
wool, silk, fabrics with metal trim, nylon tights, bulky materials such as anoraks,
blankets, eiderdowns, sleeping bags, feather quilts and any items containing rubber
foam or materials similar to rubber foam.
9
Always follow the instructions on garment labels:
may be tumble dried
delicate drying (low temperature)
normal drying (high temperature)
do not tumble dry
DRYING HINTS
•
•
•
•
•
•
•
•
•
•
•
•
Use Process
Close pillowcases and covers with fasteners to prevent small laundry items
getting tangled inside them. Close press studs, zips, hooks, tie belts, and apron
strings. Sort laundry according to type and degree of drying required.
Do not overdry laundry, this avoids creasing and saves energy.
Avoid drying dark clothes with light coloured fluffy items such as towels as they
could attract fluff.
Laundry must be thoroughly spun before tumble drying.
Even easy-case items (eg. shirts) should be briefly pre-spun before drying.
Knitted textiles (knitted underwear) may shrink a little during drying. Please
do not overdry items of this type. It is advisable to allow for shrinkage when
choosing the size of new purchases.
You can also put starched items into your dryer. However, to achieve the desired
starched effect, choose the programme Iron Dry. To remove any starch residues,
wipe out the internal drum after drying with a moist cloth and then rub it dry.
To avoid a static charge when drying is completed, use either a fabric softener
when you are washing the laundry or a fabric conditioner specifically for tumble
dryers.
Remove the laundry when the dryer has finished drying.
If individual items are still damp after drying, set a brief post-drying time of at
least 30 minutes. This will be necessary particularly for multilayered items (eg.
collars, pockets, etc.).
Make sure that no metal objects are left in the laundry (eg. hair clips, safety
pins, pins).
Turn items with double-layered fabrics inside out (eg. with cottonlined anoraks,
the cotton layer should be on the outside). These fabrics will then dry better.
Maximum loads
Recommended loads are indicated in the programme charts.
General rules:
• Cotton, linen: drum full but not too tightly packed.
• Synthetics: drum no more than half full.
• Delicate fabrics and woollens: drum no more than quarter full.
Try to load to the maximum capacity as small loads are uneconomical.
10
DRYING HINTS
Use Process
Laundry weights
The following weights are indicative:
bathrobe
1200g night dress
200g
napkin
100g ladies’ briefs
100g
quilt cover
700g men’s work shirt
600g
sheet
500g men’s shirt
200g
pillowcase
200g men’s pyjamas
500g
tablecloth
250g blouse
100g
bath towel
200g men’s underpants
100g
tea towel
100g
11
DRYING PROGRAMMES
Use Process
If the weight of the laundry is less than 1kg, it is more efficient to dry with Time
Controlled Drying.
Section
Cottons
Synthetics
Time
Course
Max load
Heavy
6kg
For bathrobes, bath towels, jeans, work
clothes
Strong
6kg
For bathrobes, bath towels, jeans, work
clothes
Normal
6kg
For shirts, t-shirts, cotton trousers
Damp
6kg
For knitted items, cotton shirts
Iron
6kg
For sheets, bed linens, table linens,
starched laundry
Extra
3kg
For sheets, tablecloths, synthetics items
Cupboard
3kg
For synthetics items
Iron
3kg
For knitted items, shirts
30’, 60’, 90’
6kg
Multi-layered fabrics, bath towels, tea
towels
Anti-Bacterial
3kg
For men’s underpants, pantywaist,
winter clothing
Silk
1.5kg
Description of programme
For silk items
Specials
Freshen-up
3kg
For men’s underpants, shirts
Air Dry
2kg
For refreshing or gently cleaning textiles
12
CARE AND CLEANING
Before Use
Care and Cleaning
You must DISCONNECT the appliance from the electricity supply before you can
carry out any cleaning or maintenance work.
External cleaning
Use only soap and water and then dry thoroughly. Important: do not use methylated
spirits, diluents, or similar products.
Cleaning the door
Periodically clean the interior part of the door
to remove any fluff. Proper cleaning ensures
effective drying.
Cleaning the filter
Your dryer will only function well if the filter
is clean. The filter collects all the fluff which
accumulates during drying and they must
therefore be cleaned at the end of each
programme. Do so with a damp cloth before
removing the laundry.
The filter must be removed for cleaning (see
picture).
WARNING: Do not use the appliance without the filter.
13
SOMETHING NOT WORKING
•
•
•
Use Process
Something not working
Certain problems are due to lack of simple maintenance or oversights, which can be
solved easily without calling a technician. Before contacting a service agent, please
carry out the checks listed below.
During machine operation, it is possible that the Start/Pause light flashes to indicate
that the machine is not working. Once the problem has been solved, press the Start/
Pause button to restart the programme.
If after all checks, the problem persists, contact Parmco at 09 573 5678.
Malfunction
Possible causes
Solution
Dryer does not work
•
Mains plug is not
plugged in
Loading door is open
Have not pressed the
Start/Pause button
•
Wrong programme
selected
Filter clogged
Incorrect volume of
laundry
Ducting issue or
obstruction
•
•
•
Drying results are
unsatisfactory
•
•
•
•
•
•
•
•
•
Plug in at mains
socket
Close loading door
Press the Start/Pause
button again
Select a different
programme the next
time you dry (see
Drying Programmes
section)
Clean lint filter
Refer to
recommended
loading volumes
Thermostat cut
out may have been
activated
Drum light does not work
•
Light bulb is defective •
Replace light bulb
Drying cycle lasts an
unusually long time
•
Load volume is too
big
Reduce load volume
•
If you are unable to identify or solve the problem, contact our Service Department.
Before calling, make a note of the model, serial number, and purchase date of your
machine. The Service Department will require this information.
14
TECHNICAL DATA
Appendix
IMPORTANT: If you call a service agent to a fault listed below, or to repair a fault
caused by incorrect use of installation, a charge will be made even if the appliance is
under warranty.
Technical Data
Dry Capacity (kg)
6.0
Electrical connection voltage - overall
power-fuse
Information on the electrical connection
is given on the rating plate
Depth with loading door open (mm)
1030
Use
The room temperature must not be
lower than +5oC or higher than +35oC
Dimensions (wxdxh) (mm)
595 x 555 x 850
It is dangerous to alter the specifications or attempt to modify this product in any
way.
Care must be taken to ensure that the appliance does not stand on the electrical
supply cable.
Any electrical work required to install this appliance should be carried out by a
qualified electrician or professional person.
IMPORTANT: The appliance must not be built-in.
•
•
Unpacking
All packing must be removed before using the appliance.
Check accessory
Open the accessory bag and check the accessories.
Accessory
Name
Quantity
Vent Hose
1
Manual
1
Should the appliance be moved, it must be transported vertically.
15
INSTALLATION
Appendix
Positioning
It is recommended that for your convenience, the machine is positioned close to
your washing machine. Whilst drying, the tumble dryer will expel a certain amount
of warm, very moist air, and this should be removed form the room as quickly as
possible to prevent condensation. In an extremely well ventilated room or close to
an open window, this may occur naturally. However, in general, it is better to carry
the dryer’s exhaust outside via the vent hose supplied with the appliance; ending
either temporarily at an open window, or permanently at a fixed ventilation grille,
fitted to an exterior wall or window.
The tumble dryer must be installed in a clean place, where dirt does not build up.
Make sure there are no obstructing items or material near the air-intake louvres at
the back (eg. paper, rags, etc.). To keep vibration and noise to a minimum when the
dryer is in use, it should be placed on a firm, level surface.
NOTE: If the floor is uneven, adjust the adjustable feet. DO not put any wooden
pieces or other objects under foot bases.
Level Adjustment
When pushing down on the diagonal
edges of the top plate of the dryer, the
machine should not rock at all. Please
check all corners. If the machine rocks,
adjust the feet again.
• Loosen the locknuts with the
spanner.
• Adjust the adjustable feet: lower
the dryer by turning right and
ascend it by turning left.
• Tighten the locknut with the spanner
after ensuring the dryer is level.
locknuts
loose
high
locked
low
adjustable foot
NOTE: The locknuts must be tightened after adjustment. Any looseness can cause
vibration and noise.
The feet must never be removed. Do not restrict the floor clearance through deep
pile carpets, strips of wood or similar. This might cause heat build-up which would
interfere with the operation of the appliance.
16
INSTALLATION
Appendix
IMPORTANT: The hot air emitted by the tumble dryer can reach temperatures
of up to 60oC. The appliance must therefore not be installed on floors which are
not resistant to high temperatures. When operating the tumble dryer, the room
temperature must not be lower than +5oC or higher than +35oC as it may affect the
performance of the appliance.
Fitting the vent hose
To simplify the installation, there is a choice of vent outlets: one at the back, the
other on the left hand side.
Connect the hose to whichever is more convenient by pulling the ring nut (A) form
the vent outlet at the back, aligning the arrows of the hose and ring nut, then
fastening by screwing the hose to the direction of the arrow, and finally pushing it
firmly back into place. The unused vents should now be sealed with the special snap
cover (B) provided.
A
B
A
Advice:
If the hose is long and the room temperature is low,
the moisture might condense inside the hose. This is
an unavoidable natural phenomenon. To prevent this
water from lying in the hose or flowing back into the
tumble dryer, it is advisable to drill a small hole (dia.
3mm) in the lowest point of the hose and to place a
small container below it (C).
Once connected to the dryer, run the vent hose to the
desired outlet point - it should contain no more than
two bends. As to the outlet itself, if you have decided
on a fixed wall/window grille, a good local builders
merchant should be able to supply you with the
necessary fittings and installation advice.
C
17
INSTALLATION
Appendix
It is important not to connect the vent hose to, for example, a cooker hood, a
chimney, or a flue pipe designed to carry the exhaust from a fuel burning appliance.
Note that to avoid condensation problems, it is essential that the dryer be fitted
with the flexible hose to carry the air outside the kitchen.
In order to prevent the appliance from overheating, it is important that the steam
exhaust is unobstructed.
If the dryer is fitted next to kitchen units, make sure that the vent hose is not
squashed. If the hose is partially squashed, drying efficiency will be reduced,
resulting in longer drying times and higher energy consumption. If the hose is
completely squashed, the safety cut-outs with which the machine is fitted may
operate.
When operating the tumble dryer, the room temperature must not be lower than
+5oC or higher than +35oC, as it may affect the performance of the appliance.
WARNING: This appliance must be earthed.
The manufacturer declines any liability should this safety measure not be observed.
Before switching on, make sure the electricity supply voltage is the same as that
indicated on the appliance’s rating plate.
Should the plug need to be replaced for any reason, proceed as described below.
The wires in the mains lead are coloured in accordance with the following code:
• Green and Yellow - Earth
• Blue - Neutral
• Brown - Live
The wire coloured Green and Yellow must be connected to the terminal marked with
the letter by the earth symbol, or coloured green and yellow.
18
ENVIRONMENT CONCERNS
Appendix
WARNING:
• A cut off plug inserted into a socket is a serious safety (shock) hazard.
• Ensure that the cut off plug is disposed of safely.
• Permanent connection- in the case of permanent connection, it is necessary
that you install a double pole switch. The switch must not break the yellow and
green cable at any point.
Packaging Materials
•
•
•
The materials marked with the
symbol are recyclable.
>PE<= polyethylene
>PS<= polystyrene
>PP<= polypropylene
This means that they can be recycled by disposing of them properly in
appropriate collection containers.
Old machine
Use authorized disposal sites for your old appliance. Help to keep your country
tidy!
The symbol
on the product or on its packaging indicates that this
product may not be treated as household waste. Instead, it should be taken to
the appropriate collection point for the recycling of electrical and electronic
equipment. By ensuring this product is disposed of correctly, you will help
prevent potential negative consequences for the environment and human
health, which could otherwise be caused by inappropriate waste handling
of this product. For more information about recycling of this product, please
contact your local council.
Ecological Hints
To save energy and to help protect the environment, we recommend the following
hints:
• Try to load the maximum capacity of the machine as small loads are
uneconomical.
• Do not overdry laundry, this avoids creasing and saves energy.
• Select the drying programme according to the type of laundry and the required
degree of dryness.
• Clean the filters regularly to avoid excessive drying times and high electricity
consumption.
• Ventilate the room well. The room temperature should not exceed +35oC during
drying.
19
p: 09 573 5678
f: 09 573 5699
e: [email protected]
w: www.parmco.co.nz
Parmco Appliances
2 year warranty
The Warranty:
• Subjecttothetermsandconditionscontainedwithinthis
warranty,iftheproductisnotofAcceptableQuality(as
definedintheConsumerGuaranteesAct)within2yearsof
thedateoforiginalpurchase,thenParmcoSalesundertakes
torepairor,atit’ssolediscretion,replacetheproduct.
• Thewarrantydoesnotcoverthecostsoftransport,mileage
ortravellingtimeiftheproductislocatedbeyond30kmofa
recognisedServiceAgent.
• Thiswarrantyisofferedasanextrabenefit,anddoes
notaffectotherlegalrights,whichcannotbemodifiedor
excludedbyagreement.
• Thiswarrantyonlyappliestogoodssuppliedandinstalledin
theNorthandSouthIslandsofNewZealand.
• Theprovisionsofthiswarrantyareinadditiontotherights
andremediesavailabletoconsumersundertheConsumer
GuaranteesAct1993.
Product
Dateofpurchase
Dealer/RetailersName
PleaseretainthisWarrantycardtogetherwithreceiptorotherproofof
purchasedatewhenseekingserviceduringthewarrantyperiod
PleasecontactParmcoat095735678ifyour
applianceneedsservicingunderwarranty.Please
haveyourmodelnumberandproofofpurchaseready.
WarrantyrepairsmustbeauthorizedbyParmco.
The Warranty is not valid:
• Iftheproductisnotinstalledandoperatedinaccordancewiththeoperating
instructions.
• Iftheproductisnotinstalledtocomplywiththeelectrical,gas,plumbing
andotherRegulationsandCodesofPracticeinNewZealand.
• Iftheproductisoperatedonvoltagesorfrequenciesoutsidethenormal
rangefordomesticappliancesinNewZealand.
• Iftheproductisnotusedinnormaldomesticuse,orifitisusedina
businessasdefinedintheConsumerGuaranteesAct.
• Ifanyserialnumberhasbeenremovedordefaced.
• Ifproofofdateofpurchaseisnotsupplied,exceptatthesolediscretionof
ParmcoSales.Proofofpurchasecanbefortheproductitself,orifinstalled
withakitchenorhousethenproofofpurchasecanbefromaParmco
resellerofproductssuppliedbyParmco.
Liability under this warranty will not be accepted for:
• Wearandtearfromnormaldomesticuse.
• Damageintransport.
• Damagecausedtotheproductbyneglect,abuse,negligence,wilfulactor
misuse.
• Anydefectcausedbyaccident,misuse,neglect,tamperingwithor
unauthorisedmodificationsoftheapplianceoranyattemptatinternal
adjustmentorrepairbyanypersonotherthananAuthorisedServiceAgent.
• Servicecallsthatrelateprincipallytothefollowing:
• Instructiononhowtousetheproduct.
• Repairorreplacementofhousefuses,electricalwiring,gasfittingor
plumbing.
• Wearandtearcausedbynormaluseoftheproduct.
• Normalorscheduledmaintenanceincludingblockedfiltersorducting.
• Consumableitemssuchaslightbulbs.
• Anydamagetoceramicglasshobscausedbyspillswhencooking.
• Anybreakageordamageofglassitems.
• Anydamagecausedbynonrecommendedproductusedforcleaning,
maintaining,lubricatingorsimilar.
• Anyaspectrelatingtotheinstallationoftheproduct,ordamagecaused
duringinstallation.
• Anythirdparty(includingreseller)orconsequentiallossordamage(direct
orindirect)howeverarising.
20


![8KG HEAT PUMP DRYER [Met DTD 315]](http://vs1.manualzilla.com/store/data/005851733_1-4b2b64d3b006b4e2563952fefa7cfd52-150x150.png)