1
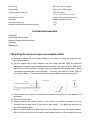
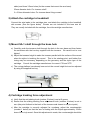
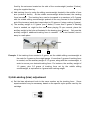
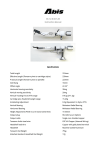
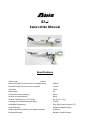
Specifications
Total Length
310mm
Effective Length (Tonearm pivot to cartridge stylus)
228mm
Practical Length (Tonearm pivot to spindle)
212mm
Overhang
16mm
Offset angle
22°
Horizontal moving sensitivity
30mg
Vertical moving sensitivity
20mg
Vertical Tracking Force (VTF) range
0-4.5g (3 + 1.5g)
Cartridge plus Headshell weight range
15-45g
Antiskating Adjustment
0-3g (Equivalent to Stylus VTF)
Vertical Bearing
Miniature Radial Bearing
Height Adjustment (Plinth to arm-wand centerline)
41-80mm
Horizontal Bearing
Miniature Radial Bearing
Output plug
RCA (XLR as an Option)
Output cable
Single core shield copper
Tonearm Audio Lead wire
OFC 4N Copper
(Stowed in separate wiring tube in wand)
Headshell lead wire
Copper with gold plated terminal
Headshell
Machine tooled Aluminum
Tonearm Net Weight
745g
Attached standard Headshell Net Weight
17g
Included Accessories
Headshell
Detachable phono cable
Screws, Washers and Wrenches
Template
Marking pin
1)
Mounting the tonearm base to turntable plinth
a) Determine where the arm base should be mounted by using the supplied arm
mounting template.
b) Put the larger hole of the template onto the center spindle. Take the attached
marking pin supplied (as illustrated below) and push it through the small hole at the
opposite end of the tonearm template (the hole opposite the spindle hole). Keep
the needle perpendicular to the template. You may now mark the center point of
the tonearm base. The center point of the tonearm base is also the pivot point.
Arm base
Marking pin
Template
Arm base
Turntable Plinth
φ22mm
Template
c) At the same time, mark the 3 holes for the screws that mount the arm base to the
armboard.
d) Do not drill holes yet !
e) Having marked the center, check to see if there is sufficient clearance for the
tonearm and the dust cover (if you have a dust cover). Pay particular attention to
the counterweight shaft.
f) After you have verified the dust cover will work with the chosen arm base location,
drill one 22mm hole (this is the center, which allows access to the tonearm stem and
cable) and three 3.5mm holes (for the screws that mount the arm base).
22mm diameter hole: For tonearm shaft!
3 x 3.5mm diameter holes: For tonearm base fixing screws!
2) Attach the cartridge to headshell
Connect the wire leads to the cartridge pins, and attach the cartridge to the headshell
with screws. (See the figure below) Screws are not included in this tone arm kit.
They are usually included with the cartridge, from the cartridge manufacturer.
3) Mount SA-1 shaft through the base hole
a) Carefully push the tonearm shaft through the hole in the arm base and then fasten
the set-screw with the hex key supplied with the tonearm. Be careful not to over
tighten!
b) Adjust the tonearm height to make the tonearm parallel with the surface of the record
when the stylus is touching the record. This is the starting point, and further fine
tuning may be necessary, depending on the geometry and the stylus type of the
cartridge. Consult the cartridge manufacturer for correct VTA and VTF!
c) The cueing platform has already been set at the correct height but can be adjusted
by using the supplied hex key.
4) Cartridge tracking force adjustment
a) Verify that the anti-skating knob (number 3 below) is set at 0 grams.
b) Ensure that the sliding tracking force adjustment knob (number 4 below) is set to
zero (the point furthest to the back of the tonearm and closest to the pivot point).
c) After the cartridge is correctly adjusted for overhang, adjust the counterweight
(number 1 below) so that the arm is floating with the stylus approximately 3-5mm
clear of the vinyl record. Once this adjustment is made, the counterweight should be
fixed by the set-screw located on the side of the counterweight (number 2 below),
using the supplied hex key.
d) Add tracking force by using the sliding counterweight located in the middle of tone
arm (number 4 below). As the middle counterweight slides forward, the tracking
force increases. The tracking force can be increased to a maximum of 3.0 grams
with the middle sliding counterweight pushed all the way forward to the headshell
end of the tonearm (each step is equivalent to 0.5 grams x 6 steps, making 3 grams).
e) The auxiliary weight is 1.5 grams (see 5 below). If more than 3 grams of tracking
force is needed, as might be the case when playing 78 rpm records, place the
ancillary weight in the hole as illustrated in the drawing (see 5 below). Only use this
auxiliary weight if additional tracking force is needed! If it is not needed, store it
away in a safe place.
1
5
2
4
3
Example: If the tracking force needed is 3 grams, set the middle sliding counterweight at
the mark for 3 grams on the weight gauge. If more than 3 grams of tracking force
is needed, use the auxiliary weight of 1.5 grams, along with the counterweight, in
order to secure your desired tracking force. For instance, the ancillary weight of
1.5 grams, plus 2.5 grams of tracking force set by the middle sliding
counterweight, is equivalent to 4 grams total tracking weight.
5) Anti-skating (bias) adjustment
a) Set the bias adjustment knob to the same number as the tracking force.
Some
experimentation may be necessary based on the specific stylus profile used by the
cartridge.