1
New WSDOT-Developed Job Aids for ADA Curb Ramp
Evaluation and Design: Show and Tell
Ron Franzen
NWR Project Development Trainer & Statewide ADA Trainer
Regional ADA Coordination Team
NWR Engineering Services
Paula Hammond
Steve Reinmuth
Secretary of Transportation
Chief of Staff
NWPMA Annual Conference
Vancouver, WA
October 25th, 2012
Introducing the CREF
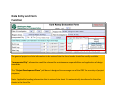
The Curb Ramp Evaluation Form (CREF) is a tool developed to ensure completeness of data collection when performing curb ramp investigations in the field.
The CREF also can generate standardized, legible and professional looking hard‐copy and electronic documentation for scoping files, project files, design documentation, and other databases.
The CREF is NOT a checklist of ADA curb ramp requirements. Rather, the CREF is designed to ensure that all data relevant to making a determination of compliance with state and federal accessibility standards is collected.
2
CREF* User’s Manual
[*Curb Ramp Evaluation Form]
3
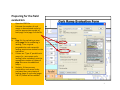
Preparing for the field evaluation
•
•
Open the CREF file
Estimate the number of curb ramps to be evaluated and print out the appropriate number of both page 1 and page 2 of the file.
Notes: 1. Page 1 is for evaluating a ramp while page 2 is for evaluating a landing. Thus a typical perpendicular curb ramp with landing requires two sheets for the evaluation.
2. If there are “Type A” parallel curb ramps (i.e.; two ramps and a landing) to be evaluated, print the appropriate number of copies of page 3 to cover the additional ramps. 3. Similarly, if there are any combination curb ramps to be evaluated then extra copies of landing (page 4) and ramp (pages 3 & 5‐7) sheets will be needed.
4
Preparing for the field evaluation
For economy of State resources, the form pages can be printed Black & White for the field evaluation…saving the Color printing for the final product after data entry back at the office.
5
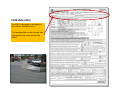
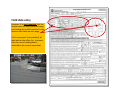
Preparing for the field evaluation
Also, print out a copy of the Curb Ramp Numbering Diagram (CRND) Index for reference out in the field.
The CRNDs are designed to promote consistent data entry on the CREF.
As of 3/9/12, the CRND library covers all perpendicular and parallel curb ramps. In the near future, the CRND library will be expanded to cover the wide variety of combination curb ramps as well as blended transitions.
6
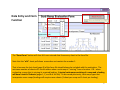
Field data entry
The CREF is designed to be legible in the field for field data entry.
The heading data can be entered later during final data entry back at the office…
7
Field data entry
However, it is very important that the location data for each evaluated ramp and landing be carefully entered in the location data fields on each page.
This is to prevent “mis‐matching” of data back at the office (i.e.; to ensure that the correct landing data is attached to the correct ramp data). 8
Field data entry
Pages 2 – 8 of the CREF include areas to write field notes of site‐specific observations.
9
Data Entry and Form Function
The “Reset Form” button will clear ALL user entered data from every sheet in the form file.
Note that the “of #” sheet pull down menu does not contain the number 1.
That is because the last sheet (page 8) of the form file should always be included with the evaluation. The minimum number of sheets of 2 results either when a curb ramp is “missing” from a location ‐ OR – when evaluating a ramp that is missing its required landing. A typical curb ramp consisting of a ramp and a landing will have a total of 3 sheets (pages 1, 2, and 8 of the file). As discussed previously, curb ramp types that incorporate more ramps/landings will require more sheets (1 sheet per ramp and 1 sheet per landing).
10
Data Entry and Form Function
The general project and site information to be entered into the form header should be readily available.
“Incorporated City” information could be relevant for maintenance responsibilities and application of design standards.
The “Project Development Phase” pull down is designed to encourage use of the CREF for a variety of project purposes.
Note: Applicable heading information that is entered into sheet 1 is automatically transferred to the other sheets in the form file.
11
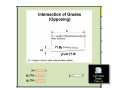
Data Entry and Form Function
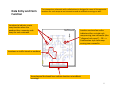
The Curb Ramp Location Table and the intersection schematic with radio buttons are to be used in tandem to identify the location of the curb ramp location being evaluated.
Checking the “Other” box indicates that the intersection leg is a high ADT commercial driveway or a private road.
Checking the “N/A” box indicates that the intersection leg does not exist at this intersection (such as at a “T‐intersection”). Note: The Curb Ramp Location information entered into sheet 1 is automatically transferred to the other sheets in the form file.
12
Data Entry and Form Function
Locations to indicate a curb ramp location when the quadrant has a separate curb ramp for each crosswalk
The intersection schematic with radio buttons is designed to cover all the potential locations for curb ramps at an intersection and at midblock crossings as well.
Location centered on radius indicates either a single curb ramp serving two crosswalks (aka “diagonal curb ramp”) – OR – a Combination style curb ramp serving two crosswalks
Locations on traffic islands or medians
Areas beyond the break lines indicate locations at midblock crossings
13
Data Entry and Form Function
The Curb Ramp General Information section is used to indicate the type of curb ramp at the location, which in turn sets the expectation of how many ramps/landings need to be evaluated and thus how many total sheets should be included in the CREF (1 sheet per each ramp or landing + the last sheet {page 8} in the form file).
Perpendicular
Parallel
Combination
14
Data Entry and Form Function
The General Accessibility Criteria section for each ramp/landing is used to gather information needed to determine compliance with state and federal accessibility standards. Each question asked of the evaluator in this section is directly related to an ADA/WSDOT Design Manual requirement. Contact either the Statewide ADA Trainer or your Regional ADA Coordinator if you have questions. 15
Data Entry and Form Function
The Slopes and Dimensions section for each ramp/landing is used to input the physical measurements of the ramp/landing that are needed to determine compliance with state and federal accessibility standards. Enter “Counter slope” data with either a (+) or a (‐) sign depending on whether the crosswalk slopes up away from the connection to the gutter (+) or rather down away from the connection to the gutter (‐).
If flares are not present, or if counter slope evaluation is not applicable because the feature does not connect to the crosswalk, then “N/A” can be entered into these boxes.
16
Data Entry and Form Function
The Detectable Warning Surface section for each ramp/landing is used to evaluate the placement and other criteria for the DWS if the ramp/landing is connected to the roadway.
Note: For DWS evaluation, it is important that the correct Curb Ramp Numbering Diagram is used and that measurements for ramp/landing width are taken in the directions shown on the diagram.
17
Data Entry and Form Function
In this example, the perpendicular curb ramp’s landing is then evaluated on sheet 2.
Data entry is similar to sheet 1.
The project and location data from sheet 1 is automatically transferred to all sheets upon input, and if the data is changed on any sheet then it will automatically update on all sheets.
18
Data Entry and Form Function
Sheets that are not used in the form file (due to the type of curb ramp being evaluated and its Curb Ramp Numbering Diagram) can be marked “N/U.”
This is recommended both as a reminder not to print the sheet and, if the sheet is accidentally printed, as a reminder that the sheet does not belong in the final product.
19
Data Entry and Form Function
After filling out the necessary form pages based on the number of ramps/landings at the curb ramp location, it is then time to fill out page 8 of the form file.
As explained earlier, page 8 of the form file is to be included as the last sheet of each evaluation package.
Thus in our perpendicular curb ramp example walkthrough (since our curb ramp has 1 ramp and 1 landing that we evaluated) page 8 becomes “Sheet 3 of 3” in our final product.
20
Data Entry and Form Function
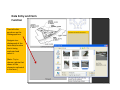
Left click anywhere on the Curb Ramp Numbering Diagram box on the form sheet.
Navigate to where you saved the jpeg photo file and select it.
21
Data Entry and Form Function
Then left click anywhere on the Photograph box.
Navigate to a photograph of the curb ramp location that is being evaluated and select it.
[Note: Try to choose a photo that shows all the elements evaluated in the form.]
22
Data Entry and Form Function
Add any field notes you want displayed on the form sheet.
23
Data Entry and Form Function
Fill in the Compliance Evaluation box.
24
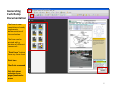
Generating
Curb Ramp Documentation
The form is now complete and ready to generate documentation of the evaluation.
The form can be printed with a number of different commands ‐
“Print Form” button from any form sheet
Print Icon
File>Print command
Ctrl‐click sheet selection from pages/bookmarks menu
25
Generating
Curb Ramp Documentation
To create electronic file documentation of the evaluation that can be printed to hard‐copy as needed –
Select “PDF995” as your printer (“Adobe PDF” for Adobe Pro users)
Select the pages used in the evaluation (for a typical curb ramp with one ramp and one landing {like this walkthrough example} that will be pages 1‐2, 8)
Select “OK” to save the file to your hard drive
26
Generating
Curb Ramp Documentation
You now have an electronic PDF file documenting the evaluation that consists ONLY of the sheets actually used in the evaluation for that particular curb ramp location (in this case, 3 sheets).
It is recommended that you develop a unique project ‐
specific file naming system for cataloguing the electronic documentation files.
27
Training available through Washington State Local Technical
Assistance Program (LTAP) Training Program -
“Pedestrian Accommodation Workshop”
– {16 hours}
Questions ?