1
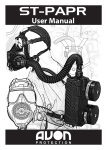
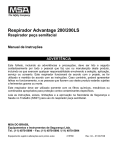
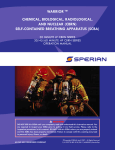
818365.qxd
11/3/98 10:40 AM
Page 1
low maintenance respirator
instructions
This booklet, including the warnings and
cautions inside, must be read and followed carefully by all persons who use or
maintain this product, including those
who have any responsibility involving its
selection, application, service or repair.
This respirator will perform as designed
only if used and maintained according to
the instructions. Otherwise, it could fail to
perform as designed and persons who rely
on this product could sustain serious personal injury or death.
See inside for instructions, warnings, and
cautions and limitations. For additional
information, call 1-800-MSA-2222 during
regular working hours, or 1-800-MSA-5555
after working hours or during emergencies.
See separate insert for NIOSH approval
information.
818365.qxd
11/3/98 10:40 AM
Page 2
the same cartridges or filters) if the mixture
meets the following conditions:
a. The cartridge/filter must be approved
for all contaminants present.
b. NIOSH permits mixing of the following
contaminants: Organic vapors, sulfur
dioxide, chlorine, ammonia, methylamine, chlorine dioxide, hydrogen sulfide, and hydrogen chloride.
c. Particulates can be mixed with any
other particulate or any gas or vapor for
which the cartridge is approved.
d. Contaminants present simultaneously
must be below IDLH levels for the specific contaminants. If any one contaminant in the mixture exceeds the IDLH
concentration, then the entire mixture
must be treated as IDLH and the respirator cannot be used (except for escape
from particulates with the appropriate
filter).
e. Mersorb-P100 cartridges can be used
against a mixture of chlorine and mercury that are both present simultaneously, but cannot be used if alternating
between mercury-contaminated atmospheres and chlorine-contaminated
atmospheres.
TABLE OF CONTENTS
NIOSH APPROVAL INFORMATION
Cautions and Limitations . . . . . . . . . . . . . . . . . 2
SPECIAL USER INSTRUCTIONS . . . . . . . . . . . . 2
Mixture of Contaminants . . . . . . . . . . . . . . . 2
Time Use Limitation . . . . . . . . . . . . . . . . . . . . . 2
RESPIRATOR USE LIMITATIONS . . . . . . . . . . . 3
EXPOSURE LIMITS . . . . . . . . . . . . . . . . . . . . . . 3
Exposure Limits for Mixtures. . . . . . . . . . . . 3
RESPIRATOR FIT TEST . . . . . . . . . . . . . . . . . . . 3
Quantitative Test. . . . . . . . . . . . . . . . . . . . . . 3
Qualitative Test . . . . . . . . . . . . . . . . . . . . . . . 3
DESCRIPTION (Full Facepiece Respirator). . . . 4
PREPARATIONS FOR DONNING . . . . . . . . . . . 4
Attaching Filter Cartridges . . . . . . . . . . . . . . 4
DONNING THE RESPIRATOR . . . . . . . . . . . . . . 4
TEST FOR TIGHTNESS . . . . . . . . . . . . . . . . . . . 5
REPLACING FILTERS/CARTRIDGES . . . . . . . . . 5
CLEANING AND DISINFECTING . . . . . . . . . . . . 5
MAINTENANCE . . . . . . . . . . . . . . . . . . . . . . . . . 6
Installing a Nosecup . . . . . . . . . . . . . . . . . . . 6
Installing an Outsert Lens . . . . . . . . . . . . . . 6
NIOSH APPROVAL INFORMATION
Cautions and Limitations
A- Not for use in atmospheres containing less
than 19.5 percent oxygen.
B- Not for use in atmospheres immediately
dangerous to life or health.
C- Do not exceed maximum use concentrations established by regulatory standards.
H- Do not wear for protection against organic
vapors with poor warning properties or
those which generate high heats of reaction with sorbent.
J- Failure to use and maintain this product
properly could result in injury or death.
L- Follow the manufacturer’s User Instructions
for changing cartridges and/or filters.
M- All approved respirators shall be selected,
fitted, used, and maintained in accordance
with MSHA, OSHA and other applicable
regulations.
N- Never substitute, modify, add, or omit
parts. Use only exact replacement parts in
the configuration as specified by the manufacturer.
O- Refer to User Instructions, and/or maintenance manuals for information on use and
maintenance of these respirators.
P NIOSH does not evaluate respirators for
use as surgical masks.
S- Special or critical user instructions and/or
specific use limitations apply. Refer to User
Instructions before donning.
Mersorb-P100 respirators utilize an endof-service-life indicator for use against
metallic mercury vapor. The band
around the side of each Mersorb-P100
cartridge, consists of chemically-treated
paper. In use, as the paper is exposed to
metallic mercury vapor, it changes from
orange to brown. When the indicator
color changes to brown, the cartridge is
beginning to lose its effectiveness
against metallic mercury vapor and
must be replaced. Thus, the wearer has
a constant, positive check on the condition of his cartridge.
Time Use Limitation
N- and R- series filters shall be limited to 8
hours of use (continuous or intermittent against
particulates). [Service time can be extended by
performing an evaluation in the specific workplace setting that demonstrates (a) that the
extended use will not degrade the filter efficiency below 95% or (b) that the total mass loading
of each filter is less than 100 mg.]
1. This respirator must be used in conjunction
with the proper chemical or particulate cartridges for protection against specific contaminants.
2. Leave area immediately if:
a. Breathing becomes difficult;
b. Dizziness or other distress occurs;
c. You taste or smell contaminant;
d. You experience eye, nose or throat irritation.
SPECIAL USER INSTRUCTIONS
Mixture of Contaminants
NIOSH allows this respirator to be used for
protection against a mixture of contaminants
that are present simultaneously, or alternately,
against one contaminant then another (using
2
TAL 8901 (L) Rev. 1 - 818365
818365.qxd
11/3/98 10:40 AM
Page 3
Exposure Limits for Mixtures
The American Conference of Governmental
Industrial Hygienists (ACGIH) publishes the following information to determine the TLV of a
mixture. First determine the total concentration of the chemical mixture (CMixture) from the
individual contaminant concentrations (C1, C2,
C3, ...) using the following formula:
3. Use strictly in accordance with instructions, labels and limitations pertaining to
this device.
4. This respirator may not provide a satisfactory seal with certain facial characteristics,
such as beards or large sideburns, that prevent direct contact between the skin and
the sealing surface of the facepiece. Do not
use this facepiece if such conditions exist.
5. This respirator is for use by trained and
qualified personnel only.
Failure to follow these precautions can result
in serious personal injury or death.
CMixture = C1 + C2 + C3 + ...
The TLV of the mixture is found by using the
following formula where T1, T2, T3, ... are the
individual contaminant TLVs and C1, C2, C3, ...
are the individual contaminant concentrations.
RESPIRATOR USE LIMITATIONS
The wearer must comply with the following
MSA respirator use limitations:
1. MAXIMUM USE CONCENTRATION—
Do not exceed any of the following:
a. 100 times the exposure limit for the
contaminants present, except during
escape only from particulates with an
approved filter cartridge.
b. Immediately dangerous to life or health
(IDLH) concentration for any contaminant present.
2. Do not wear for protection against the following contaminants. This far-from-complete list is offered only as a guide to proper evaluation of the many contaminants
found in industry. Contact MSA for further
information on other specific material.
Acrolein
Aniline
Arsine
Bromine
Carbon monoxide
Diisocyanates
Dimethylaniline
Dimethyl sulfate
Hydrogen cyanide
Hydrogen selenide
Methanol
Methyl bromide
Methyl chloride
Methylene chloride
Nickel carbonyl
Nitric Acid
TMixture =
C
C
+ 2 + 3 +...
T1 T2 T3
Only use these equations if the contaminants
present are actually mixed. Some substances
do not mix and may be present separately, for
example, in pockets or at different levels. In
that case, the lowest TLV of the substances
present must be used to determine the appropriate respirator category for protection
against all contaminants present.
See MSA’s Response Respirator Selector for
additional information.
RESPIRATOR FIT TEST
Nitro compounds:
Nitrogen oxides
Nitroglycerin
Nitromethane
Ozone
Phosgene
Phosphine
Phosphorous
trichloride
Stibine
Sulfur chloride
Urethane or other
diisocyantecontaining paints
Vinyl chloride
A qualitative or quantitative respirator fit test
must be carried out for each wearer of this respirator to determine the amount of protection it
will provide. Respirator fit tests are explained
fully in the American National Standard for
Respiratory Protection, ANSI Z88.2, which is
published by the American National Standards
Institute, 11 West 42nd Street, New York, New
York, 10036.
Quantitative Test — If a quantitative fit test is
used, a fit factor that is at least 1000 shall be
obtained before that respirator is assigned to
an individual.
EXPOSURE LIMITS
Qualitative Test — If a qualitative fit test is
used, only validated protocols are acceptable.
The individual must pass a test designed to
assess a fit factor of at least 1000.
A listing of acceptable exposure limits from
the following sources is provided in the
Response® Respirator Selector from MSA:
— American Conference of Governmental
Industrial Hygienists (ACGIH)
— Occupational Safety and Health Administration (OSHA).
— National Institute for Occupational Safety
and Health (NIOSH)
— American Industrial Hygiene Association
(AIHA)
Contact MSA at 1-800-MSA-2222 for information.
TAL 8901 (L) Rev. 1 - 818365
CMixture
C1
The user must perform a respirator fit test and
follow all warnings and limitations specified.
Failure to do so can result in serious personal
injury or death.
3
818365.qxd
11/3/98 10:41 AM
Page 4
DONNING THE
RESPIRATOR
DESCRIPTION (Full Facepiece Respirator)
The Advantage 1000 Respirator is an air purifying respirator which includes a full facepiece
assembly and a pair of air purifying elements
to provide respiratory protection against hazardous vapors, gases and/or particulate matter.
When the wearer inhales, the contaminated air
is drawn through the air-purifying elements,
and depending on the elements used, removes
the hazardous vapors, gases and/or particulate
matter. The inhalation valves open and the
exhalation valve remains closed to prevent
contaminated air from entering the facepiece.
During exhalation, the exhalation valve opens,
and the inhalation valves close to prevent
exhaled air from passing back through the air
purifying elements. The exhalation valve permits exhaled air to exit from the respirator.
To put on the respirator:
a. Adjust the facepiece headstraps so
the end tabs are at
the buckles. (see
fig. 1)
figure 1
b. Grip the facepiece
between the thumb
and fingers with
both hands. Insert
your chin into the
chin cup. (see fig. 2)
c. Pull the facepiece
headstraps over your
head. Smooth the
figure 2
straps flat against
your head.
d. Support the facepiece by holding the
speaking diaphragm
housing with one
hand.
e. To tighten the lower
(neck) straps, pull
the straps straight
figure 3
back, not out.
f. Tighten the side
(temple) straps. (see fig. 3)
g. Adjust the forehead straps if needed to
position the lens for best vision.
h. Perform the Test for Tightness Test.
Note
An air-supplied (air-line) kit is available for this
respirator (P/N 10003601).
PREPARATIONS FOR DONNING
The following inspection points must be
checked before donning the respirator. A respirator that fails the inspection must not be
used. The respirator must be repaired or
replaced.
1. Head Harness: Check to see that the head
harness straps still have their elasticity.
Inspect for breaks or tears and make sure all
adjusters are in place and working properly.
2. Facepiece: Check facepiece for dirt, cracks,
tears or holes. Inspect the shape of the
facepiece for possible distortion that may
occur from improper storage and make
sure the rubber is flexible, not stiff. Also
check for cracks.
3. Inhalation and exhalation valves: Check for
cracks, tears, distortion, dirt or build-up of
material between valve and valve seat.
4. Cartridge connectors: Check to make sure
connectors are in place and check for
cracks and damage.
5. Cartridges and filters: Make sure cartridges
and filters are clean. Never try to clean a
cartridge or filter by washing it or using
compressed air. Inspect cartridges for
scratches, cracks or other damage, particularly the sealing bead around the bottom.
Note
A nosecup accessory is available to reduce
lens fogging. If the respirator will be used in
areas of high humidity, or at temperatures
below 32°F, the nosecup accessory may be
installed. See page 5.
Do not wear conventional eyeglasses with a
full facepiece. The temple bars pass through
the sealing surface of a full facepiece and prevent a seal. Use the spectacle kit from MSA.
Failure to follow this precaution may result in
serious personal injury or death.
Attaching Filter Cartridges
Carefully attach filter cartridges to facepiece
connectors by first aligning the cutouts on the
cartridges with the lugs on the facepiece connectors and then turning the cartridge clockwise by hand until tight. Align the small lug on
the connector with the match-mark located on
the cartridge body. (See Replacing Cartridges.)
4
TAL 8901 (L) Rev. 1 - 818365
818365.qxd
11/3/98 10:44 AM
Page 5
REPLACING FILTERS/CARTRIDGES
NEGATIVE PRESSURE METHOD
The following conditions indicate that the cartridges have served their useful life and must
be replaced:
Chemical Cartridges: Odor or taste of gases or
vapors; eye, nose, or throat irritation.
Filter Cartridges/Snap-On Filters: Excessive
breathing resistance when inhaling or when
time use limitation has been reached.
Combination Cartridges: Either of the above
conditions. Brown color on end-of-service life
indicator (Mersorb® Cartridges only).
POSITIVE PRESSURE METHOD
TEST FOR TIGHTNESS
Test for Tightness Before Each Use By One of
the Following Methods:
• Negative Pressure Method — Place your
palms over cartridges lightly. Gently inhale
so that the facepiece collapses slightly and
hold breath for ten seconds. The facepiece
will remain collapsed while the breath is
held, unless there is a leak in the seal.
• Positive Pressure Method — Place your palm
over exhalation valve cover lightly. Gently
exhale so that a slight positive pressure
builds up inside the respirator and hold
breath for ten seconds. The positive pressure
will remain while the breath is held, unless
there is a leak in the seal. If any leakage is
detected around the facial seal, readjust
head harness straps and repeat test until
there is no leakage. If other than facial seal
leakage is detected, the condition must be
investigated and corrected before another
test is made. The respirator must pass one of
the above tightness tests before the respirator is used. The respirator will not furnish
protection unless all inhaled air is drawn
through suitable cartridges.
To replace cartridges:
1. Remove the expended cartridges and dispose of properly.
2. Remove the replacement cartridges from
storage bags.
3. Place cartridges on
connectors carefully.
Line up match-mark on cartridge with small
lug on connector (on facepiece).Make sure
cartridge connector lugs align with the cartridge opening. Push down and tighten cartridge clockwise until the stops are
engaged. To ensure a good seal against the
facepiece, tighten each cartridge by gripping as much of the circumference of the
cartridge as possible and then slowly turning the cartridge until tight.
CLEANING AND DISINFECTING
If the facepiece is to be cleaned, remove the
cartridges. The facepiece (with the cartridges
removed) should be cleaned and disinfected
after every use with Cleaner-Disinfectant
Liquid from MSA (P/N 697284).
1. Prepare a solution of Cleaner-Disinfectant
Liquid and water, following the instructions
on the Cleaner-Disinfectant container.
Do not enter any atmosphere with this respirator unless you know that:
1. You have read, understood and followed
all instructions and warnings pertaining to
the respirator.
2. The respirator and conditions meet the
requirements outlined.
3. The cartridges are the proper type for the
contaminant or contaminants present.
4. The amount of oxygen is sufficient to support life (that is, at least 19.5 percent oxygen by volume at sea level). Do not use if
oxygen concentration sufficient to support
life is questionable.
5. Respirator does not leak (see test for tightness).
6. Cartridges do not need to be replaced.
Discard exhausted cartridges.
7. You are not color blind and can distinguish
between the beginning and ending colors
of the end-of-service-life indicator (when
using Mersorb-P100 respirators only).
Failure to follow the above warnings can
result in serious personal injury or death.
TAL 8901 (L) Rev. 1 - 818365
2. Immerse soiled equipment in the solution
and scrub gently with a soft brush until
clean. Take care to clean the exhalation
valve in the facepiece and all other parts
that exhaled air contacts.
3. After the equipment has been immersed
for the time specified on the CleanerDisinfectant Solution container, rinse thoroughly in plain warm water (maximum
120°F) and then air-dry.
5
818365.qxd
11/3/98 10:45 AM
Page 6
Cleaning and disinfecting at or below 120°F
temperature will avoid possible overheating
and distortion of parts of the respirator assembly, which would necessitate replacement.
MAINTENANCE
This respirator must be kept in good condition
to function properly. When any respirator
shows evidence of excessive wear or damage,
it must be replaced immediately. Refer to the
Preparations for Donning section for proper
inspection of the respirator. This respirator,
when not in use, should be stored in a clean
dry location, such as its storage bag. Do not
distort rubber facepiece during storage.
Installing a Nosecup
The nosecup assembly is to be placed onto the
exhalation valve lugs inside the mask. The
larger hole surrounded by 3 smaller holes at
the bottom of the nose cup is to be used.
1. Push the exhalation valve/voicemitter area
out through the back portion (face seal
area) of the mask. Push until this portion of
the mask becomes inverted and the wings
of the exhalation valve are exposed and
can freely accept this nosecup.
2. Bend the intern mask sealing lip away from
the exhalation valve for easier installation.
3. Slide the larger lower nosecup hole over
one of the wings of the exhalation valve. A
mild soap solution can be used to aid in the
installation and alignment process.
TAL 8901 (L) Rev. 1
4. Stretch the nosecup over the other exhalation valve wing.
5. Orient the nosecup in the facepiece by
rotating it around the exhalation valve. Use
the respirator voicemitter and facepiece
intern lip for locating and aligning the
nosecup.
6. Return the facepiece to its original noninverted position. Inspect the intern lip
positioning of the facepiece to assure that
the nosecup is underneath the lip and in
the correct location. Now use the facepiece
in the normal instructed manner.
Installing an Outsert Lens
Remove the outsert lens from the packaging.
Place the two hook lugs at the top of the outsert lens over the top of the mask lens edge.
Center the outsert lens on
the mask. Next stretch the
elastic retainer band (located at the bottom of the outsert lens) over the voicemitter housing and seat it
under the voicemitter
retainer flange. The respirator can be used in the normal prescribed manner.
© MSA 1998
818365