1
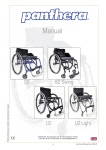
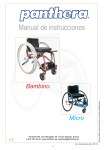
User Manual
Panthera AB reserves the right to make technical changes.
Bambino
Micro
Panthera AB, Gunnebogatan 26, SE-163 53 Spånga, Sweden
+46 8-761 50 40, www.panthera.se, [email protected]
art.nr.bruks-barn-eng Rev. 2011-01
1
CONTENTS
DESCRIPTION
Introduction
2
Contact
2
Description
3
Safety instructions
3-5
Overview
6
Settings
7-13
Accessories
13
Transport
14
Crash testing
15
Maintenance
16
Warranty
16
Technical facts
17-18
Panthera Bambino
We at Panthera manufacture active chairs that have been continuously acknowledged
over the years as the most free-rolling and easiest to manoeuvre chairs on the market.
Panthera Bambino is no exception. It is an everyday chair for children with excellent rolling
properties and it has the same superb qualities as its larger family members. Thanks to
our broad accessory line and the many
adjustment options, a very large group of different children can use Bambino. It is easy to
manoeuvre, easy to adjust and easy to lift. Panthera Bambino is simply a truly active chair
for children from about 4 to 12 years of age.
Panthera Micro
Panthera Micro is the chair for the youngest children. As we all know, being able to move
about independently is very important, and not the least for a child. Panthera Micro is therefore built to be as easy to manoeuvre as possible. Chrome molybdenum and titan form
the frame; the front wheel for marathon chairs is the drive wheel. Just as with many tennis
chairs, it has just one front wheel for easier rotation. Panthera Micro is made for children
between 1 and 5 years of age and intended for indoor use.
INTRODUCTION
We congratulate you on your choice of a wheelchair from Panthera AB and we hope you
will be satisfied with this product.
All products from Panthera AB are designed and assembled in Spånga, outside of
Stockholm. They are built to be market leading when it comes to quality, ease of manoeuvrability and low weight.
SAFETY INSTRUCTIONS
Make sure you have received the chair you ordered:
- Check the chair width.
- Check the backrest height.
- Check that you have received the accessories you ordered.
Intended use
CONTACT
If you have any questions or need help with your product, first contact your local
supplier (assistance centre). To contact the manufacturer, see the information below:
Panthera AB
Gunnebovägen 26
SE-163 53 Spånga, Sweden
+46 8-761 50 40, www.panthera.se, [email protected]
Panthera AB reserves the right to make technical changes.
We strongly recommend that you carefully read the entire user manual.
Conduct a technical inspection of the chair. Check that:
Panthera AB reserves the right to make technical changes.
Panthera Bambino and Micro are wheelchairs built for children who need an easily manoeuvred, everyday wheelchair that permits them to sit comfortably and ergonomically. The
chassis has narrow outer dimensions and is the lightest currently available on the market.
For optimal use of the Panthera wheelchair, you or a qualified professional must make the
necessary adjustments so that the child sits comfortably, and so that the chair is easy to
manoeuvre and is properly balanced. It is therefore important that you read the instructions for making adjustments to your Panthera.
- The drive wheels move smoothly in and out of their nut pieces.
- The drive wheels are properly secured after assembly.
- The button for the quick release lock in the hub springs out entirely.
- All wheels are in contact with the floor.
- The fork for the caster is easy to turn.
- The backrest is easy to fold down. Only Bambino.
Balance and tip sensitivity
The placement of the drive wheels, the backrest angle and the backrest upholstery's adjustment have the greatest effect on the wheelchair's sensitivity to tipping. After adjustment
of the chair, check that the chair's balance feels right. Tip sensitivity is also influenced by
whether a bag is hanging on the backrest, the child is leaning/reaching back, the tyres are
worn, the tyres are poorly inflated or whether an unanticipated change to the surface is
encountered.
art.nr.bruks-barn-eng Rev. 2011-01
2
art.nr.bruks-barn-eng Rev. 2011-01
3
SAFETY INSTRUCTIONS
SAFETY INSTRUCTIONS
WARNING:
Micro
A Panthera chair is designed to be as easily manoeuvred as possible. Because the chair
is so easily manoeuvred, it reacts quickly and easily to the user's actions. If the user performs the wrong action it can tip backwards for example, if no anti-tip devices are fitted.
It is fully possible to tip the chair. The anti-tip devices are safety components designed
to prevent the chair from tipping backwards and are not intended for constant operation.
If the user manoeuvres the chair in such a manner that the anti-tip devices are frequently
used, they must be checked daily. If the wheelchair is equipped with electrically powered
drive wheels, the load on the anti-tip devices can significantly increase and they should
then be checked daily.
Intended for indoor use
The reason for the chair only being suitable for indoor use is that it has just one front
wheel (to make it easier to turn). This entails a risk for the chair tipping forwards at an
angle if it is moving rapidly and encounters an obstacle or dip. This can also happen indoors but is much less common.
Most small children need a belt to prevent them from losing balance and falling out of the
chair. A basic belt is supplied with the chair. If this is not sufficient, the child must not use
the chair until the prescriber has obtained one that provides satisfactory protection.
It is important that the child has been able to properly try out the chair and takes the time
to practice his or her wheelchair technique. If you have any questions concerning wheelchair technique, contact your prescriber/therapist. Please feel free to contact us at Panthera AB as well.
Bambino
Brakes Bambino
If using our high brakes, care must be taken to not catch the fingers when operating with
the drive wheels. If the high brakes are used and the child will be moving laterally to or
from the chair, it is important that he or she clears the braking mechanism so as to avoid
fastening in it. Keep in mind that the brakes are less effective when the tyres are poorly
inflated or worn. Because tyre sizes can vary, always check the brakes after changing the
tyre type.
The brakes are designed as parking brakes and not as service brakes.
NB: For the brakes to function, the tyres must be correctly inflated. See the technical information.
Moving/lifting (Figure 1)
Due to the chair's low weight, it can shift laterally when the child moves to the chair from
the side and the brakes are applied. If you are uncertain, have the child practice this move
with your prescriber. If the wheelchair is to be lifted along with the child, always grip the
wheelchair's frame – not the backrest, push bar, leg support, wheels or other moving
parts. See Figure 1
Seat adjustment
Because spoke guards make the chair more difficult to manoeuvre, they are not standard.
But if the child is with other children, there is a risk of fingers or hands being caught between the spokes, and spoke guards can thus be necessary.
Manoeuvring Bambino
If the distance between the foot plate's lowest part and the underlying surface is less than
40 mm, the foot plate can catch on surface projections and cause falls forwards. If the
child is being pushed or moving independently down over a kerb with the anti-tip devices
extended, they can catch on the kerb edge and cause a fall forwards. If you are uncertain,
retract the anti-tip devices and ask for help.
Panthera AB reserves the right to make technical changes.
Other children can hurt themselves on the wheels.
Panthera AB reserves the right to make technical changes.
Incorrect seat adjustment can cause pressure sores. If uncertain, immediately contact your
prescriber. Ensure that the side guards do not press too hard against the thighs as this
can cause pressure sores. If the side guards are applying too much pressure, the chair is
either too narrow or the side guards require adjustment. The seat is intended for use with
a cushion.
Figure 1
art.nr.bruks-barn-eng Rev. 2011-01
4
art.nr.bruks-barn-eng Rev. 2011-01
5
OVERVIEW - Bambino (Figure 2)
ADJUSTMENTS
When adjusting the seat to the child's posture and balancing the chair (necessary for attaining the desired manoeuvring properties), it is important that you do this in the correct
order. You must adjust the seat before adjusting the balance. This is because the chair's
balance shifts when you adjust the seat.
Keep in mind that the little extra time spent on correctly adjusting the chair will be well
worth the effort. Try different settings over the course of a day to ensure that you have
correctly adjusted the seat and balanced the chair. Make the adjustments in the following
order:
1. Backrest
2. Drive wheel
3. Seat/cushion
4. Chassis
5. Foot plate
6. Caster
7. Front fork
8. Push rim
9. Anti-tip device
10. Rear axle
11. Quick release hub
12. Air valve
13. Backrest release
14. Brakes
1) Seat upholstery
2) Foot plate
3) Backrest and upholstery
4) Wheelchair balancing
5) Positioning of brakes Bambino
6) Anti-tip device Bambino
Figure 2
OVERVIEW - Micro (Figure 3)
1. Backrest
2. Drive wheel - tyre
3. Seat/cushion
4. Chassis
5. Foot plate
6. Front fork
7. Caster
8. Rear axle
9. Anti-tip device
10. Quick release hub
11. Air valve
1) Seat upholstery depth (Figures 4 and 5)
Figure 3
Panthera AB reserves the right to make technical changes.
Panthera AB reserves the right to make technical changes.
By moving the seat extension forwards and backwards, you can adjust the seat depth.
Loosen the front part of the seat by pulling backwards (the seat is secured with a Velcro
fastener). Adjust the seat depth and secure with the Velcro fastener.
Bambino
Micro
Figure 4
Figure 5
art.nr.bruks-barn-eng Rev. 2011-01
6
art.nr.bruks-barn-eng Rev. 2011-01
7
ADJUSTMENTS
ADJUSTMENTS
1) Seat upholstery tension Micro Bambino (Figures 6 and 7)
3) Backrest Bambino (Figures 10, 11 and 12)
The tension of the rear half of the seat upholstery can be adjusted by tightening or releasing the Velcro strap at the bottom of the seat; Figures 5 and 6. This enables you to vary
the seat height by about 2 cm, upwards or downwards.
Backrest height (Figure 10)
First loosen the bolts on both sides; see Figure 9. Next release the backrest upholstery
from the tensioning straps. You can now adjust the backrest to a suitable height by moving
the backrest columns upwards or downwards. Once you have found a suitable height, retighten the bolts. Remove the unattached strap if the backrest is adjusted to a low position.
2) Foot plate Micro (Figure 8)
Vertically: You can adjust the foot plate upwards or downwards by changing holes on the
bracket. Remove the screws that secure the foot plate. You can now move the foot plate
upwards or downwards to one of the vertical positions. The foot plate must be at a height
that provides support for the undersides of the thighs against the seat at the same time as
the feet are supported by the foot plate.
Horizontally: The foot plate can be turned so that the plate is backwards or forwards.
Remove the two screws that secure the foot plate. Turn the plate and retighten the screws.
Backrest angle (Figures 11 and 12)
1) Release the backrest locking function by pulling the cable (4) – see Figure 10 – and
folding the backrest forwards.
2) Loosen the lock nuts (2) with a 13-mm spanner, and screw in the adjustment screws (3)
using a 5-mm Allen key.
3) Loosen the bolts (5) and (6) – see Figure 11 – with a 10-mm spanner.
4) Fold back the backrest so that the locking pin (7) springs out.
5) Adjust the desired angle by moving the entire backrest forwards or backwards.
6) Tighten the bolts (5) and (6) with a 10-mm spanner.
7) Use the adjustment screws (3) to eliminate play using a 5-mm Allen key so that both
of the adjustment screws are even with the frame. Tighten the lock nuts (2) with a 13-mm
spanner.
8) Check that the locking pins spring out in their locking slots when the backrest is folded
back.
Foot plate Bambino (Figure 9)
Figure 9
Figure 8
Panthera AB reserves the right to make technical changes.
Figure 7
Figure 6
Panthera AB reserves the right to make technical changes.
Vertically: Loosen the screws (1) – see Figure 8 – and adjust the plate upwards or
downwards. Tighten the screws again. If the feet need to be further down, you can turn the
bracket for the foot plate so that it is straight down. Horizontally: Loosen the screws (2)
and fully open the hinge clamp, and then carefully lift the foot plate forwards or backwards.
Angle: Before you tighten the screws (2), set the desired angle. Fully tighten the screws.
Figure 10
Figure 11
Figure 12
art.nr.bruks-barn-eng Rev. 2011-01
8
art.nr.bruks-barn-eng Rev. 2011-01
9
ADJUSTMENTS
ADJUSTMENTS
3) Backrest Bambino (Figures 13)
4) Wheelchair balancing
Backrest upholstery tension: This is adjusted by tightening or loosening the straps
with Velcro fasteners at the rear of the backrest. The backrest upholstery also has a tab
that fastens under the seat upholstery with a Velcro strap. You can move this forwards or
backwards to attain suitable tension for the backrest upholstery's lower section (called the
seat bucket).
By changing these adjustments, you can form the backrest upholstery to the shape of
the child's back so that there is suitable support for the lower back. Begin by releasing the
strap and then seat the child as far back as possible in the chair. Tension the strap so that
good support is attained. If it seems that the child is not sufficiently far back in the chair,
this can be because the backrest upholstery's lower tab is attached too far forward under
the cushion upholstery. Release it and move it backwards.
Bambino (Figure 15)
Adjust the balance of the wheelchair by moving the drive wheels (rear axle) forwards or
backwards. The further forward you position the drive wheels, the more the chair will be
balanced to the rear. This causes the chair to be light at the front and there will be more
weight over the drive wheels. The chair will be easier to manoeuvre and also easier to lift
by the back wheels when passing over curbs, thresholds, etc. However, the chair must not
be overly balanced to the rear because there is then the risk of it tipping backwards.
It is important that you take the time to properly test until you have found a balance that
suits the child's body and manoeuvring technique so that the chair is as easy to manoeuvre as possible without excessive risk for tipping. After making adjustments to the chair
balance, someone should always be behind the chair when testing. If you are still uncertain of whether the chair is correctly balanced after thorough testing, you should use our
anti-tip device. The anti-tip device makes it impossible to tip backwards and is easy to
remove when it is no longer needed.
Backrest Micro (Figure 14)
Move the drive wheels as shown; see Figure 15:
Backrest upholstery tension
The backrest upholstery can be tensioned or released by tensioning or releasing the
Velcro straps at the rear of the backrest; see Figure 14. The backrest upholstery has a
tab that fastens under the seat upholstery with a Velcro strap. You can move this forwards
or backwards to attain suitable tension on the backrest upholstery's lower section (called
the seat bucket). By making these adjustments, you can form the backrest upholstery to
the shape of the child's back so that there is suitable support for the lower back. Begin by
releasing the strap and then seat the child as far back as possible in the chair. Tension the
strap so that good support is attained. If it seems that the child is not sufficiently far back
in the chair, this can be because the backrest upholstery's lower tab is attached too far
forward under the cushion upholstery. Release it and move it backwards.
2. Loosen the nuts (1) with a 15-mm spanner on both sides of the chair.
3. The rear axle can now be moved forwards and backwards along the longitudinal frame
tube. It is important that the wheel brackets are the same distance forwards on both sides.
This is easiest to check by measuring the distance as shown in Figure 14 with a measuring tape or ruler, and checking that the distance is the same on both sides.
Panthera AB reserves the right to make technical changes.
4. Now tighten the nuts (1) so that the rear axle is securely attached.
Panthera AB reserves the right to make technical changes.
Figure 14
Figure 13
1. First remove the drive wheels.
Figure 15
art.nr.bruks-barn-eng Rev. 2011-01
10
art.nr.bruks-barn-eng Rev. 2011-01
11
ADJUSTMENTS
ADJUSTMENTS
4) Wheelchair balancing
4) Positioning of the brakes Bambino (Figure 17)
Micro (Figure 16)
The brakes must be adjusted so that in the locked position, they press about 3-4 mm into
the tyres. Adjust by loosening the brake clamping bolt with a 10-mm spanner and a 4-mm
Allen key, after which you can move the brakes forwards or backwards along the frame's
seat tubes. Try different positions until the brakes are correctly adjusted and then retighten
the clamping bolt. NB: The braking force will change if the air pressure is too low, the tyres
worn or when changing to another tyre type. You should therefore regularly check the
position of the brakes.
Adjust the balance of the wheelchair by moving the drive wheels (rear axle) forwards or
backwards; see Figure 16. The further forward you position the drive wheels, the more the
chair will be balanced to the rear. This causes the chair to be light to the front and there
will be more weight over the drive wheels. The chair will be easier to manoeuvre and also
be easier to lift by the back wheels when passing over thresholds, etc. The chair must not
however, be excessively balanced to the rear as this can create a feeling of insecurity. It is
therefore important that you take the time to properly test until you have found a balance
that suits the child's body and manoeuvring technique, so that it is as easy to manoeuvre
as possible.
4) Anti-tip device Bambino (Figure 18)
With the anti-tip device lowered, adjust the ground clearance by placing the wheel tube in
one of the four positions shown in Figure 18. The anti-tip device can be folded away under
the frame when not needed. Do this be pressing down the anti-tip device and then turning
it under the seat. When you later fold out the anti-tip device, make sure that it is secured
in the locking slots. When the child is learning back wheel manoeuvring, the anti-tip device
should be set at a height that permits the chair to be balanced.
To move the drive wheels:
1. First remove the drive wheels.
2. Loosen the bolts at the bottom of the rear axle bracket on both sides of the chair; see
Figure 16.
3. The wheel bracket can now be moved forwards and backwards along the longitudinal
frame tube. It is important that the wheel brackets are the same distance forwards on both
sides. This is easiest to check by measuring the distance between the horizontal frame
tube's front edge and the wheel bracket's rear edge with a measuring tape or ruler, and
checking that the distance is the same on both sides; see Figure 16.
4. Now tighten the bolts so that the rear axle is securely attached.
Figure 16
Panthera AB reserves the right to make technical changes.
Panthera AB reserves the right to make technical changes.
Keep in mind that the little extra time spent on correctly adjusting the chair will be well
worth the effort. Try different settings over the course of a day to ensure that you have correctly adjusted the seat and balanced the chair. After about one month, make a new check
to see that everything is functioning as it should.
Figure 18
Figure 17
art.nr.bruks-barn-eng Rev. 2011-01
12
art.nr.bruks-barn-eng Rev. 2011-01
13
TRANSPORTATION
CRASH TESTING
Securing the wheelchair in a vehicle Bambino (Figure 19 and 20)
Crash-tested and approved Bambino
The wheelchair must always be turned to the vehicle’s direction of travel when the user is
sitting in the chair while underway. The wheelchair must always be secured in the vehicle
with a 4-point safety belt system. The belts are tensioned at the front edge around the
tubes at the bearing sleeves for the link wheels. See Figure 19. At the rear, the belts are
secured around the rear axle. NB: Do not use metal hooks directly against the rear axle.
See Figure 20. Pull the wheelchair backwards and pull hard on the rear belts so that the
wheelchair is stationary and moves neither forwards nor backwards. Once the chair is
properly secured, set the brakes if the chair is equipped with brakes. We also recommend
folding out the anti-tip device if the chair is so equipped. Make sure that all belts and buckles are properly tensioned in the rail on the floor and that all are pulled tight.
Panthera's Bambino wheelchair has been approved for use during transport in vehicles
operated by services for transport of the disabled as follows. We provide instructions for
how the chair is to be secured in an approved manner and which materials have been
used during testing. The following wheelchair models and materials were used upon
approval according to the tests below.
This documentation is based on the results obtained when Panthera's wheelchairs were
crash-tested according to ISO-7176-19:2001 and ISO-10542:2000. The crash test was
conducted by: SP Technical Research Institute of Sweden Test dates: 20 February 2003
and 12 November 2008.
Panthera Bambino:
Attachment equipment: Unwin belt, 4-point with snap hook
User seat belt:
Unwin 3-point seat belt, high deflector
Fastening:
Unwin low profile rail
Test dummy:
Hybrid III dummy (weight 50 kg)
During this crash test we collaborated with Unwin, which manufactures attachment equipment for wheelchairs. For more information about the belts, please contact Unwin.
Figure 20
Figure 19
Securing the user Bambino (Figures 21 and 22)
Wheelchair configuration during crash testing
Figure 22
Panthera AB reserves the right to make technical changes.
Figure 21
The wheel chair that we have crash-tested had the following configuration during testing:
Panthera AB reserves the right to make technical changes.
If the child will remain in the wheelchair while travelling, we recommend that the
wheelchair's backrest be even with or above the child’s shoulder blades. The child must be
restrained in the vehicle with a 3-point safety belt. This is to minimise the risk of injury to
the head and/or rib cage in the event of a collision or hard braking. The vehicle's safety
belt must be against the body and may not be held away from the body by any part
of the wheelchair. See Figures 21 and 22. Any unattached wheelchair parts must be
removed to reduce the risk of injury to the child or other passengers.
Panthera Bambino:
Chassis Bambino complete, width 30
Backrest Bambino complete, width 30
Foot plate Bambino, width 30
Drive wheel std. 22-inch with titan push rim
High brakes, moved forwards
Push bar complete, width 30
Neck cushion Bambino, width 30
Anti-tip device
Side guard Bambino 22-inch
Cushion Bambino, width 30, 2.5 cm
Deviations from the results may occur if the chairs have a different configuration. The
height of the chair's backrest significantly affects the results.
art.nr.bruks-barn-eng Rev. 2011-01
14
art.nr.bruks-barn-eng Rev. 2011-01
15
TECHNICAL FACTS
MAINTENANCE
Your Panthera is constructed to be virtually maintenance-free. A few parts however, require regular inspection. (Obviously you must clean and check the chair more often if you
use it in more extreme environments, such as in sand and salt water.)
Bambino
Seat width (cm)
Once monthly you must:
24
27
30
33
Overall dimensions
- Wipe the chair's chassis with automotive or dishwashing detergent and a damp cloth. In
the event of heavy soiling, a degreasing agent may be used. Lubricate all moving parts
with 5-56, universal oil after cleaning.
- Clean around the front wheel bracket in the fork (between the wheel and fork). It is here
that hair, dust, etc. often collect, which can damage the bearings. Loosen the nut with a
10-mm spanner and hold the bolt in place with another 10-mm spanner. Tighten the bolt
and remove the wheel. Clean the spacers fitted between the wheel and fork, and wipe the
outside of the wheel bearings with a rag. Squirt a drop of oil into each bearing. Now reassemble the parts.
Height
57.5-65
57.5-65
57.5-65
57.5-65
4°
4°
4°
4°
Height, rear
39
39
39
39
Height, front
41
41
41
41
18-25
23-30
23-30
23-30
7.7°-12°
7.7°-12°
7.7°-12°
7.7°-12°
Backrest angle,
forwards-backwards
Backrest height
17-25 or 27-35
Transport dimensions
Width
29.5
32.5
Panthera AB reserves the right to make technical changes.
Panthera AB reserves the right to make technical changes.
- Lubricate moving brake parts with a few drops of oil. Bambino
38.5
Length
60
60
60
60
Height
32
32
32
32
Total (g) *
8120
8348
8576
8804
Transport
4894
5140
5368
5596
User weight (kg)
50
50
50
50
Air pressure in tyres
(bar)
8
8
8
8
*Weights are with brakes fitted.
art.nr.bruks-barn-eng Rev. 2011-01
16
35.5
Weight
Twice yearly you must:
Warranty: We provide a 5-year factory warranty for the chassis. Other parts, 12 months
with the exception of wear parts.
51
65 - 71.5
Depth
- Check the chair for damage. If damage has occurred, immediately contact us at Panthera AB.
Service life: This is determined by how hard the chair is used and how careful one is with
maintenance.
51
65 - 71.5
Backrest
- Check all screws, bolts and nuts and tighten as necessary.
WARRANTY and SERVICE LIFE
48
65 - 71.5
Angle
- Inflate the tyres by removing the cap from the valve and inflating using a suitable valve
adapter. The tyres should be inflated to a pressure of 8 bar (kg).
- Wash the seat upholstery, backrest upholstery and cushion cover in a washing machine
at 40 degrees as necessary.
45
65 - 71.5
Seat
- Lubricate the axle for the drive wheels. Remove the wheels and spread a few drops of
oil on the axle. If the wheelchair is used in rain, sand, salt and slush or the wheels seldom
removed, you should do this more often.
- Lubricate the bushing at the backrest joint. Loosen the nut with a 10-mm spanner and
hold the bolt in place with another 10-mm spanner. Lubricate the bushing with a few drops
of oil. Bambino
Width
Length
art.nr.bruks-barn-eng Rev. 2011-01
17
NOTES
TECHNICAL FACTS
Micro
Seat width (cm)
24
27
24 long
27 long
Overall dimensions
Width
46
49
46
49
Length
62
62
72.5
72.5
Height
51.5
51.5
54
54
0°
0°
0°
0°
Seat
Angle
Height, rear
31
31
31
31
Height, front
31
31
31
31
15-20
15-20
20-25
20-25
Backrest angle,
forwards-backwards
0°
0°
0°
0°
Backrest height
22
22
22
22
31
34
31
34
Depth
Backrest
Transport dimensions
Width
Length
62
62
72.5
72.5
Height
50
50
52
52
Total (g) *
3518
3564
3782
3828
Transport
2342
2388
2474
2520
User weight (kg)
30
30
30
30
Air pressure in tyres
(bar)
8
8
8
8
Panthera AB reserves the right to make technical changes.
*Weights are with brakes fitted.
Panthera AB reserves the right to make technical changes.
Weight
art.nr.bruks-barn-eng Rev. 2011-01
18
art.nr.bruks-barn-eng Rev. 2011-01
19
art.nr.bruks-barn-eng Rev. 2011-01
20
Panthera AB reserves the right to make technical changes.
Panthera AB, Gunnebogatan 26, SE-163 53 Spånga, Sweden
+46 8-761 50 40, www.panthera.se, [email protected]