1
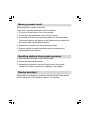
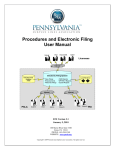
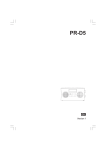
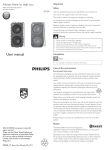
IImportant Safety Instructions
1. Read these instructions.
2. Keep these instructions.
3. Heed all warnings
4. Follow all instructions
5. Do not use this apparatus near water.
6. Clean only with dry cloth.
7. Do not block any ventilation openings. Install in accordance with
the instructions.
8. Do not install near any heat sources such as radiators,
heat registers, stoves or other apparatus ( including amplifiers )
that produce heat.
9. Do not defect the safety purpose of the polarized or
grounding-type plug. A polarized plug has two blades with one
wider than the other. A grounding type plug has two blades and
a third grounding prong. The wide blade or the third prong are
provided for your safety. If the provided plug does not fit into
your outlet, consult an electrician for replacement of the obsolete
outlet – USA version only.
1
10. Protect the power cord from being walked on or pinched
particularly at plug, convenience receptacles, and the point
where they exit from the apparatus.
11. Only use attachments/accessories specified by the
manufacturer.
12. Use only with the cart, stand, tripod, bracket, or table specified
by the manufacturer, or sold with the apparatus. When a cart is
used, use caution when moving the cart/apparatus combination
to avoid injury from tip-over.
13. Unplug this apparatus during lightning storms or when unused
for long periods of time.
14. Refer all servicing to qualified service personnel. Servicing is
required when the apparatus has been damaged in any way,
such as power-supply cord or plug is damaged, liquid has been
spilled or objects have fallen into the apparatus, the apparatus
has been exposed to rain or moisture, does not operate
normally, or has been dropped.
15. To reduce the risk of fire or electric shock, Do not expose this
appliance to Rain or Moisture.
16. The Shock Hazard Marking and Associated Graphical Symbol
is provided on the bottom panel of unit.
GB
17. Apparatus shall not be exposed to dripping or splashing and no
objects filled with liquids, shall be placed on the apparatus.
18. For outdoors use, to avoid electric shock, use battery only
during a raining day or the weather is wet.
2
3
Controls
1
2
3
4
5
6
7
8
9
10
Volume Control
Tuning Control
FM antenna
LCD display
Power On/Off
Band Selection
Preset Station
Speaker
Battery Compartment
AC power cord storage
LCD Display
A
B
C
D
Band Indicator
Frequency
Preset Stations
Low Battery Indicator
GB
4
Power the radio
1. Battery operation
Installing the batteries, first turn battery cover fixture anti-clockwise
to loosen and pull down the battery cover. Insert 4 x C size (UM-2)
battery into the compartment. Ensure the battery is inserted in
accordance with the diagram shown.
Close the battery cover and fasten the fixture by turning clockwise.
If the radio is not to be used for any extended period of time, it is
recommended that the battery is removed from the radio.
5
2. AC operation
Before you plug the AC power cord into the AC socket, be sure
the voltage is correct. If you have batteries in the radio and use the
AC power cord, the batteries will automatically be disconnected.
AC power storage is designed to store the cord when the radio is
not in use.
3. Operating the radio
This radio is equipped with two tuning methods – Manual tuning and
Memory presets recall.
Manual Tuning
1. Press the Power button to turn on the radio.
2. Select the required waveband by pressing the Band button.
3. Be sure to screw in the rubber FM antenna properly to get
best reception. For AM ( MW ) band, rotate the radio to get
best signal.
4. Rotate the Tuning Control knob will change the frequency in the
following increments
FM: 50 or 100 kHz
MW ( AM ): 9 or 10 kHz
5. Rotate the Volume Control knob to get required sound level.
6. To turn off the radio, press the Power button. Display will
show OFF.
GB
6
Memory presets recall
Storing stations in preset memories
There are 5 memory presets for each waveband.
1. Press the Power button to turn on the radio.
2. Tune to the required station using Tuning Control.
3. Press and hold down the required preset until the radio beeps.
The preset number will appear in the display and the station will
be stored under chosen preset button.
4. Repeat this procedure for the remaining presets.
5. Stations stored in preset memories can be overwritten by
following above procedures.
Recalling stations from preset memories
1. Press the Power button to turn on the radio.
2. Select the required waveband.
3. Momentarily press the required Preset button, the preset
number and station frequency will appear in the display.
Display backlight
When radio is switched on, press any button except Power button
will illuminate the LCD display for approx. 15 seconds.
7
Setting tuning step
Tuning steps on some countries are different from where you
purchase the radio. If you buy the radio in Europe and intend to
use in Northern America or some Latin American countries,
you may have to adjust tuning step so the radio may continue to
serve you well.
While radio is switched off, long press the Band button for approx.
7 seconds until display flashes current FM tuning step 50 ( kHz ).
Rotate the Tuning Control, you may adjust to 100 ( kHz ).
Press Band button again to confirm the setting.
After FM tuning step is reset, pressing Band button again,
display will show AM and flash 9 ( kHz ). Rotate the Tuning Control,
you may adjust to 10 ( kHz ). Press Band button again to confirm
the setting.
Clear the preset stations
Whenever is necessary, you can clear all the preset stations.
When radio is off, press Preset button 1 and Band at the same time
for more than 2 seconds to clear all the preset stations. Radio will
be reset to original factory set status.
GB
8
Specifications
Frequency Coverage:
FM 87.50 – 108 MHz
AM ( MW ) 520 – 1710 kHz ( 10 kHz )
522 – 1629 kHz ( 9 kHz )
AC Power:
AC 120V/60Hz/10W (USA )
AC 230V/50Hz/10W (Europe )
Batteries: 4 x UM-2 ( C Size )
Output Power:
2 Watt 10% T.H.D. @ 100 Hz @ DC battery 6V
5 Watt 10% T.H.D. @ 100 Hz @ AC 230V or 110V
9
10