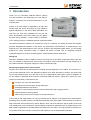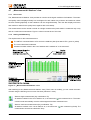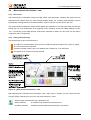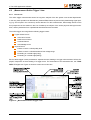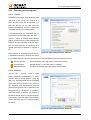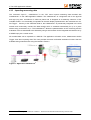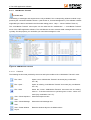
1
User Manual CAN-BUS Tester 2 GEMAC - Gesellschaft für Mikroelektronikanwendung Chemnitz mbH Zwickauer Straße 227 09116 Chemnitz Germany Phone: Fax: E-mail: Web: +49 371 3377 - 0 +49 371 3377 - 272 [email protected] www.gemac-chemnitz.de User Manual CAN-BUS Tester 2 Version: 1.8 Date: 2011-05-20 GEMAC - Gesellschaft für Mikroelektronikanwendung Chemnitz mbH Zwickauer Straße 227 09116 Chemnitz Germany Phone: Fax: E-mail: Web: +49 371 3377 - 0 +49 371 3377 - 272 [email protected] www.gemac-chemnitz.de Revision Overview Revision Overview Date Revision Change(s) 2007-06-12 0 First version 2007-07-02 1 Various changes and error correction 2007-09-17 2 CAN monitor description added 2007-11-12 3 Changes in “Ordering Information” and “Scope of Supply” 2008-01-15 4 Changes in “Ordering Information” and “Scope of Supply” 2009-05-28 5 Description of SAE J1939 and extended software amended 2010-01-25 6 Changes to new CI, new Function in Online Trigger 2010-06-07 7 Various changes and error correction 2011-05-20 8 CAN monitor description extended, License management added © Copyright 2011 GEMAC – Gesellschaft für Mikroelektronikanwendung Chemnitz mbH Subject to change without prior notice. Our policy is one of continuous improvement, and consequently the equipment may vary slightly from the description and specifications in this publication. The specifications, illustrations and descriptions provided in this documentation are not binding in detail. No part of this publication may be reproduced in any form, or by any means, without the prior written permis sion of GEMAC mbH. All rights according to copyright law expressly reserved to GEMAC mbH. Note: To use the CAN-Bus Tester 2, and for proper understanding of this manual, general knowledge of the field bus systems CAN, CANopen, DeviceNet and/or SAE J1939 are required. IV Document: 22510-HB-1-8-E-CAN-Bus Tester 2 Table of Contents Table of Content 1 Introduction.................................................................................................................................................. 1 2 Start-up........................................................................................................................................................ 3 2.1 Receiving inspection and testing.......................................................................................................... 3 2.2 Acclimatizing the device....................................................................................................................... 3 2.3 Connecting the device.......................................................................................................................... 3 2.3.1 Design.......................................................................................................................................... 3 2.3.2 Power supply............................................................................................................................... 4 2.3.3 CAN bus connection.................................................................................................................... 4 2.3.4 Connecting to the digital storage oscilloscope.............................................................................4 2.3.5 Connecting the device to the PC.................................................................................................. 4 2.4 Prevention of accidents........................................................................................................................ 4 3 Functions and Measuring Principle.............................................................................................................. 5 3.1 The most important measuring functions............................................................................................. 5 3.2 Measuring the physical bus characteristics.......................................................................................... 5 3.2.1 Disturbance-free voltage range.................................................................................................... 5 3.2.2 Edge steepness........................................................................................................................... 6 3.2.3 General quality level..................................................................................................................... 6 3.2.4 Oscilloscope display with frame analysis.....................................................................................7 3.3 Online monitoring functions.................................................................................................................. 7 3.3.1 Bus status.................................................................................................................................... 7 3.3.2 Bus traffic load............................................................................................................................. 8 3.3.3 Error frames................................................................................................................................. 8 4 The CBT2 Application Software................................................................................................................... 9 4.1 System requirements........................................................................................................................... 9 4.2 Installing the software.......................................................................................................................... 9 4.3 General notes on operation................................................................................................................ 10 4.3.1 Help........................................................................................................................................... 10 4.3.2 Data saving................................................................................................................................ 10 4.4 Program structure.............................................................................................................................. 10 4.4.1 Menu bar.................................................................................................................................... 10 4.4.2 Toolbar....................................................................................................................................... 11 4.4.3 Message bar.............................................................................................................................. 12 4.4.3.1 Bus status.......................................................................................................................... 12 4.4.3.2 Error frame counter............................................................................................................ 13 4.4.3.3 Bus traffic load................................................................................................................... 13 4.4.3.4 CAN supply voltage............................................................................................................ 13 4.4.4 Status bar.................................................................................................................................. 14 4.5 Selecting the bus system (CAN / CANopen / DeviceNet / SAE J1939)..............................................15 4.6 „Configure segment“ view.................................................................................................................. 16 4.6.1 Segment.................................................................................................................................... 16 Document: 22510-HB-1-8-E-CAN-Bus Tester 2 V Table of Contents 4.6.2 Wiring test.................................................................................................................................. 16 4.6.3 Baud rate scan........................................................................................................................... 17 4.6.4 Station scan............................................................................................................................... 17 4.6.5 Recording the online monitoring.................................................................................................17 4.6.6 Evaluation.................................................................................................................................. 18 4.6.7 List of stations............................................................................................................................ 18 4.6.8 List of Measurements................................................................................................................. 18 4.7 „Measurement All Stations“ view........................................................................................................ 20 4.7.1 How to use................................................................................................................................. 20 4.7.2 Setting and Measuring............................................................................................................... 20 4.7.3 Evaluation.................................................................................................................................. 21 4.8 „Measurement One Station“ view....................................................................................................... 22 4.8.1 How to use................................................................................................................................. 22 4.8.2 Setting and measuring............................................................................................................... 22 4.8.3 Evaluation.................................................................................................................................. 23 4.9 „Measurement Online Trigger“ view................................................................................................... 25 4.9.1 How to use................................................................................................................................. 25 4.9.2 Setting and measuring............................................................................................................... 26 4.9.3 Evaluation.................................................................................................................................. 26 4.10 Working with measurements............................................................................................................ 28 4.10.1 Measuring at different points.................................................................................................... 28 4.10.2 Measuring at different times..................................................................................................... 28 4.11 Printing a test record........................................................................................................................ 29 4.12 Exporting measuring data................................................................................................................ 30 4.12.1 CSV file.................................................................................................................................... 30 4.12.2 Graphics.................................................................................................................................. 30 4.13 Importing measuring data................................................................................................................ 31 4.14 Settings............................................................................................................................................ 32 4.14.1 General.................................................................................................................................... 32 4.14.2 Tester contact data................................................................................................................... 32 4.14.3 E-mail notification..................................................................................................................... 32 4.15 CAN Monitor.................................................................................................................................... 34 4.15.1 CAN Monitor Transmit.............................................................................................................. 35 4.15.1.1 Functions......................................................................................................................... 35 4.15.1.2 View „Messages“............................................................................................................. 36 4.15.1.3 View “Sequences”............................................................................................................ 37 4.15.2 CAN Monitor Receive............................................................................................................... 38 4.15.2.1 Functions......................................................................................................................... 39 4.15.2.2 Filter................................................................................................................................. 39 4.15.2.3 Trigger.............................................................................................................................. 40 5 The „CAN-Bus Tester 2 Scan“ Program..................................................................................................... 41 6 License Management................................................................................................................................. 42 VI Document: 22510-HB-1-8-E-CAN-Bus Tester 2 Table of Contents 7 Technical Specifications............................................................................................................................. 43 8 Scope of Supply......................................................................................................................................... 45 8.1 Scope of Supply - Basic Set............................................................................................................... 45 8.2 Content adapter sets.......................................................................................................................... 45 9 Maintenance and Customer Service.......................................................................................................... 46 9.1 Maintenance...................................................................................................................................... 46 9.2 Customer service............................................................................................................................... 46 9.2.1 Shipping..................................................................................................................................... 46 9.2.2 Support...................................................................................................................................... 46 9.2.3 Warranty and limitation of liability............................................................................................... 46 10 Ordering Information................................................................................................................................ 47 10.1 Spare parts...................................................................................................................................... 47 11 Problem Recovery.................................................................................................................................... 49 11.1 Problems with the CBT2 device setup.............................................................................................. 49 11.2 Problems when measuring............................................................................................................... 49 12 Notes....................................................................................................................................................... 51 Document: 22510-HB-1-8-E-CAN-Bus Tester 2 VII List of Tables List of Tables Table 1: Technical specifications................................................................................................................... 43 Table 2: Technical specifications (cont'd)...................................................................................................... 44 Table 3: Content adapter sets....................................................................................................................... 45 Table 4: Ordering information........................................................................................................................ 47 Table 5: Ordering information - Spare parts.................................................................................................. 48 VIII Document: 22510-HB-1-8-E-CAN-Bus Tester 2 List of Figures List of Figures Figure 1: Connections of the CBT2................................................................................................................. 3 Figure 2: Definition of disturbance-free voltage range, peak-to-peak voltage and signal level........................6 Figure 3: Structure of the CBT2 application software....................................................................................10 Figure 4: Toolbar........................................................................................................................................... 11 Figure 5: Message bar.................................................................................................................................. 12 Figure 6: Status bar...................................................................................................................................... 14 Figure 7: Bus system selection..................................................................................................................... 15 Figure 8: „Configure segment“ view.............................................................................................................. 16 Figure 9: Wiring Test - Error.......................................................................................................................... 17 Figure 10: Wiring Test - Successful.............................................................................................................. 17 Figure 11: „Measurement All Stations“ view.................................................................................................. 20 Figure 12: „Measurement One Station“ view................................................................................................. 22 Figure 13: „Measurement Online Trigger“ view............................................................................................. 25 Figure 14: Test record settings...................................................................................................................... 29 Figure 15: Export measurement - CSV file.................................................................................................... 30 Figure 16: Export measurement - Graphics.................................................................................................. 30 Figure 17: Application CANobserver®........................................................................................................... 31 Figure 18: CAN Monitor Transmit.................................................................................................................. 35 Figure 19: CAN Monitor Receive; “Scroll” mode........................................................................................... 38 Figure 20: CAN Monitor Receive; “Overwrite” mode.....................................................................................38 Figure 21: CAN Monitor Receive: Filter options............................................................................................ 40 Figure 22: CAN Monitor Receive: Trigger options......................................................................................... 40 Figure 23: CAN-Bus Tester 2 Scan............................................................................................................... 41 Figure 24: License management in information dialog..................................................................................42 Document: 22510-HB-1-8-E-CAN-Bus Tester 2 IX Terms, Definitions and Abbreviations Used in this Manual Terms, Definitions and Abbreviations Baud rate Data transfer rate (1 baud = 1 bit/s) Evaluation period 44/64 (68%) of the bit width around the bit center, within which the disturb ance-free voltage range is measured Differential voltage The voltage between the two signal lines CAN_H and CAN_L UD = UCAN_H - UCAN_L Disturbance-free The term 'disturbance-free voltage range' is used for a voltage range of the differ voltage range ential voltage for a selected station over a frame, whose value does not fall below the nominal value over the evaluation period, not even for a short time. DSO Digital storage oscilloscope Error frames Active and passive error frames Firmware Software for a microprocessor FPGA Field Programmable Gate Array – programmable logic array for real-time functions Segment CAN bus segment terminated on both line ends using a resistor. A repeater inser ted between line ends or connected to a line end also constitutes a segment ter mination. X Document: 22510-HB-1-8-E-CAN-Bus Tester 2 1 Introduction 1 Introduction Thank you for purchasing CAN-Bus Tester 2 (CBT2)! You have acquired a tool supporting you in the start-up, analysis, monitoring and servicing/maintenance of your CAN bus plant. Thanks to its wide range of applications, its high data transfer rate and above all through its high tolerance against interference in the field of plant automation, the CAN bus has been well established for the last few years. Nonetheless, even when starting up new plants, but also during operation, a large number of problems occur, resulting quickly in undesired and often expensive failures. The CBT2 possesses a USB port for connection to a PC or a notebook. The clearly structured PC software provides straightforward operation of the device, the performance and evaluation of measurements, and supports you in the determination of error sources. Thanks to the integrated update option, you are already prepared for future extensions today. In addition the device is fitted with an integrated anti-theft system(Kensington Lock) which enables longterm measurements without supervision. Wiring test During the installation phase of CAN bus plants, the wiring test of the CBT2 is especially useful. With this test, it is possible to determine line short-circuits, line breaks, the bus termination, the loop resistances of the CAN line and the CAN power supply line, and the overall line length. Measuring the physical bus characteristics Analysis of the physical bus characteristics is another principal application of the CBT2. The causes for er rors are often assumed to lie in the application software of the plant. Experience, however, has shown that most of the problems which occur are due to the use of inappropriate cable types, improper installation of the bus cables or disturbed driver functions at individual CAN bus stations. Typical error causes for a dis turbed communication on the CAN bus are: missing or too many bus terminations too long bus lines and/or spurs, wrong cable types predamaged/defective bus drivers excessive contact resistances at the connectors/terminals due to aging/corrosion transient breaks on moving cables cable routing in environments subject to strong interference Frames with a bad signal quality can only by detected via an analysis of the physical bus characteristics, permitting errors and their causes to be detected specifically. Early and regular checks already from start-up help locate fault sources before they lead to failures. Such checks increase the signal quality, the bus will work reliably and is more resistant to electromagnetic interference. Measurements at regular intervals are able to detect a gradual loss of quality before this leads to an error frame. Through preventive maintenance, it is possible to save the time and cost which would arise due to an unexpected plant standstill. Document: 22510-HB-1-8-E-CAN-Bus Tester 2 1 1 Introduction The CAN-Bus Tester 2 will help you efficiently in checking your CAN bus system and in finding faults and their causes. To this end, it provides the following scope of functions: Bus systems: CAN, CANopen, DeviceNet and SAE J1939 Automatic detection of the baud rate used Automatic determination of all stations in the plant Bus station and measuring-point-related display of the signal conditions: general quality level (0 ... 100 %) disturbance-free voltage range rising and falling edges oscilloscope display with frame analysis for the complete message frame Real-time monitoring of physical and logical errors (online logger) Continuous monitoring of bus status, bus traffic load, error frames (active/passive errors) Real-time-capable hardware trigger output for user- or error-related analysis by way of ext. DSO Simple possibilities for comparisons with older measurements Detailed test report CAN monitor The integrated CAN monitor offers transmit and receive functions. The receive function is used to monitor and record either all or specially selected message frames. The transmit function enables a self-generated message frame to be sent. In this way, it is possible to parametrize CAN devices, for example. 2 Document: 22510-HB-1-8-E-CAN-Bus Tester 2 2 Start-up 2 Start-up 2.1 Receiving inspection and testing Carefully unpack the device immediately after receipt and check the consignment. If transport damage is to be assumed, inform the delivery agent within 72 hours and keep the packaging for inspection. The device must only be transported in its original or equivalent packaging. Check the completeness of the consignment against Chapter 8 "Scope of Supply". 2.2 Acclimatizing the device Before turning on the device, make sure that the device is at the same temperature as the room temperat ure. This will take max. 60 minutes. 2.3 Connecting the device 2.3.1 Design Figure 1 shows all connections of the CBT2. The power supply is provided by the supplied AC/DC adapter (24 V) via an extra-low voltage socket. The internal contact is the plus pole. The "ON" LED lights green when the operating voltage is present. Figure 1: Connections of the CBT2 The upper D-Sub 9 connector serves for connection to the plant CAN bus. The adapter board can be plugged at the lower D-Sub 9 connector and the CAN_L and CAN_H signal lines can be sampled for evalu ation on a digital storage oscilloscope (DSO). A station-related trigger signal is available at the BNC socket. It can be connected to a DSO via the supplied BNC cable. The connection to the PC or notebook is provided using a USB cable. During operation, the "BUS STATUS" LED indicates whether there is data traffic on the CAN bus. The colors correspond to those of the bus status LED in the application software (see Section 4.4.3.1 : "Bus status"). Document: 22510-HB-1-8-E-CAN-Bus Tester 2 3 2 Start-up The triggering of a trigger pulse at the BNC socket is signaled by the "TRIGGER" LED lighting green. A red "TRIGGER" LED indicates that an error has been detected during the "Online Trigger“ measurement (see Section 4.9 : "„Measurement Online Trigger“ view"). 2.3.2 Power supply The desk power supply pack included in the scope of supply possesses a wide-range input for connection to mains voltages from 100 V to 240 V 50/60 Hz; it provides a d.c. voltage of 24 V. The CBT2 is ready for oper ation when the extra-low-voltage connector is plugged into the CBT2, the mains power cable into the power supply pack and the mains power plug into the mains power socket outlet. The "ON" LED on the device lights green. The "wings" of the extra-low-voltage connector must stand horizontally to be plugged into the CBT2. A 90° turn in the clockwise direction locks the plug in position. The CBT2 can also be operated on a supply voltage which may be available optionally on the CAN cable, provided this voltage lies in the range from 9 V to 36 V. The "ON" LED on the device then lights yellow. If a mains power connection has been established, this mains power connection will be used for the power sup ply. 2.3.3 CAN bus connection The plant to be tested is connected at the upper D-Sub 9 connector "CAN" on the CBT2 via an adapter cable. Various adapter cables are available and are included in the scope of delivery. The device can there fore immediately be connected to plants with the following bus connectors: D-Sub 9, Open style, M12, 7/8“, SAE J1939-11 and SAE J1939-13. 2.3.4 Connecting to the digital storage oscilloscope To display the signal quality of individual CAN bus stations on a DSO, the CBT2 generates a station-related trigger pulse. To this end, it is merely necessary to connect the BNC socket of the device to the external trig ger input of the oscilloscope. The adapter board included in the scope of delivery is connected at the lower D-Sub 9 connector "PROBE ADAPTER", enabling simple sampling of the signals on the data lines CAN_H and CAN_L and of the shield potential with the oscilloscope probes. For the sampling of the CAN signal, a differential sample is recommended (signal line CAN_H against CAN_L). If two simple probes are used (CH1 with CAN_H against shield and CH2 with CAN_L against shield), the storage oscilloscope must provide mathematics functions to be able to generate the difference (CH1 minus CH2). 2.3.5 Connecting the device to the PC The CBT2 is connected to a PC or notebook via the "hot-pluggable" USB port. Before you connect the device to a PC or notebook, install the supplied software, since it includes the necessary USB driver (see Section 4.2 "Installing the software"). 2.4 Prevention of accidents When operating this test device, it is imperative to observe the general accident prevention regulations for the use of measuring instruments. The device must only be used in dry rooms. 4 Document: 22510-HB-1-8-E-CAN-Bus Tester 2 3 Functions and Measuring Principle 3 Functions and Measuring Principle 3.1 The most important measuring functions The CBT2 can measure and display the signal conditions of each CAN bus station. Any problems with the appropriate station or with the bus cabling can be inferred from the results of the signal quality. The CBT2 displays the following physical properties for each CAN bus station separately: General quality level (0 ... 100 %) Disturbance-free voltage range (minimum, interference-free differential voltage) Edge steepness (worst rising and falling edges of the message frame) Oscilloscope display with frame analysis for the complete message frame In addition to the physical measurements, the CBT2 provides online monitoring functions, i.e. the entire bus traffic is monitored and checked continuously. This includes monitoring of the bus traffic load and a counter for error frames (active and passive error frames). The individual measuring functions are described in detail in the following subsections. 3.2 Measuring the physical bus characteristics The CAN bus uses a difference signal, i.e. the actual data signal is transferred via two lines inverted to each other (CAN_H and CAN_L). The difference between these two lines generates the signal digitized by each CAN bus transceiver. Any faults occurring there can endanger the correct detection of the bit stream. The CBT2 provides an evaluation of the difference signal in the form of a general quality value, the disturb ance-free voltage range and the edge steepness, as well as using the oscilloscope display. All these meas urements are determined within a message frame. Contrary to the quality level providing a general evaluation of the signal quality for the bus, the determination of the disturbance-free voltage range and of the edges, as well as the oscilloscope display are useful aids for targeted troubleshooting. 3.2.1 Disturbance-free voltage range The disturbance-free voltage range is understood as the disturbance-free range of the differential voltage, which is determined over a certain part of each bit 1 of the message frames of the station to be measured. This part is called evaluation period. Each bit is sampled 64 times. The disturbance-free voltage range is evaluated over 44/64 of the bit width (68% of the evaluation period). At the beginning and the end of each bit, 10/64 each of the bit width are ex cluded from the determination of the disturbance-free voltage range (see Figure 2). Signal overshoot and settling processes are excluded from the interference voltage measurement, if they lie outside the evalu ation period. A voltage drop of less than 1/64 of the bit time during the evaluation period cannot be detected reliably any more and in this case also has no influence on the determination of the disturbance-free voltage range.1 1 During the arbitration phase (start bit + ID + RTR), as well as during the acknowledge phase, there is no evaluation of the physical properties of the message frame, as several bus stations could be driving the signal during these phases. Document: 22510-HB-1-8-E-CAN-Bus Tester 2 5 3 Functions and Measuring Principle Figure 2: Definition of disturbance-free voltage range, peak-to-peak voltage and signal level 3.2.2 Edge steepness To evaluate the transmission properties of the bus cabling and of the individual CAN bus stations com pletely, in addition to the disturbance-free voltage range, the edges must also be studied; shallow edges can also prevent the correct decoding of the transmission signal. The CBT2 determines the edge steepness for rising and falling edges separately. To this end, two thresholds are set at 10% and 90% of the signal level determined (determined differential voltage at 42/64 = 2/3 = 66%, see Figure 2). The time required by the difference signal to change between these voltage threshold values is measured both for falling and rising edges. The rise and fall times are determined with a resolution of 1/64 of the baud rate used and displayed as a value between 0/64 and 64/64. This value al ways specifies the slowest rising and falling edge of the measured frame. A measured value of 0/64 means that the level change takes place in less than 1/64 of the bit width. 3.2.3 General quality level The quality level is a generally valid expression of the signal quality on the bus. It represents the most im portant physical properties of the bus and summarizes these in a single value. The quality level is specified as a percentage value. The value range is 0...100%. The value is determined from the following three components important for the signal quality: Edge steepness The edge steepness is measured as x/64. A steepness of 0/64 represents an ideal edge steepness 6 Document: 22510-HB-1-8-E-CAN-Bus Tester 2 3 Functions and Measuring Principle and is valued as 100%. The worst flank is defined as 32/64 and equates to 0%. Edge steepness [%] = 32− x ⋅100 % 32 x=0 ...32 Disturbance-free voltage range A disturbance-free voltage range of 1.0 V is defined as 0% – a value of 2.2 V as 100%. Disturbance− free voltage range[% ] = U disturb −1.0V ⋅100 % 2.2 V −1.0 V U disturb =1.0V ... 2.2 V Reflection Reflection is the relationship of the disturbance-free voltage range to the peak-to-peak voltage. If the peak-to-peak voltage is identical to the disturbance-free voltage range, this is the ideal case and represents 100%. If the peak-to-peak voltage is twice the value of the disturbance-free voltage range, this is defined as 0%.. Reflection[%] = 2 − U SS ⋅100 % U disturb U SS /U disturb =0.0V ... 3.0 V All three components contribute equally to the calculation of the quality level. Quality level [% ] = 3.2.4 Edge steepness [% ] Dist.− free voltage range[% ] Reflecions[%] 3 3 3 Oscilloscope display with frame analysis To evaluate signal transitions and for the measuring of reflections, the CBT2 records the signal waveform of the message frame and presents it in the oscilloscope display of the CBT2 application software. Sampling is performed at 64 times the set baud rate over a total of 160 bits (64 x 160 = 10,240 points). The trigger point for the recording always lies on the first edge of the relevant message frame with an advance of 10 bits. The trigger point can be set in the application software. 3.3 Online monitoring functions The online monitoring functions are always active, independent of any measurements started in the individu al views. 3.3.1 Bus status The bus status provides a quick overview of the status of your CAN bus plant. A cyclic measurement over one second indicates whether or not data traffic (level change) is present and whether or not the CBT2 is connected correctly to the bus. If the plant is stopped (no data traffic), the idle level of the bus is measured and evaluated. If this value lies in an impermissible range, this will be indicated. Conclusions regarding er rors in the bus cabling can be drawn from the value of this difference voltage. A precise description of the in dividual states is to be found in Section 4.4.3.1 „Bus status“. Document: 22510-HB-1-8-E-CAN-Bus Tester 2 7 3 Functions and Measuring Principle 3.3.2 Bus traffic load Not only configuration problems, but also diagnostic and alarm messages, as well as poor transmission properties and the resulting sporadic frame repetitions can extend the bus traffic load. Problems of this kind can be avoided by measuring the bus traffic load at regular intervals and saving the measured minimum and maximum values. To ensure that this measurement functions correctly, the baud rate of the CAN bus segment must merely be set via the CBT2 application software and the CBT2 connected to the plant. The device then determines the bus traffic load cyclically over durations of one second each. 3.3.3 Error frames Error frames belong to the error management functionality implemented in the data link layer in all CAN con trollers. They permit detection of the following error types: Bit errors Bit stuffing errors CRC errors Format errors Acknowledgment errors Each error which is detected by the error management is notified to all other bus stations by way of an er ror frame. This is achieved with a deliberate coding violation. All CAN controllers then discard this telegram destroyed by the error-frame and the sending CAN controller repeats this message again. The counter for error frames - like the bus traffic load, is a real-time monitoring function. The background to this measurement is a protocol check of all frames transferred on the bus. If an active or passive er ror frame is detected, the corresponding counter is incremented. As a rule, the count of this display should always show "0". If sporadic, or even frequent errors occur, this is generally attributable to problems with the physical bus characteristics and the corresponding transmission problems. The error frame counters of the CBT2 count up to a maximum of 1,000,000. The counters will only work correctly, however, if the correct baud rate has been set for the CAN bus segments via the CBT2 application software. If this is not the case, the frame detection will not function correctly. Subsequently, data traffic of any kind on the bus may lead to incrementing of the error frame counter. 8 Document: 22510-HB-1-8-E-CAN-Bus Tester 2 4 The CBT2 Application Software 4 The CBT2 Application Software 4.1 System requirements To ensure the correct installation of the CBT2 application software, your PC or notebook should meet the following minimum requirements and possess one of the operating systems listed below: Hardware: Processor: 1,2 GHz or higher at least 256 MB RAM Graphics card with 24-bit color depth (32-bit recommended) Resolution: 1,024x768 pixels or higher CD/DVD ROM drive free USB port Supported operating systems:2: Microsoft Windows® XP Microsoft Windows® Server 2003 Microsoft Windows® Vista (32 Bit and 64 Bit) Microsoft Windows® 7 (32 Bit and 64 Bit) 4.2 Installing the software The PC software is available in German and English and is supplied on CD. The installation sets up the CBT2 application software on your system and installs the USB driver required by the device. To this end, perform the following steps: 1. Insert the CD into the appropriate drive of your PC. 2. The installation starts automatically3. 3. Follow the instructions of the setup program. Note: To install the USB driver, you must possess administrator rights. 2 Microsoft and Windows® are registered trade marks of Microsoft Corporation in the USA and in other countries. 3 If the installation does not start automatically, start the setup program either with "START" → "Run..." → "{drive letter of your CD drive}:\Setup.exe" → "OK" or else directly with "{drive letter of your CD drive}:Setup.exe“ If you do not possess administrator rights, you will be asked to enter the administrator password. Document: 22510-HB-1-8-E-CAN-Bus Tester 2 9 4 The CBT2 Application Software 4.3 General notes on operation 4.3.1 Help When designing the CBT2 application software, special attention was devoted to a clear structure and a self-explaining graphical user interface. All elements of the user interface display detailed explanations when the mouse pointer is moved over a control element ("tool tip"). The manual is also supplied in electronic form and can be called up both via the help function and with the F1 key. 4.3.2 Data saving All measurement, protocol and export data set using the CBT2 application software and determined via the CBT2 device at the CAN bus plant, can be stored in a document with the file extension ".cbt2". The docu ment can be opened either by double-clicking on the file in the Windows ® Explorer or by dragging the file to the program (drag & drop). 4.4 Program structure The graphical user interface of the CBT2 application software is divided into various areas (Figure 3). Figure 3: Structure of the CBT2 application software 4.4.1 Menu bar The menu bar contains the main menus "File", "Measure", "View", "CAN Monitor", "Tools" and "Help". Use the "File" menu to open, save, export and print CBT2 documents. The "Measure" menu provides the func tions required to control measuring processes ("Start" and "Stop"). Use the "View" menu to switch between 10 Document: 22510-HB-1-8-E-CAN-Bus Tester 2 4 The CBT2 Application Software the individual measuring views. The menu function "CAN Monitor" starts the log function for transmitted and received CAN messages. The settings dialog can be found in the "Tools" menu; it can be used to configure the CBT2 application software and the CBT2 itself. The last menu item "Help" comprises the electronic manual, as well as program and device information. 4.4.2 Toolbar For user-friendly operation and switching between the measuring tasks, a toolbar has been implemented in the CBT2 application software; this can be found in the upper part of the program window (Fehler: Referenz nicht gefunden). The toolbar provides quick access to the most important menu functions. Figure 4: Toolbar Opens a new document (key combination: Ctrl + N) Opens an existing CBT2 document (key combination: Ctrl + O) Saves the active CBT2 document either with its current name or - if the document has not been given a name - with a new name (key combination: Ctrl + S) Shows how the active document will appear when printed (Print Preview) Prints the active document (key combination: Ctrl + P) Switches to the "Configure segment" view (key combination: Alt + 1) Switches to the "Measure All Stations" view (key combination: Alt + 2) Switches to the "Measure One Station" view (key combination: Alt + 3) Switches to the "Measure Online Trigger" view (key combination: Alt + 4) Starts a single measurement (key combination: F5) Starts a continuous measurement (key combination: F6) Green: Ends the measuring process after completion of a single measurement (key combination: F7) Document: 22510-HB-1-8-E-CAN-Bus Tester 2 11 4 The CBT2 Application Software Red: Ends the measuring process immediately (key combination: F8) Opens a dialog box where you can select the CAN-Bus Tester 2 to be used (if more than one CAN-Bus Tester 2 is connected to your PC) Opens the electronic manual. Make sure that a PDF display program is installed on your system, such as Adobe® Reader® (key: F1). Displays program and device information and can be used to update the CBT2 firmware and FPGA configuration. Changes the design of the graphical user interface. 4.4.3 Message bar The message bar can be found directly beneath the toolbar and is always visible. It informs you continuously on the current status of the bus and on continuously running monitoring functions. Figure 5 provides a screen-shot of the message bar and its elements. Figure 5: Message bar 4.4.3.1 Bus status The bus status display comprises multicolor LED graphics and a description text. The LED changes its color depending on the bus status. For a detailed description of the bus status measurement, please refer to Sec tion 3.3.1 „Bus status“. The following states can occur: LED = gray: CAN-Bus Tester 2 not connected to power supply and/or PC, or differential voltage in impermissible range 0.5 V ... 0.9 V. LED = yellow: Bus static (no level change detected on the bus within the measuring time of one second); difference voltage less than 0.5 V, bus idle) LED = red: Bus static (no level change detected on the bus within the measuring time of one second); difference voltage greater than 0.9 V) LED = green: Level change detected on the bus 12 Document: 22510-HB-1-8-E-CAN-Bus Tester 2 4 The CBT2 Application Software 4.4.3.2 Error frame counter The error frame counter is an online bus monitor. The CBT2 detects all active or passive error frames oc curring on the connected CAN bus (for a detailed description of error frames, see Section 3.3.3 "Error frames"). The maximum count for error frames is 1,000,000. If this number is exceeded, ">1,000,000" is dis played. A double-click of the mouse on the display will reset this value to zero for both counters. The display of the error frames can be changed from maximum count to per second display by clicking with the right button of the mouse. Another right click of the mouse resets the display to maximum count. The related tool tip displays the values of both display options. The values of the error frame counters can be recorded in a CBT2 document, like all other measurement data. The recording can be started or stopped by clicking with the left mouse button on the error frame icon or by activating the option "Record online monitoring" in the "Configure Segment" view. Any changing of the error frame counters from the time of activation is thus saved in the document and can later be displayed and printed in the test report. The "REC" icon indicates whether the recording is currently running not or . It should be taken into account that the error frame counters are reset automatically after each change or after execution of the automatic baud rate detection. For correct frame detection and thus error analysis, it is imperative that the baud rate is set correctly; otherwise, traffic of any kind on the bus may be detected as an error. 4.4.3.3 Bus traffic load The determination of the bus traffic load - like the error frame counters - constitutes an online bus monitor ing function. As already described in detail in Section 3.3.2 "Bus traffic load", the bus traffic load is meas ured and updated constantly at intervals of one second. The data of the bus traffic load display can also be recorded in a CBT2 document. Clicking with the left mouse button on the bus traffic load icon or activating the "Record bus traffic load" option in the "Config ure Segment" view will start recording of the measurement data. The "REC" icon indicates whether the re cording is currently running or not . It should be taken into account that - as for the error frame counters - changing the baud rate and execution of the automatic baud rate detection results in a reset of the bus traffic load. For correct displaying of the bus traffic load, the baud rate must be set correctly. 4.4.3.4 CAN supply voltage The supply voltage which is present optionally in the case of CAN/CANopen/SAE J1939 or always in the case of DeviceNet is measured and displayed cyclically. Document: 22510-HB-1-8-E-CAN-Bus Tester 2 13 4 The CBT2 Application Software 4.4.4 Status bar The status bar can be found at the bottom of the CBT2 application software window (Figure 6). Figure 6: Status bar When you navigate through the menus with the mouse pointer or the direction keys , the left area of the status bar describes the functions of the entries in the menu. This area also displays appropriate descrip tions regarding the effects of the buttons on the toolbar if you move the mouse pointer over the buttons. The right-hand area contains the trigger status icon, provides information regarding the CAN -Bus Tester 2 connected, and keyboard information. The trigger icon is always lit when a trigger pulse was initiated at the hardware trigger output. If a CAN-Bus Tester 2 is connected and is in use, its serial number is displayed. 14 Document: 22510-HB-1-8-E-CAN-Bus Tester 2 4 The CBT2 Application Software 4.5 Selecting the bus system (CAN / CANopen / DeviceNet / SAE J1939) During a measurement, the CBT2 must detect message frames of the CAN bus station concerned, in order to be able to evaluate its physical bus signal. The assignment of the transmitted signal to a station is de termined by the ID contained in each CAN bus message frame. With the settings CANopen, DeviceNet and SAE J1939, the Node ID, MAC ID or Source address is decoded from the CAN ID of the message frame and used for assignment of the station. As soon as this ID or Source address is detected, and if it is identical to that of the station to be measured, the frame concerned is physically measured. Only the frames trans mitted from the stations to measure will be consulted for the evaluation of the bus physics and for the user scan – RTR frames will be ignored. The bus system is selected by creating a new document us ing the menu “File” → „New..." of the CBT2 application soft ware (Figure 7 refers). License note: All bus systems will be displayed if no device is connected – once the CAN-Bus Tester 2 is connected only the bus sys tems supported by the device will be displayed (see Section 6 „License Management“). Only those can be measured by the connected device. The bus systems supported by the device are listed in the information dialog (menu: “Help“→ “About CAN-Bus Tester 2"). It is possible to evaluate docu Figure 7: Bus system selection Document: 22510-HB-1-8-E-CAN-Bus Tester 2 ments with bus systems not supported by the tester. 15 4 The CBT2 Application Software 4.6 „Configure segment“ view The „Configure segment“ view is displayed directly after starting the CBT2 application software. Here you can enter the basic settings for measuring. Figure 8 shows a screen-shot. 4.6.1 Segment If your CAN bus plant comprises several segments (bus segments separated by a repeater), you can op tionally enter a name for the segment (max. 30 characters) in the field "Designation" for differentiation. The data transfer rate you wish to use for the CAN bus segment to be measured can be set under " Baud rate". You can also use the "Baud rate scan" function to let the CBT2 determine the baud rate automatically. If no message frame from the relevant station is detected within the time set under "Timeout", this time must be increased. Figure 8: „Configure segment“ view 4.6.2 Wiring test With the wiring test, it is possible to determine line short-circuits, line breaks, the bus termination, the loop resistances of the CAN line and the CAN power supply line, and the overall line length. To ensure correct bus cabling, it is recommended to perform the wiring test at the beginning of any plant measurements. The requirements for this measurement are: CBT2 operated on the supplied power pack (not via the plant CAN bus) CBT2 connected to the PC and to the plant CAN bus 16 Document: 22510-HB-1-8-E-CAN-Bus Tester 2 4 The CBT2 Application Software All bus stations removed / no bus traffic (bus status LED = yellow) CAN supply voltage display: approx. 0.0 V Figure 9: Wiring Test - Error Figure 10: Wiring Test - Successful The wiring test is performed as a sequence of four steps. The test requires certain interactions from the user, such as activation/deactivation of the terminators and connecting of a shorting plug. A wizard guides the user through the process. 4.6.3 Baud rate scan The CBT2 can determine the baud rate for a segment automatically provided that the CAN bus plant is func tioning correctly (data traffic present, bus status LED = green). Click on "Baud rate scan"; a dialog box is opened, displaying the baud rate detected. This can be confirmed and accepted by clicking on the "OK" but ton. Note: If the baud rate is changed, the error frame counter and the bus status display are reset. The CAN monitor is deactivated. 4.6.4 Station scan The Station scan determines automatically, depending on the bus system selected (CAN type), all transmit ting stations or IDs transmitted on the bus and enters them in the List of stations. 4.6.5 Recording the online monitoring The measured values "Error frames" and "Bus traffic load" displayed in the message bar can be recorded if necessary and also saved in the CBT2 document. To start recording, click with the left mouse button either on the option or on the appropriate icon in the message bar. The current measurement values are dis played in the text fields. While the recording is running, the icon is displayed in the message bar. When using the recording functions, please note that the stored values will be lost after stopping and re starting the recording process and are then overwritten by the new values. For this reason, when opening a CBT2 document, the recording is at first always deactivated. If the error frame counters or the bus traffic load are reset when recording (double-click on "Error frames" or "Bus traffic load" in the status bar), this will also have an effect on the recording values; they will be reset. The recording functions can be used independently of any other measurements performed on the CBT2. Document: 22510-HB-1-8-E-CAN-Bus Tester 2 17 4 The CBT2 Application Software 4.6.6 Evaluation When evaluating the measurement data, you are assisted by the CBT2 application software, which is able to provide for automatic evaluation of the results. This function is activated/deactivated via "Automatic eval uation". For the evaluation, the following limit values must be set and will be stored in the current document: Critical quality level (30 ... 90%; critical measured value if not reached) Critical disturbance-free voltage range (1.0 ... 3.0 V; critical measured value if not reached) Critical rising edge (recessive - dominant) (1/64 ... 48/64, critical measured value if exceeded) Critical falling edge (dominant - recessive) (1/64 ... 48/64, critical measured value if exceeded) When the evaluation function is activated, the measured values are evaluated against the set critical limit values and - if necessary - highlighted. If any stations cannot be measured or if a timeout occurs, this in formation is also logged and displayed. The set values serve as the thresholds for the online trigger measurement, irrespective of whether automat ic evaluation is activated or deactivated. 4.6.7 List of stations The List of stations contains all CAN bus stations determined using the Station scan function. Each station can be assigned a customized designation, and various settings can be made. Subject to the selected bus system (CAN type), the following columns are provided for the stations along side the designation. CAN : ID type (standard / extended), CAN-ID (0x000...0x7FF / 0x00000000...0x1FFFFFFF) CANopen : Node ID (1...127) DeviceNet : MAC ID (0...63) SAE J1939 : Source address (0...253) The checkbox to the left of each station designation displays whether or not the appropriate station is in cluded in the measurements ( = „to be measured“) or ( = „not to be measured“). To switch, either click with the mouse on the relevant icon, or use the context-sensitive menu (right mouse button) or the keyboard (spacebar). To rename a station, either click on the "Rename" button, double-click on the cell, use the context-sensitive menu or the keyboard (F2 key). The other parameters in the list can be changed in the same way. To detect any faulty adaptation on the bus more easily, it is recommended to arrange the stations according to their physical order sequence on the bus. The order can be changed manually using the and buttons and or by drag & drop. Click on the column header for automatic sorting in ascending or descending or der of designation, ID type, CAN ID, Node ID, MAC ID or Source address. 4.6.8 List of Measurements The List of Measurements be used to manage different measurements. Each measurement possesses a symbol for the measurement type, a measuring point designation, a time stamp and, at the bottom edge of the list, an individual description. 18 Document: 22510-HB-1-8-E-CAN-Bus Tester 2 4 The CBT2 Application Software To rename a measuring point, either click on the "Rename" button, double-click on the cell, or use the con text-sensitive menu or the keyboard (F2 key). As with the List of stations, this list can also be sorted automatically in ascending or descending order by clicking on the corresponding column header. The default measurement is always placed at the top, irre spective of the sorting. The measurement data for the default measurement are not saved in the document. Document: 22510-HB-1-8-E-CAN-Bus Tester 2 19 4 The CBT2 Application Software 4.7 „Measurement All Stations“ view 4.7.1 How to use The „Measurement All Stations“ view provides an overview of the signal conditions of all stations. The meas ured quality value is displayed clearly in a bar diagram for each station. Any minimum and maximum values are also marked graphically so that variations can be recognized easily. This view also displays minimum and maximum values for the quality level, together with a time stamp. The measurement can be carried out both as a single measurement (each station is measured only once) and as a continuous measurement. Figure 11 shows a screen-shot of this view. 4.7.2 Setting and Measuring The requirements for this measurement are: The CBT2 is connected both to a PC and to the CAN bus plant (bus status LED = green or yellow) The correct baud rate is selected. At least one station exists in the List of stations and is marked as "to be measured". Figure 11: „Measurement All Stations“ view After switching to the „Measurement All Stations“ view ("View" menu or toolbar), you can control the meas urement using the following icons or menu functions ("Measure" menu): Starts a single measurement (key combination: F5) All stations marked in the List of stations as „to be measured ( ) are measured once. The meas urement ends automatically once the whole segment has been measured once. Starts a continuous measurement (key combination: F6) All stations marked in the List of stations as „to be measured“ ( ) are measured cyclically. The measurement can also be ended with "Stop“. 20 Document: 22510-HB-1-8-E-CAN-Bus Tester 2 4 The CBT2 Application Software End measurement (key: F7) The measurement is carried out up to the last station to be measured and then ended. Cancel measurement (key: F8) Clicking on this button ends the measurement immediately. While the measurement is running, an arrow symbol is displayed beneath the station currently being meas ured. If no message frame from the station concerned is detected within the set timeout time (see Section 4.6 „Configure segment“ view) this is indicated with "Timeout". In this case, check the status of the station in question or increase the timeout time. 4.7.3 Evaluation The measured stations are displayed in the diagram as a bar. If there are more than 32 stations, you can navigate using the scrollbar. Use the "View" option to view the measured data for the desired station and to display a summary for all stations. To select a station, highlight the appropriate bar in the diagram. Its desig nation and measured data are displayed in a separate table. The measurement data record of a station comprises the quality level and the minimum and maximum values of the last continuous measurement, to gether with the corresponding time stamps. With the automatic evaluation activated („Configure segment“ view), a red line highlighting the critical quality level is shown in the bar diagram. This bar is yellow if the minimum value of a station is below this limit. If the value is above the limit, the bar is displayed in green. In addition, it is possible to compare the current measurement with a previously recorded measurement. To do so, activate the "Compare with existing measurement" option and choose the relevant measurement. The corresponding measured values are then displayed to the left of the bar for the current measurement (see also Section 4.10 „Working with measurements“). Document: 22510-HB-1-8-E-CAN-Bus Tester 2 21 4 The CBT2 Application Software 4.8 „Measurement One Station“ view 4.8.1 How to use This measurement is intended to study one single station more specifically. It displays the quality level, the disturbance-free voltage range, the worst rising and falling edges, the complete signal waveform and the last detected message frame for the selected station. Figure 12 shows a screen-shot of this view. This measurement simplifies the station-related display and evaluation of the data sent along the CAN bus through the use of an oscilloscope, since triggering is only coupled to exactly one station address. Section 2.3.4 "Connecting to the digital storage oscilloscope" describes in detail, how the CBT2 can be used in conjunction with an oscilloscope. 4.8.2 Setting and measuring The requirements for this measurement are: The CBT2 is connected both to a PC and to the CAN bus plant (bus status LED = green or yellow) The correct baud rate is selected. At least one station exists in the List of stations and is marked as „to be measured“ The station to be measured must be selected Figure 12: „Measurement One Station“ view After switching to the „Measurement One Station“ view ("View" menu or toolbar), you can control the meas urement using the following icons or menu functions ("Measure" menu): Starts a single measurement (key combination: F5) 22 Station selected: The station to be measured is measured once. No station selected: All stations will be measured automatically in succession. Document: 22510-HB-1-8-E-CAN-Bus Tester 2 4 The CBT2 Application Software Starts a continuous measurement (key combination: F6) Station selected: The station to be measured is measured cyclically. No station selected: All stations will automatically be cyclically measured in succession. The measurement can also be ended with "Stop". Cancel measurement (key: F8) Clicking on this button ends the measurement immediately. Once a station is selected the current measurement data is displayed whilst the measurement is in pro gress. The current measurement data are displayed while the measurement is running. The CBT2 outputs a trigger pulse at its BNC socket whenever a message frame of the relevant station is detected (" TRIGGER" LED lights green). With this trigger signal, the transmitted frame can be displayed in true time on an oscillo scope, as described in Section 2.3.4 "Connecting to the digital storage oscilloscope". If no station is selected all stations listed will be measured in succession. A live display of the measurement data and the trigger output for the storage oscilloscope is not available. In this case, a dialog window in forms about the progress of the current measurement. If no message frame from the station concerned is detected within the set timeout time (see Section 4.6 „Configure segment“ view) this is indicated with "Timeout". In this case, check the status of the station or ex tend the timeout time (see Section 4.6 „Configure segment“ view). 4.8.3 Evaluation During and after the measurement of a station, this view displays the current, maximum and minimum measured valued for the quality level, together with the corresponding time stamps and the disturbance-free voltage range. The slowest rising and falling edges are displayed as multiples of 1/64 of the bit width. With automatic evaluation activated („Configure segment“ view), the instrument indicates the critical disturb ance-free voltage range by way of a red arrow. The relevant numerical value is displayed in yellow, symbol izing that the smallest measured disturbance-free voltage range lies below the set limit value. If the critical edge value is exceeded, the edge diagram is displayed in yellow. If the value is below the limit, the edge dia gram is displayed in green. The oscilloscope display can be switched between logical and physical representation both during and after the measurement of a station. The logical representation shows the analog signal of the measured frame to gether with an overlaid decoding of the CAN protocol. Use the "Zoom" function ("+" and "-" buttons) to en large or reduce the time section. To navigate within a zoomed-out section, use the scrollbar. The left mouse button can be used to change the trigger time of the frame (start bit). If CANopen is the selected bus system (CAN type), the Node ID is displayed when the mouse pointer is placed over the ID; for DeviceNet, the MAC ID and for SAE J1939 the Source address is displayed. The physical representation simplifies evaluation of any signal dips and reflections. From the height of the dip, it is possible to infer the changes in the characteristic wave resistance of the cable. The length and the position of the reflections indicate the distance to the point of interference. In this display, it is possible to draw up a range with the right mouse button, permitting simple calculation of the reflection heights and lengths, and thus of distances. The signal runtime is converted into a distance specification automatically. Document: 22510-HB-1-8-E-CAN-Bus Tester 2 23 4 The CBT2 Application Software For the calculations, a mean bus cable runtime constant of 4.5 ns/m is assumed for CAN/CANopen/SAE J1939 or 4.3 ns/m for DeviceNet. 24 Document: 22510-HB-1-8-E-CAN-Bus Tester 2 4 The CBT2 Application Software 4.9 „Measurement Online Trigger“ view 4.9.1 How to use The online trigger measurement serves for long-term analysis of the bus system over several days/weeks. In this way, both sporadic bus disturbances (external EMC influences) and a slowly deteriorating signal qual ity (e.g. due to liquid in the connector) can be detected. For this measurement, all message frames on the bus (irrespective of the stations in the List of stations) are subject of the online physical and logical evalu ation, and any deviations from a predefined threshold value are recorded. The online trigger can recognize the following trigger events: Logical events/ errors Active error frames Passive error frames Overload frames Acknowledge errors Physical errors Failure to reach a critical quality level Failure to reach a critical disturbance-free voltage range Exceeding of a critical edge (rising) Exceeding of a critical edge (falling) Each of these trigger events possesses a separate channel, leading to a trigger when activated. All are dis played, irrespective of the activating of a trigger event. For the duration of the activated event, the "TRIG GER" LED lights red. Figure 13 shows a screen-shot of this view. Figure 13: „Measurement Online Trigger“ view Document: 22510-HB-1-8-E-CAN-Bus Tester 2 25 4 The CBT2 Application Software 4.9.2 Setting and measuring The requirements for this measurement are: The CBT2 is connected both to a PC and to the CAN bus plant (bus status LED = green or yellow) The correct baud rate is selected. After switching to the „Measurement Online Trigger“ view ("View" menu or toolbar), you can control the measurement using the following icons or menu functions ("Measure" menu): Starts a single measurement (key combination: F5) Starts a single online trigger measurement. Measuring stops automatically when the first error event occurs. Starts a continuous measurement (key combination: F6) Starts a continuous online trigger measurement. Measuring does not stop when error events oc cur. The error events are displayed graphically in the corresponding channel. End measurement (key: F7) The continuous online trigger measurement is switched to single measurement, so that measuring stops automatically when the next error event occurs. Cancel measurement (key: F8) Clicking on this button ends the measurement immediately. The time axis resolution for the recording of the trigger events is set in the "Resolution" selection box. The shorter the selected time, the greater the amount of measurement data to be assessed. Within the set time (time slice), each trigger event is recorded in its corresponding channel. Several trigger events (e.g. two faulty frames) within one time slice can no longer be distinguished. In this case, the resolution must be in creased. It is not meaningful to set the resolution to a time less than the time required for a message frame at the set baud rate. Each time slice is represented in the display with the width of one pixel. In Single Measurement the CAN controller of the CAN monitor will automatically be stopped when a trigger event occurs if the option “Stop CAN controller on trigger“ is activated. The message frame in the oscillo scope display then corresponds to the last entry in the CAN monitor "Receive". The frames preceding the trigger can thus be analyzed. The "Send e-mail on trigger" option can be selected if the necessary configuration of the e-mail client has been performed in the Settings dialog (Section 4.14.3 : „E-mail notification“). When the option is activated, an e-mail with a description of the trigger event and a corresponding screen-shot is sent to the e-mail recipi ent. Successful sending of the e-mail is indicated in a message box. When a trigger occurs, a trigger pulse is made available at the BNC socket. The "TRIGGER" LED then lights green. 4.9.3 Evaluation The measured values acquired up to this point can be evaluated even while the measurement is still run ning. A time slice can be marked with the left mouse button. A tool tip is also displayed with additional in formation about this time slice. The time is displayed above the recorded channels, and an overall channel 26 Document: 22510-HB-1-8-E-CAN-Bus Tester 2 4 The CBT2 Application Software below the channels. This permits localization also of trigger events which lie outside the current screen area. To the left of the channels, the critical threshold set for the evaluation at the start time is displayed. Whilst the measurement is in progress, the current data of the individual channels is displayed on the right hand side. When a trigger occurs, the current value of the individual physical errors at the time of triggering can be seen. The channel in which the trigger occurred is marked with a "T". It is possible for there to be several trigger events at one trigger time. The oscilloscope display shows the message frame which produced the trigger. All setting and evaluation possibilities correspond to those for the oscilloscope display in the „Measurement One Station“ view. Document: 22510-HB-1-8-E-CAN-Bus Tester 2 27 4 The CBT2 Application Software 4.10 Working with measurements Each measurement is initially made as a default measurement and is not saved in the document. This en sures that existing measurements in a document are not overwritten. Furthermore, comparison measure ments can be performed quickly without altering the existing document. The default measurement is saved with the "Accept Measurement" button in the individual views. When do ing so, it is possible to either save the default measurement as a new measurement or overwrite the meas urement data of an existing measurement. Measurements can be managed conveniently in the measurement list of the „Configure segment“ view (see Section 4.6.8 "List of Measurements"). 4.10.1 Measuring at different points When starting up and for troubleshooting on a CAN bus plant, it is generally recommended to perform measurements at different points of the bus cabling – at least at the two bus ends. To be able to compare these measurements conveniently, the CBT2 application software offers a function to manage different measurements. When a default measurement is accepted as a new measurement, the measuring point should be filled out in accordance with the point at which the CBT2 is connected to the plant. In the evalu ation of the „Measurement All Stations“ view, the measurements from different measuring points can then be overlaid for troubleshooting assessment. 4.10.2 Measuring at different times Not only the measuring point, but especially the measuring time is interesting in the case of recurring plant measurements at specified maintenance intervals. When a default measurement is accepted as a new measurement, the time is automatically saved. In the evaluation of the „Measurement All Stations“ view, the measurements at different measuring times can then be overlaid for assessment to detect deterioration over a longer period of time. 28 Document: 22510-HB-1-8-E-CAN-Bus Tester 2 4 The CBT2 Application Software 4.11 Printing a test record After all measurements have been completed, a comprehensive test record can be printed via the CBT2 ap plication software to document the correct functioning of a CAN bus plant or to show detected problems. The test record consists of individual data areas. Before printing or displaying the print preview, the contents of the data areas can be adapted individually for a selected measurement and station. To this end, the dia log box shown in Figure 14 is displayed each time you call a print preview or printing so that you can adapt the test record accordingly. Use the „Print options" menu item to select the data areas to be displayed or left out of the test record. All settings you make in this dialog box are saved in the currently active document. The areas "Address field (customer data)", "Contact data of the tester" and "Signatures" are intended specifically for the service and maintenance companies. The customer ad dress can be entered under "Change custom er data". Access to the contact data of the tester (= service and maintenance company) can be obtained under "Change tester data". There are various data areas which can only be printed if you also possess measurement data for the selected measurement point (*) and/or station (**). If this is not the case, the relevant selection box is disabled. Various graphics can be printed as an attach ment to the test record. If no station is selec ted, the graphics of all listed stations will be printed automatically. Note: For reasons of formatting, the test record can only be printed in DIN A4 portrait format (or larger). Figure 14: Test record settings Document: 22510-HB-1-8-E-CAN-Bus Tester 2 29 4 The CBT2 Application Software 4.12 Exporting measuring data 4.12.1 CSV file In addition to the option of measurement data output as a test record, the contents of a CBT2 document can also be specified as a CSV file. This file can be read using any standard spreadsheet program, enabling the measured data to be processed further. If all measurements are completed, the ex port function can be called using the "File" → "Export..." menu. A settings dialog appears (Figure 15 refers) where measurements to be exported and required data areas are selec ted. The CSV data can be transferred to a spread sheet via the clipboard or saved in a file. When opening or importing the CSV file into Figure 15: Export measurement - CSV file a spreadsheet program, observe the follow ing formatting settings to ensure that all columns, lines and data formats are imported correctly: 4.12.2 Column delimiter: (the list separator set in the system, usually a semicolon) Line separation: Carriage Return + Line Feed (CRLF = 0x0D0A) Decimal delimiter: (the decimal delimiter set in the system, usually a dot) Graphics Use the "File" → "Export..." menu to export various graphical representations of meas urement data as bitmap graphics (.bmp,.jpg and .png). The image data can be exchanged swiftly with other programs via the export to the clipboard. The measurement and the preferred picture area can be selected in the settings dialog. If „All stations“ of „Measure ment One station“ is selected, the graphics of all stations will be saved in a chosen directory automatically. A preview allows easy selection of the measuring data to be exported (Figure 16 refers). Figure 16: Export measurement - Graphics 30 Document: 22510-HB-1-8-E-CAN-Bus Tester 2 4 The CBT2 Application Software 4.13 Importing measuring data The command “Import”→ “CANobserver" in the “File” menu imports measuring data recorded with CANobserver®4 to the CBT2 application software. The CANobserver® is a diagnostic tool for the physical and logic long term surveillance of CAN bus plants and is designed as a stationary extension of the CAN-Bus Tester 2. It's functionality is equivalent to the track display implemented in the measurement “On line Trigger”. Contrary to the CAN-Bus Tester 2, the CANobserver® is permanently integrated in the CAN network and continuously monitors the data transfer which is recorded automatically for up to 4 years without being connected to a pc. The CANobserver ® allows the parametrization of the monitoring and the evaluation of the recorded data to be effected by using a web browser via the integrated web interface or by a SNMP inquiry via a control center. All recorded data can be exported to a XML-file. The application will switch to the „Measurement Online Trigger“ view when importing data. This view provides the same comfortable evaluation functions that are available during measurements using the CAN-Bus Tester 2. Figure 17: Application CANobserver® 4 CANobserver® is a registered trademark of GEMAC – Gesellschaft für Mikroelektronikanwendung Chemnitz mbH Document: 22510-HB-1-8-E-CAN-Bus Tester 2 31 4 The CBT2 Application Software 4.14 Settings The "Settings..." command in the "Tools" menu opens a dialog box where you can adapt the program to your specific requirements. Here you can influence the behavior of the application software and of the CBT2 device. The settings in this dialog box will not be saved in the current document, but instead in the Win dows® registry for the program. 4.14.1 General Display tool tips If the mouse pointer is left over a particular screen element, e.g. a button, for a short time, the program displays a so-called "tool tip" with brief info about this element. Display all warnings and mes The CBT2 application software displays warning and message dialogs in sages again certain situations. A check box within these dialogs enables such mes sages to be skipped in the future (e.g. "Do not display this mes sage again."). If you wish the messages to be displayed again, select this option. Show CAN type selection dia Select this function to display the CAN type selection dialog each time the log at program start program is started. If this option is deactivated, the CAN type CAN is se lected as the default. The CAN type selection dialog can still be called at any other time with "File" → "New". Show disturbance-free voltage Select this function to add a graphic representation of the measured dis range turbance-free voltage range to the oscilloscope display Show peak-to-peak voltage Select this function to add a graphic representation of the measured peakto-peak voltage to the oscilloscope display Show inactive tracks Select this function to show deactivated tracks in the „Measurement On line Trigger“ view. This can decline the clarity of the display in cases where there are many errors on the bus. Show telegram traffic Select this function to show telegram traffic in the track display of the „Measurement Online Trigger“ view. Activate trigger output on er When activated the trigger impulse will be released even during a continu rors even during running con ous measurement when an error occurs. Otherwise, only when the trigger tinuous measurement occurs and the single measurement is stopping. 4.14.2 Tester contact data Use the CBT2 print function and the option of exporting the data to a CSV file to display the contact data of the plant tester. Use this tab to enter your contact data (optional). 4.14.3 E-mail notification To enable e-mail notification in response to a trigger event in the „Measurement Online Trigger“ view, the in tegrated e-mail client must be configured. 32 Document: 22510-HB-1-8-E-CAN-Bus Tester 2 4 The CBT2 Application Software Server host name Enter the address of the outgoing mail server. Example: smtp.web.de or a company SMTP server Authenticate with user name Select this function if the outgoing mail server requires authentication. In and password this case, enter your user name and password. The password is saved in encrypted form. Address sender Enter your own e-mail address. For the mail recipient, this address will be specified as the sender of the mail. Attention: Some e-mail servers check the validity of this address before forwarding the e-mail in question. Address recipient Enter the e-mail address of the person to whom the e-mail is to be sent. Subject This entry is optional. For the mail recipient, it will be displayed as the mail subject. Send e-mail Sends a test e-mail to check the configuration. Document: 22510-HB-1-8-E-CAN-Bus Tester 2 33 4 The CBT2 Application Software 4.15 CAN Monitor The CAN Monitor can be used to visualize CAN messages online and to transmit CAN messages defined by the user. The CAN Monitor operates independently of the CBT2 measuring functions. Two separate pro gram windows are provided to transmit and receive CAN messages. The following functions are available in both windows. Status LED on the CAN controller: Green: The CAN controller is activated; transmit and receive are possible. Yellow: The CAN controller has reached or exceeded its warning limit. Red: The CAN controller has been turned off automatically (is in Bus OFF status). Gray: The CAN controller is deactivated. Starting/stopping the CAN controller, Stop/continue receiving: Start Activates the CAN controller with the baud rate set in the CBT2 application software CAN Controller (key: F5). Stop (Automatic deactivation when scanning the baud rate and switching the baud rate in CAN Controller the CBT2 application software) Stop / Continue Reception of frames in the dialog window “CAN Monitor Receive" can be paused and Receiving 34 continued respectively. The CAN controller remains active. Document: 22510-HB-1-8-E-CAN-Bus Tester 2 4 The CBT2 Application Software 4.15.1 CAN Monitor Transmit License note: Transmitting of messages and sequences are only available if the corresponding software module is sup ported by the connected CAN-Bus Tester 2. (see Section 6 „License Management“). The software modules supported by the device are listed in the information dialog (menu: “Help“→ “About CAN-Bus Tester 2"). The “CAN Monitor Transmit” menu option can be called via the “CAN Monitor" → “CAN Monitor Transmit” menu of the CBT2 application software. The CAN Monitor serves to transmit CAN messages either once or cyclically. For this purpose, you can define your own CAN messages in a list. Figure 18: CAN Monitor Transmit 4.15.1.1 Functions The following functions are provided by the menu and by the toolbar of the “CAN Monitor Transmit” menu: File – New Opens a new “CAN Monitor Transmit” document (key combination: Ctrl + N). File – Open... Opens an existing “CAN Monitor Transmit” document (key combination: Ctrl + O). File – Save Saves the current “CAN Monitor Transmit” document with its existing name or - if the document has not yet been given a name - with a new name (key combination: Ctrl + S). View – Show Sequence Shows the sequence view View View – Show Message Shows the CAN message view View View – Reset Window Reset the windows layout to its default values Layout Document: 22510-HB-1-8-E-CAN-Bus Tester 2 35 4 The CBT2 Application Software 4.15.1.2 View „Messages“ CAN messages can be created and configured in the View „Messages“. In this view the CAN messages are transmitted once or repeatedly. Message – Create Mes Creates a new CAN message at the current position (key: Ins). sage Message – Duplicate Duplicates a selected CAN message (key: Ctrl + Ins). Message Message – Delete Mes Deletes the selected CAN message (key: Del). sage Message – Message Moves a selected CAN message in the list one place up (key: Shift + Ar Move Up row Up). Message – Message Moves a selected CAN message in the list one place down (key: Shift + Move Down Arrow Down). Message – CAN-ID hex Switch the ID display from hexadecimal to decimal Message – Data hex Message – Font... enabled: display hexadecimal disabled: display decimal Switch the data display from hexadecimal to decimal enabled: display hexadecimal disabled: display decimal Opens a dialog to setup the font in the view “Messages”. The following properties can be used to define a CAN message: Cycle single: The CAN message is transmitted once. multiple: The CAN message is transmitted cyclically with the set cycle time (10 ms ... 60,000 ms). Up to max. 10 CAN messages can be defined as “multiple”. Cycle time Interval in ms with which a CAN message is transmitted repeatedly. If this option is se lected, the cycle must be defined as “multiple”. ID type standard: CAN ID acc. to standard protocol, 11-bit (0x000...0x7FF) extended: CAN ID acc. to extended protocol, 29-bit (0x00000000...0x1FFFFFFF) CAN ID Identifier of the CAN message to be transmitted Name Name of the CAN message. This name can be used by all other CAN messages with the same CAN ID. Description Additional description of a CAN message. RTR Definition of the frame type: 0: Data frame, 1: Remote frame Data Used to enter the data to be transmitted. The number of bytes entered is used for the data length code (DLC), irrespective of the selected frame type (RTR). 36 Document: 22510-HB-1-8-E-CAN-Bus Tester 2 4 The CBT2 Application Software Selecting the “Transmit” button transmits the appropriate CAN message either once or repeatedly. Selecting the button once more deactivates the multiple transmission of a CAN message. 4.15.1.3 View “Sequences” In the View “Sequences” the created CAN messages are grouped into sequences. This makes it possible to send multiple CAN messages with a defined time interval once or repeatedly. Sequences – Create Creates a new sequence at the current position (key: Ins). Sequence Sequences – Duplicate Duplicates a selected sequence (key: Ctrl + Ins). Sequence Sequences – Delete Deletes the selected sequence (key: Del). Sequence Sequences – Rename Renames the selected sequence (key: F2). Sequence Sequences – Change Activates one-time or repeated transmission of the selected sequence. Cycle (one-time/re (key: F3). peated) Sequences – Sequence Moves a selected sequence in the list one place up (key: Shift + Ar Move Up row Up). Sequences – Sequence Moves a selected sequence in the list one place down (key: Shift + Ar Move Down row Down). Sequences – Insert Inserts a CAN message into the selected sequence. Message Sequences – Remove Removes a selected CAN message from the sequence (key: Del). Message Sequences – Change Changes the waiting time after the selected message (key: F4). Waiting Time After Mes sage Sequences – Message Moves a selected CAN message in the sequence one place up (key: Move Up Shift + Arrow Up). Sequences – Message Moves a selected CAN message in the sequence one place down (key: Move Down Shift + Arrow Down). Document: 22510-HB-1-8-E-CAN-Bus Tester 2 37 4 The CBT2 Application Software 4.15.2 CAN Monitor Receive License note: Receiving of messages is only available if the corresponding software module is supported by the connec ted CAN-Bus Tester 2. (see Section 6 „License Management“). The software modules supported by the device are listed in the information dialog (menu: “Help“→ “About CAN-Bus Tester 2"). The “CAN Monitor Receive” option can be called via the “CAN Monitor" → “CAN Monitor Receive” menu of the CBT2 application software. The “CAN Monitor Receive” option serves to receive and display CAN mes sages. There are two modes of display: The “Scroll” mode: Presentation of the CAN messages in the order in which they are received (Figure 19) Figure 19: CAN Monitor Receive; “Scroll” mode The “Overwrite” mode: Presentation of the received CAN messages sorted by their CAN ID. (Figure 20) Figure 20: CAN Monitor Receive; “Overwrite” mode 38 Document: 22510-HB-1-8-E-CAN-Bus Tester 2 4 The CBT2 Application Software 4.15.2.1 Functions The following functions are provided by the menu and the toolbar of the “CAN Monitor Receive” menu: File - New Opens a “CAN Monitor Receive” document (key combination: Ctrl + N). File - Open... Opens an existing “CAN Monitor Receive” document (key combination: Ctrl + O). File - Save Saves the current “CAN Monitor Receive” document with its existing name or - if the document has not yet been given a name - with a new name (key combination: Ctrl + S). File - Export Exports all recorded message frames to a CSV-file File - Properties Opens the dialog “Properties” Functions - Delete list Deletes all received CAN messages from the list Settings - Filter Sets a filter for the CAN messages to be received (“Hide/unhide CAN messages) Activate Trigger Activation of a trigger on the CAN-ID or data fields with adjustable amount of telegrams after trigger (key: F10) Search Opens the “Search” dialog. Allows searching the ID- or the data field (key: Ctrl + F) Continue search Searches for the next term specified by “Search” (key: F3) Search backwards Searches for the previous term specified by “Search” (key: Shift + F3) View - Scroll Displays the CAN messages in the order in which they were received View - Overwrite Displays the received CAN messages sorted by their CAN ID. View - Time stamp, Displays the time stamp relative to the time stamp of the CAN message re relative ceived previously Switch ID display enabled: display hexadecimal disabled: display decimal enabled: display hexadecimal disabled: display decimal Switch data display 4.15.2.2 Filter The “Filter...” command in the “Settings” dialog enables the configuration of a filter 5 for CAN messages. There are two lists for filtered and accepted identifiers. You can choose a complete identifier group by way of the masks or else perform a direct selection of the identifiers to be filtered. 5 The filter is available for 11 bit identifier only Document: 22510-HB-1-8-E-CAN-Bus Tester 2 39 4 The CBT2 Application Software A maximum of two OR'd masks is provided to select an identifier group. Each bit in the identifier masks can be assigned one of the following values:X Bit is not relevant. 0 - Bit is relevant and must be “0” 1 - Bit is relevant and must be “1” The selection can be performed either using the appropriate buttons or by enter ing the appropriate hexadecimal values for Mask and Value. The bit value “1” in the Mask field means that this bit is relev ant, while bit value “0” means that this bit Figure 21: CAN Monitor Receive: Filter options need not be used for filtering. In the Value field, you specify the bit value which the relevant bits in the Mask field must assume to be accepted by the filter. For the direct selection, the relevant identifiers can be highlighted in the lists and moved between the groups of filtered or accepted IDs. Direct selection will deactivate the filtering of identifier groups. 4.15.2.3 Trigger The command “Trigger...” can be found in the “Settings” dialog and allows the user to configure a trigger on CAN-IDs (standard or extended) or on any data field. Parts of the data field can be masked. Parts with “X” are irrelevant for the trigger function. In Figure 22 all messages containing a 02hex as the second data byte are be ing triggered. Additionally, the user can configure the number of frame mes sages after the trigger point and the be havior after their reception: “stop receiving” stops the record ing of the message frames in the receive window “stop CAN controller” deactivates the CAN controller. All sending action in “CAN Monitor Trans mit” will be stopped. Figure 22: CAN Monitor Receive: Trigger options 40 Document: 22510-HB-1-8-E-CAN-Bus Tester 2 5 The „CAN-Bus Tester 2 Scan“ Program 5 The „CAN-Bus Tester 2 Scan“ Program The "CAN-Bus Tester 2 Scan" program provides a quick overview of the type and serial number of the connected CAN-Bus Tester 2. The program is entered in the Autostart folder and is called auto matically with each system start. For each CAN-Bus Tester 2 de tected, a symbolic icon Figure 23: CAN-Bus Tester 2 Scan . appears in the info area of the task bar. When you click with the mouse on this icon, the menu shown in Figure 23 is opened. Use this menu to call the CBT2 application software and the manual directly. Note: If this program is not required, the link can be deleted from the Autostart folder. Document: 22510-HB-1-8-E-CAN-Bus Tester 2 41 6 License Management 6 License Management The CAN-Bus Tester 2 is available in a basic version with the bus system CAN. This basic version is de livered in the case complete with all accessories (see Section 8.1 “Scope of Supply - Basic Set”). Optional bus system such as CANopen, DeviceNet and SAE J1939 as well as optional software modules can be activated via licenses at any time. On purchase of licenses for additional bus systems or software modules a license file (*.cbt2lic) is provided. This license file can be downloaded to the connected CAN-Bus Tester 2 via the button “Load License” in the information dialog (Figure 24). The license is only valid for a tester with a specific serial number and can only be loaded on this tester. Figure 24: License management in information dialog 42 Document: 22510-HB-1-8-E-CAN-Bus Tester 2 7 Technical Specifications 7 Technical Specifications General parameters and overview of functions Use (CAN type) CAN (ISO11898-2), CANopen, DeviceNet (EN 50325-2), SAE J1939 Bit sampling 64-fold, 10,240 sampling points Supported baud rates • Depending on CAN type: 10; 20; 50; 100; 125; 250; 500; 800; 1000 kbit/s • Additionally user-defined: 5; 33.3; 62.5; 75; 83.3; 200 kbit/s • Automatic detection via baud rate scan List of stations • Automatic detection via Station scan • Designation, CAN ID, ID type, Node ID, MAC ID, Source address, can also be entered manually List of Measurements • Possibility to measure at different measuring points and at different times • Sorting by measurement type, measuring point and measurement time Quality level • Value representing the signal quality (0 ...100%) • Minimum value and maximum values saved • Time stamp Disturbance-free voltage range and edges • Disturbance-free voltage range (typ. -0,75 ... 3 V, resolution 50 mV) • Edge steepness (falling and rising, specified in 1/64th of the bit width) • Minimum value and maximum values saved Oscilloscope display • Trigger on message frames with specified ID, trigger position can be set • Frame analysis and full frame recording • Decoding according to protocol (CAN, CANopen, DeviceNet, SAE J1939) • Zoom (six stages) Online trigger • Real-time monitoring of the bus for logical and physical errors • Resolution can be set (10 ms ... 1 min) • Oscilloscope display and e-mail notification on triggers Automatic evaluation Limit value settings and measured-value evaluation according to: • critical quality level • critical disturbance-free voltage range • critical edge (rising and falling) Bus status Bus traffic detection (display: dominant, recessive, not defined, bus traffic) Bus traffic load • Permanent display of the bus traffic load (0 ... 100%), • Minimum and maximum values saved Error frames • Constant display of detected frame errors • Distinction between active and passive error frames (0 ... >50.000) Protocol monitor • All supported baud rates • Online receipt of CAN message frames, including filtering • Single or cyclic transmission of CAN message frames and sequences Test record Comprehensive, configurable measuring and test record on DIN A4: • Letterhead with tester and customer contact data • Tabular representation of the measured values • Graphic representation of the measured values Export function • Measuring data as a configurable CSV file • Graphical measured-data representation as a configurable bitmap (.bmp,.jpg,.png) Firmware and FPGA configuration can be updated via USB CE conformity Equipment safety EN 60950-1:2006/A1:2010 EMC • Low-frequency interference emission: • High-frequency interference emission: • Interference immunity: EN 61000-3-2:2006/A1:2009/A2:2009 EN 55022:2006/A1:2007 EN 61000-6-2:2005/AC:2005 Table 1: Technical specifications Document: 22510-HB-1-8-E-CAN-Bus Tester 2 43 7 Technical Specifications Electrical parameters Power supply Via the supplied wide-range power supply pack (9 ... 36 V DC) Current consumption 0.55 ... 0.15 A Measuring of the differential voltage typ. -0.75 V ... 3.00 V Measuring of the loop resistances typ. 0 Ω ... 800 Ω Measuring of the cable length typ. 0 m ... 500 m • 0...100 m: • 100...500 m: Resolution: 0.5 m, Accuracy: 3 % ± 1,5 m Resolution: 1.0 m, Accuracy: 10 % ± 10 m • For a signal runtime of: 4.5 ns/m for CAN/CANopen/SAE J1939 4.3 ns/m for DeviceNet Measuring of the CAN supply voltage 0 ... 36 V Potential difference between the connections CAN bus, USB and oscilloscope < 50 V DC (or < 71 V AC) Trigger output for the oscilloscope BNC socket, electrically isolated, H pulse, approx. 2 bits wide, level approx. 5 V Mechanical parameters Supply voltage connection Extra-low voltage socket CAN connection 2 x 9-pin D-Sub connector PC connection Self-powered device to USB Specification 1.1, electrically isolated Trigger output for the oscilloscope BNC socket, electrically isolated Housing Aluminum sheet housing Temperature range • Operation: • Storage: 5 °C ... 40 °C -20 °C ... 60 °C Humidity • Operation: • Storage: 20 % ... 80 % (non-condensing) 20 % ... 80 % (non-condensing) Degree of protection of the housing IP20 to EN 60529 Dimensions (Device / Case) 170 mm x 134 mm x 40 mm / 504 mm x 354 mm x 119 mm Weight (Device / Case) Approx. 600 g / Approx. 5000 g Table 2: Technical specifications (cont'd) Warning: The CBT2 is a Class A device. Such devices can cause interference in residential areas. In this case, the plant operator can be required to take appropriate measures and to bear the costs of such measures. 44 Document: 22510-HB-1-8-E-CAN-Bus Tester 2 8 Scope of Supply 8 Scope of Supply 8.1 Scope of Supply - Basic Set The scope of supply of the CAN-Bus Tester 2 comprises the following: CAN-Bus Tester CBT2 CAN bus accessories: 6 adapter sets (D-Sub 9, Open style, M12, 7/8“, SAE J1939-11, SAE J1939-13) Adapter board (for simple connection of oscilloscope probes) USB cable (3 m) BNC cable (1.5 m) Power supply: AC/DC adapter: Type: Desk power pack Input voltage: 100 ... 240 V, 50 Hz ... 60 Hz Output voltage (DC): 24 V, 500 mA, Connection cable: 2 m length with extra-low-voltage plug Mains power cable (1.8 m): Country variants: Europe, Great Britain, U.S.A./Japan, (Australia possible) User Manual Product CD with USB driver and application software robust lockable case (incl. keys) 8.2 Content adapter sets Adapter set Content Adapter set 1: D-Sub 9 • Adapter cable 1 • Shorting plug 1 • Terminating resistor Adapter set 2: Open style • Adapter cable 2 • Shorting plug 2 • Adapter for Open style Adapter set 3: M12 • Adapter cable 3 • Shorting plug 3 • Terminating resistor • T-piece Adapter set 4: 7/8“ • Adapter cable 4 • Shorting plug 4 • Terminating resistor • T-piece Adapter set 5: SAE J1939-11 • Adapter cable 5 • Shorting plug 5 • Terminating resistor • Y-piece Adapter set 6: SAE J1939-13 • Adapter cable 6 Table 3: Content adapter sets Document: 22510-HB-1-8-E-CAN-Bus Tester 2 45 9 Maintenance and Customer Service 9 Maintenance and Customer Service 9.1 Maintenance The CAN-Bus Tester 2 is maintenance-free. Calibration is not necessary. Any repairs must only be per formed by the manufacturer. 9.2 Customer service 9.2.1 Shipping If you send the CAN-Bus Tester 2 for repair, use only the original or equivalent packaging. Please give a brief error description and your telephone number in case we have any questions. 9.2.2 Support If you have any technical questions, please specify the serial number of your device, its firmware and hard ware configuration version and the version of the CBT2 application software. Please direct questions to your supplier or else contact the hotline of the CAN-Bus Tester 2 manufacturer. Manufacturer: GEMAC - Gesellschaft für Mikroelektronikanwendung Chemnitz mbH Zwickauer Str. 227 09116 Chemnitz Phone +49 371 3377 - 0 Fax +49 371 3377 - 272 Web http://www.gemac-chemnitz.de E-mail [email protected] 9.2.3 Warranty and limitation of liability We will assume a warranty of 24 months for the CAN-Bus Tester 2, commencing from the date of delivery. Any repairs required during this time and which fall under the manufacturer's obligation to give a warranty will be performed free of charge. Any damage resulting from improper use of the device or from exceeding of the specified technical parameters is not covered by the manufacturer's obligation to give a warranty. GEMAC will only be liable for consequential damage resulting from use of the product in case of deliberate action or gross negligence. The General Terms and Conditions of GEMAC - Gesellschaft für Mikroelektronikanwendung Chemnitz mbH will apply. 46 Document: 22510-HB-1-8-E-CAN-Bus Tester 2 10 Ordering Information 10 Ordering Information Product Description Article No. CAN-Bus Tester 2 basic version Bus system: CAN complete scope of supply see section 8.1 “Scope of Supply - Basic Set” PR-22517-10 Basic set CAN-Bus Tester 2 Licenses for optional bus systems CANopen License key for bus system CANopen SW-22517-01 DeviceNet License key for bus system DeviceNet SW-22517-02 SAE J1939 License key for bus system SAE J1939 SW-22517-03 Licenses for optional software modules CAN monitor (transmit / receive) License key for CAN monitor (transmit / receive) SW-22517-10 Accessories for additional country variants Mains power cable Australia Mains power cable for Australia for AC/DC adapter KB-00093-03 Table 4: Ordering information 10.1 Spare parts Product Description Article No. Mains power cable Euro Mains power cable for Europe for AC/DC adapter KB-00093-00 Mains power cable U.K. Mains power cable for Great Britain for AC/DC adapter KB-00093-01 Mains power cable U.S.A./Japan Mains power cable for U.S.A. / Japan for AC/DC adapter KB-00093-02 Adapter board CAN bus adapter to connect the CBT2 with an oscilloscope LP-10235-51 USB cable Connection between CBT2 and PC PR-00211-00 BNC cable Connection between trigger port and oscilloscope KB-03032-00 AC/DC adapter Desk power pack, 100 ... 240 V; 50 Hz ... 60 Hz; 24 V/500 mA BG-00177-00 Adapter cable 1 Connecting cable to connection to CBT2 with D-Sub 9 bus connector KB-03021-01 Shorting plug 1 D-Sub 9 shorting plug for wiring test BG-00171-00 Terminating resistor D-Sub 9 connector with terminating resistor ST-03058-00 Adapter cable 2 Connecting cable to connection to CBT2 with Open style bus connector KB-03022-01 Shorting plug 2 Open style shorting plug for wiring test BG-00172-00 Open style adapter Open style adapter with socket (two screw terminals per contact) BU-03068-00 Adapter cable 3 Connecting cable to connection to CBT2 with M12 bus connector KB-03023-01 Shorting plug 3 M12 shorting plug for wiring test BG-00173-00 Terminating resistor M12 connector with terminating resistor ST-03008-00 T-piece M12 branch connector ST-03007-00 Adapter cable 4 Connecting cable to connection to CBT2 with 7/8” bus connector KB-03115-00 Shorting plug 4 7/8” shorting plug for wiring test ST-03045-00 Terminating resistor 7/8” connector with terminating resistor ST-03060-00 T-piece 7/8” branch connector ST-03043-00 Adapter set D-Sub 9 Adapter set Open style Adapter set M12 Adapter set 7/8” Document: 22510-HB-1-8-E-CAN-Bus Tester 2 47 10 Ordering Information Product Description Article No. Adapter cable 5 Connecting cable to connection to CBT2 with SAE J1939-11 bus connector KB-03114-00 Adapter cable 6 Connecting cable to connection to CBT2 with SAE J1939-13 bus connector KB-03113-00 Shorting plug 5 SAE J1939-11 shorting plug for wiring test BG-03005-00 Terminating resistor SAE J1939-11 connector with terminating resistor BU-03097-00 Y-piece SAE J1939-11 branch connector ST-03056-00 Adapter set SAE J1939 Table 5: Ordering information - Spare parts 48 Document: 22510-HB-1-8-E-CAN-Bus Tester 2 11 Problem Recovery 11 Problem Recovery The following chapter will help you if you have problems with your CAN-Bus Tester 2. This chapter lists typ ical error sources and problem situations, indicates possible causes and offers possible solutions. If you encounter a problem with your CBT2 and/or the application software which is not listed here or cannot be solved by the solutions specified here, please contact the manufacturer (see Section 9.2.2 „Support“). 11.1 Problems with the CBT2 device setup Problem Questions, causes & problem recovery CAN-Bus Tester 2 is not detected: • Error in the Windows® setup for the device • Driver not found • "No CAN-Bus Tester 2 connected" Questions: • CBT2 connected to PC and power supply ("ON" LED)? • Does the USB hardware of your PC function correctly? • Is "CAN-Bus Tester 2" displayed under "USB" in the device manager? • Is the correct operating system installed (see Section 4.2 "Installing the software")? How to solve this problem: • Disconnect the CAN-Bus Tester 2 from PC and from the mains. • If necessary uninstall the CBT2 application software (e.g. via the Control Panel) • Install the CBT2 application software (see Section 4.2 "Installing the software") • Reboot your PC. • Connect the CAN-Bus Tester 2 to the mains power (AC/DC adapter) and your PC (USB cable). • Windows® should now detect a new device and install the appropriate drivers. • CBT2 is recognized by the device manager and CAN-Bus Tester 2 Scan, but operator software displays "No CANBus Tester 2connected" How to solve this problem: • Open the Select device dialog under "Tools" → select "CAN-Bus Tester 2" and choose one of the CBT2 devices from the list. 11.2 Problems when measuring Problem Questions, causes & problem recovery Wiring test • Button is disabled (hidden) Questions: • CBT2 operated on the supplied power pack (not via the plant CAN bus)? • CBT2 connected to the PC and to the plant CAN bus? • All bus stations removed / no bus traffic (bus status LED = yellow)? • CAN supply voltage display: approx. 0.0 V? How to solve this problem: • Realize the above prerequisites Baud rate scan • Button is disabled (hidden) Questions: • CBT2 connected to PC and power supply ("ON" LED)? • CBT2 detected by application software (→ status bar)? • CBT2 correctly connected to plant CAN bus? • Level change present on the bus (bus status LED = green)? How to solve this problem: • Provide for transmission activity on the CAN bus • No baud rate detected Possible causes: • Incorrect bus installation (→ excessive reflections) • Excessive interference affecting the line • Defective CAN bus driver • Line short-circuits • Unsupported baud rate selected How to solve this problem: • Correct the baud rate manually or try a different baud rate. • Perform the wiring test Station scan • Button is disabled (hidden) Document: 22510-HB-1-8-E-CAN-Bus Tester 2 Questions: 49 11 Problem Recovery Problem Questions, causes & problem recovery • CBT2 connected to PC and power supply ("ON" LED)? • CBT2 detected by application software (→ status bar)? • CBT2 correctly connected to plant CAN bus? • Level change present on the bus (bus status LED = green)? How to solve this problem: • Provide for transmission activity on the CAN bus Error frame counter • Counts continuously Possible causes: • An incorrect baud rate has been selected (→ Baud rate scan) • There is an error in the physical bus characteristics and there are significant signal faults. "All Stations", "One Station" and "Online Trigger" measurements • cannot be started Questions: • CBT2 connected to PC and power supply ("ON" LED)? • CBT2 detected by application software (→ status bar)? • CBT2 correctly connected to plant CAN bus? • At least one station highlighted in the List of stations as "to be measured"? Additionally for the "Measurement One Station": • One station selected? How to solve this problem: • Provide for transmission activity on the CAN bus Printing and exporting • The relevant data field is disabled 50 How to solve this problem: • Perform the desired measurement for the station(s). Document: 22510-HB-1-8-E-CAN-Bus Tester 2 12 Notes 12 Notes Document: 22510-HB-1-8-E-CAN-Bus Tester 2 51 12 Notes 52 Document: 22510-HB-1-8-E-CAN-Bus Tester 2