1
Introduction
Thank you for choosing the Dometic Wine Cellar!
Please read the following instructions carefully before installing your new wine cellar. We trust you
will be completely satisfied with your purchase.
The wine cellar must be installed and used according to these instructions in order for it to operate
correctly and economically.
Transit damage
Inspect the wine cellar for transit damage. You
must report any damage the company responsible
for the delivery within the legal or stated time for
this type of product. If there is no such established
report time, the damage must be reported within
seven days of delivery.
contact information
europe
Please contact your dealer for service/support.
USA
Service Office
Dometic, LLC
2320 Industrial Pkwy.
Elkhart, IN 46516
Phone: 574-294-2511
Service Center Assistance
Phone: 800-544-4881
Accessories
Installation
When unpacking the wine cellar, please check that
the following accessories are included:
•Keys
•CD
•Instruction manual
Please follow these installation instructions:
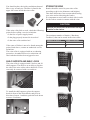
•For best performance, air needs to circulate freely over the cooling unit behind the wine cellar.
• Place your wine cellar far away from any source
of heat (radiator, cooker or intense sunlight).
•Screwdriver (star quad)
•The free-standing design of the cellar means that
it should stand at least 25 mm (1”) from the rear
and side walls.
•Adjustable spanner or fixed spanner,
21 mm (0.83”)
•Allow a clearance of at least 100 mm (4”) above
the wine cellar.
Necessary additional tools not included:
Data plate
Wall
Check the data plate,
inside the wine
cellar at the top left, to
ensure you have received
the right model.
25 mm (1”)
Rear
25 mm (1”)
The data plate shows details that you will need to
quote if you have to contact service personnel.
30 mm (1.2”)
It is a good idea to make a note of them here:
Model designation. . . . . . . . . . . . . . . . . . . . . . . . .
Product number. . . . . . . . . . . . . . . . . . . . . . . . . . .
Serial number . . . . . . . . . . . . . . . . . . . . . . . . . . . .
Voltage . . . . . . . . . . . . . . . . . . . . . . . . . . . . . . . . .
-6-
Wall