1
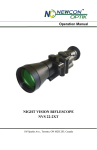
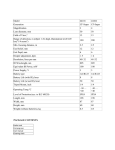
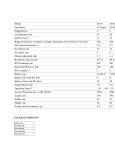
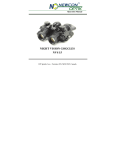
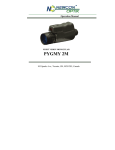
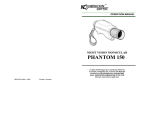
Operation Manual NIGHT VISION SYSTEM NIGHT WITNESS M3 105 Sparks Ave., Toronto, ON, M2H 2S5, Canada 1 IMPORTANT INFORMATION Read prior to activation. You have purchased a sophisticated electronic device. To operate it properly, please read this manual carefully. Ignoring the operation procedures described in this manual will void your warranty. NEVER disassemble the unit. This device contains a source of high voltage, which may be hazardous to your health. NEVER open the diaphragm of the objective lens of an active unit in bright light, including daylight. In the daytime the objective lens diaphragm must be closed. A tiny hole in the diaphragm provides enough light for daytime testing. NEVER aim an active unit at intense light sources, such as lights, headlamps, campfires, the Moon, etc. NEVER reverse the polarity of a battery. ALWAYS remove battery when not in use for a long period. ALWAYS keep the objective lens diaphragm closed when not in use or at day light conditions ALWAYS store the device in a warm dry place. 2 PRECAUTIONS NIGHT WITNESS M3 is a sophisticated precise optical instrument equipped with electronics. Therefore, it should be handled with due care. Avoid strong heat, direct sunlight, impacts, dust, moisture and sudden changes of temperatures. Keep it in mind that, although being very durable, NIGHT WITNESS M3 contains fragile components. Do not touch the optical surfaces with fingers. Doing so may damage the antireflection coating. Cleaning of optical surfaces should only be performed with professional camera lens cleaning supplies. Use only a soft clean cloth to clean the exterior of the device. Make sure to switch off the unit and remove the battery during periods of non-operation and when storing the device for long period of time. Do not apply unnecessary pressure to the lens assembly, agile elements & thread connections. 3 TABLE OF CONTENTS 1. OVERVIEW ................................................................ 5 2. DELIVERY SET ......................................................... 6 2.1 Standard delivery set ................................ 6 2.2 Optional accessories ................................ 7 3. SPECIFICATIONS ..................................................... 8 4. UNIT DESIGN ............................................................ 9 5. OPERATION INSTRUCTIONS ............................... 10 Installing battery ................................................. 10 Switching the unit on .......................................... 10 Switching the unit off ......................................... 12 Adjusting to a particular camera......................... 12 Auto shut OFF at bright light ............................. 12 Using IR illuminator ........................................... 13 Attaching the camera .......................................... 13 Mounting on a tripod .......................................... 14 Using of different objective lenses ..................... 14 6. WARRANTY ............................................................ 15 7. TROUBLESHOOTING ............................................ 16 8. CUSTOMER SUPPORT ........................................... 18 9. ACCEPTANCE CERTIFICATE .............................. 19 4 1. OVERVIEW Compact lightweight night vision system NIGHT WITNESS M3 is intended for low light observation & photo/video surveillance. This miniature monocular device is equipped with high gain, high resolution Generation 3 Image Intensifier Tube. NIGHT WITNESS M3 is distinguished by its modular design. It can be equipped with wide variety of accessories including interchangeable lenses, adapters for coupling digital photo and video cameras. NIGHT WITNESS M3 is equipped with an external highlight cut off sensor to protect the image intensifier tube. This sensor measures ambient luminance level and, if it exceeds the overload capacity for the Image Intensifier Tube, the power supply of the device is switched off after approximately 40 seconds of the light exposure. The operator must remove the light source, which does not allow working under normal conditions, and then turn the device off and on to restore the operation. Under bright light conditions the objective lens diaphragm must be closed. 5 2. DELIVERY SET 2.1 Standard delivery set N 1 2 3 4 5 6 7 8 9 DESCRIPTION NIGHT WITNESS M3 with C-Mount 25mm / F1.4 lens Camera/video adapter 37/52 mm DSLR camera adapter (Canon) Tripod mount AA battery Cleaning tissue User manual Soft case Hard Case 6 QUANTITY 1 1 1 1 1 1 1 1 1 2.2 Optional accessories Head gear 1x objective lens with rubber cap 7 3. SPECIFICATIONS Magnification 1x Image Intensifier Tube (IIT) 18 mm Gen. 3 Focal length / F Number 25 mm / F1.4 Iris control Manual, from zero to F1.4 Field of view 40° Focus range 0.5 m - infinity Focal length 25 mm Eye relief 25 mm Exit pupil 20 mm Dioptric adjustment range -6 ... +5 Operation temperature -40°C … +55°C Storage temperature -40°C … +65°C Relative humidity Up to 98% Lens mount C-mount, 1” – 32 TPI Battery type 1xAA or 1xCR123 Battery life 40 hours (20 hours with infrared illuminator) Tripod socket standard 1/4”, 20 TPI Dimensions 115x70x45mm Weight 325 g NOTE: Due to continuous design improvements parameters may vary from those given above. 8 4. UNIT DESIGN 6 4 7 1 2 5 3 8 1. On / Off and IR illuminator switch 2. FIGURE 1 6. Infrared illuminator and light sensor Battery compartment cover with battery type adapter 7. Battery compartment 3. Objective lens with manual iris control 8. 4. Eyepiece 5. Eyepiece rubber Objective lens diaphragm (must be closed at bright light conditions) 9 5. OPERATION INSTRUCTIONS Installing battery Unit is supplied with uninstalled battery. Prior to installing the battery, make sure the switch (1, Fig.1) is in the OFF position and the lens cap is on. The unit can operate on either AA Alkaline or CR-123 Lithium battery. Lithium battery durability is doubled against the service time of conventional battery and provides better performance at low temperatures. To install battery unscrew the battery compartment cover (6, Fig.1). When using CR-123 Lithium type battery, remove the battery type adapter. Observe the polarity indicated on the housing. Put the battery in and screw the battery cover back on. Switching the unit on In the daytime close the diaphragm (iris) of the 1x lens prior to switching the unit on. 10 To check if the unit is operational switch it ON (rotate switch (1, Fig.1) clockwise) and look through the eyepiece (4, Fig.1). You should see greenish-lit screen. If the screen is not lit check the battery. When the unit is ON user may see either one or two circular indicators through the eyepiece (Fig. 2). When inactive they are hardly noticeable. Bright yellow or flashing red spot indicates low battery voltage. For an FIGURE 2 uninterrupted operation keep a IR illuminator indicator (red, fresh battery ready and replace it left), Low battery indicator on time. Bright red indicator (yellow, right) reminds the user that the IR illuminator is on (for more details on illuminator see below). In the daytime with closed diaphragm it is normal to observe a fuzzy image. Switching on the night vision device in the daytime is intended for testing purposes only. The rotating switch has four positions: “Off”, “Auto”, “On”, “IR”. In Auto mode the monocular will switch off automatically when turned upright. 11 Switching the unit off After you have finished using the device, turn it off by rotating switch (1, Fig.1) to OFF position. Put a protective lens cap on the lens. Remove the battery from the battery compartment to avoid any damage of the device in case of electrolyte leakage. Adjusting to a particular camera Turn on the device with the attached camera. Direct the device to an object placed within 8-15m from the viewer. Set the eyepiece lens (4, Fig. 1) to zero on the diopter scale. Obtain the sharpest image possible on the camera screen by focusing the objective lens (3, Fig. 1), then adjust it by the eyepiece lens if necessary. Auto shut OFF at bright light The NIGHT WITNESS M3 monocular has a built-in high light sensor located near the IR illuminator (2, Fig. 1). This sensor shuts the monocular off after about 45 second exposure to light exceeding 10-1 lux. To reset the monocular switch it off and then back on as described in 6.3 and 6.2. High-light shut-off feature does not mean that the unit will react to occasional flashes or bright spots. It protects the tube against excessive light exposure only. 12 Using IR illuminator In case of insufficient light when observing a close object turn on the IR illuminator by turning the switch (1, Fig.1). Red indicator visible through the eyepiece will warn you when the IR illuminator is on. IR illuminator’s light can be partially or completely blocked if large size objective lens is mounted on the device. Note: The IR illuminator is visible to anybody equipped with a night vision device and can disclose the user’s presence. Attaching the camera The adapter consists of 2 rings: a) Camera adapter is 52x0.75mm. It fits the filter lens thread of various cameras, e.g. Nikon. b) Video adapter is 37x0.75mm. It fits Sony cameras and some others. If our adapter does not fit your camera obtain a proper step up / step down rings. 13 Mounting on a tripod The tripod adapter enables mounting the unit on the standard tripod with 1/4” thread socket. It has a flat screw with the large grooved head for convenient tightening. Note: Over tightening the screw may damage the thread. Using of different objective lenses The Night Witness M3 monocular can work with large variety of standard lenses made under the C-mount standard. The resulting magnification of the system would be equal to M=Focal length of the lens divided by 27.5. 14 6. WARRANTY NEWCON warrants this product against defects in materials and workmanship for one year from the date of the original purchase, longer warranty is available, subject to the terms of the specific sales contract. Should your Newcon product prove to be defective during this period, please deliver the product securely packaged in its original container or an equivalent, along with the proof of the original purchase date, to your Newcon Dealer. Newcon will repair (or, at its option, replace with the same or comparable model), the product or part thereof, which, on inspection by Newcon, is found to be defective in materials or workmanship. What This Warranty Does Not Cover: NEWCON is not responsible for warranty service should the product fail as a result of improper maintenance, misuse, abuse, improper installation, neglect, damage caused by disasters such as fire, flooding, lightning, improper power supply, or service other than by a NEWCON Authorized Service. Postage, insurance and shipping costs incurred while presenting your NEWCON product for warranty service are your responsibility. If shipping from North America please include a cheque or money order payable to NEWCON OPTIK for the amount of $15.00 to cover handling and return shipping. 15 7. TROUBLESHOOTING No green light through eyepieces Check that the batteries are installed properly. Check the charge of the batteries. Replace them if they are weak. Image is unclear Check if the lenses are foggy or dusty. Clean them if necessary. If the image is still unfocused – adjust the eyepieces; see the recommendations on focussing for details. Image flashes Image may flash during the first two minutes after activation. It may continue flashing if exposed to bright light (even with the diaphragm is closed!). Condensation accumulates on the parts When the unit is brought from the cold into a warm environment internal condensation may appear. The unit 16 has to be warmed up for up to two hours to regain full operational capacity. Visibility decreased or disappeared Bright light sources (the Moon, projectors or headlights) may cause visibility to degrade or even completely disappear. Move the device away from the light source immediately. The image will be restored within two minutes. Adverse atmospheric conditions such as fog, haze or extremely dark environments decrease visibility. 17 8. CUSTOMER SUPPORT Should you experience any difficulties with your Newcon Optik product, consult this manual first. If the problem remains, contact our customer support department at +1(416) 663-6963 or toll free at 1-877-3686666 (North America only). Our operating hours are 9am-5pm, Monday - Friday, Eastern Standard Time. Under no circumstances should the equipment be sent to Newcon without authorisation from our technical support department. Newcon accepts no responsibility for unauthorized returns. To locate NEWCON Authorized Dealer call +1(416) 663-6963 or fax +1(416) 663-9065 Email: [email protected] Web: www.newcon-optik.com The defective products should be shipped to: US Customers: 2498 Superior Ave. Cleveland, OH 44114, USA From all other countries: 105 Sparks Ave., Toronto ON, M2H 2S5, CANADA 18 9. ACCEPTANCE CERTIFICATE NIGHT WITNESS M3 serial number: ______________________________________________ IIT serial number: ______________________________ Date of production: ______________________________________________ Quality Inspector’s signature: ______________________________________________ 19 NEWCON OPTIK Printed in Canada