1
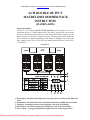
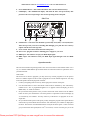
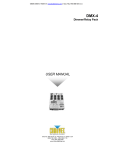
4-CH DOUBLE OUTPUT
DMX DIMMER PACK
USER’S MANUAL
ORDER DIRECTLY TODAY AT: www.BulbAmerica.com or CALL TOLL FREE 888-505-2111
4-CH DOUBLE OUTPUT
MATRIX DMX DIMMER PACK
INSTRUCTION
(MATRIX-DMX)
Product description:
The unit is 1,2,or 4-channel MATRIX DMX DIMMER pack. This pack can serve as a
stand-alone chaser or a DMX dimmer pack. This pack is designed for zero-crossing
circuitry, which protects against inductive loads. Each channel comes with two 3-prong
Edison sockets for USA or IEC sockets for Europe. This unit features XLR female and
male connection for DMX compatibility. Each channel is Equipped with a fusel, the
Max. Output is 10A (120V) or 5A (230V) per channel and total current is 20A (120V)
or 15A(230V).
Front View
1. Mode button - this button will change the power packs operate mode between DMX and
chaser.
2. Menu button - this button will activate the different functions in DMX and chase modes.
3. Up button - this button will increase the displayed value in the LCD display.
4. Down button - this button will decrease the displayed value in the LCD display.
5. Power output - 3 prong grounded Edison output sockets or 8 total output sockets.
Please purchase PDF Split-Merge on www.verypdf.com to remove this watermark.
ORDER DIRECTLY TODAY AT: www.BulbAmerica.com or CALL TOLL FREE 888-505-2111
6. Green LED indicators - these LED will indicate their relevant channel activity.
7. LED display - this multifunction display will detail all chase and procreativity that
pertains to the current operating to the current operating mode of the pack.
Side View
8. Channel fuses - each of the four channels is protected by 10A (120V) or 6.3A(230V) fuse.
These fuses prevent you from overloading and damaging your pack. Be sure to always
replace with the exact same type fuse.
9. Power switch - this switch controls the unit’s main power.
10. Power cord - plug this cord into a matching power supply for your area.
11. DMX input - this connector accepts your DMX input signal.
12. DMX output - this connector sends your DMX input signal through to the next DMX
device.
Operation modes:
The unit has two different operating modes. This unit can be used as a four-channel chaser or as a
1,2, or 4 channels DMX dimmer pack. Please follow the instructions below to operate the unit in
your desired mode.
Chase mode:
This device has 16 built in programs, you may select any of these programs or set the pack to
chase in a random sequence of all 16 built in programs for a more dramatic light show. You may
control the speed at which the programs will chase.
1. Connect your lighting effects to the any of the eight power sockets on the pack.
2. Use the mode button to select chase mode: Chase mode is indicated by “PA” followed by
numbers 01-16. “PA” is programmed applied. If “A” appears in the LCD display you are in
DMX mode, “A” stands for address.
3. Set your desired chase pattern: Once you have selected the chase function use the MENU
button to select your desired chase. The chase pattern is represented in the LCD display by
“P” followed by two numbers. You may select any of the built in 16 programs to run at a
single time.
4. Set your desired chase speed: at this point you may change the program chase speed. While in
chase mode, tap on the MENU button until the “SP” followed by two numbers is displayed in
the LCD. Then use the UP and DOWN buttons to adjust the chase speed. A value of 99 will
give you the fastest chase speed (about 1/10 th of a second). A value of 01 will give you’re the
Please purchase PDF Split-Merge on www.verypdf.com to remove this watermark.
ORDER DIRECTLY TODAY AT: www.BulbAmerica.com or CALL TOLL FREE 888-505-2111
slowest chase speed (one step every 30 sec.).
5. you may now change the light intensity: use the MENU button to select “d” in the LCD. Use
the Up and DOWN arrow keys to change the light output\ intensity. 00 will give the lowest
output and 99 will give you full intensity.
DMX MODE:
Use this operating mode only if you plan to use your pack as a DMX dimmer. This function will
allow you to turn on and control the intensity of non-DMX with the use of a DMX controller. On,
off and dimming functions can be performed through this pack. You may also set your dimmer
pack to functions as a 1, 2, or 4 channel DMX dimmer pack. Which means you can combine the
output functions.
1. Plug in a DMX controller to your dimmer pack via the 3-pin XLR cables.
2. Connect your lighting effects to any of the eight power sockets on the front of the pack.
3. Decide if you are going to use your dimmer pack as 1, 2, or 4 channels. This function allows
you to:
A. Control the output to all four outlets with one DMX channel.
B. Group outlet channels one and two and group outlets channels three and the second group
will be by one DMX channel and the second group will be controlled by another DMX
channel. This gives the pack a DMX value of two.
C. The default setting is a four-channel DMX switcher; each channel is controlled by one
DMX channel.
4. To change the channel function mode be sure you are inDMX mode. Use the menu button to
select “ CH” followed by two digits. Then use the UP and DOWN arrow buttons to change the
setting from 01,02, or 04. Your dimmer pack is initially set as a four-channel DMX switcher.
5. The dimmer pack is initially set to be activated by DMX address one. To change this setting
be sure you are you are in DMX mode. Use the MENU button to select the address settings,
this will be indicated by an “A” in the first character of the LCD followed by your desired
DMX address. Remember the DMX address tells your DMX controller what channel to
activate the pack’s functions.
6. Once you have set the pack’s DMX address be sure your controller’s address matches that of
the packs.
7. Your pack will now operate as DMX dimmer, you may control the light output intensity
through your DMX controller. 0 will give no output and 100 will give you full output.
Fuse replacement:
To replace the protective fuse, use a flat head screwdriver to unscrew the fuse holder. Pull out the
old fuse and replace it with a new one. Inset the fuse back into slot and tighten. Always replace
with the exact same type fuse remove unless otherwise specified by an authorized service
technician.
Caution:
Always disconnect the units main power before performing any type of service or fuse
replacement.