1
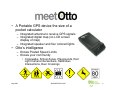
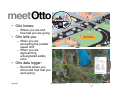
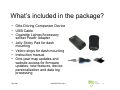
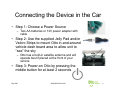
Otto-Driving
Companion®
Device
Personalization, and
Configuration
© PERSENTECH 2011
1
• A Portable GPS device the size of a
pocket calculator
– Integrated antenna to receive GPS signals
– Integrated digital map (no LCD screen
display of map)
– Integrated speaker and four colored lights
• Otto’s intelligence
– Knows Posted Speed Limits
– Knows your community
• Crosswalks, School Zones, Playgrounds, Red
Light Camera Intersections, Hazardous
Intersections, Deer Crossings
!
May-2007
©PERSENTECH 2007
2
• Otto knows:
– Where you are and
how fast you are going
• Otto tells you:
– When you are
exceeding the posted
speed limit
– When you are
approaching
a designated safety
zone
• Otto data logger:
– Records where you
drove and how fast you
were going
May-2007
©PERSENTECH 2007
3
What’s included in the package?
• Otto-Driving Companion Device
• USB Cable
• Cigarette Lighter/Accessory
socket Power Adapter
• Jelly Sticky Pad for dash
mounting
• Velcro strips for dash mounting
• Instruction manual
• One-year map updates and
website access for firmware
updates, new features, device
personalization and data log
processing
May-2007
©PERSENTECH 2007
4
Connecting the Device in the Car
• Step 1: Choose a Power Source
– Two AA batteries or 12V power adapter with
cable
• Step 2: Use the supplied Jelly Pad and/or
Velcro Strips to mount Otto in-and-around
vehicle dash board area to allow unit to
“see” the sky
– Otto has a built-in satellite antenna and will
operate best if placed at the front of your
vehicle
• Step 3: Power-on Otto by pressing the
middle button for at least 2 seconds
May-2007
©PERSENTECH 2007
5
Otto Operation
• As Otto turns on, it will play a short melody and the green light will
blink on and off until it acquires the satellite signal
• Otto will be ready when the green light stops blinking
– If you are outdoors with a clear view of the sky, this process will take
approximately 45 seconds and as long as 3 minutes if the device is
powered on the first time or after being off for more than 8 hours (called
a “cold start”)
– If you only have a partial view of the sky (for example, you are standing
beside a tall building), this process may take longer.
– If you do not have a clear view of the sky (for example, you are inside a
building), the device may not acquire a satellite signal and the green
light will continue to blink
• Due to the positioning “fix” required for accuracy, this is a GO or No
GO type feedback to the user
– i.e. Either the device has a “fix” on your position or it does not have a
“fix” on your position
May-2007
©PERSENTECH 2007
6
Connecting Otto to your PC
• Configuring Otto using the Website
– Use your PC to connect to the Internet to
configure Otto’s settings, receive the
latest map updates, download new
maps, and upload your OttoLog™data
files to view trip information and to render
the trips on GoogleEarth®
• Configuring Otto using the Otto
Configuration Software
– You can also use the Otto Configuration
Software (downloaded from the website
or installed from the accompanying
CDROM) instead of the website to
configure your Otto device and to upload
your data log files from the device
• You will still require an Internet
connection to view the log files on
GoogleEarth ®
May-2007
©PERSENTECH 2007
7
Using your Microsoft Internet
Explorer® (IE) Web Browser
• You must use the Microsoft Internet
Explorer® Application Software that
comes with your PC
– Netscape, Firefox or other Internet
browser applications will not work
as they will not support the
ActiveX®
– An ActiveX® control will be
downloaded to your PC’s Internet
Explorer® when you click on the
Login to my Otto button
– You should see the screens shown
on the following slides on your PC
desktop as you launch your IE web
browser to allow for the ActiveX®
element to be configured on your
PC
May-2007
©PERSENTECH 2007
8
Using the Website (1)
• Go to http://www.myottomate.com and
click on the Login to my Otto button
May-2007
©PERSENTECH 2007
9
Using the Website (2)
• You will see the following screen the first time you connect to the
Website with your Otto connected to the PC
May-2007
©PERSENTECH 2007
10
Using the Website (2)
• Click on the highlighted bar at the top of your IE
application and select “Install ActiveX Control”
May-2007
©PERSENTECH 2007
11
Using the Website (3)
• The time it takes to download the ActiveX®
control file will depend on your Internet
connection speed
– The file is approximately 600 kBytes in size
• After the IE application downloads the file, the
Otto driving companion will be recognized and
the IE application will be communicating with
Otto to allow you to configure it, download maps
and upload your data log files
• You should see the desktop screen shown on
the next page after Otto becomes operational
through to the website
May-2007
©PERSENTECH 2007
12
Using the Website (4)
•
•
When you see this screen, you can proceed to configure, download maps and
manage your OttoLog data files
If you are having difficulty in downloading the ActiveX® control, go to the Appendix in
this presentation to verify your Internet Explorer browser application settings
May-2007
©PERSENTECH 2007
13
myDevice (1)
• Click on the “myDevice” tab
– At this point, the IE browser application
with the ActiveX® control will begin to
communicate with your Otto device
– You will initially see a small green bar
scrolling along as the program
recognizes the connected Otto device
and then presents you with your
myOtto home page
– This page, shown on the next slide,
contains information about your device
that can be used for customer support
and system verification
May-2007
©PERSENTECH 2007
14
myDevice (2)
•
•
Click on “Update and Manage Coverage Map” to add/remove or update your maps
The screen on the following page shows you a sample of the coverage maps that are
loaded on your device
May-2007
©PERSENTECH 2007
15
Update and Manage Coverage
Maps
May-2007
©PERSENTECH 2007
16
Personalize General Otto Settings
• Click on “Personalize General Otto Settings” to configure Otto’s
basic settings
May-2007
©PERSENTECH 2007
17
“Personalize Road Safety Alerts”
• Click on “Personalize Road Safety Alerts” to
configure the speed limit notification settings and
the Road Safety Alert Settings
• The details for each of these settings is
described with the setting, in the user manual
and user manual addendum, and in the Otto
Configuration Software User Manual
• Remember to select the “APPLY SETTINGS”
button at the bottom of the main screen after you
make changes
May-2007
©PERSENTECH 2007
18
“Speed Limit Notification Changes”
May-2007
©PERSENTECH 2007
19
“Road Safety Alert Settings”
May-2007
©PERSENTECH 2007
20
“Personalize OttoLog Trip
Recording”
• The model PM2626 supports data logging
in addition to the road safety alerts
• Click on the “Personalize OttoLog Trip
Recording” icon to begin configuring your
device
May-2007
©PERSENTECH 2007
21
“Personalize Log File”
•
•
This screen indicates the log file size and time remaining in the log for the given sampling interval
You would click on the “Clear Logging Memory” button to reset your memory space to the initial
state
–
May-2007
When you do this, you will clear out/delete all previous data and trips on the device, so make sure you save
the log files before you clear the logging memory
©PERSENTECH 2007
22
“Logging Configuration”
•
Two settings to configure when Otto should stop recording data if the vehicle is idle
(i.e. parked or stopped for a long period of time) and how often to record trip samples
–
May-2007
Once per second is the default setting that provides the greatest resolution in data
©PERSENTECH 2007
23
“Security Settings”
• Configure the security settings for your data logs
according to your needs:
– High, Medium and Easy access are available
May-2007
©PERSENTECH 2007
24
“myLogs”
• Return to the main screen and click on “myLogs” to
access the data logs resident on your Otto device
• Click on “Upload a New Log for Viewing”
May-2007
©PERSENTECH 2007
25
“Upload a New Log for Viewing”
• You can choose whether to upload a log directly from your Otto
device, or you can upload a previously saved data log that is
resident on your PC
May-2007
©PERSENTECH 2007
26
“Upload Log from my Otto”
•
Click on the “Upload Log from Otto” button
–
•
You will see a window on the screen that allows you to upload the log file and save it to your PC
for future use
–
–
•
Ensure that the Otto device is connected to the PC through the USB port
If you do not want to save the log file to the PC, simply click on the “CONTINUE” button
If you do want to save the log file to the PC, click on the “Browse” button and select the folder where you
would like to save the log file, i.e. OTTO-LOGFILES, and then select a name for your Log file, i.e. Otto-4066May20-07.ipl
Once the logfile is uploaded and saved to your PC, it will then be uploaded to the external server
for processing
–
May-2007
Click “Finish” after you are prompted that the Log file was uploaded successfully
©PERSENTECH 2007
27
“Upload Log from PC”
•
When you select “Upload Log from PC”, you will see a browser window
open
– Browse to the folder on your PC where you have previously saved your Log files
and select the file you would like to open
– The log files will have a format:
• Filename.ipl
May-2007
©PERSENTECH 2007
28
“Upload Log File”
• Once you have selected the file
to upload, the web browser
application will upload the file to
the server for you and you will
then have access to the trip
information and the various trip
reporting options
– This includes trip reports in PDF
format
– Exporting trip information to other
applications
– Uploading the trip information to
“GoogleEarth 3D®)
• Click “Finish” and you will see the
screen shown on the following
slide when the data upload has
been completed
May-2007
©PERSENTECH 2007
29
myLogs with Trip Information
May-2007
©PERSENTECH 2007
30
Viewing Reports from myLog
• The main screen identifies the filename of the
data log currently uploaded, the Serial Number
of the Otto that recorded the data, the number
of trips in the file, the total distance (in km)
driven, and the total time duration recorded
– Note that a trip start and trip stop are defined as
follows:
• Trip Start or Stop: When the Otto device has
been power-cycled – powered on = Start Trip,
powered off = Stop Trip
• Trip Stop: When the Otto senses a stop (no
change in position or velocity) after the value in
minutes set in the OttoLog Configuration panel setting the value to pause logging after a certain
number of minutes
• Trip Start: When Otto is still on, and has paused
logging after the number of minutes set in the
OttoLog configuration, Otto will start logging
again once it senses a change in position and a
change in velocity
May-2007
©PERSENTECH 2007
31
View Reports Generated from
MyLog
• Click on “View Reports Generated from
My Log” to select the desired trip reporting
function
May-2007
©PERSENTECH 2007
32
View Reports Generated from
MyLog
• There are currently five different reports
available:
–
–
–
–
–
Overall Trip Summary
Speeding exceptions
Aggressive Acceleration
Estimated Fuel Costs
Detailed Trip Report
• You can click on the “Save as PDF” icon to save
the report as a PDF file
• The following slides provide you with an
example of each report
May-2007
©PERSENTECH 2007
33
Overall Trip
Summary
May-2007
©PERSENTECH 2007
34
“Speeding Exceptions”
May-2007
©PERSENTECH 2007
35
“Excessive Acceleration & Braking”
May-2007
©PERSENTECH 2007
36
“Fuel Cost per Trip”
May-2007
©PERSENTECH 2007
37
“Detailed Trip Information”
May-2007
©PERSENTECH 2007
38
“View where I drove on a Map” (1)
• Select “View where I drove on a map” if you wish
to view your trips on GoogleEarth 3D®
• The next screen that appears will give you the
option to download GoogleEarth 3D® if you do
not already have this loaded
– Select the GoogleEarth 3D® icon if you have already
downloaded the application and this will launch
GoogleEarth® and will overlay your trips on the globe
May-2007
©PERSENTECH 2007
39
“View where I drove on a Map” (2)
May-2007
©PERSENTECH 2007
40
“View where I drove on a Map” (3)
• When GoogleEarth 3D opens, you
will see a temporary folder with the
OttoLog Trips shown in the left
sidebar
• In the main screen, you will see all
the trips highlighted as green lines
along with all the driving behaviour
alerts that include:
– Acceleration-deceleration points
– Maximum velocity points
– Start Trip points
– End Trip points
– Points of Interest that the
user has previously marked
May-2007
©PERSENTECH 2007
Trip Number
followed by
date and time
41
View where I drove on a Map” (4)
May-2007
©PERSENTECH 2007
42
View where I drove on a Map” (5)
• You can view individual trips and the
information on the trip
– In the left hand side “Places” pane on
the screen, select only one trip OttoLog Trip #31
• You can expand the trip to:
–
–
–
–
–
View Trail
Click the start icon to view details
Click on the maximum velocity
Click on the Aggressive Acceleration
Click on the stop icon to view details
– The Google Earth 3D® map of trip #31
with the start icon clicked is shown in
the following slide as an example
May-2007
©PERSENTECH 2007
43
View where I
drove on a
Map” (5)
May-2007
©PERSENTECH 2007
44
View where I drove on a Map” (6)
May-2007
©PERSENTECH 2007
45
GoogleEarth3D®
•
•
•
•
Google Earth 3D® is a powerful application program that allows the user to
do many different overlays of information
PERSENTECH suggests that the user review the GoogleEarth 3D® Help
section to learn more about using the tool
Click on “Help” and select “User Guide” to get this additional information
http://earth.google.com/userguide/v4/
May-2007
©PERSENTECH 2007
46
“Export Log in Another Format” (1)
• If you wish to export your OttoLog trip data to another
application program, click on “Export Log in Another
Format”
– The types of format supported at this time include:
•
•
•
•
PDF file format of all the trip points
ASCII text file format of all the trip points
GPX file format for use with back-office server applications
Microsoft Streets & Trips® File format for viewing the trip data
points in this application software
– Examples of these file formats are provided on the next several
slides
May-2007
©PERSENTECH 2007
47
“Export Log in Another Format” (2)
PDF File Format
May-2007
©PERSENTECH 2007
48
“Export Log in Another Format” (3)
Text File Format
May-2007
©PERSENTECH 2007
49
“Export Log in Another Format” (4)
GPX File
Format
May-2007
©PERSENTECH 2007
50
“Export Log in Another Format” (4)
Streets and Trips File
Format
May-2007
©PERSENTECH 2007
51
“Export Log in Another Format” (5)
•
Sample of trip trace from the Streets and Trips output file loaded into the Microsoft
Streets and Trips® Application Software
–
Open Application Data Tab Import Data Wizard Select filename ottolog-streettrips.txt Choose the Comma character separator Select Country Region Click Finish
Streets and Trips
Map showing part of
Trip #31 previously
shown on
GoogleEarth 3D®
May-2007
©PERSENTECH 2007
52
Appendix
• This appendix contains information relating to
security settings on your Microsoft Internet
Explorer® browser application
• The default settings on the IE 6 and IE7 browser
applications in the “Medium-High” security
setting are sufficient to allow the ActiveX®
element to be downloaded
• In some cases, however, other programs or a
user may have changed the settings and so you
will need to verify your IE configuration settings
to allow your IE browser application to
communicate with your Otto device
May-2007
©PERSENTECH 2007
53
IE6 Explorer Settings (1)
• The default IE6 (Internet Explorer version 6)
settings will allow the ActiveX® control to be
downloaded
– In some cases, the IE security settings may have
been changed and this may prevent you from
downloading and installing the ActiveX® control
• The following screens show you the settings that
are required on your IE6 application to ensure
that you can download the control and enable
the communication between the Otto device and
the IE6 application
May-2007
©PERSENTECH 2007
54
IE6 Explorer Settings (2)
• Select Tools Internet Options
May-2007
©PERSENTECH 2007
55
IE6 Explorer Settings (3)
• Select the “Security” Tab Then select “Custom Level”
– Make sure that the “Run ActiveX controls and plug-ins is “Enabled”
May-2007
©PERSENTECH 2007
56
IE7 Explorer Settings (1)
• The Internet Explorer® version 7 web browser
application is similar to the IE6 application, but has one
additional security setting that you may be required to
select
– Once again, by default, most security settings in their default
state do not need to be changed to allow for operation with Otto
– In some instances, however, the user and/or other application
programs may have made some changes to the default settings
– The following slides show the settings that need to be verified
with the IE7 browser application if you are experiencing difficulty
in downloading the ActiveX® control
May-2007
©PERSENTECH 2007
57
IE7 Explorer Settings (2)
• Select Tools “Manage Add-ons” “Enable or
Disable Add-ons” from the main IE7 Menu bar
May-2007
©PERSENTECH 2007
58
IE7 Explorer Settings (3)
• Select
“Downloaded
ActiveX controls
(32 bit)” or “Addons currently
loaded in Internet
Explorer” and
ensure that the
“CUEUpdate
Control” ActiveX
control is
“Enabled”
May-2007
©PERSENTECH 2007
59
IE7 Explorer Settings (4)
•
The “Security” “Custom Level” Enable “Run ActiveX controls and plug-ins”
setting should also be set
–
–
May-2007
This is the same as for the IE6 browser application
Remember, by default at the Medium-High Setting, this will already be set
©PERSENTECH 2007
60