1
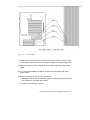
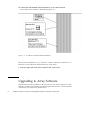
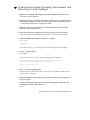
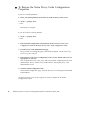
Netra Proxy Cache 1.0 Server to
Array Upgrade Instructions
A Sun Microsystems, Inc.
Business
901 San Antonio Road
Palo Alto, , CA 94303-4900
Part No: 805-3511-10
Revision A, March 1998
USA 650 960-1300 fax 650 969-9131
Netra Proxy Cache 1.0 Server to
Array Upgrade Instructions
Part No: 805-3511-10
Revision A, March 1998
Copyright 1997 Sun Microsystems, Inc. 901 San Antonio Road, Palo Alto, California 94303-4900 U.S.A. All rights reserved.
All rights reserved. This product or document is protected by copyright and distributed under licenses restricting its use, copying,
distribution, and decompilation. No part of this product or document may be reproduced in any form by any means without prior written
authorization of Sun and its licensors, if any.
Portions of this product may be derived from the UNIX® system, licensed from Novell, Inc., and from the Berkeley 4.3 BSD system,
licensed from the University of California. UNIX is a registered trademark in the United States and in other countries and is exclusively
licensed by X/Open Company Ltd. Third-party software, including font technology in this product, is protected by copyright and licensed
from Sun’s suppliers. RESTRICTED RIGHTS: Use, duplication, or disclosure by the U.S. Government is subject to restrictions of FAR
52.227-14(g)(2)(6/87) and FAR 52.227-19(6/87), or DFAR 252.227-7015(b)(6/95) and DFAR 227.7202-3(a).
Sun, Sun Microsystems, the Sun logo, and Solaris are trademarks or registered trademarks of Sun Microsystems, Inc. in the United States
and in other countries. All SPARC trademarks are used under license and are trademarks or registered trademarks of SPARC International,
Inc. in the United States and in other countries. Products bearing SPARC trademarks are based upon an architecture developed by Sun
Microsystems, Inc.
TM
The OPEN LOOK® and Sun Graphical User Interfaces were developed by Sun Microsystems, Inc. for its users and licensees. Sun
acknowledges the pioneering efforts of Xerox Corporation in researching and developing the concept of visual or graphical user interfaces
for the computer industry. Sun holds a nonexclusive license from Xerox to the Xerox Graphical User Interface, which license also covers
Sun’s licensees who implement OPEN LOOK GUIs and otherwise comply with Sun’s written license agreements.
THIS PUBLICATION IS PROVIDED “AS IS” WITHOUT WARRANTY OF ANY KIND, EITHER EXPRESS OR IMPLIED, INCLUDING,
BUT NOT LIMITED TO, THE IMPLIED WARRANTIES OF MERCHANTABILITY, FITNESS FOR A PARTICULAR PURPOSE, OR
NON-INFRINGEMENT.
Copyright 1997 Sun Microsystems, Inc., 901 San Antonio Road, Palo Alto, Californie 94303-4900 U.S.A. Tous droits réservés.
Ce produit ou document est protégé par un copyright et distribué avec des licences qui en restreignent l’utilisation, la copie et la
décompilation. Aucune partie de ce produit ou de sa documentation associée ne peut être reproduite sous aucune forme, par quelque
moyen que ce soit, sans l’autorisation préalable et écrite de Sun et de ses bailleurs de licence, s’il y en a.
Des parties de ce produit pourront être derivées du système UNIX® licencié par Novell, Inc. et du système Berkeley 4.3 BSD licencié par
l’Université de Californie. UNIX est une marque enregistrée aux Etats-Unis et dans d’autres pays, et licenciée exclusivement par X/Open
Company Ltd. Le logiciel détenu par des tiers, et qui comprend la technologie relative aux polices de caractères, est protégé par un
copyright et licencié par des fournisseurs de Sun.
Sun, Sun Microsystems, le logo Sun, et Solaris sont des marques déposées ou enregistrées de Sun Microsystems, Inc. aux Etats-Unis et
dans d’autres pays. Toutes les marques SPARC, utilisées sous licence, sont des marques déposées ou enregistrées de SPARC International,
Inc. aux Etats-Unis et dans d’autres pays. Les produits portant les marques SPARC sont basés sur une architecture développée par Sun
Microsystems, Inc.
TM
Les utilisateurs d’interfaces graphiques OPEN LOOK® et Sun ont été développés de Sun Microsystems, Inc. pour ses utilisateurs et
licenciés. Sun reconnaît les efforts de pionniers de Xerox Corporation pour la recherche et le développement du concept des interfaces
d’utilisation visuelle ou graphique pour l’industrie de l’informatique. Sun détient une licence non exclusive de Xerox sur l’interface
d’utilisation graphique, cette licence couvrant aussi les licenciés de Sun qui mettent en place les utilisateurs d’interfaces graphiques OPEN
LOOK et qui en outre se conforment aux licences écrites de Sun.
CETTE PUBLICATION EST FOURNIE "EN L’ETAT" SANS GARANTIE D’AUCUNE SORTE, NI EXPRESSE NI IMPLICITE, Y COMPRIS,
ET SANS QUE CETTE LISTE NE SOIT LIMITATIVE, DES GARANTIES CONCERNANT LA VALEUR MARCHANDE, L’APTITUDE DES
PRODUITS A REPONDRE A UNE UTILISATION PARTICULIERE OU LE FAIT QU’ILS NE SOIENT PAS CONTREFAISANTS DE
PRODUITS DE TIERS.
Please
Recycle
Contents
1.
Netra Proxy Cache Server to Array Upgrade Instructions 1
Upgrade Kit Components 2
Upgrade Procedure Overview
2
Installing the FastEthernet Card
H
To Install the FastEthernet Card
Upgrading to Array Software
H
2
4
8
To Upgrade the Netra Proxy Cache Software
9
System Recovery 10
H
To Restore the Solaris Operating Environment and Netra Proxy Cache
Packages 11
H
To Restore the Netra Proxy Cache Configuration Properties
12
Contents iv
v
Netra Proxy Cache 1.0 Server to Array Upgrade Instructions ♦ Revision A, March 1998
CHAPTER
1
Netra Proxy Cache Server to Array
Upgrade Instructions
“Upgrade Kit Components” on page 2
“Upgrade Procedure Overview” on page 2
“Installing the FastEthernet Card” on page 2
“Upgrading to Array Software” on page 8
“System Recovery” on page 10
TM
This document explains how to upgrade your Netra Proxy Cache Server to the
Netra Proxy Cache Array product. It also explains how to restore your upgraded
server, should you experience a catastrophic failure.
This document assumes you have a Netra Proxy Cache Server that you are
upgrading to the array form of the product and that you have one or more
additional Netra Proxy Cache hosts with array software. Together, the machine you
are upgrading and the additional host(s) will form a Netra Proxy Cache Array.
Before starting the procedure specified in this document, it is strongly recommended
that you read Chapter 1 of the Netra Proxy Cache Array Configuration Guide. In
particular, you should know what a control network is and have:
4 a subnet address for your control network
4 a host address on the control network for each host in your array
You should also know what an administrative host is. This procedure assumes that the
server you are upgrading will act as the administrative host for the array.
See Chapter 1 of the Netra Proxy Cache Array User’s Manual for a high-level overview
of the Netra Proxy Cache Array product.
1
Upgrade Kit Components
The Netra Proxy Cache Server to Array Upgrade Kit consists of the following:
4 A Sun FastEthernet PCI card and cable with RJ45 connectors
4 An upgrade CD containing the scripts and packages to convert a Netra Proxy
Cache Server to the Array version of the product
4 A set of Netra Proxy Cache Array software documents:
4
Netra Proxy Cache Array Configuration Guide (805-1793-10)
Netra Proxy Cache Array User’s Manual (805-3512-10)
4 “Netra Proxy Cache Array Product Notes” (805-3513-10)
4
Upgrade Procedure Overview
At a high level, the upgrade procedure consists of:
1. Installing the Sun FastEthernet card in your Netra Proxy Cache Server and
connecting the new network interface to a control network.
2. Installing the Netra Proxy Cache Array software and performing array
configuration.
Installing the FastEthernet Card
The reference for this procedure is the Netra Proxy Cache 30 Hardware Installation
Guide (part number 805-3246-10), which is shipped with the Netra Proxy Cache
Server product.
The numbered panels in Figure 1–1 and Figure 1–2, below, illustrate the steps
involved in installing the FastEthernet card. Detailed written instructions follow the
figures.
2
Netra Proxy Cache 1.0 Server to Array Upgrade Instructions ♦ Revision A, March 1998
Figure 1–1
Powering Off, Attaching Wrist Strap, Removing Filler Panel
Netra Proxy Cache Server to Array Upgrade Instructions
3
Figure 1–2 Inserting Card, Attaching Card Bracket Tab, Removing Wrist Strap,
Replacing Side Panel
To Install the FastEthernet Card
1. In the Netra Main Administration page, click Restart and Shutdown.
2. In the Restart and Shutdown Administration page, click Shutdown.
Make sure “Check for new devices during restart” is selected.
4
Netra Proxy Cache 1.0 Server to Array Upgrade Instructions ♦ Revision A, March 1998
3. When the shutdown completes (after about 60 seconds), press the Standby (
4. )side of the power switch. See panel 1 of Figure 1–3.
5. Grasp the side panel and pull it toward the back of the system. Lift up and
remove the panel. See panel 2 of Figure 1–3.
Note - If the lock block is installed, you must remove it before opening the
system unit.
Figure 1–3
Power Switch and Side Panel
Netra Proxy Cache Server to Array Upgrade Instructions
5
6. Locate the wrist strap (shipped with the PCI card), and attach its adhesive
copper strip to the chassis back panel. Wrap the other end twice around your
wrist, with the adhesive side against your skin.
7. Remove the filler panel from the back panel of the system chassis.
8. Locate a PCI card slot for Sun FastEthernet card.
Use Slot 2, unless that slot is already in use.
TABLE 1–1
PCI Card Slots
PCI Card Slot:
Operating
Frequency
Input/Output Signaling Level:
Usable for
Array
Upgrade?
Slot 1 J1301
33 MHz or 66
MHz
3.3 volts
No
Slot 2 J1401
33 MHz
5.0 volts
Yes
Slot 3 J1501
33 MHz
5.0 volts
Yes
Slot 4 J1601
33 MHz
5.0 volts
Yes
These slots are illustrated in Figure 1–4. The Sun FastEthernet card shipped in the
upgrade kit is a 33 MHz card and thus cannot take advantage of the 66 MHz
capability of slot 1 (J1301). It should be installed in slot 2 (J1401). If that slot is not
available use slot 3 (J1501), or slot 4 (J1601).
Note - Examples that follow in this document and in the Netra Proxy Cache Array
manuals assume that the second network interface is installed in slot 2 (J1401).
6
Netra Proxy Cache 1.0 Server to Array Upgrade Instructions ♦ Revision A, March 1998
Figure 1–4
PCI Card Slots
9. Fit the card back panel into one of the system chassis card slots, and lower the
card connector so that it touches its associated card slot on the main logic board.
10. Push the card by its corners straight down into the slot until the card is fully
seated.
11. Use a magnetized Phillips screwdriver to attach the card bracket tab to the
system chassis.
12. Detach the wrist strap and close the system unit.
a. Holding the side panel in both hands, guide it so that the hooks align with
the channels on the system unit chassis.
b. Install the lock block if necessary.
Netra Proxy Cache Server to Array Upgrade Instructions
7
13. Connect the just-installed network interface to your control network.
The location of the interface is illustrated in Figure 1–5.
Figure 1–5
Location of Control Network Interface
The new network interface (hme1) connects to a hub, to which you connect the hme1
interfaces on all of the hosts in the Netra Proxy Cache Array.
1. Press the right side of the power switch to turn on the server.
Upgrading to Array Software
The references for this procedure are the Netra Proxy Cache Array Configuration Guide
and User’s Manual. The following procedure requires that you have a serial terminal
connected to your Netra Proxy Cache Server.
8
Netra Proxy Cache 1.0 Server to Array Upgrade Instructions ♦ Revision A, March 1998
If you want, you can back up your Netra Proxy Cache Server configuration before
starting the following procedure. This backup procedure is described in Chapter 3 of
the Netra Proxy Cache Server Configuration Guide.
To Upgrade the Netra Proxy Cache Software
1. Insert the upgrade CD into the CD drive of your Netra Proxy Cache Server.
2. At a serial terminal connected to your Netra Proxy Cache Server, log in as root.
3. Still at the serial terminal connected to your Netra Proxy Cache Server, enter:
# cd /cdrom/netra_proxy_cache_1_0_upgrade
# ./upgrade
The upgrade script completes its work silently and returns you to the operating
system prompt. Your Netra Proxy Cache Server now includes the array software.
4. At this point, if you have not already done so, perform initial host
configuration on all other hosts in your Netra Proxy Cache Array.
See Chapter 2 of the Netra Proxy Cache Array Configuration Guide for instructions.
5. Return to a machine running a browser and load the Netra Main
Administration page from the server you are upgrading.
This machine will act as the administrative host for the array.
6. In the Netra Main Administration page, click Proxy Cache Service.
7. In the Proxy Cache Administration page, click Start administration server.
If the proxy cache administration server is already started, skip this and the
following step.
8. In the Operation Successful page, click the up-arrow icon to return to the
(now-repopulated) Proxy Cache Administration page.
From this point till the end of the procedure, you use the procedures specified in
Chapter 3 of the Netra Proxy Cache Array Configuration Guide, starting on page 3-10.
9. Perform basic array configuration, as described on page 3-10 of the Netra Proxy
Cache Array Configuration Guide.
10. Perform basic array member configuration, as described on page 3-15 of the
Netra Proxy Cache Array Configuration Guide.
Netra Proxy Cache Server to Array Upgrade Instructions
9
11. Install your array configuration on all hosts in your array, as described on page
3-17 of the Netra Proxy Cache Array Configuration Guide.
12. Back up your configuration to diskette, as described on page 3-21 of the Netra
Proxy Cache Array Configuration Guide.
13. Update your DNS, as described on page 3-23 of the Netra Proxy Cache Array
Configuration Guide.
At this point, clients can use the proxy cache service provided by the Netra Proxy
Cache Array.
System Recovery
This section specifies the procedure for recovery should the hard disk from which
you boot fail. You need both the Netra Proxy Cache recovery CD and the Netra
Proxy Cache 1.0 Server to Array Upgrade CD to complete the recovery procedure.
The recovery CD is shipped with the Netra Proxy Cache Server product. The
upgrade CD is shipped with this document.
Note - A nearly indispensable aid to the recovery of a Netra Proxy Cache Server is
the backup diskette you were instructed to create in Step 1 on page 4 on Step 12 on
page 10. If you do not have such a diskette, you can still recover, but you must
repeat some of the configuration steps described in the Netra Proxy Cache Array
Configuration Guide.
The procedure described below performs the following tasks:
4 Formats your hard disks and installs the partition map appropriate for a Netra
Proxy Cache Server
TM
4 Installs the Solaris
operating environment
4 Installs the Netra Proxy Cache product packages
The recovery procedure for a Netra Proxy Cache Server that has been upgraded to
the array form of the product is different from both the non-array server and the
machine purchased as a Netra Proxy Cache Array host. The recovery procedure for a
Netra Proxy Cache Array host is described in Appendix A of the Netra Proxy Cache
Array Configuration Guide.
10
Netra Proxy Cache 1.0 Server to Array Upgrade Instructions ♦ Revision A, March 1998
To Restore the Solaris Operating Environment and
Netra Proxy Cache Packages
1. Replace the hard disk, following the procedure specified in the Netra Proxy
Cache Server Service Manual.
2. Ensure that you have a terminal connected to your Netra Proxy Cache Server, as
described in Appendix A of the Netra Proxy Cache Array Configuration Guide
or Netra Proxy Cache Server Configuration Guide.
3. With your Netra Proxy Cache Server connected to both service and control
networks, power up your server.
4. Insert the Netra Proxy Cache Server recovery CD in the server’s CD drive.
This is the CD that was shipped with the Netra Proxy Cache Server product.
5. Send the RS232 break signal to obtain the ok prompt.
For tip use:
<return>~#
For telnet, use Ctrl-]. For other programs, use the appropriate break signal.
6. At the ok prompt, enter:
ok boot cdrom
The Solaris boot process starts. The following prompt is displayed:
Please confirm that you want to reinstall Netra Proxy Cache 1.0.
This will ERASE ALL EXISTING DATA on the system.
Answer yes, no or quit: y
7. Enter y to the preceding prompt.
The entire process takes about an hour. The process completes when the server
returns to the ok prompt.
8. Using the upgrade CD, perform Step 1 on page 4 through Step 1 on page 4, on
Step 1 on page 9.
9. At the serial terminal from which you invoked the upgrade script, enter the
following command to halt the server:
# init 0
Netra Proxy Cache Server to Array Upgrade Instructions
11
To Restore the Netra Proxy Cache Configuration
Properties
If you have a backup diskette:
1. Insert your backup diskette in the drive of the Netra Proxy Cache Server.
2. At the ok prompt, enter:
ok boot
Restoration is complete.
If you do not have a backup diskette:
1. At the ok prompt, enter:
ok boot
2. Perform initial configuration as described in the Netra Proxy Cache Server
Configuration Guide or the Netra Proxy Cache Array Configuration Guide.
3. Load the Proxy Cache Administration page.
The procedure for loading this page is described in Chapter 3 of the Netra Proxy
Cache Array User’s Manual.
4. Perform proxy cache service configuration, if the server’s default values are not
appropriate for your use.
You can install the proxy cache, array, and array member configuration from your
administrative host or another array member that is running the proxy cache
administration server.
5. Click the Install Configuration link.
In the Install Configuration page, select the host you are restoring and click Install
Selected Hosts.
See the Netra Proxy Cache Array Configuration Guide for details on the Install
Configuration feature.
12
Netra Proxy Cache 1.0 Server to Array Upgrade Instructions ♦ Revision A, March 1998