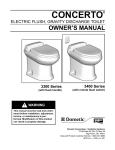
1
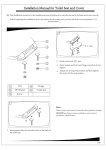
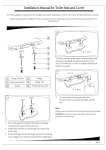
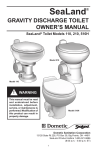
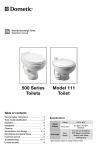
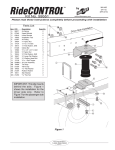
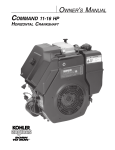
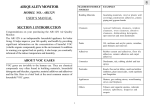
TRAVELER LITE ® FINE CHINA TOILET OWNER’S MANUAL Traveler Lite® Toilet Model 210 Dometic Corporation • Sanitation Systems 13128 State Rt 226, PO Box 38, Big Prairie, OH 44611 SeaLand Product Hotline 1-800-321-9886 (8:00 a.m. - 5:00 p.m. ET) 1 TABLE OF CONTENTS Important Information ............................... Toilet Model Identification ......................... How to Use ............................................... Installation ................................................ Proper Cleaning and Maintenance ........... 2 2 2 3 4 Winterizing ............................................... 4 Deodorants and Special Tissue ................ 5 Troubleshooting ................................... 6 - 7 Warranty ................................................... 8 IMPORTANT INFORMATION 1. Do not use chlorine or caustic chemicals, such as laundry bleach or drain opening types, in the system. These products damage the seals in toilets and dump valves. 2. Do not permit foreign objects (paper towels, paper cups, diapers, sanitary napkins, etc.) to be flushed through the toilet. 3. Mechanical seal toilets, like SeaLand Traveler Lite units, are designed to only discharge directly into a holding tank. Horizontal pipe runs as found in conventional residential or commercial plumbing systems cannot be accommodated. 4. Toilet bowl and flush seals must be regularly cleaned and winterized according to “Proper Cleaning and Maintenance” and “Winterizing” procedures on page 4, or your warranty coverage may be voided. TOILET MODEL IDENTIFICATION The model identification label is located on the toilet base and will show the model number and serial number. Remove base cover to locate identification label (see page 3). DOMETIC CORPORATION P.O. BOX 38, 13128 STATE RT 226 (800) 321-9886 BIG PRAIRIE, OH 44611 USA MODEL NO. 000 SERIAL NUMBER 000000 HOW TO USE To prepare the Traveler Lite toilet for use, check to be sure water supply to the toilet is connected. Turn on water supply and check system for leaks. Flush toilet and check for leaks. To properly use the Traveler Lite toilet, follow these simple instructions: 1. To add water to the toilet, lift or raise the flush lever until desired water level is reached. Generally, more water is required only when flushing solids. 2. To flush toilet, push lever all the way down until contents leave toilet bowl. Water flow pressures vary at different locations, therefore holding the flush lever down for 4-8 seconds may be required. We require a minimum flow at the toilet of two gpm (7.6 lpm) for proper rim and bowl wash. 3. Release flush lever by allowing it to snap back, which permits positive sealing around the flush ball. 4. A small amount of water should remain in bowl. Note: Holding flush lever down longer than necessary results in excessive water usage. 2 INSTALLATION 1. To replace an older toilet, turn off water supply to toilet. Disconnect water line at toilet water valve. Unscrew floor bolt nuts and remove toilet. Discard old floor seal and mounting bolts. The old floor flange may be used if it is in good condition. 2. When installing new floor flange, make certain that the toilet mounting bolts align properly with Traveler Lite toilet mounting pattern (Figure A). 3. Secure flange to floor using flat head screws through countersunk holes in flange. Insert floor bolts into slotted holes in flange (Figure A). 4. If toilet is being installed in a shower stall, apply a 1/4" thick by 3/4" wide bead of glazing compound around the circumference of the floor flange (Figure B). 5. Position floor seal by pressing the floor bolts up through holes in the seal. 6. Set toilet in place with bolts protruding up through mounting holes in base (Figure C). 7. Install washers and hex nuts provided with toilet. Snug nuts down equally with standard 7/16" open end wrench. Remove excess glazing compound from around base in shower stall installation. Install two wood screws provided in two holes at rear of base. (See Figure C). 8. Remove pedal cover from flush pedal before connecting water supply line (see instructions below). Connect water supply line to water valve (1/2" MPT) inlet using appropriate fittings or an extension (Figure D). 9. Turn on water supply and flush toilet to test for leaks. 10. Re-attach pedal cover to flush pedal after making sure there are no leaks at connections. 11. Put base cover in front of toilet base, aligning flush pedal with opening on side of cover. Push base cover back until it locks into place, making sure it does not interfere with flush pedal operation (Figure E). Removing Pedal Cover Traveler Lite Model 210 (2-bolt connection) Fig. A Fig. B Fig. C Insert two wood screws in rear of base. Fig. D Fig. E 1. Press tab on back of pedal to release pedal cover. 2. Pull cover forward to remove it. Cover snaps back into place. 3 PROPER CLEANING AND MAINTENANCE The Traveler Lite toilet should be cleaned regularly for maximum sanitation and operational efficiency. You can clean it just as you would a household toilet. Do not use caustic chemicals, such as drain-opening types, as they will damage the seals. BOWL CLEANING: For stubborn stains, use SeaLand® Bowl and Seal Cleaner (Fig. A). It’s manufactured especially for use with Traveler Lite toilets. In certain locations where water is hard, a build-up of lime may dull the toilet bowl finish. Restore the shine with this SeaLand cleaner. If you cannot find it in your area, contact Dometic for your nearest dealer. If the cleaner is not available, you can also use Bar Keepers Friend® cleanser. It is not necessary to vigorously scrub with either product. Please follow label instructions. Fig. A SEAL CLEANING: After an extended time, mineral deposits from hard water can build up under the edge of the rubber bowl seal, resulting in a slow leakdown of water from the bowl. To prevent this mineral build-up, periodically clean under the bowl seal with SeaLand Bowl and Seal Cleaner (Fig. B). Fig. B 1. Shut off water supply. 2. Apply cleaner onto the seal cleaning tool (supplied with new toilet), open the flush ball by pressing on flush lever, and scrub under the seal. Make sure to push bristles between bottom of seal and top of flush ball surface to scrub all parts of seal that come into contact with flush ball. 3. Close ball and wait 2-3 minutes. 4. Open flush ball. Use brush and water to rinse away cleanser and loosened deposits. WINTERIZING At the end of each season, the Traveler Lite toilet should be winterized for storage by either draining or using potable water-safe antifreeze in the system. Fig. C To drain: 1. Thoroughly flush system with fresh water. 2. Empty holding tank. 3. Shut off water supply to toilet, and remove inlet waterline (Fig. C). Do not remove brass cap on bottom of valve. 4. Press flush lever until all water is drained from toilet. To use antifreeze: 1. Drain potable water tank. 2. Add freshwater antifreeze to potable water tank. 3. Flush potable water antifreeze and water mixture through toilet and into the waste holding tank. Each installation is different, so amounts may vary. User discretion is required to assure adequate protection. 4. Empty holding tank. NOTE: Use nontoxic antifreeze designated for potable water systems. (See vehicle owner’s manual.) Never use automotive-type antifreeze in freshwater systems. 4 DEODORANTS AND SPECIAL TISSUE Your Traveler Lite toilet requires the regular addition of a deodorant product to reduce malodors and to help break down holding tank contents. Several factors should be considered in selecting a deodorant product. Liquid or Granulated. Liquid products work more quickly by readily going into solution. Granulated powder formulations have the advantage of requiring less storage space and are less likely to leak if the package is inadvertently damaged. Formaldehyde versus Non-Formaldehyde. Dometic manufactures both types of deodorants. Generally speaking, formaldehyde formulas control odor very effectively at all temperatures and with all degrees of water hardness. SeaLand ® Environment-Friendly brand, which is formaldehyde free, is similarly effective. How Much Deodorant and How to Add It. The deodorant is added directly into the toilet bowl, then flushed into the holding tank. Follow bottle or package instructions. Conditions of extremely warm weather, longer waste holding time and larger tank capacities may require more deodorant treatment. Also, to maintain optimum efficiency in odor control, the waste holding tank should be cleaned thoroughly at least once or more each season depending on use. Why Not Use Household Toilet Paper in Your Toilet. Household tissues often contain adhesives which bond together the paper fibers from which the tissue is made. The adhesives prevent the tissue from breaking apart, and their use in “ultra-low flow” systems can cause system clogging. SeaLand tissue is especially designed for use in low water toilet systems. Its rapid dissolving properties minimize the amount of residual paper in the holding tank and allow deodorizers to work more efficiently. SeaLand Brand versus Other Brands. We constantly strive to provide our system owners with effective products that have minimal environmental impact and good value. Many deodorant products do not measure up to our standards of performance and value. SeaLand® Liquid Deodorant Environment Friendly 32-oz. bottle Part No. 379114032 SeaLand® Rapid-Dissolving Toilet Tissue Four 400-sheet rolls Part No. 379441204 SeaLand® Cleaner 16-oz. bottle Part No. 379314016 5 TROUBLESHOOTING GUIDE BALL SEAL TRAVELER LITE BASE ASSEMBLY ADJUSTING NUT BOWL SEAL FLUSH BALL FLUSH PEDAL BAND CLAMP WATER VALVE ASSEMBLY TOP VALVE CAP FILTER SCREEN SHAFT SPRING CARTRIDGE TRAVELER LITE TOILET BOWL, REAR VIEW VALVE BODY PEDAL COVER WATER VALVE SCREWS VACUUM BREAKER HOSE CONNECTION VACUUM BREAKER/BOWL CONNECTION Problem Possible Cause Service Instructions 1. Toilet emits odor (flush ball open). a. Odor emitting from base of toilet. b. Plugged holding tank vent line. a. Use SeaLand brand deodorants. b. Clear obstruction from vent line. 2. Water will not stay in bowl. a. Loose band clamp. b. Improper seal around flush ball due to dirt or debris on underside of ball seal. a. Tighten adjusting screw. b. Inspect flush ball and underside of seal. Clean under seal if needed (see page 4. Cleaning tool available – part no. 600344236). c. Replace seal. d. Replace flush ball. c. Worn or damaged seal. d. Worn or damaged flush ball. 3. Flush ball will not close completely. a. Too much friction between flush ball and ball seal. b. Water valve screws are too tight. 6 a. Lubricate between flush ball and ball seal with furniture polish or cooking spray. b. Loosen screws slightly. TROUBLESHOOTING GUIDE (cont’d) Problem Possible Cause Service Instructions 3. Flush ball will not close completely. (continued) c. Defective spring cartridge. c. Check spring tension by pushing flush lever down, then release it suddenly. If lever does not snap back to original position, replace spring cartridge. 4. Flush ball will not open. a. Broken shaft. b. Shaft not fully engaged in the spring cartridge. a. Replace shaft. b. Rotate flush ball slightly until shaft lines up with square in spring cartridge and is fully engaged. 5. Water does not shut off in toilet (toilet overflows). a. Worn or defective water valve. a. Replace water valve. b. Worn or defective spring cartridge. b. Replace spring cartridge. 6. Hand spray unit leaks. a. Hand sprayer is defective. a. Replace hand sprayer. 7. Water does not enter toilet bowl properly. a. Insufficient water flow rate at toilet. a. Check water flow rate at toilet. Rate should be 2 gpm (7.6 lpm) at toilet. b. Remove and clean screen located on water valve. c. Clean holes. If still a problem, replace toilet bowl. b. Water valve clogged. c. Plugged rim wash holes in toilet. 8. Water is leaking from water valve. a. Water valve body cracked due to freeze damage. b. Water line connection is loose or not seated properly. c. Defective water valve. d. Stripped threads. a. Replace water valve. 9. Water is leaking from bottom of toilet base. a. Toilet is not secured to floor. b. Worn or defective toilet mounting floor seal. c. Cracked base. d. Worn or defective floor flange. a. Tighten toilet mounting bolts. b. Replace floor seal between floor flange and toilet base. c. Replace base assembly. d. Replace floor flange. 10. Water is leaking from rear of toilet bowl. a. Worn or defective vacuum breaker. a. Remove white cap from vacuum breaker. Flush toilet. If water leaks during flush, vacuum breaker needs to be replaced. b. Secure vacuum breaker connection. c. Replace toilet bowl. If loose, push breaker into bowl. b. Loose vacuum breaker. c. Cracked or defective toilet bowl. 11. Water is leaking from the base/toilet connection. a. Band clamp may be loose. b. Ball and bowl seals may be worn or defective. 7 b. Insure that threads are not cross-threaded and tighten. c. Replace water valve. d. Replace water valve. a. Remove plastic base cover (on applicable models) and tighten the band clamp. b. Replace ball and bowl seals. MANUFACTURER’S 3-YEAR AND 10-YEAR LIMITED WARRANTY Dometic Corporation warrants, to the original purchaser only, that this SeaLand ® gravity discharge toilet, if used for personal, family or household-like purposes, is free from defects in material and workmanship for a period of three (3) years from the date of purchase. Dometic also warrants, to the original purchaser only, that the ceramic portion of the toilet bowl will not discolor, stain, scratch or craze for a period of ten (10) years if used for personal, family or household-like purposes, and is regularly cleaned as described in the product’s owner’s manual. If this Dometic product is placed in commercial or business use, it will be warranted, to the original purchaser only, to be free of defects in material and workmanship for a period of ninety (90) days from the date of purchase. Dometic reserves the right to replace or repair any part of this product that proves, upon inspection by Dometic, to be defective in material or workmanship. All labor and transportation costs or charges incidental to warranty service are to be borne by the purchaser-user. EXCLUSIONS IN NO EVENT SHALL DOMETIC BE LIABLE FOR INCIDENTAL OR CONSEQUENTIAL DAMAGES, FOR DAMAGES RESULTING FROM IMPROPER INSTALLATION, OR FOR DAMAGES CAUSED BY NEGLECT, ABUSE, ALTERATION, OR USE OF UNAUTHORIZED COMPONENTS. THIS INCLUDES FAILURES WHICH MAY RESULT FROM NOT FOLLOWING THE WINTERIZATION OR CLEANING PROCEDURES AS DESCRIBED ON PAGE 5 OF THIS OWNER’S MANUAL. ALL IMPLIED WARRANTIES, INCLUDING ANY IMPLIED WARRANTY OF MERCHANTABILITY OR FITNESS FOR ANY PARTICULAR PURPOSE, ARE LIMITED TO A PERIOD OF ONE (1) YEAR FROM DATE OF PURCHASE. IMPLIED WARRANTIES No person is authorized to change, add to, or create any warranty or obligation other than that set forth herein. Implied warranties, including those of merchantability and fitness for a particular purpose, are limited to one (1) year from the date of purchase for products used for personal, family or household-like purposes, and ninety (90) days from the date of purchase for products placed in commercial or business use. OTHER RIGHTS Some states do not allow limitations on the duration of an implied warranty, and some states do not allow exclusions or limitations regarding incidental or consequential damages; so, the above limitations may not apply to you. This warranty gives you specific legal rights, and you may have other rights which vary from state to state. To obtain warranty service, first contact your local dealer from whom you purchased this product. Dometic Corporation • Sanitation Systems 13128 State Rt. 226, P.O. Box 38 Big Prairie, OH 44611-0038 USA SeaLand Product Hotline 1-800-321-9886 (8:00 a.m. - 5:00 p.m. ET) ® Registered; ™ Trademark of Dometic Corporation ® Bar Keepers Friend is a trademark of Servaas Laboratories. ® Teflon is a registered trademark of Du Pont Co. Dometic Corporation 600344934 3/04 8