1
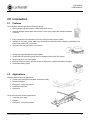
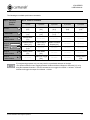
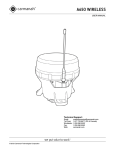
A704 Series USER MANUAL Technical Support: Email: Toll Free: Worldwide: Fax: Web: © 2015 Carmanah Technologies Corporation [email protected] 1.877.722.8877 (US & Canada) 1.250.380.0052 1.250.380.0062 carmanah.com A704 SERIES USER MANUAL © 2015 Carmanah Technologies Corporation 2 A704 SERIES USER MANUAL Contents 1.0 Safety & Usage .................................................................................................................................................. 4 1.1 Viewing Precautions ........................................................................................................................................ 4 1.2 Battery Precautions ......................................................................................................................................... 4 1.3 Wireless Precautions ....................................................................................................................................... 5 1.4 Regulatory ....................................................................................................................................................... 5 1.5 Warranty Disclaimer ........................................................................................................................................ 5 2.0 Introduction ....................................................................................................................................................... 6 2.1 Features .......................................................................................................................................................... 6 2.2 Applications ..................................................................................................................................................... 6 3.0 Installation ......................................................................................................................................................... 7 3.1 Antenna ........................................................................................................................................................... 8 3.2 Location ........................................................................................................................................................... 9 3.3 Orientation ....................................................................................................................................................... 9 3.4 Dimensions & Mounting.................................................................................................................................10 4.0 Operation .........................................................................................................................................................11 4.1 Theory of Operation .......................................................................................................................................11 4.2 User Interface ................................................................................................................................................11 4.3 Modes ............................................................................................................................................................14 4.4 Features ........................................................................................................................................................17 5.0 Maintenance ....................................................................................................................................................22 5.1 Inspection ......................................................................................................................................................22 5.2 Storage & Battery Charging ..........................................................................................................................22 5.3 Battery Replacement .....................................................................................................................................23 5.4 Recycling .......................................................................................................................................................26 5.5 A704 Head Replacement on A704-5 Chassis ...............................................................................................26 6.0 Troubleshooting ..............................................................................................................................................30 7.0 Warranty ...........................................................................................................................................................31 © 2015 Carmanah Technologies Corporation 3 A704 SERIES USER MANUAL 1.0 Safety & Usage The following symbols indicate important safety warnings and precautions throughout this manual: WARNING indicates that serious bodily harm or death may result from failure to adhere to the precautions. CAUTION indicates that damage to equipment may result if the instructions are not followed. NOTE suggests optimal conditions and provides additional information. WIRELESS features and functions that require a Handheld Controller. PUSH BUTTON features and functions that require interaction with the push button on the light. 1.1 Viewing Precautions Do not view an actively emitting infrared or visible light from the side or top of the light (close to or on beam) from a range of less than 4 ft. (1.2 m). A safe limit for near-infrared viewing, established by the American Conference of Governmental and Industrial Hygienists (ACGIH), is 65 mW/in2 (10 mW/cm2) as the maximum exposure limit for viewing for up to 16 minutes. This power density can be produced at the lens surface when actively emitting infrared light. 1.2 Battery Precautions Use extreme caution when handling the light. This product is capable of generating enormous shortcircuit currents. Remove all jewelry (bracelets, metal-strap watches, rings) before attempting to handle or remove the batteries. Charge your battery periodically. Permanent damage and reduced capacity will result if the battery is not correctly maintained. © 2015 Carmanah Technologies Corporation 4 A704 SERIES USER MANUAL The rate of battery self-discharge is very dependent upon temperature. The warmer the temperature, the faster the batteries will discharge. Lights that have been stored will usually require a top-up charge before they are put into service. The most accurate battery health status reading is obtained when the unit has been in a dark location and in off mode for at least 24 hours. 1.3 Wireless Precautions Keep the Handheld Controller at a distance of at least 3 ft. (1 m) from the antennas of lights or other Handheld Controllers. It transmits a powerful radio signal that could damage sensitive receiver circuitry if operated at close range. 1.4 Regulatory This device complies with Part 15 of the FCC Rules. Operation is subject to the following two conditions: 1. This device may not cause harmful interference, and 2. This device must accept any interference received, including interference that may cause undesired operation. This equipment has been tested and found to comply with the limits for a Class B digital device, pursuant to Part 15 of the FCC Rules. These limits are designed to provide reasonable protection against harmful interference in a residential installation. This equipment generates, uses, and can radiate radio frequency energy and, if not installed and used in accordance with the instruction manual, may cause harmful interference to radio communications; however, there is no guarantee that interference will not occur in a particular installation. If this equipment does cause harmful interference to radio or television reception, which can be determined by turning the equipment off or on, the user is encouraged to try to correct the interference by one or more of the following measures: Reorient or relocate the receiving antenna; Increase the separation between the equipment and receiver; Connect the equipment into an outlet on a circuit different from that to which the receiver is connected; Consult the dealer or an experienced radio/TV technician for help. This Class [B] digital apparatus complies with Canadian ICES-003. Cet appareil numérique de la classe [B] est conforme à la norme NMB-003 du Canada. 1.5 Warranty Disclaimer This manual will familiarize you with the features and operating standards of the product. Failure to comply with the use, storage, maintenance, or installation instructions detailed in this manual could void the user warranty. Changes or modifications not expressly approved by the party responsible for compliance could void the user’s authority to operate the equipment. Installation work must be done by a qualified person(s) in accordance with all application local codes and standards. © 2015 Carmanah Technologies Corporation 5 A704 SERIES USER MANUAL 2.0 Introduction 2.1 Features The A704 Solar Airfield Light has the following features: Self-contained, high-performance, solar-powered light source Optional 900 MHz ISM wireless control with 2.5 miles (4 km) range with available Handheld Controller Easy-to-install and low-maintenance with long-life light emitting diodes (LEDs) Available in red, green, yellow, white, blue omnidirectional and white/white, red/green, yellow/white, and bidirectional visible LED output colors Indicator LEDs and push button user interface Intelligent Energy Management System (EMS) Visible LED and night vision goggle (NVG)-compatible infrared (IR) LED outputs Aviation yellow or olive drab chassis Optional external connector provides long-term, high power operation and battery charging Replaceable battery packs 2.2 Applications The A704 has the following applications: Runway edge (omnidirectional MIRL & directional HIRL) Runway threshold Emergency or temporary airfield Construction barricade Obstruction The A704-VL has the following applications: Taxiway & apron edge Helipad Emergency or temporary helipad © 2015 Carmanah Technologies Corporation 6 A704 SERIES USER MANUAL 3.0 Installation Each shipment includes: A704 or A704-VL Manual Antenna (wireless models only) © 2015 Carmanah Technologies Corporation 7 A704 SERIES USER MANUAL 3.1 Antenna An antenna is included with each light ordered with optional wireless control. Grip the antenna by its metal base and hand-tighten it onto the antenna connector. The effective range of the wireless control system is 2.5 miles (4 km). Wireless range is greatly affected by use and location. To achieve the best wireless range: Handheld Controller antenna is parallel to the light’s antenna Elevate the Handheld Controller’s antenna Ensure surrounding grass and foliage is trimmed Clear line-of-sight between antennas © 2015 Carmanah Technologies Corporation 8 A704 SERIES USER MANUAL 3.2 Location Year-round, unrestricted solar exposure is critical to long-term performance. Shade dramatically reduces the ability of the light to charge its battery. Year-round sun: During the winter, the sun is lower on the horizon. Because the angle of the sun changes with the seasons, be aware that obstructions such as trees, buildings, and mountains that do not shade the solar panel during the summer may shade it during the winter. Cooler is better: The battery lasts longest if you can minimize its exposure to high temperatures. Choose a location that is away from hot, dark colored surfaces like asphalt or black steel plate. Mounting kits are available that elevate the light and can help reduce the temperature of the battery. Flat: Ensure the mounting surface is flat and level. 3.3 Orientation The handle can be used to orient the light relative to the runway. This is useful for directional and bidirectional lights: Red / Green directional White omnidirectional © 2015 Carmanah Technologies Corporation White directional 9 A704 SERIES USER MANUAL 3.4 Dimensions & Mounting The A704 has a common head and base. The solar engine varies depending on the application. Compact Solar Engine Standard Solar Engine Large Solar Engine (Optional wireless antenna shown) Optimal for high solar or low use applications (Optional wireless antenna shown) Optimal for most applications (Optional wireless antenna shown) Optimal for low solar or high use applications 11 lbs. (4.9 kg) 15 lbs. (6.7 kg) 23 lbs. (10.5 kg) 4.2 vdc 15 Ahr. battery = 63 Whr. total 4x 1.7 W Solar Panels = 6.8 W total 4.2 vdc 24 Ahr. battery = 101 Whr. total 4x 3.8 W Solar Panels = 15.2 W total 4.2 vdc 50 Ahr. battery = 210 Whr. total 4x 3.8 W Solar Panels = 15.2 W total Mount using 0.5 in. (12 mm) fasteners. Fasteners are not included but are available as kits. © 2015 Carmanah Technologies Corporation 10 A704 SERIES USER MANUAL 4.0 Operation 4.1 Theory of Operation During daylight, the solar panels charge the battery using the Energy Management System (EMS). The capacity of the battery ensures that even with poor levels of sunlight over an extended period, the light has enough reserve power to continue to perform reliably. Stored battery energy is then available to power the output LEDs in one of several modes. These modes are selected using the push button user interface on the light or a Handheld Controller. The most commonly used modes are Autonomous and Temporary Modes. The Handheld Controller is a transmitting radio that sends commands to a receiving radio inside the light. The Handheld Controller is optional and only communicates with lights that have optional wireless control. For Handheld Controller operation and button sequences, see its manual. 4.2 User Interface 4.2.1 Indicator LEDs Inside the lens, near the push button, are three indicator LEDs that illuminate green, amber or red. They: Guide push button operation Indicate diagnostic feedback Indicate normal operating state after the push button has not been used for 10 sec. Green indicator Amber indicator Red indicator Push Button Indicator All indicators are off Operating State Autonomous or Temporary Mode, Infrared LED output Storage Mode Green indicator flashes 1x every 2 sec. Autonomous or Temporary Mode, Visible LED output Amber indicator flashes 1x every 1 sec. Battery is charging via the external connector Amber indicator flashes 1x every 2 sec. Battery is charging via the solar panel © 2015 Carmanah Technologies Corporation 11 A704 SERIES USER MANUAL 4.2.2 Push Button The push button is used for configuration and control. It can be used in conjunction with, or instead of, a Handheld Controller for most modes and features. The two types of push button inputs are: Hold Pressing and holding the push button down for several sec. will cycle through the command levels The command level is indicated by the number of amber indicator LED flashes Once the desired command level has been reached, release the push button Press Momentarily pressing the push button 1x – 5x chooses a command within that command level Each momentary press must be quick and less than 1 sec. You must select a command within 10 sec. of entering a command level, otherwise the light exits that command level The green indicator LED flashes the number of accepted momentary presses The red indicator LED flashes three times if the command has not been accepted Indicator LED and push button sequences will be referred to as: [hold push button for a group of # amber flashes, press push button #] For example, [4,2] is: 1. Hold the push button for a group of 4x amber flashes 2. Press the push button 2x, green indicator LED flashes quickly 2x to confirm © 2015 Carmanah Technologies Corporation 12 A704 SERIES USER MANUAL The following are available push button commands: Step 1: Hold for a group of flashes Step 2: Press for command 1 press 2 presses 3 presses 4 presses 5 presses No hold Standby Mode [0,1] Autonomous Low [0,2] Autonomous Med [0,3] Autonomous High [0,4] Flash Toggle [0,5] 1 amber flash Temporary Low [1,1] Temporary Med [1,2] Temporary High [1,3] No action No action Storage Mode [2,1] Do Not Use* Do Not Use* No action No action Infrared Output ONLY [3,1] Visible Output ONLY [3,2] Visible & Infrared Outputs [3,3] No action No action Infrared Toggle [3,1]# No action No action No action No action group of 4 amber flashes Battery Check [4,1] UCS Status [4,2] No action No action No action group of 5 amber flashes No action Button Lock Toggle [5,2] No action No action Factory Reset [5,5] group of 2 amber flashes group of 3 amber flashes non-wireless wireless# *For engineering purposes only; use may result in unpredictable behavior of the light. # For optional wireless control, toggling between Visible and Infrared Outputs is done with [3,1] or by using the Handheld Controller. Use the command once to toggle from Visible -> Infrared. A second command will toggle the output from Infrared -> Visible. © 2015 Carmanah Technologies Corporation 13 A704 SERIES USER MANUAL 4.3 Modes 4.3.1 Autonomous Mode In Autonomous Mode, the output LEDs turn on during the night and turn off during the day. The change from dayto-night or night-to-day is known as a transition. A built-in ambient brightness sensor detects transitions. Autonomous Mode setting is recommended by a solar simulation. See carmanah.com for a solar simulation for your application. Correct setting is important to ensure sustainable, year-round operation. The Autonomous Mode setting is selected by push button sequence [0,2], [0,3], [0,4] or the Handheld Controller: Intensity Output LEDs Flashing Active AUTO LOW* Low Visible No Dusk-to-dawn AUTO MED Medium Visible No Dusk-to-dawn AUTO HIGH High Visible No Dusk-to-dawn AUTO LOW IR Low Infrared No Dusk-to-dawn AUTO MED IR Medium Infrared No Dusk-to-dawn AUTO HIGH IR High Infrared No Dusk-to-dawn AUTO LOW FLASH Low Visible 0.25 sec. on, 0.75 sec. off Dusk-to-dawn AUTO MED FLASH Medium Visible 0.25 sec. on, 0.75 sec. off Dusk-to-dawn AUTO HIGH FLASH High Visible 0.25 sec. on, 0.75 sec. off Dusk-to-dawn AUTO LOW IR FLASH Low Infrared 0.25 sec. on, 0.75 sec. off Dusk-to-dawn AUTO MED IR FLASH Medium Infrared 0.25 sec. on, 0.75 sec. off Dusk-to-dawn AUTO HIGH IR FLASH High Infrared 0.25 sec. on, 0.75 sec. off Dusk-to-dawn Setting *Factory default is AUTO LOW, visible LED, steady-on. © 2015 Carmanah Technologies Corporation 14 A704 SERIES USER MANUAL 4.3.2 Temporary Mode A Temporary Mode activation interrupts other modes and ignores transitions. This activation lasts for a preset time of 15 minutes and then the light reverts to its previous Autonomous Mode. Maximum number of Temporary Mode activations per day is recommended by a solar simulation. See carmanah.com for a solar simulation for your application. Correct usage is important to ensure sustainable, year-round operation. The Temporary Mode setting is selected by push button sequence [1,1], [1,2], [1,3], or the Handheld Controller: Flashing Activation, Handheld Controller command Activation, push button command Visible No 15 min. 60 min. Medium Visible No 15 min. 60 min. TEMP HIGH High Visible No 15 min. 60 min. TEMP LOW IR Low Infrared No 15 min. 60 min. TEMP MED IR Medium Infrared No 15 min. 60 min. TEMP HIGH IR High Infrared No 15 min. 60 min. TEMP LOW FLASH Low Visible 0.25 sec. on, 0.75 sec. off 15 min. 60 min. TEMP MED FLASH Medium Visible 0.25 sec. on, 0.75 sec. off 15 min. 60 min. TEMP HIGH FLASH High Visible 0.25 sec. on, 0.75 sec. off 15 min. 60 min. TEMP LOW IR FLASH Low Infrared 0.25 sec. on, 0.75 sec. off 15 min. 60 min. TEMP MED IR FLASH Medium Infrared 0.25 sec. on, 0.75 sec. off 15 min. 60 min. TEMP HIGH IR FLASH High Infrared 0.25 sec. on, 0.75 sec. off 15 min. 60 min. Intensity Output LEDs TEMP LOW Low TEMP MED Setting © 2015 Carmanah Technologies Corporation 15 A704 SERIES USER MANUAL 4.3.3 Standby Mode Standby Mode turns off the output LEDs and waits for the next day-to-night transition. After this transition, the light enters its previous Autonomous Mode. Standby Mode is enabled by push button sequence [0,1] or the Handheld Controller. 4.3.4 Lights Off Mode Lights Off Mode turns off the output LEDs indefinitely until it receives a command to turn them on. Lights Off Mode is enabled by the Handheld Controller. 4.3.5 Emergency Mode Emergency Mode sets all lights in all groups to emergency flash. Emergency flash is TEMP HIGH FLASH. After 15 min., the lights revert to their previous Autonomous modes. Emergency Mode is enabled by the Handheld Controller. 4.3.6 ARCAL Mode The Aircraft Radio Control of Aerodrome Lighting (ARCAL) feature works in conjunction with an ARCAL VHF receiver to allow aircraft pilots to control the lights. ARCAL Mode is enabled by the Handheld Controller. 4.3.7 Storage Mode Storage Mode is a low power state used for storing or shipping the light. Lights are shipped from the factory in Storage Mode: No response to wireless control and no output from the LEDs Indicator LEDs are off Stores the last mode before entering Storage Mode Sunlight or external power will continue to charge the battery If the ambient light level is 30 lux or less for 24 hours, the light will automatically enable Storage Mode. Storage Mode is enabled by push button sequence [2,1]. To disable Storage Mode, press the push button 1x. © 2015 Carmanah Technologies Corporation 16 A704 SERIES USER MANUAL 4.4 Features 4.4.1 Low Voltage Disconnect Low Voltage Disconnect (LVD) protects the battery from being discharged to levels low enough to cause permanent damage. When LVD is entered: Radio and output LEDs are disabled Output LEDs flashes 0.1 sec. every 60 sec. to let the user know the light needs attention Red indicator LED is flashing Battery continues charging When the battery state of charge reaches an acceptable level, LVD is exited. LVD is enabled in all modes. 4.4.2 Automatic Light Control Automatic Light Control (ALC) is a patented algorithm that matches the light’s energy consumption to its energy storage. As the battery state of charge diminishes, ALC decreases the output LED intensity. ALC has 4 intensity steps until finally entering LVD. The ALC step depends on the battery state of charge. This ensures the light will continue to operate through periods of poor sunlight. ALC is enabled in all Autonomous Modes. ALC is disabled in all Temporary Modes. 4.4.3 External Power – Charge Ports If continuous high intensity output or backup power is required, external power can be provided to the charge port on the base plate. When connected, external power is used to power up the light and charge its battery. External power is not a control signal and cannot configure the light. The push button or Handheld Controller is still used for normal operations. When external power is provided to the connector on the base plate, the light will not exit Temporary Mode after a preset time. It will remain in Temporary Mode until commanded otherwise or until the light detects that external power is no longer available. There are 2 optional charge ports: charge port and military charge port. © 2015 Carmanah Technologies Corporation 17 A704 SERIES USER MANUAL Military Charge Port 4.4.3.1 The military charge port is on top of the base plate. Remove the connector cap and attach a power cable terminated with the correct mating connector and pin-out: PIN A: INPUT GROUND PIN C: NOT USED PIN B: +9.0 to 13.5 VDC INPUT Military Charge Port MS3116 connector detailed in MIL-DTL-26482 (approved vendor: Amphenol PT06-E-8-3P-SR-025) Connector accepts 24 – 20 AWG stranded wire +9.0 to 13.5 VDC input @ 2.2 A max. Charge Port 4.4.3.2 The charge port underneath the base plate is intended for temporary indoor charging and not for permanent outdoor installations. Remove the connector cap and attach a power cable terminated with a barrel connector. Route the cable out under one of the base plates’ notches. Charge Port Notch Notch +9.0 to 13.5 VDC input @ 2.2 A max. © 2015 Carmanah Technologies Corporation 5.5 mm OD INPUT GROUND 2.5 mm ID +9.0 TO 13.5 VDC INPUT 18 A704 SERIES USER MANUAL 4.4.4 Battery Check Push button sequence [4,1] checks the battery state of charge. The indicator LEDs then show the following for 10 sec.: Indicator Battery State of Charge Green Good, 75 – 100% Amber Charge, 50 – 75% Red Flashing Red 10 – 50% LVD, ≤ 10% 4.4.5 Flash Toggle Push button sequence [0,5] toggles between steady-on and flashing output LEDs. Rate of flash is 0.25 sec. on, 0.75 sec. off. 4.4.6 Infrared Toggle Push button sequence [3,1] toggles between visible and infrared output LEDs. 4.4.7 Push Button Lock Toggle Push button sequence [5,2] toggles between locking and unlocking the push button: Red indicator LED flashes 2x when the push button is first locked When locked, push button commands are ignored If any other push button command is given other than unlocking the push button, the red indicator LED flashes 3x Green indicator LED flashes 2x when the push button is unlocked 4.4.8 Diagnose The battery state of charge and radio health can be queried via the Handheld Controller using its Diagnose function. Diagnose is disabled when LVD is entered. © 2015 Carmanah Technologies Corporation 19 A704 SERIES USER MANUAL 4.4.9 Grouping Grouping allows independent control of different subsets of lights on an airfield: There are 8 groups, numbered 1 through 8 Each light can be assigned to only one group A handheld controller can control multiple groups at a time A light can be reassigned to another group as required When adding a light to a group, the Handheld Controller re-sends the last mode to everyone in that group In order to configure the group of a light: 1. Light must be powered for at least 10 sec. and not in Storage Mode 2. Press the push button 1x. This instructs the light to receive grouping configurations from the Handheld Controller for 5 min. 3. Grouping configuration is sent from Handheld Controller 4. After successfully receiving a grouping configuration, the light receives that group’s last mode from the Handheld Controller. 5. Light exits its 5 min. window where it would receive grouping configurations. Factory default is group 1. © 2015 Carmanah Technologies Corporation 20 A704 SERIES USER MANUAL 4.4.10 Unique Code Sequence Unique Code Sequence (UCS) allows one or more Handheld Controllers to be uniquely associated to one or more lights. When UCS is enabled, the Handheld Controller sends a code with each radio transmission. Only lights configured to accept that particular code will respond to the transmission. The benefits are: Independence Nearby installations of lights can be operated independently by different Handheld Controllers without interference. Security It is not possible for another Handheld Controller to interrupt airfield operation. The Handheld Controller cannot control UCS configured and non-UCS configured lights at the same time. For security, the user has to manually interact with the light for UCS configuration: 1. Light must be on for at least 10 sec. and not in Storage Mode 2. Press the push button 1x. This instructs the light to receive UCS configurations from the Handheld Controller for 5 min. 3. UCS configuration is sent from Handheld Controller 4. After successfully receiving a UCS configuration, the light flashes for 5 sec. Push button sequence [4,2] requests the UCS status from the indicator LEDs: Indicator UCS Amber Enabled Red Disabled Factory default is UCS disabled. 4.4.11 Factory Reset Push button sequence [5,5] performs a Factory Reset that sets the light back to a known state: AUTO LOW visible LED, steady-on Group 1 UCS off Green, amber, and red indicator LEDs momentarily turn on then turn off once the reset is complete © 2015 Carmanah Technologies Corporation 21 A704 SERIES USER MANUAL 5.0 Maintenance 5.1 Inspection Although the light is maintenance-free, significant performance gains can be made with clean solar panels and lenses: Clean the solar panels monthly. Use water and a soft sponge or cloth. A mild non-abrasive cleanser can be used for more stubborn residue. Rinse well. Clean solar panels and lenses more frequently during drier months, as they may become covered in dust more quickly. A pressure washer is not recommended. Visual inspection – check the exterior for cracks, missing or broken hardware or other potential problems. 5.2 Storage & Battery Charging When storing the light, it is important to maintain the battery: Put the light in Storage Mode or disconnect the battery Store in a cool location Check the battery state of charge once per month Do not use the Lights Off Mode for storing the light. The radio is still active in this mode and may receive wireless commands. If charging is required, charge the battery fully using one of several methods: Source Incandescent light bulb, 60 W 12 in. (30 cm) from solar panels Halogen light bulb, 500 W 24 in. (60 cm) from solar panels Time to Charge from 10% to 100% State of Charge >1000 hrs. 600 hrs. Direct sunlight 150 hrs. Available AC plug-in charger attached to the optional charge port 18 hrs. © 2015 Carmanah Technologies Corporation 22 A704 SERIES USER MANUAL 5.3 Battery Replacement DO NOT INSTALL A702, A703, A704-5, A704-H, 800 Series BATTERY PACKS A704 battery packs are nominal 4.2 vdc and have unique harnessing. Use of an incorrect battery pack will damage the EMS permanently. Look for the red 4.2V label on the top of the pack. 4.2V A704 is configurable and has several battery pack options. This instruction shows a typical battery pack. If the battery is permanently damaged and needs to be replaced: 1. Remove the 4 base plate screws using a 5/32 in. hex driver 2. Pull upwards on the handle to slowly separate the chassis from the base plate © 2015 Carmanah Technologies Corporation 23 A704 SERIES USER MANUAL 3. Disconnect the locking battery harness and remove the chassis; disconnect the optional, locking charge port harness battery connector charge port connector 4. Using a ½ in. hex socket, remove the central bolt and its hardware 5. Pull the battery up and over its mounting post © 2015 Carmanah Technologies Corporation 24 A704 SERIES USER MANUAL Installing a battery pack is similar to the above steps: 1. Slide the battery pack over the mounting post, noting the correct orientation to the base plate battery connector base plate holes 2. 3. 4. 5. 6. Tighten the central bolt and its hardware to 40 in.-lbs. Connect the optional charge port harness Ensure the base plate gasket is clean and seated in its groove Hold the chassis over the battery pack and connect the battery harness Align the handle with the base plate and battery pack and slowly slide the chassis down handle battery connector base plate holes 7. Tighten 4 base plate screws to 40 in.-lbs. © 2015 Carmanah Technologies Corporation 25 A704 SERIES USER MANUAL 5.4 Recycling This product required the extraction and use of natural resources. It may contain substances that could be harmful to the environment or human health if improperly handled at the product’s end of life. In order to avoid release of such substances into the environment and to reduce the use of natural resources, we encourage you to recycle the product in an appropriate way that will ensure most of the materials are reused or recycled appropriately. Check your local municipality for electronics recyclers. The symbol indicates that this product complies with the European Union’s requirements according to Directive 2002/96/EC on waste electrical and electronic equipment (WEEE). The battery is a rechargeable lead-acid battery. Consult your local laws for information on recycling. 5.5 A704 Head Replacement on A704-5 Chassis If you have an A704-5 and you have received an A704 head replacement please follow these instructions below. To determine if your light is an A704-5 please check the white label located on the circuit board inside the lens. See the pictures below for examples of an A704-5. Use extreme caution when handling the batteries. Do not allow any metal object to contact the exposed battery terminals. 1. Remove the 4 top head screws using the included 5/32 in. security hex driver included in the kit. 2. Lift off the head by the handle and disconnect the white connector by pressing the latch and pulling apart. white connector © 2015 Carmanah Technologies Corporation 26 A704 SERIES USER MANUAL 3. Remove the main head connector by pressing on the two raised sides and pulling straight apart. main head connector Be very careful not to bend or damage pins in this connector. It may short the battery or permanently damage the connector. ground screw 4. Using a #2 Phillips screwdriver, remove the ground screw from the top of the head. This screw can be recycled since it will no longer be used with the new head. Do not leave the screw loose in the bottom of the chassis as this could cause damage to the light during handling. ground cable 5. Using a ½ in. hex socket, remove the battery retention bolt holding down the ground cable. Remove the ground cable and recycle. Reinstall the battery retention bolt and hardware; tighten to 200 in. lbs. © 2015 Carmanah Technologies Corporation 27 A704 SERIES USER MANUAL 6. Install the adaptor harness that came in the kit onto the main head connector. Ensure the white dots are aligned. Press the two sides together until 2 audible clicks are heard. Care must be taken to ensure that the pins in the adaptor harness are aligned correctly or a battery short circuit may occur. Click correctly mated alignment marks Click 7. Reconnect the battery harness and press together until it is latched. 8. Connect the free end of the harness to head connector. The indicator LEDs will light and then start blinking. head connector The head handle must be aligned with the military charge port. © 2015 Carmanah Technologies Corporation 28 A704 SERIES USER MANUAL 9. Place head on to light ensuring no wires are pinched between the chassis body and the head. Also, ensure the gasket is inside the groove in the head. Reinstall the 4 top security hex screws in in a star pattern, tighten to 70 in.-lbs. The plastic washer is no longer needed and can be recycled. 10. The head replacement is complete and your light is ready for service. © 2015 Carmanah Technologies Corporation 29 A704 SERIES USER MANUAL 6.0 Troubleshooting Symptom Feedback Cause Output LEDs are off All indicator LEDs are off Infrared output LEDs are on Unresponsive to wireless control Solution De-select the IR button on the Handheld Controller and send a visible output command; Use push button infrared toggle [3,1] Output LEDs flash once every 60 sec; Storage Mode is active De-activate Storage Mode by pressing push button 1x LVD is entered Charge the battery Mismatched groups Ensure the Handheld Controller’s and light’s group match UCS is enabled Ensure the Handheld Controller’s and light’s UCS match or turn off UCS Antenna not installed Ensure the light’s antenna is properly installed Handheld Controller problem Check Handheld Controller battery, PIN status, and Pass through Battery is bad Replace the battery Battery is not connected Check that the battery connector is fully inserted Infrared output LEDs are on De-select the IR button on the Handheld Controller and send a visible output command; Red indicator LED is flashing Output LEDs are on or off Green indicator LED is flashing; Unresponsive to wireless control Output LEDs are off Unresponsive to wireless control All indicator LEDs are off Unresponsive to push button Output LEDs are off in Autonomous Mode All indicator LEDs are off Use push button infrared toggle [3,1] Green indicator LED is flashing © 2015 Carmanah Technologies Corporation Daylight; ambient brightness is above 500 lux Darken the entire light and wait 20 sec. for the light to turn on Nearby lights are illuminating the ambient brightness sensor Increase distance between lights, turn off unneeded lights, or shield lights 30 A704 SERIES USER MANUAL 7.0 Warranty This product is covered by the Carmanah warranty. Visit carmanah.com for additional information. Before contacting Carmanah’s customer service department, please have the serial number of your light available, a brief description of the problem, as well as all details of the installation and recharging efforts. To contact Customer Service: Mail: Carmanah Technologies Corp. 250 Bay Street Victoria, BC Canada V9A 3K5 Phone: 1.250.380.0052 1.877.722.8877 Fax: 1.250.380.0062 Email: [email protected] Website: carmanah.com (worldwide) (toll-free, U.S. and Canada) © 2015 Carmanah Technologies Corporation 31 © 2015 Carmanah Technologies Corporation Technical Support: Email: Toll Free: Worldwide: Fax: Web: © 2015 Carmanah Technologies Corporation [email protected] 1.877.722.8877 (US & Canada) 1.250.380.0052 1.250.380.0062 carmanah.com 72936_A704_UserManual_RevC