1
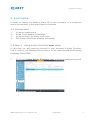
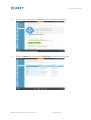
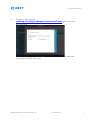
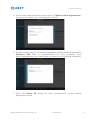
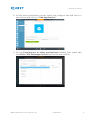
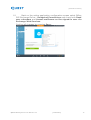
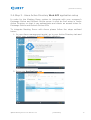
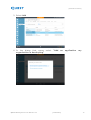
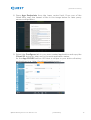
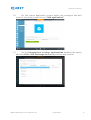
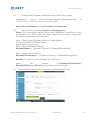
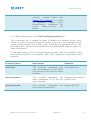
Meeting Rooms User Manual
Document Identifier: iQMRUM
Document Statu\Version: Draft\0.0.3
Document Publication Date: 2015.05.12
Template Identifier\Version: iQuest Document Template T-1\2.0.0
Table of Contents
1. Introduction ......................................................................... 4 2. Azure setup .......................................................................... 5 2.1. Prerequisites......................................................................... 5 2.2. Step 1 - Azure Active Directory user setup ............................... 5 2.3. Step 2 – Azure Active directory Native application setup .......... 8 2.4. Step 3 - Azure Active Directory Web API application setup ....... 13 3. Values to save for client application and proxy server setup ....... 21 3.1. Meeting room impersonated user email ................................... 21 3.2. Client application.................................................................. 21 3.3. Web API application .............................................................. 21 4. VM Proxy configuration ......................................................... 22 4.1. Prerequisites........................................................................ 22 4.2. Connecting to the Azure Vitrual Machine .................................. 22 4.3. Configuring the Meeting Room Proxy Server .properties............. 22 4.3.1. Copying Apple push certificates files ................................... 23 4.3.2. Editing properties in the application.properties file ................ 23 4.3.3. Editing properties in the office365.properties file................... 24 4.3.4. Editing properties in the meeting-rooms.properties file ......... 25 4.3.5. Editing properties in the mail-config.properties file ................ 26 5. Starting the Meeting Room Proxy Server ................................. 27 5.1. Starting the Proxy Server ...................................................... 27 5.2. Restarting the Proxy Server ................................................... 27 5.3. Stopping the Proxy Server ..................................................... 27 [Internal Document]
Document Control Section ................................................................... 28 iQMRUM Meeting Rooms User Manual 0.0.2
[Confidential]
3
[Internal Document]
1. Introduction
iQMRUM Meeting Rooms User Manual 0.0.2
[Confidential]
4
[Internal Document]
2. Azure setup
In order to enable the Meeting Room VM to work properly in a company’s
Azure environment, a few steps must be followed.
2.1. Prerequisites
1.
2.
3.
4.
An Azure subscription
Azure Portal general knowledge
An Azure Active Directory with users
Self Signed Certificate creation knowledge
2.2. Step 1 - Azure Active Directory user setup
In this step you will create an account in your company’s Active Directory
that is used by the Meeting Rooms Server to be impersonated while calling
Exchange Online EWS
1.
Go to your Azure Active Directory page in Azure management portal
iQMRUM Meeting Rooms User Manual 0.0.2
[Confidential]
5
[Internal Document]
2.
Select your company’s Azure Active Directory directory
3.
Select Users tab and select Add User from the utility bar
iQMRUM Meeting Rooms User Manual 0.0.2
[Confidential]
6
[Internal Document]
4.
Create a user named
[email protected] with user role
permissions
Follow the 3 steps of the creation wizard providing the required
information about the user.
iQMRUM Meeting Rooms User Manual 0.0.2
[Confidential]
7
[Internal Document]
2.3. Step 2 – Azure Active directory Native application setup
The Meeting Room server solution comes with an iOS and an Android client
companion applications that must be integrated with the Azure Active
Directory for OAuth2.0 authentication.
In order to integrate the two mobile apps an Active Directory Native
application must be created in Azure. To create the Native application please
follow the following steps.
1. In your Azure management portal, go to your Active Directory tab and
select your company’s Active Directory directory
2. Select the Applications tab
iQMRUM Meeting Rooms User Manual 0.0.2
[Confidential]
8
[Internal Document]
3. Select Add
4. In the dialog that opens
organization is developing”
iQMRUM Meeting Rooms User Manual 0.0.2
select
“Add
an
[Confidential]
application
my
9
[Internal Document]
5. In the next step select the bullet next to “Native client application”
and give it a name (e.g. meetingroom.native)
6. On the second step in the native application configuration wizard add a
Redirect URI that is representative to your company (e.g.
http://iquestgroup.com) (this does not have to be a physical endpoint)
7. Save the Client ID string for later configuration of the mobile
application clients
iQMRUM Meeting Rooms User Manual 0.0.2
[Confidential]
10
[Internal Document]
8. On the native application screen select the configure tab and scroll to
the bottom and click on “Add application”
9. On the Permissions to other applications window that opens add
the Office 365 Exchange Online application and confirm
iQMRUM Meeting Rooms User Manual 0.0.2
[Confidential]
11
[Internal Document]
10.
Back on the native application configuration screen select Office
365 Exchange Online - Delegated Permissions and check both Read
user calendars and Access mailboxes as the signed-in user via
Exchange Web Services.
Confirm all changes by pressing Save.
iQMRUM Meeting Rooms User Manual 0.0.2
[Confidential]
12
[Internal Document]
2.4. Step 3 - Azure Active Directory Web API application setup
In order for the Meeting Room system to integrate with your company’s
Exchange Online and Outlook Online server it must be first setup in Azure
Active Directory so that it can authenticate and obtain an access token for
Exchange Online and Outlook Online APIs.
To integrate Meeting Room with Azure please follow the steps outlined
below:
1. In your Azure management portal, go to your Active Directory tab and
select your company’s Active Directory directory
2. Select the Applications tab
iQMRUM Meeting Rooms User Manual 0.0.2
[Confidential]
13
[Internal Document]
3. Select Add
4. In the dialog that opens
organization is developing”
iQMRUM Meeting Rooms User Manual 0.0.2
select
“Add
an
[Confidential]
application
my
14
[Internal Document]
5. In the next step select the bullet next to “Web application and/or
web API” and give it a name (e.g. meetingroom.webapi)
6. In the last step of the application setup wizard add a Sign-On URL
and an App-ID URL.
7. Save the application Client ID from the configuration page.
iQMRUM Meeting Rooms User Manual 0.0.2
[Confidential]
15
[Internal Document]
8. Open App Endpoints from the lower control belt. From one of the
listed URLs copy the tenant id like in the image below for later proxy
server configuration.
9. Select the Configure tab in your new created application and copy the
Client ID string for later use in the web application setup.
As the App ID-URI add an URI that is unique to your active directory
applications (e.g. http://localhost/meetingroom)
iQMRUM Meeting Rooms User Manual 0.0.2
[Confidential]
16
[Internal Document]
10.
On the native application screen select the configure tab and
scroll to the bottom and click on “Add application”
11.
On the Permissions to other applications window that opens
add the Office 365 Exchange Online application and confirm
iQMRUM Meeting Rooms User Manual 0.0.2
[Confidential]
17
[Internal Document]
12.
Back on the application configuration screen select Office 365
Exchange Online - Application Permissions and check both Read
calendars in all mailboxes and Use Exchange Web Services with
full access to all mailboxes.
Confirm all changes by pressing Save.
iQMRUM Meeting Rooms User Manual 0.0.2
[Confidential]
18
[Internal Document]
13.
Create a Self Signed Certificate with a 2048 key length
#makecert -r -pe -n "CN=MyCompanyName MyAppName Cert"
12/15/2015 -e 12/15/2016 -ss my -len 2048
-b
Save this certificate in a .p12 format for later use.
14.
Retrieve the certificate value and thumbprint
Note: The instructions below show using Windows PowerShell to get
properties of a x.509 certificate. Other platforms provide similar tools
to retrieve properties of certificates.
$cer = New-Object System.Security.Cryptography.
X509Certificates.X509Certificate2
$cer.Import("mycer.cer")
$bin = $cer.GetRawCertData()
$base64Value = [System.Convert]::ToBase64String($bin)
$bin = $cer.GetCertHash()
$base64Thumbprint = [System.Convert]::ToBase64String($bin)
$keyid = [System.Guid]::NewGuid().ToString()
Store
the
values
for $base64Thumbprint,
$base64Value and $keyid, to be used in the next step.
15. Download the application manifest from the Azure Portal
iQMRUM Meeting Rooms User Manual 0.0.2
[Confidential]
19
[Internal Document]
16.
In the manifest replace the empty “KeyCredentials”: [], property
with the following JSON.
"keyCredentials": [
{
"customKeyIdentifier": "$base64Thumbprint_from_above",
"keyId": "$keyid_from_above",
"type": "AsymmetricX509Cert",
"usage": "Verify",
"value": "$base64Value_from_above"
}
],
17.
Save and upload the manifest back in Azure. Save all changes
and wait for Azure confirmation that the operation has completed
successfully.
iQMRUM Meeting Rooms User Manual 0.0.2
[Confidential]
20
[Internal Document]
3. Values to save for client application and proxy server
setup
3.1. Meeting room impersonated user email
The impersonated user email is required for user impersonation when the
proxy VM tries to access the EWS SOAP API. The user email can be found at
chapter 2.2 – Step 4
3.2. Client application
The client applications require the Client ID of the Azure Native application.
The value can be found in the native application configuration guide at
chapter 2.3 - Step 7
3.3. Web API application
The proxy server VM requires the generated Self Signed Certificated, Client
ID of the Azure Web API and the Tenant ID for the created application. The
three values can be found in the Web API configuration guide at chapter 2.4
– Step 13,chapter 2.4 – Step 7 and chapter 2.4 – Step 8.
iQMRUM Meeting Rooms User Manual 0.0.2
[Confidential]
21
[Internal Document]
4. VM Proxy configuration
4.1. Prerequisites
•
•
•
•
Basic
Basic
Basic
Basic
SSH knowledge
Linux knowledge
Linux CLI knowledge
Linux editing tools knowledge (e.g. nano, vi)
4.2. Connecting to the Azure Vitrual Machine
4.3. Configuring the Meeting Room Proxy Server .properties
In this step you will configure the Meeting Room Proxy Server with
information about your environment in order for the Proxy Server to be able
to connect to your Azure AD and Office 365 Exchange Online.
All the steps below are mandatory unless instructed otherwise. Please
complete them in order for the system to function properly.
The properties are located in the Tomcat webapps folder. In order to begin
configuration please navigate to the webapps folder by typing in the
terminal:
#cd /usr/share/tomcat/webapps/meetingroom/WEB-INF/classes/
The tutorial assumes using Linux’s nano tool to edit the .properties files.
Any other editing tool can be used for editing these files.
To begin editing a .properties file type in the terminal while in the
/usr/share/tomcat/webapps/meetingroom/WEB-INF/classes/
#sudo nano <file-name>.properties
To save the edited files press “Ctrl+X”, confirm saving when asked with
“Y” and confirm the file override with “Enter”. To cancel the operation after
“Ctrl+X” press “N” to abort saving the file.
iQMRUM Meeting Rooms User Manual 0.0.2
[Confidential]
22
[Internal Document]
After all configurations are complete please restart the proxy server.
See Chapter 5 for instructions on how to do this.
4.3.1.Copying Apple push certificates files
In order to enable push notifications for Apple devices please copy the
Apple push certificates for the iPhone and iPad applications at the location
/usr/share/tomcat/webapps/meetingroom/WEB-INF/classes/
4.3.2.Editing properties in the application.properties file
This properties set is needed to configure the Meeting Room Proxy Server to
be able to send push notifications to the iPhone, Android and iPad mobile
applications.
In the table below you will find the properties that need to be edited in the
application.properties file together with their respective descriptions and
example.
Property name
Description
device.notification.gcm.
apiKey
This property represents the AIzaSyDNP4igvXLR2GY
Google Cloud Messaging Api Key oaKezYFpRRPjjHused to sent push notifications bbSBY
to Android mobile devices
device.notification.apple
Certificate.certPath
This property represents the iphone_push_cert.p12
iPhone
push
notification
certificate file name present in
the /classes directory
device.notification.apple
Certificate.certAlias
This property represents the apns iphone alias
iPhone
push
notification
certificate’s
certificate
alias
name. The alias was set when
the certificate was created
device.notification.apple
Certificate.certPwd
This property represents the iPhone1234
iPhone
push
notification
certificate
password.
This
password was set when the
iQMRUM Meeting Rooms User Manual 0.0.2
Example
[Confidential]
23
[Internal Document]
certificate was created
device.notification.apple
Certificate.certPath.pad
This property represents the ipad_push_cert.p12
iPad push notification certificate
file name present in the /classes
directory
device.notification.apple
Certificate.certAlias.pad
This property represents the apns ipad alias
iPad
push
notification
certificate’s
certificate
alias
name. The alias was set when
the certificate was created
device.notification.apple
Certificate.certPwd.pad
This property represents the iPad1234
iPad push notification certificate
password. This password was
set when the certificate was
created
4.3.3.Editing properties in the office365.properties file
This properties set is needed in order to enable the Meeting Room Proxy
Server to be able to access meeting rooms information from your company’s
Azure Active Directory and to obtain Access Tokens in order to access the
Office 365 API and Exchange Online API.
In the table below you will find the properties that need to be edited in the
office365.properties file together with their respective descriptions and
example.
Property name
Description
office365.exchange.onli
ne.impersonated.smtp
This property represents the meeting.room@contos
user email needed to be set as o.onmicrosoft.com
an impersonated account when
making
SOAP
requests
to
Exchange Web Services. The
creation of this account was
done in chapter 2.2 – Step 4
office365.client.id
This property represents the 44ab8ae8-973d-4104Azure Active Directory Web API 8ac3-33fc5b023bab
iQMRUM Meeting Rooms User Manual 0.0.2
Example
[Confidential]
24
[Internal Document]
application’s Client ID and it
has been generated when the
application was created. To find
it please see in chapter 2.4 –
Step 7
office365.tenant.id
This property represents your f69b1501-2f02-4ab2company
Tenant ID.
This b722-a64208f9c095
property has been generated
when the Azure Active Directory
Web
API
application
was
created. To find it please see in
chapter 2.4 – Step 8
office365.certificate.na
me
This property represents the file azuread-certificate.p12
name of the certificate used by
the proxy for SSL authentication
with Azure Active Directory. This
certificate is the one that was
created in chapter 2.4 – Step 13
office365.certificate.pas
sword
This property represents the azureCertPassword
password for the Azure Active
Directory certificate used for SSL
authentication. This password is
the one that was used when the
certificate was generated in
chapter 2.4 – Step 13
4.3.4.Editing properties in the meeting-rooms.properties file
This properties set is needed in order for the Meeting Room Proxy Server to
be able to configure itself with values on initialization.
In the table below you will find the properties that need to be edited in the
meeting-rooms.properties file together with their respective descriptions and
example.
Property name
Description
mailbox.domain
This
iQMRUM Meeting Rooms User Manual 0.0.2
property
Example
represents
the contoso.onmicrosoft.co
[Confidential]
25
[Internal Document]
mail mailbox domain of the m
account
created earlier (see
chapter 2.2 – Step 4). It is used
to
generate
secure
basic
authentication credentials for
secure
client-to-server
API
access
4.3.5.Editing properties in the mail-config.properties file
This properties set is needed in order to enable the Meeting Room Proxy
Server to notify via email a support person or group in the eventuality of a
critical system failure (e.g. server crash, Exchange configuration error). The
generated mail can then be forwarded to the appropriate support entity for
issue remediation.
In the table below you will find the properties that need to be edited in the
mail-config.properties file together with their respective descriptions and
example.
Property name
Description
mail.host
This property represents the smtp.gmail.com
mail host address of the SMTP
mail service to be used for email
sending.
mail.username
This property represents the meetingroom.reporter
email username of to use for @gmail.com
email sending.
mail.password
This property represents
email account password.
iQMRUM Meeting Rooms User Manual 0.0.2
Example
the Password12345
[Confidential]
26
[Internal Document]
5. Starting the Meeting Room Proxy Server
There are three operations available to interact with the Meeting Room Proxy
Server
5.1. Starting the Proxy Server
To start the Meeting Room Proxy Server please type in the terminal:
#sudo service tomcat start
5.2. Restarting the Proxy Server
To restart the Meeting Room Proxy Server please type in the terminal:
#sudo service tomcat restart
5.3. Stopping the Proxy Server
To stop the Meeting Room Proxy Server please type in the terminal:
#sudo service tomcat stop
iQMRUM Meeting Rooms User Manual 0.0.2
[Confidential]
27
[Internal Document]
Document Control Section
Record of Changes
No.
Version
Date
Status
1
0.0.1
2015.06.10
Draft
5
0.0.2
2015.06.11
Draft
Who
Marius
Gherman
Marius
Gherman
Description
Azure Setup Draft
Added .properties configurations
6
7
Recipients of Document
No.
Version
Date
Who
Description
1
2
3
4
5
6
7
iQMRUM Meeting Rooms User Manual 0.0.2
[Confidential]
28