1
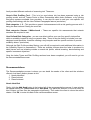
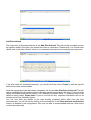
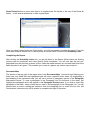
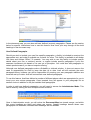
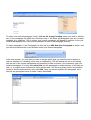
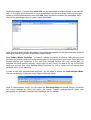
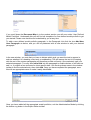
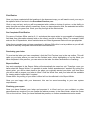
e-Suitability User Manual
This user manual is specifically designed to cover the Avail data library and its use in
e-Suitability Amber Lite and Avelo Software Adviser Office.
Any support relating to installation, program updates, or technical issues for Amber Lite should be
directed to The Exchange on 08450 531111 or e-mail [email protected]. For Avelo
software, contact Avelo Software Support on 08450 683000 or email [email protected]
Getting Started
The Avail data library is constantly updated to ensure the data contained within it is both relevant
and accurate. You will be prompted to update your data library frequently to ensure you are
running the most up to date version.
Letter Types
Avail provides a filtering process when constructing suitability reports which will cut down on the
amount of information needed to be manually inserted. The first process is with the Letter Type.
This allows the user to dictate the type of advice process.
The letter types supported are:
Personal Full Advice
Personal limited Advice
Business Full Advice
Business Limited Advice
Mortgage (MCOB regulations)
Demands & Needs (ICOB regulations)
Pre-sale Report
By selecting a letter type, the user can focus the letter on the specific advice process provided.
Risk Profiling
The second part of the filtering process is to confirm whether investment advice has been given. If
any part of the advice process has included investment advice, then a tick should be placed in the
field Is Risk Profiling Used? If the advice only covers non investment business such as Term
Assurance or Mortgage, then do not tick this box.
Avail provided different methods of assessing risk. These are:
Generic Risk Profiling Tool – This is to be used where risk has been assessed using a risk
profiling model, such as Towers Perrin or Silent Partnership within Avelo Software, or by utilising
third party systems available from providers. It can also be used to add your own specific risk
profiling methodology with the User Defined Paragraphs feature (see below).
Risk categories 1- 5 – This provides a generic risk assessment with a risk grading process with 1
being the least risk and 5 being the most risk.
Risk categories Sesame / Whitechurch – These are specific risk assessments that network
members are required to use.
User Defined Risk Categories - you are now able to define your own firm specific risk profiles
within e-suitability instead of using our generic data. There is also the facility to include your user
designed model portfolios, therefore creating a truly bespoke and firm specific solution to provide
suitability letters. (see below)
Although the Risk Profile provides filtering, you will still be required to add additional information in
the Suitability Report to personalise it. There are multiple choices when the letter is produced to
detail issues such as investing outside a normal risk profile, ethical investing, benchmarking and
specific investment objectives.
Once the Letter Types and Risk Profiling sections have been completed, you will need to go into
the Recommendations screen.
Recommendations
The Recommendations screen is where you can detail the needs of the client and the solutions
offered. Avail has 3 distinct phases to this
1. Needs Identified
2. Plans Advised
3. Plans Actioned.
Needs Identified
Firstly, click the Add Need button in the bottom left of the recommendations screen. A new window
will appear asking for a Need Area and a Sub Need. Pay particular attention to the sub need, as
this is where you can filter the paragraphs significantly. Then select the client to whom the advice
relates. Click OK, to enter this data in the recommendation screen.
Add Plan Advised
The next button in Recommendations is the Add Plan Advised. This will provide a window to enter
the specific details of the plan you advised the client to commence. Please Note: You should enter
details here of the plan advised, which is not necessarily the plan that has actually been proposed.
If the plan holds an investment element, you should click the button Funds to add the specific
sectors and funds recommended.
Once the appropriate fields have been completed, tick the box Has Plan Been Actioned? This will
now pre-populate the next section which is the plan actually proposed by the client. If you are using
Amber Lite Stand Alone with the library 2.30.0 upwards or Adviser Office 7.1 upwards, this box will
default to being ticked. Please Note: If you do not tick this box, important information will not be
transferred into the Suitability Report.
You can now alter any details of the plan actually proposed which differ from the plan
recommended. You will do this by clicking on the second line in the Plans Advised and Actioned
screen, as detailed in the image below. Now you can alter a recommended premium, fund choice
or other important data.
In the event that the plan actioned by the client is completely different to the plan you have
recommended, then once you have completed the Add Plan Advised fields, do not check the box
“has plan been actioned”, then click OK, then click the button in the recommendations screen Add
Plan Actioned. You can then enter details of the plan actioned by the client.
Multiple Product Recommendations
When providing multiple product solutions, you will need to add an additional need. You should not
just add another plan advised under the current need. For example. If you are providing protection
solutions and a term assurance and a separate critical illness plan have been recommended, you
would have added two needs in the upper portion of your recommendations screen as shown
below. After adding a need, then you would add plan advised, specific to that need.
Producing the Suitability Letter
User Styles
This feature in Amber Lite and Adviser Office 7.2 upwards allows users to customise the look and
feel of the letter generated by allowing users to pre-determine the type of font, font size,
justification, bold and underline text. In order to allow different styles to be implemented, Avail has
categorised 7 different styles which can be altered according to user preferences. These different
styles are as follows:
Bullet Point List
Footer
Main Body Text
Main Heading
Plan Detail Heading
Sub Heading 1
Sub Heading 2
So, as an example, if you wish to change how a main heading looks, by altering it from Times New
Roman, 14 Point, Bold and Centred, to maybe 16 Point and Underlined, this can be done within the
User Styles facility.
If you are happy with the style of the Avail letter as default, no action is necessary. If you
wish to change Styles then:
For Amber lite users, open Amber Lite, and in the Address Book, go to Tools then Styles.
For users of Adviser Office 7.2 upwards, User Styles and User Defined Paragraphs will need to be
enabled and managed by an e-Suitability Administrator. This will ensure one individual customizes
e-Suitability for the benefit of all licensed e-Suitability users within the firm. To designate an
administrator, go to Database Administration, System Options, e-Suitability and confirm the
user to whom admin rights should be given. There can only be one system administrator. If in any
doubt how to enable these rights, please contact support. For the administrator to change styles,
go to the AO taskbar, Maintain Adviser Office, Suitability Letter Styles.
Once opened in either Amber Lite or Adviser Office, you can view the different user styles in the
top left corner by clicking the drop down list directly under Styles Preview. By clicking on any one of
the 7 styles, you can view how the style appears in the document you are completing. To change a
style as above, simply select the type of font you require, size, justification or other permutation,
and then click the button Update. This will update all paragraphs that that particular style. You can
customise as many styles as you require. If having altered a font you don’t like the result, use the
Reset Default button to return that style to its original state. Be careful of the use of the Reset All
button – It will reset all alterations to their original style!
Once you have finished using the Styles facility, you will now need to complete the report. From the
main client folder in Amber Lite, or activity entry in Adviser Office Click the link Suitability Letter.
Completing the Report
After clicking the Suitability Letter link, you will be taken to the Report Writer where the filtering
process can be completed, and client specific fields completed. You will note that the text prepopulated from the previous process is blue, fields that need attention are red and fields that have
been attended to are green. This enables you to see at a glance any further input required.
Document Map
The section in the top right of the report writer is the Document Map. You should start filtering your
letter here. Any fields that are highlighted bold will need a specific action taken. By highlighting a
bold heading in the document map, you will see a choice of paragraph options in the Paragraph
List section below. To view a paragraph in the Paragraph List for enclosure in the letter, just
highlight the paragraph and it will appear in the Paragraph Preview pane. If you wish to insert this
paragraph in the letter, simply check the box next to this paragraph in the Paragraph List. You will
always need to make a paragraph selection from the paragraph list or check the box Info Not
Documented, otherwise you will be unable to complete and sign off the letter.
In the document map, you can also add user defined (custom) paragraphs. Please see the section
below for specific instructions how to use this feature. Now work your way through all the bold
headings in the document map.
User Defined Paragraphs
Should you wish to include your own firm specific paragraphs, a facility is included to construct the
appropriate text, and make it available as a choice for users. This facility is available to all Amber
Lite users and Adviser Office 7.2 upwards. You may wish to use this facility to include specific
details about your firm or advisory service, or maybe include specific paragraphs if your firm
assesses investment risk based on its own set of principles. You could also add paragraphs to
certain product areas if you have a bespoke offering.
Although user defined paragraphs make e-Suitability a tailored solution, it does not remove the
need or responsibility for Avail to keep the data up to date. Avail will still maintain the main
paragraph library; however you will be responsible for ensuring your own paragraph additions are
accurate and up to date. Avail will not maintain user defined paragraphs.
To use this feature, Avail has defined a number of different places which are appropriate for you to
insert your own custom paragraphs. Once inserted, they will appear in your paragraph list as
another choice in addition to the pre-installed Avail paragraphs.
In order to add user defined paragraphs, you will need to access the Administrator Mode. This
can be done by clicking the icon in Report Writer as below.
Once in Administration mode, you will notice the Document Map has turned orange, and within
this, some headings are black and others are orange. Orange headings denote where user
paragraphs can be added, whereas black headings are not editable.
To add a user defined paragraph, firstly, click on the orange heading where you wish to add the
text. In the paragraph list below the document map, it will show all paragraphs that are currently
available as a selection. This is where your custom paragraph will appear in addition to the preinstalled paragraphs from Avail, and be available as one of the paragraph choices.
To add a paragraph, in the Paragraph List click the icon Add New User Paragraph as below, and
you will be presented with a new window to add your desired paragraph.
In the new window, you note that you have to dictate which style you want the text to appear in,
such as whether it is a heading, main body or subheading. This will ensure the text is in-keeping
with the rest of the system paragraphs and therefore provide uniformity. Once selected, type your
selected paragraph. You may also add a field into the paragraph to enable choices of text such as
and / or, or maybe a free text area for client specific date. Use the drop down menu in the window
toolbar to find the selected entry then click Add. Once you have completed the paragraph, save
this with an appropriate name to make it easily identifiable.
Once you have added all the appropriate paragraphs, exit the Administration Mode by clicking the
Admin cog button in the Report Writer toolbar.
User Defined Risk Profiling – This works similar to the user defined paragraphs as listed above.
In order to activate the facility to produce user defined risk profiling you first need to make the
following choices at the very start of the filtering process.
Firstly you must tick the check box ‘Is Risk Profiling Used’. This will then allow you to select ‘User
Defined Risk Categories’ from the Risk Profiling Methodology drop down box.
Follow the usual process in the ‘Edit Recommendations’ screen to load the report writer. In order to
add user defined risk profiling, you will need to access the Administrator Mode. This can be done
by clicking the icon in Report Writer as below.
Once in Administration mode, you will notice the Document Map has turned orange, and within
this, some headings are black and others are orange. Orange headings denote where user
paragraphs can be added, whereas black headings are not editable.
If you scroll down the Document Map in to the ‘further information’ section you will now notice
‘User Defined Risk Categories’. You will already find our risk profiling template to get you started
and help you construct your own paragraphs. Please note that our template can be deleted by you
at any time.
To add your own risk profiling paragraph, in the Paragraph List click the icon Add New User
Paragraph as below, and you will be presented with a new window to add your desired paragraph.
In the new window, you note that you have to dictate which style you want the text to appear in,
such as whether it is a heading, main body or subheading. This will ensure the text is in-keeping
with the rest of the system paragraphs and therefore provide uniformity. Once selected, type your
selected paragraph. You may also add a field into the paragraph to enable choices of text such as
and / or, or maybe a free text area for client specific date. Use the drop down menu in the window
toolbar to find the selected entry then click Add. Once you have completed the paragraph, save
this with an appropriate name to make it easily identifiable.
Once you have added all the appropriate risk profiling paragraphs, exit the Administration Mode by
clicking the Admin cog button in the Report Writer toolbar.
User Defined Model Portfolios – In order to activate the facility to produce user defined model
portfolios you should initially follow the usual process in the constructing your letter. Once you have
finished making your selections in the ‘Add Plan Advised’ window you must ensure that you
complete the funds section correctly. Simply click on the ‘Funds’ box and at the top of the funds
listed you will now find ‘User Defined Model Portfolios’ for you to select and you should then
distribute 100% to this selection.
In order to add user defined model portfolios, you will need to access the Administrator Mode.
This can be done by clicking the icon in Report Writer as below.
Once in Administration mode, you will notice the Document Map has turned orange, and within
this, some headings are black and others are orange. Orange headings denote where user
paragraphs can be added, whereas black headings are not editable.
If you scroll down the Document Map in to the product section you will now notice ‘User Defined
Model Portfolios’. Underneath this you will find our template of a user defined model portfolio to get
you started. Please note that this can be deleted by you at any time.
To add a user defined model portfolio paragraph, in the Paragraph List click the icon Add New
User Paragraph as below, and you will be presented with a new window to add your desired
paragraph.
In the new window, you note that you have to dictate which style you want the text to appear in,
such as whether it is a heading, main body or subheading. This will ensure the text is in-keeping
with the rest of the system paragraphs and therefore provide uniformity. Once selected, type your
selected paragraph. You may also add a field into the paragraph to enable choices of text such as
and / or, or maybe a free text area for client specific date. Use the drop down menu in the window
toolbar to find the selected entry then click Add. Once you have completed the paragraph, save
this with an appropriate name to make it easily identifiable.
Once you have added all the appropriate model portfolios, exit the Administration Mode by clicking
the Admin cog button in the Report Writer toolbar.
Field Entries
Once you have completed all the headings in the document map, you will need to work your way to
the specific fields in red text in the Document Preview pane.
Click on any red text, and you will be presented with a either a choice of options, or the facility to
enter free text and client specific reasoning. Once you have altered a field, the amended text within
the field will turn to green text. Work your way through all the field entries.
Pre Completed Field Entries
For users of Adviser Office version 8.1.1 and above the report writer is now capable of completing
field data from information already held on the client’s record in Adviser Office. For example, fields
such as No of Dependents, client marital status and Client Agreement Date will now pre-populate.
If the clients records have not been completed in Adviser Office this is not a problem as you will still
be able to manually complete field entries as instructed above.
Previewing your letter
To preview the letter you have completed, click the Print Preview icon in the top toolbar. This will
open up your letter where you can see the finished work, either highlighting or not the fields you
have completed. After preview, you can return to the letter for either amendment or finalising.
Export to Word
Any work completed in the Report Writer will automatically be saved on exit. Therefore, once you
have exited the Report Writer, it is possible to make further amendments if needed. By exiting the
report writer, you will be taken back to the place you originally started your letter, and from here
you will be able to export your letter to Word. Click the Word Icon, and your letter will be available
for viewing and/or further edit if required.
Please Note: Any editing of your letter in Word will not be reflected in the Report Writer.
Once you are happy with your document, this can be saved according to your own system
requirements.
Finalising your report
Once you have finalised your letter and exported it to Word and you are confident no other
amendments are required, you can finalise the advice process. In the client folder, select the Green
Tick on the tool bar. Once you have finalised the process, no further amendments can be made.
FAQ’s – Answers to some common questions.
Q: In the Report Writer, there are many greyed out fields in the Document Map which I can’t amend
and are not relevant to the advice I am giving. Can I hide these to simplify my view?
A: Yes. When in the Report Writer go to the top left area of your screen, click on Phases then left
click Phase Suppression. This will simplify the view in the Document Map
Q: How do I produce an Unsecured Income Recommendation or comprehensive retirement report?
A: First, Select the Letter Type applicable, and also the method of risk profiling. Then, in the
Recommendations screen, Add Need, the select the need area Options at Retirement, then
select the sub need such as Arranging a Secure Income or Arranging a Flexible Income. You
will note that USP reviews can also be documented here. You can then go to Add Plan Advised
and select the appropriate type of plan such as Unsecured Income Plan.
Q: How do I construct a basic annuity recommendation without using the options at retirement
report?
A: First, Select the Letter Type applicable, and also the method of risk profiling. Then, in the
Recommendations screen, Add Need, the select the need area Retirement Planning, and the
sub need Pension Taking at Retirement. You can then go to Add Plan Advised and select the
plan Annuity. This will provide all available annuity options and justification.
Q: How do I create a report including Trust recommendations?
A: This can be done in various ways. If your report specifically covers the setting up of a new trust,
or explaining the details of a trust already established, you should start your report with the letter
type Trust Report. This will provide reasons behind the establishment of the trust including the
objectives of the trust. To then make a specific trust recommendation, you should go into the
recommendations screen, Add Need then select Trusts. You can select a sub need of existing
trust recommendation or establishment of a new trust. After this, the Add Plan Advised screen will
provide the choice of the trust recommended. Your Suitability Report will how provide all the
justification surrounding the establishment of a trust. Once you have added the trust information,
you will need to add an additional need in the recommendations screen for any investment plan
recommended within the trust arrangement.
If your Suitability report includes multiple areas, you may wish to start your letter with the letter type
Personal Full Advice and add trust information from the recommendation screen only. This will
produce a letter not specifically focusing on establishment of a trust.
Q: How do I produce a Wrap Recommendation?
A: First, Select the Letter Type applicable, and also the method of risk profiling. This report is
designed to be a stand alone document explaining why a Wrap service may be in the client’s best
interests, and can be used without a specific product recommendation. If this is the case, then do
not complete the Recommendations screen, simply open the Report Writer to finalise the report. If
you have recommended specific products for use in the Wrap Account, then you would use the
recommendations screen to Add Need, and Add Plan Advised accordingly.
Q: How do I produce a Recommendation for multiple investment products?
A: If you are using a service such as CoFunds or Fidelity Funds Network, then use the product
Multi Investment Platform. This product allows the justification of different collectives within one
plan, such as Unit Trusts, ISA’s and Direct Share Holdings. It will also provide justification for a
Discretionary Management Service.
Q: How do I use the Business Protection Report?
A: When in the Recommendations Screen, select the need area Business Protection, then the
sub need either Companies or Partnerships and Sole Traders. Then click Add Plan Advised
and select from the list. Remember to tick the box “Has Plan Been Actioned”. If in addition to a
this recommendation, you are also recommending a product such as Term Assurance, then you
should add another need - Protection, and Sub Need such as Life Assurance for Business
Protection. Then, add the recommended product for business protection by using Add Plan
Advised.
Q: How do I review existing funds within a plan?
A: Firstly, ensure that you have selected the appropriate Risk Profiling Methodology. Then, in the
Recommendations screen, select the need area Investment Fund Review, and the Sub Need
will allow you to select whether funds have been reviewed and remain unaltered, or whether
Pension or Investment funds have been reviewed and altered. In the Add Plan Advised, select
again the course of action appropriate.
Have you got an unanswered query?
Any support relating to installation, program updates, or technical issues for Amber Lite should be
directed to The Exchange on 08450 531111 or e-mail [email protected]. For Avelo
Software, contact Avelo Software Support on 08450 683000 or email [email protected]. Any
queries relating to the data content should be emailed to Avail [email protected]
Avail Ltd, 3 Adelaide House, Corbygate Business Park, Priors Haw Road, Corby, Northants, NN17 5JG
Web www.avail.uk.net tel. 01536 443202 email [email protected]