1
4. DMX-512 CONTROL CONNECTIONS
This fixture complies with international USITT DMX standards and can be used with either a 3 pin
or 5 pin DMX connector. Plug in the provided 3 pin XLR cable to the female 3-pin XLR output of
your controller and the other side to the male 3-pin XLR input of the MICROH PLASMAWAVE.
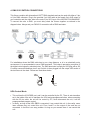
To connect the units to DMX, you must daisy chain the fixtures together as referred in the
diagram below. Always end your DMX-512 connection with a DMX terminator.
For installations where the DMX cable has to run a long distance, or is in an electrically noisy
environment, it is recommended to use a DMX terminator. This helps in preventing corruption of
the digital control signal by electrical noise. The DMX terminator is simply an XLR plug with a 120
ȍUHVLVWRUFRQQHFWHGEHWZHHQSLQVDQGZKLFKLVWKHQSOXJJHGLQWRWKHRXWSXW;/5VRFNHWRI
the last fixture in the chain. Please see illustrations below.
120¡
2
3
1
PIN 3
PIN 2
ILDA Control Mode
z
z
This unit has the ILDA DB25 port, and it can be controlled by the PC, There is auto transform
set in the inside of the unit to transform the ILDA and preprogrammed show. when connecting
with the 25 pin cable, the unit will be control by PC, when disconnect the unit, it will be
preprogrammed program controlࠋ
In theory, as long as the ILDA DB25 is connected, It can control this unit. In the reality, some
laser software may not control this unit. Pins 4 and17 on the output of the card are not
connected. In fact this is an easy problem. As long as you connect them. It can control this
unit.
5