1
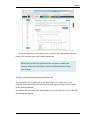
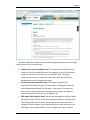
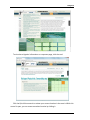
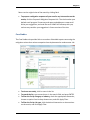
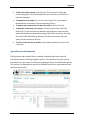
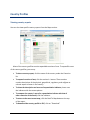
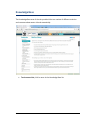
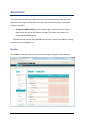
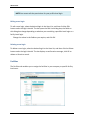
Water Risk Filter USER GUIDE Copyright © 2014 Prognoz Corporation. All rights reserved. All trademarks are the property of their respective owners. No portion of this user guide may be reproduced or transmitted in any form or by any means, electronic or mechanical, including photocopying, recording, or information storage and retrieval systems, for any purpose other than the recipient’s personal use, without the express written permission of Prognoz. The information contained in this user guide is subject to change without notice. While every effort has been made to ensure the accuracy and reliability of this information, neither Prognoz nor its partners or affiliates shall be liable for errors contained herein or consequential damages in connection with the furnishing, performance, or use hereof. The software described herein is licensed subject to the conditions set forth in the software services agreement. Document version 2.0 Table of contents Table of contents ............................................................................................................ 1 About the Water Risk Filter ........................................................................................... 1 Site structure .............................................................................................................. 1 Home page ...................................................................................................................... 3 Log in and registration ................................................................................................ 4 Water Risk Assessment .................................................................................................. 6 Adding a new facility ................................................................................................... 6 Adding a new agricultural commodity assessment ..................................................... 7 Adding multiple new facilities /agricultural commodity assessments at the same time ....................................................................................................................... 10 Editing a facility .......................................................................................................... 11 Water Risk Assessment ............................................................................................ 13 Adjusting weightings.............................................................................................. 14 Portfolio Results........................................................................................................ 15 Questionnaire ........................................................................................................... 16 Sending a link to the questionnaire to another user ............................................ 17 Reports...................................................................................................................... 18 Mitigation ...................................................................................................................... 21 Mitigation................................................................................................................... 21 Case Studies .............................................................................................................. 23 Agriculture (in development).................................................................................... 24 Maps .............................................................................................................................. 25 Country Profiles............................................................................................................ 26 Viewing country reports ........................................................................................... 26 Knowledge Base ............................................................................................................ 27 Admin Panel .................................................................................................................. 28 Modules ..................................................................................................................... 28 Adding a user login ............................................................................................... 29 Assigning permissions to a user login ................................................................... 29 Editing a user login ................................................................................................ 30 Deleting a user login ............................................................................................. 30 Facilities ..................................................................................................................... 30 About the Water Risk Filter The Water Risk Filter is an online application for corporate officers, facility managers, and investors to analyze the impact of their business activity on the water supply, understand potential risk exposures, and obtain ideas for mitigating risk in a proactive way. To use the Water Risk Filter, browse to www.waterriskfilter.panda.org. We recommend that you use Internet Explorer 9 or higher, Mozilla Firefox 9 or higher, the latest version of the Google Chrome, or Safari 5 browser with pop-ups enabled. TIP To send an email to WWF with regard to this site, click the Feedback button on the right side of the browser window. Site structure The Water Risk Filter contains five main areas. Access these areas using the navigation bar near the top the pages of the site. Home. This page provides general information about the tool as well as links to the user guide a video tutorial, the FAQs, and more information on water stewardship. Water Risk Assessment. This area of the site contains the facility and commodity water risk assessment. Tailored questionnaire for calculating a facility or commodity specific basin-related and facility- or commodityrelated water risk. You can present results with different details and populate reports. Mitigation. This area of the site provides information concerning response to risk. While risk scores are not prescriptive about the specific actions that you should take, the Mitigation section structures your response along the steps of stewardship and the three risk categories of the Water Risk Filter. You can also access a full set of references and support materials for each 1 About the Water Risk Filter 2 step as well as links to relevant case studies based on publicly available examples. These case studies enable you to explore how other companies have begun to tackle water issues. Maps. This area of the site enables you to choose from various map overlays, such as water scarcity, biodiversity, climate change, commodity footprints and other thematic maps. Country Profiles You access a complete list of country profiles to give you a more thorough understanding of water issues in places of key interest. Knowledge Base. This area of the site provides access to supporting information. Learn about water stewardship initiatives, browse a list of key publications, and access a complete country profile database. Home page The home page of the Water Risk Filter provides an overview of the site and links to site resources. Click the buttons in the navigation bar to go to the various areas of the site. The Mitigation button appears against a different colored background to call your attention to this important site feature. 3 Home page NOTE If you are a portfolio-level or facility-level user, you can access the Admin Panel by clicking the link of your login name near the top of the page, toward the right. To switch between English, Spanish and Chinese versions of the site, click the EN, SP and CH links near the top of the page. To read a news story about water risk, click one of the links under the Water Risk News section, or click the name of this section to go to the Water Risk News page of the Knowledge Base. To find answers to frequently asked questions, hover over the questions under the FAQs section. Log in and registration Your login for the Water Risk Filter site determines your level of access to the site’s features. There are three different access levels: Portfolio. Portfolio-level logins are for those who require a broad understanding of a company’s water risk across multiple facilities. Portfoliolevel users can administer the logins of facility-level users of the same company. Facility. Facility-level logins are for managers who are responsible for one or more facilities but who do not necessarily need to assess the water risk for the company as a whole. Guest. Guest logins provide limited access for those who want to learn more about the site and its features. When you arrive at the home page for the first time, the site provides you with Guest privileges. To obtain a login for portfolio-level access, click the Register button in the Log In section. 4 Home page The site displays the Registration dialog box. Fill in the information in this form, accept the terms and conditions and click Save. You may then use your user name and password to log into the site and create facility-level logins for other users in your company. For more information, please refer to the Admin Panel section of this guide. 5 Water Risk Assessment Adding a new facility To add a new facility, click the Add New button at the bottom of the facility list. The site displays the Add New dialog box. Then follow these steps: 1. Type the name of the facility in the Name field. 2. Choose the industry of this facility from the Industry drop-down menu. 3. Indicate the location of the facility by clicking Select location. The Select Location dialog box appears: 6 Water Risk Assessment In the search field, type the name of the city or region, and click Search. The map places a marker at this location. If you need to fine-tune the placement of the facility, zoom in by dragging the Zoom slider, and drag the position of the marker. NOTE Providing accurate location information is essential to assessing the facility’s risk. The tool links the GPS position of the provided location to the different underlying databases. 4. Click Save. The Select Location dialog box closes. 5. Click Save again in the “Add new box”. The site adds the facility to your company profile. Adding a new commodity assessment To add a new agricultural commodity assessment, click the Add New button at the top or bottom of the facility list on the left of the screen. The site displays the Add New dialog box. 7 Water Risk Assessment Then follow these steps: 1. Type the name of the facility/farm or other identifier in the Name field. 2. For the industry choose Agriculture (Plant products) from the Industry dropdown menu. 3. The Commodity drop-down menu appear 4. Select an agricultural commodity 5. As location you can chose an exact location as in the facility assessment OR just the country depending your knowledge 6. Indicate the location of the facility by clicking Select location. The Select Location dialog box appears: 8 Water Risk Assessment In the search field, type the name of the city or region, and click Search. The map places a marker at this location. If you need to fine-tune the placement of the facility, zoom in by dragging the Zoom slider, and drag the position of the marker. OR Select the location by country from the Country drop-down list. NOTE Providing accurate location information is essential to assessing the commodity’s risk. The tool links the GPS position of the provided location to the different underlying databases OR uses country level information only to assess the commodity on country level. The user can decided on the location data availability. 7. Click Save when the location has been assigned and the Select Location window closes. 8. Click Save again in the “Add new box”. The site adds the facility to your company profile. 9 Water Risk Assessment Adding multiple new facilities /agricultural commodity assessments at the same time From the New Facility dialog box, you can add up to 300 new facilities/commodities at the same time to your portfolio. To do so, click the Upload Multiple Facilities button at the bottom in the dialog box. The Upload Multiple Facilities dialog box appears. Then follow Step 1.1 or Step1.2 and Step 2: Step 1.1: Click on Download facility Excel form, save and open the file. Step 1.2: Click on Download commodity Excel form, save and open the file. Fill in the Excel form following these steps: 10 Water Risk Assessment 1. Type the name of a facility in the Facility name field. 2. Set the location for the facility by providing the GPS coordinates or a clear location description such as an address. 3. Choose the industry (facility Excel form) and the commodity (commodity Excel form) for the facility from the Industry/Commodity drop-down menu. 4. Repeat Steps 1–3 for each facility you want to add. When the list is complete, save the file on your computer. Step 2: Click on Import from Excel and choose the prepared file from the directory of your computer, then click Ok. The data sets are transferred into an online form of the Water Risk Filter. This can several minutes depending on the number of facilities. From the Adding Multiple Facilities dialog box, you can also perform the following actions: To delete a facility, click its Delete icon to the right of its row of fields. To add an additional line to fill in a facility manually, click the Adding One Facility button. When all data is complete, click Save to upload the facilities into your user portfolio. This can take several minutes and the uploaded facilities start to occur on the left hand side of the site-screen in the facility list. Editing a facility To edit a facility, click its Edit button. The site displays the Edit Facility dialog box. 11 Water Risk Assessment Edit the definition of the facility as you require, and click Save. 12 Water Risk Assessment The Water Risk Assessment tab shows aggregated risk scores for the selected facility as a heat map. Below the heat map, you find detailed results broken down by basin-related risk and company-related risk. Basin-related risk results come from the Quick View calculations, based on the 20 indicators linked to the GPS position of the facility location that you provided. Company-related risk results come from the answers to the facility-specific questionnaires. 13 Reports To get more information about a particular risk, hover over its Information icon. To edit your answer for any company/commodity-related risk, click its Edit icon, and choose a new answer from the choices that appear. The site makes the change and marks the Edit icon to help you remember that you modified this answer. Please note that basin-related risks are not editable. Adjusting weightings The site weights the various risk factors to determine your facility’s/commodity’s overall water risk. If you have better knowledge of the local situation and wish to adjust these weightings for a more accurate assessment, click the Tailor Weightings button at the top of the detailed list. The Weightings dialog box appears. 14 Reports Type new values in the fields as you require, and then click OK to save your changes. The site displays a warning if the sum of the weightings does not equal 100 percent for each level. To revert to the model’s recommended weightings, click Reset. Portfolio Results The Portfolio Results tab shows a matrix of all basin and company/commodity risks for all the assessed facilities/commodities of your company. 15 Reports When hovering over the dot’s the facility name(s) and the risk score will be displayed. The matrix can be downloaded as PDF printed or all results can be downloaded in a Excel document for further analysis. Questionnaire Use the questionnaire to determine the specific water risk for the selected facility. Each facility has its own questionnaire; the answers from one facility do not affect the water risk for other facilities, although a high-risk facility does affect the risk level of the company as a whole. 16 Reports Answer the questions on the questionnaire, and click the Save And Show Results button. The site takes you to the Portfolio Results tab. TIP You may return to the questionnaire at any time to modify your answers. When you are finished, click Save And Show Results to save your changes. Sending a link to the questionnaire to another user The site enables you to send a link to the questionnaire to another user in your company. You might use this feature when the other person is better able to answer facility-specific questions. To send the link in an email, click the envelope icon to the right of the row of tabs. The Send dialog box appears. 17 Reports To choose the user who should fill out the questionnaire, select this user’s radio button. To send the link to the questionnaire to the selected user, click Send. To delete a user, click this user’s Delete icon. To edit a user, click this user’s Edit icon. To add a new user, click Add User. Reports The Reports tab provides links to reports about the water risk for your client, company or facility. Much of the information in these reports comes from the questionnaire, the portfolio results, and the facility results. 18 Reports The Water Risk Filter produces three automatically generated reports covering all relevant items of the risk assessment: Portfolio-level report (available soon). This report contains high-level risk results for all the assessed facilities of your company or client and provides insight on the exposure to water risk on a portfolio level. The report represents risk scores in a matrix and a list, and it plots the facilities on detailed water-scarcity and pollution maps. Facility-level report (available soon). This report contains all the information of a specific facility’s risk assessment, including the heat map and all underlying individual risk indicators. It also plots the company on water-scarcity and pollution maps and generates examples of mitigation responses based on the facility’s three highest risks. CDP report 2014 (available soon). We are working together with the Carbon Disclosure Project (CDP) to ensure that you have a head start in filling in the next CDP questionnaire for water. We provide all the information that is available for your company on a portfolio level in the same structure as the CDP Water Initiative questionnaire. The site supplies this report in Word 19 Reports format, so that you can copy and paste your answer into the CDP questionnaire, which gives you the opportunity to amend your answers. These reports contain interactive features, including maps and selectable facilities. The precise set of features depends upon which report you choose. 20 To view a report, click its title in the list on the left. For the facility-level report, please select the relevant facility from the list that appears. Mitigation The Mitigation area of the site offers valuable suggestions for reducing the water risk for your company or facility. You can also read case studies about how other companies have managed and mitigated their risks. This area has two tabs: Mitigation and Case Studies. Mitigation The Mitigation tab presents a matrix of risk factors and types of risk. To view information at any intersection of the matrix, simply roll the mouse over the corresponding card. 21 Mitigation To view the mitigation information on a separate page, click the card. Click the Quick View control to review your current location in the matrix. While this control is open, you can move to another location by clicking it. 22 Mitigation Return to the original view of the matrix by clicking Back. To propose a mitigation response of your own for any intersection on the matrix, click the Propose A Mitigation Response link. The site launches your default email program if necessary and opens and addresses a new email. Write your suggestion, and send the email. WWF will follow up with you, and we may consider your suggestion in future versions of the site. Case Studies The Case Studies tab provides links to a number of detailed reports concerning the mitigation actions that various companies have implemented to reduce water risk. To view a case study, click its name in the list. To search the list, type a search term in the search field, and press ENTER. To filter the list by category or industry, check the appropriate dimension, choose an option from its drop-down menu, and click Apply Filter. To filter the list by risk type, click the desired intersection or intersections on the matrix, and click Apply Filter. 23 Mitigation To filter the list by country, click the map. The site opens the Filter By Country dialog box. Click the desired country or countries, and click OK to close the dialog box. To export the case study, click an icon next to Export To. Your browser downloads the case study in the corresponding format. To open a print-ready version of the case study, click the Print link. To propose a case study of your own, click the Propose Your Own Case Study link. The site launches your default email program if necessary and opens and addresses a new email message. Write your case study, and send the email. WWF will follow up with you, and we may consider your case study in future versions of the site. To return to the list of case studies, click the Back button at the top of the case study. Agriculture (in development) The Agriculture tab provides links to a number of detailed agricultural specific information sources including mitigation actions. The collection currently contains information of major crops, rain-fed and irrigated agriculture, and stakeholder groups. This section is in development and will be available soon with an improved structure and filter functionality 24 Mitigation Maps The Maps section enables you to view various maps concerning water-risk-related issues. To choose the map layer, select from the list of main layer and when available the sub-layer (e.g. water scarcity, blue water footprint etc.). To adjust the view of the map, click the region of the world that you want to see in the bar along the bottom of the map. If you are currently viewing a Google map, you can also pan and zoom. To get more information about a facility on a Google map, click one of the red map pins. The site takes you to the Facility Results tab of the Full Assessment area for the selected facility. To view the Description, Source and link of the map, click on the arrow tab to view these information To display a selection of facilities, use the filter function 25 Country Profiles Viewing country reports You can also view specific country reports from the Maps section. Most of the country profiles contain expandable sections of text. To expandFor most of the country profiles, you can op To view a country report, click the name of the country under the Countries list. To expand a section of text, click the section’s + button. These sections contain descriptions of the physical, geopolitical, regulatory, and religious or cultural aspect of water in the country. To show the description and source of a quantitative indicator, hover over the indicator with the mouse pointer. To compare the country’s score for a quantitative indictor with that of other countries of the world, click the indicator. To return to the most recent map, click the Back To Map button at the top of the report. To download the country profile in PDF, click on ”Download” 26 Knowledge Base The Knowledge Base area of the site provides links to a number of different statistics and resources about water risk and stewardship. 27 To view an article, click its name in the Knowledge Base list. Admin Panel The Admin Panel enables a portfolio-level user to create new facility-level users and administer their logins. Facility-level users may review the information in the Admin Panel but not edit it. To open the Admin Panel, go to the home page, and click the name of your login at the top right of the browser window. The Admin Panel opens in a new browser window or tab. The Admin Panel has two tabs: Modules and Facilities. Access these tabs by clicking their names in the navigation bar. Modules The Modules tab enables you to create users and assign privileges to their accounts. 28 Admin Panel Adding a user login To add a user login, follow these steps: 1. Click the Add User button at the bottom of the Users list. The site displays the New User dialog box: 2. Fill in the requested information for this user login. Note that you control the login name and password. 3. Click Save. The New User dialog box closes, and the site adds the user login to your company. Assigning permissions to a user login To assign permissions to a user login, follow these steps: 1. From the Users list, click the desired user login. The site displays the permissions for this login in the table. You can expand the list of permissions under Assessment and Mitigation by clicking their + buttons. 2. Check the checkboxes for those permissions that you want to grant in the corresponding modules or areas of the site. (Please note that an Edit permission automatically grants Read permission also.) You may also uncheck a permission that you previously granted to revoke this particular permission. 3. Click Save. 29 Admin Panel NOTE You cannot edit the permissions for your profile-level login. Editing a user login To edit a user login, select the desired login in the Users list, and then click the Edit button under the login’s details. The site opens the Edit User dialog box; the fields on this dialog box change depending on whether you are editing a portfolio-level login or a facility-level login. Change the values in the fields as you require, and click OK. Deleting a user login To delete a user login, select the desired login in the Users list, and then click the Delete button under the login’s details. The site displays a confirmation message; click OK to delete or Cancel to cancel. Facilities The Facilities tab enables you to assign the facilities in your company to specific facilitylevel users. 30 Admin Panel To do so, follow these steps: 1. In the list of users, select the desired user. The table shows those facilities for which this user is currently responsible. 2. Check a facility’s checkbox to assign the facility to this user, or uncheck its checkbox to remove the facility from this user. 3. Click Save. Please note that your portfolio-level login always has access to all the facilities in your company; you cannot remove facilities from this type of login. NOTE The Facilities tab also enables you to add, edit, and delete user logins. The procedures here are the same as they are in the Modules tab. 31