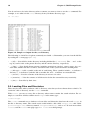
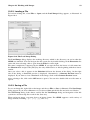
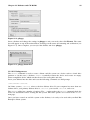
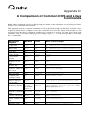
1
Red Hat Enterprise Linux 3
Red Hat Enterprise Linux Step
By Step Guide
Red Hat Enterprise Linux 3: Red Hat Enterprise Linux Step By Step Guide
Copyright © 2003 by Red Hat, Inc.
Red Hat, Inc.
1801 Varsity Drive
Raleigh NC 27606-2072 USA
Phone: +1 919 754 3700
Phone: 888 733 4281
Fax: +1 919 754 3701
PO Box 13588
Research Triangle Park NC 27709 USA
rhel-sbs(EN)-3-Print-RHI (2003-11-12T01:05)
Copyright © 2003 by Red Hat, Inc. This material may be distributed only subject to the terms and conditions set forth in the
Open Publication License, V1.0 or later (the latest version is presently available at http://www.opencontent.org/openpub/).
Distribution of substantively modified versions of this document is prohibited without the explicit permission of the copyright
holder.
Distribution of the work or derivative of the work in any standard (paper) book form for commercial purposes is prohibited
unless prior permission is obtained from the copyright holder.
Red Hat, Red Hat Network, the Red Hat "Shadow Man" logo, RPM, Maximum RPM, the RPM logo, Linux Library,
PowerTools, Linux Undercover, RHmember, RHmember More, Rough Cuts, Rawhide and all Red Hat-based trademarks and
logos are trademarks or registered trademarks of Red Hat, Inc. in the United States and other countries.
Linux is a registered trademark of Linus Torvalds.
Motif and UNIX are registered trademarks of The Open Group.
Intel and Pentium are registered trademarks of Intel Corporation. Itanium and Celeron are trademarks of Intel Corporation.
AMD, Opteron, Athlon, Duron, and K6 are registered trademarks of Advanced Micro Devices, Inc.
Netscape is a registered trademark of Netscape Communications Corporation in the United States and other countries.
Windows is a registered trademark of Microsoft Corporation.
SSH and Secure Shell are trademarks of SSH Communications Security, Inc.
FireWire is a trademark of Apple Computer Corporation.
IBM, AS/400, OS/400, RS/6000, S/390, and zSeries are registered trademarks of International Business Machines
Corporation. eServer, iSeries, and pSeries are trademarks of International Business Machines Corporation.
All other trademarks and copyrights referred to are the property of their respective owners.
The GPG fingerprint of the [email protected] key is:
CA 20 86 86 2B D6 9D FC 65 F6 EC C4 21 91 80 CD DB 42 A6 0E
Table of Contents
Introduction.......................................................................................................................................... i
1. Changes to This Manual ........................................................................................................ i
2. Document Conventions......................................................................................................... ii
3. Copying and Pasting Text With X........................................................................................ iv
4. Using the Mouse ................................................................................................................... v
5. We Need Feedback! .............................................................................................................. v
6. Sign Up for Support .............................................................................................................. v
I. Starting Out ...................................................................................................................................... i
1. Getting Started ...................................................................................................................... 1
1.1. Setup Agent........................................................................................................... 1
1.2. Introductory Terms................................................................................................. 4
1.3. Logging In.............................................................................................................. 6
1.4. Graphical Interface................................................................................................. 8
1.5. Opening a Shell Prompt ......................................................................................... 8
1.6. Creating a User Account........................................................................................ 8
1.7. Documentation and Help ..................................................................................... 10
1.8. Logging Out ......................................................................................................... 12
1.9. Shutting Down your Computer ............................................................................ 13
2. Using the Graphical Desktop .............................................................................................. 15
2.1. Using the Desktop................................................................................................ 15
2.2. Using the Panel .................................................................................................... 16
2.3. Using Nautilus .................................................................................................... 18
2.4. Start Here ............................................................................................................. 19
2.5. Logging Out ......................................................................................................... 22
3. Shell Prompt Basics ............................................................................................................ 25
3.1. Why Use a Shell Prompt...................................................................................... 25
3.2. The History of the Shell....................................................................................... 25
3.3. Determining Your Current Directory with pwd ................................................... 26
3.4. Changing Directories with cd .............................................................................. 26
3.5. View Directory Contents with ls.......................................................................... 29
3.6. Locating Files and Directories ............................................................................. 30
3.7. Clearing and Resetting the Terminal.................................................................... 31
3.8. Manipulating Files with cat................................................................................ 31
3.9. Pipes and Pagers .................................................................................................. 35
3.10. More Commands for Reading Text Files........................................................... 37
3.11. Command History and Tab Completion ............................................................ 39
3.12. Using Multiple Commands ................................................................................ 40
3.13. Ownership and Permissions............................................................................... 40
4. Managing Files and Directories .......................................................................................... 47
4.1. A Larger Picture of the File System .................................................................... 47
4.2. Identifying and Working with File Types ............................................................ 48
4.3. File Compression and Archiving ......................................................................... 49
4.4. Manipulating Files at the Shell Prompt ............................................................... 55
II. Using Your System ....................................................................................................................... 59
5. Web Browsing..................................................................................................................... 61
5.1. Mozilla................................................................................................................. 61
5.2. Web Browser Keyboard Shortcuts ....................................................................... 63
6. Email Applications.............................................................................................................. 65
6.1. Evolution.............................................................................................................. 65
6.2. Mozilla Mail......................................................................................................... 68
6.3. Plain Text Email Clients ...................................................................................... 70
7. Working with Documents ................................................................................................... 73
7.1. The OpenOffice.org Suite................................................................................... 73
7.2. Editing Text Files ................................................................................................. 79
7.3. Viewing PDFs ...................................................................................................... 81
8. Audio, Video, and General Amusement ............................................................................. 83
8.1. Playing Audio CDs .............................................................................................. 83
8.2. Playing Digital Audio Files ................................................................................. 83
8.3. Troubleshooting Your Sound Card ...................................................................... 85
8.4. Troubleshooting Your Video Card ....................................................................... 86
8.5. Games .................................................................................................................. 87
8.6. Finding Games Online ......................................................................................... 87
9. Working with Digital Cameras ........................................................................................... 89
9.1. Using gtKam ....................................................................................................... 89
10. Working with Images ........................................................................................................ 91
10.1. Viewing Images.................................................................................................. 91
10.2. Manipulating Images with the GIMP................................................................ 92
10.3. Additional Resources ......................................................................................... 95
11. Diskettes and CD-ROMs .................................................................................................. 97
11.1. Using Diskettes .................................................................................................. 97
11.2. CD-ROMs .......................................................................................................... 99
11.3. CD-Rs and CD-RWs ........................................................................................ 100
11.4. Additional Resources ....................................................................................... 103
III. Troubleshooting Your System ................................................................................................. 105
12. Frequently Asked Questions ........................................................................................... 107
12.1. Localhost Login and Password ........................................................................ 107
12.2. Error Messages During Installation of RPMs.................................................. 107
12.3. Starting Applications ....................................................................................... 107
12.4. Accessing a Windows Partition ....................................................................... 109
12.5. Finding Commands Quickly ............................................................................ 110
12.6. Tips on Using Command History .................................................................... 110
12.7. Keep ls Output from Scrolling ....................................................................... 111
12.8. Forgotten Password.......................................................................................... 111
12.9. Password Maintenance..................................................................................... 112
12.10. Changing Login from Console to X at Startup .............................................. 112
IV. Appendix ................................................................................................................................... 115
A. KDE: The K Desktop Environment ................................................................................. 117
A.1. Introducing KDE............................................................................................... 117
A.2. Finding Help ..................................................................................................... 117
A.3. Using The Desktop............................................................................................ 117
A.4. Using The Panel ................................................................................................ 118
A.5. Managing Files.................................................................................................. 122
A.6. Browsing the Web with Konqueror ................................................................. 123
A.7. Using Konqueror to View Images ................................................................... 125
A.8. KMail ................................................................................................................ 126
A.9. Customizing KDE ............................................................................................. 128
A.10. Logging Out of KDE....................................................................................... 128
B. Getting Started with Gnu Privacy Guard.......................................................................... 129
B.1. Configuration File ............................................................................................. 129
B.2. Warning Messages............................................................................................. 130
B.3. Generating a Keypair......................................................................................... 130
B.4. Generating a Revocation Certificate.................................................................. 132
B.5. Exporting your Public Key................................................................................ 133
B.6. Importing a Public Key ..................................................................................... 135
B.7. What Are Digital Signatures? ........................................................................... 136
B.8. Additional Resources ........................................................................................ 136
C. Applications ..................................................................................................................... 139
D. A Comparison of Common DOS and Linux Commands ................................................ 141
E. System Directories............................................................................................................ 143
F. Keyboard Shortcuts........................................................................................................... 145
Index................................................................................................................................................. 147
Colophon.......................................................................................................................................... 153
Introduction
Welcome to the Red Hat Enterprise Linux Step By Step Guide!
By now, you should have read the Red Hat Enterprise Linux Installation Guide and successfully installed Red Hat Enterprise Linux. This manual is designed to help new and intermediate Linux users
navigate and perform common tasks. Keep in mind that Linux looks, feels, and performs differently
from other operating systems you may have used. Forget about the conventions of other operating systems and, with an open mind, approach Red Hat Enterprise Linux as a new, interesting, and versatile
alternative.
This manual is task-oriented. You will find useful tips, hints, warnings, and screen shots interspersed
throughout. First, you will learn the basics of using Red Hat Enterprise Linux, such as customizing a
desktop, configuring a printer, and getting online. Once the basics are covered, the tasks covered in
this manual become progressively more advanced.
Most users choose to work within either the GNOME or KDE graphical desktop environments (other
desktop environments are also available). The Red Hat Enterprise Linux Step By Step Guide focuses
primarily on how to perform tasks in these two environments.
Topics discussed include:
•
Using the graphical desktop environment
•
Managing files and directories
•
Working with documents
•
Using the Web and email
•
Working with a digital camera
After conquering the basics of your Red Hat Enterprise Linux system, you may need information
on more advanced topics. You can find this information in the Red Hat Enterprise Linux System
Administration Guide, the Red Hat Enterprise Linux Reference Guide, the Red Hat Enterprise Linux
Introduction to System Administration, and the Red Hat Enterprise Linux Security Guide.
HTML, PDF, and RPM versions of the manuals are available on the Red Hat Enterprise Linux Documentation CD and online at http://www.redhat.com/docs/.
Note
Although this manual reflects the most current information possible, read the Red Hat Enterprise
Linux Release Notes for information that may not have been available prior to our documentation being finalized. They can be found on the Red Hat Enterprise Linux CD #1 and online at
http://www.redhat.com/docs/.
1. Changes to This Manual
This manual was previously published under the title Red Hat Linux Getting Started Guide. It has been
renamed and incorporated into the Red Hat Enterprise Linux documentation set. It has been modified
to include new features in Red Hat Enterprise Linux 3 and reflect changes in documented procedures
that are not supported in Red Hat Enterprise Linux. Changes to this manual include:
ii
Introduction
Getting Started With GNU Privacy Guard
This new chapter discusses sending and receiving secure email using GNU Privacy Guard (GPG).
The chapter discusses the configuration and usage of GPG with an email client.
Diskettes and CD-ROMs
The section discussing X-CD-Roast was removed as it is no longer included in Red Hat Enterprise Linux.
Email Applications
The section discussing pine was removed as it is no longer included in Red Hat Enterprise
Linux.
2. Document Conventions
When you read this manual, certain words are represented in different fonts, typefaces, sizes, and
weights. This highlighting is systematic; different words are represented in the same style to indicate
their inclusion in a specific category. The types of words that are represented this way include the
following:
command
Linux commands (and other operating system commands, when used) are represented this way.
This style should indicate to you that you can type the word or phrase on the command line
and press [Enter] to invoke a command. Sometimes a command contains words that would be
displayed in a different style on their own (such as file names). In these cases, they are considered
to be part of the command, so the entire phrase is displayed as a command. For example:
Use the cat testfile command to view the contents of a file, named testfile, in the current
working directory.
file name
File names, directory names, paths, and RPM package names are represented this way. This style
should indicate that a particular file or directory exists by that name on your system. Examples:
The .bashrc file in your home directory contains bash shell definitions and aliases for your own
use.
The /etc/fstab file contains information about different system devices and file systems.
Install the webalizer RPM if you want to use a Web server log file analysis program.
application
This style indicates that the program is an end-user application (as opposed to system software).
For example:
Use Mozilla to browse the Web.
[key]
A key on the keyboard is shown in this style. For example:
To use [Tab] completion, type in a character and then press the [Tab] key. Your terminal displays
the list of files in the directory that start with that letter.
Introduction
iii
[key]-[combination]
A combination of keystrokes is represented in this way. For example:
The [Ctrl]-[Alt]-[Backspace] key combination exits your graphical session and return you to the
graphical login screen or the console.
text found on a GUI interface
A title, word, or phrase found on a GUI interface screen or window is shown in this style. Text
shown in this style is being used to identify a particular GUI screen or an element on a GUI
screen (such as text associated with a checkbox or field). Example:
Select the Require Password checkbox if you would like your screensaver to require a password
before stopping.
top level of a menu on a GUI screen or window
A word in this style indicates that the word is the top level of a pulldown menu. If you click on
the word on the GUI screen, the rest of the menu should appear. For example:
Under File on a GNOME terminal, the New Tab option allows you to open multiple shell
prompts in the same window.
If you need to type in a sequence of commands from a GUI menu, they are shown like the
following example:
Go to Main Menu Button (on the Panel) => Programming => Emacs to start the Emacs text
editor.
button on a GUI screen or window
This style indicates that the text can be found on a clickable button on a GUI screen. For example:
Click on the Back button to return to the webpage you last viewed.
computer output
Text in this style indicates text displayed to a shell prompt such as error messages and responses
to commands. For example:
The ls command displays the contents of a directory. For example:
Desktop
Mail
about.html
backupfiles
logs
mail
paulwesterberg.png
reports
The output returned in response to the command (in this case, the contents of the directory) is
shown in this style.
prompt
A prompt, which is a computer’s way of signifying that it is ready for you to input something, is
shown in this style. Examples:
$
#
[stephen@maturin stephen]$
leopard login:
user input
Text that the user has to type, either on the command line, or into a text box on a GUI screen, is
displayed in this style. In the following example, text is displayed in this style:
To boot your system into the text based installation program, you must type in the text command at the boot: prompt.
iv
Introduction
replaceable
Text used for examples which is meant to be replaced with data provided by the user is displayed
in this style. In the following example, version-number is displayed in this style:
The directory for the kernel source is /usr/src/ version-number /, where
version-number is the version of the kernel installed on this system.
Additionally, we use several different strategies to draw your attention to certain pieces of information. In order of how critical the information is to your system, these items are marked as note, tip,
important, caution, or a warning. For example:
Note
Remember that Linux is case sensitive. In other words, a rose is not a ROSE is not a rOsE.
Tip
The directory /usr/share/doc/ contains additional documentation for packages installed on your
system.
Important
If you modify the DHCP configuration file, the changes will not take effect until you restart the DHCP
daemon.
Caution
Do not perform routine tasks as root — use a regular user account unless you need to use the root
account for system administration tasks.
Warning
Be careful to remove only the necessary Red Hat Enterprise Linux partitions. Removing other partitions could result in data loss or a corrupted system environment.
Introduction
v
3. Copying and Pasting Text With X
Copying and pasting text is easy using your mouse and the X Window System. To copy text, simply
click and drag your mouse over the text to highlight it. To paste the text somewhere, click the middle
mouse button in the spot where the text should be placed.
4. Using the Mouse
Red Hat Enterprise Linux is designed to use a three-button mouse. If you have a two-button mouse,
you should have selected three-button emulation during the installation process. If you’re using threebutton emulation, pressing both mouse buttons at the same time equates to pressing the missing third
(middle) button.
In this document, if you are instructed to click with the mouse on something, that means click the left
mouse button. If you need to use the middle or right mouse button, that will be explicitly stated. (This
will be reversed if you’ve configured your mouse to be used by a left handed person.)
The phrase "drag and drop" may be familiar to you. If you’re instructed to drag and drop an item on
your GUI desktop, click on something and hold the mouse button down. While continuing to hold
down the mouse button, drag the item by moving the mouse to a new location. When you’ve reached
the desired location, release the mouse button to drop the item.
5. We Need Feedback!
If you spot a typographical error in the Red Hat Enterprise Linux Step By Step Guide, or if you have
thought of a way to make this manual better, we would love to hear from you! Please submit a report
in Bugzilla: http://bugzilla.redhat.com/bugzilla/) against the component rhel-sbs.
When submitting a bug report, be sure to mention the manual’s identifier:
rhel-sbs(EN)-3-Print-RHI (2003-11-12T01:05)
If you have a suggestion for improving the documentation, try to be as specific as possible when describing it. If you have found an error, please include the section number and some of the surrounding
text so we can find it easily.
6. Sign Up for Support
If you have a variant of Red Hat Enterprise Linux 3, please remember to sign up for the benefits you
are entitled to as a Red Hat customer.
Registration enables access to the Red Hat Services you have purchased, such as technical support
and Red Hat Network. To register your product, go to:
http://www.redhat.com/apps/activate/
Note
You must activate your product before attempting to connect to Red Hat Network. If your product
has not been activated, Red Hat Network rejects registration to channels to which the system is not
entitled.
vi
Good luck, and thank you for choosing Red Hat Enterprise Linux!
The Red Hat Documentation Team
Introduction
I. Starting Out
To begin the journey of using your Red Hat Enterprise Linux system, you need to learn the basics.
This part introduces the concepts and terms that help you get the most out of Red Hat Enterprise
Linux, and learn some of its exciting features. From configuring your system with Setup Agent to
using your graphical desktop and the shell prompt, this part helps you get acquainted with your Red
Hat Enterprise Linux system.
Table of Contents
1. Getting Started ................................................................................................................................ 1
2. Using the Graphical Desktop ....................................................................................................... 15
3. Shell Prompt Basics ...................................................................................................................... 25
4. Managing Files and Directories ................................................................................................... 47
Chapter 1.
Getting Started
From booting up to shutting down, whether you are working or playing, Red Hat Enterprise Linux
provides tools and applications to help you get the most out of your computing environment. This
chapter guides you through some basic tasks that you can perform on your Red Hat Enterprise Linux
system.
1.1. Setup Agent
The first time you start your Red Hat Enterprise Linux system, the Setup Agent is presented. The
Setup Agent guides you through the configuration of your Red Hat Enterprise Linux system. Using
this tool, you can set your system time and date, add users to your system, install software, register
your machine with the Red Hat Network, and more. Setup Agent allows you to configure your environment at the beginning, so that you can get started using your Red Hat Enterprise Linux system
quickly.
Figure 1-1. Setup Agent
The Setup Agent first prompts you to read and agree to the License Agreement, which discusses your
rights in using Red Hat Enterprise Linux. Click Yes, I agree to the License Agreement and click
Next to continue.
Important
You must agree to the License Agreement to continue using Red Hat Enterprise Linux. If you choose
No, I do not agree at the License Agreement screen, the machine prompts you to either re-read the
agreement or decline and shutdown your system. You cannot use Red Hat Enterprise Linux without
first agreeing to the License Agreement.
2
Chapter 1. Getting Started
Figure 1-2. License Agreement
The Setup Agent allows you to manually set your machine’s date and time, which adjusts the clock on
your computer’s BIOS (Basic Input Output System). To set the day, month, and year on your system,
use the calendar interface. To set your time in hours, minutes, and seconds, use the provided text
boxes.
You may also synchronize your date and time automatically with a network time server — a computer
that sends accurate date and time settings to your system through a network connection. Check the
box labeled Enable Network Time Protocol and use the drop-down menu to select the time server
you want to use. Once you have set your time and date, click Next to continue.
Figure 1-3. Date and Time Configuration
Next, you should create a user account to use on a routine basis. It is not recommended to log in to
your root account for common computing tasks, as you may damage your system or unintentionally
delete a file. The Setup Agent lets you enter a username, an optional full name for the account, and a
password (which you must enter twice). This creates a user account that you can use to log into your
Red Hat Enterprise Linux system and which has its own home directory on the system to store files.
Chapter 1. Getting Started
3
Figure 1-4. User Account
The Setup Agent probes your system for sound cards and attempts to configure the correct settings
for use with Red Hat Enterprise Linux. You can then click the Play test sound button to play a sound
sample. If you can hear the sample, select OK and your sound card configuration is complete.
Figure 1-5. Sound Card
To register your system with Red Hat Network and receive automatic updates of your Red Hat Enterprise Linux system, choose Yes, I would like to register my system with Red Hat Network. This
will start the Red Hat Update Agent — a utility that guides you step-by-step through the registration
of your machine with Red Hat Network. Selecting No, I do not want to register my system skips
the registration. For more information about Red Hat Network and registering your machine, refer to
the Red Hat Network documentation at http://www.redhat.com/docs/manuals/RHNetwork/.
4
Chapter 1. Getting Started
Figure 1-6. Red Hat Network Registration Client
To install Red Hat Enterprise Linux RPM packages that you did not install during installation, software
from third-party providers, or documentation from the Red Hat Enterprise Linux Documentation CD,
you can do so at the Additional CDs screen. Insert the CD containing the software or documentation
you want to install, click the Install... button, and follow the instructions.
Note
If you are installing a package from the Red Hat Enterprise Linux Installation CDs, you must insert
CD 1, click the Install... button, choose the package(s) or component you want to install, and, if
prompted , change the CD.
Figure 1-7. Installing Additional Software
Now that your system is configured, you are ready to log in and start using Red Hat Enterprise Linux.
Press Forward to exit the Setup Agent.
1.2. Introductory Terms
When you learn about a new operating system, you should also learn new terminology. This section
defines a few basic terms you should learn. You will see these terms often throughout all Red Hat
Enterprise Linux documentation including the Red Hat Enterprise Linux Step By Step Guide:
Chapter 1. Getting Started
5
•
Command: An instruction given to the computer, most often with the keyboard or mouse.
•
Command line: The space at the shell prompt where commands are typed.
•
Graphical Desktop: The most visible area of a GUI. The desktop is where your user Home and
Start Here icons are located. You can customize your desktop to have special backgrounds, colors,
and pictures to add a personal touch.
•
Graphical User Interface (GUI): A general term for interactive windows, icons, menus, and panels
which allow a user to initiate actions such as starting applications and opening files using a mouse
and keyboard.
•
Icons are small images representing an application, folder, shortcut or system resource (such as a
diskette drive). Launcher icons usually refer to application shortcuts.
•
Man page and Info page: Man (short for manual) and Info pages give detailed information about
a command or file (man pages tend to be brief and provide less explanation than Info pages). For
example, to read the man page for the su command, type man su at a shell prompt (or type info
su for the info page). To close man or Info pages, press [q].
•
Panel: A desktop toolbar, usually located across the bottom of your desktop (such as Figure 1-8).
The panel contains the Main Menu button and shortcut icons to start commonly used programs.
Panels can also be customized to suit your needs.
Figure 1-8. The Desktop Panel
•
Root: Root is an administrative user account created during installation and has complete access to
the system. You must be logged in as root to accomplish certain system administration tasks, such
as changing administrative passwords and running system configuration tools. User accounts are
created so that typical user tasks can be done without using the root account, which can reduce the
chance of damaging your Red Hat Enterprise Linux installation or applications permanently.
•
RPM: RPM stands for RPM Package Manager and is how Red Hat builds and delivers its software
files. An RPM is a software package file you can install on your Red Hat Enterprise Linux computer.
•
Shell prompt: A command line interface between the user and the operating system (Figure 1-9).
The shell interprets commands entered by the user and passes them on to the operating system.
6
Chapter 1. Getting Started
Figure 1-9. A Shell Prompt
•
su and su -: The command su gives you access to the root account or other accounts on your system.
When you type su to switch to your root account while still inside your user account shell, you have
access to important system files that you can change (or damage if you are not careful). Logging in
with the su - command makes you root within the root account shell. Use caution when you are
logged in as root.
•
X or X Window System: These terms refer to the graphical user interface environments. If you are
"in X" or "running X", you are working in a GUI rather than a console environment.
Although the emphasis throughout this book is on navigation and productivity using the graphical
desktop environment, both the graphical and shell prompt methods of logging in and using your Red
Hat Enterprise Linux system are discussed for your reference.
1.3. Logging In
The next step to using your Red Hat Enterprise Linux system is to log in. When you log in, you are
introducing yourself to the system (also called authentication). If you type the wrong user name or
password, you will not be allowed access to your system.
Unlike some other operating systems, your Red Hat Enterprise Linux system uses accounts to manage
privileges, maintain security, and more. Not all accounts are created equal: some accounts have fewer
rights to access files or services than others.
Note
Red Hat Enterprise Linux applications and files are case sensitive, which means that typing root
refers to a different account than Root. By default, root refers to the root user (also known as the
superuser), or system administrator.
If you have already created and logged in to a user account, you can skip ahead to Chapter 2 Using the
Graphical Desktop. If you created only the root account, refer to Section 1.6 Creating a User Account
to learn how to set up a user account.
Chapter 1. Getting Started
7
If you did not create a user account using the Setup Agent, you must log in as root. After you create a
user account, it is highly recommended that you log in as that user instead of root to prevent accidental
damage to your Red Hat Enterprise Linux installation.
Caution
Because your Red Hat Enterprise Linux system creates the root account during installation, some
new users are tempted to use only this account for all of their activities. This is a dangerous idea,
because the root account is allowed to do anything on the system. You can easily damage your
system by accidentally deleting or modifying sensitive system files. You may be tempted to forego
creating and using a user account during or after installation, but it is not recommended.
1.3.1. Graphical Login
When your system has booted, a graphical login screen is displayed as shown in Figure 1-10. Again,
unless you have chosen to give your machine its own hostname, which is primarily used in a network
setting, your machine will probably be called localhost.
Figure 1-10. The Graphical Login Screen
To log in as root from the graphical login screen, type root at the login prompt, press [Enter], type
the root password that you chose during installation at the password prompt, and press [Enter]. To log
in as a normal user, type your username at the login prompt, press [Enter], type your password that
you selected when creating the user at the password prompt, and press [Enter].
Logging in from the graphical login screen automatically starts the graphical desktop for you.
1.3.2. Virtual Console Login
During installation, if you selected an installation type other than Workstation or Personal Desktop
and chose text as your login type, you will see a login prompt similar to the following after booting
your system:
Red Hat Enterprise Linux release 3
Kernel 2.4.21-3.EL on an i686
localhost login:
8
Chapter 1. Getting Started
Unless you have chosen to give your machine its own hostname, which is primarily used in a network
setting, your machine will probably be called localhost.localdomain.
To log in as root from the console, type root at the login prompt, press [Enter], then type the root
password that you chose during installation at the password prompt and press [Enter]. To log in as
a normal user, type your username at the login prompt, press [Enter], type your password that you
selected when creating the user at the password prompt, and press [Enter].
After logging in, you can type the command startx to start the graphical desktop.
1.4. Graphical Interface
When you installed Red Hat Enterprise Linux you had the opportunity to install a graphical environment. Once you start the X Window System, you will find a graphical interface known as a desktop
similar to Figure 1-11.
Figure 1-11. The Graphical Desktop
1.5. Opening a Shell Prompt
The desktop offers access to a shell prompt, an application that allows you to type commands instead
of using a graphical interface for all computing activities. While the Red Hat Enterprise Linux Step By
Step Guide primarily focuses on performing tasks using the graphical interface and graphical tools, it
is sometimes useful and faster to perform tasks from a shell prompt. Refer to Chapter 3 Shell Prompt
Basics for further details.
You can open a shell prompt by selecting Main Menu => System Tools => Terminal.
You can also start a shell prompt by right-clicking on the desktop and choosing New Terminal from
the menu.
To exit a shell prompt, click the X button on the upper right corner of the shell prompt window, type
exit at the prompt, or press [Ctrl]-[D] at the prompt.
Chapter 1. Getting Started
9
1.6. Creating a User Account
When you first started your Red Hat Enterprise Linux system after installation, you were given the
opportunity to create one or more user accounts using the Setup Agent. If you did not create at least
one account (not including the root account) you should do so now. You should avoid working in the
root account for daily tasks.
There are two ways to create new and/or additional user accounts: using the graphical User Manager
application or from a shell prompt.
To create a user account graphically using the User Manager:
1. Click the Start Here icon on the desktop. In the new window that opens, click the System
Settings icon, and then click the Users & Groups icon. You can also select Main Menu =>
System Settings => Users & Groups from the panel.
You can also start the User Manager by typing redhat-config-users at a shell prompt.
2. If you are not logged in as root, you will be prompted for your root password.
3. The window shown in Figure 1-12 will appear. Click Add User.
Figure 1-12. The Red Hat User Manager
4. In the Create New User dialog box, enter a username (this can be an abbreviation or nickname),
the full name of the user for whom this account is being created, and a password (which you will
enter a second time for verification). The name of this user’s home directory and the name of the
login shell should appear by default. For most users, you can accept the defaults for the other
configuration options. Refer to the Red Hat Enterprise Linux System Administration Guide for
details about additional options.
5. Click OK. The new user will appear in the user list, signaling that the user account creation is
complete.
To create a user account from a shell prompt:
1. Open a shell prompt.
2. If you are not logged in as root, type the command su - and enter the root password.
3. Type useradd followed by a space and the username for the new account you are creating at the
command line (for example, useradd jsmith). Press [Enter]. Often, usernames are variations
on the user’s name, such as jsmith for John Smith. User account names can be anything from
the user’s name, initials, or birthplace to something more creative.
4. Type passwd followed by a space and the username again (for example, passwd jsmith).
10
Chapter 1. Getting Started
5. At the New password: prompt enter a password for the new user and press [Enter].
6. At the Retype new password: prompt, enter the same password to confirm your selection.
Important
You should take precautions when you choose a password. The password is the key to your
account, so it should be both unique and easy for you to remember. Your password should be
at least six characters. You can use both uppercase and lowercase letters, as well as numbers
and characters. Avoid easy selections, such as qwerty or password. If you want to pick an
easy-to-remember but somewhat unique password, consider a variation of a word, such as
a1rPl4nE for airplane.
1.7. Documentation and Help
There are several resources available to get the information you need to use and configure your Red
Hat Enterprise Linux system. Along with the Red Hat Enterprise Linux documentation there are manual pages, documents that detail usage of important applications and files; INFO pages which break
information about an application down by context-sensitive menus; and help files that are included
in the main menubar of graphical applications. You can choose any method of accessing documentation that best suits your needs, as all of these resources are either already installed on your Red Hat
Enterprise Linux system or can be easily installed.
1.7.1. Manual Pages
Applications, utilities, and shell prompt commands usually have corresponding manual pages (also
called man pages) that show the reader available options and values of file or executable. Man Pages
are structured in such a way that users can quickly scan the page for pertinent information, which is
important when dealing with commands that they have never previously encountered.
1.7.1.1. Using man
Man Pages can be accessed via shell prompt by typing the command man and the name of the executable. For example, to access the man page for the ls command, type the following:
man ls
The NAME field shows the executable’s name and a brief explanation of what function the executable
performs. The SYNOPSIS field shows the common usage of the executable, such as what options are
declared and what types of input (such as files or values) the executable supports. The DESCRIPTION
field shows available options and values associated with a file or executable. See Also shows related
terms, files, and programs.
Chapter 1. Getting Started
11
Figure 1-13. Reading a Man Page with the Shell Prompt
To navigate the man page you can use the [Page Down] and [Page Up] keys or use the [Spacebar] to
move down one page and [B] to move up. To exit the man page, type [Q].
To search a man page for keywords type [/] and then a keyword or phrase and press [Enter]. All
instances of the keyword will be highlighted throughout the man page, allowing you to quickly read
the keyword in context.
1.7.1.2. Printing a Man Page
Printing man pages is a useful way to archive commonly used commands, perhaps in bound form for
quick reference. If you have a printer available and configured for use with Red Hat Enterprise Linux
(refer to the Red Hat Enterprise Linux System Administration Guide for more information), you can
print a man page by typing the following command at a shell prompt:
man command| col -b | lpr
The example above combines separate commands into one unique function. man command will output
the contents of the command man page to col, which formats the contents to fit within a printed page.
The lpr command sends the formatted content to the printer.
1.7.1.3. The man Man Page
Just like other commands, man has its own man page. Type man man at the shell prompt for more
information.
1.7.2. Red Hat Enterprise Linux Documentation
If you have the Red Hat Enterprise Linux boxed set, remember to take a look at the Red Hat Enterprise Linux Documentation CD. All of the Red Hat Enterprise Linux manuals are on this CD.
Individual downloads of our documentation in HTML, RPM, PDF, and compressed tarball format
(.tar.gz) are also available at http://www.redhat.com/docs/. Once you have logged in to your user
account, inserting the Documentation CD in your CD-ROM drive should automatically start the Package Management Tool and allow you to install any of the Red Hat Enterprise Linux documentation.
Follow the instructions and choose the documentation you would like to install.
12
Chapter 1. Getting Started
Figure 1-14. Package Management Tool Displaying Documentation Available for Installation
After you have installed the documentation packages you want, you can access them at any time by
clicking Main Menu => Documentation.
If you have downloaded individual documentation RPM packages from the Red Hat website at
http://www.redhat.com/docs/ you can install these manuals from a shell prompt. Open a shell
prompt, and type the following at the command line:
su -
Press [Enter]. You will be asked for your root password. Enter the password at the prompt and press
[Enter]. You are now logged in as root. To install all of the Red Hat Enterprise Linux manuals, change
to the directory that contains the RPM files and type the following:
rpm -ivh rhl-*.rpm
Press [Enter].
To install only certain manuals, replace rhl-*.rpm with the full file name of the manual that you
want to install. For example, the file name for the Red Hat Enterprise Linux Step By Step Guide will
look something like rhl-gsg-en-3.noarch.rpm, so you would type the following to install it on
your system:
rpm -ivh /mnt/cdrom/rhl-gsg-en-3.noarch.rpm
Press [Enter]. Type exit at the command line and press [Enter]. This logs you out of the root account
and back to your user account.
Now go to Main Menu => Documentation and select the manual you want to read.
1.8. Logging Out
1.8.1. Graphical Logout
To log out your graphical desktop session, select Main Menu => Log Out.
When the confirmation dialog appears as shown in Figure 1-15, select the Logout option and click
the Yes button. To save the configuration of your desktop, as well as any programs which are running,
check the Save current setup option.
Chapter 1. Getting Started
13
Figure 1-15. Logout Confirmation
1.8.2. Virtual Console Logout
If you are not using the X Window System, and you logged in at the console, type exit or [Ctrl]-[D]
to log out of the console session.
1.9. Shutting Down your Computer
Before turning off your computer, it is important to properly shut down Red Hat Enterprise Linux.
Never turn your computer off without shutting down first, as you may lose unsaved data or damage
your system.
1.9.1. Graphical Shutdown
If you are in the graphical desktop, log out of your session as described in Section 1.8 Logging Out.
From the graphical desktop logout screen shown in Figure 1-15, select Shutdown and click OK to
confirm.
Some computers automatically turn the power off after shutting down Red Hat Enterprise Linux. If
your computer does not, you can safely turn off the power to your computer after you see the message:
Power down.
1.9.2. Virtual Console Shutdown
To shutdown your computer at a shell prompt, type the following command:
halt
Some computers automatically turn the power off after shutting down Red Hat Enterprise Linux. If
your computer does not, you can safely turn off the power to your computer after you see the message:
System halted.
14
Chapter 1. Getting Started
Chapter 2.
Using the Graphical Desktop
Red Hat Enterprise Linux includes a powerful graphical desktop environment where you can easily
access your applications, files, and system resources. Both new and experienced users can take full
advantage of their Red Hat Enterprise Linux systems using the graphical desktop.
This chapter covers the fundamentals of the desktop and how you can configure it for your needs.
2.1. Using the Desktop
Your first view of the graphical desktop looks something like Figure 2-1.
Figure 2-1. The Graphical Desktop
The graphical desktop gives you access to the applications and system settings on your computer.
Notice that it offers three main tools to make use of the applications on your system: panel icons,
desktop icons, and menus.
The long bar across the bottom of the desktop is the panel. The panel contains application launcher
icons, a notification area for notification icons, and small applications called applets that let you
control sound volume, switch workspaces, and displays the status of your system.
The icons elsewhere on the desktop can be shortcuts to file folders, application launchers, and shortcuts to removable devices such as CD-ROM and diskettes when they have been mounted. To open a
folder or launch an application, double-click on its icon.
The menu systems can be found by clicking on the Main Menu button
by double-clicking on the Start Here icon
icon.
. They can also be found
on the desktop and then clicking the Applications
The desktop works in the manner you might expect it to when working with other operating systems.
You can drag and drop files and application icons to areas that are easily accessible. You can add new
16
Chapter 2. Using the Graphical Desktop
icons for files and applications to the desktop, panel, and file manager. You can change the appearance
of most of the tools and applications and change system settings with provided configuration tools.
2.2. Using the Panel
The desktop panel is the bar that stretches across the bottom of the screen and holds icons and small
applications which makes using your system easier. The panel also holds the Main Menu, which
contains shortcuts for all of your applications. Applets embedded on the panel allow you to run specific
tasks or monitor your system or services while remaining out of your way. The notification area holds
alert icons such as the one for Red Hat Network so that you can be quickly alerted to critical messages.
Figure 2-2. The Panel
2.2.1. Using the Main Menu
You can click on the Main Menu button
access the applications on your system.
to expand it into a large set of menus that allow you to
From here, you can start most applications included in Red Hat Enterprise Linux. Notice that, in
addition to the recommended applications, you can also access additional applications within each
sub-menu. These sub-menus give you access to a full range of applications on your system. From the
Main Menu, you can also log out, run applications from a command line, find files, and lock your
screen (which runs a password protected screen saver).
2.2.2. Using Applets
Applets are small applications that run on the panel. Applets let you monitor various aspects of your
system. Some applets perform useful tasks while others are designed to be entertaining.
There are a few applets that run on your panel by default. These applets are fairly important and are
covered in the following list.
Workspace Switcher
The graphical desktop gives you the ability to use multiple workspaces so you do not have to have
all of your running applications crowding one viewable desktop area. The Workspace Switcher
represents each workspace (or desktop) in small squares and show the applications running on
them. Click on one of the squares with your mouse to move to that desktop. You can also use the
keyboard shortcut [Ctrl]-[Alt]-[up-arrow], [Ctrl]-[Alt]-[down-arrow], [Ctrl]-[Alt]-[right-arrow],
or [Ctrl]-[Alt]-[left-arrow] to switch between desktops.
Figure 2-3. Workspace Switcher
Chapter 2. Using the Graphical Desktop
17
Taskbar
Next to the Workspace Switcher is the Taskbar. The Taskbar is an applet which shows you
the titles of running applications on any one virtual desktop. This is very helpful if you decide to
minimize an application as it seems to disappear from the desktop. Once it disappears, you can
bring it back by clicking on its title in the Taskbar.
Figure 2-4. The Taskbar
2.2.3. Using the Notification Area
Red Hat Network Alert Notification Tool
Part of the Notification Area, the Red Hat Network Alert Notification Tool provides you with
an easy way to make sure your system is up-to-date with current errata and bug fixes from Red
Hat. The applet shows you different images that indicate whether your system is up to date or
needs upgrades. If you click on the icon, a list of available updates is displayed. To update your
system, click the button to launch the Red Hat Update Agent. If you are not registered with Red
Hat Network, it launches the registration component. Right-click on the applet icon for a list of
options from which to choose.
Figure 2-5. Red Hat Network Alert Notification Tool
The Authentication Icon
The key icon that is sometimes displayed in the Notification Area is a security notification
that displays whenever you have gained root authentication for your system (such as running a
graphical system configuration tool). It disappears when the authentication times out.
Figure 2-6. Authentication Icon
Printer Notification Icon
The Printer Notification Icon allows you to manage your print jobs. Click on the icon to view
running print jobs, and cancel jobs by right-clicking on the job and selecting Cancel. The Printer
Notification Icon only appears during an active print job. If the print job you have is small, you
may not see the icon appear.
18
Chapter 2. Using the Graphical Desktop
Figure 2-7. The Printer Notification Icon
Warning
If you cannot see any of the notification icons, then the notification area was removed from the
desktop panel. To add the it back to your panel, right-click on the panel and choose Add to Panel =>
Utility => Notification Area.
2.2.4. Adding Icons and Applets to the Panel
To make the panel fit your needs, you may want to add more applets and launcher icons.
To add an applet to the panel, right-click in an unused area on the panel, select Add to Panel, and
choose from the various types of applets. When you select an applet, it appears on your panel. In
Figure 2-8, the Weather Report applet has been added to show the current local weather and temperature.
Figure 2-8. The Weather Report Applet on the Panel
To add a launcher icon to the panel, right-click in an unused area on the panel and select Add to Panel
=> Launcher.... This launches a dialog box that allows you to enter the name of the application,and
the location and name of the command that starts the application (such as /usr/bin/foo). You can
even choose an icon for the application. Click OK and the new launcher icon appears on the panel.
Tip
Another quick and easy way to add a launcher to the panel is to right-click on an unused area of the
panel and choose Add to Panel => Launcher from menu. Then select an application that appears
in the menu. This automatically adds a launcher icon based on the properties of the item in the Main
Menu.
2.2.5. Configuring the Desktop Panel
You can hide the panel automatically or manually, place it on any edge of your desktop, change its
size and color, and change the way it behaves. To alter the default panel settings, right-click in an
unused area of the panel and select Properties. You can set the size of the panel, its position on the
desktop, and whether you want the panel to be automatically hidden (Autohide) when not in use. If
you choose to hide the panel, it does not appear on the desktop until you move your mouse pointer
over the panel area (called hovering).
Chapter 2. Using the Graphical Desktop
19
2.3. Using Nautilus
The graphical desktop includes a file manager called Nautilus that gives you a graphical display
of your system and personal files. Nautilus is designed to be much more than a visual listing of
files, however. It allows you to configure your desktop, configure your Red Hat Enterprise Linux
system, browse your photo collection, access your network resources, and more all from one integrated
interface. In essence, Nautilus becomes a shell for your entire desktop experience.
Working in Nautilus is efficient and provides an alternative to searching through the various submenus connected to the Main Menu or using a shell prompt to navigate the file system. The following
sections explain how to use the Nautilus to enhance your desktop experience.
To start Nautilus as a file manager, double-click on your home directory icon:
Once Nautilus appears, you can navigate through your home directory or the rest of the file system.
To return to your home directory, click the Home button.
The browser window contains folders and files which you can drag with your mouse to move and copy
into new locations. You can open another Nautilus window by selecting File => New Window. Once
you have another Nautilus window, you can drag and drop files to different directories. By default,
dragging a file from one directory to another moves the file. To copy the file to another directory, press
the [Ctrl] key while dragging and dropping the file.
By default, image files in your home directory are seen as thumbnails. For text files, this means you see
a portion of the actual text in the icon. For images, you see a scaled-down (or thumbnail) version of the
image. To turn off this feature, select Edit => Preferences. Select the Preview tab, then select Never
in the drop down for Show thumbnails. Disabling this (and other) previewing features increases the
speed of Nautilus.
2.4. Start Here
Figure 2-9. The Start Here Window
Start Here was designed to hold all of the tools and applications you need to access when using your
system. From your favorite applications to system and configuration tools, the Start Here window
provides a central location for using and customizing your system.
You can access the Start Here screen at any time by double-clicking on the desktop icon labeled
Start Here.
20
Chapter 2. Using the Graphical Desktop
The Start Here screen includes icons that allow you to access your favorite applications, desktop
preferences, Main Menu items, server configuration tools, and system settings.
Tip
You can add your favorite locations to the Bookmarks. Navigate to the location you want to bookmark, and then select Bookmarks => Add Bookmark.
2.4.1. Customizing the Desktop
From the Start Here screen, you can select the Preferences icon to configure your desktop, which
presents you with a wide selection of configuration options. The following lists a few of the options
and tools in each area.
Background
You can configure your background with new colors or a new image. To learn more about configuring your desktop background, refer to Section 2.4.1.1 Changing your Desktop Background.
Keyboard Shortcuts
You can configure shortcuts — pressing a combination of keystrokes on the keyboard — to
perform actions within an application or on your desktop. For example, you can configure a
shortcut to move from your current Workspace to Workspace 2 by pressing [Ctrl]-[F2].
Sound
In this section you can configure the system sounds associated with various functions. For example, to play a sound when you log in to your desktop, you can configure it.
2.4.1.1. Changing your Desktop Background
One way to dramatically alter the appearance of your graphical desktop is to change the background
using the Background Preferences tool. You can choose from several background images included
with Red Hat Enterprise Linux in the /usr/share/backgrounds/ directory, or you can use your
own image. To start the Background Preferences tool, right-click on the desktop and choose Change
Desktop Background from the menu. You can also double-click the Start Here icon, select Preferences, and finally select Background.
Chapter 2. Using the Graphical Desktop
21
Figure 2-10. The Background Preferences Tool
The Background Preferences tool allows you to load a new background from a directory of
provided images (/usr/share/backgrounds/images/). You can also drag an image into the
window from your own image directory. There are several additional options for displaying your
background image. The Wallpaper option displays multiple instances of your image across the
desktop, which is useful if you use a small image or if you use a tile (or pattern) image from
/usr/share/backgrounds/tiles/ (or from your own image collection). The Centered option
places your image in the center of the desktop, leaving the default background colors to fill in any
remaining desktop space. To fill the desktop with an image without tiling it, use the Scaled or
Stretched options. Figure 2-11 shows a background image of flowers and plants that is stretched to
fill the entire desktop.
Figure 2-11. The Desktop with a New Background
If you want to create a background with your own custom colors and no images, choose the No
Picture option and adjust your colors using the Background Style options. Choose your own Top
Color and Bottom Color and the color gradient (or the blending of colors). Click Close to save and
exit the Background Preferences tool.
22
Chapter 2. Using the Graphical Desktop
2.4.2. Customizing your System
The Start Here screen in Nautilus contains additional configuration tools that help you with your
new Red Hat Enterprise Linux system and the server applications included.
The System Settings icon includes tools that help you set up your system for personal everyday use.
The following lists some of the tools included in System Settings and what you can do with them.
Date & Time
This tool allows you to set the date and time of your machine. You can set your time zone
information as well. Refer to the Red Hat Enterprise Linux System Administration Guide for
details on using this tool.
Printing
The Printer Configuration Tool allows you to add a new printer to your system. The printer
may be connected to your machine or available on a network. Refer to the Red Hat Enterprise
Linux System Administration Guide for details.
Soundcard Detection
The Sound Card Configuration Tool tool probes your machine for available sound devices.
Refer to Section 8.3 Troubleshooting Your Sound Card for more details on configuring your
sound hardware.
Users & Groups
The User Manager tool allows you to add and remove users from your system. Refer to Section
1.6 Creating a User Account for details.
You may also find server configuration tools in the Start Here area, depending on which variant of
Red Hat Enterprise Linux you installed. These tools help you configure services and applications you
are using on the local machine to serve other machines. The server configuration tools are found by
clicking on the System Settings icon and then the Server Settings icon. A few examples of the tools
found in this area are the HTTP Configuration Tool and the Domain Name Service Configuration
Tool. You must have those server applications installed before these tools appear in this section. Refer
to the Red Hat Enterprise Linux System Administration Guide for details.
2.5. Logging Out
When you have finished working and want to quit GNOME, you are presented with the choice of
logging out of GNOME (leaving the system running), restarting the machine, or halting the system
completely.
Figure 2-12. The Desktop Log Out Confirmation
Chapter 2. Using the Graphical Desktop
23
To quit the graphical desktop, select the Log Out menu item from the Main Menu. This brings up a
dialog which presents you with the options listed above.
24
Chapter 2. Using the Graphical Desktop
Chapter 3.
Shell Prompt Basics
3.1. Why Use a Shell Prompt
Graphical environments for Linux have come a long way in the past few years. You can be perfectly
productive in the X Window System and only have to open a shell prompt to complete a few tasks.
However, many Red Hat Enterprise Linux functions can be completed faster from the shell prompt
than from a graphical user interface (GUI). In less time than it takes to open a file manager, locate a
directory, and then create, delete, or modify files from a GUI, a task can be finished with just a few
commands at a shell prompt.
A shell prompt looks similar to other command line interfaces with which you might be familiar.
Users type commands at a shell prompt, the shell interprets these commands, and then the shell tells
the OS what to do. Experienced users can write shell scripts to expand their capabilities even further.
Figure 3-1. A Shell Prompt
This chapter explains how to navigate the file system, manipulate files, perform simple administration
tasks, and other shell prompt basics.
3.2. The History of the Shell
When AT&T software engineers Dennis Ritchie and Ken Thompson were designing UNIX™, they
wanted to create a way for people to interact with their new system.
Operating systems at that time came with command interpreters, which could take commands from
the user and interpret them into something computers could use.
But Ritchie and Thompson wanted something more, something that offered better features than the
command interpreters available at that time. This lead to the development of the Bourne shell (known
as sh), created by S.R. Bourne. Since the creation of the Bourne shell, other shells have been developed, such as the C shell (csh) and the Korn shell (ksh).
26
Chapter 3. Shell Prompt Basics
When the Free Software Foundation sought a royalty-free shell, developers began to work on the
language behind the Bourne shell as well as some of the popular features from other shells available
at the time.
The result was the Bourne Again Shell, or bash. Although your Red Hat Enterprise Linux system
includes several different shells, bash is the default shell for interactive users. You can learn more
about bash by reading the bash man page (type man bash at a shell prompt).
3.3. Determining Your Current Directory with pwd
Once you start looking through directories, it is easy to get lost or forget the name of your current
directory. By default, the Bash prompt in Red Hat Enterprise Linux shows just your current directory,
not the entire path.
Figure 3-2. The Command pwd Shows You Where You Are
To determine the exact location of the current directory at a shell prompt and type the command pwd.
The output should look similar to:
/home/sam
This example shows that you are in the user sam’s directory, which is in the /home/ directory.
The command pwd stands for print working directory. When you typed pwd, you asked your Linux
system to display your current location. Your system responded by printing the full path of the current
directory in the shell prompt window. When the system responds to requests for information, the
response is called standard output, and can be printed to the shell prompt, or redirected to other
programs or to other output devices such as printers.
Using pwd is very helpful as you learn to navigate your Red Hat Enterprise Linux system.
3.4. Changing Directories with cd
Changing directories is easy as long as you know where you are (your current directory) and how that
relates to where you want to go.
To change directories, use the cd command. Typing this command by itself returns you to your home
directory; moving to any other directory requires a pathname.
Chapter 3. Shell Prompt Basics
27
You can use absolute or relative pathnames. Absolute paths start at the top of the file system with /
(referred to as root) and then look down for the requested directory; relative paths look down from
your current directory, wherever that may be. The following directory tree illustrates how cd operates.
/
/directory1
/directory1/directory2
/directory1/directory2/directory3
If you are currently in directory3 and you want to switch to directory1, you need to move up in
the directory tree.
Executing the command
cd directory1
while you are in directory3, presents you with an error message explaining that there is no such
directory. This is because there is no directory1 below directory3.
To move up to directory1, type:
cd /directory1
This is an example of an absolute path. It tells Linux to start at the top of the directory tree (/) and
change to directory1. A path is absolute if the first character is a /. Otherwise, it is a relative path.
Using absolute paths allows you to change to a directory from the / directory, which requires you to
know and type the complete path. Using relative paths allows you to change to a directory relative
to the directory you are currently in, which can be convenient if you are changing to a subdirectory
within your current directory.
The command cd .. tells your system to go up to the directory immediately above the one in which
you are currently working. To go up two directories, use the cd ../.. command.
Use the following exercise to test what you have learned regarding absolute and relative paths. From
your home directory, type the relative path:
cd ../../etc/X11
After using the full command in the example, you should be in the directory X11, which is where
configuration files and directories related to the X Window System are available.
Take a look at your last cd command. You told your system to:
1. Go up one level to your login directory’s parent directory (probably /home)
2. Then go up to that directory’s parent (which is the root, or /, directory)
3. Then go down to the /etc/ directory
4. Finally, go to the X11/ directory
Conversely, using an absolute path moves you to the /etc/X11/ directory more quickly. For example:
cd /etc/X11
Absolute paths start from the root directory (/) and move down to the directory you specify.
28
Chapter 3. Shell Prompt Basics
Note
Always make sure you know which working directory you are in before you state the relative path to
the directory or file you want to get to. You do not have to worry about your position in the file system,
though, when you state the absolute path to another directory or file. If you are not sure, type pwd
and your current working directory is displayed, which can be your guide for moving up and down
directories using relative pathnames.
Command
Function
cd
Returns you to your login directory
cd ~
Also returns you to your login directory
cd /
Takes you to the entire system’s root directory
cd /root
Takes you to the home directory of the root, or superuser,
account created at installation; you must be the root user
to access this directory
cd /home
Takes you to the home directory, where user login
directories are usually stored
cd ..
Moves you up one directory
cd ~otheruser
Takes you to otheruser’s login directory, if otheruser has
granted you permission
cd /dir1/subdirfoo
Regardless of which directory you are in, this absolute
path takes you directly to subdirfoo, a subdirectory of
cd ../../dir3/dir2
This relative path takes you up two directories, then to
dir3, then to the dir2 directory
dir1
Table 3-1. cd Options
Now that you are starting to understand how to change directories, see what happens when you change
to root’s login directory (the superuser account). Type:
cd /root
If you are not logged in as root, you are denied permission to access that directory.
Denying access to the root and other users’ accounts (or login directories) is one way your Linux
system prevents accidental or malicious tampering. Refer to Section 3.13 Ownership and Permissions.
To change to the root login and root directory, use the su - command.
su -
Tip
The command su means substitute users and it allows you to log in as another user temporarily.
When you type su by itself and press [Enter], you become root (also called the superuser) while still
inside your login shell (your user’s home directory). Typing su - makes you become root with root’s
login shell; it is as if you had logged in as root originally.
Chapter 3. Shell Prompt Basics
29
As soon as you give the root password, the prompt changes to superuser status. For example:
[root@localhost root]$
When you are done working as root, type exit at the prompt; you are returned to your user account.
3.5. View Directory Contents with ls
Now that you know how to change directories, it is time to learn how to view the contents of these
directories. Using the ls command, you can display the contents of your current directory.
Many options are available with the ls command. The ls command, by itself, does not show all the
files in the directory. Some files are hidden files (also called dot files) and can only be seen with an
additional option specified to the ls command.
Tip
To view all ls command options, read the man page by typing man ls at a shell prompt. To print the
man page, at the prompt type man ls | col -b | lpr.
Type the command ls -a. Now you can view files that begin with dots.
Figure 3-3. ls with the -a Option
Hidden files are most often configuration files which set preferences in programs, window managers,
shells, and more. The reason they are hidden is to help prevent any accidental tampering by the user.
When you are searching for something in a directory, you are not usually looking for these configuration files. Keeping them hidden helps to avoid some screen clutter when viewing directories at the
shell prompt.
Viewing all the files using the ls -a command can give you plenty of detail, but you can view still
more information by using multiple options.
If you want to see the size of a file or directory, when it was created, and so on, add the long option (-l)
to the ls -a command. This command shows the file creation date, its size, ownership, permissions,
and more.
30
Chapter 3. Shell Prompt Basics
You do not have to be in the directory whose contents you want to view to use the ls command. For
example, to see what is in the /etc/ directory from your home directory, type:
ls -al /etc
Figure 3-4. Sample ls Output for the /etc Directory
The following is a brief list of options commonly used with ls. Remember, you can view the full list
by reading the ls man page (man ls).
(all) — Lists all files in the directory, including hidden files (.filename). The .. and . at the
top of your list refer to the parent directory and the current directory, respectively.
• -a
(long) — Lists details about contents, including permissions (modes), owner, group, size, creation date, whether the file is a link to somewhere else on the system and where its link points.
• -l
(file type) — Adds a symbol to the end of each listing. These symbols include /, to indicate a
directory; @, to indicate a symbolic link to another file; and *, to indicate an executable file.
• -F
• -r
(reverse) — Lists the contents of the directory in reverse sort order.
• -R
(recursive) — Lists the contents of all directories below the current directory recursively.
• -S
(size) — Sorts files by their sizes.
3.6. Locating Files and Directories
There may be times when you know a file or directory exists but you do not know where to find it. To
search for a file or directory, use the locate command.
With locate, you can see every file or directory whose name contains the search criterion. For example, to search for all files with the word finger in the name, type:
locate finger
The locate command uses a database to locate files and directories that have the word finger in
the file or directory name. The search results could include a file called finger.txt, a file called
pointerfinger.txt, a directory named /fingerthumbnails/, and so on. To learn more about
locate, read the locate man page (type man locate at a shell prompt).
Chapter 3. Shell Prompt Basics
31
The locate command works very quickly, as long as the database is up to date. That database is
automatically updated on a nightly basis through a cron job. cron is a small program that runs in the
background, performing various tasks (such as updating the locate database) at regularly scheduled
intervals.
Tip
As a daemon, cron executes tasks at regularly scheduled intervals. To read the cron man page, type
man cron at the shell prompt.
The cron task periodically updates the slocate database, which is used to catalog file locations.
Switching between operating systems and shutting down your machine at the end of the day can
interfere with the automatic database update run by cron.
To update the database manually, log in as root (type su - at a shell prompt and then your root
password) and type the command updatedb.
After a few minutes, the slocate database that is used by the locate command is updated.
When you are done working as root, type exit at the prompt; you are returned to your user account.
Note
You can run anacron to have your system execute commands periodically, with a frequency specified
in days. Unlike cron, it does not assume that the machine is running continuously. Hence, it can be
used on machines that are not running 24 hours a day to control daily, weekly, and monthly jobs that
are usually controlled by cron.
Refer to the man page on anacron (type man anacron at the command line) and the Red Hat Enterprise Linux System Administration Guide for more information.
3.7. Clearing and Resetting the Terminal
After even one ls command in a shell prompt, the terminal window you are working in can begin
to look crowded. You can always exit from the terminal window and open a new one, but there is a
quicker and easier way to remove the contents displayed in the terminal.
Try typing the command clear at the shell prompt. The clear command does just what it implies:
it clears the terminal window.
Tip
A useful shortcut to typing clear at a shell prompt is to press [Ctrl]-[L], which also clears terminal.
Refer to Appendix F Keyboard Shortcuts for more useful shortcuts.
Sometimes, you may accidentally open a program file or some other non-text file in a terminal window.
Once you close the file, you could find that the text you are typing does not match the output on the
monitor.
In such cases, type reset to return the terminal window to its default values.
32
Chapter 3. Shell Prompt Basics
3.8. Manipulating Files with cat
Red Hat Enterprise Linux has a utility which can help you keep short lists, gather lists together, and
even show you information about your system.
The utility is called cat, short for concatenate, which means to combine files.
The command cat also displays the contents of an entire file on the screen (for example, type cat
filename.txt). If the file is fairly long, it quickly scrolls past you on the screen. To prevent this,
use the cat filename.txt | less command.
Using the pipe (|) and the less command together displays the file one page at a time. You can then
use the up and down arrow keys to move backward and forward through the pages. For more on using
pipes to combine two separate functions, refer to Section 3.9 Pipes and Pagers.
3.8.1. Using Redirection
Redirection means causing the shell to change what it considers to be standard input or where the
standard output should be going.
To redirect standard output, use the symbol. Placing after the cat command (or after any utility
or application that writes to standard output) directs its output to the file name following the symbol.
For example, using cat by itself outputs whatever you input to the screen as if it were repeating the
line you just typed. The following example shows cat repeating every line that is entered:
Figure 3-5. The cat Command
To redirect the output of cat to a file, type the following at a shell prompt (pressing the [Enter] key
takes you to the next blank line):
cat
sneakers.txt
Chapter 3. Shell Prompt Basics
33
Figure 3-6. Redirecting Output to a File
Press [Enter] to go to an empty line and use the [Ctrl]-[D] key combination to quit cat.
Do you notice anything different in Figure 3-6? There are no repeated entries. That is because the
standard output from cat was redirected. That redirection was to a brand new file you made called
sneakers.txt.
You can find the file in the directory you were in when you started cat (type ls if you want to see it
listed).
As you learned earlier, you can also use cat to read the file you have created. At the prompt, type:
cat sneakers.txt
Caution
Be careful when you redirect the output to a file, because you can easily overwrite an existing file!
Make sure the name of the file you are creating does not match the name of a pre-existing file, unless
you want to replace it.
Use output redirection again for another file and call it home.txt. For this example, type the command cat > home.txt, then [Enter], followed by:
bring the coffee home
take off shoes
put on sneakers
make some coffee
relax!
Now, on an empty line, use the [Ctrl]-[D] key combination again to quit cat.
Next, use cat to join home.txt with sneakers.txt and redirect the output of both files to a brand
new file called saturday.txt (as seen in Figure 3-7). Type the following:
cat sneakers.txt home.txt
saturday.txt
34
Chapter 3. Shell Prompt Basics
Figure 3-7. Joining Files and Redirecting Output
You can see that cat has added home.txt where sneakers.txt ended.
3.8.2. Appending Standard Output
You can use output redirection to add new information to the end of an existing file. Similar to when
you used the symbol, you tell your shell to send the information somewhere other than standard
output.
However, when you use
of a file entirely.
, you are adding information to a file, rather than replacing the contents
The best explanation is a demonstration. Take two files which have already been created
(sneakers.txt and home.txt) and join them by using the append output symbol. To add the
information in home.txt to the information already in sneakers.txt, type:
cat home.txt
sneakers.txt
Now check the file using the command cat sneakers.txt. The final output shows the contents of
home.txt at the end of the file:
buy some sneakers
then go to the coffee shop
then buy some coffee
bring the coffee home
take off shoes
put on sneakers
make some coffee
relax!
The command you typed appended the output from the file home.txt to the file sneakers.txt.
By appending the output, you save yourself time (and a bit of disk clutter) by using existing files,
rather than creating a new file.
Compare the results of the files sneakers.txt and saturday.txt, and you can see that they are
identical. To make your comparison, type:
cat sneakers.txt; cat saturday.txt
The contents of both files are displayed — first sneakers.txt, then saturday.txt (as shown in
Figure 3-8).
Chapter 3. Shell Prompt Basics
35
Figure 3-8. Stringing Commands and Comparing Files
3.8.3. Redirecting Standard Input
Not only can you redirect standard output, you can perform the same type of redirection with standard
input.
When you use the redirect standard input symbol
read as input for a command.
, you are telling the shell that you want a file to be
Use a file you have already created to demonstrate this idea. Type:
cat
sneakers.txt
Because you used the less-than symbol ( ) to separate the cat command from the file, the output of
sneakers.txt was read by cat.
Figure 3-9. Redirecting Standard Input
36
Chapter 3. Shell Prompt Basics
3.9. Pipes and Pagers
In Linux, pipes connect the standard output of one command to the standard input of another command.
Consider the ls command that was discussed earlier. There are plenty of options available with ls,
but what if the contents of a directory scroll by too quickly for you to view them?
View the contents of the /etc/ directory with the command:
ls -al /etc
How do you get a closer look at the output before it moves off the screen?
One way is to pipe the output to a utility called less, a pager utility that allows you to view information one page (or screen) at a time.
Use the vertical bar (|) to pipe the commands.
ls -al /etc | less
Now you can view the contents of /etc/ one screen at a time. To move forward a screen, press
[Space]; to move back a screen, press [B]; to quit, press [Q]. Alternatively, you can use the arrow keys
to navigate with less.
To search the output of a text file using less, press [/] and then type the keyword you want to search
for within the file. For example:
/Linux
Pipes can also be used to print only certain lines from a file. Type:
grep coffee sneakers.txt | lpr
This command prints every line in the sneakers.txt file that mentions the word "coffee" (read more
about grep in Section 3.10.3 The grep Command).
3.9.1. The more Command
The main difference between more and less is that less allows backward and forward movement
using the arrow keys, while more only uses the [Spacebar] and the [B] key for forward and backward
navigation.
List the contents of the /etc/ directory using ls and more.
ls -al /etc | more
Chapter 3. Shell Prompt Basics
37
Figure 3-10. Piping Output of ls to more
To search the output of a text file using more, press [/] and then type the keyword you want to search
for within the file. For example:
/foo
Use the [Spacebar] to move forward through the pages. Press [Q] to exit.
3.10. More Commands for Reading Text Files
You have already been introduced to several basic shell prompt commands for reading files in text
editors. Here are a few more.
3.10.1. The head Command
You can use the head command to look at the beginning of a file. The command is:
head
filename
head can be a useful command, but because it is limited to the first several lines, you cannot see how
long the file actually is. By default, you can only read the first ten lines of a file. You can change the
number of lines displayed by specifying a number option as shown in the following command:
head -20
filename
3.10.2. The tail Command
The reverse of head is tail. Using tail, you can view the last ten lines of a file. This can be useful
for viewing the last 10 lines of a log file for important system messages. You can also use tail to
watch log files as they are updated. Using the -f option, tail automatically prints new messages
from an open file to the screen in real-time. For example, to actively watch /var/log/messages,
type the following at a shell prompt as the root user:
tail -f /var/log/messages
38
Chapter 3. Shell Prompt Basics
3.10.3. The grep Command
The grep command is useful for finding specific character strings in a file. For example, if you want
to find every reference made to "coffee" in the file sneakers.txt, you would type:
grep coffee sneakers.txt
Each line in that file where the word "coffee" is found is displayed.
Tip
Unless otherwise specified, grep searches are case sensitive. That means that searching for Coffee
is different than searching for coffee. Among grep’s options is -i, which allows for a case-insensitive
search through a file. Read the grep man page for more about this command.
3.10.4. I/O Redirection and Pipes
You can use pipes and output redirection when you want to store and/or print information to read at a
later time.
You can, for example, use grep to search for particular contents of a file, then have those results either
saved as a file or sent to a printer.
To print information about references to "coffee" in sneakers.txt, for example, type:
grep coffee sneakers.txt | lpr
3.10.5. Wildcards and Regular Expressions
What if you forget the name of the file you are looking for? Using wildcards or regular expressions,
you can perform actions on a file or files without knowing the complete file name. First type out what
you know, and then substitute the remainder with a wildcard. Wildcards are special symbols that can
be substituted for letters, numbers, and symbols. Wildcards make finding particular directories and
files easier than examining long directory listings to find what you are searching for.
Tip
To read more about wildcards and regular expressions, take a look at the bash man page (man bash).
Remember that you can save the file to a text file by typing man bash | col -b
bash.txt. Then,
you can open and read the file with less or with an editor such as vi (vi bash.txt). If you want to
print the file, be aware that it is quite long.
To find a file is called "sneaksomething.txt," type:
ls sneak*.txt
The name of the file appears:
sneakers.txt
Chapter 3. Shell Prompt Basics
39
You will probably use the asterisk (*) most frequently when you are searching. The asterisk searches
out everything that matches the pattern you are looking for. By typing
ls *.txt
or
ls sn*
you would find sneakers.txt and any other files whose name ends with .txt or begins with sn.
The asterisk helps to narrow your search as much as possible.
Another way to narrow a search is to use the question mark symbol (?). Like the asterisk, using ? can
help locate a file matching a search pattern.
In this case, though, ? is useful for matching a single character, so if you were searching for
sneaker?.txt, you would get sneakers.txt as a result, and/or sneakerz.txt, if there were
such a file name.
Regular expressions are more complex than the straightforward asterisk or question mark.
When an asterisk, for example, just happens to be part of a file name, as might be the case if the file
sneakers.txt was called sneak*.txt, that is when regular expressions can be useful.
Using the backslash (\), you can specify that you do not want to search out everything by using the
asterisk, but you are instead looking for a file with an asterisk in the name.
If the file is called sneak*.txt, type:
sneak\*.txt
Here is a brief list of wildcards and regular expressions:
• *
— Matches all characters
• ?
— Matches one character
• \*
— Matches the * character
• \?
— Matches the ? character
• \)
— Matches the ) character
3.11. Command History and Tab Completion
It does not take long before the thought of typing the same command over and over becomes unappealing. One minor typing error can ruin lines of a series of commands.
One solution is to use the command line history. By scrolling with the [Up] and [Down] arrow keys,
you can find plenty of your previously typed commands.
Try it by taking a look again at sneakers.txt (created in Section 3.8.1 Using Redirection). The first
time, however, at the shell prompt, type:
cat sneakrs.txt
Nothing happens, of course, because there is no sneakrs.txt file. Use the [Up Arrow] key to bring
back the command, then use the [Left Arrow] key to get to the point where we missed the "e." Insert
the letter and press [Enter] again.
We now see the contents of the sneakers.txt file.
40
Chapter 3. Shell Prompt Basics
By default, up to 500 commands can be stored in the bash command line history file.
Tip
By typing the env command at a shell prompt, we can see the environment variable that controls
the size of the command line history. The line which reads, HISTFILESIZE=500 shows the number of
commands that bash stores.
The command line history is actually kept in a file, called .bash_history in your login directory.
We can read it in a number of ways: by using vi, cat, less, more, and others.
Be aware that the file can be long. To read it with the more command, from your home directory type:
more .bash_history
To move forward a screen, press [Space]; to move back a screen, press [B]; to quit, press [Q].
Tip
To find a command in your history file without having to keep hitting the arrow keys or page through
the history file, use grep (refer to Section 3.10.3 The grep Command ). Here is how you can quickly
find a previously used command: say you are searching for a command that is similar to cat sneaksomething. You have used the command before and you think it might be in your history file. At the
shell prompt, type:
history | grep sneak
Another time-saving tool is known as command completion. If you type part of a file, command, or
pathname and then press the [Tab] key, bash presents you with either the remaining portion of the
file/path, or a beep (if sound is enabled on your system). If you hear a beep, press [Tab] again to obtain
a list of the files/paths that match what has been typed so far.
For example, if you forget the command updatedb, but remember a portion of the command, you
can su - to root and use the following instructions. At the shell prompt, type up and press the [Tab]
key twice. A list of possible completions is displayed, including updatedb and uptime. By typing
the partial command upd and pressing [Tab] again, your command is completed for you.
When you are done working as root, type exit at the prompt; you are returned to your user account.
3.12. Using Multiple Commands
Linux allows you to enter multiple commands at one time. The only requirement is that you separate
the commands with a semicolon.
Suppose you have downloaded a new file called foobar-1.3-2.i386.rpm and you want to put it in
a new subdirectory within your home directory called rpms/, but the subdirectory has not been created. You can combine both the creation of the rpms/ directory and the moving of your downloaded
file into the directory by typing the following at a shell prompt:
mkdir rpms/; mv foobar-1.3-2.i386.rpm rpms/
Running the combination of commands creates the directory and moves the file in one line.
Chapter 3. Shell Prompt Basics
41
3.13. Ownership and Permissions
Earlier in this chapter, when you tried to change to root’s login directory, you received the following
message:
-bash: cd: /root/: Permission denied
That was one demonstration of Linux’s security features. Linux, like UNIX, is a multi-user system
and file permissions are one way the system protects against malicious tampering.
One way to gain entry when you are denied permission is to su - to root, as you learned earlier. This
is because whoever knows the root password has complete access.
But switching to the superuser is not always convenient or recommended, since it is easy to make
mistakes and alter important configuration files as the superuser.
All files and directories are "owned" by the person who created them. You created the file
sneakers.txt (refer to Section 3.8.1 Using Redirection) in your login directory, so
sneakers.txt belongs to you.
That means you can specify who is allowed to read the file, write to the file, or (if it is an application
instead of a text file) who can execute the file.
Reading, writing, and executing are the three main settings in permissions. Since users are placed into
a group when their accounts are created, you can also specify whether certain groups can read, write
to, or execute a file.
Take a closer look at sneakers.txt with the ls command using the -l option (refer to Figure 3-11).
There is a lot of detail provided here. You can see who can read (r) and write to (w) the file, as well as
who created the file (sam), and to which group the owner belongs (sam). Remember that, by default,
the name of your group is the same as your login name.
Figure 3-11. Permissions for sneakers.txt
Other information to the right of the group includes file size, date and time of file creation, and file
name.
The first column shows current permissions; it has ten slots. The first slot represents the type of file.
The remaining nine slots are actually three sets of permissions for three different categories of users.
For example:
-rw-rw-r--
42
Chapter 3. Shell Prompt Basics
Those three sets are the owner of the file, the group in which the file belongs, and "others," meaning
other users on the system.
(rw-)
|
|
type owner
(rw-)
|
group
(r--) 1 sam sam
|
others
The first item, which specifies the file type, can show one of the following:
• d
— a directory
• -
(dash) — a regular file (rather than directory or link)
• l
— a symbolic link to another program or file elsewhere on the system
Beyond the first item, in each of the following three sets, you may see one of the following:
• r
— file can be read
• w
— file can be written to
• x
— file can be executed (if it is a program)
• -
(dash) — specific permission has not been assigned
When you see a dash in owner, group, or others, it means that particular permission has not been
granted. Look again at the first column of sneakers.txt and identify its permissions.
ls -l sneakers.txt
-rw-rw-r-1 sam sam
150 Mar 19 08:08 sneakers.txt
The file’s owner (in this case, sam) has permission to read and write to the file. The group, sam, has
permission to read and write to sneakers.txt, as well. It is not a program, so neither the owner or
the group has permission to execute it.
3.13.1. The chmod Command
Use the chmod command to change permissions. This example shows how to change the permissions
on sneakers.txt with the chmod command.
The original file looks like this, with its initial permissions settings:
-rw-rw-r--
1 sam sam
150 Mar 19 08:08 sneakers.txt
If you are the owner of the file or are logged into the root account, you can change any permissions
for the owner, group, and others.
Right now, the owner and group can read and write to the file. Anyone outside of the group can only
read the file (r--).
Caution
Remember that file permissions are a security feature. Whenever you allow anyone else to read, write
to, and execute files, you are increasing the risk of files being tampered with, altered, or deleted. As
a rule, you should only grant read and write permissions to those who truly need them.
Chapter 3. Shell Prompt Basics
43
In the following example, you want to allow everyone to write to the file, so they can read it, write
notes in it, and save it. That means you must change the "others" section of the file permissions.
Take a look at the file first. At the shell prompt, type:
ls -l sneakers.txt
The previous command displays this file information:
-rw-rw-r--
1 sam sam
150 Mar 19 08:08 sneakers.txt
Now, type the following:
chmod o+w sneakers.txt
The o+w command tells the system you want to give others write permission to the file
sneakers.txt. To check the results, list the file’s details again. Now, the file looks like this:
-rw-rw-rw-
1 sam sam
150 Mar 19 08:08 sneakers.txt
Now, everyone can read and write to the file.
To remove read and write permissions from sneakers.txt use the chmod command to take away
both the read and write permissions.
chmod go-rw sneakers.txt
By typing go-rw, you are telling the system to remove read and write permissions for the group and
for others from the file sneakers.txt.
The result looks like this:
-rw-------
1 sam sam
150 Mar 19 08:08 sneakers.txt
Think of these settings as a kind of shorthand when you want to change permissions with chmod,
because all you really have to do is remember a few symbols and letters with the chmod command.
Here is a list of what the shorthand represents:
Identities
u — the user who owns the file (that is, the owner)
g — the group to which the user belongs
o — others (not the owner or the owner’s group)
a — everyone or all (u, g, and o)
Permissions
r — read access
w — write access
x — execute access
Actions
+ — adds the permission
- — removes the permission
= — makes it the only permission
44
Chapter 3. Shell Prompt Basics
Want to test your permissions skills? Remove all permissions from sneakers.txt — for everyone.
chmod a-rwx sneakers.txt
Now, see if you can read the file with the command cat sneakers.txt, which should return the
following:
cat: sneakers.txt: Permission denied
Removing all permissions, including your own, successfully locked the file. But since the file belongs
to you, you can always change its permissions back with the following command:
chmod u+rw sneakers.txt
Use the command cat sneakers.txt to verify that you, the file owner, can read the file again.
Here are some common examples of settings that can be used with chmod:
• g+w
— adds write access for the group
• o-rwx
• u+x
— removes all permissions for others
— allows the file owner to execute the file
• a+rw
— allows everyone to read and write to the file
• ug+r
— allows the owner and group to read the file
• g=rx
— allows only the group to read and execute (not write)
By adding the -R option, you can change permissions for entire directory trees.
Because you can not really "execute" a directory as you would an application, when you add (or
remove) the execute permission for a directory, you are really allowing (or denying) permission to
search through that directory.
For instance, if you do not allow others to have the execute permission on the /tigger/ directory, it
does not matter who has read or write access. No one can access the directory unless they know the
exact file name.
For example, type
chmod a-x tigger
to remove everyone’s execute permissions.
Here is what happens when you try to change directories using the cd tigger command after removing everyone’s execute permissions:
bash: tigger: Permission denied
Next, restore your own and your group’s access:
chmod ug+x tigger
If you check your work with ls -l, you can see that only others are denied access to the /tigger/
directory.
Chapter 3. Shell Prompt Basics
45
3.13.2. Changing Permissions With Numbers
Remember the reference to the shorthand method of chmod? Here is another way to change permissions, although it may seem a little complex at first.
Go back to the original permissions for sneakers.txt:
-rw-rw-r--
1 sam sam
150 Mar 19 08:08 sneakers.txt
Each permission setting can be represented by a numerical value:
•
r=4
•
w=2
•
x=1
•
-=0
When these values are added together, the total is used to set specific permissions. For example, if you
want read and write permissions, you would have a value of 6; 4 (read) + 2 (write) = 6.
For sneakers.txt, here are the numerical permissions settings:
-
(rw-)
|
4+2+0
(rw-)
|
4+2+0
(r--)
|
4+0+0
The total for the user is six, the total for the group is six, and the total for others is four. The permissions
setting is read as 664.
If you want to change sneakers.txt so those in your group do not have write access, but can still
read the file, remove the access by subtracting two (2) from that set of numbers.
The numerical values then become six, four, and four (644).
To implement these new settings, type:
chmod 644 sneakers.txt
Now verify the changes by listing the file. Type:
ls -l sneakers.txt
The output should be:
-rw-r--r--
1 sam sam
150 Mar 19 08:08 sneakers.txt
Now, neither the group nor others have write permission to sneakers.txt. To return the group’s
write access for the file, add the value of w (2) to the second set of permissions.
chmod 664 sneakers.txt
Warning
Setting permissions to 666 allows everyone to read and write to a file or directory. Setting permissions to 777 allows everyone read, write, and execute permission. These permissions could allow
tampering with sensitive files, so in general, it is not a good idea to use these settings.
46
Chapter 3. Shell Prompt Basics
Here is a list of some common settings, numerical values and their meanings:
• -rw-------
(600) — Only the owner has read and write permissions.
• -rw-r--r--
(644) — Only the owner has read and write permissions; the group and others have
• -rwx------
(700) — Only the owner has read, write, and execute permissions.
read only.
(755) — The owner has read, write, and execute permissions; the group and others
have only read and execute.
• -rwxr-xr-x
(711) — The owner has read, write, and execute permissions; the group and others
have only execute.
• -rwx--x--x
• -rw-rw-rw- (666)
— Everyone can read and write to the file. (Be careful with these permissions.)
(777) — Everyone can read, write, and execute. (Again, this permissions setting can
be hazardous.)
• -rwxrwxrwx
Here are some common settings for directories:
• drwx------
(700) — Only the user can read, write in this directory.
• drwxr-xr-x
(755) — Everyone can read the directory; users and groups have read and execute
permissions.
Chapter 4.
Managing Files and Directories
Your desktop file manager is a powerful and important tool for managing files and directories using
the graphical desktop. This chapter discusses various shell prompt commands that can be used to
manage files and directories on your Red Hat Enterprise Linux system. This chapter also discusses
compression tools to create archives of your files for backup or to conveniently send to others.
Note
Due to system security, unless you are root, you are not allowed to gain access to all system-level
files and directories. If you do not have the permission to open, delete, or execute a file, an error
message is displayed showing your access has been denied. This is normal behavior and is used to
prevent non-privileged users from modifying or deleting important system files.
4.1. A Larger Picture of the File System
Every operating system has a method of storing data in files and directories so that it can keep track
of additions, modifications, and other changes.
In Linux, every file is stored in a directory. Directories can also contain directories; these subdirectories can also contain files and other subdirectories.
You might think of the file system as a tree-like structure and directories as branches. These directories
may contain, or be the "parent" of, directories within it (called subdirectories) which hold files and
may contain subdirectories of their own.
There would not be a tree without a root, and the same is true for the Linux file system. No matter how
far away the directories branch, everything is connected to the root directory, which is represented as
a single forward slash (/).
Tip
Red Hat Enterprise Linux uses the term root in several different ways, which might be confusing to
new users. There is the root account (the superuser, who has permission to do anything), the root
account’s home directory (/root) and the root directory for the entire file system (/). When you are
speaking to someone and using the term root, be sure to know which root is being discussed.
Unless you are a system administrator or have root (superuser) access, you probably do not have permission to write to the files and directories outside of your home directory. Certain directories are
reserved for specific purposes. For example, /home/ is the default location for users’ home directories.
Users that do not have superuser access might find the following directories useful for finding their
home directories, reading documentation, or storing temporary files.
• /home/
— Default location for users’ home directories. For example, a user with the username
foo has the home directory /home/foo/.
48
Chapter 4. Managing Files and Directories
— Location of documentation for installed packages. For example, the
documentation for the redhat-config-date software package is located in the directory
/usr/share/doc/redhat-config-date- version-number /.
• /usr/share/doc/
— The reserved directory for all users to store temporary files. Files stored here are not
permanent. A system process removes old files from this directory on a periodic basis. Do not write
any files or directories that you want to keep permanently here.
• /tmp/
Your Red Hat Enterprise Linux system is compatible with many other Linux distributions because of
the Filesystem Hierarchy Standard (FHS). The FHS guidelines help to standardize the way system
programs and files are stored on all Linux systems.
To learn more about the FHS, refer to the Red Hat Enterprise Linux Reference Guide. You can also
visit the FHS website at http://www.pathname.com/fhs/.
4.2. Identifying and Working with File Types
If you are new to Linux, you may see certain file types that you do not recognize because of their
unfamiliar extension. A file’s extension is the last part of a file’s name after the final dot (in the file
sneakers.txt, "txt" is that file’s extension).
Here is a brief listing of file extensions and their meanings:
4.2.1. Compressed and Archived Files
• .bz2
• .gz
— a file compressed with bzip2
— a file compressed with gzip
• .tar
— a file archived with tar (short for tape archive), also known as a tar file
• .tbz
— a tarred and bzipped file
• .tgz
— a tarred and gzipped file
• .zip —
a file compressed with ZIP compression, commonly found in MS-DOS applications; most
compressed files for Linux use the gzip compression, so finding a .zip archive for Linux files is
rare
For information on working with bzip2, gzip, and tar files, refer to Section 4.3 File Compression
and Archiving.
4.2.2. File Formats
• .au
— an audio file
• .gif
— a GIF image file
• .html/.htm
• .jpg
— an HTML file
— a JPEG image file
• .pdf
— an electronic image of a document; PDF stands for Portable Document Format
• .png
— a PNG image file (short for Portable Network Graphic)
• .ps
— a PostScript file; formatted for printing
• .txt
— a plain ASCII text file
• .wav
— an audio file
Chapter 4. Managing Files and Directories
• .xpm
49
— an image file
4.2.3. System Files
• .conf
— a configuration file; configuration files sometimes use the .cfg extension, as well
• .lock
— a lock file; determines whether a program or device is in use
• .rpm
— a Red Hat Package Manager file used to install software
4.2.4. Programming and Scripting Files
• .c
— a C program language source code file
• .cpp
— a C++ program language source code file
• .h
— a C or C++ program language header file
• .o
— a program object file
• .pl
— a Perl script
• .py
— a Python script
— a library file
• .so
• .sh
— a shell script
• .tcl
— a TCL script
But file extensions are not always used, or used consistently. So what happens when a file does not
have an extension, or the file does not seem to be what the extension says it is supposed to be?
That is when the file command can be helpful.
For example, you find a file called saturday without an extension. Using the file command, you
can tell what type of file it is by typing:
file saturday
In the example, the command file saturday displays ASCII text, telling you it is a text file. Any
file that is designated as a text file should be readable by using the cat, more, or less commands, or
by using a text editor such as gedit or vi.
Tip
To learn more about file, read the man page by typing man file.
For more information on helpful commands for reading files, refer to Chapter 3 Shell Prompt Basics.
50
Chapter 4. Managing Files and Directories
4.3. File Compression and Archiving
Sometimes it is useful to store a group of files in one file so that they can be backed up, easily
transferred to another directory, or even transferred to a different computer. It is also sometimes useful
to compress files into one file so that they use less disk space and download faster via the Internet.
It is important to understand the distinction between an archive file and a compressed file. An archive
file is a collection of files and directories that are stored in one file. The archive file is not compressed
— it uses the same amount of disk space as all the individual files and directories combined. A
compressed file is a collection of files and directories that are stored in one file and stored in a way that
uses less disk space than all the individual files and directories combined. If you do not have enough
disk space on your computer, you can compress files that you do not use very often or files that you
want to save but do not use anymore. You can even create an archive file and then compress it to save
disk space.
Note
An archive file is not compressed, but a compressed file can be an archive file.
4.3.1. Using File Roller
Red Hat Enterprise Linux includes a graphical utility called File Roller that can compress, decompress, and archive files and directories. File Roller supports common UNIX and Linux file compression and archiving formats and has a simple interface and extensive help documentation if you need
it. It is also integrated into the desktop environment and graphical file manager to make working with
archived files easier.
To start File Roller click Main Menu => Accessories => File Roller. You can also start File Roller
from a shell prompt by typing file-roller. Figure 4-1 shows File Roller in action.
Tip
If you are using a file manager (such as Nautilus), you can double-click the file you wish to unarchive or decompress to start File Roller. The File Roller browser window appears with the decompressed/unarchived file in a folder for you to extract or browse.
Chapter 4. Managing Files and Directories
51
Figure 4-1. File Roller in Action
4.3.1.1. Decompressing and Unarchiving with File Roller
To unarchive and/or decompress a file click the Open toolbar button. A file menu pops up, allowing
you to choose the archive you wish to work with. For example, if you have a file called foo.tar.gz
located in your home directory, highlight the file and click OK. The file appears in the main File
Roller browser window as a folder, which you can navigate by double-clicking the folder icon. File
Roller preserves all directory and subdirectory structures, which is convenient if you are looking for a
particular file in the archive. You can extract individual files or entire archives by clicking the Extract
button, choosing the directory you would like to save the unarchived files, and clicking OK.
4.3.1.2. Creating Archives with File Roller
If you need to free some hard drive space, or send multiple files or a directory of files to another
user, File Roller allows you to create archives of your files and directories. To create a new archive,
click New on the toolbar. A file browser pops up, allowing you to specify an archive name and the
compression technique. For example, you may choose a Tar Compressed with gzip (.tar.gz) format
from the drop-down menu and type the name of the archive file you want to create. Click OK and your
new archive is now ready to be filled with files and directories. To add files to your new archive, click
Add, which opens a browser window (Figure 4-2) that you can navigate to find the file or directory
you want to be in the archive. Click OK when you are finished, and click Archive => Close to close
the archive.
Figure 4-2. Creating an Archive with File Roller
52
Chapter 4. Managing Files and Directories
Tip
There is much more you can do with File Roller than is explained here. Refer to the File Roller
manual (available by clicking Help => Manual) for more information.
4.3.2. Compressing Files at the Shell Prompt
Compressed files use less disk space and download faster than large, uncompressed files. In Red Hat
Enterprise Linux you can compress files with the compression tools bzip2, gzip, or zip.
The bzip2 compression tool is recommended because it provides the most compression and is found
on most UNIX-like operating systems. The gzip compression tool can also be found on most UNIXlike operating systems. If you need to transfer files between Linux and other operating system such
as MS Windows, you should use zip because it is more compatible with the compression utilities on
Windows.
Compression Tool
File
Extension
Decompression Tool
bzip2
.bz2
bunzip2
gzip
.gz
gunzip
zip
.zip
unzip
Table 4-1. Compression Tools
By convention, files compressed with bzip2 are given the extension .bz2, files compressed with
gzip are given the extension .gz, and files compressed with zip are given the extension .zip.
Files compressed with gzip are uncompressed with gunzip, files compressed with bzip2 are uncompressed with bunzip2, and files compressed with zip are uncompressed with unzip.
4.3.2.1. Bzip2 and Bunzip2
To use bzip2 to compress a file, type the following command at a shell prompt:
bzip2 filename
The file is compressed and saved as filename.bz2.
To expand the compressed file, type the following command:
bunzip2 filename.bz2
The filename.bz2 compressed file is deleted and replaced with filename.
You can use bzip2 to compress multiple files and directories at the same time by listing them with a
space between each one:
bzip2 filename.bz2 file1 file2 file3 /usr/work/school
The above command compresses file1, file2, file3, and the contents of the
/usr/work/school/ directory (assuming this directory exists) and places them in a file named
filename.bz2.
Chapter 4. Managing Files and Directories
53
Tip
For more information, type man bzip2 and man bunzip2 at a shell prompt to read the man pages for
bzip2 and bunzip2.
4.3.2.2. Gzip and Gunzip
To use gzip to compress a file, type the following command at a shell prompt:
gzip filename
The file is compressed and saved as filename.gz.
To expand the compressed file, type the following command:
gunzip filename.gz
The filename.gz compressed file is deleted and replaced with filename.
You can use gzip to compress multiple files and directories at the same time by listing them with a
space between each one:
gzip -r filename.gz file1 file2 file3 /usr/work/school
The above command compresses file1, file2, file3, and the contents of the
/usr/work/school/ directory (assuming this directory exists) and places them in a file named
filename.gz.
Tip
For more information, type man gzip and man gunzip at a shell prompt to read the man pages for
gzip and gunzip.
4.3.2.3. Zip and Unzip
To compress a file with zip, type the following command:
zip -r filename.zip filesdir
In this example, filename.zip represents the file you are creating and filesdir represents the
directory you want to put in the new zip file. The -r option specifies that you want to include all files
contained in the filesdir directory recursively.
To extract the contents of a zip file, type the following command:
unzip filename.zip
You can use zip to compress multiple files and directories at the same time by listing them with a
space between each one:
zip -r filename.zip file1 file2 file3 /usr/work/school
54
Chapter 4. Managing Files and Directories
The above command compresses file1, file2, file3, and the contents of the
/usr/work/school/ directory (assuming this directory exists) and places them in a file named
filename.zip.
Tip
For more information, type man zip and man unzip at a shell prompt to read the man pages for zip
and unzip.
4.3.3. Archiving Files at the Shell Prompt
A tar file is a collection of several files and/or directories in one file. This is a good way to create
backups and archives.
Some of the options used with the tar are:
• -c
— create a new archive
— when used with the -c option, use the filename specified for the creation of the tar file;
when used with the -x option, unarchive the specified file
• -f
• -t
— show the list of files in the tar file
• -v
— show the progress of the files being archived
• -x
— extract files from an archive
• -z
— compress the tar file with gzip
• -j
— compress the tar file with bzip2
To create a tar file, type:
tar -cvf filename.tar directory/file
In this example, filename.tar represents the file you are creating and directory/file represents
the directory and file you want to put in the archived file.
You can tar multiple files and directories at the same time by listing them with a space between each
one:
tar -cvf filename.tar /home/mine/work /home/mine/school
The above command places all the files in the work and the school subdirectories of /home/mine
in a new file called filename.tar in the current directory.
To list the contents of a tar file, type:
tar -tvf filename.tar
To extract the contents of a tar file, type:
tar -xvf filename.tar
This command does not remove the tar file, but it places copies of its unarchived contents in the
current working directory, preserving any directory structure that the archive file used. For example, if
the tarfile contains a file called bar.txt within a directory called foo/, then extracting the archive file
Chapter 4. Managing Files and Directories
55
results in the creation of the directory foo/ in your current working directory with the file bar.txt
inside of it.
Remember, the tar command does not compress the files by default. To create a tarred and bzipped
compressed file, use the -j option:
tar -cjvf filename.tbz file
tar files compressed with bzip2 are conventionally given the extension .tbz; however, sometimes
users archive their files using the tar.bz2 extension.
The above command creates an archive file and then compresses it as the file filename.tbz. If you
uncompress the filename.tbz file with the bunzip2 command, the filename.tbz file is removed
and replaced with filename.tar.
You can also expand and unarchive a bzip tar file in one command:
tar -xjvf filename.tbz
To create a tarred and gzipped compressed file, use the -z option:
tar -czvf filename.tgz file
tar files compressed with gzip are conventionally given the extension .tgz.
This command creates the archive file filename.tar and compresses it as the file filename.tgz.
(The file filename.tar is not saved.) If you uncompress the filename.tgz file with the gunzip
command, the filename.tgz file is removed and replaced with filename.tar.
You can expand a gzip tar file in one command:
tar -xzvf filename.tgz
Tip
Type the command man tar for more information about the tar command.
4.4. Manipulating Files at the Shell Prompt
Files can be manipulated using one of the graphical file managers, such as Nautilus or Konqueror.
They can also be manipulated using a shell prompt, which is often faster. This section explains how
to manipulate files at the shell prompt.
4.4.1. Creating Files
You can create new files either with applications (such as text editors) or by using the command
touch, which creates an empty file that you can use to add text or data. To create a file with touch,
type the following at a shell prompt.
touch
filename
56
Chapter 4. Managing Files and Directories
Replace filename with the name of your choice. If you run a directory listing, you can see that
the new file contains zero (0) bytes of information because it is an empty file. For example, typing the
command ls -l newfile at the shell prompt returns the following output:
-rw-rw-r--
1 sam
sam
0 Apr 10 17:09 newfile
4.4.2. Copying Files
Like so many other Linux features, there is a variety of ways to manipulate files and directories. You
can also use wildcards, as explained in Section 3.10.5 Wildcards and Regular Expressions, to make
the process of copying, moving, or deleting multiple files and directories faster.
To copy a file, type the following command.
cp
source
destination
Replace source with the name of the file you want to copy, and
name of the directory where you want the file to go.
destination
with the
To copy the file sneakers.txt to the directory tigger/ in your home directory, move to your home
directory and type:
cp sneakers.txt tigger/
You can use both relative and absolute pathnames with cp. Our home directory is the parent of the
directory tigger/; tigger/ is one directory down from our home directory.
Tip
To learn more about relative and absolute pathnames, refer to Section 3.4 Changing Directories with
cd .
Read the cp man page (type man cp at the shell prompt) for a full list of the options available with
cp. Among the options you can use with cp are the following:
• -i (interactive)
— Prompts you to confirm if the file is going to overwrite a file in your destination.
This is a handy option because it can help prevent you from making mistakes.
(recursive) — Rather than just copying all the specified files and directories, this copies the
whole directory tree, subdirectories and all.
• -r
• -v
(verbose) — Shows the progress of the files as they are being copied.
Now that you have the file sneakers.txt in the tigger/ directory, use cp -i to copy the file again
to the same location.
cp -i sneakers.txt tigger/
cp: overwrite ’tigger/sneakers.txt’?
To overwrite the file that is already there, press [Y] and then [Enter]. If you do not want to overwrite
the file, press [N] and [Enter].
Chapter 4. Managing Files and Directories
57
4.4.3. Moving Files
To move files, use the mv command. For more about mv, refer to the mv man page (type man mv).
Common options for mv include the following:
(interactive) — Prompts you if the file you have selected overwrites an existing file in the
destination directory. This is a good option, because like the -i option for cp, you are given the
chance to make sure you want to replace an existing file.
• -i
• -f (force)
— Overrides the interactive mode and moves without prompting. Unless you know what
you are doing, this option is dangerous; be very careful about using it until you become more
comfortable with your system.
• -v
(verbose) — Shows the progress of the files as they are being moved.
If you want to move a file out of your home directory and into another existing directory, type the
following (you need to be in your home directory):
mv sneakers.txt tigger/
Alternatively, the same command using absolute pathnames looks like
mv sneakers.txt /home/newuser/sneakers.txt /home/newuser/tigger/
4.4.4. Deleting Files and Directories
You learned about creating files with the touch command, and you created the directory tigger/
using mkdir.
Now you need to learn how to delete files and directories. Deleting files and directories with the rm
command is a straightforward process. Refer to the rm man page for more information. Options for
removing files and directories include:
(interactive) — Prompts you to confirm the deletion. This option can stop you from deleting a
file by mistake.
• -i
• -f (force)
— Overrides interactive mode and removes the file(s) without prompting. This might not
be a good idea, unless you know exactly what you are doing.
• -v
(verbose) — Shows the progress of the files as they are being removed.
• -r
(recursive) — Deletes a directory and all files and subdirectories it contains.
To delete the file piglet.txt with the rm command, type:
rm piglet.txt
Warning
Once a file or directory is removed with the rm command, it is gone permanently and cannot be
retrieved.
Use the -i (interactive) option to give you a second chance to think about whether or not you really
want to delete the file.
rm -i piglet.txt
58
Chapter 4. Managing Files and Directories
rm: remove ’piglet.txt’?
You can also delete files using the wildcard *, but be careful, because you can easily delete files you
did not intend to throw away.
To remove a file using a wildcard, you would type:
rm pig*
The above command removes all files in the directory which start with the letters pig.
You can also remove multiple files using the rm command. For example:
rm piglet.txt sneakers.txt
You can use rmdir to remove a directory (rmdir foo, for example), but only if the directory is
empty. To remove directories with rm, you must specify the -r option.
For example, if you want to recursively remove the directory tigger/ you would type:
rm -r tigger/
If you want to combine options, such as forcing a recursive deletion, you can type:
rm -rf tigger/
A safer alternative to using rm for removing directories is the rmdir command. With this command,
you are not allowed to use recursive deletions, so a directory which has files cannot be deleted.
Warning
The rm command can delete your entire file system! If you are logged in as root and you type the
simple command rm -rf /, you are in trouble; this command recursively removes everything on your
system.
Read the rmdir man page (man rmdir) to find out more about this command.
II. Using Your System
Now that you have begun exploring your Red Hat Enterprise Linux system, you can start using some
of the many applications that are included with it. From Internet surfing and personal productivity, to
games and beyond, this part details some popular software programs that help you become more productive with your computer, and tap the power of the Internet for your research and communications.
Table of Contents
5. Web Browsing................................................................................................................................ 61
6. Email Applications........................................................................................................................ 65
7. Working with Documents............................................................................................................. 73
8. Audio, Video, and General Amusement...................................................................................... 83
9. Working with Digital Cameras .................................................................................................... 89
10. Working with Images.................................................................................................................. 91
11. Diskettes and CD-ROMs ............................................................................................................ 97
Chapter 5.
Web Browsing
Once you have configured your Internet connection, you are ready to get online. Red Hat Enterprise
Linux comes with several Web browsers, graphical applications that use your Internet connection to
access the World Wide Web: news, research, shopping, banking, and more. This chapter briefly explains how to surf the Web using Mozilla. For information about using the Konqueror Web browser,
refer to Section A.6 Browsing the Web with Konqueror.
5.1. Mozilla
Part of the mozilla.org organization’s wide range of Open Source Internet application developments,
Mozilla is a powerful, integrated, and standards-compliant Web browser, email client, news reader,
and more. The Web browsing component displays Web content such as webpages and images. Mozilla
also uses plug-ins for interactive multimedia such as streaming video and Web animation. This section
shows you how to use the Mozilla Web browser to explore the Internet.
To start Mozilla click the Mozilla Web Browser launcher on the panel or choose Main Menu =>
Internet => Mozilla Web Browser.
Figure 5-1. Mozilla Main Browser Window
5.1.1. Using Mozilla
Mozilla functions like any Web browser that you may have used before. It has the standard navigational toolbars, buttons, and menus.
62
Chapter 5. Web Browsing
The navigation bar has an address field with which you can type a Uniform Resource Locator (URL)
— the name or address of a website — into the address field at the top of the browser window. Mozilla
supports keyword searching via the address field as well. Type a keyword or phrase into the address
field and click the Search button. The search results appears in the main browsing area.
Figure 5-2. The Mozilla Navigational Bar
There is also a sidebar on the left that contains additional options, such as integrated search functionality, bookmarks, and a What’s Related option that displays webpages similar in topic to the page
currently displayed in the main browsing area.
Figure 5-3. The Mozilla SideBar
At the bottom left corner of the browser window, there are the following small icons: Navigator,
Mail & Newsgroups, Composer, Address Book, and IRC Chat. These are separate applications
integrated into the Mozilla suite and are useful for experiencing email, chat, news, and other aspects
of the Internet besides the Web. For information on using the Mozilla Mail email client, refer to
Chapter 6 Email Applications.
Finally, there is the Personal Toolbar which can be customized with your own bookmarks or quickly
take you back to your homepage. The Personal Toolbar is useful for keeping and categorizing webpages so that you do not have to type the address every time you want to access the page. To add a
site to your Personal Toolbar, click and hold the left mouse button on the small icon next to the URL
in the address field and drag it directly to the Personal Toolbar or into a folder icon. You can access
Personal Toolbar folders by clicking the icon and choosing the website from the drop-down menu.
Chapter 5. Web Browsing
63
Mozilla also allows you to browse multiple websites within one browser window using navigational
tabs. Instead of using two or more separate windows to read multiple webpages, you can open a tab
by clicking File => New => Navigator Tab or by pressing [Ctrl] and [T] at the same time. This opens
the new tab and allows you to switch between tabs by clicking on them. To close a tab, right-click on
the tab and choose Close Tab from the menu or click the X at the right of the tab bar to close the tab
currently displayed.
For additional information on using Mozilla, click on Help (on the top menu panel) and then on Help
Contents.
5.1.2. Mozilla Composer
You can use Mozilla Composer to create webpages. You do not need to know HTML to use this tool.
To open Composer, click on Window => Composer from the Mozilla main menu, or click on the
Composer icon in the lower left part of the screen:
.
The Mozilla help files provide information on creating webpages with Composer.
Go to Help on the main menu and select Help Contents. When the help screen opens, click on the
Contents tab and expand the Creating Webpages menu by clicking on the arrow next to it. A list
of topics appear and clicking on any of these provide you with information for creating and editing
webpages using Mozilla Composer.
Figure 5-4. Mozilla Composer
5.2. Web Browser Keyboard Shortcuts
Table 5-1 shows some common keyboard shortcuts available in Mozilla. Keyboard shortcuts can help
you efficiently browse the Web.
64
Chapter 5. Web Browsing
Shortcut
Description
[Ctrl]-[T]
Opens a new tab for browsing multiple websites
within one browser window
[Ctrl]-[N]
Opens a new browser window
[Ctrl]-[Q]
Closes all browser windows and exits the application
[Ctrl]-[L]
Moves the cursor to the browser’s address field
[Ctrl]-[P]
Prints the current displayed webpage or document
[Ctrl]-[right arrow]
Moves forward by one link or page
[Ctrl]-[left arrow]
Moves backward by one link or page
[Ctrl]-[R]
Reloads the current page
[Ctrl]-[H]
Opens the browsing history
[Ctrl]-[F]
Finds a keyword or string within a page
Table 5-1. Keyboard Shortcuts
Chapter 6.
Email Applications
Email is a very popular way of communicating with others over the Internet. You can use email with
an email client, an application that understands the various email transmission standards and allows
you to send, receive, and read email. Red Hat Enterprise Linux includes several email applications,
including graphical email clients like Evolution and Mozilla Mail, and text-based clients like mutt.
All of the email client applications are designed to suit certain types of users; so, you can choose one
with the features that best suits your particular needs.
The purpose of this chapter is to demonstrate how to use some of the popular email applications
included in Red Hat Enterprise Linux. Since all email clients perform the same basic tasks (send and
receive email), you should choose one that is convenient and easy to use.
This chapter briefly discusses the following email clients:
•
Evolution
•
Mozilla Mail
•
Mutt, a text-based email client
Before you launch an email client, you should have some information from your Internet Service
Provider (ISP) handy so that you can configure the client properly. The following lists a few important
things you may need to know:
Your email address
The email address you use to send and receive mail. This is usually in the form of
[email protected].
Server type for receiving email (POP or IMAP)
In order to receive mail, you must know what type of server your network administrator or ISP
is using. This POP or IMAP address, is usually in the form of mail.someisp.net.
POP, short for Post Office Protocol, is used to send email from a mail server to your email client’s
inbox, the place where incoming email is stored. Most ISP email servers use the POP protocol,
although some can use the newer IMAP (Internet Message Access Protocol).
IMAP, short for Internet Message Access Protocol, is a protocol for retrieving email messages
from your ISP’s email server. IMAP differs from POP in that email from IMAP servers are
stored on the server and stays there even as you download and read your mail, whereas POP mail
is downloaded to your email client directly and does not stay on the server.
Server type for sending email (SMTP)
The Simple Mail Transfer Protocol (SMTP) is a protocol for sending email messages between
servers. Most email systems that send mail over the Internet use SMTP to send messages from
one server to another; the messages can then be retrieved with an email client using either POP
or IMAP. SMTP is also used to send messages from a mail client to a mail server. This is why
you need to specify both the POP or IMAP server and the SMTP server when you configure your
email application.
If you have any questions regarding what information you need, contact your ISP or network administrator. Unless properly configured, you cannot make full use of the email clients discussed in this
chapter.
66
Chapter 6. Email Applications
6.1. Evolution
Evolution is more than just an email client. It provides all of the standard email client features, including powerful mailbox management, user-defined filters, and quick searches. It additionally features
a flexible calendar/scheduler which allows users to create and confirm group meetings and special
events online. Evolution is a full-featured personal and workgroup information management tool for
Linux and UNIX-based systems, and is the default email client for Red Hat Enterprise Linux.
To launch Evolution from the desktop panel, go to Main Menu => Internet => Evolution Email.
Figure 6-1. Evolution Welcome Screen
The first time you start Evolution you are presented with the Welcome Screen (Figure 6-1), which
allows you to configure your email connection. Follow the on-screen instructions and fill in the information you collected from your ISP or administrator in the text boxes provided. When you are done,
click Finish, to be presented with the Main Screen as shown in Figure 6-2.
Chapter 6. Email Applications
Figure 6-2. Evolution Main Screen
To view what is in your inbox or to send an email, click on the Inbox icon.
Figure 6-3. Evolution Inbox Screen
To compose a mail, select New Message from the toolbar.
67
68
Chapter 6. Email Applications
Figure 6-4. Evolution New Email Message Screen
Once you have composed a message and entered an email address to send the email to, click Send on
the toolbar.
While Evolution does so much more than read and send email, this chapter focuses exclusively
on its email capabilities. To learn more about using other features of Evolution, such as calendering/scheduling and group messaging, click Help from the main toolbar and choose the component
you want to learn more about.
6.2. Mozilla Mail
This section briefly covers the basic steps for sending and receiving email with Mozilla. If you need
further information about using Mozilla Mail, the Mozilla Help contents are located under Help on
the main menu.
To start Mozilla Mail, select Main Menu => Internet => More Internet Applications => Mozilla
Mail.
You are presented with a New Account Setup screen. Select Email account, which allows you to
configure your email connection. Follow the on-screen instructions and fill in the information you
collected from your ISP or administrator in the text boxes provided.
Chapter 6. Email Applications
69
Figure 6-5. Account Setup
To open Mozilla Mail while in Mozilla, click on the mail icon near the lower left corner of the
.
Mozilla screen
Figure 6-6. Mozilla Mail and News
To create a new email message, click the Compose button.
70
Chapter 6. Email Applications
Figure 6-7. Mozilla Mail New Email Message Screen
To send an email, click on the Send button or go to File => Send Now or Send Later. If you choose
to send later, you can go back to the main mail screen and go to File => Send unsent messages.
To read email, click on the mail folder you created for yourself to view any messages waiting for you.
Then, click on the message you want to read.
Once you read a message, you can delete it, save it to a separate folder, and more.
6.2.1. Mozilla and Newsgroups
Newsgroups are Internet discussion groups with specific topics. The discussions are in threaded format
(which means all topics and responses to the topic are sorted and organized for convenient reading)
and subscribing to a group is very easy. You do not have to post messages if you do not want to; you
can just lurk, which is a Newsgroup term for reading without posting messages. There are a great
many newsgroups on the Web with topics ranging from politics to computer games to random strange
thoughts. You can even post and download pictures and files to Newsgroups (although your ISP may
restrict Newsgroups to text-based postings only).
To join a newsgroup, you first need to set up a newsgroup account. Click on your mail account name
in the sidebar and select Create a new account from the options that appear on the right of the screen.
The New Account Setup screen appears again. Select Newsgroup account and then click Next.
Enter your name and email address on the next screen and click Next. On the following screen, enter
the name of your news server (if you do not know the name of your news server, contact your Internet
service provider or network administrator for this information). On the last few screens, you can
determine the name that this account is referred to and review your settings.
The newsgroup account you created appears in the sidebar of the Mozilla mail screen. Right-click on
this account name and select Subscribe. A dialog box appears, listing all the newsgroups available.
Select the groups you are interested in reading and click Subscribe. When you are done, click on OK.
Now, click on the arrow next to the newsgroup account name and the list of groups you are subscribed
to appears beneath. Select the newsgroup you want to access and a dialog box appears with information about downloading and reading existing messages. Posting to a newsgroup is just like writing
an email, except that the newsgroup name appears in the To field rather than an email address. To
unsubscribe from a newsgroup, right-click on the group name and select Unsubscribe.
Chapter 6. Email Applications
71
6.3. Plain Text Email Clients
Most modern email clients allow the user to select whether they want to send their emails in plain
text or in HTML. The advantage of HTML formatted email is that they can contain graphics and
interactive links to Web sites. The particular font can be specified, the layout is very controllable,
textures, and pictures or backgrounds can be added; all this makes for a visually appealing message
when it gets to the recipient.
On the other hand, plain text email is just that — plain text. They is nothing fancy, there are no pictures
embedded in the email, and there are no special fonts. Plain text emails are simple.
The term plain text refers to textual data in ASCII format. Plain text (also called clear text) is the
most portable format because it is supported by nearly every email application on various types of
machines.
This chapter discusses the mutt plain text email client.
6.3.1. Using Mutt
Mutt is a small but very powerful text-based mail client for UNIX operating systems.
Mutt’s configuration file, ~/.muttrc, gives mutt its flexibility and configurability. It is also this file
that might give new users problems. The number of options that mutt has available to it are truly
astounding. mutt allows the user to control nearly all of the functions that mutt uses to send, receive,
and read your mail. As is true with all powerful software, it takes time to understand the features and
what they can do for you.
Most of the options are invoked using the set or unset commands, with either boolean or string
values, e.g. set folder = ~/Mail.
All configuration options can be changed at any time by typing a [:] followed by the relevant command. For example :unset help turns off the handy keyboard command hints at the top of the
screen. To turn those hints back on, type :set help.
If you cannot remember the command you want to use, there is always tab-completion to help you.
You do not have to type all your preferred configuration commands each time you run mutt, you can
save them in a file which is loaded every time the program starts up. This configuration file must exist
in your home directory, it has to be named either ~/.muttrc or ~/.mutt/muttrc.
When you launch mutt (by typing mutt at a shell prompt), a screen appears with a list of email
messages. This initial menu is called the index.
Figure 6-8. mutt Main Screen
72
Chapter 6. Email Applications
These messages are in a default mail folder, often called the mailspool, that you can think of as your
inbox. Use the [K] and [J] keys on your keyboard to move the highlighted cursor up and down the list
of messages.
In the index or pager views, use the [R] key to reply to a message or the [M] key to create a new one.
Mutt prompts for the To: address and the Subject: line. A text editor (defined by your $EDITOR
environmental variable in the configuration file) then launches allowing you to compose your message.
Type your message, save your file and exit the editor.
After editing your email, Mutt displays the compose menu, where you can customize your message
headers, change the encoding, add file attachments or simply press the [Y] key to send your email on
its way.
To learn more about mutt, refer to the man pages for muttrc and mutt (type man muttrc or man
mutt at the shell prompt). You may also find the mutt manual to be very helpful. The mutt manual
is installed in /usr/share/doc/mutt-1.2.x/, where x is the version number of mutt installed on
your system.
Chapter 7.
Working with Documents
Red Hat Enterprise Linux includes several tools for managing all of your documents. Whether you are
preparing for a presentation, writing a formal letter, or opening a document from an email attachment,
Red Hat Enterprise Linux has a tool that suits your needs.
7.1. The OpenOffice.org Suite
Productivity suites are collections of applications designed to save time and assist users at work, at
school, and at home. Usually, productivity suites are graphical and include such applications as word
processors, spreadsheets, and presentation utilities. The applications that comprise a productivity suite
are integrated — which means that you can, for example, write a document with an embedded chart
created by the spreadsheet application as well as a slide from a graphical presentation application.
Integration of the software that make up a productivity suite helps you to give impact to your presentations, lectures, or printed collateral.
Red Hat Enterprise Linux includes a powerful business productivity suite called OpenOffice.org,
which incorporates several complementary applications into one integrated package. Using OpenOffice.org is much faster and easier than learning complex tags and code to format your documents and
presentations. It allows you complete control over the layout and content of your documents and lets
you see the results as you edit it. This real-time, visual form of document formatting is called what
you see is what you get (or WYSIWYG) editing.
7.1.1. OpenOffice.org Features
The OpenOffice.org suite contains several applications for creating and editing documents, spreadsheets, business presentations, and artwork. It includes templates, forms, and wizards for creating
basic professional documents and presentations quickly. If you have ever worked with or received
.doc or .xls files, you know they are commonly associated with the Microsoft Office suite. The
OpenOffice.org suite is able to read, edit, and create files in several formats, including files which
are commonly associated with Microsoft Office. Table 7-1 shows the many different types of files you
can use and tasks you can accomplish with the OpenOffice.org suite.
Application
File Compatibility
Document Types
OpenOffice.org
Writer
.sxw, .sdw, .doc, .rtf, .txt,
.htm/.html
Formal letters, business forms, school
papers, resumes, newsletters, reports
OpenOffice.org
Calc
.sxc, .dbf, .xls, .sdc, .slk,
.csv, .htm/.html
Spreadsheets, charts, tables, graphs,
personnel directories, address books,
budgets, simple databases
OpenOffice.org
Impress
.sxi, .ppt, .sxd, .sdd
Business and academic presentations,
Web presentations, lectures, slide
shows
OpenOffice.org
Draw
.sxd, .sda; export files to several
Illustrations, line drawings, clip art,
image formats, including .jpg, .bmp, organizational charts
.gif, and .png
Table 7-1. OpenOffice.org Features
As you can see, the OpenOffice.org suite has many file compatibility features, and allows you to
74
Chapter 7. Working with Documents
accomplish several tasks for academic, business, or home use. The following sections shows you how
to use the OpenOffice.org suite.
7.1.2. OpenOffice.org Writer
Writing documents using OpenOffice.org is similar to other word processing applications you may
have used before. A word processor is like a text editor but has several additional features that allow
you to format, design, and print your documents without the need to memorize complex formatting
tags or codes. OpenOffice.org Writer is a powerful word processor that features WYSIWYG formatting — what you see in the OpenOffice.org Writer window is exactly what you get if you printed
the document or if you gave the document file to someone else for them to view. Figure 7-1 shows
OpenOffice.org Writer in action:
Figure 7-1. OpenOffice.org Writer
To start OpenOffice.org Writer from your desktop panel, choose Main Menu => Office => OpenOffice.org Writer; to start it from a shell prompt, type oowriter.
The main interface is the document editing area (the white space in the middle of the window) where
you can add and edit text. At the top of the window are various functions collected into toolbars that let
you choose your fonts, letter sizes, justification (aligning the text of your document to the left, center,
or right margins), and more. There is also a text box that enables you to specify the exact location of
a document on your machine and load the document into the editing area. There are also buttons for
opening, saving, and printing documents, as well as buttons for creating new documents (which opens
up a new window with a blank document for you to add content).
Along the left side of the window, there is a toolbar with buttons for checking your spelling, toggling
the automatic highlighting of misspelled words, keyword and phrase searching, and other convenient
editing functions. If you hover the mouse cursor over a toolbar button, a pop-up Tip is displayed with
a brief explanation of the button’s functionality. You can display more detailed Tips by clicking the
Help menu and choosing Extended Tips.
You can immediately begin typing text into the document editing area at any time using the default
settings. To save your text, click the Save button
, which opens the pop-up file browser. You can
choose the file format from the File type drop down menu at the bottom of the browser window.
The default file type is appropriate for files that you are working on exclusively with OpenOffice.org
applications. However, for files that you need to distribute to Microsoft Office users, or if you are
Chapter 7. Working with Documents
75
editing a file that was sent as an email attachment with the .doc extension, you can save the file as a
Microsoft Word file type that others are able to open in Microsoft Word.
While OpenOffice.org Writer is useful for general document editing, you can also add objects such
as images, illustrations, charts, and tables to your document to complement your text or give impact
to your documents. To add an image to the document, select Insert => Graphics => From File, and
choose the image from the pop-up file browser. The image appears where you placed your cursor and
can be made larger or smaller by clicking on the resizing borders around the image. Figure 7-2 shows
an image added to a document.
Figure 7-2. Adding an Image to Your Document
Once you have created your document, you can save it in any format that you wish. Consult Table
7-1 for available file formats. Note that you can also export your document to HTML or PDF format,
formats which can be read by almost every computer with a Web browser (such as Mozilla) or PDF
viewer application (such as xpdf or Adobe Acrobat Reader).
7.1.3. OpenOffice.org Calc
From large enterprises to home offices, professionals in every industry use spreadsheets for keeping
records, creating business charts, and manipulating data. OpenOffice.org Calc is a software spreadsheet application that allows you to enter and manipulate data cells organized in columns and rows. A
cell is a container for individual pieces of data, such as a quantity, label, or mathematical formula. You
can perform calculations on groups of cells (such as adding or subtracting a column of cells) or create
charts based on the quantities contained in a group of cells. You can even incorporate spreadsheet data
into your documents for a professional touch.
To start OpenOffice.org Calc from the desktop panel, select Main Menu => Office => OpenOffice.org Calc. To start OpenOffice.org Calc from a shell prompt, type oocalc.
Figure 7-3 shows OpenOffice.org Calc in action.
76
Chapter 7. Working with Documents
Figure 7-3. OpenOffice.org Calc
OpenOffice.org Calc allows you to enter and manipulate personal or business data. For example,
you can create a personal budget by entering data descriptions (such as rent, groceries, and
utilities) into column A and the quantities of those data descriptions in column B. OpenOffice.org Calc allows you to enter the data either in the cell itself by double clicking the cell and
typing your information or by using the Input Line (the text box on the toolbar). Then you can
run a formula on column B to come up with a total. OpenOffice.org Calc has several preset functions and calculations (such as =SUM() for addition/multiplication, =quotient() for division, and
=subtotal()for preparing receipts). For detailed information about creating functions for calculating your numerical data in OpenOffice.org Calc, refer to the documentation by selecting Help =>
Contents.
If you need to create charts or graphs for class or business presentations, OpenOffice.org has several
chart and graph templates available. Highlight the areas you would like to chart, then click Insert
=> Chart.... In the Chart window, the data ranges you choose is shown in the text box for you to
customize further if desired. Click Next to display the many different charts and graphs you can create
using your data. Choose the style you want, and click Create. The graph is displayed anchored within
the spreadsheet window. You can move it anywhere on the screen for printing, or you can save the
graph as an object that you can then embed in OpenOffice.org Writer documents or OpenOffice.org
Impress presentations.
Chapter 7. Working with Documents
77
Figure 7-4. Creating Charts with OpenOffice.org Calc
You can save spreadsheets created with OpenOffice.org Calc in several file formats, including the native .sxc as well as Microsoft Office compatible .xls formats. Additionally, you can export rendered
charts and graphs to several image file formats and integrate them with document files, webpages, and
presentations.
For more information about using OpenOffice.org Calc, refer to the help page located in Help =>
Contents from the file menus.
7.1.4. OpenOffice.org Impress
Visual aids can give your presentations an added impact that catches your audience’s attention and
keeps them interested. OpenOffice.org Impress is a graphical tool that can help you make a more
convincing presentation.
To start OpenOffice.org Impress from the graphical desktop, select Main Menu => Office =>
OpenOffice.org Impress. To start OpenOffice.org Impress from a shell prompt, type ooimpress.
OpenOffice.org Impress features a step-by-step automated presentation wizard called AutoPilot that
allows you to create presentations from a collection of default style templates. You can make slides
with itemized lists, outlines, or images. You can even import charts and graphs created by OpenOffice.org Calc into a slide.
Figure 7-5 shows OpenOffice.org Impress in action.
78
Chapter 7. Working with Documents
Figure 7-5. OpenOffice.org Impress
When you first start OpenOffice.org Impress, you are presented with the AutoPilot. You can choose
the style of your slides, the medium with which you present your slides (plain paper, transparent
paper for overhead projectors, slides, or a display monitor), and any animated visual effects you want
to apply to the slides if you run presentations from your computer.
Figure 7-6. OpenOffice.org Impress AutoPilot Wizard
Once you have chosen your preferences with AutoPilot tool, you can choose the type of slide you want
to create. You can select a pre-formatted slide from the list or start with a blank slide and customize
the layout yourself. To add new slides to your presentation, click Insert Slide... in the floating toolbar,
and a pop-up window appears allowing you to choose the layout of the new slide. You can have as
many slides in your presentation as you need.
You can also preview your presentation at any point by selecting Slide Show => Slide Show from the
file menus. The presentation is presented in full screen, which you can exit by cycling through every
slide until you reach the end or by pressing the [Esc] key at any point in the slide show.
Your presentation can be saved in several file formats. You can save in the native OpenOffice.org
Impress format (for example, mypresentation.sxi), the Microsoft PowerPoint format
(mypresentation.ppt), or StarImpress format (mypresentation.sdd). You can also print your
presentation to plain or transparent paper formats by clicking File => Print from the file menu.
Chapter 7. Working with Documents
79
To learn more about OpenOffice.org Impress, click Help => Contents from the file menus.
7.1.5. OpenOffice.org Draw
If you want to create graphics for your documents and presentations, you can use OpenOffice.org
Draw. Using your mouse as a you would a pen or a paintbrush, OpenOffice.org Draw allows you to
make illustrations and save them in several formats that you can add to printed documents, place on
websites, or attach to emails.
To start OpenOffice.org Draw from the desktop panel, click Main Menu => Office => OpenOffice.org Draw. To start OpenOffice.org Draw from a shell prompt, type oodraw.
Figure 7-7 Shows OpenOffice.org Draw in action.
Figure 7-7. OpenOffice.org Draw
If you are familiar with illustration and graphics applications such as The GIMP (refer to Chapter
10 Working with Images for more information), notice that OpenOffice.org Draw has some of the
same basic functions. There are toolbars for creating straight and curved lines, basic shapes such as
squares and circles, 3D objects such as cones and cubes, and more. You can create images and fill
them with the color of your choice using the Area Style/Filling drop-down menu on the main toolbar.
You can additionally insert text into your illustrations. OpenOffice.org Draw also allows you to open
and import images and modify them with the tools provided.
When you complete your illustration or image modifications, you can save the file in one of several
native file formats or export your work to several popular formats such as .jpg or .png. Refer to
Table 7-1 for the complete list of compatible image file formats.
For more information on using OpenOffice.org Draw, refer to the documentation located at Help =>
Contents from the file menus.
7.2. Editing Text Files
Red Hat Enterprise Linux includes several text editors, applications that allow you to view and modify
plain text files. Plain text files are files that contain text without any font or style formatting applied to
it, such as system logs and configuration files.
80
Chapter 7. Working with Documents
gedit is a graphical text editor. It can open, edit, and save plain text files. You can also cut and paste
text to and from other graphical desktop applications, create new text files, and print files. gedit has a
clear and understandable interface that uses tabs so that you can open more than one file at the same
time without opening more than one gedit window.
To start gedit, click Main Menu => Accessories => Text Editor. You can also start gedit by typing
gedit at a shell prompt.
Note
gedit can only be used in a graphical desktop environment.
Figure 7-8. gedit
Once gedit is running, you are presented with a blank editing area. You can begin using gedit immediately or click the Open button to locate the plain text file you want to edit. The file loads into the
main editing area as shown in Figure 7-8. You can navigate the text file by clicking and holding the
scroll bar on the right edge of the window and moving your mouse cursor up and down; or, use the
arrow keys to navigate through the text file line-by-line. Press the [Page Up] and [Page Down] keys to
advance the document a page at a time.
Tip
gedit allows you to open multiple text files in one window using separate tabs for each file. If you
have a file already open and want to copy text from another file, click Open, choose the file you want
to access, and the file opens in a new tab within the gedit window. You can navigate between each
file by clicking on the the tab associated with the particular filename.
Once you have modified or written your text file, you can save it by pressing the Save button in the
toolbar, or by choosing File => Save from the file menus. If you are writing a new text file, a pop-up
Chapter 7. Working with Documents
81
window prompts you to name the file and save it in the directory of your choice. If you are editing
an existing file, then any changes you make automatically appears in the file the next time you open
it. You can also choose File => Save As... to save an existing file under a new name or in a different
location, which is convenient if, for example, you are editing a configuration file and you want to test
your changes without losing your original configuration.
For more information about gedit, choose Help => Contents from the file menus to access the gedit
manual.
7.2.1. Shell Prompt Text Editors
If you are not using a graphical desktop and want to read and modify a text or configuration file, Red
Hat Enterprise Linux includes the vi (pronounced vee-eye) text editor. vi is a simple application that
opens within the shell prompt and allows you to view, search, and modify text files. To start vi, type
vi at a shell prompt. To open a file with vi type vi filename at a shell prompt.
Figure 7-9. vi
By default, vi opens a file in Normal mode, meaning that you can view and run built-in commands
on the file but you cannot add text to it. To add text, press [i] (for Insert mode), which allows you to
make any modifications you need to. To exit insert mode, press [Esc], and vi reverts to Normal mode.
To exit vi, press [:] (which is the vi command mode) and press [q] then [Enter]. If you have made
changes to the text file that you want to save, press [:] and type [w] then [q] to write your changes
to the file and exit the application. If you accidentally made changes to a file and you want to exit
vi without saving the changes, type [:] and then type [q] followed by [!], which exits without saving
changes.
More information about using vi can be found by typing man vi at a shell prompt.
7.3. Viewing PDFs
A PDF (Portable Document Format) file is an electronic image of a document. PDF captures formatting information from a variety of desktop publishing applications, making it possible to send formatted documents and have them appear on the recipient’s monitor or printer as they were intended. To
view a PDF you must have a PDF reader.
82
Chapter 7. Working with Documents
An open source application called xpdf is included with Red Hat Enterprise Linux. The xpdf toolbar at
the bottom has navigational tools that let you move backward and forward through the PDF document,
as well as standard zoom, print, and find tools. The xpdf man page provides useful information on the
xpdf options. To view the xpdf man page, at a shell prompt type man xpdf.
Figure 7-10. xpdf
To view a PDF with xpdf:
1. In your desktop environment, go to Main Menu => Graphics => PDF Viewer. You can also
launch xpdf by typing xpdf at a shell prompt.
2. Right-click in the xpdf screen to display a list of options.
3. Select Open to display the file browser.
4. Select the PDF file you want to view and click Open.
Another popular PDF viewer is Adobe Acrobat Reader. While it is not included with Red Hat Enterprise Linux, you can download it free of charge at http://www.adobe.com/.
Chapter 8.
Audio, Video, and General Amusement
This chapter presents you with the lighter side of Red Hat Enterprise Linux. From games and toys to
multimedia applications, Red Hat Enterprise Linux provides many packages to assist you in having
some fun with your computer.
8.1. Playing Audio CDs
To play an audio CD, place the CD in your CD-ROM drive. The CD Player application should appear
automatically and begin playing the first audio track. If the interface does not appear, click Main
Menu => Sound & Video => CD Player to launch the CD Player application.
Figure 8-1. CD Player Interface
The CD Player interface acts similar to a standard CD player, with play, pause, and stop functions.
There is even a sliding bar that allows you to adjust the volume. Press the Next track and Previous
Track buttons to skip forward or backward one track; you can also use the Track List drop down
menu to select a track from the available listing.
You can edit the track listings for your CDs by clicking the Open track editor button. You can also
change the way the application functions by clicking on the Open Preferences button. Here you can
set themes for the player as well as set the behavior of the CD-ROM drive when you open or quit the
CD Player application.
Figure 8-2. CD Player Preferences
84
Chapter 8. Audio, Video, and General Amusement
8.2. Playing Digital Audio Files
Digital audio has become very popular in recent years. Users enjoy the technology because the sound
quality is excellent compared to analog tape or records, and the files are compact (audio files can
easily be transferred across the Internet).
To take advantage of this technology, Red Hat Enterprise Linux includes the powerful X Multimedia
System (XMMS), a cross-platform multimedia player which allows you to play several digital audio
file formats.
Figure 8-3. XMMS Interface
XMMS can be used for more than just playing digital audio files. By default XMMS can play Ogg
Vorbis, RIFF wave, and most module formats. Additionally, XMMS can be extended via plugins to
play a number of other digital multimedia formats.
To launch XMMS, go to Main Menu => Sound & Video => Audio Player.
To launch XMMS from a shell prompt, type the command xmms.
8.2.1. Using XMMS
To play an audio file with XMMS, click the Open button
window.
and choose a file from the Load File(s)
Figure 8-4. The Load File(s) Window
In Figure 8-4, you see that there are several files to choose from. The files that end in .ogg are Ogg
Vorbis files, a popular new audio file format, while the .pls file is an audio playlist file. You can use
XMMS to add audio files into a list and then save it as a playlist. This can be convenient if you have
Chapter 8. Audio, Video, and General Amusement
85
several audio files and you want to categorize them (for example, by genre or artist). Highlight the file
you wish to play (if you have multiple files, click and hold the mouse button and drag it over all of the
files you want to open) and click OK. Notice that XMMS begins to play your audio files immediately.
To adjust the volume click and drag the volume slider (the long slider above the Open button) to the
left to lower the volume or to the right to increase it like a CD player. There are also buttons to stop,
pause, and skip (backward and forward) your audio files.
To learn more about using XMMS and its many options, refer to the man page by typing man xmms
at a shell prompt.
8.3. Troubleshooting Your Sound Card
If, for some reason, you do not hear sound and know that you do have a sound card installed, you can
run the Sound Card Configuration Tool utility.
To use the Sound Card Configuration Tool, choose Main Menu => System Settings => Soundcard
Detection. A small text box pops up prompting you for your root password.
Note
Most sound cards are supported by Red Hat Enterprise Linux, but there are some sound cards that
are not completely compatible or may not work at all. If you are having trouble configuring your sound
card, check the Hardware Compatibility List at http://hardware.redhat.com/hcl/ to see if your card is
supported.
The Sound Card Configuration Tool utility probes your system for sound cards. If the utility detects
a plug and play sound card, it automatically tries to configure the correct settings for your card. You
can then click the Play test sound button to play a sound sample. If you can hear the sample, select
OK and your sound card configuration is complete.
Figure 8-5. Sound Card Configuration Tool
8.3.1. If Sound Card Configuration Tool Does Not Work
If the Sound Card Configuration Tool does not work (if the sample does not play and you still do
not have audio sounds), there are alternatives, although they are not quite as simple as running the
Sound Card Configuration Tool. You can edit your modules.conf file as discussed in the next
section (this strategy is not recommended for most new users) or refer to the documentation that came
with your sound card for more information.
86
Chapter 8. Audio, Video, and General Amusement
8.3.1.1. Manual Sound Card Configuration
If your sound card is not a plug and play card, you can manually edit your /etc/modules.conf file
to include the sound card module that it should use. For example:
alias sound sb
alias midi opl3
options opl3 io=0x388
options sb io=0x220 irq=7 dma=0,1 mpu_io=0x300
For information on configuring sound manually, refer to the Linux Sound HOWTO at the Linux Documentation Project webpage:
http://www.tldp.org/HOWTO/Sound-HOWTO/
8.4. Troubleshooting Your Video Card
Video card configuration is handled during the Red Hat Enterprise Linux installation (refer to the Red
Hat Linux Installation Guide for more information). However, if you did not choose to configure a
video card at that time, or if you need to reconfigure your settings, you can use the X Configuration
Tool utility. You should do this, for example, if you install a new video card.
Note
The X Configuration Tool backs up your system’s original video configuration file to
/etc/X11/XF86Config.backup in case you need it to switch back to a previous configuration.
To run the X Configuration Tool, click Main Menu => System Settings => Display. A pop-up
window prompts you for your root password. You can also start from a shell prompt by typing the
command redhat-config-xfree86, which then prompts you to enter your root password. If you
are working from a shell prompt and X is not working, redhat-config-xfree86 attempts to start
a minimal X session to allow you to continue your configuration. Follow the instructions that appear on the screen. The X Configuration Tool attempts to automatically configure your video card
and monitor settings for you. Figure 8-6 shows the Advanced tab for configuring your video device
manually.
Figure 8-6. X Configuration Tool
Chapter 8. Audio, Video, and General Amusement
87
To configure your monitor manually, click the Advanced tab, then click the Configure... button next
to the Monitor Type entry. A pop-up window displays a list of monitor models. Choose your model
and click OK. You can also let the X Configuration Tool probe your monitor for the correct model
and vertical/horizontal frequency settings.
To configure your video card manually, click the Advanced tab, then click the Configure... button
next to the Video Card entry. A pop-up window displays a list of video card models. Choose your
model and click OK. You can also let the X Configuration Tool probe your video card for the correct
model and settings by clicking the Probe Videocard button.
When you have finished reconfiguring your video card and monitor, you should be able to start an X
session and enjoy your graphical desktop environment.
8.5. Games
Playing games under Red Hat Enterprise Linux is a fun way to pass the time. The games included in
Red Hat Enterprise Linux appeal to quite a large number of video game enthusiasts.
Game availablity depends on the variant of Red Hat Enterprise Linux you installed. You must have
those game packages installed before they appear under the Main Menu => Games menu. Refer to the
Red Hat Enterprise Linux System Administration Guide for details on installing additional packages.
To start a game, click Main Menu => Games and select the game of your choice. Figure 8-7 shows a
fun game for kids of all ages called Same GNOME. In this game you point your mouse at matching
marbles until they start to spin; then, you can click them to make them disappear. The object of the
game is to make all the marbles disappear.
Figure 8-7. Same GNOME — Match the Marbles Game
8.6. Finding Games Online
There are many games available within Red Hat Enterprise Linux and online. For more information,
here are a few suggestions:
•
http://www.linuxgaming.net/ — A website that covers Linux-compatible games in depth.
•
http://www.tuxgames.com/ — A store where you can buy games just for Linux.
•
http://www.linuxgames.com/ — T Linux gaming news site.
•
http://happypenguin.org/ — The Linux gaming repository.
You can also browse the Internet for linux games using a search engine, such as
http://www.google.com/.
88
Chapter 8. Audio, Video, and General Amusement
Chapter 9.
Working with Digital Cameras
Digital cameras have recently grown in popularity because of their increasing image quality and easy
interaction with desktop PCs. Digital cameras create high-quality images that allow you to send to
others over the Internet or print on a color printer. Red Hat Enterprise Linux supports several brands of
digital cameras and has applications that help you access, view, and modify your digital photographs.
9.1. Using gtKam
Red Hat Enterprise Linux supports over 100 digital camera models. So, whether your camera uses
a USB or serial port to communicate with your computer, it is likely that Red Hat Enterprise Linux
supports it.
gtKam is a graphical application that allows you to interface with your digital camera. gtKam works
directly with your digital camera, allowing you to open, view, save, and delete images directly. You
can also download the images to your computer and modify it with image manipulation programs
such as The GIMP (refer to Chapter 10 Working with Images for more information about image
manipulation tools).
To start gtKam, choose Main Menu => Graphics => Digital Camera Tool. You can also start
gtKam by typing gtkam at a shell prompt.
Before you begin using gtKam, you need to configure it to work with your digital camera. From
the menu, choose Camera => Add Camera.... From the pop-up dialog, you can choose your camera
from the drop-down list or let gtKam automatically find your camera by clicking Detect. Click Apply
to accept the changes and OK to close the dialog box.
Figure 9-1. Adding a Camera in gtKam
Once you have added your camera, it will be shown as an icon on the left panel of the main gtKam
window. You only have to configure gtKam for your camera once; the settings will be saved with
each additional use.
Directories shown below the icon may differ depending on your brand of camera. Select the directory
that commonly stores your images and the stored images will immediately load as thumbnail images
in the main panel. From this panel, click on the images you want, which you can then save to disk by
choosing File => Save Selected Photos. If you want to save all of the stored images, choose Select
=> All, then save the images to disk.
90
Chapter 9. Working with Digital Cameras
Figure 9-2. Viewing Images with gtKam
For more information about using gtKam, refer to the gtKam page at the gPhoto website:
http://gphoto.sourceforge.net/proj/gtkam/
Chapter 10.
Working with Images
Digital images have grown in popularity with the development of the graphical Internet and the increasing quality of digital cameras. There are several types of image files, some of which are created
using sophisticated illustration software packages, while others are made from digital sources such as
a scanner or camera. You may have downloaded some of these image files from the Web or receive
them them as attachments to in an email message. You may also want to create your own images to
send to others. You can view and modify the most common types of image files using applications
included in Red Hat Enterprise Linux.
10.1. Viewing Images
This section discusses some of the common tools for viewing image files. Certain tools included in
Red Hat Enterprise Linux are specialized applications that enhance images; while others are generalpurpose file managers that have integrated image viewing functionality.
10.1.1. Using Nautilus to View Images
Nautilus is a general-purpose file manager and browser for the graphical desktop environment. Nautilus has many functions beyond simple image viewing; however, for this section, we only use it for
basic image browsing. For more information about Nautilus, refer to Chapter 2 Using the Graphical
Desktop.
Nautilus is known for its ease-of-use and it handles images with the same ease as it does for other file
types. To begin browsing your image collection with Nautilus, double-click your home desktop icon:
This provides a view of all files and folders within your home directory. Double-click a supported
image file and Nautilus opens the file. Figure 10-1 illustrates how Nautilus automatically creates
thumbnails of any images within a folder:
Figure 10-1. Contents of a Folder in Nautilus
92
Chapter 10. Working with Images
Double-click on any thumbnail icon to view the image at its native size and the image loads within
the browser window. To increase or decrease the size of the viewed image in Nautilus, click on the
zoom buttons next to the Location: field as shown in Figure 10-2:
Figure 10-2. The Zoom Function in Nautilus
Click the + button to increase the size of the image or - to decrease it.
10.2. Manipulating Images with the GIMP
The GNU Image Manipulation Program (GIMP) is a powerful application that can create, alter, manipulate, and enhance digital image files.
10.2.1. GIMP Basics
To use the GIMP, you must know some of the basics. Start the GIMP from the desktop by choosing
Main Menu => Graphics => The GIMP or from a shell prompt, start the GIMP using the command
gimp.
Figure 10-3 illustrates a typical GIMP session.
Figure 10-3. The GIMP
Chapter 10. Working with Images
93
10.2.2. Loading a File
To load an existing file, select File => Open, and the Load Image dialog appears, as illustrated in
Figure 10-4.
Figure 10-4. The Load Image Dialog
The Load Image dialog displays the working directory, which is the directory you are in when the
GIMP was launched. You can navigate the file system tree by double-clicking on the Directories list
on the left, then selecting a file to open from the Files list on the right.
File name completion is supported by the GIMP. If you type the first few letters of a file name into
the Selection field and press the [Tab] key, the only subdirectories or files beginning with those letters
remain.
Once you select a file, it appears in the Selection field near the bottom of the dialog. On the right
side of the dialog, a thumbnail preview is displayed. Alternatively, a Generate Preview button is
displayed. If you want to view a thumbnail of the image, click on the Generate Preview button.
After selecting a file, click on the OK button to open it. You can also double-click on a file name to
open it.
10.2.3. Saving a File
To save an image file, right click on the image and choose File => Save (or Save as). The Save Image
dialog appears if you choose Save as or if you choose Save and the file has not been saved before.
The Save Image dialog looks almost exactly like the Load Image dialog and navigation of the file
system tree and choosing files works in the same way.
When saving an image, you must choose an image format. The GIMP supports a wide variety of
image formats, including .gif, .png, .jpg, and .bmp.
94
Chapter 10. Working with Images
10.2.4. GIMP Options
Like many applications, the GIMP provides more than one method to accomplish tasks. The easiest
way to work with images is to right-click the image, which displays a set of menus containing most
of the GIMP’s many capabilities, including image sizing, rotation, and filter application.
For example to make an image appear as if it was clipped from a newspaper, right-click on the image
within the GIMP and select Filters => Distorts => Newsprint.... Select the quantity of lines per inch
using the sliders. When a desired quantity is reached, click OK to render the image with the new effect
applied. Figure 10-5 shows an example of an image after the Newsprint... filter has been applied:
Figure 10-5. An Image Modified with the Newsprint... Filter
The Toolbox palette also has several easily accessible functions. To bring the Toolbox palette, rightclick on the image and select Tools => Toolbox. Using the Toolbox palette, you can add text to
images, erase regions of an image, or even fill selected regions with the color of your choice.
For example, if you wish to add text to a file, select the
button and click on your image. This
loads the Text Tool dialog box, where you can choose a font and type some text in the provided text
box. Click OK and the text is displayed as a floating section on the image. You can then move the text
to the position you wish using the Move Layers tool, available by selecting the
10-6 shows the photo with added text:
Figure 10-6. Using the Text Tool on an Image
button. Figure
Chapter 10. Working with Images
95
The GIMP is a powerful image editing tool and it takes some time to master all of its functions. Try
exploring some of the options yourself. If you make a mistake, you can always undo your mistakes by
right-clicking on the image and choosing Edit => Undo.
10.3. Additional Resources
While this chapter covers image applications briefly, there is much more detailed information available. Refer to the following resources if you are interested in learning more about the applications in
this chapter.
10.3.1. Installed Documentation
Often, software packages include comprehensive documentation.
•
The GIMP manual page contains some of the more advanced command line options and environment variables associated with it. You can read the manual page by typing man gimp at a shell or
terminal prompt. The GIMP also has a help browser accessible by choosing Help => Help... from
the GIMP toolbar menu.
10.3.2. Useful Websites
The Web has several sites of interest if you are looking for more detailed information about an application covered in this chapter:
•
http://www.gimp.org/ — The official GIMP website.
•
http://www.rru.com/~meo/gimp/faq-user.html — A Frequently Asked Questions (FAQ) list for
questions commonly asked about the GIMP by GIMP users (as opposed to developers).
•
http://manual.gimp.org/manual/ — The online GIMP User Manual.
•
http://gimp-savvy.com/ — The companion website to the book Grokking the GIMP, by Carey
Bunks. The entire book is also available on the site for download
•
http://tigert.gimp.org/gimp/ — The GIMP website of tigert (Tuomas Kuosmanen).
10.3.3. Related Books
If you need in-depth information about the many capabilities of the GIMP, try your favorite bookstore.
The following books were available at the time of this writing:
•
The Artists’ Guide to the GIMP by Michael J. Hammel; Frank Kasper and Associates, Inc.
•
GIMP Essential Reference by Alex Harford; New Riders Publishing
•
GIMP for Linux Bible by Stephanie Cottrell Bryant, et al; Hungry Minds, Inc.
•
GIMP: The Official Handbook by Karin Kylander and Olof S. Kylander; Coriolis Group
•
Grokking the GIMP by Carey Bunks; New Riders Publishing
•
Sams Teach Yourself GIMP in 24 Hours by Joshua and Ramona Pruitt; Sams
96
Chapter 10. Working with Images
Chapter 11.
Diskettes and CD-ROMs
Using diskettes and CD-ROMs with Red Hat Enterprise Linux requires some understanding about
removable media. This chapter discusses how to read and write files to and from diskettes, how to
format diskettes, and how to read and copy data from a CD-ROM. This chapter also covers using
CD-writable and CD-rewritable drives.
11.1. Using Diskettes
Diskettes are one of the oldest removable media solutions available for the personal computer (PC).
Diskettes are ideal as a portable storage solution for small files that need to be physically moved
around. For example, if two PCs are not on the same network, diskettes are a great solution to transfer
files from one computer to the other.
11.1.1. Mounting and Unmounting a Diskette
A diskette must first be mounted before it can be used. To mount a diskette, insert it into the diskette
drive and type mount /mnt/floppy/ at a shell prompt.
The diskette drive activity light should blink as the diskette’s file system is mounted to the
/mnt/floppy directory.
You can access the contents of the diskette by changing into that directory with the cd
/mnt/floppy/ command.
Alternatively, you can also mount a diskette by right-clicking on the desktop and choosing Disks =>
Floppy. This mounts the diskette and adds a desktop icon which you can double-click to explore the
diskette contents.
Now that the diskette has been mounted it is available to be copied from or written to. You can open,
save, and copy files to/from it as you would normally do to your hard drive. You can even explore the
diskette’s contents in Nautilus (as shown in Figure 11-1) or Konqueror.
Figure 11-1. Viewing files on a Diskette with Nautilus
When you are done using the diskette, you should unmount it before ejecting it from the drive. To do
this, close any applications that may be using files on the diskette or exploring the diskette’s contents
(such as Nautilus or Konqueror), and at a shell prompt type the following command :
umount /mnt/floppy/
98
Chapter 11. Diskettes and CD-ROMs
If you are using GNOME, you can unmount the diskette by right-clicking on the
Unmount Volume from the menu.
icon and choosing
You can now safely eject the diskette from the drive.
11.1.2. Putting Linux Files on an MS-DOS Diskette
To copy files from a Linux machine to an MS-DOS formatted diskette so that a Windows machine
can read it you should format your diskette with an MS-DOS (FAT) file system. This can be done
with the Windows OS or with gfloppy (see Section 11.1.3.1 Using gfloppy). Then mount it in Linux
as described in Section 11.1.1 Mounting and Unmounting a Diskette. Copy files using the following
command (substituting filename with the name of the file you wish to copy):
cp filename /mnt/floppy
You can then unmount the diskette and eject it from the drive. The new file on the diskette should now
be accessible from your Windows machine.
11.1.3. Formatting a Diskette
To use a diskette specifically with Red Hat Enterprise Linux, you need to format the diskette using
the ext2 file system. ext2 is one of the file systems supported by Red Hat Enterprise Linux, and is the
default method used for formatting diskettes.
Warning
Formatting a diskette will erase all of its contents. Be sure to backup any files that you need before
performing any of the following operations on your diskettes.
Once you have created an ext2 file system on the diskette, you can manipulate its contents in the same
ways that you manipulate directories and files on your hard drive.
11.1.3.1. Using gfloppy
To start gfloppy, choose Main Menu => System Tools => Floppy Formatter. From a shell prompt,
type /usr/bin/gfloppy. As shown in Figure 11-2, the gfloppy interface is small and has few options. The default settings are sufficient for most users and needs; however, you can format your
diskette with an MS-DOS file system type if necessary. You can also choose the density of your
diskette (if you are not using the usual high density 3.5" 1.44MB diskette). You can also elect to quick
format the diskette if it was previously formatted as ext2.
Chapter 11. Diskettes and CD-ROMs
99
Figure 11-2. gfloppy
Insert a diskette and change the settings in gfloppy to suit your needs; then click Format. The status
box will appear on top of the main window, showing you the status of formatting and verification (see
Figure 11-3). Once complete, you can eject the diskette and close gfloppy.
Figure 11-3. gfloppy Status Box
11.1.3.2. Using mke2fs
The mke2fs command is used to create a Linux ext2 file system on a device such as a hard drive
partition or (in this case) a diskette. mke2fs essentially formats the device and creates an empty,
Linux-compatible device which can then be used for storing files and data.
Insert your diskette into the drive and issue the following command at a shell prompt:
/sbin/mke2fs /dev/fd0
On Linux systems, /dev/fd0 refers to the first diskette drive. If your computer has more than one
diskette drive, your primary diskette drive is /dev/fd0, your second /dev/fd1, and so on.
The mke2fs utility has a number of options. The -c option makes the mke2fs command check the
device for bad blocks before creating the file system. The other options are covered in the mke2fs
man page.
Once you have created an ext2 file system on the diskette, it is ready to be used with your Red Hat
Enterprise Linux system.
100
Chapter 11. Diskettes and CD-ROMs
11.2. CD-ROMs
The CD-ROM format is a popular medium to deliver typically large software applications as well as
multimedia games and presentations. Most of the software that can be purchased from retail outlets
come in the form of CD-ROMs. This section shows you how to use CD-ROMs on your Red Hat
Enterprise Linux system.
11.2.1. Using CD-ROMs with Your File Manager
By default, CDs are automatically mounted and the file manager is displayed allowing you to explore the contents of the CD. Figure 11-4 shows the contents of a CD-ROM within the Nautilus file
manager.
Figure 11-4. Contents of a CD-ROM in Nautilus
A CD desktop icon
also appears, which you can use to unmount and eject your CD-ROM after
use. Right-click on the icon to view all of the available choices. For example, to unmount and eject
the CD-ROM, choose Eject from the menu.
11.2.2. Using CD-ROMs From a Shell Prompt
You can also manually mount and unmount your CD-ROMs from a shell prompt. Insert a CD into
your CD-ROM drive, open a shell prompt, and type the following command:
mount /mnt/cdrom
The CD-ROM should now be mounted and available for use with your file manager. You can access
your CD-ROM by clicking the home icon on the desktop and typing /mnt/cdrom in the location bar.
After working with your CD, you must unmount it before you can eject it from your CD-ROM drive.
Close any applications or file managers that are using the CD-ROM and type the following command
at a shell prompt:
umount /mnt/cdrom
You can now safely press the eject button on your CD-ROM drive to retrieve your CD.
11.3. CD-Rs and CD-RWs
CD-writable (CD-R) drives have grown in popularity as an inexpensive way to backup and archive
several megabytes of data, including applications, personal files, and even multimedia (audio/video
Chapter 11. Diskettes and CD-ROMs
101
and still image) presentations. Red Hat Enterprise Linux includes several tools for using CD-Rs and
CD-rewritable (CD-RW) drives.
11.3.1. Using CD Creator
If you want to perform a quick file or directory backup to a CD-R or CD-RW, there is a tool included
in the Nautilus file manager called CD Creator.
CD Creator allows you to drag and drop files from a Nautilus window to the CD Creator interface.
To access the CD Creator feature in Nautilus, insert a blank CD-R(W) into your drive and the CD
Creator window will automatically display. You can also double click your home directory icon from
the desktop and choose Go => CD Creator from the window menus. You can also type burn: in the
Location bar to start CD Creator.
Figure 11-5. The CD Creator Interface in Nautilus
Open a new Nautilus window and select the files or directories you want to write to CD-R(W). To
select multiple files, press and hold the [Ctrl] key, and click on the files and folders. Then release the
[Ctrl] key, press and hold the left mouse button, and drag the files and folders to the CD Creator
window.
When you are ready to write the files to your CD-R(W), click the Write to CD button in the CD
Creator window, which displays a dialog box where you can select the writing speed, name the CD,
and choose other options.
Figure 11-6. The CD Creator Write Dialog Box
102
Chapter 11. Diskettes and CD-ROMs
Click the Write files to CD button to start burning. A status window displays the writing progress, as
shown in Figure 11-7.
Figure 11-7. The CD Creator Write Status Window
By default, the CD-R(W) should automatically eject from your drive when it is finished. Since it is
generally recommended to periodically backup personal files, the CD Creator can help you do so
quickly.
11.3.2. Using CD-Rs and CD-RWs with Command Line Tools
If you want to use a shell prompt to write images to CD-R or CD-RWs, there are two utilities available:
mkisofs and cdrecord. These utilities have several advanced options that are beyond the scope of
this guide; however, for basic image creation and writing, these tools save some time over the graphical
alternatives such as X-CD-Roast.
11.3.2.1. Using mkisofs
The mkisofs utility creates ISO9660 image files that can be written to a CD-R(W). The images created by mkisofs can include all types of files. It is most useful for archival and file backup purposes.
Suppose you wish to backup a directory called /home/joeuser/, but exclude the subdirectory
/home/joeuser/junk/ because it contains unnecessary files. You want to create an ISO image
called backup.iso and write it to CD-R(W) so that you can use it on your Red Hat Enterprise Linux
PC at work and your Windows laptop for trips. This can be done with mkisofs by running the following command:
mkisofs -o backup.iso -x /home/joeuser/junk/ -J -R -A -V -v /home/joeuser/
The image is created in the same directory that you ran the command. Table 11-1 explains each
command line option. For more information on using mkisofs, refer to the additional resources in
Section 11.4 Additional Resources.
You can now use the ISO image file with cdrecord, the command line based CD recording utility.
For more information about using cdrecord, refer to Section 11.3.2.2 Using cdrecord .
Option
Function
-o
Specifies an output file name of the ISO image.
-J
Generates Joliet naming records; useful if the CD is used in
Windows environments.
-R
Generates Rock Ridge (RR) naming records to preserve filename
length and casing, especially for UNIX/Linux environments.
-A
Sets an Application ID — a text string that will be written into
the volume header of the image which can be useful to determine
what applications are on the CD.
Chapter 11. Diskettes and CD-ROMs
103
Option
Function
-V
Sets a Volume ID — a name that is assigned to it if the image is
burned, and the disc is mounted in Solaris and Windows
environments.
-v
Sets verbose execution, which is useful for viewing the status of
the image as it is being made.
-x
Excludes any directory immediately following this option; this
option can be repeated (for example, ... -x /home/joe/trash -x
/home/joe/delete ...).
Table 11-1. mkisofs Options
11.3.2.2. Using cdrecord
The cdrecord utility writes audio, data, and mixed-mode (a combination of audio, video, and/or data)
CD-ROMs using options to configure several aspects of the write process, including speed, device,
and data settings.
To use cdrecord, you must first establish the device address of your CD-R(W) device by running the
following command as root at a shell prompt:
cdrecord -scanbus
This command shows all CD-R(W) devices on your computer. It is important to remember the device address of the device used to write your CD. The following is an example output from running
cdrecord -scanbus.
Cdrecord 1.8 (i686-pc-linux-gnu) Copyright (C) 1995-2000 Jorg Schilling
Using libscg version ’schily-0.1’
scsibus0:
0,0,0
0) *
0,1,0
1) *
0,2,0
2) *
0,3,0
3) ’HP
’ ’CD-Writer+ 9200 ’ ’1.0c’ Removable CD-ROM
0,4,0
4) *
0,5,0
5) *
0,6,0
6) *
0,7,0
7) *
To write the backup file image created with mkisofs in the previous section, switch to the root user
and type the following at a shell prompt:
cdrecord -v -eject speed=4 dev=0,3,0 backup.iso
The command sets the write speed (4), the device address (0,3,0), and sets write output (verbose [-v]),
which is useful for tracking the status of the write process. The -eject argument ejects the CDROM after the write process is complete. The same command can also be used for burning ISO image
files downloaded from the Internet, such as Red Hat Enterprise Linux ISO images.
You can use cdrecord to blank CD-RW discs for reuse by typing the following:
cdrecord --dev=0,3,0 --blank=fast
104
Chapter 11. Diskettes and CD-ROMs
11.4. Additional Resources
This chapter briefly covers several applications. Refer to the following resources for more information
about the applications in this chapter
11.4.1. Installed Documentation
•
cdrecord man page — Discusses how to burn data, audio and mixed-mode CD-ROMs. Offers
all options and commands in detail, including some example commands for common CD-R(W)
burning tasks.
(where version is the version of cdrecord
installed on your system) — Several documentation files are included with general usage and licensing information.
• /usr/share/doc/cdrecord- version
•
mkisofs man page — Comprehensive detail of the utility, including some warnings about creating
certain types of ISO images. Offers all options and commands in detail, including some example
commands for creating common ISO image files.
(where version is the version of mkisofs installed on your system) — Several documentation files are included with general usage and licensing information.
• /usr/share/doc/mkisofs- version
• /usr/share/doc/dvdrecord- version /
(where
version
is the version of
dvdrecord installed on your system) — For users who have DVD-R(+W) devices, this set of
documentation helps you get started mastering DVD-ROMs for data backup and multimedia
presentation.
11.4.2. Useful Websites
•
http://freshmeat.net/projects/cdrecord/ — The cdrecord project page on Freshmeat is regularly
updated with the newest releases, news, and user commentary.
•
http://www.freesoftware.fsf.org/dvdrtools/ — The official website of the dvdrtools project,
which includes the dvdrecord utility for writing DVD-R(+W) discs.
III. Troubleshooting Your System
If you ever run into problems using your Red Hat Enterprise Linux system, there are steps you can
take and tools you can use to recover from issues that get you back to using your system normally.
From booting into rescue mode to changing a forgotten password, this part can show you how to
troubleshoot several common issues that you may run into in the course of using Red Hat Enterprise
Linux.
Table of Contents
12. Frequently Asked Questions .................................................................................................... 107
Chapter 12.
Frequently Asked Questions
This chapter answers some of the most common questions about using Red Hat Enterprise Linux
that you may ask as you become more familiar with it. From recovering forgotten passwords to troubleshooting package installation problems, this chapter guides you step-by-step through some common tasks to get you on your way.
12.1. Localhost Login and Password
I have installed Red Hat Enterprise Linux. After rebooting, I get a message telling me it needs a
localhost login and password. What are these?
Unless you specified a hostname for your computer, or received that information from a network connection, your Red Hat Enterprise Linux installation names your machine localhost.localdomain
by default.
When you get to that initial prompt, it is asking you to log in to your system. If you created a user
account with the Setup Agent, you can log in using that username and password. If you did not create
a user account, then you can log in as the super user, also known as root. The root password is the
system password you assigned during installation.
It is highly recommended that you create at least one user account for regular use of your Red Hat
Enterprise Linux system. You can create a new user after logging in as root with the User Manager
graphical tool or the useradd shell prompt utility. For more information, refer to Section 1.6 Creating
a User Account.
12.2. Error Messages During Installation of RPMs
How do I install an RPM from a CD or the Internet? I keep getting an error message when I use RPM.
If you are getting an error message similar to failed to open /var/lib/rpm/packages.rpm,
it is because you do not have proper permission to install RPM files.
When you install software, you are often required to make system-wide changes which only root can
make, such as creating new directories outside of your home directory or making changes to your
system configuration. If you are using your normal user account, you do not have permission to make
such changes by default.
You need to be the root user to install RPM files. At a shell prompt, switch to the root user by running
the following command:
su -
After entering the root password when prompted, you should then be able to install the RPM file
without further errors. For more information about using RPM and Package Management Tool,
refer to the Red Hat Enterprise Linux System Administration Guide on the Red Hat Enterprise Linux
Documentation CD or online at http://www.redhat.com/docs/.
12.3. Starting Applications
I installed an application I downloaded from the Internet, and everything seemed to go fine, but I still
get command not found when I type its name. I think I have the right name, so why does it not
start?
108
Chapter 12. Frequently Asked Questions
If you are trying to start an application from the shell prompt and it is not working, try
typing out the full directory path before the name of the application’s executable (such as
/usr/local/bin/my-executable).
For example, imagine that you have downloaded the setiathome client application and want to try
it out. You follow the directions for installing the software, which creates a subdirectory in your home
directory called seti/. Now, start the application using the full path to the executable file as shown
below:
/home/joe/seti/setiathome
The reason you may need to type the full pathnames in order to start an application is because the
executable was not placed in a directory where your user shell environment knew it could be found
(such as /usr/local/bin).
You can customize your settings so that you are not required to use the type the full path to the
application each time. To do this, you must edit your PATH environment variable.
12.3.1. Editing Your PATH
If you frequently start programs that are not located in a directory that your user shell has been
configured to search, you must edit your user shell configuration file to add the directory containing
the executable you wish to run. You can do this by adding the directory to your PATH environment
variable.
Caution
These instructions are intended only for user accounts. Avoid modifying files such as the root user’s
.bash_profile, because of the potential security risks.
Start a text editor, such as gedit or vi, at a shell prompt. You can open the file called .bash_profile
by typing the following:
gedit .bash_profile
Look for a PATH statement, similar to the one shown below.
PATH=$PATH:$HOME/bin:/usr/local/bin:
To the end of this statement, add $HOME/seti as shown below:
PATH=$PATH:$HOME/bin:/usr/local/bin/:$HOME/seti:
Save the file and exit the text editor.
You can then make the changes to .bash_profile take effect immediately by typing the following
command:
source .bash_profile
By adding paths to your .bash_profile, you can place utilities and programs in your path and be
able to execute them without having to type ./ in front of the command.
Chapter 12. Frequently Asked Questions
109
Tip
For more information about using and configuring your shell prompt refer to Chapter 3 Shell Prompt
Basics.
12.4. Accessing a Windows Partition
I have a dual-boot system with Red Hat Enterprise Linux and Windows 98. Is there a way to access
my Windows partition while I am running Linux?
You can access another partition on your system (for example, a Windows partition), in two different
ways.
You should first determine where your Windows partition is located by determining what physical hard
disk your Windows partition is located in (such as the primary master IDE drive or the the first SCSI
drive). To find this information, you can use the Hardware Browser, which lists detailed information
about the hardware in your Red Hat Enterprise Linux system.
To start the Hardware Browser, choose Main Menu => System Tools => Hardware Browser.
Figure 12-1 shows Hardware Browser in action.
Figure 12-1. Hardware Browser hard disk device listing
Select Hard Drives from the panel and find your Windows partition from the Disk Information
displayed. Windows partitions normally use the FAT or FAT32 file system type. This file system type
can be mounted and read within Linux; however, if your Windows partition uses NTFS, then you
cannot mount and read from it as Red Hat Enterprise Linux does not support NTFS file systems. Note
the Device information for your Windows partition, as this is the device that you mount to access your
Windows data.
Once you have determined where your Windows partition is located on your hard drive, log in as root
(type su and then enter the root password) at a shell prompt.
Create a directory in which the Windows partition is mounted by typing the following command. For
example:
mkdir /mnt/windows
110
Chapter 12. Frequently Asked Questions
Before you can access the partition, you must mount it in the directory you just created. As root, type
the following command at a shell prompt (where /dev/hda1 is the Windows partition you found via
Hardware Browser):
mount -t vfat /dev/hda1 /mnt/windows
You may then logout of root user mode and access your Windows data by changing into the mounted
Windows partition:
cd /mnt/windows
To automatically mount a Windows partition every time you boot your Red Hat Enterprise Linux
system, you must modify the /etc/fstab file, which configures all file systems and disk device
mounting options.
At a shell prompt, su - to root, following the above example.
Next, open the /etc/fstab in a text editor by typing (for example):
gedit /etc/fstab
Add the following on a new line (replacing /dev/hda1 with the Windows partition you found via
Hardware Browser):
/dev/hda1 /mnt/windows vfat auto,umask=0 0 0
Save the file and exit your text editor.
The next time the system is rebooted, the /etc/fstab file is read, and the Windows partition is
automatically mounted in the directory /mnt/windows. To access the partition at a shell prompt,
type the command cd /mnt/windows. To navigate through directories or files with spaces, surround
the name of the directory or file with quotation marks, as in ls "Program Files".
12.5. Finding Commands Quickly
I was looking at a man page yesterday, but I cannot remember the name of the command I was reading
about, and I did not write it down. How do I get the man page back?
The command you used is stored in a file called .bash_history. By default, this file records the last
500 commands you typed at the shell prompt.
You can glimpse the history of your commands by typing history at the shell prompt, but the results
are displayed too quickly for you to read every line.
Another way to view .bash_history is with a utility such as less. Type less .bash_history
at the shell prompt and the results will display one page at a time. To move forward a screen, press
the [Space] bar; to move back a screen, press the [b] key, and to quit, press [q].
Paging through .bash_history to find a command can be tedious. Alternatively, you can search
through the file for keywords using grep, a powerful search utility.
Say you were reading the man page the day before, but cannot recall its name. To search for the
command, type:
history | grep man
All the commands you typed which have the word man in them are now highlighted.
There are many ways to use your command history. For other tips and tricks, see Section 12.6 Tips on
Using Command History.
Chapter 12. Frequently Asked Questions
111
12.6. Tips on Using Command History
What are some other ways I can use command history?
If you type history, a numbered list scrolls by very quickly, showing you the previous 500 commands you have used.
You probably do not need to see all of the last 500 commands, so the command history 20 might
be useful. This way, only the previous 20 commands you typed are displayed (you can use any quantity
as an argument of the history command).
12.6.1. Other Shortcuts
Here are other command history shortcuts which may be useful to you:
•
"Bang, bang": Typing !! (called "bang bang") executes the last command in the history.
•
"Bang number": Typing !number (as in !302) executes the command which is numbered 302 in
the history file.
•
"Bang string": Typing !string (as in !rpm) executes a command with the most recent matching string from the history file.
•
[Up arrow] and [down arrow]: At the shell or GUI terminal prompt, you can press the up arrow
to move back through previous commands in your history list (the down arrow moves you forward through the commands) until you find the command you want. Press [Enter] to execute the
command, just as if you had typed it on the command line.
12.7. Keep ls Output from Scrolling
Whenever I type ls I can barely see the output of the directory because it scrolls by too quickly. How
can I actually read the output?
To prevent the output of ls from scrolling by too quickly, pipe the output to a utility such as less or
more. You are then able to see the output one screen at at time.
To read the contents of /etc with less, type the following command at the shell prompt:
ls -al /etc | less
To move forward a screen, press [Space] bar; to move back a screen, press the [b] key; to quit, press
[q].
You can achieve the same results with more, another paging utility.
12.7.1. Printing ls Output
You can also print directory listings by piping the output to a printer in the same way that you piped
the output to your screen. If you have configured a printer, type the following to pipe the output of a
command to the printer:
ls -al /etc | lpr
112
Chapter 12. Frequently Asked Questions
12.8. Forgotten Password
Help! I forgot my root password. How do I log in now?
You can log in using single-user mode and create a new root password.
To enter single-user mode, reboot your computer. If you use the default boot loader, GRUB, you can
enter single user mode by performing the following:
1. At the boot loader menu, use the arrow keys to highlight the installation you want to edit and
type [A] to enter into append mode.
2. You are presented with a prompt that looks similar to the following:
grub append> ro root=LABEL=/
3. Press the Spacebar once to add a blank space, then add the word single to tell GRUB to boot
into single-user Linux mode. The result should look like the following:
ro root=LABEL=/ single
4. Press [Enter] and GRUB will boot single-user Linux mode. After it finishes loading, you will
be presented with a shell prompt similar to the following:
sh-2.05b#
5. You can now change the root password by typing
passwd root
You will be asked to re-type the password for verification. Once you are finished, the password
will be changed. You can then reboot by typing reboot at the prompt; then you can log in to
root as you normally would.
12.9. Password Maintenance
I forgot or want to change my user account password.
Open a shell prompt and type the following:
passwd username
Replace username with your normal user name.
The passwd command will then ask for the new password, which you will need to enter twice. You
can now use the new password to log in to your user account.
12.10. Changing Login from Console to X at Startup
How do I change my login from the console to the graphical screen?
Instead of logging in to your system at the console and typing the startx command to start the X
Window System, you can configure your system so that you can log in directly to X.
You must edit one file, /etc/inittab, by changing just one number in the runlevel section. When
you are finished, reboot the computer. The next time you log in, you will have a graphical login
prompt.
Open a shell prompt. If you are in your user (home) account, change to the root user by using the su
command:
su -
Now, type gedit /etc/inittab to edit the file with gedit. The file /etc/inittab will open.
Within the first screen, you will see a section of the file which looks like this:
Chapter 12. Frequently Asked Questions
113
# Default runlevel. The runlevels used by RHS are:
#
0 - halt (Do NOT set initdefault to this)
#
1 - Single user mode
#
2 - Multiuser, without NFS (The same as 3, if you do not have networking)
#
3 - Full multiuser mode
#
4 - unused
#
5 - X11
#
6 - reboot (Do NOT set initdefault to this)
#
id:3:initdefault:
To change from a console to a graphical login, you should change the number in the line
id:3:initdefault: from a 3 to a 5.
Warning
Change only the number of the default runlevel from 3 to 5.
Your changed line should look like the following:
id:5:initdefault:
When you are satisfied with your change, save and exit the file using the [Ctrl]-[x] keys. You will see
a message telling you that the file has been modified, and asking you to confirm your change. Type
[Y] for yes.
Now, your next login after reboot will be from the graphical screen.
114
Chapter 12. Frequently Asked Questions
IV. Appendix
This part contains supplemental information and instruction that you may find useful during the course
of your Red Hat Enterprise Linux usage. Perhaps you want to use the KDE graphical desktop environment, or learn more about configuring your system to send and receive encrypted email. This
section shows you time-saving keyboard shortcuts, discusses the Red Hat Enterprise Linux directory
structure, and more.
Table of Contents
A. KDE: The K Desktop Environment ......................................................................................... 117
B. Getting Started with Gnu Privacy Guard................................................................................ 129
C. Applications ................................................................................................................................ 139
D. A Comparison of Common DOS and Linux Commands ....................................................... 141
E. System Directories...................................................................................................................... 143
F. Keyboard Shortcuts.................................................................................................................... 145
Appendix A.
KDE: The K Desktop Environment
A.1. Introducing KDE
The K Desktop Environment (KDE) is a graphical desktop that uses common graphical objects such
as icons, windows, menus, and panels; it allows you to access your Red Hat Enterprise Linux system
and applications using your mouse and keyboard.
This appendix covers the basics of using KDE: system navigation, working with files and applications,
and customizing the desktop to suit your needs.
If you would like to learn more about KDE, visit the official website at http://www.kde.org.
A.2. Finding Help
You can access a comprehensive set of documentation about KDE through the HelpCenter.
Figure A-1. The HelpCenter
You can access the HelpCenter from the Main Menu by selecting Help. To access HelpCenter from
the desktop, right-click on the desktop and select the Help => K Desktop Handbook.
The opening screen of the HelpCenter browser appears like Figure A-1. From this main page, you
can view help documentation on topics such as using and configuring the desktop, working with the
many applications included with KDE, and working with the Konquerer file manager.
A.3. Using The Desktop
Once you start KDE, your default desktop looks similar to Figure A-2.
118
Appendix A. KDE: The K Desktop Environment
Figure A-2. A Typical KDE Desktop
The KDE desktop displays application launchers, document windows, file folders, and so on. You can
also access the main menu and configure the desktop to suit your needs.
The long bar across the bottom of the desktop is the panel. The panel contains application launchers,
status indicators, and the desktop manager. You can have up to 16 desktops running at the same time
in KDE. The panel taskbar shows your currently running applications.
Icons located on the desktop can be files, folders, device links, or application launchers. Click on an
icon to open the associated resource.
The KDE desktop works similarly to other graphical desktop environments. You can drag and drop
files and application icons to any location on the desktop. You can also add new icons for all types
of applications and resources to the desktop, panel, or file manager. The desktop itself is also highly
customizable. You can change the appearance of buttons, window and frame decorations, and backgrounds. Configuration tools are also available which allow you to customize the way the desktop
behaves at events such as single- and double-clicking mouse buttons and chording keystrokes to create time-saving shortcuts.
The default KDE desktop displays icons for the trash can, your home directory, the Start Here icon
for applications and configuration tools, and a diskette icon. You can access any one of these resources
by double-clicking on the associated icon.
When you right-click on these icons, you see several options for working with these resources, such
as Delete, Rename, Move to Trash, and Copy.
You can drag and drop unwanted items such as files you no longer need to the Trash icon. Right-click
on the trash can and select Empty Trash Bin to delete the items from your system permanently.
A.4. Using The Panel
The panel stretches across the bottom of the desktop. By default, it contains the main menu icon and
quick-launch icons for starting a Web browser, email client, word processor, and other commonly
used applications.
Appendix A. KDE: The K Desktop Environment
119
Figure A-3. The Panel
The panel is highly configurable. You can add and remove buttons that launch applications easily.
Right-click on the panel and select Configure Panel to open the panel Settings. You can configure
panel orientation and size, set a panel hiding configuration (where the panel remains hidden until you
hover over the panel area), and customize your main menu. Click Help at any time to learn more about
configuring your panel.
Figure A-4. Panel Settings
Other tabs in Settings contain options to further customize your panel and taskbar. Click on Help for
more information on these options.
Applications and utilities can be added easily to the panel. To add an application launcher to the panel,
right-click on the panel and choose Add. Then select Application Button and make your choice from
the menus.
A.4.1. Using The Main Menu
is the central point for using KDE. Clicking on the Main Menu icon on the panel
The Main Menu
displays a large master menu from which you can perform tasks such as launch applications, find files,
and configure your desktop. The main menu also contains several submenus that organize applications
and tools into several categories, including Graphics, Internet, Office, Games, and more.
From the Main Menu, you can lock your screen, which displays a password-protected screensaver.
You can also run applications from a command line as well as logout of your KDE session.
A.4.2. Using Applets
Applets are small applications that run on the panel. There are several types of applets performing
functions such as system monitoring, time and date display, and launching applications by typing
commands in a text box.
There are some applets that run on the panel by default. This section covers them in detail.
120
Appendix A. KDE: The K Desktop Environment
A.4.2.1. Working with Multiple Desktops
By default, KDE provides four desktops that you can use to display multiple applications without
having to crowd all of them onto one desktop. Each desktop can hold icons, open applications, and be
individually customized.
For example, while you are writing a message in Evolution on desktop one, you can have Mozilla
browsing the Web on desktop two, the OpenOffice.org Writer word processor open on desktop three,
and so on.
You can change the number and names of desktops available in KDE by making these adjustments:
1. Right-click on the desktop; a brief menu of actions is displayed.
2. Select Configure Desktop; the KDE desktop configuration tool is displayed.
3. Click the Multiple Desktops icon (see Figure A-5).
Figure A-5. Virtual Desktop Configuration
You can change the names of your desktops (from Desktop 1, Desktop 2, etc.) by deleting the default
names and typing a new name in each desktop’s corresponding text box.
You can also change the number of desktops available to you by adjusting the slider in the Number
of Desktops. For more desktops, drag the bar to the right; for fewer desktops, drag the bar to the left.
The Appearance, Behavior, and Paths, and Background icons are where you can make various
desktop configuration changes. For example, to customize each virtual desktop to have different backgrounds, click the Background icon, uncheck the Common Background checkbox, click the virtual
desktop you want to change, and choose the color or image you want to make your background using
the associated tabs.
Appendix A. KDE: The K Desktop Environment
121
Figure A-6. Desktop Background Configuration
After you make any adjustments to your desktop configuration, click Apply to save the changes. Click
OK to close the desktop configuration tool.
Buttons for your desktops appear on the panel in the Desktop Pager. Click on a tile to move to a
different desktop.
Tip
You can use the keyboard combination of the [Ctrl] and Function keys to switch desktops. For example, [Ctrl]-[F2] switches to desktop two, [Ctrl]-[F3] takes you to desktop three, and so on.
A.4.2.2. Viewing The Taskbar
The taskbar displays all running applications, both minimized and displayed, on all desktops.
Figure A-7. Applications on the Taskbar
You can maximize running applications or bring them to the front of your working windows by clicking on the associated item on the taskbar.
Tip
Another way to bring minimized or background windows to the front is to use the [Alt] and [Tab] keys.
To pick an item from the taskbar, hold down both the [Alt]-[Tab] key. To scroll through the tasks, hold
down the [Alt] key, while tapping the [Tab] key. When you have found the task you want to maximize
and bring to the front, release both keys and the application appears on the desktop.
122
Appendix A. KDE: The K Desktop Environment
A.4.3. Adding Icons and Applets to the Panel
To further customize the panel for your particular needs, you can include additional launcher icons to
start applications without using the main menu or Start Here.
To add a new launcher to the panel, right-click the panel and choose Add => Application Button and
choose the application or resource you wish to add to the panel. This automatically adds an icon on the
panel. You can move the icon anywhere you want on the panel by right-clicking the icon and choosing
Move Application Button, where Application is the name of the application associated with
the icon.
A.4.4. Configuring the KDE Panel
You can hide the panel automatically or manually, place it on any edge of your desktop, change its
size and color, and change the way it behaves. To alter the default panel settings, right-click the panel
and choose Configure Panel. The Settings window appears, allowing you to adjust all panel settings,
or any one of the specific properties (Arrangement, Hiding, Menus, and so on). Choose the Hiding
tab, click Hide automatically, and adjust the number of seconds to elapse before the panel is hidden.
Click Apply then OK to close the Settings dialog. The panel remains hidden until you hover over the
panel area to make it reappear.
A.5. Managing Files
Konqueror is the file manager and a Web browser for the KDE desktop. Konqueror allows you to
configure your KDE desktop, configure your Red Hat Enterprise Linux system, play multimedia files,
browse digital images, surf the Web, and more from one interface. This section explains some of the
ways Konqueror can help you work with and enjoy your Red Hat Enterprise Linux system.
To start Konqueror for file management, click on your home directory icon
.
Konqueror opens up in a window on your desktop, allowing you to navigate through your home
directory and throughout your Red Hat Enterprise Linux file system. After exploring, you can return
to your home directory by clicking the Home button on the toolbar.
Figure A-8. The Konqueror File Manager
Appendix A. KDE: The K Desktop Environment
123
You can navigate through the file system by clicking on folders within the main window frame or
through the hierarchical file system viewer on the navigation panel as shown in Figure A-8. Files and
folders in the main window frame can be moved or copied to another folder or sent to the trash. You
can also delete files and folders by right-clicking on the item and choosing Delete.
Konqueror also displays thumbnail icons for text, images, PostScript/PDF files, and Web files. It can
also preview sounds from digital audio files.
A.5.1. The Navigation Panel
Another useful feature of Konqueror is the navigation panel. This panel appears on the left side of
the Konqueror file browser window by default. The navigation panel makes many of your sytem
resources available to you in convenient tabbed icons. Figure A-9 shows the navigation panel.
Figure A-9. Working with the Navigation Panel
The navigation panel lets you access your Web bookmarks, browsing history, network resources, file
system, and has a built-in media player for playing multimedia files without having to open a separate
application. The navigation panel makes Konqueror an efficient solution for users who want fast and
easy access to all of their files and information.
A.6. Browsing the Web with Konqueror
Konqueror not only allows you to browse your local and network file system, but with component
technology used throughout KDE, Konqueror is also a full featured Web browser, which you can use
to explore the World Wide Web.
To launch Konqueror choose Main Menu => Internet => More Internet Applications => Konqueror Web Browser.
124
Appendix A. KDE: The K Desktop Environment
Figure A-10. Welcome to Konqueror
To begin your Web session, enter a URL in the Location field. For example:
http://www.redhat.com
Press [Enter] to connect to the webpage. You can navigate the webpage using your mouse and keyboard. To scroll up and down a webpage, click the the scroll bar on the right side of the browser
window as you drag the mouse up and down. You can also press the arrow keys on your keyboard to
move up and down the webpage.
If you want to load any new content on the webpage, click the Refresh button on the toolbar or press
[F5], which reloads the page along with any new content available.
To stop a page from loading, click the Stop button on the toolbar or press [Esc].
To move back to a previously loaded webpage or move forward to a recently loaded page, click the
Back and Forward buttons or press [Alt] and the left or right arrow key to move backward or forward
one webpage, respectively.
Konqueror also allows you to load multiple pages within one browser window, alleviating the need
to have multiple browser windows open at the same time. Konqueror uses tabs to accomplish loading
multiple pages in one window. To open a link in a new tab, right-click the link and choose Open in
New Tab (or Open in Background Tab if you want to keep your current tab on top). The tabs appear
with the header of the webpage displayed for easy reference. Click the tab of the webpage you want
to display. To close a tab, right-click on the tab and choose Close Tab from the menu.
For additional information on using Konqueror, click on Help (on the top menu panel) and then on
Konqueror Handbook.
Appendix A. KDE: The K Desktop Environment
125
Figure A-11. The Konqueror Handbook
A.7. Using Konqueror to View Images
You can also use the Konqueror file manager to view images. If you chose KDE as your default desktop environment, click on your home directory desktop icon to access the Konqueror file manager:
.
Using Konqueror as an image browser works similarly to Nautilus (see Chapter 10 Working with
Images for more information). Image files automatically generate thumbnail image icons for you to
preview within the file browser window. When you double-click on a thumbnail icon, the browser
displays the image in its native size, as shown in Figure A-12.
Figure A-12. Viewing an Image in Konqueror
126
Appendix A. KDE: The K Desktop Environment
To zoom in and out of an image, you first need to change the way Konqueror renders the image.
From the window menu, choose View => View Mode => Image Viewer Part. This re-displays the
image and allow you to rotate and zoom in on the image using the two magnifying glass icons or the
magnification percentage drop-down menu on the toolbar, as shown in Figure A-13.
Figure A-13. Image viewing configuration on the Konqueror Toolbar
You can also open the image with more advanced image viewers, as well as with The GIMP. Rightclick on the image, choose Open With..., then Other.... A pop-up menu appears allowing you to open
the application you wish to use. To launch the GIMP, choose Graphics and scroll down the list of
applications. Click on the GIMP icon and click OK, as seen in Figure A-14.
Figure A-14. The Open With... Dialog Box
A.8. KMail
KMail is an email tool for KDE. It has an intuitive graphical interface similar to Evolution that allows
you to send and receive email using a graphical interface. To open KMail, click on the Main Menu
=> Internet => More Internet Applications => KMail.
Before you can really use KMail, you must configure it so it can send and receive mail. To run the
configuration tool, select Settings from the KMail toolbar, and click on Configure KMail.
The Configure Mail Client window consists of the following sections: Identities, Network, Appearance, Composer, Security, and Folders. To begin sending and receiving messages, you have
to change the settings in the Identities and Network tabs. Have your email information from your
service provider or administrator handy so that you can fill in the required information to begin using
KMail. For additional information, refer to the KMail user manual (Help => KMail Handbook) or
visit KMail’s homepage at http://kmail.kde.org.
Appendix A. KDE: The K Desktop Environment
127
Figure A-15. KMail Main Screen
Once you have your email settings configured, you can begin sending and receiving email. The folders
on the left side of the KMail screen allow you to view emails you have received, emails ready to be
sent, emails you have sent, and more.
To compose a mail, click on the new message icon in the tool bar:
Figure A-16. KMail New Email Message Screen
128
Appendix A. KDE: The K Desktop Environment
Once you have composed a message and entered an email address to send the email to, click Send in
the toolbar:
.
A.9. Customizing KDE
KDE allows you to configure the desktop and your system to suit your needs. The KDE Control
Center, available by selecting Main Menu => Control Center, lets you customize the look and
behavior of the desktop. The following list explains some of the configuration options in detail.
KDE Components
This section lets you configure the Konqueror file manager and customize certain file operations.
You can also associate files to applications that you prefer (for example, assigning all digital
music files to open in XMMS instead of the default player).
Appearance & Themes
This sections allows you to customize the visual aspect of your desktop environment. You can
customize background images and configure fonts, themes, icons, panel elements, screensavers,
and window border appearance. You can also customize mouse and keyboard events which makes
working with the desktop as efficient for your needs as possible.
Regional & Accessibility
This section allows you to set country and language options to your particular locale. For users
with sight or hearing impairments, you can also configure accessibility features such as audible
and visual cues and keyboard/mouse customization.
System Administration
This section is an advanced system configuration interface. You need your root password to
configure most of these options. This section allows you to install new fonts, configure login
management, set system paths, and more. It is strongly recommended that you leave these settings
at their default values unless you understand the consequences of changing them.
Web Browsing
This section allows you to configure the Konqueror Web browser. You can configure options
such as cache sizes, website cookies, plugins, proxy settings (if available), and enhanced browsing using keyword shortcuts.
A.10. Logging Out of KDE
There are two ways to log out of your KDE session. From the Main Menu, select Logout User,
where User is your account username. To log out from the desktop, right-click on the desktop and,
from the menu, select Logout User where User is your account username. In either case click
Logout and your session ends.
Figure A-17. KDE Logout Screen
Appendix B.
Getting Started with Gnu Privacy Guard
Have you ever wondered if your email can be read during its transmission from you to other people,
or from other people to you? Unfortunately, complete strangers could conceivably intercept or even
tamper with your email.
In traditional (also known as "snail") mail, letters are usually sealed within envelopes, stamped and
delivered from post office branch to branch until they reach their destination. But sending mail through
the Internet is much less secure; email is usually transmitted as unencrypted text from server to server.
No special steps are taken to protect your correspondence from being seen or tampered with by other
people.
To help you protect your privacy, Red Hat Enterprise Linux 3 includes GnuPG, the GNU Privacy
Guard, which is installed by default during a typical Red Hat Enterprise Linux installation. It is also
referred to as GPG.
GnuPG is a tool for secure communication; it is a complete and free replacement for the encryption
technology of PGP (Pretty Good Privacy, a widely popular encryption application). Using GnuPG, you
can encrypt your data and correspondence as well as authenticate your correspondence by digitally
signing your work. GnuPG is also capable of decrypting and verifying PGP 5.x.
Because GnuPG is compatible with other encryption standards, your secure correspondence is probably compatible with email applications on other operating systems, such as Windows and Macintosh.
GnuPG uses public key cryptography to provide users with a secure exchange of data. In a public
key cryptography scheme, you generate two keys: a public key and a private key. You exchange your
public key with correspondents or with a keyserver; you should never reveal your private key.
Encryption depends upon the use of keys. In conventional or symmetric cryptography, both ends of
the transaction have the same key, which they use to decode each other’s transmissions. In public key
cryptography, two keys co-exist: a public key and a private key. A person or an organization keeps
their private key a secret, and publishes their public key. Data encoded with the public key can only be
decoded with the private key; data encoded with the private key can only be decoded with the public
key.
Important
Remember that your public key can be given to anyone with whom you want to communicate securely,
but you must never give away your private key.
For the most part, cryptography is beyond the scope of this publication; volumes have been written
about the subject. In this chapter, however, we hope you gain enough understanding about GnuPG to
begin using cryptography in your own correspondence. If you want to learn more about GnuPG, PGP
and encryption technology, see Section B.8 Additional Resources.
B.1. Configuration File
The first time you run a GnuPG command, a .gnupg directory is created in your home directory.
Starting with version 1.2, the configuration filename has change from .gnupg/options to
.gnupg/gpg.conf. If .gnupg/gpg.conf is not found in your home directory, .gnupg/options
is used. If you only use version 1.2 or higher, it is recommended that you rename your configuration
file with the following command:
130
Appendix B. Getting Started with Gnu Privacy Guard
mv ~/.gnupg/options ~/.gnupg/gpg.conf
If you are upgrading from a version prior to 1.0.7, you can create signature caches in your keyring to
decrease the keyring access time. To perform this operation, execute the following command once:
gpg --rebuild-keydb-caches
B.2. Warning Messages
When executing GnuPG commands, you may see the following message:
gpg: Warning: using insecure memory!
This warning is because non-root users can not lock memory pages. If users could lock memory pages,
they could perform out-of-memory Denial of Service (DoS) attacks; thus, it is a possible security
problem. For details, refer to http://www.gnupg.org/(en)/documentation/faqs.html#q6.1.
You might also see the following message:
gpg: WARNING: unsafe permissions on configuration file "/home/username/.gnupg/gpg.conf"
This message is shown if the file permissions of your configuration file allows others to read it. If
you see this warning, it is recommended that you execute the following command to change the file
permissions:
chmod 600 ~/.gnupg/gpg.conf
Another common warning messages is as follows:
gpg: WARNING: unsafe enclosing directory permissions on configuration file
"/home/username/.gnupg/gpg.conf"
This message is shown if the file permissions of the directory that contains the configuration file allows
others to read its contents. If you see this warning, it is recommended that you execute the following
command to change the file permissions:
chmod 700 ~/.gnupg
If you upgraded from a previous version of GnuPG, you might see the message:
gpg: /home/username/.gnupg/gpg.conf:82: deprecated option "honor-http-proxy"
gpg: please use "keyserver-options honor-http-proxy" instead
This warning is because your ~/.gnupg/gpg.conf file contains the line:
honor-http-proxy
Version 1.0.7 and higher prefers a different syntax. Change the line to the following:
keyserver-options honor-http-proxy
B.3. Generating a Keypair
To begin using GnuPG, you must first generate a new keypair: a public key and a private key.
To generate a keypair, at a shell prompt, type the following command:
Appendix B. Getting Started with Gnu Privacy Guard
131
gpg --gen-key
Since you work with your user account most frequently, you should perform this action while logged
in to your user account (not as root).
You see an introductory screen, with key options, including one recommended option (the default),
similar to the following:
gpg (GnuPG) 1.2.1; Copyright (C) 2002 Free Software Foundation, Inc.
This program comes with ABSOLUTELY NO WARRANTY.
This is free software, and you are welcome to redistribute it
under certain conditions. See the file COPYING for details.
Please select what kind of key you want:
(1) DSA and ElGamal (default)
(2) DSA (sign only)
(5) RSA (sign only)
Your selection?
Most of the screens which require you to choose an option lists the default option, within parentheses.
You can accept the default options by pressing [Enter].
In the first screen, you should accept the default option: (1) DSA and ElGamal. This option allows
you to create a digital signature and encrypt (and decrypt) with two types of technologies. Type 1 and
then press [Enter].
Next, choose the key size, or how long the key should be. Generally, the longer the key, the more
resistant against attacks your messages are. The default size, 1024 bits, should be sufficiently strong
for most users, so press [Enter].
The next option asks you to specify how long you want your key to be valid. Usually, the default (0
= key does not expire) is fine. If you do choose an expiration date, remember that anyone with
whom you exchanged your public key also have to be informed of its expiration and supplied with a
new public key. If you do not choose an expiration date, then you are asked to confirm your decision.
Press [y] to confirm your decision.
Your next task is to provide a user ID that consists of your name, your email address, and an optional
comment. When you are finished, you are presented with a summary of the information you entered.
Once you accept your choices, you must enter a passphrase.
Tip
Like your account passwords, a good passphrase is essential for optimal security in GnuPG. For
example, mix your passphrase with uppercase and lowercase letters, use numbers, or punctuation
marks.
Once you enter and verify your passphrase, your keys are generated, and a message similar to the
following is displayed:
We need to generate a lot of random bytes. It is a good idea to perform
some other action (type on the keyboard, move the mouse, utilize the
disks) during the prime generation; this gives the random number
generator a better chance to gain enough entropy.
+++++.+++++.++++++++....++++++++++..+++++.+++++.+++++++.+++++++
+++.++++++++++++++++++++++++++++++++++++++..........................++++
132
Appendix B. Getting Started with Gnu Privacy Guard
When the activity on the screen ceases, your new keys are made and placed in the directory .gnupg
in your home directory. To list your keys, use the command:
gpg --list-keys
You will see something similar to the following:
/home/username/.gnupg/pubring.gpg
----------------------------------------pub 1024D/B7085C8A 2000-06-18 Your Name [email protected]
sub 1024g/E12AF9C4 2000-06-18
If you created a GnuPG key with version 1.0.6 or lower, exported your private key, and imported it
into a new one, you have to explicitly trust your own key to sign items with version 1.0.7 or higher.
To trust your key, type the following command (replace user-id ):
gpg --edit-key
#
user-id
!
$
"
At the Command> prompt type trust and select 5 = I trust ultimately to trust your own key.
B.4. Generating a Revocation Certificate
Once you have created your keypair, you should create a revocation certificate for your public key. If
you forget your passphrase, or if it has been compromised, you can publish this certificate to inform
users that your public key should no longer be used.
Note
When you generate a revocation certificate, you are not revoking the key you just created. Instead,
you are giving yourself a safe way to revoke your key from public use in case you forget your
passphrase, switch ISPs (addresses), or suffer a hard drive crash. The revocation certificate can
then be used to disqualify your public key.
Your signature is valid to others who read your correspondence before your key is revoked, and you
are able to decrypt messages received prior to its revocation. To generate a revocation certificate, use
the --gen-revoke option:
gpg --output revoke.asc --gen-revoke
[email protected]
Note that if you omit the --output revoke.asc option from the above, your revocation certificate
is returned to the standard output, which is your monitor screen. While you can copy and paste the
contents of the output into a file of your choice using a text editor, it is probably easier to send the
output to a file in your login directory. That way, you can keep the certificate for use later, or move it
to a diskette and store it someplace safe.
The output looks similar to the following:
sec
1024D/823D25A9 2000-04-26
Your Name
#
[email protected]
$
Create a revocation certificate for this key?
Press [Y] to create a revocation certificate for the listed key. Next, you are asked to select the reason
for revocation and provide an optional description. After confirming the reason, enter the passphrase
you used to generate the key.
Appendix B. Getting Started with Gnu Privacy Guard
133
Once your revocation certificate has been created (revoke.asc), it is located in your login directory.
You should copy the certificate to a diskette and store it in a secure place. (If you do not know how to
copy a file to a diskette in Red Hat Enterprise Linux, see the Red Hat Enterprise Linux Step By Step
Guide.)
B.5. Exporting your Public Key
Before you can use public key cryptography, other people must have a copy of your public key. To
send your key to correspondents or to a keyserver, you must export the key.
To export your key, so you can display it on a webpage or paste it in email, type the following command:
gpg --armor --export [email protected]
%
mykey.asc
You do not see any output, because not only did you export your public key, you redirected the output
to a file called, for example, mykey.asc. (Without the addition of
mykey.asc, the key would
have been displayed as the standard output on the monitor screen.)
%
Now, the file mykey.asc can be inserted into email or exported to a keyserver. To see the key, type
less mykey.asc to open the file in a pager (type [q] to quit the pager). It should look like the
following:
-----BEGIN PGP PUBLIC KEY BLOCK----Version: GnuPG v1.2.1 (GNU/Linux)
Comment: For info see http://www.gnupg.org
mQGiBDkHP3URBACkWGsYh43pkXU9wj/X1G67K8/DSrl85r7dNtHNfLL/ewil10k2
q8saWJn26QZPsDVqdUJMOdHfJ6kQTAt9NzQbgcVrxLYNfgeBsvkHF/POtnYcZRgL
tZ6syBBWs8JB4xt5V09iJSGAMPUQE8Jpdn2aRXPApdoDw179LM8Rq6r+gwCg5ZZa
pGNlkgFu24WM5wC1zg4QTbMD/3MJCSxfL99Ek5HXcB3yhj+o0LmIrGAVBgoWdrRd
BIGjQQFhV1NSwC8YhN/4nGHWpaTxgEtnb4CI1wI/G3DK9olYMyRJinkGJ6XYfP3b
cCQmqATDF5ugIAmdditnw7deXqn/eavaMxRXJM/RQSgJJyVpbAO2OqKe6L6Inb5H
kjcZA/9obTm499dDMRQ/CNR92fA5pr0zriy/ziLUow+cqI59nt+bEb9nY1mfmUN6
SW0jCH+pIQH5lerV+EookyOyq3ocUdjeRYF/d2jl9xmeSyL2H3tDvnuE6vgqFU/N
sdvby4B2Iku7S/h06W6GPQAe+pzdyX9vS+Pnf8osu7W3j60WprQkUGF1bCBHYWxs
YWdoZXIgPHBhdWxnYWxsQHJlZGhhdC5jb20+iFYEExECABYFAjkHP3UECwoEAwMV
AwIDFgIBAheAAAoJEJECmvGCPSWpMjQAoNF2zvRgdR/8or9pBhu95zeSnkb7AKCm
/uXVS0a5KoN7J61/1vEwx11poLkBDQQ5Bz+MEAQA8ztcWRJjW8cHCgLaE402jyqQ
37gDT/n4VS66nU+YItzDFScVmgMuFRzhibLblfO9TpZzxEbSF3T6p9hLLnHCQ1bD
HRsKfh0eJYMMqB3+HyUpNeqCMEEd9AnWD9P4rQtO7Pes38sV0lX0OSvsTyMG9wEB
vSNZk+Rl+phA55r1s8cAAwUEAJjqazvk0bgFrw1OPG9m7fEeDlvPSV6HSA0fvz4w
c7ckfpuxg/URQNf3TJA00Acprk8Gg8J2CtebAyR/sP5IsrK5l1luGdk+l0M85FpT
/cen2OdJtToAF/6fGnIkeCeP1O5aWTbDgdAUHBRykpdWU3GJ7NS6923fVg5khQWg
uwrAiEYEGBECAAYFAjkHP4wACgkQkQKa8YI9JamliwCfXox/HjlorMKnQRJkeBcZ
iLyPH1QAoI33Ft/0HBqLtqdtP4vWYQRbibjW
=BMEc
-----END PGP PUBLIC KEY BLOCK-----
B.5.1. Exporting to a Keyserver
If you are only writing to a few correspondents, you can export your public key and send it to them
personally. If you correspond with many people, however, distribution of your key can be time consuming. Instead, you can use a keyserver.
A keyserver is a repository on the Internet which can store and distribute your public key to anyone
who requests it. Many keyservers are available, and most try to remain synchronized with each other;
134
Appendix B. Getting Started with Gnu Privacy Guard
sending your key to one keyserver is like distributing it to them all. A correspondent can request your
public key from a from a keyserver, import that key to their keyring, and they are ready for secure
correspondence with you.
Tip
Because most keyservers are synchronized, sending your public key to one keyserver is usually as
good as sending it to them all. You can, however, locate different keyservers. One place to begin your
search for keyservers and more information is Keyserver.Net available at http://www.keyserver.net.
You can send your public key from either the shell prompt or from a browser; of course, you must be
online to send or receive keys from a keyserver.
•
From the shell prompt, type the following:
•
From your browser, go to Keyserver.Net (http://www.keyserver.net) and select the option to add
your own PGP public key.
gpg --keyserver search.keyserver.net --send-key [email protected]
Your next task is to copy and paste your public key into the appropriate area on the webpage. If you
need instructions on how to do that, use the following:
•
Open your exported public key file (such as mykey.asc, which was created in Section B.5
Exporting your Public Key) with a pager — for example, use the less mykey.asc command.
•
Using your mouse, copy the file by highlighting all the lines from the BEGIN PGP to END PGP
notations (see Figure B-1).
•
Paste the contents of the file mykey.asc into the appropriate area of the page on Keyserver.Net
by middle-clicking with your mouse (or left- and right-clicking if you are using a two-button
mouse). Then select the Submit button on the keyserver page. (If you make a mistake, press the
Reset button on the page to clear your pasted key.)
Appendix B. Getting Started with Gnu Privacy Guard
135
Figure B-1. Copying Your Public Key
Note that if you are submitting your key to another Web-based keyserver, the above transaction is
essentially the same.
That is all you need to do. Regardless of whether you use the shell prompt or the Web, you see a
message that your key was successfully submitted — either at the shell prompt or at the keyserver’s
website. From now on, users who want to communicate securely with you can import your public key
and add it to their keyring.
B.6. Importing a Public Key
The other end of key exchange is importing other people’s public keys to your keyring — is just as
simple as exporting keys. When you import someone’s public key, you can decrypt their email and
check their digital signature against their public key on your keyring.
One of the easiest ways to import a key is to download the key or save it from a website.
After downloading a key and saving it to the file key.asc, use the following command to add it to
your keyring.
gpg --import key.asc
Another way to save a key is to use a browser’s Save As feature. If you are using a browser such
as Mozilla, and you locate a key at a keyserver, you can save the page as a text file (go to File =>
Save Page As). In the drop-down box next to Files of Type, choose Text Files (*.txt). Then, you can
import the key — but remember the name of the file you saved. For example, if you saved a key as a
text file called newkey.txt, to import the file, at a shell prompt, type the following command:
gpg --import newkey.txt
The output looks similar to the following:
136
Appendix B. Getting Started with Gnu Privacy Guard
gpg: key F78FFE84: public key imported
gpg: Total number processed: 1
gpg:
imported: 1
To check that the process was successful, use the gpg --list-keys command; you should see your
newly imported key listed on your keyring.
When you import a public key, you add that key to your keyring (a file in which public and secret keys
are kept). Then, when you download a document or file from that entity, you can check the validity of
that document against the key you added to your keyring.
B.7. What Are Digital Signatures?
Digital signatures can be compared to your written signature. Unlike traditional correspondence, in
which it might be possible to tamper with your written signature, digital signatures can not be forged.
That is because the signature is created with your unique secret key and can be verified by your
recipient using your public key.
A digital signature timestamps a document; essentially, that means that the time you signed the document is part of that signature. So if anyone tries to modify the document, the verification of the
signature fails. Some email applications, such as Exmh or KDE’s KMail, include the ability to sign
documents with GnuPG within the application’s interface.
Two useful types of digital signatures are clearsigned documents and detached signatures. Both types
of signatures incorporate the same security of authenticity, without requiring your recipient to decrypt
your entire message.
In a clearsigned message, your signature appears as a text block within the context of your letter; a
detached signature is sent as a separate file with your correspondence.
B.8. Additional Resources
There is more to encryption technology than can be covered in one slim introduction to GnuPG. Here
are some resources where you can learn more.
B.8.1. Installed Documentation
• man gpg
and info gpg — Quick Reference of GnuPG commands and options.
B.8.2. Useful Websites
•
http://www.gnupg.org — The GnuPG website with links to the latest GnuPG releases, a comprehensive user’s guide, and other cryptography resources.
•
http://hotwired.lycos.com/webmonkey/backend/security/tutorials/tutorial1.html — Visit the
Encryption Tutorial from Webmonkey to learn more about encryption and how to apply
encryption techniques.
•
http://www.eff.org/pub/Privacy — The Electronic Frontier Foundation, "Privacy, Security, Crypto,
& Surveillance" Archive.
Appendix B. Getting Started with Gnu Privacy Guard
137
B.8.3. Related Books
•
The Official PGP User’s Guide by Philip R. Zimmerman; MIT Press
•
PGP: Pretty Good Privacy by Simson Garfinkel; O’Reilly & Associates, Inc.
•
E-Mail Security: How to Keep Your Electronic Messages Private by Bruce Schneier; John Wiley &
Sons
138
Appendix B. Getting Started with Gnu Privacy Guard
Appendix C.
Applications
The following table shows some of the Red Hat Linux applications that are available to perform
many common tasks. This is not a complete list of all applications available. Applications in between
(parentheses) denotes the formal name of the application.
Category
Recommended
Application
Word Processors
OpenOffice.org Writer
Spreadsheets
OpenOffice.org Calc
Presentations
OpenOffice.org Impress
Charts and
Diagrams
Dia
Kchart, Kivio, XFig
Graphics
The GIMP
Icon Editor (K Icon Editor)
Image Viewers
Nautilus
Eye of Gnome
Digital Cameras/Scanners
Digital Camera Tool
(gtKam), Scanning
(XSane)
Scan and OCR Program (Kooka), The GIMP
PDAs
Jpilot
Evolution
CD Recording
CD Creator, cdrecord
Text Editors
Text Editor (gedit)
nano, vi
Email Clients
Evolution
Mozilla Mail, mutt
Web Browsers
Mozilla
Konquerer links
Chat/Instant
Messaging
Messaging Client (GAIM)
IRC Client (X-Chat), KSirc
PDF/PostScript
Viewers
xpdf
GNOME Ghostviewer
Project
Management
Project Management
(MrProject)
Fax
Fax Viewer (KFax)
Sound
Audio Player (XMMS),
Kaboodle, aumix, KDE Sound Mixer, KMid
CD Player (GNOME CD),
Sound Recorder
(GNOME Sound),Volume
Control (GNOME Volume
Control)
Table C-1. Applications
Extras
140
Appendix C. Applications
Appendix D.
A Comparison of Common DOS and Linux
Commands
Many Linux commands typed at a shell prompt are similar to the commands you would type in DOS.
In fact, some commands are identical.
This appendix provides common commands used at the DOS prompt in Windows and their counterparts in Linux. Basic examples of how the command are used at the Linux shell prompt are also
provided. Note that these commands usually have a number of options. To learn more about each
command, read its associated man page (for example, type man ls at the shell prompt to read about
the ls command).
Command’s
Purpose
MS-DOS
Linux
Basic Linux Example
Copies files
copy
cp
cp thisfile.txt /home/thisdirectory
Moves files
move
mv
mv thisfile.txt /home/thisdirectory
Lists files
dir
ls
ls
Clears screen
cls
clear
clear
Closes shell
prompt
exit
exit
exit
Displays or sets
date
date
date
date
Deletes files
del
rm
rm thisfile.txt
"Echoes" output to
the screen
echo
echo
echo this message
Edits text files
edit
gedit(a)
gedit thisfile.txt
Compares the
contents of files
fc
diff
diff file1 file2
Finds a string of
text in a file
find
grep
grep word or phrase thisfile.txt
Formats a diskette
format a:
mke2fs
/sbin/mke2fs /dev/fd0 (/dev/fd0 is the
Linux equivalent of A:)
Displays command
help
command
/?
man or
info
man command
Creates a directory
mkdir
(if diskette
is in A:)
mkdir
mkdir directory
Views contents of a more
file
less(b)
less thisfile.txt
Renames a file
mv(c)
mv thisfile.txt thatfile.txt
ren
142
Appendix D. A Comparison of Common DOS and Linux Commands
Command’s
Purpose
MS-DOS
Linux
Basic Linux Example
Displays your
location in the file
system
chdir
pwd
pwd
Changes directories cd
with a specified
pathname
path (absolute
path)
cd
pathname
cd /directory/directory
Changes directories cd..
with a relative path
cd ..
cd ..
Displays the time
time
date
date
Shows amount of
RAM in use
mem
free
free
Notes:
a. Gedit is a graphical text editor; other editors you can use in place of Gedit include nano and
vi.
b. The more pager can also be used to page through a file one screen at a time.
c. The mv command can both move a file and, if you want to rename a file in the same directory,
"move" that file to the same directory with a new name.
Table D-1. Similar Commands
Appendix E.
System Directories
This is a list of the primary Red Hat Enterprise Linux system directories. Each directory is described
briefly. For additional directory information, refer to the Red Hat Enterprise Linux System Administration Guide and the Red Hat Enterprise Linux Reference Guide.
• /bin/
— Used to store user commands. The directory /usr/bin/ also stores user commands.
— Location of many system commands, such as shutdown. The directory /usr/sbin/
also contains many system commands.
• /sbin/
• /root/
— The home directory of root, the superuser.
— This directory is used for automatically mounting directories on removeable devices
(such as Zip drives) and remote directories (such as NFS shares) using autofs. Refer to the autofs
manual page (type man autofs at a shell prompt) for more information.
• /misc/
— This directory typically contains the mount points for file systems mounted after the
system is booted. For example, the default CD-ROM mount point is /mnt/cdrom/.
• /mnt/
• /boot/
— Contains the kernel and other files used during system startup.
• /lost+found/ —
Used by fsck to place orphaned files (files without names).
• /lib/ — Contains
many device modules and library files used by programs in /bin/ and /sbin/.
The directory /usr/lib/ contains library files for user applications.
• /dev/
— Stores device files.
• /etc/
— Contains configuration files and directories.
• /var/
— For variable (or constantly changing) files, such as log files and the printer spool.
— Contains files and directories directly relating to users of the system, such as programs
and supporting library files.
• /usr/
— A virtual file system (not actually stored on the disk) that contains system information
used by certain programs.
• /proc/
• /initrd/ — A directory
modules during bootup.
that is used to mount the initrd.img image file and load needed device
Warning
Do not delete the /initrd/ directory. You will be unable to boot your computer if you delete the
directory and then reboot your Red Hat Enterprise Linux system.
• /tftpboot/ — Contains
files and applications needed for Preboot Execution Environment (PXE),
a service that allows client machines and machines without hard drives to boot an operating system
from an image on a central PXE server.
• /tmp/ — The temporary
and write access.
• /home/
directory for users and programs. /tmp/ allows all users on a system read
— Default location of user home directories.
— Directory where optional files and programs are stored. This directory is used mainly by
third-party developers for easy installation and uninstallation of their software packages.
• /opt/
144
Appendix E. System Directories
Appendix F.
Keyboard Shortcuts
Here are a few keyboard shortcuts you can use to perform common tasks quickly. Many more are
available in addition to what is listed here. For more command line and keyboard shortcuts, visit:
http://sunsite.dk/linux-newbie/lnag_commands.html#shortcuts
•
[Ctrl] + [Alt] + [Backspace] = kills your current X session. Kills your graphical desktop session
and returns you to the login screen. Use this if the normal exit procedure does not work.
•
[Ctrl] + [Alt] + [Delete] = shutdown and reboots your Red Hat Enterprise Linux system at a nongraphical shell prompt. Use only when the normal shutdown procedure does not work. In a graphical desktop session, this shortcut displays the desktop logout screen that allows you to logout,
reboot, or shut down your system.
•
[Ctrl] + [Alt] + [Fn] = switches screens. [Ctrl]+[Alt] + one of the function keys displays an available
screen. By default, [F1] through [F6] are text-mode shell prompt screens and [F7] is the graphical
desktop screen.
•
[Alt] + [Tab] = switches tasks in a graphical desktop environment. If you have more than one
application open at a time, you can use [Alt] + [Tab] to switch among open tasks and applications.
•
[Ctrl] + [a] = moves cursor to the beginning of a line. This works in most text editors and in the
URL field in Mozilla.
•
[Ctrl] + [d] = logout of (and close) shell prompt. Use this quick shortcut instead of typing exit or
logout.
•
[Ctrl] + [e] = moves cursor to end of a line. This works in most text editors and in the URL field in
Mozilla.
•
[Ctrl] + [l] = clears the terminal. This shortcut does the same thing as typing clear at a command
line.
•
[Ctrl] + [u] = clears the current line. If you are working in a terminal, use this shortcut to clear the
current line from the cursor all the way to the beginning of the line.
•
[Middle Mouse Button] = pastes highlighted text. Use the left mouse button to highlight the text.
Point the cursor to the spot where you want it pasted. Click the middle mouse button to paste it. In
a system with a two-button mouse, if you configured your mouse to emulate a third mouse button,
you can click both the left and right mouse buttons simultaneously to perform a paste.
•
[Tab] = command autocomplete. Use this command when using a shell prompt. Type the first few
characters of a command or filename and then press the [Tab] key. It will automatically complete
the command or show all commands that match the characters you typed.
•
[Up] and [Down] Arrow = shows command history. When using a shell prompt, press the [up] or
[down] arrow to scroll through a history of commands you have typed from the current directory.
When you see the command you want to use, press [Enter].
146
Appendix F. Keyboard Shortcuts
Index
A
accounts
creating, 9
appending standard output, 34
applets
adding to KDE panel, 122
adding to the panel, 18
on the desktop panel, 16
panel
in KDE, 119
applications
and Red Hat Enterprise Linux, 139
starting from shell prompt, 107
archiving files, 50
B
bunzip2, 52
burning CDs, 100
additional resources, 104
with CD Creator, 101
with cdrecord, 102
with mkisofs, 102
bzip2, 52
C
cat, 32
cd, 26
CD-rewritable (CD-RW), 100
additional resources, 104
and CD Creator, 101
and cdrecord, 102
and mkisofs, 102
CD-writable (CD-R), 100
additional resources, 104
and CD Creator, 101
and cdrecord, 102
and mkisofs, 102
cdrecord, 103
CDs, playing, 83
chmod, 41
numerical settings, 45
clear, 31
command history, 39
tips, 111
commands
(See shell prompt)
cat, 37
cat, using, 32
cd, 26
change directories, 26
chmod, 41
numerical settings, 45
clear, 31
cron, 31
DOS, 141
finding, 110
grep, 37
head, 37
history, 110
locate, 30
ls, 29
keeping output from scrolling, 111
ls -a, 29
ls -al, 29
ls, common options with, 30
multiple, 40
print working directory (pwd), 26
pwd, 26
reset, 31
rm
(See files, deleting)
rm -r
(See directories, deleting)
stringing together, 40
su -, 28
tail, 37
common user questions, 107
compressing files, 50
conventions
document, ii
copying and pasting text
when using X, v
creating graphics
with OpenOffice.org Draw, 79
creating user accounts, 9
D
decryption
with GnuPG, 129
desktop
(See graphical desktop)
applets, 16
background
changing, 20
KDE, 117
desktops
multiple
KDE, 120
devices
digital cameras, 89
gtKam, 89
digital cameras, 89
gtKam, 89
148
directories
changing, 26
copying, 56
deleting, 57
descriptions, 143
listing contents, 29
managing
from shell prompt, 25
moving, 57
diskettes, 97
formatting, 98
mke2fs, 99
mounting, 97
unmounting, 97
using, 97
documents, 73
OpenOffice.org, 73
OpenOffice.org Writer, 74
PDF, 81
text files, 79
dot files
(See hidden files)
drag and drop, v
drawing
OpenOffice.org Draw, 79
feedback
contact information for this manual, v
FHS
(See Filesystem Hierarchy Standard)
file, 49
file manager
for KDE, 122
Nautilus, 19
file managers, 47
File Roller, 50
file system
understanding, 47
file types, 48
files
archived, 48
archiving, 50
with File Roller, 50
compressed, 48
E
email clients, 65
Evolution, 66
KMail, 126
Mozilla Mail, 68
Newsgroups, 70
mutt, 71
plain text, 71
mutt, 71
encryption
with GnuPG, 129
environment variables
PATH, 108
Evolution
(See email clients)
ext2 file system
and floppy disks, 98
F
FAQ, 107
accessing a Windows partition, 109
finding previous used commands, 110
history tips and tricks, 111
keeping ls output from scrolling, 111
login problems, 112
permissions for installing RPMs, 107
starting applications, 107
compressing, 50
with File Roller, 50
copying, 56
copying at a shell prompt, 55
creating
touch, 55
deleting, 57
deleting at a shell prompt, 55
formats, 48
managing
from shell prompt, 25
moving, 57
moving at a shell prompt, 55
renaming at a shell prompt, 55
types of, 48
Filesystem Hierarchy Standard, 48
floppy disks
(See diskettes)
formatting diskettes, 98
149
G
I
games and amusements, 87
finding more online, 87
getting started
logging in, 6
Setup Agent, 1
GIMP, 92
opening a file, 93
saving a file, 93
GNOME desktop
(See graphical desktop)
Gnu Privacy Guard
(See GnuPG)
GnuPG
additional resources, 136
digital signatures, 136
exporting public key, 133
to keyserver, 133
generating a keypair, 130
generating a revocation certificate, 132
importing a public key, 135
insecure memory warning, 130
introduction, 129, 129
warning messages, 130
GPG
(See GnuPG)
graphical desktop, 15
applets, 18
background
changing, 20
customizing, 20
logging out of, 22
main menu, 16
Nautilus, 19
panel, 16
Start Here , 19
using, 15
workspace, 15
graphical login
changing to, 112
graphics
GIMP, 92
gtKam, 89
gunzip, 52
gzip, 52
images
H
Hardware Browser, 109
help
with KDE
finding, 117
hidden files, 29
history
finding commands using, 110
additional resources, 95
manipulation, 91
GIMP, 92
viewing, 91, 91
Konqueror, 125
Nautilus, 91
introduction, i
K
KDE, 117
applets
adding, 122
multiple desktops, 120
customizing, 128
desktop, 117
desktop icons, 118
desktops
multiple, 120
switching, 121
documentation, 117
Konqueror
navigation panel, 123
main menu, 119
panel, 118
applets, 119
switching tasks, 121
Taskbar, 121
website, 117
keyboard shortcuts, 145
Web browser, 63
KMail
(See email clients)
Konqueror
(See Web browsers)
KDE file manager, 122
navigation panel, 123
viewing images with, 125
150
L
O
less, 36
linux commands
(See shell prompt)
listing directories
(See commands, ls)
log in, 6
logging in, 6
graphical, 112
graphical login, 8
virtual console login, 7
logging out, 12
from the desktop, 22
KDE, 128
login problems
using single-user mode, 112
ls, 29
printing output, 111
viewing output, 111
O’Reilly & Associates, Inc., 137
OpenOffice.org, 73
Draw, 79
features, 73
Impress, 77
Writer, 74, 75
ownership and permissions, 41
M
main menu
in KDE, 119
on the desktop, 16
mke2fs, 99
mkisofs, 102
mouse
how to use, v
Mozilla
(See Web browsers)
Mozilla Mail
(See email clients)
music
Ogg Vorbis, 84
Wave, 84
XMMS, 84
using, 84
mutt
(See email clients)
N
Nautilus, 19
disabling text icons, 19
disabling thumbnails, 19
viewing images with, 91
new users
creating accounts, 9
Newsgroups
(See email clients)
P
pagers, 36
less, 36
panel
configuring, 18
configuring the, 122
KDE, 118
adding applications, 119
customizing, 119
hiding, 119
on the graphical desktop, 16
partitions
accessing Windows, 109
password
forgotten, 112
passwords
secure, 10
PATH, 108
editing, 107
pathnames
relative and absolute, 26
PDF
viewing, 81
xpdf, 81
peripherals
digital cameras, 89
gtKam, 89
permissions
numerical settings, 45
setting for new RPMs, 107
permissions and ownership, 41
pipes, 36
plain text
(See text files)
presentations
OpenOffice.org Impress, 77
pwd, 26
151
R
redirecting standard input, 35
redirection, 32
reset, 31
root, 47
and root login, 47
logging in as, 6
RPMs
error message while installing, 107
S
Setup Agent, 1
shell, 25
history of, 25
shell prompt, 8
basic commands, 25
chmod, 42
single-user mode, 112
sound card
configuring, 85
Sound Card Configuration Tool, 85
spreadsheets
OpenOffice.org Calc, 75
standard input
redirecting, 35
standard output
appending, 34
redirecting, 32
Start Here, 19
changing desktop background with, 20
startx, 8
su -, 28
superuser
(See commands, su -)
switching desktops
KDE, 121
switching tasks
KDE, 121
system directories
descriptions, 143
T
tab completion, 39
Taskbar
KDE, 121
terminal
(See shell prompt)
terms
introductory, 4
text files, 79
editing, 79
from a shell prompt, 81
The Graphical Desktop, 8
Trash icon
KDE, 118
troubleshooting
sound card, 85
video card, 86
U
unzip, 52
user account
creating, 9
importance of, 7
utilities
cat, 32
less, 36
V
vi , 81
W
wallpaper
changing, 20
Web browsers, 61
Konqueror, 123
Mozilla, 61
using, 61
Windows
accessing on a separate partition
add line to /etc/fstab, 109
World Wide Web
browsers, 61
Mozilla, 61
X
X Configuration Tool, 86
xpdf, 81
Colophon
The manuals are written in DocBook SGML v4.1 format. The HTML and PDF formats are produced
using custom DSSSL stylesheets and custom jade wrapper scripts. The DocBook SGML files are
written in Emacs with the help of PSGML mode.
Garrett LeSage created the admonition graphics (note, tip, important, caution, and warning). They
may be freely redistributed with the Red Hat documentation.
The Red Hat Product Documentation Team consists of the following people:
Sandra A. Moore — Primary Writer/Maintainer of the Red Hat Enterprise Linux Installation Guide
for the x86, Itanium™, and AMD64 Architectures; Primary Writer/Maintainer of the Red Hat Enterprise Linux Installation Guide for the IBM® eServer™ iSeries™ and IBM® eServer™ pSeries™
Architectures; Contributing Writer to the Red Hat Enterprise Linux Step By Step Guide
Tammy Fox — Primary Writer/Maintainer of the Red Hat Enterprise Linux System Administration
Guide; Contributing Writer to the Red Hat Enterprise Linux Installation Guide for the x86, Itanium™,
and AMD64 Architectures; Contributing Writer to the Red Hat Enterprise Linux Security Guide; Contributing Writer to the Red Hat Enterprise Linux Step By Step Guide; Writer/Maintainer of custom
DocBook stylesheets and scripts
Edward C. Bailey — Primary Writer/Maintainer of the Red Hat Enterprise Linux Introduction to
System Administration; Primary Writer/Maintainer of the Release Notes; Contributing Writer to the
Red Hat Enterprise Linux Installation Guide for the x86, Itanium™, and AMD64 Architectures
Johnray Fuller — Primary Writer/Maintainer of the Red Hat Enterprise Linux Reference Guide; Cowriter/Co-maintainer of the Red Hat Enterprise Linux Security Guide; Contributing Writer to the Red
Hat Enterprise Linux Introduction to System Administration
John Ha — Primary Writer/Maintainer of the Red Hat Cluster Suite Configuring and Managing a
Cluster; Primary Writer/Maintainer of the Red Hat Glossary; Primary Writer/Maintainer of the Red
Hat Enterprise Linux Installation Guide for the IBM® S/390® and IBM® eServer™ zSeries® Architectures; Co-writer/Co-maintainer of the Red Hat Enterprise Linux Security Guide; Contributing
Writer to the Red Hat Enterprise Linux Introduction to System Administration; Contributing Writer to
the Red Hat Enterprise Linux Step By Step Guide
The Red Hat Localization Team consists of the following people:
Jean-Paul Aubry — French translations
David Barzilay — Brazilian Portuguese translations
Bernd Groh — German translations
James Hashida — Japanese translations
Michelle Ji-yeen Kim — Korean translations
Yelitza Louze — Spanish translations
Noriko Mizumoto — Japanese translations
Nadine Richter — German translations
Audrey Simons — French translations
Francesco Valente — Italian translations
Sarah Saiying Wang — Simplified Chinese translations
Ben Hung-Pin Wu — Traditional Chinese translations
154