1
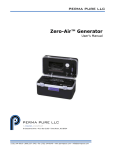
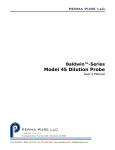
PRINCIPLE OF OPERATION
AS™-Series Ammonia Scrubbers remove ammonia from a gas stream to protect analyzers and
sample lines from clogging due to the formation of
ammonium salts.
Ammonia reacts with phosphoric acid, forming
ammonium phosphate. This relatively high melting
point salt immediately deposits inside the ammonia scrubber, removing it from the gas stream.
The reaction is quite selective, and does not affect
the concentrations of other gases in the steam.
AS™- Series
Ammonia Scrubber
User Manual
Figure 1 - Flow Schematic
Phosphoric acid is very hygroscopic so it will draw
water from the gas stream, creating some liquid
phosphoric acid solution in the bottom of the
scrubber. To avoid excess liquid formation, the
scrubber should be heated, either by installation in
a heated enclosure or by using a heated scrubber.
The AS-Series proprietary scrubber media has
been formulated for continuous operation. Its life
expectancy is dependent upon the sample flow
rate and ammonia concentration in the gas
stream. It is very selective in its reactions with the
gas, removing only ammonia. It is also a very safe,
stable chemical to handle and store.
AS™ is a trademark of Perma Pure LLC.
Bulletin# 250
PERMA PURE
8 Executive Drive
Toms River, N.J. 08755
Phone: 800-337-3762
732-244-0010
Fax: 732-244-8140
e-mail: [email protected]
Web Site: www.permapure.com
AMMONIA SCRUBBER SPECIFICATIONS
Polysulfone
Pressure
30 psig
Temperature 120°C
Port Size
1/4 " NPT
Stainless Steel
100 psig
200°C*
1/4" NPT
* When thumbscrew is replaced with SST Hex Bolt.
Be sure to connect sample inlet to port marked “IN” on
the scrubber housing.
PERFORMANCE
The Ammonia Scrubber performance varies
depending on the concentration of ammonia and
flowrate of the gas sample. At a flowrate of 1 lpm
and 1ppm of ammonia, media should last 40,000
hours.
REPLACING SCRUBBING MEDIA
When deposits are visible 75% of the way up the
housing, the scrubbing media needs to be replaced
(see Figure 2).
1. Unscrew thumbscrew on bottom of housing.
2. Swing yoke to one side.
3. Separate housing and bottom cap as an assembly
from top cap.
4. Remove spring.
5. Remove old media and dispose of properly (housing may be rinsed with soapy water to clean).
6. Fill housing with 150cc of Berl Saddles (tap housing to allow material to settle).
7. Pour 50cc of Scrubbing Media.
8. Replace stainless steel screen on top of media.
9. Replace spring.
10. Clean o-rings on shell and inside top
manifold (replace if necessary).
11. Place center tube into o-ring seal in top cap.
12. Push and twist to seal housing around o-ring.
13. Replace yoke and tighten thumbscrew finger tight (do not overtighten).
Warning!
BURL SADDLES
& MEDIA
YOKE
HEATER JACKET SETUP
Shoulder Screw
Jacket
Yoke
Thumbscrew
Figure 2
Power Supply Connection for Heater Jacket
1. Connect 120/240VAC power supply to wires on
scrubber (note: white wire must be capped with
wire nut since voltage is present when heater is
energized in 240VAC operation).
2. Allow heater jacket to run for 15-20 minutes
before starting sample flow (heater is equipped
with thermocouple and thermostat to regulate
heater).
DO NOT overtighten the thumbscrew.
Doing so may cause the housing to
crack.
REPLACEMENT PARTS
THUMB SCREW
Figure 2
Part Number
AS-200-08-PSH
AS-200-08-SSH
AS-200-3
AS-200-08-EB
Description
Stainless steel top & bottom with polysulfone shell
Stainless steel top & bottom with stainless steel shell
O-ring replacement set
1 burl saddles and media
15 filling replacement