1
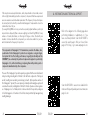
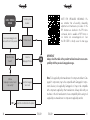
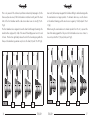
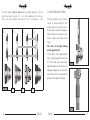
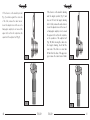
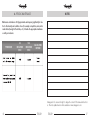
FRONT
DERAILLEUR
USER'S MANUAL
1 - GENERAL NOTES AND COMPATIBILITY
CONTENTS
1
GENERAL NOTES AND COMPATIBILITY
27
2
INFORMATION AND TECHNICAL SUPPORT
29
3
SAFETY RECOMMENDATIONS
32
4
BEFORE USING YOUR BICYCLE
33
5
USE
35
6
PERIODIC INSPECTIONS
43
7
MAINTENANCE/LUBRICATION/CLEANING
44
8
PERIODIC MAINTENANCE TABLE
46
26
ENGLISH
WARNING!
Carefully read, follow and understand the instructions given in this manual. It is
an essential part of the product, and you should keep it in a safe place for future
reference.
MECHANIC QUALIFICATION - Please be advised that many bicycle service and repair
tasks require specialized knowledge, tools and experience. General mechanical aptitude may not be sufficient to properly service or repair your bicycle. If you have any doubt
whatsoever regarding your service/repair ability, please take your bicycle to a qualified
repair shop.
"AN ACCIDENT" - Please note that throughout this manual, reference is made that "an
accident" could occur. Any accident could result in damage to your bicycle, its components and, more importantly, could cause you or a bystander to sustain severe personal
injury or even death.
INTENDED USE - This Campagnolo® product is designed and manufactured for use
only on road racing style bicycles that are ridden only on smooth road or track surfaces.
Any other use of this product, such as off-road or on trails is forbidden.
LIFESPAN - WEAR - INSPECTION REQUIREMENT - The lifespan of Campagnolo®
components depends on many factors, such as rider size and riding conditions. Impacts,
falls, improper use or harsh use in general may compromise the structural integrity of
the components and significantly reduce their lifespan. Some components are also
subject to wear over time. Please have your bicycle regularly inspected by a qualified
mechanic for any cracks, deformation, signs of fatigue or wear (use of penetrating fluid
or other visual enhancers to locate cracks on parts is recommended).
ENGLISH
27
If the inspection reveals any deformation, cracks, impact marks or stress marks, no matter how slight, immediately replace the component; components that have experienced
excessive wear also need immediate replacement. The frequency of inspection depends on many factors; check with your authorized Campagnolo® representative to select a
schedule that is best for you.
If you weigh 82 kg/180 lbs or more, you must be especially vigilant and have your bicycle
inspected more frequently (than someone weighting less than 82 kg/180 lbs) for any
evidence of cracks, deformation, or other signs of fatigue or stress. Check with your
mechanic to discuss whether the components you selected are suitable for your use,
and to determine the frequency of inspections.
2 - INFORMATION AND TECHNICAL SUPPORT
Refer to the diagram on the following page when
performing installation or adjustments or if you
have a technical problem. Scan this QR CODE to
access the search page to find your closest Campagnolo Pro Shop, or go to www.campagnolo.com.
The components of Campagnolo® 11s transmissions, as well as the brakes, rims,
pedals and all other Campagnolo® products are designed as a single integrated system. Not to affect safety, performance, longevity, functionality and the
WARRANTY, use exclusively the parts and components supplied or specified by
Campagnolo S.r.l., without interfacing or replacing them with products, parts or
components manufactured by other companies.
The user of this Campagnolo® product expressly recognizes that there are risks inherent
in bicycle riding, including but not limited to the risk that a component of the bicycle
can fail, resulting in an accident, personal injury or death. By his purchase and use of
this Campagnolo® product, the user expressly, voluntarily and knowingly accepts and/
or assumes these risks, including but not limited to the risk of passive or active neglicence of Campagnolo s.r.l. or hidden, latent or obvious defects in the product, and agrees
to hold Campagnolo s.r.l. harmless to the fullest extent permitted by law against any
resulting damages.
28
ENGLISH
Scan this QR CODE to access more detailed information and frequently asked questions at www.campagnolo.com
ENGLISH
29
NOTE FOR SPECIALISED MECHANICS: Please remember that all assembly, disassembly,
adjustment and maintenance procedures for the
EPS drivetrain are described in the EPS technical manual, which is available in PDF format on
our internet site www.campagnolo.com. Scan
this QR CODE to directly access the main page
I contact my local
mechanic
I HAVE A TECHNICAL
PROBLEM
I access www.campagnolo.com
and search for a Pro Shop near me
Was a Pro Shop
found?
NO
OK
Problem solved?
I contact a
Campagnolo Pro Shop
OK
END
IMPORTANT
Always check the tables in the product technical manual to ensure compatibility with the previous Campagnolo ranges.
NO
Is there a
Campagnolo Service Center
in my country?
NO
30
OK
Note: Tools supplied by other manufacturers for components similar to Campagnolo® components, may not be compatible with Campagnolo® components. Likewise, tools supplied by Campagnolo s.r.l. may not be compatible
with components supplied by other manufacturers. Always check with your
mechanic or the tool manufacturer to insure compatibility before using tools
supplied by one manufacturer on components supplied by another.
I contact the Campagnolo
Service Center
I contact the store that sold me the product
ENGLISH
ENGLISH
31
3 - SAFETY RECOMMENDATIONS
4 - BEFORE USING YOUR BICYCLE
• Please be advised that if the maintenance and repair procedures provided in this
manual are not properly performed, or if the other instructions in this manual are not
followed, an accident could occur.
• Never make any modifications whatsoever to any component of any Campagnolo®
product.
• Parts which have been bent or otherwise damaged in an accident or as a result of
any other impact must not be re-straightened. They must be replaced immediately with
original Campagnolo® parts.
• Wear clothes which are snug-fitting and which make you visible to traffic, such as
neon fluorescent or other bright colors.
• Avoid biking at night because it is more difficult for you to be seen by traffic, and it
is more difficult for you to see obstructions on the ground. If you do ride at night, you
should equip your bicycle with and use a headlight and a tail light.
• Never use a bicycle or bicycle component unless you are thoroughly familiar with its
use and maintenance history. "Used" equipment may have been misused and abused,
and can unexpectedly fail resulting in an accident.
• When riding in wet conditions, remember that the stopping power of your brakes
is greatly reduced and that the aderence of the tires on the ground is considerably
reduced. This makes it harder to control and stop your bicycle. Extra care is required
when riding your bicycle in wet conditions to avoid an accident.
• Always wear a properly fitted and fastened bicycle helmet that has been approved
by ANSI or SNELL.
DO NOT RIDE YOUR BICYCLE IF IT DOES NOT PASS THIS PRE-RIDE TEST
CORRECT ANY CONDITION BEFORE YOUR RIDE.
• Be sure that all of the components of your bicycle, including but not limited to your
brakes, pedals, handgrips, handlebars, frame and seating system, are in optimum
condition and suitable for use.
• Be sure that none of the components of bicycle are bent, damaged or out of
alignment.
• Check to be sure that all quick release fasteners, nuts and bolts are properly
adjusted. Bounce the bicycle on the ground and listen and look for anything which
may be loose.
• Be sure that your wheels are perfectly centred. Spin the wheels to be sure that
they do not wobble up and down or from side to side, and that they do not
make contact with the fork legs or brake pads while rotating.
• Check all reflectors to make sure that they are clean, straight and securely
mounted.
• Check you brake pads and cables to be sure they are in good condition.
• Test your brakes in the beginning of your ride to make sure that they are operating
properly.
• Learn and follow the local bicycle laws and regulations, and obey all traffic signals,
signs and laws while you ride.
32
ENGLISH
If you ever any comments, questions or concerns, please contact your nearest
Campagnolo Service Center. A list of service centers may be found on our
website at www.campagnolo.com.
ENGLISH
33
IMPORTANT! COMPATIBILITY NOTE
WARNING!
The front derailleur is NOT designed to operate (and is therefore not compatible)
with Ultra-Shift / Power-Shift Ergopower controls and Bar-End controls from the
2014 range and prior which do not bear the distinctive marking.
The part you have is the result of numerous engineering operations carried out
on various parts in order to improve the
overall performance of the drivetrain unit.
The use of parts which do not belong to this range may significantly
reduce the overall performance of
the drivetrain, therefore we recommend not mixing parts from the old
ranges with those from the new.
In order to help you and to enhance
performance, Campagnolo has introduced a distinctive mark (a boxed letter
as illustrated here) on the new Super
Record, Record and Chorus unit parts
in order to point out their compatibility.
Therefore, please ensure that the letter in the parts that operate for shifting
(right-hand ErgoPower or bar end and
rear derailleur) and in the parts that operate for derailings (left-hand ErgoPower
or bar end and front derailleur, crankset
and bottom bracket cup) correspond.
34
5 - USE
A
The front derailleur is a component
of the drivetrain of the bicycle which
moves the chain between the chainring
of the crankset to obtain different final
drive ratios (the parts of the front derailleur are shown in Fig. 1).
E
A - joints
B - front derailleur mount
C - derailleur cage
D - cage insert (Chorus version only)
E - frame mount reinforcement system
(where applicable)
C
1
B
A
D
5.1 - FRONT DERAILLEUR OPERATION
If the front derailleur is set up and working correctly, the chain cannot come into contact with the fork when it is on the largest chainring, regardless of the position of the
rear derailleur.
ENGLISH
ENGLISH
35
This is only ensured if the technical specifications indicated by Campagnolo (for the
frame used) are observed, if the front derailleur is installed correctly, and if the travel
limits of the front derailleur and the cable tension have been set correctly (Pos.D Fig.2).
The front derailleur is also designed to lower the chain from the largest chainring to the
smallest with a single push (2 clicks) of the inner left hand Ergopower lever to its end
of travel. This function significantly reduces the risk of the chain dropping within the
frame, as the derailleur cage remains very close to the chain (1st push / Pos.B - Fig.2).
As a result, the chain may rub against the fork when shifting to smaller chainrings while
the rear derailleur is on larger sprockets. To eliminate chain noise, once the chain is
on the smallest chainring, push the inner lever once again by 1 click (2nd push / Pos.A
- Fig.2).
When moving the rear derailleur onto smaller sprockets from Pos. A, to prevent the
chain from rubbing against the fork, press the front derailleur lever once or twice to
move into position B or C (1st push, 2nd push - Fig.3).
A
A
B
C
B
2°
1°
2°
2
36
click
C
D
D
3°
1°
click
3
click
ENGLISH
ENGLISH
click
click
click
37
The front derailleur may be moved from the smallest chainring to the largest with a single lever push of 1, 2 or 3 clicks, depending on the initial position of the front derailleur itself (position C, B or A respectively - Fig.4).
A
4
B
click
C
click
D
5.2 - FRONT DERAILLEUR SETTINGS
If the front derailleur does not function
correctly as described, adjust the front
derailleur cable tension setting screw on
the frame cable, or adjust the Campagnolo
adjuster, which must be installed on cable
sheaths on frames with internally routed
cables.
If the chain is on the largest chainring
and rubs against the fork:
• if the chain is on the largest sprocket
(Fig. 5), and rubs against the inner side
of the fork, reduce the cable tension:
tighten the adjuster screw. In the case of a
Campagnolo adjuster, do not exceed the
lower notch as this will compromise the
operation of the adjuster itself (Fig. 6).
5
click
6
38
ENGLISH
ENGLISH
39
If the chain is on the smallest chainring
and the largest sprocket (Fig. 9) and
does not lift onto the largest chainring
after 3 clicks, increase the cable tension:
loosen the adjuster screw. In the case of
a Campagnolo adjuster, do not exceed
the upper notch as this will compromise the operation of the adjuster itself
(Fig. 10). After moving the chain onto
the largest chainring, check that the
inner side of the fork is no more than
0.5 mm from the chain. If the gap is larger, increase the cable tension further.
• If the chain is on the smallest sprocket
(Fig. 7), and rubs against the outer side
of the fork, increase the cable tension:
loosen the adjuster screw. In the case of a
Campagnolo adjuster, do not exceed the
upper notch as this will compromise the
operation of the adjuster itself (Fig. 8).
7
8
40
9
10
ENGLISH
ENGLISH
41
If the chain is on the smallest chainring
and the largest sprocket (Fig.9) and does
not lift onto the largest chainring after 2
clicks, reduce the cable tension: tighten
the adjuster screw. In the case of a
Campagnolo adjuster, do not exceed the
lower notch as this will compromise the
operation of the adjuster itself (Fig. 11).
If the front derailleur still does not
function correctly after making these
adjustments, take the bike to a specialised mechanic, as indicated in the chapter Installation/Removal.
WARNING!
Campagnolo spare parts must only be installed by qualified personnel with specialised knowledge, suitable tools and sufficient experience and who carefully
follow the installation instructions. Failure to comply with the above could result
in product malfunctions, accidents, physical injury or death.
6 - PERIODIC INSPECTIONS
Before each use and after a fall or collision, check that the component does not exhibit
11
any of the following problems:
• abnormal noise from front derailleur
• bent derailleur cage
• cage insert damaged, out of place or missing (Chorus version only).
• excessive joint play: try moving the derailleur cage by hand to test for free play).
WARNING!
Also check the chain (oxidised, worn, damaged or jammed links) and chainrings (worn
The upper and lower travel limits of the front derailleur must only be set by a
specialised mechanic.
An incorrectly set front derailleur may cause dangerous malfunctions and result in
accidents and serious or even fatal injuries.
42
ENGLISH
or damaged teeth) for problems.
If one or more of these problems are found or in the event of any doubts on the correct
operation of the component, contact a specialised mechanic as indicated in chapter 2
"Information and technical support".
ENGLISH
43
7 - MAINTENANCE / LUBRICATION / CLEANING
• The duration of the components is variable based on the conditions of use, frequency
and quality of maintenance. For proper component maintenance, it is necessary to frequently perform the cleaning and lubrication operations, especially under conditions
of heavy use (e.g. each time after washing the bicycle, after use in wet conditions, on
dusty or muddy roads etc.).
• Check chapter 8 to determine the frequency with which you should have maintenance performed on your components by a specialised mechanic: Period maintenance.
• Dirt seriously damages the bicycle and its components. Wash, clean and dry your
bicycle carefully after use.
• Never spray your bicycle with water under pressure. Pressurized water, even form
the nozzle of a small garden hose, can pass under seals and enter your Campagnolo
components, thereby affecting its operation. Wash your bicycle and Campagnolo
components by wiping them down with water and neutral soap.
• Do not expose the products to high temperature, do not leave them closed in cars
parked under the sun, do not keep them near radiators or other heat sources, do not
leave carbon or plastic products in direct sunlight.
7.1 - PROCEDURE FOR CLEANING AND LUBRICATING THE FRONT DERAILLEUR
• Before lubricating, carefully clean the drivetrain (system, sprocket pack, chainrings
and rear derailleur wheels) with a brush or cloth soaked in a specific degreaser/detergent. In the case of dust or mud, remove any residuals with specific plastic tools.
• Dry the drivetrain with a soft cloth: never use abrasive sponges or metal scouring
pads.
• Carefully lubricate the components, using a specific chain lubricant.
• After application, turn the hand cranks using all the possible gear combinations in
order to properly lubricate the entire drivetrain.
• Carefully clean any remaining lubricant remaining on the bicycle or the floor.
• At the end of the lubrication operations, CAREFULLY degrease the braking rim and
the brake blocks.
WARNING!
Salty environments (such as winter roads or roads near the sea) may lead to galvanic corrosion of most of the bicycle's exposed components. To prevent damage,
malfunctions and accidents, rinse, dry and carefully re-lubricate all components
which are subject to this phenomenon.
44
ENGLISH
WARNING!
Residual lubricant on the rims and the brake blocks can reduce or cancel out the
braking performance of your bicycle and be the cause of accidents, physical injury
or death.
ENGLISH
45
8 - PERIODIC MAINTENANCE
NOTES
Maintenance intervals are strictly approximate and may vary significantly in relation to the intensity and conditions of use (for example: competitions, rain, winter
roads with salt, weight of the athlete, etc.). Schedule the appropriate maintenance with your mechanic.
PROCEDURE
KM
INDICATION
(MAX)
TIME
INDICATION
(MAX)
CALCULATION
METHOD
Campagnolo S.r.l. reserves the right to change the content of this manual without notice. The most updated version will be available on www.campagnolo.com.
46
ENGLISH
ENGLISH
47