1
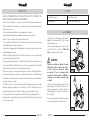
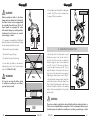
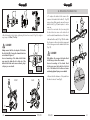
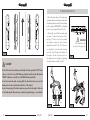
BRAKES
WARNING!
Carefully read, follow and understand the instructions given in this manual.
It is an essential part of the product, and you should keep it in a safe place
for future reference.
MECHANIC QUALIFICATION - Please be advised that many bicycle service and
repair tasks require specialized knowledge, tools and experience. General mechanical aptitude may not be sufficient to properly service or repair your bicycle. If
you have any doubt whatsoever regarding your service/repair ability, please take
your bicycle to a qualified repair shop.
"AN ACCIDENT" - Please note that throughout this manual, reference is made
that "an accident" could occur. Any accident could result in damage to your
bicycle, its components and, more importantly, could cause you or a bystander to
sustain severe personal injury or even death.
INTENDED USE - This Campagnolo® product is designed and manufactured for
use only on road racing style bicycles that are ridden only on smooth road or track
surfaces. Any other use of this product, such as off-road or on trails is forbidden.
LIFESPAN - WEAR - INSPECTION REQUIREMENT - The lifespan of Campagnolo® components depends on many factors, such as rider size and riding
conditions. Impacts, falls, improper use or harsh use in general may compromise
the structural integrity of the components and significantly reduce their lifespan.
Some components are also subject to wear over time. Please have your bicycle
regularly inspected by a qualified mechanic for any cracks, deformation, signs
of fatigue or wear (use of penetrating fluid or other visual enhancers to locate cracks on parts is recommended). If the inspection reveals any deformation,
cracks, impact marks or stress marks, no matter how slight, immediately replace
the component; components that have experienced excessive wear also need
immediate replacement. The frequency of inspection depends on many factors;
check with your authorized Campagnolo® representative to select a schedule that
is best for you.
If you weigh 82 kg/180 lbs or more, you must be especially vigilant and have your
bicycle inspected more frequently (than someone weighting less than 82 kg/180
lbs) for any evidence of cracks, deformation, or other signs of fatigue or stress.
Check with your mechanic to discuss whether the components you selected are
suitable for your use, and to determine the frequency of inspections.
The components of Campagnolo® 10s, 11s transmissions, as well as the brakes,
rims, pedals and all other Campagnolo® products are designed as a single integrated system. Not to affect safety, performance, longevity, functionality and
the WARRANTY, use exclusively the parts and components supplied or specified
by Campagnolo S.r.l., without interfacing or replacing them with products, parts
or components manufactured by other companies.
Note: Tools supplied by other manufacturers for components similar to Campagnolo® components, may not be compatible with Campagnolo® components.
Likewise, tools supplied by Campagnolo s.r.l. may not be compatible with components supplied by other manufacturers. Always check with your mechanic or
the tool manufacturer to insure compatibility before using tools supplied by one
manufacturer on components supplied by another.
The user of this Campagnolo® product expressly recognizes that there are risks
inherent in bicycle riding, including but not limited to the risk that a component
of the bicycle can fail, resulting in an accident, personal injury or death. By his
purchase and use of this Campagnolo® product, the user expressly, voluntarily
and knowingly accepts and/or assumes these risks, including but not limited to
the risk of passive or active neglicence of Campagnolo s.r.l. or hidden, latent or
obvious defects in the product, and agrees to hold Campagnolo s.r.l. harmless to
the fullest extent permitted by law against any resulting damages.
WARNING!
Always wear protective gloves and glasses while working on the bike.
16
ENGLISH
ENGLISH
17
1 - TOOLS
SAFETY TIPS
DO NOT USE YOUR BICYCLE IF IT DOES NOT PASS THIS TEST – CORRECT ANY
FAULTY SITUATIONS BEFORE USING THE BICYCLE.
• Please note that failure to correctly carry out the maintenance and repair procedures indicated in this manual or to follow the instructions in this manual could
result in an accident.
• Never make any modifications to any Campagnolo® product.
• Ensure that the brake cables and brake block are in good condition.
• Ensure correct operation of the brakes before riding.
• If you brake too hard with the front brake the wheel could lock up causing a
forward fall with potentially serious injuries.
• Any bent or damaged parts following impact or accidents must be replaced with
original Campagnolo® parts.
• Wear close fitting and highly visible clothing (fluorescent colours or other bright
colours / alternatively light colours).
• Avoid cycling at night because it is difficult for others to see you and obstacles on
the road are difficult to distinguish. If you use the bicycle at night, fit it with suitable
lights and reflectors which are securely mounted and clean.
• Never use a bicycle or component with which you are not completely familiar or
the use and maintenance operations of which are unknown. Second hand parts
may have been used incorrectly or may be ruined, therefore they could break unexpectedly, causing an accident.
• If the bicycle is used in the wet remember that the braking power and tyre grip
decrease significantly, making it more difficult to control. Therefore pay closer
attention when riding on wet surfaces in order to prevent possible accidents.
• Learn and observe local cycling rules and all the road signs during your ride.
• Always wear a correctly fastened protective helmet and ensure that it is approved
for use in your country.
5 mm Allen wrench
2 mm Allen wrench
Torque wrench
12 mm open end wrench
2 - ASSEMBLY
• Fit the brake on the frame or the fork and
tighten the socket-head nut (A - Fig. 1) using
a 5 mm Allen wrench.
• Fix the cable, tightening the cable clamp
screw (B - Fig. 1) to a torque of 5 Nm - 44
in.lbs using a 5 mm Allen wrench.
WARNING!
Please be sure that you tighten the cable
sufficiently, without crushing the cable,
so that it does not slip when brakes
are applied. A loose or damaged cable
can cause the brake system to malfunction
resulting in an accident, personal injury
or death.
C
A
B
5 Nm
(44 in.lbs)
1
D
• Initially center the brake in relation to the
wheel using the lock-nut (D - Fig. 2) and a 12
mm open end wrench in order to position the
brake pads about 1 mm from the surface of
the rim (Fig. 3).
If necessary, perform fine adjustment using the
cable tension adjustment screw (C - Fig. 1).
2
18
ENGLISH
ENGLISH
19
• If your brakes are fitted with the adjustment
screw (E - Fig. 5), then correct centering (Fig.
3), using a Phillips screwdriver.
WARNING!
When mounting the brake to the frame
always make sure that at least 6 threads of
the brake’s centre bolt are engaged with
the internally threaded sleeve (Fig. 4). If
fewer threads are engaged, the centre
bolt may fail during use, resulting in brake
detachment from the frame an accident,
personal injury or death.
A
E
• To guarantee compatibility with different
thickness frames the front brakes (including
the nut already installed) come with:
- 10 mm front fixing nut (standard)
10 Nm (88 in.lbs)
5
~1 mm
3
~1 mm
3 - ADJUSTING THE BRAKE PADS
- 18 mm front fixing nut (long)
• Periodically check the brake pads to insure
that they are about 1 mm from the surface of
the rim (Fig. 3). If this is not the case, adjust the
distance using the cable tension adjustment
screw (C - Fig. 6). If this proves insufficient,
loosen the cable securing screw (B - Fig. 6),
adjust the distance of the pads to the rim, reset
the position of the cable and secure it again by
tightening the cable retainer screw (B - Fig. 6).
- 25 mm front fixing nut (extra long)
• Secure firmly the brake to the frame by
tightening the nut (A - Fig. 5) with a torque
wrench to 10 Nm (88 in.lbs).
WARNING!
NO!
• For pad-holders equipped with orbital articulation which can be oriented in all directions
(Fig. 7): adjust the brake pads so that they are
centered in height in relation to the braking
surface of the rim and parallel to it horizontally
and vertically.
A loose nut can cause the brake system
to malfunction resulting in an accident,
personal injury or death.
C
B
6
WARNING!
4
20
Please be sure that you tighten the cable sufficently, without crushing the cable, so
that it does not slip when brakes are applied. A loose or damaged cable can cause
the brake system to malfunction resulting in an accident, personal injury or death.
OK!
ENGLISH
ENGLISH
21
4 - REPLACING THE BRAKE PADS
7
• Block the brake block holder by tightening the 5 mm hex screw (A - Fig. 8) to a tightening torque of 8 Nm (71 in.lbs).
DANGER!
Always ensure that the closed part of the brake
block holder (B) is facing the forward direction
as indicated in figure 9.
Incorrect mounting of the brake block holder
may cause the brake block to slide out of the
brake block holder and cause accidents, physical injury or even death.
• To replace the brake blocks remove the
screw on the brake block holder (F - Fig. 10)
using a 2 mm Allen wrench, remove the worn
brake block (Fig. 10) and replace it with a
new one.
• Insert the new brake block, ensuring that
the wheel direction arrow on the brake block
is in the actual forward direction of the wheel.
F
• Ensure that the seat (G - Fig. 10) of the brake
block screw is in the position that corresponds
to the locking screw on the brake block holder
(Fig. 10).
DANGER!
A
8
FRONT
8 Nm
(71 in.lbs)
Fully tighten the screw on the brake block
holder using a 2 mm Allen wrench.
Incorrect mounting of the brake block
holder may cause the brake block to slide
out of the brake block holder and cause
accidents, physical injury or even death.
F
G
• Ensure that the distance of the pads from
the wheel is about 1 mm (Fig.3).
REAR
10
B
B
9
22
ENGLISH
ENGLISH
23
5 - BRAKE MAINTENANCE
• Check the wear status of the brake pads
at regular intervals and replace them when
the braking surfaces reach the limit marked
by the wording "WEAR LIMIT" or if braking
power is in any way insufficient (Fig. 12).
• Periodically check that the brake pads
are about 1 mm from the surface of the
rim (Fig. 13). If this is not the case, adjust
the distance using the cable tension
adjustment screw (C - Fig. 14). If this proves insufficient, loosen the cable securing
screw (B - Fig. 14), adjust the distance of
the pads to the rim, reset the position of
the cable and secure it again by tightening
the cable retainer screw (B - Fig. 14).
11
DANGER!
B
~1 mm
13
ENGLISH
12
C
For both front and rear brake pad, identify the brake pad with "LEFT" indication to install it on the LEFT brake pad holder and the brake block with
"RIGHT" indication to install it on the RIGHT brake pad holder.
Insert the new brake pad, ensuring that the wheel direction arrow on the
brake pad is in the actual forward direction of the wheel.
Incorrect mounting of the brake pad may cause the brake pad to slide out
of the brake pad holder and cause accidents, physical injury or even death.
24
WARNING!
The wear limit is the
bottom of the grooves.
ENGLISH
~1 mm
14
25
NOTES
WARNING!
Please be sure that you tighten the cable sufficently, without crushing the cable,
so that it does not slip when brakes are applied. A loose or damaged cable can
cause the brake system to malfunction resulting in an accident, personal injury
or death.
• When replacing brake pads, cables and casings - only use original Campagnolo®
spare parts.
• Periodically check that the tightening screw (F - Fig. 10) on the brake block holder is
completely tightened.
• Check torque setting(s) of the brake, brake pad and cable locking screws at regular
intervals.
• Do not allow oil or grease to contaminate the brake blocks.
• Using the bicycle in the rain can lead to a greater accumulation of sand/dirt on the
brake pads, with consequent damage to the rims, even in the course of a single outing.
To keep the pads in optimum condition and to avoid wear on the sides of the rims,
check your brake pads constantly. Use a file to immediately remove any foreign bodies
which could be deposited on the pads themselves.
• When riding in wet conditions, remember that the stopping power of your brakes
is greatly reduced and that the adherence of the tires on the ground is considerably
reduced. This makes it harder to control and stop your bicycle. Extra care is required
when riding your bicycle in wet conditions to avoid an accident.
WARNING!
Salt water environments (as found on winter roads and near the seaside) can cause
galvanic corrosion on most bike parts. Carefully rinse, clean, dry and re-lubricate
all exposed parts to avoid damage, malfunctions and accidents.
Campagnolo S.r.l. reserves the right to change the content of this manual without notice. The most updated version will be available on www.campagnolo.com.
26
ENGLISH
ENGLISH
27