1
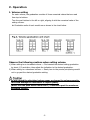
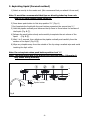
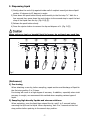
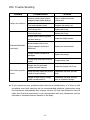
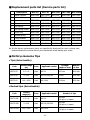
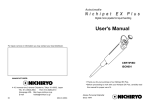
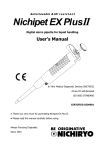
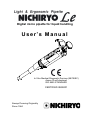
Digital micro pipette for liquid handling
User’s Manual
In Vitro Medical Diagnostic Devices (98/79/EC)
Annex III self-declared
ISO 8655 STANDARD
CERTIFIED ISO9001
Always Pursuing Originality
Since 1944
● Thank you for purchasing the NICHIRYO Le.
● Before proceeding to work with the NICHIRYO Le, please carefully read this manual
for proper use of it.
I. Introduction
This operator’s manual explains the operation of the Nichiryo Digital Micro
Pipette ‘NICHIRYO Le’. Please read carefully to ensure safe and correct
operation of the instrument. Please pay special attention to passages marked
in bold lettering. Be sure to read cautions that need strict observance and
underlined sections before using the instrument.
II. Features
● As volume amount setting is done digitally, easy volume setting is possible with a
simple press of the push button.
● Through adoption of an easy to grasp design and a lightweight construction,
(in comparison with our Nichipet EX model) we have realized a product design that
allows long hours of use without operator fatigue.
● The structure of the unit has been designed to reduce the effects of hand
temperature on performance accuracy.
● Our lineup of 5 different models allows a wide range of sampling, between
1.0ul – 1000ul.
III. Standard Accessories
● Tips: x 3
● Grease: x 1
● User’s Manual
When unpacking package, check to make sure that the above-mentioned items are included.
IV. Safety Precautions
● Please be sure to carefully read the sections titled “Safety Precautions”
and “
Cautions:” before using the instrument.
● The contents of "CAUTIONS" are matters that require the user's attention, not only
for using the Nichiryo Le properly but for preventing the user from accidents and
physical damage.
●After reading this manual, please keep it in a convenient place for easy referral at
any time.
-1-
Please read the following prior to use for your safety and correct usage
of the instrument.
Be sure to observe the following instructions for using
the NICHIRYO Le properly and safely
1.
Do not use this instrument for any purpose except pipetting liquid.
2.
Do not modify this instrument as modification may cause an accident.
3.
Do not use this instrument for pipetting any liquid to be injected into the
human body.
4.
Do not eject the tip towards anybody.
5. Do not discharge any sample liquid while pointing the instrument at anybody.
Some liquids are dangerous and may cause bodily harm.
6.
Do not eject the tip while liquid is still inside.
7.
Handle the tip with care, as the point is sharp and dangerous.
8.
Firmly attach the tip to the nozzle. If not attached securely it may fall off
causing the sample liquid to scatter.
9.
When handling liquid harmful to the human body, be careful not to directly
touch the tip during or after use.
10. If the instrument is soiled with liquid harmful to the human body, immediately
take proper measures to clean it safely before proceeding with work.
11. Do not use this instrument for stirring liquid or for any other such action.
Additionally, do not use the instrument in any manner that will cause the tip to
loosen, fall off, or the instrument itself to be soiled with scattered liquid.
12. Do not use this instrument for any purpose except pipetting liquid.
-2-
Users are required to strictly observe the following points in order for the
instrument to retain its precision and original performance for a long time.
1.
Do not expose this instrument directly to the sun when working with it, or for 2
hours before starting work, otherwise the instrument may fail in precise
pipetting. Avoid working with this instrument in a humid and hot place.
2.
Just before starting work with this instrument, avoid touching the tip and
nozzle cylinder as far as circumstances permit. If the nozzle cylinder is warmed
by your hand, it is hard to maintain accuracy.
3.
For pipetting, follow the forward method (explained in this manual). If it is
performed in a different way, it may result in inaccurate pipetting.
4.
Operate the push button slowly. If quickly released, sample liquid will be
sucked into the main body, which may result in not only inaccurate pipetting
but also deterioration of the instrument.
5. Do not hold the instrument horizontally or upside down when there is liquid
inside the tip, otherwise the liquid will get inside the main body, which may
cause deterioration of the instrument.
6.
If liquid is sucked inside the main body (inside the nozzle), clean as quickly as
possible. Liquid inside the nozzle is a main cause of precision/reproducibility
loss and may lead to breakdown of the instrument.
7.
When turning the push button, do not exceed the specified sample volume
limit, as this may damage the instrument or cause deterioration.
8.
Do not perform pipetting with less liquid than the set volume. If the quantity is
less than the set volume, this may cause the liquid to scatter into the main
body, which may result in deterioration of the instrument.
9.
The pipette can be used between +4°C and +40°C, but the specifications may
vary.
10. Depending on the frequency of use, the pipette should be cleaned in a soap
solution and maintained the airtight chamber according to this manual.
-3-
Contents
● Operating procedure ························································· 5
● Disassembling/Reassembling the airtight chamber ················· 9
● Specifications ··································································· 10
● Troubleshooting ······························································· 11
● Parts list ·········································································· 12
-4-
V. Operation
1. Volume setting
For each volume, the graduation consists of three numerical values that are read
from top to bottom.
Turn the push button to the left or right, aligning it with the numerical value of the
setting volume.
✱ Graduation units of each model are as shown in the chart below.
Observe the following cautions when setting volume.
1) When setting to an increased volume → First exceed the desired setting graduation
by about 1/3 revolution, then adjust the indication to the desired graduation.
2) When setting to a decreased volume → Slowly turn to the precise point,being careful
not to go past the desired graduation setting.
● Do not exceed the stipulated volume range or change the volume capacity.
This could damage the instrument or impair quality.
(Never turn the push button more than 1/3 revolution past the maximum
stipulated volume).
-5-
2. Aspirating liquid (Forward method)
1) Attach a new tip to the nozzle end. (We recommend that you attach it from rack)
Note: It would be recommended that tips are directly picked up from rack.
And do not twist pipette when fixing tip.
2) Press down push button to first stop position “b”. (Fig. A)
* Don’t aspirate the liquid with the push button pressed at the second stop “c”.
3) Hold the pipette vertically and immerse the tip 2mm to 3mm below the surface of
the liquid. (Fig. B-①)
4) Release the push button slowly and smoothly to aspirate the set volume of the
liquid.
(Fig. B-②)
5) Wait 1 to 2 seconds, then withdraw the pipette vertically and carefully from the
surface of the liquid. (Fig. B-②)
6) Wipe any droplets away from the outside of the tip using a medical wipe and avoid
touching the tip’s orifice.
Note: Do not aspirate when push button position is at “c”.
Note: The push button has to be pushed and released slowly. Otherwise it
may cause wrong accuracy.
①
②
③
④
a
b
c
Ejector button
Fig.B
-6-
3. Dispensing liquid
1) Gently place the end of tip against inside wall of recipient vessel just above liquid
surface 10 degrees to 45 degrees in angle.
2) Press down the push button slowly and smoothly to the first stop “b”. Wait for a
few seconds then press down the push button to the second stop to expel the last
drop of the liquid from the tip. (Fig. D-④,⑤)
3) Release the push button slowly.
4) Press the ejector button to remove the tip and dispose of it. (Fig. D-⑥)
When using any toxic or harmful liquid to human, do not touch any used tips.
①
②
③
④
⑤
⑥
a
b
c
Fig.C
(Reference)
1) Pre-rinsing
When attaching a new tip, before sampling, repeat suction and discharge of liquid to
the first stop position 2 to 3 times.
Pre-rinsing will result in a high degree of accuracy. In addition, especially when strict
accuracy is sought, we recommend this method when sampling various types of
liquid.
2) Sampling high density liquids and viscous solutions
When aspirating, once the liquid has entered the tip, wait 2 to 3 seconds before
removing the tip from the liquid. When dispensing, wait 2 to 3 seconds at the first
stop position before pushing to the second stop position.
-7-
-8-
VI. Disassembly and assembly of airtight section
For airtight section maintenance, or when a problem such as that clearly stated in the
“Trouble Shooting” section of this manual occurs, carry out disassembly,inspection and
cleaning following the instructions below.
1. Disassembly
1) Remove the ejector pipe.
With the ejector button depressed, slide the ejector pipe to the right
(clockwise direction) and remove from the ejector shaft. Next, pull out the
ejector pipe. (Refer to Fig.D).
2) Remove the bottom nut.
While holding down the nozzle cylinder, turn the bottom nut
counter clockwise and remove from the body.
At this time the spring inside the nozzle cylinder may cause
the internal parts to po p out. Please use care and remove
slowly.
3) Remove each part.
Remove the parts in the nozzle cylinder: First spring, plunger, first spring
holder, second spring and O-ring. (The plunger and first spring holder are
a complete set on the 1000ul model). Once removed, carry out part
replacement, inspection and cleaning of the airtight section.
● During disassembling take care not to lose any of the parts.
2. Assembly
✱ Basically assembly is done in the reverse order of disassembly. (Referto Fig.E ).
1) Set the O-ring on the O-ring holder.
2) With the plunger tip facing upward, attach each part in the order of first spring →
first spring holder → stroke pipe → second spring → O-ring retainer → O-ring.
Next, insert in the nozzle cylinder.
3) Install the ejector pipe. Install in the reverse order of disassembly.
● After assembly, before using the unit, test-operate it a few times to
confirm that there are no problems
-9-
VII. Specifications
Nichiryo Le (model No. NLE) is a high quality pipette. The technical figures given in the
Table-1 “NLE Maximum Permissible Errors” were obtained using genuine Nichiryo BMT tips.
Nichiryo declares that pipettes comply with the requirements of the ISO 8655 Standard,
by type testing. The adjustment is carried out under strictly defined and monitored
conditions (ISO 8655-6):
● The basis of adjustment, EX
● Reference temperature, 20°C
● Relative humidity, 50%
● Barometric pressure, 101KPa
● Use of distilled water grade 3 (ISO 3696)
● Ten measurements for each test volume at three points, nominal volume,
50% of nominal volume and the minimum or 10% of nominal volume.
Table-1 NLE Maximum Permissible Errors
Code
NLE-10
NLE-20
NLE-100
NLE-200
NLE-1000
Volume
range (uL)
1~10
2~20
10~100
20~200
100~1000
Measured
volume(uL)
Accuracy
(systematicerror)
(%)
Precision
(randomerror)
(%)
1
±6.0*
≦5.0*
5
±2.0
≦1.6
10
±1.2
≦0.8
2
±5.0*
≦3.0*
10
±2.0
≦1.0
20
±1.0
≦0.5
10
±2.0
≦1.0
50
±1.2
≦0.6
100
±0.8
≦0.3
20
±1.2
≦1.0
100
±1.0
≦0.6
200
±0.8
≦0.3
100
±1.2
≦0.8
500
±1.0
≦0.6
1000
±0.7
≦0.3
✱Accuracy and reproducibility of 1uL on the NLE-10 model and 2uL on the NLE-20 model
will be greatly influenced by the operator’s sampling skill.
✱ The data given in the table conform to the ISO 8655-2 standard.
-10-
VIII. Trouble Shooting
Problem
Probable cause
clogged (foreign matter buildup)
Clean or replace the nozzle
cylinder part.
The nozzle cylinder is loose
Retighten the bottom nut.
The O-ring is worn
Replace the O-ring.
The O-ring is worn
Replace the O-ring.
Inside of nozzle cylinder point is
Liquid is not suctioned
Solution
Airtight section lubricant (grease)
has been used up.
Grease the airtight section.
Nozzle cylinder point is worn.
Suctioned liquid leaks
(Visual inspection shows level
from the tip
difference).
Plunger surface is scratched or
damaged.
The tip being used does not fit the
nozzle.
Plunger and O-ring lubricant
(grease) has been used up.
Push button operation
is poor
Replace the nozzle cylinder.
Replace the plunger.
Change the tip used.
Grease the plunger and O-ring.
Liquid has been drawn into the unit
Disassemble the lower part and
(inside of nozzle cylinder)
clean.
Plunger surface is dirty or foreign
Disassemble the lower part and
matter has adhered to it.
clean or replace the plunger.
✱ If you experience any problems other than those noted above, or if there is still
a problem even after carrying out the recommended solutions, please stop using
the instrument immediately and request service. At that time please be sure to
make sure that the instrument is not contaminated with any substances such as
microbes or chemicals that are harmful to the body.
-11-
■ Replacement parts list (Service parts list)
Description
① Nozzle cylinder
NLE-10
NLE-20
NLE-100
NLE-200
NLE-1000
NPE-024A
NPE-024B
NPE-024C
NPE-024D
NPE-024E
② Bottom nut
NPE-030 *Same for all volume sizes.
③ Ejector pipe
NPE-025A
NPE-025B
NPE-025B
NPE-025B
NPE-025C
④ Plunger
NPE-017A
NPE-017B
NPE-017C
NPE-017D
NPE-017E
⑤ First spring
NPE-017A
NPE-017B
NPE-017C
NPE-017C
NPE-017D
⑥ First spring holder
NPE-020A
NPE-020A
NPE-020A
NPE-020A
NPE-020B
⑦ Stroke ring
NPE-018A
NPE-018A
NPE-018A
NPE-018A
NPE-018B
⑧ Second spring
NPE-023A
NPE-023A
NPE-023A
NPE-023A
NPE-023B
⑨ O-ring retainer
NPE-021A
NPE-021B
NPE-021C
NPE-021D
NPE-021E
⑩ O-ring
NPE-022A
NPE-022B
NPE-022C
NPE-022D
NPE-022E
⑪ Grease
N3-0711A
N3-0711A
N3-0711A
N3-0711A
N3-0711A
✱ As the above replacement parts are specifically designed for each volume size,
please indicate the volume size of your instrument when placing your order.
■ Nichiryo Genuine Tips
● Tips (Autoclavable)
Tip length
(approx. size)
Number
of tips
NLE-10
45.7mm
1000 tips
clear
NLE-20/100/200
53mm
1000 tips
clear
NLE-1000
81.9mm
1000 tips
Code
Volume range
(uL)
Color
BMT2-SS
0.5~10
clear
BMT2-SG
2~200
BMT2-LG
100~1000
Applicable model
● Racked tips (Autoclavable)
Code
Volume
range(uL)
Color
BMT2-SSR
0.5~10
clear
NLE-10
960 tips
(96 tips x 10 cases)
BMT2-SGR
2~200
clear
NLE-20/100/200
960 tips
(96 tips x 10 cases)
BMT2-LGR
100~1000
clear
NLE-1000
960 tips
(96 tips x 10 cases)
Applicable model
-12-
Number of tips
Memo
- 13-
Memo
- 14-
Inspection and Calibration Statement
The enclosed pipette was tested and calibrated under closely controlled
environmental conditions to ensure that it meets published calibration specifications.
The precision and accuracy results obtained for this pipette are provided on the
enclosed calibration certificate.
Because temperature and humidity conditions affect the calibration results of liquid
measurement devices, your pipette should be calibrated under conditions of use.
The calibration results obtained in your laboratory may vary from our results due to
differences in environmental testing conditions.
For repair, service or information you may contact your local distributor.
Manufacturer:
Tokyo office
1-10-1 Kandanishiki-cho, Chiyoda-ku, Tokyo 101-0054, Japan
TEL: +81-3-6273-7652(English) FAX: +81-3-6273-7944
URL: http://www.nichiryo.co.jp/
E-mail: [email protected]
2013.Ver.1