1
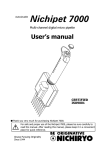
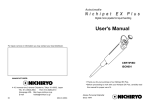
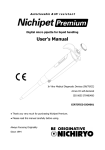
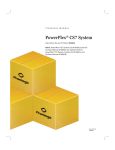
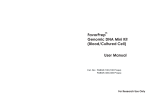
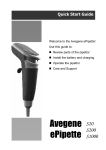
Nichipet F & V
Fixed & Triple Volume Micro Pipettes
User’s Manual
・Thank you for your purchase of our Nichipet F&V.
・Before proceeding to work with your Nichipet F & V, carefully read this
manual for proper use of it.
Always Pursuing Originality
Since 1944
FEATURES
Thumb Plunger : Smooth, effortless movement of the plunger reduces the
operator’s fatigue.
Select Volume
: Volume change is simply achieved by just turning the thumb
knob. The selected volume remains fixed. (Nichipet V)
Tip Ejector Knob: Built in tip ejector for the safe disposal of used tips. Knob
location eliminates the possibility of accidental tip ejection.
Body Design
: Lightweight, slender design reduces the operator’s fatigue.
Thermal insulation prevents body heat from contributing to
measurement error during prolonged handling.
Seal Ring
: Fluoroplastic seal and Rubber-O-Ring eliminate the need for
routine maintenance and lubrication.
Tip Ejector Pipe : Non-Metallic Tip Ejector Body permits easy access to the
bottom of commonly used test tubes.
Cylinder
: Designed to minimize dead air space for increased pipette
accuracy.
SPECIFICATIONS / ORDERING INFORMATION
Nichipet-V TRIPLE VOLUME
Cat.No.
NPV-S
NPV-M
NPV-L
Volume
10/20/50μL
50/100/200μL
200/500/1000μL
Accuracy
±1.2~±0.7%
±0.7~±0.5%
±0.7~±0.5%
Precision
≦0.6~≦0.3%
≦0.4~≦0.3%
≦0.3~≦0.2%
Nichipet-F FIXED VOLUME (Standard Volume)
Cat.No.
Volume
NPF-5
(5μL)
NPF-1000
(1000μL)
5,10,20,25,50
100,200,250,300
500 & 1000 μL
Accuracy
5μL:±1.5%
Precision
≦0.5%
10μL:±1.2%
≦0.4%
20μL~25μL:±0.8%
≦0.3%
50μL~300μL:±0.6%
500μL~1000μL:±
0.5%
≦0.3%
1
≦0.2%
OPERATION
1. Select the desired volume on Nichipet V
by turning the thumb knob until the desired
volume figures on the thumb knob correspondto the arrow mark printed on the top
of the pipette handle.(Fig. 1)
2. Place a disposable tip firmly onto the end
of the pipette. Depress the thumb knob to
the first stop. Dip the tip into the liquid to a
depth of 3mm. (Step 1 of Fig. 2)
3. Smoothly return the thumb knob to its originalposition. The liquid will then be drawn
into the tip. (Step 2)
4. Touch the tip against the inside wall of the receiving vessel. (Step 3)
5. Smoothly depress the thumb knob to the first stop (step4), pause: then
depress the knob to the second stop (step5).
Note: When dispensing serum and other viscous fluids, it is necessary to pause
about two seconds before moving to the secondary stop.
6. Remove the used tip from the pipette by depressing the tip ejector knob.
(Step 6)
Note: Depress and release the thumb knob at constant speed to ensure good
precision.
2
AIDS TO PRECISION AND ACCURACY
Listed below are some techniques found to improve sampling precision.
PLEASE READ THIS SECTION CAREFULLY.
1. Try to effect the same speed for both the intake and delivery of all samples.
Smooth depression and release of the plunger knob will give the most
consistent
results. Never allow the plunger to “snap” back. Consistency of technique is a
key to precision.
2. Always depress the thumb knob to the proper stop before insertion of the tip
Into the solution. Depression of the thumb knob after insertion may cause the
Formation of an air bubble in the tip and result in filling error.
3. Try to insert the tip to approximately the same depth in the sample each time,
never going deeper than 3mm. Hold the instrument as vertically as possible
(10° maximum from vertical).
4. When sampling hot or cold material, the tip temperature should be equalized
to that of the solution to prevent contraction or expansion of solution.
SERVICE AND MAINTENANCE INFORMATION
It is recommended that the following servicing procedures be performed at
regular intervals. Heavy usage or usage with corrosive fluids will require more
frequent servicing.
Disassembly (Reference Figure 3 & 4)
1. Turn the screw bolt counterclockwise to
remove a tip ejector pipe. Gently pull the
tip ejector pipe off the end of tip ejector
pipe during this procedure.
2. Unscrew the barrel assembly from the
handle and carefully pull directly away
from the handle. The plunger assembly
and spring can be removed from the
pipette. Refer to Figure 4 for the internal
configuration of the pipette being
serviced. Take special care not to bend
the piston rod, especially in the smaller
volume units.
3. Replace the O-ring.
3
4. Reassemble the unit by reversing the above procedures. Refer to Figure 4
when reassembling to ensure that all parts are placed in the correct position.
5. To reassemble the tip ejector pipe gently push on the tip ejector pipe so that
the pipe mates with the handle connection. Turn the screw clockwise to
secure.
6. After the above maintenance procedure, should the feeling of a smooth piston
stroke seem different from what it was before this procedure, immediately
disassemble the pipette as in the above procedure and reassemble per the
schematics in Figures 3 and 4.
7. After the above maintenance procedure, should the tip ejector knob stroke
seem different and lack the smoothness of its normal stroke, immediately
disassemble the tip ejector portion of the pipette and reassemble ensuring the
spring and spring holder are installed properly.
4
ORDERING INFORMATION
Nichipet-F Fixed Volume Pipette
Cat.No.
Volume
Accessories
NPF-5(5uL)
to
NPF-1000(1000uL)
5,10,20,25,50
100,200,250,300
500 & 1000uL
Appropriate tips
Nichipet-V TRIPLE VOLUME
Cat.No.
NPV-S
NPV-M
NPV-L
Volume
10/20/50μL
50/100/200μL
200/500/1000μL
5
Accessories
Appropriate tips
Tip (Autoclavable)
BMT2-SS
Volume(μ
L)
0.5~10
BMT2-SE
2~200
Clear
BMT2-SG
2~200
Clear
BMT2-LG
100~1000
Clear
Cat.No.
Color
Usable Model
Q’ty(bag)
Clear
NPF-5,10
NPV-S,M
NPF-15~200
NPV-S,M
NPF-15~200
NPV-L
NPF-250~1000
1000
Q’ty(box)
1000
1000
1000
Racked Tip (Autoclavable)
Cat.No.
Volume(μ
L)
Color
Usable Model
BMT2-SSR
0.5~10
Clear
NPF-5,10
BMT2-SER
2~200
Clear
BMT2-SGR
2~200
Clear
BMT2-LGR
100~1000
Clear
NPV-S,M
NPF-15~200
NPV-S,M
NPF-15~200
NPV-L
NPF-250~1000
960
(96pcs.x10c/s)
960
(96pcs.x10c/s)
960
(96pcs.x10c/s)
960
(96pcs.x10c/s)
Stand
Cat.No.
BMT-STD
(Acryl resin)
Description
6 pipttes can be stored.
Inspection and Calibration Statement
The enclosed pipette was tested and calibrated under closely controlled
environmental conditions to ensure that it meets published calibration
specifications.
The precision and accuracy results obtained for this pipette are provided on the
enclosed calibration certificate.
Because temperature and humidity conditions affect the calibration results of
liquid measurement devices, your pipette should be calibrated under conditions
of use.
The calibration results obtained in your laboratory may vary from our results due
to differences in environmental testing conditions.
6
For repair, service or information you may contact:
MANUFACTURER:
Tokyo office
1-10-1 Kandanishiki-cho, Chiyoda-ku, Tokyo 101-0054, Japan
TEL: +81-3-6273-7652(English) FAX: +81-3-6273-7944
URL: http://www.nichiryo.co.jp/
E-mail: [email protected]
2014.Ver.1
7