1
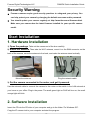
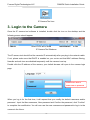
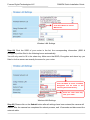
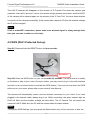
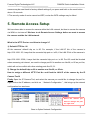
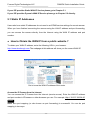
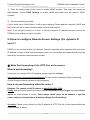
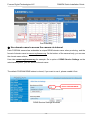
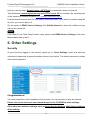
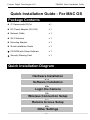
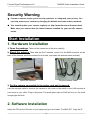
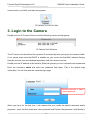
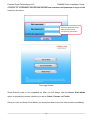
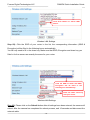
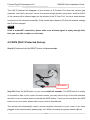
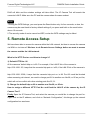
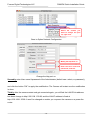
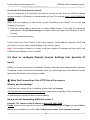
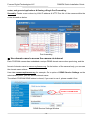
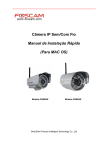
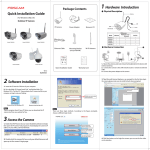
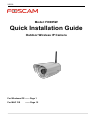
V50.03 Model: FI8905W Quick Installation Guide Outdoor Wireless IP Camera For Windows OS ------ Page 1 For MAC OS ------ Page 15 Foscam Digital Technologies LLC FI8905W Quick Installation Guide Quick Installation Guide - For Windows OS Package Contents IP Camera with IR-Cut x1 DC Power Adapter (5V-2.0A) .x 1 Network Cable x1 Wi-Fi Antenna .x 1 Mounting Bracket .x 1 Quick Installation Guide x1 CD-ROM with Setup Software .x 1 Security Warning Card x1 Quick Installation Diagram Hardware Installation Software Installation Login the Camera Wireless Connection Setup Remote Access Setup Other Settings -1- Foscam Digital Technologies LLC FI8905W Quick Installation Guide Security Warning Foscam cameras require good security practices to safeguard your privacy. You can help protect your camera by changing the default username and/or password. You should update your camera regularly at http://www.foscam.us/firmware.html. Make sure your camera has the latest firmware installed for your specific camera model. Start Installation 1. Hardware Installation 1) Open the package. Take out the camera out of the box carefully. 2) Mount the antenna. Then take the Wi-Fi antenna, mount it on the SMA connector on the back of the camera, screw the antenna to the back, and make the antenna stand vertically. Mount the antenna Plug the network cable 3) Get the camera connected to the router, and get it powered. Use the network cable to connect the camera to the router or the switch in the LAN network at your home or your office. Plug in the power. The small green light on RJ45 will turn on, the small orange light will blink. 2. Software Installation Insert the CD into the CD drive of your computer and go to the folder “For Windows OS”. Copy the IP camera tool to your computer and start the program. -2- Foscam Digital Technologies LLC FI8905W Quick Installation Guide IP Camera Tool icon 3. Login to the Camera Once the IP camera tool software is installed, double click the icon on the desktop and the following screen should appear. IP Camera Tool Windows The IP camera tool should find the camera’s IP automatically after you plug in the network cable. If not, please make sure that DHCP is enabled on your router and that MAC address filtering, firewalls and anti-virus are disabled temporarily until the camera is set up. Double click the IP address of the camera; your default browser will open to the camera login page. Default user name is admin with no password When you log in for the first time, it will request that you modify the default username and/or password . Input the New username, New password and Confirm the password, click “Confirm” to complete the modification. You will now use the new username and password to log in to the camera in the future. -3- Foscam Digital Technologies LLC FI8905W Quick Installation Guide Input the New username, New password and Confirm the password. If you use IE browser, select this login mode . If you use Firefox, Google Chrome, Safari, select this login mode . If you use Mobile phone, please select this login mode . Note There are three login methods. One is IE ActiveX Mode, the other is Server Push Mode for Safari, Firefox, Google Chrome, the third mode is Mobile Phone for mobile phone. Please choose IE ActiveX Mode if you are using IE browser now. If it is your first time logging into the camera using Internet Explorer, click the “ActiveX Mode” button. This mode is used for Internet Explorer. It will then prompt you to download the ActiveX plugin. -4- Foscam Digital Technologies LLC FI8905W Quick Installation Guide In the above screenshot, we see a grey screen for camera video and a red “X” in the top left corner. This indicates that our ActiveX controls are not configured properly. Usually in Internet Explorer versions 8 or later, you will see a pop up box at the bottom of the screen, which asks if you would like to allow the ActiveX control module to run for the camera. Click “Allow.” Once you login again, you should be able to see live camera video. -5- Foscam Digital Technologies LLC FI8905W Quick Installation Guide Congratulations! You have succeeded in accessing in the camera by wired connection. Just leave all the menus alone before you finish the quick installation. Note The default user name is admin with no password. If you are unable to see a live video, please make sure to allow ActiveX to run when prompted. If you only see a black screen with a red cross in the center, please try another port number instead of the default “port 80” .You may want to try port 85, 8005, etc. If you are still unable to see a live video, try shutting down any firewall or anti-virus software on your computer. 4. Wireless Connection Setup Wireless Lan Settings support Infra(Do wireless lan settings manually) ,WPS (Wi-Fi Protected Set-up) and Adhoc modes. If your router does not support WPS function, please go to chapter 4.1 and make wireless connection settings manually. If your router supports WPS function, please go to chapter 4.2 and make wireless connection settings quickly. If there is no wireless router, please read Wireless Settings in the User Manual about how to set Adhoc. 4.1 Infrastructure Mode Step 01) Please choose “Device Management” and goes to the option Wireless LAN Settings , click “Wireless LAN Settings”. Then enable “Using Wireless LAN”. Click the Scan button and the camera will detect all WIFI devices around the area. It should also display your router in the list. -6- Foscam Digital Technologies LLC FI8905W Quick Installation Guide Click Scan Button to search WIFI device . Wireless LAN Settings Step 02) Click the SSID of your router in the list, the corresponding information (SSID & Encryption) will be filled in the following boxes automatically. You will only need to fill in the share key. Make sure that SSID, Encryption and share key you filled in for the camera are exactly the same for your router. Click the SSID of router and SSID, Encryption will be filled in the following box automatically . Enter the same share key with your router . Wireless LAN Settings Step 03) Please click on the Submit button after all settings have been entered,the camera will reboot. After the camera has completed the reboot process, wait 10 seconds and disconnect the network cable. -7- Foscam Digital Technologies LLC FI8905W Quick Installation Guide The LAN IP address will disappear on the window of IP Camera Tool when the camera gets restarted. Just wait for around 1 minute, the camera will get wireless connection, and the LAN IP of the camera will be showed again on the window of the IP Cam Tool. You have done wireless connection of the camera successfully. If the camera has a dynamic IP, after the wireless settings, the IP will be changed. Note If fail to make WiFi connection, please make sure wireless signal is strong enough first, then you can refer to seller or us for help. 4.2 WPS (Wi-Fi Protected Set-up) Step 01) Press and hold the RESET button for four seconds. Reset Button . Step 02) Press the WPS button on your router within 60 seconds. The WPS button is usually on the back or side of your router. On some routers, you may need to log in to the web interface and click on an on-screen button to activate the WPS feature. If you are not sure where the WPS buttons is on your router, please refer to your router’s User Manual. The camera will automatically create a secure wireless connection to your router. If you have plugged in the network cable, please plug it out. While connecting, the green network light on RJ45 will blink and the wireless settings will take effect. The IP Camera Tool will search the camera’s LAN IP. Make sure the PC and the camera share the same subnet. Note 1 During the WPS Settings, you must press the Reset button only for four seconds, or else, the -8- Foscam Digital Technologies LLC FI8905W Quick Installation Guide camera may be reset back to factory default settings if you press and hold on the reset button above 10 seconds. 2 The security mode of router cannot be WEP, or else the WPS settings may be failed. 5. Remote Access Setup We have been able to access the camera within the LAN network, but how to access the camera via WAN or via internet? We have to do Remote Access Settings before we want to access the camera outside the LAN network. What is the HTTP Port no. and How to change it ? 1) Default HTTP No.: 80 All the cameras’ default http no. is 80. For example, if the LAN IP link of the camera is http://192.168.1.35, it says that the camera’s http port no. is 80, if the LAN IP link of the camera is http://192.168.1.35:88, it says that the camera’s http port no. is 88. Port 80 could be blocked when accessing via internet, we need to change port 80 to another one like 88, or 85 as you like, which will not be conflict with other existing ports like 25, 21. 2) Change the default http no.80 to another one like 88, or 85 etc. How to assign a different HTTP Port No. and fixed the LAN IP of the camera by the IP Camera Tool? Firstly Open the IP Camera Tool, and select the camera you would like to change the port for. Right click on the IP address, and click on “Network Configuration”, this brings up the network configuration box as shown: Select the camera you want to change the port no, right click . Goes to Option Network Configuration -9- Foscam Digital Technologies LLC FI8905W Quick Installation Guide Modify the Http Port no. Enter the User name and password, click OK . Change the http port no. Secondly, enter User name & password of the Administrator (default user: admin, no password), and click the button ”OK” to apply the modification. The Camera will restart one the modification is done. Thirdly, after the camera restart and get connected again, you will find the LAN IP link address has been change to http://192.168.1.35:88, and the LAN IP address is fixed at http://192.168.1.35:88. It won’t be changed no matter you re-power the camera or re-power the router. IP Camera Tool Windows Setting up Remote Access First, check to see if your ISP (Internet Service Provider) provides a Static WAN IP address service or a Dynamic WAN IP address service. This guide has been divided into two different sections of setting up remote access, one for Static IP addresses and one for Dynamic IP addresses. - 10 - Foscam Digital Technologies LLC FI8905W Quick Installation Guide If your ISP provides Static WAN IP Service please go to Chapter 5.1. If your ISP provides Dynamic WAN IP Service please go to Chapter 5.2 directly . 5.1 Static IP Addresses Users who have static IP addresses do not need to set DDNS service settings for remote access. When you have finished connecting the camera using the LAN IP address and port forwarding, you can access the camera directly from the Internet using the WAN IP address and port number. How to Obtain the WAN IP from a public website ? To obtain your WAN IP address, enter the following URL in your browser: http://www.whatismyip.com.The webpage at this address will show you the current WAN IP. Get to know the WAN IP address of the router Access the IP Camera from the Internet You can access the IP Camera from the Internet (remote access). Enter the WAN IP address and port number in IE browser or other browsers you use. For example, Http:// 183.37.28.254:85 Note Make sure port mapping (or also known as port forwarding) is successful. You can do port mapping in two ways. - 11 - Foscam Digital Technologies LLC FI8905W Quick Installation Guide 1) Enter the setting page of the router to enable UPNP function. Then login the camera as administrator, choose UPnP Settings to enable UPNP and make sure the state is “UPnP success”. 2) Do port forwarding manually. If your router has a Virtual Server, it will do port mapping. Please add the camera’s LAN IP and port which you set in basic network settings to the Virtual map list. Note: If you plug the camera in a router, it will have dynamic IP address and you need to set DDNS service settings to view it remotely. 5.2 How to configure Remote Access Settings (For dynamic IP user) ? DDNS is a service that allows your Network Camera, especially when assigned with a dynamic IP address, to have a fixed host and domain name, you can access the camera directly from the Internet by the domain name and port number. ① Make Port Forwarding of the HTTP Port of the camera What is port forwarding? If you have no concept of Port Forwarding, please open the webpage http://portforward.com/help/portforwarding.htm to learn some knowledge of Port Forwarding. Or Use Google to check out what is port forwarding. How to do port forwarding within the router ? Example: The camera’s LAN IP address is http://192.168.1.35:88 Firstly, login the router, goes to the menu of Port Forwarding or Port Trigger (or named Virtue Server on some brands of router). Take Linksys brand router as an example, Login the router, and goes to Applications & Gaming->Single Port Forwarding. Secondly, Create a new column by LAN IP address & HTTP Port No. of the camera within the router showed as below. - 12 - Foscam Digital Technologies LLC FI8905W Quick Installation Guide Port forwarding ② Use domain name to access the camera via internet Each FOSCAM camera has embedded a unique DDNS domain name when producing, and the format of domain name is xxxxxx.myfoscam.org. On the bottom of the camera body, you can see the domain name sticker. Here take camera.myfoscam.org for example. Go to option of DDNS Service Settings on the administrator panel, you can see the domain name. The default FOSCAM DDNS status is closed, if you want to use it, please enable it first. Enable FOSCAM DDNS DDNS Service Settings Windows - 13 - Foscam Digital Technologies LLC FI8905W Quick Installation Guide Now you can use http:// Domain name + HTTP Port to access the camera via internet. Take hostname camera.myfoscam.org and HTTP Port no. 88 for example, the accessing link of the camera via internet would be http:// camera.myfoscam.org:88 Foscam domain name is free for three years, three years later, if you want to continue using the account, you need to pay for it. On the option of DDNS Service Settings, click Validity Queries to check the validity and you will see the renew link. Note If you want to use Third Party Domain name, please read DDNS Service Settings in the User Manual about how to set it. 6. Other Settings Security At your first time logging in the camera, please go to “Users Settings” panel and reset the username or password to prevent intruders connect your device. The default username is admin with a blank password. Congratulations! You have finished the quick installation of the camera. You can take time to play the camera. Please refer to the electronic user manual burned in the CD-ROM for other settings. Other advanced software settings, such as Alarm Service Settings, Mail Service Settings, Alias Settings. - 14 - Foscam Digital Technologies LLC FI8905W Quick Installation Guide Quick Installation Guide - For MAC OS Package Contents IP Camera with IR-Cut x1 DC Power Adapter (5V-2.0A) .x 1 Network Cable x1 Wi-Fi Antenna .x 1 Mounting Bracket .x 1 Quick Installation Guide x1 CD-ROM with Setup Software .x 1 Security Warning Card x1 Quick Installation Diagram Hardware Installation Software Installation Login the Camera Wireless Connection Setup Remote Access Setup Other Settings - 15 - P.12 Foscam Digital Technologies LLC FI8905W Quick Installation Guide Security Warning Foscam cameras require good security practices to safeguard your privacy. You can help protect your camera by changing the default username and/or password. You should update your camera regularly at http://www.foscam.us/firmware.html. Make sure your camera has the latest firmware installed for your specific camera model. Start Installation 1. Hardware Installation 1) Open the package. Take out the camera out of the box carefully. 2) Mount the antenna. Then take the Wi-Fi antenna, mount it on the SMA connector on the back of the camera, screw the antenna to the back, and make the antenna stand vertically. Mount the antenna Plug the network cable 3) Get the camera connected to the router, and get it powered. Use the network cable to connect the camera to the router or the switch in the LAN network at your home or your office. Plug in the power. The small green light on RJ45 will turn on, the small orange light will blink. 2. Software Installation Insert the CD into the CD drive of your laptop and go to the folder “For MAC OS”. Copy the IP - 16 - Foscam Digital Technologies LLC FI8905W Quick Installation Guide camera tool to your MAC and start the program. IP Camera Tool Icon for Mac 3. Login to the Camera Double click the IP Camera Tool icon and the following screen should appear. IP Camera Tool Windows The IP camera tool should find the camera’s IP automatically after you plug in the network cable. If not, please make sure that DHCP is enabled on your router and that MAC address filtering, firewalls and anti-virus are disabled temporarily until the camera is set up. Double click the IP address of the camera; Safari will prompt you for a username and a password. Enter the username admin and leave the password field blank. This is the default login information. You will then see the camera’s login page. Default Username is admin with no password . When you log in for the first time, it will request that you modify the default username and/or password . Input the New username, New password and Confirm the password, click Modify to - 17 - Foscam Digital Technologies LLC FI8905W Quick Installation Guide complete the modification. You will now use the new username and password to log in to the camera in the future. Input the New username, New password and Confirm the password. The Login Screen Since ActiveX mode is not compatible on Mac, you will always click the Server Push Mode option to access the camera, whether you are on Safari, Chrome, or Firefox. Once you click on Server Push Mode, you should be taken to the live video screen immediately. - 18 - Foscam Digital Technologies LLC FI8905W Quick Installation Guide The Live Video Page 4. Wireless Connection Setup Wireless Lan Settings support Infra(Do wireless lan settings manually) ,WPS (Wi-Fi Protected Set-up) and Adhoc modes If your router does not support WPS function,please go to chapter 4.1 and make wireless connection settings manually. If your router supports WPS function, please go to chapter 4.2 and make wireless connection settings quickly. If there is no wireless router, please read Wireless Settings in the User Manual about how to set Adhoc. 4.1 Infrastructure Mode Step 01): Please choose “Device Management” and goes to the option Wireless LAN Settings , click “Wireless LAN Settings”. Then enable “Using Wireless LAN”. Click the Scan button and the camera will detect all WIFI devices around the area. It should also display your router in the list. - 19 - Foscam Digital Technologies LLC FI8905W Quick Installation Guide Click Scan Button to search WIFI device . Wireless LAN Settings Step 02): Click the SSID of your router in the list, the corresponding information (SSID & Encryption) will be filled in the following boxes automatically. You will only need to fill in the share key. Make sure that SSID, Encryption and share key you filled in for the camera are exactly the same for your router. Click the SSID of router and SSID, Encryption will be filled in the following box automatically . Enter the same share key with your router . Wireless LAN Settings Step 03): Please click on the Submit button after all settings have been entered, the camera will reboot. After the camera has completed the reboot process, wait 10 seconds and disconnect the network cable. - 20 - Foscam Digital Technologies LLC FI8905W Quick Installation Guide The LAN IP address will disappear on the window of IP Camera Tool when the camera gets restarted. Just wait for around 1 minute, the camera will get wireless connection, and the LAN IP of the camera will be showed again on the window of the IP Cam Tool. You have done wireless connection of the camera successfully. If the camera has a dynamic IP, after the wireless settings, the IP will be changed. Note If fail to make WiFi connection, please make sure wireless signal is strong enough first, then you can refer to seller or us for help. 4.2 WPS (Wi-Fi Protected Set-up) Step 01) Press and hold the RESET button for four seconds. Reset Button Step 02) Press the WPS button on your router within 60 seconds. The WPS button is usually on the back or side of your router. On some routers, you may need to log in to the web interface and click on an on-screen button to activate the WPS feature. If you are not sure where the WPS buttons is on your router, please refer to your router’s User Manual. The camera will automatically create a secure wireless connection to your router. If you have plugged in the network cable, please plug it out. While connecting, the green network light on - 21 - Foscam Digital Technologies LLC FI8905W Quick Installation Guide RJ45 will blink and the wireless settings will take effect. The IP Camera Tool will search the camera’s LAN IP. Make sure the PC and the camera share the same subnet. Note 1 During the WPS Settings, you must press the Reset button only for four seconds, or else, the camera may be reset back to factory default settings if you press and hold on the reset button above 10 seconds. 2 The security mode of router cannot be WEP, or else the WPS settings may be failed. 5. Remote Access Setup We have been able to access the camera within the LAN network, but how to access the camera via WAN or via internet? We have to do Remote Access Settings before we want to access the camera outside the LAN network. What is the HTTP Port no. and How to change it ? 1) Default HTTP No.: 80 All the cameras’ default http no. is 80. For example, if the LAN IP link of the camera is http://192.168.1.35, it says that the camera’s http port no. is 80, if the LAN IP link of the camera is http://192.168.1.35:88, it says that the camera’s http port no. is 88. Port 80 could be blocked when accessing via internet, we need to change port 80 to another one like 88, or 85 as you like, which will not be conflict with other existing ports like 25, 21. 2) Change the default http no.80 to another one like 88, or 85 etc. How to assign a different HTTP Port No. and fixed the LAN IP of the camera by the IP Camera Tool ? Firstly Open the IP Camera Tool, and select the camera you would like to change the port for. Right click on the IP address, and click on “Network Configuration”, this brings up the network configuration box as shown: - 22 - Foscam Digital Technologies LLC FI8905W Quick Installation Guide Select the camera you want to change the port no, right click . Goes to Option Network Configuration Modify the Http Port no. Enter the User name and password, click OK . Change the http port no. Secondly, enter User name & password of the Administrator (default user: admin, no password), and click the button ”OK” to apply the modification. The Camera will restart one the modification is done. Thirdly, after the camera restart and get connected again, you will find the LAN IP link address has been change to http://192.168.1.35:88, and the LAN IP address is fixed at http://192.168.1.35:88. It won’t be changed no matter you re-power the camera or re-power the router. - 23 - Foscam Digital Technologies LLC FI8905W Quick Installation Guide IP Camera Tool Windows Setting up Remote Access First, check to see if your ISP (Internet Service Provider) provides a Static WAN IP address service or a Dynamic WAN IP address service. This guide has been divided into two different sections of setting up remote access, one for Static IP addresses and one for Dynamic IP addresses. If your ISP provides Static WAN IP Service please go to Chapter 5.1. If your ISP provides Dynamic WAN IP Service please go to Chapter 5.2 directly . 5.1 Static IP user Static IP users do not need to set DDNS service settings for remote access. When you have finished connecting the camera using LAN and port forwarding, you can access the camera directly from the Internet by the WAN IP and port number. How to Obtain the WAN IP from a public website To obtain your WAN IP address, enter the following URL in your browser: http://www.whatismyip.com.The webpage at this address will show you the current WAN IP. Get to know the WAN IP address of the router - 24 - Foscam Digital Technologies LLC FI8905W Quick Installation Guide Access the IP Camera from the Internet You can access the IP Camera from the Internet (remote access). Enter the WAN IP address and port number in IE browser or other browsers you use. For example, Http:// 183.37.28.254:85 Note Make sure port mapping (or also known as port forwarding) is successful. You can do port mapping in two ways. 1) Enter the setting page of the router to enable UPNP function. Then login the camera as administrator, choose UPnP Settings to enable UPNP and make sure the state is “UPnP success”. 2) Do port forwarding manually. If your router has a Virtual Server, it will do port mapping. Please add the camera’s LAN IP and port which you set in basic network settings to the Virtual map list. Note: If you plug the camera in a router, it will have dynamic IP address and you need to set DDNS service settings to view it remotely. 5.2 How to configure Remote Access Settings (For dynamic IP user) DDNS is a service that allows your Network Camera, especially when assigned with a dynamic IP address, to have a fixed host and domain name, you can access the camera directly from the Internet by the domain name and port number. ① Make Port Forwarding of the HTTP Port of the camera What is port forwarding? If you have no concept of Port Forwarding, please open the webpage http://portforward.com/help/portforwarding.htm to learn some knowledge of Port Forwarding. Or Use Google to check out what is port forwarding. How to do port forwarding within the router ? Example: The camera’s LAN IP address is http://192.168.1.35:88 , Firstly, login the router, goes to the menu of Port Forwarding or Port Trigger (or named Virtue Server on some brands of router). Take Linksys brand router as an example, Login the - 25 - Foscam Digital Technologies LLC FI8905W Quick Installation Guide router, and goes to Applications & Gaming->Single Port Forwarding. Secondly, Create a new column by LAN IP address & HTTP Port No. of the camera within the router showed as below. Port forwarding ② Use domain name to access the camera via internet Each FOSCAM camera has embedded a unique DDNS domain name when producing, and the format of domain name is xxxxxx.myfoscam.org. On the bottom of the camera body, you can see the domain name sticker. Here take camera.myfoscam.org for example. Go to option of DDNS Service Settings on the administrator panel, you can see the domain name. The default FOSCAM DDNS status is closed, if you want to use it, please enable it first. Enable FOSCAM DDNS DDNS Service Settings Window - 26 - Foscam Digital Technologies LLC FI8905W Quick Installation Guide Now you can use http:// Domain name + HTTP Port to access the camera via internet. Take hostname camera.myfoscam.org and HTTP Port no. 88 for example, the accessing link of the camera via internet would be http:// camera.myfoscam.org:88 Foscam domain name is free for three years, three years later, if you want to continue using the account, you need to pay for it. On the option of DDNS Service Settings, click Validity Queries to check the validity and you will see the renew link. Note If you want to use Thirty Party Domain name, please read DDNS Service Settings in the User Manual about how to set it. 6. Other Settings Security At your first time logging in the camera, please go to “Users Settings” panel and reset the username or password to prevent intruders connect your device. The default username is admin with a blank password. - 27 - Foscam Digital Technologies LLC FI8905W Quick Installation Guide Congratulations! You have finished the quick installation of the camera. You can take time to play the camera. Please refer to the electronic user manual burned in the CD-ROM for other settings. Other advanced software settings, such as Alarm Service Settings, Mail Service Settings, Alias Settings. Foscam Digital Technologies LLC 14027 Memorial Dr. #132, Houston, TX 77079 Telephone: 1-800-930-0949 Sales: [email protected] Support: [email protected] - 28 -