1
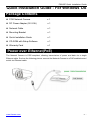
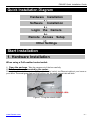
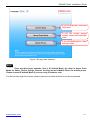
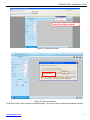
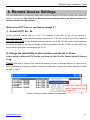
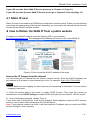
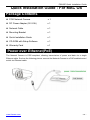
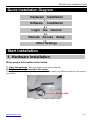
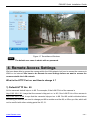
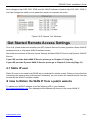
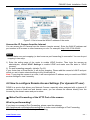
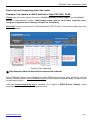
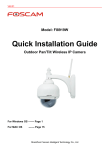
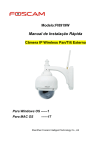
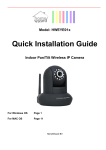
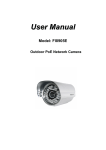
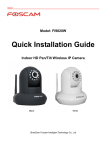
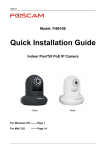
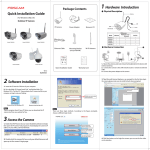
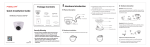
Model: FI8905E Quick Installation Guide Ourdoor POE Network Camera For Windows OS ------- Page 1 For MAC OS ------- Page 14 ShenZhen Foscam Intelligent Technology Co., Ltd FI8905E Quick Installation Guide Quick Installation Guide - For Windows OS Package Contents POE Network Camera x1 DC Power Adapter (5V-2.0A) .x 1 Network Cable x1 Mounting Bracket .x 1 Quick Installation Guide x1 CD-ROM with Setup Software .x 1 Warranty Card x1 Power over Ethernet(PoE) The Network Camera is POE-compliant, allowing transmission of power and data via a single Ethernet cable. Such as the following picture: connect the Network Camera to a PoE-enabled router/ switch via Ethernet cable. www.foscam.com -1- FI8905E Quick Installation Guide Quick Installation Diagram Hardware Installation Software Installation Login the Camera Remote Access Setup Other Settings Start Installation 1. Hardware Installation When using a PoE-enabled router/switch 1) Open the package. Take the camera out of the box carefully. 2) Get the camera connected to the router. Connect the Network Camera to a PoE-enabled router/ switch via Ethernet cable at your home or your office. The small green light on RJ45 will turn on, the small orange light will blink. Figure 1.1 Plug the network cable www.foscam.com -2- FI8905E Quick Installation Guide When using a non-PoE router/switch 1) Open the package. Take out the camera out of the box carefully. 2) Get the camera connected to the router and get it powered Use the network cable to connect the camera to the router or the switch in the LAN network at your home or your office. Plug in the power. The small green light on RJ45 will turn on, the small orange light will blink. Figure 1.2 Plug the network cable and power 2. Software Installation Insert the CD into the CD drive of your computer and find the folder “For Windows OS”. Double click IPCamSetup.exe to install, it pops up a window as below (Fig.1.3). Just click button “Next” to finish the installation. Figure 1.3 Click Next to continue the installation www.foscam.com -3- FI8905E Quick Installation Guide Figure 1.4 Click Finish to finish installation A shortcut icon will appear on your desktop after the IP Camera Tool software installation is successfully completed. Figure 1.5 Shortcut icon 3. Login the Camera Double click the IP Camera Tool icon and the following screen should appear. Figure 1.6 IP Camera Tool Windows The IP camera tool should find the camera’s IP automatically after you plug in the network cable. If not, please make sure that DHCP is enabled on your router and that MAC address filtering, firewalls and anti-virus are disabled temporarily until the camera is set up. Double click the LAN IP address of the camera, it pops up a password dialog box. www.foscam.com -4- FI8905E Quick Installation Guide Default user name is admin with no password Figure 1.7 Enter the username and password www.foscam.com -5- FI8905E Quick Installation Guide If you use IE browser, select this login mode If you use Firefox, Google Chrome, Safari, select this login mode If you use Mobile phone, select this login mode Figure 1.8 Login User Interface Note There are three login methods. One is IE ActiveX Mode, the other is Server Push Mode for Safari, Firefox, Google Chrome, the third mode is Mobile Phone for mobile phone. Please choose IE ActiveX Mode if you are using IE browser now. For the first time login the camera, please make sure to allow ActiveX to run when prompted. www.foscam.com -6- FI8905E Quick Installation Guide Select Run Add-on button Figure 1.9 Run the ActiveX Select Run Figure 2.0 Run the ActiveX Click Run button, and re-login the camera again, you can see the following surveillance window: www.foscam.com -7- FI8905E Quick Installation Guide Figure 2.1 Surveillance Windows Congratulations! You have succeeded in accessing in the camera by wired connection. Just leave all the menus alone before you finish the quick installation. Note The default user name is admin with no password. If you are unable to see a live video, please make sure to allow ActiveX to run when prompted. If you only see a black screen with a red cross in the center, please try another port number instead of the default “port 80” .You may want to try port 85, 8005, etc. If you are still unable to see a live video, try shutting down any firewall or anti-virus software on your computer. www.foscam.com -8- FI8905E Quick Installation Guide 4. Remote Access Settings We have been able to access the camera within the LAN network, but how to access the camera via WAN or via internet? We have to do Remote Access Settings before we want to access the camera outside the LAN network. What is the HTTP Port no. and How to change it ? 1) Default HTTP No.: 80 All the cameras’ default http no. is 80. For example, if the LAN IP link of the camera is http://192.168.1.35, it says that the camera’s http port no. is 80, if the LAN IP link of the camera is http://192.168.1.35:88, it says that the camera’s http port no. is 88. Port 80 could be blocked when accessing via internet, we need to change port 80 to another one like 88, or 85 as you like, which will not be conflict with other existing ports like 25, 21. 2) Change the default http no.80 to another one like 88, or 85 etc. How to assign a different HTTP Port No. and fixed the LAN IP of the camera by the IP Camera Tool? Firstly Open the IP Camera Tool, select the camera you want to change the port no, right click on the IP address link, and goes to Option ”Network Configuration”, it pops up another dialogue showed as Fig2.2, Fig2.3. Select the camera you want to change the port no, right click Figure 2.2 Goes to Option Network Configuration www.foscam.com -9- FI8905E Quick Installation Guide Modify the Http Port no. Enter the User name and password, click OK Figure 2.3 Change the http port no. Secondly, enter User name & password of the Administrator (default user: admin, no password), and click the button ”OK” to apply the modification. The Camera will restart one the modification is done. Thirdly, after the camera restart and get connected again, you will find the LAN IP link address has been change to http://192.168.1.35:88, and the LAN IP address is fixed at http://192.168.1.35:88. It won’t be changed no matter you re-power the camera or re-power the router. Figure 2.4 IP Camera Tool Windows Get Started Remote Access Settings First of all, please make sure whether your ISP (Internet Service Provider) provides a Static WAN IP address service or a Dynamic WAN IP address service. We divide two sections of Remote Access Settings by Static WAN IP Service and Dynamic WAN IP Service. www.foscam.com - 10 - FI8905E Quick Installation Guide If your ISP provides Static WAN IP Service please go to Chapter 4.1 (Page 11). If your ISP provides Dynamic WAN IP Service please go to Chapter 4.2 directly (Page 12). 4.1 Static IP user Static IP users do not need to set DDNS service settings for remote access. When you have finished connecting the camera using LAN and port forwarding, you can access the camera directly from the Internet by the WAN IP and port number. How to Obtain the WAN IP from a public website To obtain your WAN IP address, enter the following URL in your browser: http://www.whatismyip.com.The webpage at this address will show you the current WAN IP. Figure 2.5 Get to know the WAN IP address of the router Access the IP Camera from the Internet You can access the IP Camera from the Internet (remote access). Enter the WAN IP address and port number in IE browser or other browsers you use. For example, Http:// 183.37.28.254:85 Note Make sure port mapping (or also known as port forwarding) is successful. You can do port mapping in two ways. 1) Enter the setting page of the router to enable UPNP function. Then login the camera as administrator, choose UPnP Settings to enable UPNP and make sure the state is “UPnP success”. 2) Do port forwarding manually. (details: Fig.2.6) If your router has a Virtual Server, it will do port mapping. Please add the camera’s LAN IP and port which you set in basic network settings to the Virtual map list. Note: If you plug the camera in a router, it will have dynamic IP address and you need to set DDNS service settings to view it remotely. www.foscam.com - 11 - FI8905E Quick Installation Guide 4.2 How to configure Remote Access Settings (For dynamic IP user) DDNS is a service that allows your Network Camera, especially when assigned with a dynamic IP address, to have a fixed host and domain name, you can access the camera directly from the Internet by the domain name and port number. ① Make Port Forwarding of the HTTP Port of the camera What is port forwarding? If you have no concept of Port Forwarding, please open the webpage http://portforward.com/help/portforwarding.htm to learn some knowledge of Port Forwarding. Or Use Google to check out what is port forwarding. How to do port forwarding within the router Example: The camera’s LAN IP address is http://192.168.1.35:88 , Firstly, login the router, goes to the menu of Port Forwarding or Port Trigger (or named Virtue Server on some brands of router). Take Linksys brand router as an example, Login the router, and goes to Applications & Gaming->Single Port Forwarding. Secondly, Create a new column by LAN IP address & HTTP Port No. of the camera within the router showed as below. Figure2.6 Port forwarding ② Use domain name to access the camera via internet Each FOSCAM camera has embedded a unique DDNS domain name when producing, and the format of domain name is xxxxxx.myfoscam.org. On the bottom of the camera body, you can see the domain name sticker. www.foscam.com - 12 - FI8905E Quick Installation Guide Here take camera.myfoscam.org for example. Go to option of DDNS Service Settings on the administrator panel, you can see the domain name. Figure 2.7 DDNS Service Settings Windows Now you can use http:// Domain name + HTTP Port to access the camera via internet. Take hostname camera.myfoscam.org and HTTP Port no. 88 for example, the accessing link of the camera via internet would be http:// camera.myfoscam.org:88 Foscam domain name is free for three years, three years later, if you want to continue using the account, you need to pay for it. On the option of DDNS Service Settings, click Validity Queries to check the validity and you will see the renew link. Note If you want to use Third Party Domain name, please read DDNS Service Settings in the User Manual about how to set it. 5. Other Settings Congratulations! You have finished the quick installation of the camera. You can take time to play the camera. Please refer to the electronic user manual burned in the CD-ROM for other settings. Other advanced software settings, such as Alarm Service Settings, Mail Service Settings, User Settings, If you have problem with FOSCAM IP camera, please first contact FOSCAM reseller for solving the problems. If our reseller cannot provide service, pls contact our service department: [email protected] . www.foscam.com - 13 - FI8905E Quick Installation Guide Quick Installation Guide - For MAC OS Package Contents POE Network Camera .x 1 DC Power Adapter (5V-2.0A) .x 1 Network Cable x1 Mounting Bracket .x 1 Quick Installation Guide x1 CD-ROM with Setup Software .x 1 Warranty Card x1 Power over Ethernet(PoE) The Network Camera is POE-compliant, allowing transmission of power and data via a single Ethernet cable. Such as the following picture: connect the Network Camera to a PoE-enabled router/ switch via Ethernet cable. www.foscam.com - 14 - FI8905E Quick Installation Guide Quick Installation Diagram Hardware Installation Software Installation Login the Camera Remote Access Setup Other Settings Start Installation 1. Hardware Installation When using a PoE-enabled router/switch 1) Open the package. Take the camera out of the box carefully. 2) Get the camera connected to the router. Connect the Network Camera to a PoE-enabled router/ switch via Ethernet cable at your home or your office. Figure 1.1 Plug the network cable www.foscam.com - 15 - FI8905E Quick Installation Guide When using a non-PoE router/switch 1) Open the package. Take out the camera out of the box carefully. 2) Get the camera connected to the router and get it powered Use the network cable to connect the camera to the router or the switch in the LAN network at your home or your office. Plug in the power. The small green light on RJ45 will turn on, the small orange light will blink. Figure 1.2 Plug the network cable and power 2. Software Installation Insert the CD in your CD drive of your laptop and find the folder “For MAC OS”. Copy the IP camera tool to your MAC and start the program. Figure 1.3 Shortcut icon 3. Login the Camera Double click the IP Camera Tool icon and the following screen should appear. Figure 1.4 IP Camera Tool Windows The IP camera tool should find the camera’s IP automatically after you plug in the network cable. If not, please make sure that DHCP is enabled on your router and that MAC address filtering, firewalls and anti-virus are disabled temporarily until the camera is set up. Double click the LAN IP address of the camera, it pops up a password dialog box. www.foscam.com - 16 - FI8905E Quick Installation Guide Default Username is admin with no password Figure 1.5 Enter user name: admin, no password, and click login If you use IE browser, select this login mode If you use Firefox, Google Chrome, Safari, select this login mode If you use Mobile phone, select this login mode Figure 1.6 Login User Interface Note There are three login methods. One is IE ActiveX Mode, the other is Server Push Mode for Safari, Firefox, Google Chrome, the third mode is Mobile Phone for mobile phone. Please choose Server Push Mode if you are using Firefox.Safari or Google Chrome browser now. www.foscam.com - 17 - FI8905E Quick Installation Guide Figure 1.7 Surveillance Windows Note The default user name is admin with no password. 4. Remote Access Settings We have been able to access the camera within the LAN network, but how to access the camera via WAN or via internet? We have to do Remote Access Settings before we want to access the camera outside the LAN network. What is the HTTP Port no. and How to change it ? 1) Default HTTP No.: 80 All the cameras’ default http no. is 80. For example, if the LAN IP link of the camera is http://192.168.1.35, it says that the camera’s http port no. is 80, if the LAN IP link of the camera is http://192.168.1.35:88, it says that the camera’s http port no. is 88. Port 80 could be blocked when accessing via internet, we need to change port 80 to another one like 88, or 85 as you like, which will not be conflict with other existing ports like 25, 21. www.foscam.com - 18 - FI8905E Quick Installation Guide 2) Change the default http no.80 to another one like 88, or 85 etc. How to assign a different HTTP Port No. and fixed the LAN IP of the camera by the IP Camera Tool? Firstly Open the IP Camera Tool, select the camera you want to change the port no, right click on the IP address link, and goes to Option ”Network Configuration”, it pops up another dialogue showed as Fig1.8, Fig1.9. Select the camera you want to change the port no, right click Figure 1.8 Goes to Option Network Configuration Modify the Http Port no. Enter the User name and password, click OK Figure 1.9 Change the http port no. Secondly, enter User name & password of the Administrator (default user: admin, no password), and click the button ”OK” to apply the modification. The Camera will restart one the modification is done. Thirdly, after the camera restart and get connected again, you will find the LAN IP link address has www.foscam.com - 19 - FI8905E Quick Installation Guide been change to http://192.168.1.35:88, and the LAN IP address is fixed at http://192.168.1.35:88. It won’t be changed no matter you re-power the camera or re-power the router. Figure 2.0 IP Camera Tool Windows Get Started Remote Access Settings First of all, please make sure whether your ISP (Internet Service Provider) provides a Static WAN IP address service or a Dynamic WAN IP address service. We divide two sections of Remote Access Settings by Static WAN IP Service and Dynamic WAN IP Service. If your ISP provides Static WAN IP Service please go to Chapter 4.1 (Page 20). If your ISP provides Dynamic WAN IP Service please go to Chapter 4.2 directly (Page 21). 4.1 Static IP user Static IP users do not need to set DDNS service settings for remote access. When you have finished connecting the camera using LAN and port forwarding, you can access the camera directly from the Internet by the WAN IP and port number. How to Obtain the WAN IP from a public website To obtain your WAN IP address, enter the following URL in your browser: http://www.whatismyip.com.The webpage at this address will show you the current WAN IP. www.foscam.com - 20 - FI8905E Quick Installation Guide Figure 2.1 Get to know the WAN IP address of the router Access the IP Camera from the Internet You can access the IP Camera from the Internet (remote access). Enter the WAN IP address and port number in IE browser or other browsers you use. For example, Http:// 183.37.28.254:85 Note Make sure port mapping (or also known as port forwarding) is successful. You can do port mapping in two ways. 1) Enter the setting page of the router to enable UPNP function. Then login the camera as administrator, choose UPnP Settings to enable UPNP and make sure the state is “UPnP success”. 2) Do port forwarding manually. (details: Fig.2.2) If your router has a Virtual Server, it will do port mapping. Please add the camera’s LAN IP and port which you set in basic network settings to the Virtual map list. Note: If you plug the camera in a router, it will have dynamic IP address and you need to set DDNS service settings to view it remotely. 4.2 How to configure Remote Access Settings (For dynamic IP user) DDNS is a service that allows your Network Camera, especially when assigned with a dynamic IP address, to have a fixed host and domain name, you can access the camera directly from the Internet by the domain name and port number. ① Make Port Forwarding of the HTTP Port of the camera What is port forwarding? If you have no concept of Port Forwarding, please open the webpage http://portforward.com/help/portforwarding.htm to learn some knowledge of Port Forwarding. Or Use Google to check out what is port forwarding. www.foscam.com - 21 - FI8905E Quick Installation Guide How to do port forwarding within the router Example: The camera’s LAN IP address is http://192.168.1.35:88 , Firstly, login the router, goes to the menu of Port Forwarding or Port Trigger (or named Virtue Server on some brands of router). Take Linksys brand router as an example, Login the router, and goes to Applications & Gaming->Single Port Forwarding. Secondly, Create a new column by LAN IP address & HTTP Port No. of the camera within the router showed as below. Figure2.2 Port forwarding ② Use domain name to access the camera via internet Each FOSCAM camera has embedded a unique DDNS domain name when producing, and the format of domain name is xxxxxx.myfoscam.org. On the bottom of the camera body, you can see the domain name sticker. Here take camera.myfoscam.org for example. Go to option of DDNS Service Settings on the administrator panel, you can see the domain name. www.foscam.com - 22 - FI8905E Quick Installation Guide Figure 2.3 DDNS Service Settings Window Now you can use http:// Domain name + HTTP Port to access the camera via internet. Take hostname camera.myfoscam.org and HTTP Port no. 88 for example, the accessing link of the camera via internet would be http:// camera.myfoscam.org:88 Foscam domain name is free for three years, three years later, if you want to continue using the account, you need to pay for it. On the option of DDNS Service Settings, click Validity Queries to check the validity and you will see the renew link. Note If you want to use Thirty Party Domain name, please read DDNS Service Settings in the User Manual about how to set it. 5. Other Settings Congratulations! You have finished the quick installation of the camera. You can take time to play the camera. Please refer to the electronic user manual burned in the CD-ROM for other settings. Other advanced software settings, such as Alarm Service Settings, Mail Service Settings, User Settings, If you have problem with FOSCAM IP camera, please first contact FOSCAM reseller for solving the problems. If our reseller cannot provide service, pls contact our service department: [email protected] . ShenZhen Foscam Intelligent Technology Co., Ltd www.foscam.com - 23 -