1
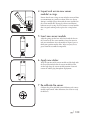
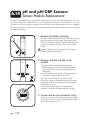
pH and pH/ORP Sensors
6.14 Sensor Module Replacement
EXO pH and pH/ORP feature replaceable sensor modules due to the electrolyte depleting characteristics
necessary to make such measurements. We recommend that users replace these modules as necessary,
typically one to two years if stored properly in the provided storage solution when not in use. Working
life will depend on the conditions of the deployment environment. Perform this procedure in a clean, dry
laboratory environment.
1 Remove old sticker and plug.
A
Peel off and discard the old sticker that covers the junction
of the sensor body and the module. Then, with a small,
flat-blade screwdriver, remove the small rubber plug from
the gap in the hard plastic ring at the base of the sensor
module.
Caution: Always exercise extra care when using sharp or
potentially harmful instruments.
2 Remove and discard old sensor
module.
2
1
1
To remove, perform two motions simultaneously.
1.With your fingers, squeeze the sensor module’s hard
plastic ring so that it compresses the gap left by the
rubber plug.
2.Steadily pull the sensor module straight back from the
sensor body, rocking slightly if necessary.
Note: The act of removing the old sensor module
renders the o-rings on the module unusable. To prevent
catastrophic leaks, do not attempt to reinstall a module
with damaged o-rings.
Discard the head according to your organization’s
guidelines, or return it to manufacturer for recycling.
3 Inspect and service connector cavity.
Inspect the connector cavity of the probe body for debris
or moisture. If detected, remove it with a lint-free cloth or a
gentle blast of compressed air.
pg
| 102
4 Inspect and service new sensor
module’s o-rings.
Ensure that the two o-rings are not nicked or torn and have
no contaminants or particles on them. If the user detects
damage, carefully replace them with the extras included in
the sensor module kit. Then apply a thin coat of Krytox®
lubricant to each o-ring. If a user removes a sensor module
that is in good working order, replace the o-rings before
use.
5 Insert new sensor module.
Align the prongs on the base of the head with the slots in
the sensor body. The sensor module is keyed to insert in
only one orientation. Once the module is aligned, press it
firmly into position until it clicks. Wipe away any excess
grease from the assembled components.
6 Apply new sticker.
Wrap the junction of the sensor module and the body with
the new sticker included in the sensor module kit. This
sticker helps keep the sensor module junction clean and
retains the rubber plug throughout deployment.
7 Re-calibrate the sensor.
Calibrate the pH or pH/ORP sensor following each sensor
module replacement. After calibration, the sensor is ready
for field use.
pg
| 103