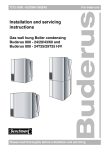
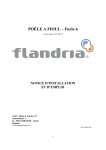
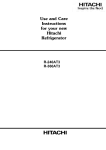
1
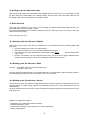
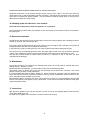
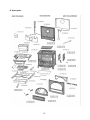
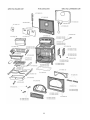
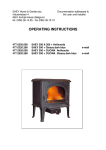
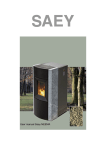
SAEY Home & Garden NV
Industrielaan 4
B - 8501 Kortrijk-Heule
www.saeyheating.com
Documentation addressed
to the user and installer
Installation – and Operation Manual
SAEY 92 (TOP) WOOD/COAL
478.0292.XX
478.0392.XX
Saey 92 coal
Saey 92 TOP coal
1
Contents
1.
GENERAL INFORMATION ...................................................................
3
2.
T ECHNICAL CHARACTERISTICS .........................................................
4
DIMENSIONS OF THE STOVE ..............................................................
4
3.
IMPORTANT ......................................................................................
4
4.
INSTALLATION OF THE STOVE ...........................................................
5
5.
CONNECTION OF THE STOVE TO THE CHIMNEY ..................................
5
6.
SUITABLE FUEL
...............................................................................
6
7.
BEFORE FIRST USE ..........................................................................
6
8.
WARNING! P LAYING CHILDREN! .......................................................
6
9.
STOKING UP OF THE FIRE .................................................................
7
10.
FILLING WITH COALS
........................................................................
7
11.
STOKING UP THE FIRE WITH BROWN COAL ........................................
7
12.
STOKING UP THE FIRE
.......................................
8
13.
REFILL WITH FUELS
..........................................................................
8
14.
STOKING UP THE FIRE WITH WOOD ..................................................
8
WITH BRECHCOKES
14.1 REBUILD..........................................................................................
14.2 REFILL.............................................................................................
14.3 SERVICE .........................................................................................
14.4 ASH REMOVAL .................................................................................
15.
REMOVAL OF THE ASHES ..................................................................
9
16.
M AINTENANCE ..................................................................................
9
17.
INSTRUCTIONS ..................................................................................
9
18.
SPARE PARTS ...................................................................................
10
19.
FAULTS ............................................................................................
12
20.
GUARANTEE ....................................................................................
14
2
1. General information
Dear user!
When you purchased this SAEY 92, you chose a high class cast-iron combustion and heating appliance.
Our warmest congratulations!
We devoted a lot of attention to the technology, but also to the materials used, the processing and the
compactness of the appliance. This enables us to guarantee problem-free operation.
If you wish to achieve maximal performance in terms of ecological and economical considerations, you
should comply with this installation and operation manual and carry out its instructions.
If the stove is damaged due to non-compliance with the installation and operation manual, the guarantee
will no longer be valid.
If the stove is built in, the applicable laws and local regulations regarding fire prevention and architecture
should be complied with.
Are you looking for further information or technical data? Installation problems? Contact your
distributor first.
Please keep in a safe place!
Subject to amendment!
Sketches are not contractually binding!
3
2. Technical characteristics
TYPE
Maximum heating capacity
Performance class
kW
S 92 H/K
5 - 14
%
1 (h>70)
Dimensions of the stove
Height stand. type
TOP type
Width
mm
mm
mm
765
800
710
Width stand. type
TOP type
Rear connection
mm
mm
550
580
ja
mm
mm
Ø mm
557
557
150
Distance middle connect.pipe - floor
Stand. type
TOP type
Outside Ø of the connector pipe
Dimensions glass HxWxThickness
mm
Space to heat
m
461x265x4
225
Small filler door opening
mm
18.5 x 17
Max. length for wood
Type anthracite
mm
mm
500
20/30
Weight op the stove
S 92
ca. kg
200
S 92 TOP
ca. kg
218
3. Important
WARNING!
- The user of a stove must read the manual attentively before using the appliance for the first time.
- If your stove has been installed in the living room, you must ensure a sufficient supply of fresh air in any
case.
- The appliance should only be used with closed doors.
- When the doors remain open once the stove is functioning, the thermostat function is disabled and the
inflow into the stove is no longer being controlled. The danger then arises that the stove will become too hot,
so that slag formation takes place and the parts exposed to the flames are damaged.
-This kind of damage is not covered by the guarantee.
- Shut the stove doors and turn off the thermostat, even when the stove is not in operation.
4
4. Installation of the stove
It is only when the appliance was connected by an authorised installer that you can be certain that the
installation and fire protection instructions were observed.
The most important connection component is the chimney.
Make an appointment with a recognised chimneysweeper so that the specific regulations applicable in the
country of use in this regard, are also complied with.
Also pay attention to the following:
The stove is suitable for a chimney with several shafts. For this purpose, the stove must be used with
closed doors.
The inflow of air must be sufficient in whatever space the appliance has been installed. Tightly closed doors
and windows may cause problems in this regard.
Preferably place your stove near the chimney (hearth). A heat-resistant, fireproof base (bottom plate) must
be placed underneath the stove.
These bases (made of cast iron, steel sheeting,…) are available commercially. In any case, ensure that the
base is fireproof.
Flammable objects such as doors, furniture, woodwork etc. must be at a distance of at least 60 cm.
Thanks to the protective plate at the back of the stove, the appliance may be placed up to 30 cm from the
wall.
5. Connection of the stove to the chimney
A strong chimney draught makes it possible to connect the stove directly to the
chimney (with outlet at the back). The diameter of the smoke duct must correspond
with that of the connector (150 mm).
When the draught of the chimney is insufficient, under 0,08 mbar (0,8 mm WS) –
the stove must be connected with a perpendicularly smoke duct of 1 till 1,5 m length
with the chimney (outlet above).
The smoke duct must be sealed at all connection points! Attent ion is specifically
drawn to the danger of escaping fumes. False air results in a weaker chimney
draught.
If the chimney draught is too strong, the installation of a draught regulator is
recommended.
Take note of the following precautionary measures before the smoke duct is installed:
•
•
•
•
•
•
•
The diameter of the smoke duct may not be reduced, the smoke duct may not be made smaller and it
may not be positioned horizontally, but should rise towards the chimney at a slight angle.
The stovepipe must fit into the chimney opening to make the discharge of fumes possible. Make
provision for a double lining in this regard.
Chimney connections of different stoves may not be so positioned opposite one other, i.e. at the same
height. This may obstruct the discharge of exhaust fumes. The minimum distance between two outlets for
fumes should be at least 30 cm.
Do not connect too many stoves to one chimney – too many connections hamper the upward draught.
Ask you chimney sweeper for advice.
The chimney may not conduct any false air. Ensure that the chimney control valves as well as the
cleaning openings in the cellar are closed.
The smoke duct must be securely attached to the connector.
The chimney and the stove must be cleaned once a year by a recognized chimney sweeper.
5
6. Suitable fuel
The SAEY 92 stove makes use of the following fuels:
* Anthracite, grain structure 20/30
* wood: logs with sticky bark, e.g. cleaved logs with a length of 33 cm. The wood should be stored for about
2 years, and should have a maximum residual humidity level of 20%. Wet wood does not burn well and
produces smoke, resulting in condensation and a tar discharge, which makes the stove dirty. Take care: DO
NOT burn waste matter.
When burning wood a rebuilding of the stove is necessary and some
further regulations and air supplies are different to handle.
7. Before first use
When used for the first time, the stove must be dried out first. For this purpose, use a little fuel to keep the
fire burning for one hour. Thermostat on position “Max.Open”.
Monitor the protection process carefully. In this regard, carefully wipe off any condensation drops before the
residue gets a chance to burn into the enamel (e.g. the lacquer).
8. Warning! Playing children!
A stove gets hot, especially the covering plate, the casing and the glass pane.
Install your stove in a safe place in order to prevent children from touching it.
Even if all the safety regulations are observed, there is still a risk of accidents occurring.
KEEP SMALL CHILDREN AT A SAFE DISTANCE
6
9. Stoking up the fire
When the stove is lit – thermostat: on position “8”
Open the door with the glass panel and put crumpled newspapers on the fire grating, with a handful of
splintered wood (thin wood) on top of it.
Alternative: 4 – 5 firelighters. Pour on that a small amount fuel. After the stove has been lit, the door with the
glass panel must be firmly closed.
The door of the ash pan must be opened slightly so that the condensation vapours that are released will not
be deposited on the cold door with the glass panel.
Monitor the combustion process, and close the door of the ash pan after about 10 minutes.
IMPORTANT: The door of the ash pan and the door with the glass panel should now not be opened again,
except for the purpose of topping up.
10. Filling with coals
You may start to fill the stove when the lighting fuel is totally burnt up and if the base is still glowing
sufficiently. The filling funnel is filled as it suits you but it has to be at least half full.
The stove may only be filled till the mark sign. The above gas slots in the filling funnel must stay free so that
the gases, carbonized at a low temperature, could escape.
When max. filled the stove can work 14 till 16 hours!
When max. filled with lower thermostat position till 24 hours.
To stoke: - air drawer: fix “closed”
- thermostat: position 2-8, as you desire
IMPORTANT:
It is recommended to put the thermostat on a lower position after half an hour. For this purpose are you sure
that the burning is carried out correctly.
The ignition of the thermostat depends also on other factors: the local circumstances, the condition of the
building and the chimney. After a bit experimentation, you will regulate easily and definitely your stove.
11. Stoking up the fire with brown coal
The amounts usable fuel (long briquettes 6” – 7” and little briquettes) is defined by the desired warmth. Only
when there is much warmth necessary, the stove has to be filled fully.
The smallest position (1-2) is the “glow position”.
For heating in the night, when there is only a small need to warmth, the 3- 4 long briquettes are enough or 2
spades briquettes on the burning grid without poking in the ashes.
Put the thermostat on minimal air supply (1-2).
7
12. Stoking up the fire with brech-cokes
When the burning is weak, the brechcokes needs a bigger amount of burning air. It is not possible to make
the stove work with a thermostat in the smallest position, what the case is with other fuels. Above all, the
thermostat could only be put gradually on a smaller position.
13. Refill with fuels
Coal: with every refilling turn, you have to use a shaking grid. Before opening the filling funnel lid, the
thermostat has to be put on position “8 open”.
So that the outlet gases that are located in the filling funnel or in the burning room, not come on the place
where the stove is located.
Wood: not poke: (see 14.4)
14.1 Stoking up the fire with wood - Rebuild
When you want your stove works with wood, then there is a small rebuild necessary. Following steps need
to be done:
• Remove the filling funnel after you opened the lid
• Place the wood grid you can buy optionally instead of the coal grid
• The secundairy air drawer between the 2 front doors must be open
(must be closed while
using coals)
• With the 2 air drawers you can find above the fire door, you can fix the air supply. Release the air
drawer button by turning ¼ of a turn left. (should be closed while using coals)
14.2 Stoking up the fire with wood - Refill
To stoke - thermostat: position 1-2 (base position wood)
- air drawer: “open” max.
The logs should be inserted through the right-hand filler door or the door with the glass panel and placed on
the still sufficiently glowing base, in no more than 2 layers. Do not overfill.
14.3 Stoking up the fire with wood - Service
The burning of wood is accompanied by high flames and heavy smoke production. Wood must be burnt up
rapidly and with a constant oxygen supply. The combustion process may not be slowed down under any
circumstances.
Avoid an excessive amount of fuel in any case, otherwise the energy surge become too great and too much
heat will be lost.
Negative consequences could be:
* smouldering fire, condensation and tar discharge
* excessive production of soot
* inconvenience caused by smoke (emission of harmful substances)
* danger of asphyxiation
8
WOOD PROVIDES INTENSE COMBUSTION OF SHORT DURATION/
Sustained combustion is only achieved through regular top-ups, which means: only when the wood has
almost been burnt up and the degassing process completed – high flames are reduced to small, low flames
and wood is converted into glowing embers – can the emission of heat be slowed down by closing the air
slider above the glass door (see image).
14.4 Stoking up the fire with wood – Ash removal
Take note: de not poke the fire when the appliance is in operation.
Wood combustion produces little ash. Because of this, the remains of the embers continue to smoulder in
the glowing ash.
15. Removal of the ashes
The ashes from the stove have to be removed daily 1 till 2 times. Poking happens with a shaking bar that is
located on the back, with a closed ash door.
From time to time the slag rests has also to be removed. This can happen with a pull grid. The pull grid is
located behind the ash door and the handle is pulled away.
In this purpose you get an opening and you can easily scrape the ash rests and slag with a poke.
The ash pan may be maximally filled with ash to the upper edge. No ash cone may be formed: otherwise
cooling of the combustion chamber becomes impossible and the cast iron parts would begin to melt.
The ash door should always be closed when the stove is in operation. If this is not done, the stove
overheats and is damaged.
16. Maintenance
The smoke discharge duct (between the checking-plate and the rear wall) must be cleaned after every
heating season – at least 1 x a year.
By removing the control damper, you will be able to reach the smoke discharge duct.
This makes it easy to remove the fly ash from the discharge duct as well as the connector. The control
damper must be put back correctly afterwards.
It is recommended that, after the feating season (i.e. during the summer months) the flue pipe between the
stove and chimney should be removed or sealed in order to prevent condensation and/or corrosion in the
stove. This improves the durability of your stove.
Before starting again to heat with your stove after a period of not using it is recommended to decrease the
tension of the screws on the glass by using a screwdriver. In this case you will raise the lifespan of the glass
and avoid possible cracks.
17. Instructions
With the luxury appliance you may put just after 1 month in use on the polished filling funnel lid and the
carrier water kettle, pans, etc.
No water may be spilled on the hot plates, to prevent cracks from forming.
9
18. Spare parts
10
11
19. Faults
Malfunctioning
The fire is not burning well
Cause
Solution
Wood too moist
Wrong fuel
•
•
Chimney draught too weak:
(Minimal pressure: 10Pa at the
heating gas connector pipe)
•
•
•
•
•
Glass soon gets dirty
Not enough combustion air
•
Wood too moist
Wrong fuel
•
•
•
Too much wood has been added
•
Not enough combustion air
•
A lacquer odour is emitted
and smoke develops
Curing of the primer used
•
Condensation
High temperature difference
•
Inconvenience caused by
smoke
Chimney draught too weak:
(Minimal pressure: 10Pa on the
outlet connector pipe)
•
•
•
•
•
•
Fuel has not been burnt up
completely
Gradual capacity regulator
(thermostat)
Check; max. residual moisture 20%
Use only the fuel allowed for the
appliance
Check the air-tightness of the outlet
Light a kindling fire in the chimney
Close any open doors of other
appliances connected to the
chimney.
Close the cleaning hatches of the
chimney
If necessary, clean the connector
pipe
Check the ventilation installation of
the residence or cooker hood, and
open a window if necessary
Check; max. residual moisture 20%
Fuel not small enough – max.
circumference is 50 cm
Use only the fuel allowed for the
appliance
Do not add more than 2 to 3 pieces
of wood
Check the ventilation installation of
the residence or cooker hood, and
open a window if necessary
Rapid heating of the heating
appliance will result in an odour
being given off (see 3.1). This will
dissipate after a while
Open the door slightly during the
heating phase. Do not leave the
appliance unattended during this
phase!
Check the air-tightness of the outlet
Light a kindling fire in the chimney
Close any open doors of other
appliances connected to the
chimney.
Close the cleaning hatches of the
chimney
If necessary, clean the connector
pipe
In principle, fuel should be topped
up only when no more orange
flames are visible in the stove.
Service grip
12
Ash pan
Base position: open (outside)
Base position: open (outside)
Mark sign in filling funnel lid
(max. filling height coal)
Max. stacking height of logs
Opening the filling funnel lid
take out the filling funnel
Take out the cleaning panel
13
20. Guarantee
The manufacturer guarantees
a.
b.
impeccable quality and processing of the raw materials according to the
stated requirements
assembled by an expert
The guarantees a. en b. provide for free repairs to the appliance, more specifically to parts declared unfit for
use.
Such parts are only replaced free of charge when it can be proven that there are flaws in the raw materials
or in the workmanship.
No further claims may be made.
The manufacturer doe s not guarantee
Parts that are subject to wear and tear, and damage to and defects in the appliances or their parts, caused
by:
Chemical or physical influences from outside with regard to transport, storage, incorrect installation and use
of appliance (e.g. cooling down with water, overheating).
Use of inferior fuels – incorrect operation.
The manufacturer is not responsible for direct or indirect damage caused by the appliance. No claim can be
laid to a full or partial exchange, unless the manufacturer is unable to fix the flaw or damage within a certain
time span.
Your Saey / Flandria device is guaranteed for two years against any manufacturing defect from the
date of purchase provided that it is used according to the user’s manual. The till slip or bill
indicating the date substitutes for the guarantee.
The scope of this guarantee is limited to the repair or replacement of parts that are discovered to be
faulty during the course of normal use.
This guarantee does not apply to malfunctions due to poor installation, incorrect use, modification
of the device, dismantling of the device, wear and tear or lack or maintenance.
Claims against guarantee must always be made at your point of sales.
14