1
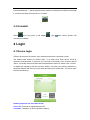
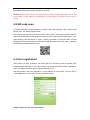
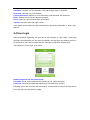
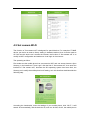
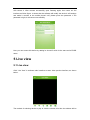
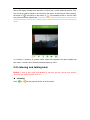
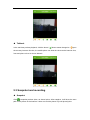
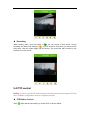
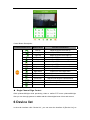
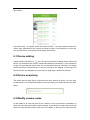
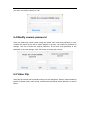
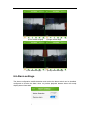
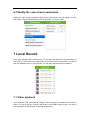
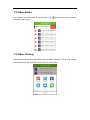
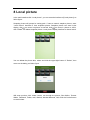
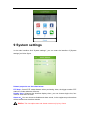
IOS Seetong User Manual Ver 1.2 Content 1 PREFACE .............................................................................................................................................3 2 FUNCTION BRIEF ................................................................................................................................3 3 INSTALL AND UNINSTALL SOFTWARE .................................................................................................4 4 LOGIN ................................................................................................................................................5 4.1 Device login .............................................................................................................................5 4.2 QR code scan..........................................................................................................................6 4.3 User registration......................................................................................................................6 4.4 User login .................................................................................................................................7 4.5 Set camera Wi-Fi ....................................................................................................................8 5 LIVE VIEW ..........................................................................................................................................9 5.1 Live view...................................................................................................................................9 5.2 Listening and talking back ...................................................................................................10 5.3 Snapshot and recording....................................................................................................... 11 5.4 PTZ control ............................................................................................................................12 6 DEVICE LIST .....................................................................................................................................13 6.1 Device adding........................................................................................................................14 6.2 Device searching ..................................................................................................................14 6.3 Modify camera name............................................................................................................14 6.4 Modify camera password.....................................................................................................15 6.5 Video Flip ...............................................................................................................................15 6.6 Alarm settings........................................................................................................................16 6.7 Modify the code stream parameters. .................................................................................17 7 LOCAL RECORD ................................................................................................................................17 7.1 Video playback ......................................................................................................................17 7.2 Video delete...........................................................................................................................18 7.3 Video sharing.........................................................................................................................18 8 LOCAL PICTURE ................................................................................................................................19 9 SYSTEM SETTINGS ............................................................................................................................20 10 ALARM MESSAGE ...........................................................................................................................21 11 USER MANUAL................................................................................................................................21 12 ABOUT............................................................................................................................................21 13 FAQ ...............................................................................................................................................22 1 Preface Thank you for choosing our products, we will provide you the best service, if you have any questions or need, please contact the technical support department at any time. This manual applies to iPhone Seetong mobile phone surveillance client, contents only for reference, mainly to help user how to install and use mobile phone surveillance software. Product, updated from time to time, so a part of software screenshot may be have differences with manual without prior notice, we will update it in newer version of manual. This user manual may have technical inaccurate or literal error, we sincerely hope you can feed back your suggest to enrich and improve our manual, thank you for your strongly support. 2 Function Brief Seetong Mobile-phone Surveillance Software we called Seetong for short, is designed for mobile-phone user. It is convenience for users to monitor their device in anywhere, and do some operations as listening, talking back, capturing, videoing ETC. This manual detailed describes the use method of Seetong. After the mobile phone connected with the Internet, open this software, you can surveillance your device in real-time, no matter where is the device. Now we make a short introduction of functions included in Seetong. User Registration Support register cloud management server legitimate user, for user add device and manage device more convenient. Login Support login or logout surveillance device through “device login”, get device list through “user login”; Edit parameters in “user login” (such as cloud server legitimate username, cloud server legitimate password); edit parameters in “device login” (such as cloud server legitimate device ID, device username and password) “User login” default saves username. “Device login” default saves device cloud ID, user name and password. Software default saves the latest login information. Device manage Support device to add, camera name, user password, media parameter modification; image flip, motion detection and alarm settings. Live view User can choose multiple devices’ multiple channels to preview real time surveillance video and choose 1/4, 1/9, 1/16 split screen to view at the same time. Recording and capturing User can real time record video or capture video; file will automatically be saved in mobile phone memory card. Listening and talking back While front-end device with the function of audio and connect audio input and output device, user can listening and talking back in the interface of live view. PTZ User can adjust surveillance position through PTZ remote control while previewing real time surveillance video. Operation contains PTZ moving (up, down, left, right, rotate, stop rotate, left up, left down, right up and right down ), adjust iris, zoom in, zoom out, focus near and focus far. Landscape Mode and Vertical Screen Mode User can choose landscape mode or vertical screen mode as needed. QR Code Scan Scan QR code in device’s Internet webpage to fill in information in device login edit box, if the information is right, this device will be added auto. Alarm control Support alarm information switch and alarm settings, the user can configure. Snapping pictures and Video file sharing Support local file photo albums and local video sharing. 3 Install and Uninstall Software 3.1 Operating Environment Seetong*.*.*.ipa supports running on iPhone mobile phone and iPad 5.0 and upper version. 3.2 Install Download Seetong*.*.*.ipa through electronic market or mobile phone assistant and install it. Install successfully the shortcut icon as follow: 3.3 Uninstall Select then long press it will display , click and confirm “delete” will uninstall successfully. 4 Login 4.1 Device login Click the shortcuts in the screen, open Seetong and enter the interface of login. The default login method is “Device login”. It is means that enter device cloud ID username and password, if right then you can login successfully. Here a button named “More”, as usually, the access username and password of device is “admin” and “123456”, to simplify the operating, this two has been written, only when your device username or password different with then you need click this button and modify then. The device login interface as following: Related properties are described below: Device ID: Cloud server legitimate device ID; Username: Username of device (default is admin); Password: Password of device (default is 123456). Notice: when login as device, the login is for one device, though after login you can add other devices, every device is independent, so after logout, the device list will not be saved. 4.2 QR code scan To simplify operation, Seetong with the function of QR code scanning. This is used to add device auto. The adding step as follow: First access cloud server by browser, select “device login”, entering the device cloud ID and enter its web page. In the upper left corner, there is a QR code as follow figure. Then open Seetong, click the button of “Scan”, enter the interface of “Scan QR code”. Put the mobile phone screen aligned to the QR code in the computer screen and scan it, after that, the Seetong will add this device auto. 4.3 User registration Since when you login as device, the device list can’t be saved, there is another login method named user login. If you login as user, your device list will be written in database, when you login in this user again, it will get the before list. First we introduce the user registration. In the interface of “User login”, click the link of “User Registration”, then come out the interface as follow: Related properties are described below: Username: required, 4 to 32 characters. Only can be digit, letter or underline. Password: required, 6 to 32 characters. Confirm Password: required, 6 to 32 characters, must the same with password. Email: optional, use for receive alarm information. Phone: optional, use for receive alarm information. Captcha: required, same with right number. User register successfully will input username and password information in “User Login” edit box. 4.4 User login After successfully registering will auto skip to the interface of “User Login”. Enter right username and password you can login successfully. the first login user without device so its device list is null, if the user with devices, after login in will show the device list. The interface of “User Login” is as follow: Related properties are described below: Username: Cloud server legitimate user (default is null, case insensitive). Password: Cloud server legitimate password of user (default is 123456). Following figures are new user first time login in, its device list is null (left) and the device list of the user has many devices (right). 4.5 Set camera Wi-Fi The function of “Set camera wifi” is designed for special device. For example of TH66R device, put device to reset to factory setting in hardware method, then it can be used as AP. But now this device can’t access the internet, the function of “Set camera wifi” is to modify its WIFI configuration and make sure it can login in cloud server. The operating as follow: First make sure the mobile phone has connected to WIFI and can access internet. Open Seetong, in the interface of “User Login” click the link of “Set camera wifi”, then enter the interface of “Set camera wifi”, because the ISO operating system has some limit, the Seetong can’t modify the mobile phone’s wifi setting, so in this interface detail describe the following step. According the introduction, enter the settings of your mobile phone, click “Wi-Fi”, it will search AP automatically, find the device’s AP, such as 161504, click it, the mobile phone will connect it. After connect successfully, open Seetong again, then come out the interface as follow figure. It shows that the software will modify the device’s wifi settings and make it connect to the mobile phone’s wifi, please press the password. If the password is right, it will connect successfully. Now you can access this device by adding its cloud ID which is the same as its ESSID name. 5 Live view 5.1 Live view Click “Live View” in software main interface to enter video preview interface, as shown below: The method of selecting device to play is click the window, this time the window will be select, click again will skip to the interface of “Device list”, in here select the device, click, then this device will be added to the window to play video, as follow figure. When playing, the button of will change to the button of . From adding device to view its video may need some time, please wait. In this video preview screen also can switch the video bit stream and the main stream for viewing.Click "Settings" button in the top left hand corner can enter seetong main screen. In 4 screens, 9 screens, 16 screens mode, repeat this operation can open multiple real time video. 9 screens and 16 screens default plays key frame. 5.2 Listening and talking back Notice: If want to play audio and talkback in real time preview, device must support audio and set “Audio Encode” as G.711. Listening Click “ ” to “ ” to play preview audio, as shown below: Talkback In the real-time preview playback, click the button " " button status changed to " "open the two-way intercom function, the mobile phone can hear the voice can be heard in front, front end phone voice. As shown below:k. 5.3 Snapshot and recording Snapshot Click to snapshot preview video, as shown below. After snapshot, it will show the save path of this picture in the interface. Users can find the picture in [Local picture] also. Recording When playing video, click the button of , you can record of this device. During recording, the button will change to . You can record to more than one device at the same time. Click the button again will end record. The record file will be saved in the interface of “Local record”. 5.4 PTZ control Notice: If want to control PTZ while real time previewing, device must support PTZ and the “PTZ Basic Configuration” must be configured correctly. PTZ Button Control Click “ ” while real time previewing to control PTZ, as shown below: Control Button Description: Function Button Icon Button Name Function Introduction Left Up Adjust PTZ lens move left up Up Adjust PTZ lens move up Right Up Adjust PTZ lens move right up Down Adjust PTZ lens move down Right Adjust PTZ lens move right Left Adjust PTZ lens move left rotate Adjust PTZ rotate contiously Stop ratate Left down Stop PTZ rotate Adjust PTZ move left down Right down Adjust PTZ move right down Zoom in Adjust focus at close distance Zoom out Adjust focus at far distance Focus Far Adjust focus length at close distance Focus Near Adjust focus length at far distance Iris zoom in Zoom in iris Iris zoom out Zoom out iris Single Channel Sign Control Click up/down/left/right while previewing video to realize PTZ move up/down/left/right. Also you can through gesture to realize real time video digital zoom in/out and recover. 6 Device list In the main interface click “Device list”, you can enter the interface of [Device List], as follow figure: In the device list, ● the green means the device is online, ● the gray means the device is offline. Only online device can connect and view its video. In the interface of device list, you can add device, search device and modify device alias. 6.1 Device adding Click the upper-right button of , you can enter the interface of adding device. When add device, you need enter the cloud ID, name and password of the device. If your information is right, you can add this device, also you can add device by scan QR code. The added device will show in the device list, if now you are login in the method of user login, this device will write into database, so when the user login again, this device still exist. 6.2 Device searching The search-box as follow figure, when there are many devices in the list, you can enter the key word in it, the software will search from list to match your word and show the result below. 6.3 Modify camera name As the default is to save the cloud ID for a device, it’s not convenient to remember, so allow user to modify device alias as their needing. In the device list, select the device that need to modify alias and press it until come out a dialog. In the enter box write the name you want, and click the button of “OK”. 6.4 Modify camera password Since the initial login cloud system using the default user name and password, in use, consider the user's device has a certain degree of security, can modify its password in settings. The first to enter the original password, fill out and verify password in the password to the new settings, click "OK" button to modify the success. 6.5 Video Flip Video flip flip vertical and horizontal turning into two categories. Video in video streaming itself is in default mode, open the flip vertical and horizontal flip will be different, as shown below: 【The default image】 【The default image】 【Image vertical flip】 【Image horizontal flip】 6.6 Alarm settings The alarm configuration mobile detection and receive the alarm switch can be installed, configured to receive the alarm when no preview playback detects alarm will accept display alarm information. 6.7 Modify the code stream parameters. Modify the code stream parameter refers to the main stream and sub stream, bit rate, frame rate, resolution parameters on line configuration. As shown below: 7 Local Record In the main interface click “Local record”, you can enter the interface of [Local record], as follow figure. Those files are created when view stream, enter the interface of it, record files are ordered by time. In this interface, you can play record file,share or delete it. 7.1 Video playback In this interface, click record file can replay it. When playing, the mobile phone will list its player, you can choose by yourself. After select, it will replay. During replay, you can do some operates as fast forward, slow progress and so on. 7.2 Video delete Click “Delete” can delete video. As shown below, click “ can delete video record. ” and make sure your operation 7.3 Video sharing Video files can be shared by Sina Weibo, Tencent Weibo, Facebook, Twitter, mail, Wechat, Wechat Moments, QQ. Click the Cancel button to cancel share. 8 Local picture In the main interface click “Local picture”, you can enter the interface of [Local picture], as follow figure: Snapshot picture will prompt its saving path. If want to search snapshot picture, enter “Local Picture” interface to view snapshot picture. Snapshot picture can zoom in/out can zoom in picture to 400%, display, click can zoom out picture as normal, click click “Delete” can delete snapshot picture. Local picture display interface as shown below: You can delete the picture also, select and click the upper-right button of “Delete”, then come out the dialog, as follow figure: Will zoom preview, click "share" button, can through the picture: Sina Weibo, Tencent Weibo, Facebook, Twitter, mail, Wechat, Wechat Moments, QQ. Click the Cancel button to cancel share.. 9 System settings In the main interface click “System settings”, you can enter the interface of [System settings], as follow figure: Related properties are described below: PTZ Step: Control PTZ rotate distance when previewing video, the bigger number PTZ rotate, the further distance will move. Display View: Software play interface display views, you can choose single view, four views, 9 views and 16 views. Alarm set:You can choose to disable and alarm sound, in the equipment preview alarm will be issued when the alarm sounds. Notice: The nine split screen and sixteen screen only by key frame. 10 Alarm Message In the software main interface, click the "alarm message" into the alarm message interface, display alarm history information. As shown below: 11 User manual In software main interface, click “User Manual” to enter help interface. 12 About In software main interface, click “About” to view version information, contact information and etc, as shown below: 13 FAQ 1. Why can’t preview surveillance video after finishing inputting login information? A. When Use “user login”, look up whether device username and password information have been written correctly when added. B. Check network, look up whether mobile phone has been connect with Internet. C. Maybe UPNP port failed and the firmware version is too low wiithout P2P function. 2. Why sometimes video delay is bigger or is easy to disconnect? A. Network condition is poor, wireless network is poor. B. Video frame rate and resolution is too big, reduce them can improve video fluency and stability. (Note: video encode setting has multiple parameters, please see if it is the video parameters of mobile phone, different devices have different adjustment methods, please refer to user manual of corresponding device to seek help. ) C. Device and server connect is not stable, P2P penetrate is not stable. D. The device is perviews by many users, buffer is full. 3. Why can’t control PTZ? A. Check if video channel supports PTZ. B. PTZ response may be delay, wait for a moment. Before contact with the technical support department, please read user manual of product or “online help” of mobile phone client first. If you still have questions, please contact with the technical support department, email: [email protected]