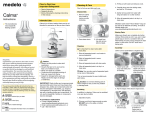
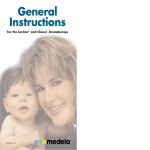
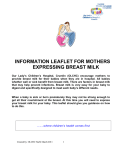
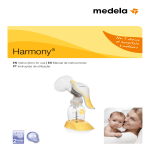
1
double duet
breastmilk
initiation kit
instructions
for use with symphony breastpump
includes harmony manual breastpump
double or single pumping kit
24 mm and 27 mm PersonalFit™ breastshields
DEHP and Latex free
67355S
Double Duet Breastmilk Initiation Kit
To
•
•
•
purchase non-sterile replacement parts:
Locate a Medela retailer at http://medela.findlocation.com
Email [email protected], or
Call 1-800-435-8316
24 mm PersonalFit™
Breastshield (2)
87073
Let-down Symbol
Handle (1)
8007262
Diaphragm (1)
Stem w/
8007034
O-Ring (1)
O-Ring (1)
Connector (2)
8107236
Yellow
Valve (2)
80789
White
Membrane (2)
Colostrum Collection
Container (2)
27 mm PersonalFit
Breastshield (2)
80 mL Collection
Container
with Lid (2)
87074
Tubing (2)
8007213
Membrane Cap (2)
8100769
Membrane (2)
8200094
Container Lid (2)
8107181
Spare Membranes
87088
Which Container When
Medela’s 35 mL colostrum container has
20 mL of pumping capacity and 35 mL of
storage capacity. The curved bottom minimizes
loss of colostrum or breastmilk during transfer
to a syringe. The small size helps keep mothers
motivated to pump by setting proper expectations
of initial milk production.
Medela’s 80 mL breastmilk collection container
has 65 mL of pumping capacity and 80 mL of
storage capacity.
Visit your Medela retailer or go to www.medela.com
for our selection of larger breastmilk collection
& storage containers.
Pumping Should Be Comfortable
When it comes to finding the
right fit in a breastshield every
mother is different. Sizing
may change throughout your
breastfeeding experience as
the breast and nipple tissue
changes. To determine the
correct size breastshield,
you need to watch your
breasts while pumping.
24 mm
27 mm
While pumping—
You should see the following if you have the correct size breastshield:
•Pumping feels comfortable, not
painful.
•The nipple is centered and moves
freely in the tunnel.
•Minimal or no areolar tissue is pulled
into the tunnel of the breastshield.
•There is gentle rhythmic motion in
the breast with each cycling of the
pump.
areola
tunnel
breastshield
•The breast empties all over. After
pumping gently press around your breast. If an area still
feels full or a bit firmer, you may not have emptied the milk duct in
that area of the breast.
After pumping—
•After a pumping session the nipple is not irritated and is not painful
to the touch.
If you do not see the above, you may need to seek the
advice of a lactation or healthcare professional to assist
you in getting the proper fit.
Double Duet Breastmilk
Initiation Kit
Important
This product is sterile. Package must be
inspected for any holes, broken seals, or damage
before opening. If present, you MUST wash
product prior to first use. If you have any other
questions, consult with your healthcare provider
for further cleaning instructions.
Online Breastfeeding Resources
•To learn more about storing and caring for your breastmilk:
www.BreastmilkGuidelines.com
•For free advice from a lactation consultant:
www.medelabreastfeedingus.com/for-expectant-mothers/
ask-the-lc
•For breastfeeding tips & solutions including:
•
•
•
•
•
How to breastfeed
Challenges & solutions
Going back to work
Breastpumping
Choosing the right size breastshield
www.medelabreastfeedingus.com/for-expectant-mothers/tips-andsolutions
•For help with choosing a breastpump:
www.medelabreastfeedingus.com/product-selector
If you experience discomfort while pumping,
contact your lactation professional as you may
need a different size breastshield. To locate
Medela products, visit http://medela.findlocation.com
or call 1-800-TELL-YOU.
Single User Caution:
This product is a personal care item
that should not be shared between users.
Symphony® Pumping Kit Assembly & Use
Wash hands with soap and water
prior to handling your kit.
1 S
ecurely attach
breastshields to
connectors.
(Note: See inside
cover for selecting
the proper size
breastshield.)
4 S
crew collection
containers onto
connector bottom.
(Note: See inside
cover for selecting
the proper size
container.)
2 S
nap white
membranes
onto yellow
valves until
membranes
lie flat.
3 P
ush yellow valves
onto inner ring of
connector bottom.
5 Insert pale yellow
round ends
of tubing into
openings in back
of connectors.
6 Insert the triangular 7 Fit protective
two-toned yellow
membranes onto
ends of tubing into
membrane caps.
ports on membrane
caps.
2
9 Push membrane
8 T
o open lid, hold
10 Close lid before
caps into place on
down the oval
pumping.
the pump. A “click”
button on the top of
(If lid does not
will be heard once
the Symphony
close, check to see
properly seated.
breastpump and
that membrane
(Note: If single
lift up on the
caps are properly
pumping, only seat
handle.
seated.)
one membrane cap.)
13 If let-down
11 Center breastshields 12 To turn the pump
occurs before the
over your nipples
on, press the power
Expression Phase
and start pumping.
button. You will be
begins, press the
(Caution: pushing
starting in the
let-down button
shields too firmly into
Stimulation Phase.
to begin the
breasts may reduce
Expression Phase.
milk flow.)
14 When your pumping session is over, store your breastmilk and
clean your kit. See the Breastpump Kit Care section for cleaning
instructions.
For breastmilk storage guidelines go to
www.BreastmilkGuidelines.com
3
Harmony™ Kit Assembly & Use
1 S
ecurely attach
breastshield to
connector.
2 S
nap white
membrane onto
yellow valve until
membrane lie flat.
Wash hands with soap and water
prior to handling your kit.
3 P
ush yellow valve
onto inner ring of
connector.
Correct
4 S
crew collection
container onto
connector.
Incorrect
Hint: Make sure the oval shape is lined up
correctly in the diaphragm.
4
5 P
lace oval shaped
base of the stem
into diaphragm.
6 A
lign silicone
diaphragm/stem
with tab on pump
handle. Press down
firmly around entire
edge to ensure a
proper seal.
7 Insert stem of
8 Center breastshield
handle assembly
over nipple.
into opening on top
(Caution: pushing
of connector and
shield too firmly into
push until you feel
breast may reduce
it snap in.
milk flow.)
11 Once let-down
9 R
otate the
10 Start pumping in
has begun, switch
adjustable handle
the Stimulation
to the Expression
for your maximum
Phase by pressing
Phase by pressing
pumping comfort.
down on the milk
the back of the
The level of vacuum
drops symbol
pump handle.
is controlled by the
on front of
This mode mimics
compression and
the pump handle.
baby’s deeper,
the speed of the
Press and release
more relaxed
handle stroke. You
quickly until you
sucking and
decide the pumping
see milk flow
is designed to
rhythm that is best
begin. This mode
maximize milk flow.
for you.
mimics baby’s
initial rapid sucking
and is designed to
stimulate milk flow/
let-down.
12 When your pumping session is over, store your breastmilk and
clean your kit. See the Breastpump Kit Care section for cleaning
instructions.
For breastmilk storage guidelines go to
www.BreastmilkGuidelines.com
5
Converting to the Symphony® Breastpump
1 R
emove handle assembly from
connector.
2 Insert pale yellow round end of tubing into
opening on top of connector.
See Symphony Kit Assembly on page 2 and refer to steps 6-14 to
complete assembly.
Breastpump Kit Care
Good hygiene will help protect the
breastmilk that you give to your baby. For
the best protection when handling your
breastmilk, wash your hands with soap
and water, and follow the guidelines for
cleaning, drying, and storing your kit.
6
How do I disassemble my kit?
1 Finish pumping.
Symphony:
(Note: It is important to let pump
run for 2 minutes with tubing
attached. This will eliminate
condensation that naturally
results from humidity.)
While the pump is still
running, disconnect
tubing from connector.
Both Symphony and Harmony:
2 R
emove collection container(s)
and store breastmilk.
For breastmilk storage
guidelines go to www.
BreastmilkGuidelines.com.
3. Disassemble.
ll parts that come in contact with your breast and
A
breastmilk must be disassembled and washed for the kit
and pump to function efficiently.
Harmony:
a R
emove the pump
handle assembly from the
connector. Check to see if
it needs cleaning.
Note: Under normal use, the pump
handle and diaphragm/stem only
need to be cleaned periodically
or when it is apparent they have
become soiled. (Hint: Do not remove
small white o-ring from stem.)
Continue to step b on next page.
7
How do I disassemble my kit? (cont’d.)
Both Symphony® and Harmony™:
eparate remaining parts of your kit that come in contact with your
S
breast and breastmilk.
b S
eparate breastshield(s)
from connector(s).
c T
wist and pull the
yellow valve(s) off the
connector(s).
d R
emove the white
membrane(s) from
the valve(s).
Cleaning
1 Wash parts.
Rinse all separated parts in cool
water to remove breastmilk.
2 Wash and Rinse
-or-
•Wash all separated
parts in warm,
soapy water.
•Rinse all separated
parts with clear water.
8
Dishwasher
•Wash all separated
parts on top rack
of dishwasher.
Drying & Storing
Allow all breastpump kit parts to air dry in a clean area and store dry
parts when not in use. Do NOT store wet or damp parts.
Sanitizing
In addition to washing, you may sanitize your kit parts that come in
contact with breast and breastmilk once per day by following the
instructions on Medela’s Quick Clean™ Micro-Steam™ bag or boiling.
Note: Do NOT use Quick Clean Micro-Steam bags with the Harmony
pump handle, diaphragm/stem and breastshield connectors.
If boiling your kit:
1 S
eparate all parts that come in contact with your breast and
breastmilk.
2 Choose a pot that is large enough so the kit parts DO NOT
rest on the sides or bottom while boiling.
3 Fill the pot with water and bring to a boil.
4 Carefully drop parts into boiling water, and boil for 10 minutes.
5 Gently remove parts from water with tongs and place on a clean
surface.
6 See Drying & Storing section (above) for further instructions.
Quicker Cleaning
You can use Medela’s Quick Clean
wipes in between pumping sessions
and then clean your kit once you get
home. Follow instructions on Quick Clean package.
9
Breastpump Kit Care
Tubing Care
It is not necessary to clean tubing after each use. If your tubing comes
in contact with breastmilk, clean it by following these directions.
•Rinse and run cold water through tubing to remove breastmilk.
•Dry tubing by attaching it to pump and running for 2 minutes or
until dry. This will eliminate condensation that naturally results from
humidity.
•In addition to washing, you may sanitize by following the
instructions on page 9.
• Tubing may appear cloudy after boiling or microsteaming.
To Sterilize Kits in the Hospital
Important Note: Do NOT autoclave Harmony handle, diaphragm/
stem and breastshield connectors.
All disassembled parts can be autoclaved to a maximum of 272° F for
3 minutes at 29 PSIG or 250° F for 15-20 minutes at 15 PSIG.
To avoid damage during and immediately after sterilization:
•Sterilize parts without applying external pressure.
•Allow parts to cool before applying external pressure.
Note: If gas sterilization is used, residual testing is recommended to
determine the proper length of aeration.
Tips for Success
•Prior to pumping, relax, take a few deep breaths and think of
your baby.
•Using a breastpump should be easy and comfortable. The first few
times may seem a bit awkward, but you will quickly find your best
position and pumping speed.
•Many new mothers find that in the first week or two of breastfeeding,
they may experience nipple tenderness and soreness. This is
normal and will improve as both mom and baby learn this new skill.
If soreness persists, contact a lactation consultant or healthcare
provider to assist in proper breastshield sizing or comfortable
breastfeeding techniques.
•To soothe sore nipples, you may purchase Tender Care products
by visiting your Medela retailer. To locate a retailer visit
www.medela.com or call 1-880-TELL YOU.
10
Troubleshooting
If you feel the pump is not giving sufficient suction, you can check
several things:
•Make sure the white membrane is clean and lies completely flat on
the yellow valve.
•Verify that yellow valve on breastpump kit is fitted correctly into the
breastshield connector.
Symphony® Breastpump Troubleshooting
•Make sure breastpump is plugged in.
•Check and secure all connections of kit and breastpump.
•Ensure that the pale yellow ends of the tubing fit securely into
connectors and the triangular two-tone yellow ends into the
membrane caps. (Refer to Symphony kit assembly instructions.)
•Inspect Symphony membranes. If membranes appear to be worn or
have a tear they need to be replaced (Article # 8200094).
Harmony™ Breastpump Troubleshooting
•Make sure the stem assembly on the
pump handle is seated all the way
into the pump body until it will go no
further. Make sure the white o-ring is in
place in the stem handle.
•Make sure the oval base of the stem is
properly seated in the oval base of the
diaphragm.
•Finally, make sure the diaphragm is pushed all the way onto the
circular rim on the underside of the handle.
•If pump handle does not release smoothly or sticks, check
diaphragm assembly to correct. (Refer to step 6 of the Harmony Kit
Assembly Instructions on page 4.)
If assistance is still needed after reviewing this booklet, please email
Medela Customer Service at [email protected] or call
(800) 435-8316 or (815) 363-1166.
11
Medela, Inc.
P.O. Box 660
1101 Corporate Drive
McHenry, IL 60051-0660, USA
Ph: (800) 435-8316 or (815) 363-1166
Fax: (815) 363-1246
Email: [email protected]
www.medela.com
Medela and Symphony are registered trademarks of Medela in the USA.
PersonalFit, Quick Clean and Micro-steam are trademarks of Medela,
Inc. in the USA and in other countries. Applications for registration of
Medela is pending in other countries.
© 2011 Medela, Inc. Printed in the U.S.A.
Medela, Symphony y Lactina son marcas registradas de Medela en
EE.UU. PersonalFit, Quick Clean y Micro-steam son marcas comerciales
de Medela, Inc. en EE. UU. y en otros países. Solicitudes de registro de
Medela en trámite en otros países.
© 2011 Medela, Inc. Impreso en los EE.UU.
© 2011 Medela, Inc.