1
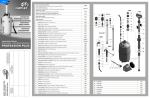
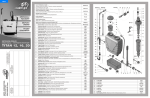
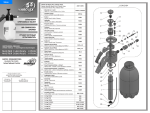
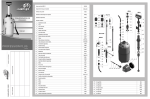
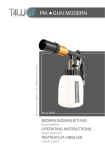
Menu
Lanca teleskopowa z rączką
Telescopic lance with handle / Телескоп. штанга с рукояткой
R010mx
Lanca teleskopowa bez rączki
Telescopic lance without handle / Телескоп. штанга без рукоятки
R01mx
Zawór bezpieczeństwa
Safety valve / Предохранительный клапан
CIŚNIENIOWY
OPRYSKIWACZ RĘCZNY
PRESSURISED
HAND SPRAYER
ПОМПОВЫЙ
ОПРЫСКИВАТЕЛЬ
INSTRUKCJA OBSŁUGI
OWNER MANUAL
ИНСТРУКЦИЯ ПО ЭКСПЛУАТАЦИИ
data naprawy
date of the repair
дата ремонта
ГАРАНТИЙНЫЙ ТАЛОН
KARTA GWARANCYJNA
GUARANTEE CARD
opis wady
description of the fault
описание дефектов
pieczęć sprzedawcy i data
stamp of the retailer and the date
дата и печать продавца
048/PL,GB,RUS/2010/A
R03d
Zestaw końcówka lancy z MR1,5
Lance tip with nozzle MR1.5 / Наконечник для штанги с MR1,5
Z12/15
Rączka lancy z zaworem
Feeding valve integrated with handle / Рукоятка с клапаном
R020j
Pompa kompletna
Complete pump / Комплектный насос
R05d
1
Zbiornik Profession / Container Profession / Бачок Profession
2
Cylinder pompy / Pump cylinder / Цилиндр насоса
R19f
3
Nakrętka zbiornika / Container cap / Гайка бачка
R15
4
Półtulejka tłoczyska / Piston half-case / Половинка втулки поршня
R147
5
Nakrętka pompy / Pump nut / Гайка насоса
R12a
6
Tłoczysko pompy / Pump piston / Поршень насоса
R20u
7
Lanca obtrysk., fi 12 mm / Lance pipe., fi 12 mm / Штанга, fi 12 мм
R73nx50
8
Lanca obtrysk., fi 8 mm / Lance pipe., fi 8 mm / Штанга, fi 8 мм
R73mx60
9
Tulejka zaciskowa, fi 8 mm / Clasp case, fi 8 mm / Зажимная втулка, fi 8 мм
R103
10
Przycisk zaworu dozującego / Feeding valve trigger / Кнопка дозирующего клапана
R44
11
Rączka lancy / Lance handle / Рукоятка штанги
R02j
12
Filterek / Filter / Фильтр
R40
13
Końcówka węża - sztucerek / Hose end piston / Наконечник шланга
R81e
14
Nakrętka węża / Hose nut / Гайка шланга
R80e
15
Wąż / Hose / Шланг
R011d
16
Rurka zasysająca / Sucking pipe / Трубка засасывающая жидкость
M08_
17
Króciec przewodu / Hose stub pipe / Патрубок шланга
R82c
18
Korpus zaworu bezpieczeństwa / Safety valve body / Корпус предохранительного клапана
R82d
19
Zawór bezpieczeństwa - popychacz / Safety valve - shank / Cтержень предохр. клапана
R98
20
Sprężynka / Spring / Пружинка
R13n
21
Nakrętka M-16 / Nut M-16 / Гайка M-16
R26
22
Zawór bezpieczeństwa - uchwyt / Safety valve - handle / Ручка предохр. клапана
R100
23
Rdzeń dyszy / Nozzle nucleus / Стержень форсунки
R114
24
Nakrętka dyszy / Nozzle nut / Гайка форсунки
R64
25
Nakrętka dyszy 1.5 do MR / Nozzle 1.5 nut for MR / Гайка форсунки 1.5 для MR
26
Tłoczek / Piston / Поршенёк
R43
27
Sprężynka / Spring / Пружинка
R48a
35
O-ring 38x5
R14
28
Nakrętka bez otworu / Nut without hole / Гайка без отверстия
R50
36
O-ring 28x4
R22
29
Pręt mosiężny, fi 3 mm / Brass bar, fi 3 mm / Латунный прут, fi 3 мм
M11
37
O-ring 11,3x2,4
R47c
30
Pierścień zapinka lancy / Lance ring clasp / Цепной замок штанги
R107
38
O-ring 10x2
R41
31
Tulejka teleskopu / Telescope ring faucet / Втулка телескоп. штанги
R109
39
O-ring 8x2
R108
32
Pierścień zaciskowy / Clasp ring / Зажимное кольцо
R106
40
O-ring 5,3x2
R116
33
Uszczelka 16x24 / Seal 16x24 / Прокладка 16х24
R17
41
O-ring 3x2
R42
34
Grzybek gumowy / Pump rubber valve-cap / Запорный клапан насоса
R24
42
O-ring 28x2
R22a
R60 (B) (C) (D)
R115_1.5
GB
OWNER MANUAL
PRESSURISED HAND SPRAYER
WITH TELESCOPIC LANCE
This sprayer is designed to protect vineyards, orchards and fields against pets and weeds.
Uncontaminated sprayer can be used for washing cars and machines and also as a source
of water during a journey and at a campsite.
1. TECHNICAL SPECIFICATIONS
model:
Total container capacity
Working container capacity
Average liquid output
Maximum working pressure
Overpressure protection
Container diameter
Sprayer height
Net weight
Container substance
Profession 5 Profession 7 Profession 9 Profession 12
7.83 l
5.75 l
9.50 l
11.60 l
7.00 l
5.00 l
8.00 l
11.00 l
0.3 - 1.0 l/min
0.4 MPa (4 bar) (60 PSI)
Safety valve R03d
220 mm
470 mm
415 mm
570 mm
600 mm
1,90 kg
1,70 kg
2,00 kg
2,20 kg
polypropylene
2. SPRAYER'S EQUIPMENT
In each packing of Proffesion you can find:
1. Complete sprayer with pump, hose and lance handle with feeding valve
2. Telescopic lance with adjustable nozzle MR1.5 and MR1.0
3. Funnel with sieve
4. Silicon lubricant in a phial, O-ring R47c
5. User manual
The Marolex Comapany has a right to change the equipment.
3. PREPARING AND OPERATING INSTRUCTIONS
1. In the first trial it is recommended to use the clean water. After filling the container in,
put the pump in and screw it in properly. Pump the container and check the safety
valve by pulling its handle up (R100).
2. Prepare the spraying liquid according to the instructions given on the chemicals’
packaging.
3. Screw the lance into the case of the feeding valve R020j and make sure that there's an
o-ring 11,3x2,4 (R47c) inside the valve.
4. Unscrew the pump and pour liquid into the container using a funnel.
5. Put the pump back in, screw the pumps screw cap tight and pump until you get the
right spraying or the safety valve opens. If the pressure is too high the safety valve will
automatically open and release the excess air.
6. Adjust the length of the telescopic lance and screw tight the locking sleeve, so the
lance won't extend under pressure - fig.4.
7. After filling the container in and reaching the maximum pressure, the sprayer can be
transported using the shoulder belt or the pump handle. For the transport position
block the pump handle by pushing it down and turning 90 degrees left - fig. 3.
8. While holding the lance handle, press the button to open the feeding valve.
9. When necessary, you can increase the pressure by further pumping up.
4. USAGE RECOMMENDATIONS
1. During the operation don’t place the sprayer on its side, as the air, not liquid will be
sucked in.
2. It is not recommended to fill the container in over the working capacity.
3. The sprayer should be stored in a shaded place, in temperature above +4°degrees.
4. Do not use contaminated sprayer for any other purposes than spraying chemicals.
5. After finishing work, the sprayer must be emptied and thoroughly rinsed with water.
The filter inside the handle must be taken out and cleaned. When the sprayer is
completely assembled, pump it up and blow the air through it.
6. After noticing any resistance in the pump piston, feeding valve trigger or safety valve,
the seals in these parts must be lubricated using the silicone smear. Failing to do it can
cause damage to the seals and result in loss of the guarantee.
7. When using to spray plants with chemicals, you must comply with safety and hygiene
regulations and strictly follow instructions given on the package of those chemicals.
8. If you leave some liquid in the lance during winter, expanding ice may damage the valve
and the handle.
Telescopic lance R01mx - fig. 4
5. WORK SAFETY REGULATIONS
1. Children, pregnant women, people taking medicines or other drugs restricting the
concentration powers or drinking alcohol are forbidden to operate the sprayer
2. Before first spraying check the sprayer’s action using clean water.
3. When working with chemicals (also during liquid preparation and destroying the
packages) it is necessary to wear protective clothing (rubber boots, gloves, a coat, a cap
and a mask).
4. It’s forbidden to work with chemicals on an empty stomach and eat or drink during
working. It’s forbidden to drink alcohol one day before and one day after working with
chemicals.
5. It’s forbidden to pour the liquid remains to the open water reservoirs or biological
sewage treatment plants. These notes apply also to the water after cleansing the
container and other parts of the sprayer.
6. Expendable sprayer should be handed over for utilization.
7. In case of poisoning the doctor must be contacted.
8. People working using the sprayer should strictly comply to all the recommendations on
the package of the spraying agents.
9. It’s forbidden to work using leaky or disabled sprayer.
10. All the operations should be done after decompression of the sprayer.
11. Thoroughly cleanse the sprayer after each using and before servicing.
12. It’s forbidden to use the sprayer for other purposes than stipulated in the owner manual
13. The sprayer must be stored clean and in winter season it is essential to check, that
there is no liquid left in the container or lance.
14. The only device for making the working pressure is a pump placed inside the
container – it’s forbidden to use any other devices for this purpose !!!
15. It’s forbidden to spray with easy inflammable chemicals or substances
which can cause an explosion eg. Petrol, solvents.
16. Changes in the sprayer or using it not according to its allocation can result
in poisoning people or animals, polluting the environment, damaging the sprayer or
accidents.
17. After finishing work, you should change your clothes (the protective clothes must be
cleaned), wash your hands, face, mouth and throat, and clean your nose.
18. After spraying, adulterate the remaining liquid at least 10 times and spray it on the same
area or plant again.
19. After finishing work pour the water out, blow air through it by pumping through it a few
times with feeding valve R020j open.
20. The user is fully responsible for the damages caused by not complying with these
recommendations.
21. The sprayer must be stored empty and non–pressurized.
22. It is forbidden to block the safety valve or make any unauthorized changes in the
sprayers as it may cause damages or injury.
23. After the compression the container must not be hit or dropped.
24. Before commencing work the safety valve must be checked by pulling the valve
out. The valve should move in and out easily.
25. We recommend filling in the tank through our funnel with sieve. The sieve will filter the
liquid and this will protect the nozzles from clogging.
26. The sprayer while working and storing should be secured from any unauthorized
people, especially children.
9. TROUBLESHOOTING
After unscrewing 103 sleeve from lance sleeve “B”, move apart both (“A” and “B”) parts.
While pulling the “A” part, the R107 clasp is helpful in removing R106 and R108 gaskets
form the sleeve socket.
After unclasping the R107 clasp, you can clean or replace R106 and R108 gaskets.
After reinstalling gaskets and the clasp, screw both sleeves together. Screw the R103 nut
tight, so the lance “A” won't be able to change its length when using.
Push & move forward
(constant flow)
fig.4
nozzle
colour
MR1.0
MR1.5
MR2.0
MF2.110
MF3.110
MF4.110
MF4.45
MF5.30
green
bright yellow
red
yellow
blue
red
red
brown
liquid
output
nozzle type,
remarks
3 nozzle 5 nozzle 7 nozzle
kit
kit
kit
Z09j3
Z09j7
Z09j5
~0,40 litr/min.
adjustable stream
~0,60 litr/min.
angle
~0,80 litr/min.
~0,80 litr/min.
~1,15 litr/min. flatstream
~1,65 litr/min.
~1,10 litr/min.
flatstream
~1,60 litr/min.
Nozzles MR1.0 and MR1.5 are enclosed with the sprayer. Other nozzles can be purchased in the kits.
1.
2.
3.
4.
5.
6.
7.
8.
9.
The guarantee period is 24 months from the date of purchase.
Sprayers with chemical remains will not be repaired.
Reclamation should be lodged to the seller of the sprayer.
The claims will be accepted after showing the defected part or giving the full description
of the fault.
Number of repairs after which the seller can’t refuse to exchange the sprayer for a new
one (in case there are still defects) is 3.
Operations connected with exploitation of the sprayer and described in the manual are
not treated as guarantee repairs.
The producer won’t accept the claim if there were changes in pressure regulation or the
storing, operating, maintaining of the product were not according to the manual.
Mechanical damages caused by the user can’t be the subject to reclamation. The
damaged parts can be exchanged but the costs are charged.
The guarantee repairs should be made using always the genuine Marolex parts.
Before using the sprayer, check the safety
valve R03d by pulling its handle !
After test filling of the container (about 5 to 10 pump
pushes) pull the valve handle - you should hear air
coming out of the valve.
After you release the handle, air mustn't got out
through the valve. Check if the safety valve nut R26 is
screwed in tight.
Push and turn
to block
(transport
position)
Pull
(testing the
safety valve)
fig. 2
fig. 3
Freezing water rup-tured
handle or valve.
The valve or the hose nut
is not screwed tight
Replace it (valve & handle R020j)
Screw the valve tight or replace
gasket
Feeding valve leaking
Damaged valves cylinder
top gasket (it wasn't
lubricated periodically)
Replace gaskets or the cylinder
or even the entire R020j valve
(don't forget about lubricating
the valve!)
Feeding valve is
closed, but lance is
leaking
Damaged valves cylinder
top gasket (it wasn't
lubricated periodically)
Replace gaskets or the cylinder
or even the entire R020j valve
(don't forget about lubricating
the valve!)
Weak spraying action
although the pressure
in the tank is high
R40 filter dirty
Unscrew the hose, remove the
R40 filter and clean it or replace
with a new one
Liquid stream is
uneven
Nozzle end piece dirty
Unscrew the nozzle cap and
clean nozzle and whirler
You can not reach the
maximum pressure
Pump rubber valve-cap is
dirty
Pumps cylinder gasket is
worn out
No silicon lubricant in the
pump
Clean or replace gaskets.
Lubricate the pump with silicon
lubricant.
There's air appearing
in the hose and liquid
stream is disrupted
Intake pipe M08 in
container is not pushed
tight into R82c hose stub
pipe
Unscrew the hose, remove the
pipe and push the stub pipe
hard in (you can also glue it
together)
10. DISMANTLING, UTILISATION
The damaged sprayer, not suitable for repair, should be utilised in such way as not to
pollute the environment.
Cleansed plastic elements should be recycled as well as the metal parts.
11. GENERAL REMARKS
In the lances handle there's a filter (R40) installed, designed to protect nozzles from
clogging.
The container is protected against overpressurising by the R03d safety valve.
It is possible to use the pump handle to carry the sprayer (after locking the handle in
transport position).
You can interchange parts and components between PROFESSION and HOBBY models.
You can adjust the stream angle by twisting MR1.0 MR1.5 nozzles.
There's a wide range of nozzles available from the MAROLEX catalogue.
With MAROLEX sprayers you can use a wide range of nozzles: cone, deflect, flat,
regulated which are available on the market.
12. SAFETY SIGNS
lp.
meaning
sign
place
1.
tablet
on container
2.
Sign indicating possibility of unspecified danger.
on container
3.
Sign indicating that a users manual should be read
before starting work.
on container
4.
Sign indicating danger of poisoning. Eating or
drinking while using the device is forbiden.
on container
Manufacturer:
The sprayer used once for chemicals can not be
used for other purposes.
Solution:
After winter season
water leaks from the
handle
7. SERVICE AND WARRANTY REPAIRS
After finishing work, cleaning the sprayer and blowing air through it, you should:
1. Unscrew hose connected to the handle, remove R40 filter, and clean it (preferably under
running water).
2. Check if the pump works easy without any jamming. If you feel any resistance, remove
the pump, unscrew the R20b piston rod, and lubricate: gaskets, piston rod, cylinder
using silicon lubricant.
3. Unscrew the bottom nut from the feeding valve - R020j, remove the valve piston with a
spring, clean it, lubricate with silicon lubricant, put it back into the valve and screw in the
nut tight.
4. Unscrew the nozzle cap, remove the nozzle, wash it and reassemble.
5. Check if the safety valve handle, after pulling, returns to its normal position. If it jams,
unscrew the R26 safety valve nut, remove the valve pin, clean it and lubricate slightly with
silicon lubricant. Reassemble the valve and screw the valve nut tight.
Safety valve R03d - fig.2
Cause:
NOZZLES. Liquid output at 0.35 Mpa
8. MAINTENANCE AND DISASSEMBLY
6. TECHNICAL INSTRUCTIONS
Syptoms:
Distributor: