1
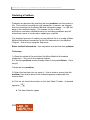
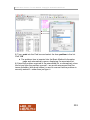
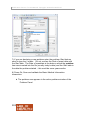
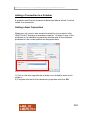
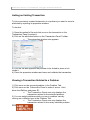
Health One Version 7.1 User Manual. Copyright 2011Helix Health Ltd Problem Orientated Medical Records HEALTHone™ has a feature called Problem Orientated Medical Records(POMR) which provides the ability to link transactions to a problem. Once linked in this way the physician can firstly, see at a glance what the patient’s primary problems are, and additionally elect to view only those transactions that relate to a particular problem. Problems appear in the Problems Tab of the Patient Information Panel. This tab has two buttons – one to display the active problems and the other to display the historical ones. POMR is an extension to the transaction filtering method mentioned in the Getting Startedsection. There it was described how to filter the Transaction Panel to view just lab results, experts reports etc. Once POMR is implemented, it is possible to view lab results that just relate to a particular problem. The process of using the POMR feature is as follows: Declare a problem Link transactions to a problem View transactions relating to a specific problem Change the status of a problem between active and inactive Displaying / Hiding the Problem Tab The Problem Tab is displayed or hidden in the Patient Information Panel by selecting the menu option View / Problem 199 Health One Version 7.1 User Manual. Copyright 2011Helix Health Ltd Declaring a Problem Problems are declared by inserting the item problem: into the patient’s file. This could be inserted into any transaction, however; we suggest that it be inserted into the Basic Medical Information page – i.e. the first page in the medical chapter. The reason for this is that it provides a consistent method/location for recording problems and will make them easier to locate when updating is required. The standard process of creating a new patients file is to create a Basic Medical Information transaction as the first transaction in the Medical Chapter – this is done using the Sequence Basic medical information – this sequence includes the item problem:. Technique 1) Open the patient’s file and select the Basic Medical Information transaction – first one in the medical chapter. 2) If the item problem: exists already select it and press Return. Go to step 6) Create the item problem: 3) Select the last item (do not open it) – this is done to ensure that the problem: item that is about to be inserted appears underneath the current items. 4) Click on the Insert Item button on the Item Panel Toolbar – illustrated opposite. 200 The Item Selector opens Health One Version 7.1 User Manual. Copyright 2011Helix Health Ltd 5) Type: prob into the Find box and select the item problem in the list. Click OK he problem item is inserted into the Basic Medical Information page and automatically opens; displaying it’s associated list. 6) Select the problem required in the associated list, or alternatively close the list and type the problem yourself – we would recommend that the terms dictionary (blue book button) is used to ensure that the problem is correctly entered – rather than just type it. 201 Health One Version 7.1 User Manual. Copyright 2011Helix Health Ltd 7) If you are declaring a new problem enter the problem Start date no need to type the // marks. Do not confuse the Date of event date with the Start date. The Date of eventdate is the date on which the problem: item was inserted into the file (usually today’s date) and the Start date is the date the problem started – this could be some years earlier. 9) Press Ok, Save and validate the Basic Medical Information transaction. 202 The problem now appears in the active problem window of the Problem Panel. Health One Version 7.1 User Manual. Copyright 2011Helix Health Ltd Linking a Transaction to a Problem A problem must first be declared as described above before it can be linked to a transaction. Linking a New Transaction Whenever you insert a new medical transaction into a patient’s file HEALTHone™ displays its properties window. Problem is one of the attributes in the transaction properties window and all the declared problems for the current patient are displayed there. 1) Click on the box opposite the problem to be linked to place a tick inside it. 2) Complete the rest of the transaction properties and click OK. 203 Health One Version 7.1 User Manual. Copyright 2011Helix Health Ltd Linking an Existing Transaction To link a previously created transaction to a problem you need to view its attributes by opening its properties window. To do that: 1) Open the patient’s file and click once on the transaction in the Transaction Panel to select it. 2) Click on the attributes button on the Transaction Panel Toolbar. The properties window now appears 3) Click on the box opposite the problem to be linked to place a tick inside it. 4) Close the properties window and save and validate the transaction. Viewing a Transaction Related to a Problem 1) Click once on the required problem in the Problem Tab. 2) Click once on the Transaction Panel to make it active. Hold down the Ctrl key and press E. The Transaction Panel now only displays the transaction related to the selected problem. 3) You can switch problems while you are in problem view by clicking on a different one in the Problem Tab. The Transaction Panel now only displays the transaction related to the newly selected problem. 204 Health One Version 7.1 User Manual. Copyright 2011Helix Health Ltd 4) To return to normal view Hold down the Ctrl key and press E again. There is an alternative way to switch between problem view and normal view: 1) Click once on the required problem in the Problem Tab. 2) Right click the mouse anywhere in the Transaction Panel and select Filtered on problems in the pop up menu that appears. The Transaction Panel now only displays the transaction related to the selected problem. 3) To return to normal view repeat step 2) above. Changing the Status of a Problem A problem can have one of two states: Active or Inactive. This is controlled by the End date check box in the problem: items attributes. To Make a Problem Inactive 1) Open the patient’s file and click once on the transaction that contains the problem: item. If you took our advice this will be the Basic Medical Information transaction. 2) Click once to select the problem: item. Press Return to open the item. 3) Now check the End date check box and complete the end date. 4) Click OK to close the item window. Save and validate the transaction. Problem now appears in the History view of the Problem Tab. To Make an Inactive Problem Active 1) Follow steps 1) and 2) above, now uncheck the End date, follow step 4) 205 Health One Version 7.1 User Manual. Copyright 2011Helix Health Ltd Own Notes 206