1
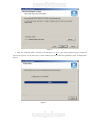
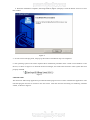
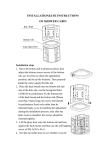
Electronic Microscope
User’s Manual
This instruction manual shows the proper operation of this Electronic Microscope. Please follow instructions
carefully when operating this system.
Safety Instructions
z
To master the proper operation of this Electronic Microscope, please read the following
safety instructions carefully. Make sure you are knowledgeable to all operations of the
system.
z
Following safety instructions are provided to help users to safely and properly operate this
Electronic Microscope and its accessories, and to avoid any possible damage or hurt to the
system or users.
Warning
z
Electronic Microscope cannot be aligned towards the sun or other strong light sources.
z
Stop operating the system immediately in case bad odor or smoking comes out from any
parts. Otherwise, fire or electric shock may be occurred.
z
Stop operating the system immediately in case of fall-off of the system or broken of its
cover.
z
The system is not waterproofed so do not put it into or get to water or liquid. Use soft cloth
to dry the surface in case its surface is wet with water or salt water.
z
Do not daub the system with any materials which contains alcohol, benzene, or other
solvents. This kind of material may catch fire.
z
Do not place or store the system under strong sun light or in high temperature
environment.
z
Do not shake or knock on the system to avoid any possible damage to it.
z
The temperature of the system may rise after long time operation.
Electronic Microscope Installation Guide
First of all, remove the microscope's regular ocular from the microscope
system and then unpack the electronic ocular's package. Carefully take out the
electronic ocular and its accessories, select one suitable adapter and add this
adapter onto the lens of electronic ocular according to the direction indicated in
the figure. Now it's ready to install the electronic ocular onto the microscope
system. Put this electronic ocular into the hole, where the regular ocular was,
and then adjust the direction of electronic ocular. Plug the data cable into its
according port.
Notes:
There are four kinds of microscope Objectives: achromatic Objectives, Apo Objectives, plan Objectives,
plan-Apo Objectives. The above mentioned first two Objectives, that is achromatic Objectives and Apo
Objectives, have imaging plane bending effects. This means when adjusting the focusing distance to obtain
a clear center, the edge will become obscure. On the other hand, when the edge is clear, the center will be
obscure. However, if using plan Objectives, this phenomenon does not exist.
System Requirements:
CPU: Intel Pentium IV 1.7GHz or above
Memory: 256M or above
Hard disk: above 150MB available disk space required for drive installation and normal application
running.
Installation (for Windows 2000):
Now the PC is ready. Use an USB cable to connect the Electronic Microscope system to the previous installed
USB . Boot the PC and insert the support CD into an optical driver.
1. Locate the installation file DrvSetup.exe in the support CD, double click to start setup program. An installation
interface, as shown in figure 1, will display.
Figure 1.
2. Click the button “ N ext”, shown in figure 1, and then click the “Browse” button displayed in the next
U
U
window, as shown in figure 2, to choose the installation path.
Figure 2.
3. After the installation path is selected, click the button of “ N ext”. The setup program begins to install the
U
U
system onto your PC. At the same time, a status window pops out to show the installation status, as displayed in
figure 3.
Figure 3.
4. When the installation completes, following windows, figure 4, displays. Click the button “Finish” to close
this window.
Figure 4.
5. An auto-search message panel, will pop up when above installation steps are completed.
6. The operating system will execute required drive installation procedure when it finds a new hardware. If all
devices, as shown in figure 5 are listed in the device manager, this means this electronic ocular system has been
properly installed.
Figure 5.
Uninstall Guide
The Electronic Microscope application provided uninstall program can be used to uninstall this application. The
uninstall program shortcut is located in the start menu. Click this shortcut will bring out following uninstall
wizard, as shown in figure 6.
Figure 6.
Select “ R emove” option, and click button “ N ext” to start uninstall operation.
U
U
U
U
The device has been installed complete. Now you can run the “Amcap” icon to preview the image (Fig.7).
(Figure 7)