Transcript
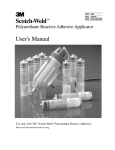
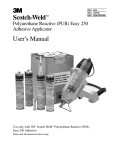
3
Important Safety Instructions
Scotch-Weld Replacement Part
™
Installation Guide
Part Description:
! WARNING
Disconnect air and electrical power and make sure applicator has
cooled to room temperature before servicing. Failure to follow the
procedure may cause electrical shock or burns.
A
B
! WARNING
WIRESTAND
Do not clean or remove 3M™ Scotch-Weld™ Polyurethane Reactive
Adhesive with heat, flame, or solvent. May cause hazardous vapors
or fire. For additional health and safety information see product label
and Material Data Sheet for Scotch-Weld Adhesive used.
Product ID/Stock No.:
62-9895-0033-5
! WARNING
For use on:
3M™ Scotch-Weld™ Polyurethane
Reactive Adhesive Applicator
Use only 3M specified replacement parts. Use of other replacement
parts may cause hazardous conditions or damage the applicator.
REMOVING OLD WIRESTAND:
1. Pull one side of the wirestand out of its
pivot hole (A) and allow it to spring
down into the recessed area (B).
REMOVING OLD WIRESTAND:
2. Turn the applicator over and pull the
other side of the wirestand out of the
other pivot hole and over the edge of
the applicator.
The wirestand should now be able to
be removed entirely.
Refer to 3M™ Scotch-Weld™ Polyurethane Reactive
Adhesive Applicator User’s Manual for more information.
NOTE: If you attempt to pull the end completely out in Step 1, binding may occur on the
other side. For best results, use this two-step procedure to reduce possible damage
to wirestand or applicator.
IMPORTANT NOTICE: 3M MAKES NO
WARRANTIES, EXPRESS OR IMPLIED,
INCLUDING, BUT NOT LIMITED TO, ANY
IMPLIED WARRANTY OF MERCHANTABILITY
OR FITNESS FOR A PARTICULAR PURPOSE.
User is responsible for determining whether the
3M product is fit for a particular purpose and
suitable for user’s method of application.
A
B
C
INSTALLING NEW WIRESTAND:
INSTALLING NEW WIRESTAND:
3. Hold the wirestand so the rounded part
4. Pull the other end of the wirestand just
(C) curves away from the applicator
and temporarily hook one end of the
wirestand so the end rests down in the
bottom of recess (B) as shown.
enough to go over the edge of the
applicator and position it into the pivot
hole (A).
The spring action of the wirestand will
pull itself down into place.
INSTALLING NEW WIRESTAND:
LIMITATION OF REMEDIES AND LIABILITY:
If the 3M product is proved to be defective, THE
EXCLUSIVE REMEDY, AT 3M’S OPTION, SHALL
BE TO REFUND THE PURCHASE PRICE OF OR
TO REPAIR OR REPLACE THE DEFECTIVE 3M
PRODUCT. 3M shall not otherwise be liable for
loss or damages, whether direct, indirect, special,
incidental, or consequential, regardless of the
legal theory asserted, including, but not limited to,
contract, negligence, warranty, or strict liability.
5. Pull the first end of the wirestand –
from Step 3 – out of the recess and
position it over its pivot hole.
The spring action of the wirestand will
pull itself down into place.
3
Industrial Business
Industrial Adhesives and Tapes Division
3M Center, Building 220-5E-06
St. Paul, MN 55144-1000
Printed in U.S.A.
©3M 2005
78-6900-7034-3
(1/05)