1
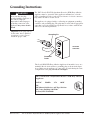
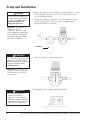
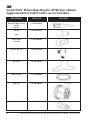
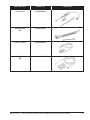
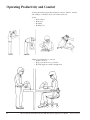
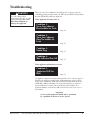
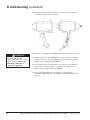
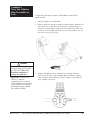
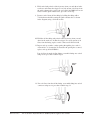
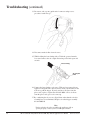
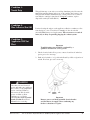
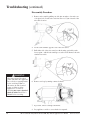
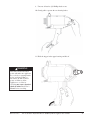
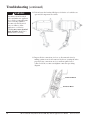
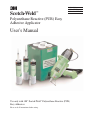
3
Scotch-Weld™
120V. USA
100V. JAPAN
120V. USA REFURB
Polyurethane Reactive (PUR) Easy
Adhesive Applicator
User’s Manual
Use only with 3M™ Scotch-Weld™ Polyurethane Reactive (PUR)
Easy Adhesives
Please read all instructions before using.
Table of Contents
Important Safety Instructions . . . . . . . . . . . . . . . . . . . . . . . . . . . . . . . . . . . . . . . . . . . . . . . . . . . . . . 1
3M™ Scotch-Weld™ Polyurethane Reactive (PUR) Easy Adhesive
........1
Scotch-Weld PUR Easy Adhesive Applicator Operation
....................1
Scotch-Weld PUR Easy Adhesive Applicator Servicing
.....................2
Grounding Instructions
............................................................3
Setup and Installation . . . . . . . . . . . . . . . . . . . . . . . . . . . . . . . . . . . . . . . . . . . . . . . 4-5
Loading Applicator and Dispensing with New Cartridge . . . . . . . . . . . . . . . . . . . 6-8
Reloading Applicator . . . . . . . . . . . . . . . . . . . . . . . . . . . . . . . . . . . . . . . . . . . . . . 9-15
Cold Cartridge Reload . . . . . . . . . . . . . . . . . . . . . . . . . . . . . . . . . . . . . . . . 9-13
Preheated Cartridge Reload . . . . . . . . . . . . . . . . . . . . . . . . . . . . . . . . . . . 13-15
Applicator Shutdown . . . . . . . . . . . . . . . . . . . . . . . . . . . . . . . . . . . . . . . . . . . . . . . . 15
Nozzle Removal and Replacement . . . . . . . . . . . . . . . . . . . . . . . . . . . . . . . . . . . . . .16
Applicator Diagram and Replacement Parts List . . . . . . . . . . . . . . . . . . . . . . . . . . 17
Parts and Accessories . . . . . . . . . . . . . . . . . . . . . . . . . . . . . . . . . . . . . . . . . . . . . 18-19
Operator Productivity and Comfort . . . . . . . . . . . . . . . . . . . . . . . . . . . . . . . . . . . . . 20
Troubleshooting . . . . . . . . . . . . . . . . . . . . . . . . . . . . . . . . . . . . . . . . . . . . . . . . . . 21-36
Condition 1: No or Low Adhesive Flow/Audible Air Leak . . . . . . . . . . 22-26
Condition 2: No or Low Adhesive Flow/No Audible Air Leak . . . . . . . 27-30
Condition 3: Nozzle Drip . . . . . . . . . . . . . . . . . . . . . . . . . . . . . . . . . . . . . . . . 31
Condition 4: Slow Adhesive Shut Off . . . . . . . . . . . . . . . . . . . . . . . . . . . . . . 31
Condition 5: Applicator Will Not Heat: . . . . . . . . . . . . . . . . . . . . . . . . . . 31-36
Applicator Reassembly Procedure . . . . . . . . . . . . . . . . . . . . . . . . . . . . . . . . . . . . . . 37
Warranty/Important Notice/Limitation of Remedies/Limitation of Liability . . . . . 38
i
3M™ Scotch-Weld™ Polyurethane Reactive (PUR) Easy Adhesive Applicator User’s Manual
©3M 2005 October
Important Safety Instructions
SAVE THESE INSTRUCTIONS
Read all instructions before using this product.
3M™ Scotch-Weld™ Polyurethane
Reactive (PUR) Easy Adhesive
For health and safety information, see product label
and Material Safety Data Sheet for Scotch-Weld
PUR Easy Adhesive before using.
! WARNING
Use only with 3M™ Scotch-Weld™ Polyurethane
Reactive (PUR) Easy Adhesive Cartridges. Use
with any other materials may cause hazardous
conditions.
! WARNING
3M™ Scotch-Weld™ Polyurethane Reactive
(PUR) Easy Adhesive Cartridges should be
preheated or used in 3M Scotch-Weld PUR Easy
Adhesive Preheater or 3M Scotch-Weld PUR Easy
Adhesive Applicator only. Do not preheat 3M
Scotch-Weld PUR Easy Adhesive Cartridges in
ovens or other heating devices or use in other
applicators. May cause hazardous conditions.
! WARNING
Do not heat or expose 3M™ Scotch-Weld™
Polyurethane Reactive (PUR) Easy Adhesive to
temperatures or surfaces above 275°F (135°C).
Vapors of heated material may be irritating to
eyes and respiratory tract and may cause
asthma-like symptoms in persons previously
sensitized to isocyanates.
! WARNING
Do not clean or remove 3M™ Scotch-Weld™
Polyurethane Reactive (PUR) Easy Adhesive with
heat, flame, or solvent. May cause hazardous
vapor or fire.
Important: For additional health and safety
information, see product label and Material Safety
Data Sheet for Scotch-Weld Adhesive used.
! WARNING
Avoid Contact with Flammable materials
3M™ Scotch-Weld™ Polyurethane Reactive
(PUR) Easy Adhesive Applicator Operation
! WARNING
To reduce the risk of electrical shock or injury
while operating or servicing the 3M™ ScotchWeld™ Polyurethane Reactive (PUR) Easy
Adhesive Applicator, observe the following safety
rules:
1. Operate and service the applicator only as
described in this manual.
2. Connect the applicator only to a properly
grounded outlet.
3. Do not unplug the applicator by pulling on the
cord. Grasp the plug, not the cord, to unplug.
4. Do not handle the plug or applicator with wet
hands.
5. Do not use the applicator outdoors or on wet
surfaces.
6. Do not use the applicator with damaged cord or
plug.
7. Do not use the applicator if it is not working
properly or has been dropped, damaged,
submerged in water, or left outdoors.
! WARNING
Use only 3-prong grounded plug and properly
grounded outlet. Failure to use properly grounded
plug and outlet may cause electrical shock.
Important: If you are not sure of proper
connections, get help from a qualified electrician
or service person.
! WARNING
Do not use an unapproved extension cord with the
applicator. Use an extension cord which complies
with NEC requirements and state and local codes
and other requirements.
Important: Use only a properly rated 3-prong
grounded extension cord which complies to NEC
requirements state and local codes.Use of an
improper extension cord may cause electrical
shock.
Continued on next page
©3M 2005 October
3M™ Scotch-Weld™ Polyurethane Reactive (PUR) Easy Adhesive Applicator User’s Manual
1
Important Safety Instructions (continued)
Important
FOR INDUSTRIAL USE ONLY
This 3M™ Scotch-Weld™ Polyurethane Reactive (PUR) Easy Adhesive Applicator
is designed exclusively for use with 3M™ Scotch-Weld™ Polyurethane Reactive
(PUR) Easy Adhesives. The use of this applicator with other adhesives or use of this
applicator other than for its intended use may result in unsafe or hazardous
conditions.
! Caution
Avoid contact with hot adhesive, cartridge,
applicator tip, and metal components. May cause
burns.
Important: Wear heat resistant gloves and safety
glasses when using.
! Caution
Do not connect the applicator to air supply with
greater than 80 psi air pressure. May cause
hazardous conditions or damage the applicator.
Important: For disposal of adhesive or adhesive
components, please read and follow information
found on the selected 3M™ Scotch-weld™
Polyurethane Reactive (PUR) Easy Adhesive
MSDS.
3M™ Scotch-Weld™ Polyurethane
Reactive (PUR) Easy Adhesive
Applicator Servicing
! WARNING
Disconnect air and electrical power and make sure
applicator has cooled to room temperature before
servicing. Failure to disconnect air and electrical
power or failure to allow applicator to cool before
servicing may cause electrical shock or burns.
Read User’s Manual before servicing.
! WARNING
Use only 3M-specified replacement parts. Use of
other replacement parts may cause hazardous
conditions or damage the applicator.
! WARNING
Do not modify the plug provided with the
applicator or use with an adapter or ungrounded
outlet. Improper grounding connection of the
applicator may cause electric shock.
Important: If the plug will not fit the outlet, have
a qualified electrician or service person install the
proper outlet.
2
3M™ Scotch-Weld™ Polyurethane Reactive (PUR) Easy Adhesive Applicator User’s Manual
©3M 2005 October
Grounding Instructions
! WARNING
Do not modify the plug
provided with the applicator or
use with an adapter or
ungrounded outlet. Improper
grounding connection of the
applicator may cause electric
shock.
The 3M™ Scotch-Weld™ Polyurethane Reactive (PUR) Easy Adhesive
Applicator must be grounded. If the applicator malfunctions or breaks
down, grounding provides a path of least resistance for electric current to
help reduce the risk of electric shock.
This applicator is equipped with a cord having an equipment-grounding
conductor and grounding plug. The plug must be used with an appropriate
outlet that is properly installed and grounded in accordance with all state
and local codes and requirements.
Important: If the plug will not
fit the outlet, have a qualified
electrician or service person
install the proper outlet.
Grounding Pin
Grounded
Outlet Box
Grounded
Outlet
The Scotch-Weld PUR Easy Adhesive Applicator is intended for use on a
nominal 120-volt circuit and has a grounding plug as shown in the figure
above. Make sure the applicator is connected to an outlet having the same
configurations as the plug. Do not use an adapter.
3M™ Scotch-Weld™ Polyurethane Reactive (PUR) Easy Adhesive
Applicator
120VAC
50/60Hz
1.7A
200W
3M
3M Industrial Adhesives and Tapes Division
3M Center, Building 220-5E-06
St. Paul, MN 55144-1000
©3M 2005 October
3M™ Scotch-Weld™ Polyurethane Reactive (PUR) Easy Adhesive Applicator User’s Manual
3
Setup and Installation
! Caution
Do not connect the applicator to
air supply with greater than 80
psi air pressure. May cause
hazardous conditions or
damage the applicator.
1. Remove the applicator from its shipping container and inspect for any
obvious damage. If damaged, do not use and immediately contact
your local 3M representative.
2. Connect air coupling provided on the end of the supply hose (male
1/8-inch pipe thread) to a filtered, regulated and dry air supply.
(Regulator and filter not included.)
Important: For disposal of
adhesive or adhesive
components, please read and
follow information found on the
selected 3M™ Scotch-Weld™
Polyurethane Reactive (PUR)
Easy Adhesive MSDS.
Filter/Dryer
! WARNING
Use only 3-prong grounded plug
and properly grounded outlet.
Failure to use properly grounded
plug and outlet may cause
electrical shock.
3. Adjust air regulator to a 80 psi starting point.
Important: If you are not sure
of proper connections, get help
from a qualified electrician or
service person.
! WARNING
4. Plug applicator into grounded 120 VAC receptacle.
Do not use an unapproved
extension cord with the
applicator. Use an extension
cord which complies with NEC
requirements and state and local
codes and other requirements.
4
3M™ Scotch-Weld™ Polyurethane Reactive (PUR) Easy Adhesive Applicator User’s Manual
©3M 2005 October
5. Push the on/off switch to the “on” position, indicated by visible red
portion of the switch.
On
On/Off
Switch
Off
! Caution
Avoid contact with hot
adhesive, cartridge, applicator
tip, and metal components.
May cause burns.
6. Let applicator heat for five (5) minutes prior to loading adhesive
cartridge.
7. Remove end cap from applicator by unscrewing end cap
counterclockwise.
Important: Wear heat resistant
gloves and safety glasses when
using.
! WARNING
Use only 3M™ Scotch-Weld™
Polyurethane Reactive (PUR)
Easy Adhesive Cartridges. Use
with any other material may
cause hazardous conditions.
! WARNING
3M™ Scotch-Weld™
Polyurethane Reactive (PUR)
Easy Adhesive Cartridges
should be preheated or used in
3M Scotch-Weld PUR Easy
Adhesive Preheater or 3M
Scotch-Weld PUR Easy
Adhesive Applicator only. Do
not preheat 3M Scotch-Weld
PUR Easy Adhesive Cartridges
in ovens or other heating
devices or use in other
applicators. May cause
hazardous conditions.
©3M 2005 October
3M™ Scotch-Weld™ Polyurethane Reactive (PUR) Easy Adhesive Applicator User’s Manual
5
Loading Applicator and Dispensing
with New Adhesive Cartridge
! Caution
Avoid contact with hot
adhesive, cartridge, applicator
tip, and metal components.
May cause burns.
1. Select adhesive cartridge and place it on a bench or flat work surface
with the threaded nozzle pointing upward.
2. Place a punch or similar tool into the nozzle portion of the cartridge
as shown.
Important: Wear heat resistant
gloves and safety glasses when
using.
3. Tap the punch handle using a hammer, mallet or similar instrument
until the front aluminum seal of the cartridge has been pierced.
4. Select and install a disposable nozzle provided with the 3M™
Scotch-Weld™ Polyurethane Reactive (PUR) Easy Adhesive onto the
cartridge by turning the nozzle clockwise unitl the nozzle base is
tight or flush with the cartridge.
6
3M™ Scotch-Weld™ Polyurethane Reactive (PUR) Easy Adhesive Applicator User’s Manual
©3M 2005 October
! WARNING
5. Insert adhesive cartridge, complete with disposable nozzle into the
applicator as shown.
Sco
tch
-W
eld
™
Use only 3M™ Scotch-Weld™
Polyurethane Reactive (PUR)
Easy Adhesive Cartridges. Use
with any other material may
cause hazardous conditions.
6. Adjust the Shroud: With a Scotch-Weld PUR Easy adhesive cartridge
and Disposable Nozzle loaded in the applicator, insert Nozzle
Shroud (A) into Nozzle Warmer (B) allowing Approximately 1/16”
of the Disposable Nozzle protruding as shown and tighten set- screw
(C) to secure
B
A
! WARNING
Use only 3M™ Scotch-Weld™
Polyurethane Reactive (PUR)
Easy Adhesive Cartridges. Use
with any other material may
cause hazardous conditions.
! WARNING
3M™ Scotch-Weld™
Polyurethane Reactive (PUR)
Easy Adhesive Cartridges
should be preheated or used in
3M Scotch-Weld PUR Easy
Adhesive Preheater or 3M
Scotch-Weld PUR Easy
Adhesive Applicator only. Do
not preheat 3M Scotch-Weld
PUR Easy Adhesive Cartridges
in ovens or other heating
devices or use in other
applicators. May cause
hazardous conditions.
©3M 2005 October
C
7. Tighten applicator end cap to ensure a positive seal. Allow cartridge
to warm for a minimum of 35 minutes.
10
11 12 1
3
9
8
2
7
6
5
4
3M™ Scotch-Weld™ Polyurethane Reactive (PUR) Easy Adhesive Applicator User’s Manual
7
Loading Applicator and Dispensing
with New Adhesive Cartridge (continued)
! WARNING
Do not heat or expose 3M™
Scotch-Weld™ Polyurethane
Reactive (PUR) Easy Adhesive
to temperatures or surfaces
above 275°F (135°C). Vapors
of heated material may be
irritating to eyes and
respiratory tract and may
cause asthma-like symptoms
in persons previously
sensitized to isocyanates.
Dispensing
1. After the adhesive cartridge has completely warmed for a minimum of
35 minutes, (in the Easy Preheater or applicator) actuate trigger on
applicator for adhesive application. (For best results, set air pressure at
80 psi to start adhesive flow.)
2. Adjust for desired adhesive flow rate by setting air regulator between
30 psi and 80 psi.
Note
For best results, hang the applicator from a tool balancer
or stand up by means of the wire stand.
! Caution
Tool Balancer
Do not connect the applicator to
air supply with greater than 80
psi air pressure. May cause
hazardous conditions or
damage the applicator.
Important: For disposal of
adhesive or adhesive
components, please read and
follow information found on the
selected 3M™ Scotch-Weld™
Polyurethane Reactive (PUR)
Easy Adhesive MSDS.
! WARNING
Do not clean or remove 3M™
Scotch-Weld™ Polyurethane
Reactive (PUR) Easy Adhesive
with heat, flame, or solvent.
May cause hazardous vapor
or fire. For additional health
and safety information, see
product label and Material
Safety Data Sheet for ScotchWeld Adhesive used.
Wire Stand
Important: For additional
health and safety information,
see product label and Material
Safety Data Sheet for ScotchWeld Adhesive used.
8
3M™ Scotch-Weld™ Polyurethane Reactive (PUR) Easy Adhesive Applicator User’s Manual
©3M 2005 October
Reloading Applicator
Cold Cartridge
Reload
! Caution
Avoid contact with hot
adhesive, cartridge, applicator
tip, and metal components.
May cause burns.
Important
Adhesive will resist flowing through applicator if
total heat history of adhesive cartridge at application
temperature exceeds 40 hours (total time in
preheater and in applicator). Properly discard any
adhesive cartridge that has been heated longer than
40 hours and replace with a new, heated cartridge.
1. If applicator is cold, turn it on and allow to heat for five (5) minutes.
2. Unscrew and remove end cap from applicator.
Important: Wear heat resistant
gloves and safety glasses when
using.
! WARNING
Use only 3M™ Scotch-Weld™
Polyurethane Reactive (PUR)
Easy Adhesive Cartridges. Use
with any other material may
cause hazardous conditions.
©3M 2005 October
3. Remove empty cartridge with attached nozzle assembly from
applicator and discard.
3M™ Scotch-Weld™ Polyurethane Reactive (PUR) Easy Adhesive Applicator User’s Manual
9
Reloading Applicator (continued)
Cold Cartridge
Reload
4. Select adhesive cartridge and place it on a bench or flat work surface
with the threaded nozzle pointing upward.
5. Place a punch or similar tool into the nozzle portions of the cartridges
as shown.
! WARNING
3M™ Scotch-Weld™
Polyurethane Reactive (PUR)
Easy Adhesive Cartridges
should be preheated or used in
3M Scotch-Weld PUR Easy
Adhesive Preheater or 3M
Scotch-Weld PUR Easy
Adhesive Applicator only. Do
not preheat 3M Scotch-Weld
PUR Easy Adhesive Cartridges
in ovens or other heating
devices or use in other
applicators. May cause
hazardous conditions.
! WARNING
Use only 3M™ Scotch-Weld™
Polyurethane Reactive (PUR)
Easy Adhesive Cartridges. Use
with any other material may
cause hazardous conditions.
6. Tap the punch handle using a hammer, mallet or similar instrument
until the front aluminum seal of the cartridge has been pierced.
! Caution
Avoid contact with hot
adhesive, cartridge, applicator
tip, and metal components.
May cause burns.
Important: Wear heat resistant
gloves and safety glasses when
using.
10
3M™ Scotch-Weld™ Polyurethane Reactive (PUR) Easy Adhesive Applicator User’s Manual
©3M 2005 October
Cold Cartridge
Reload
! Caution
7. Select and install a nozzle provided with the 3M™ Scotch-Weld™
Polyurethane Reactive (PUR) Easy Adhesive onto the cartridge by
turning the nozzle clockwise until the nozzle base is tight or flush
with the cartridge.
8. Insert adhesive cartridge complete with nozzle into the applicator as
shown.
™
eld
Avoid contact with hot
adhesive, cartridge, applicator
tip, and metal components.
May cause burns.
! WARNING
Use only 3M™ Scotch-Weld™
Polyurethane Reactive (PUR)
Easy Adhesive Cartridges. Use
with any other material may
cause hazardous conditions.
Sco
tch
-W
Important: Wear heat resistant
gloves and safety glasses when
using.
9. Tighten applicator end cap to ensure a positve seal. Allow cartridge to
warm for a minimum of 35 minutes before dispensing.
10
11 12 1
3
9
8
©3M 2005 October
2
7
6
5
4
3M™ Scotch-Weld™ Polyurethane Reactive (PUR) Easy Adhesive Applicator User’s Manual
11
Reloading Applicator (continued)
! WARNING
Do not heat or expose 3M™
Scotch-Weld™ Polyurethane
Reactive (PUR) Easy Adhesive to
temperatures or surfaces above
275°F (135°C). Vapors of heated
material may be irritating to
eyes and respiratory tract and
may cause asthma-like symptoms
in persons previously sensitized
to isocyanates.
Dispensing
1. After the adhesive cartridge has completely warmed for a
minimum of 35 minutes, actuate trigger on applicator for
adhesive application. (For best results, set air pressure at 80
psi to start adhesive flow.)
2. Adjust for desired adhesive flow rate by setting air regulator
between 30 psi and 80 psi.
! WARNING
3M™ Scotch-Weld™ Polyurethane
Reactive (PUR) Easy Adhesive
Cartridges should be preheated or
used in 3M Scotch-Weld PUR Easy
Adhesive Preheater or 3M ScotchWeld PUR Easy Adhesive
Applicator only. Do not preheat 3M
Scotch-Weld PUR Easy Adhesive
Cartridges in ovens or other heating
devices or use in other applicators.
May cause hazardous conditions.
! WARNING
Do not clean or remove 3M™
Scotch-Weld™ Polyurethane
Reactive (PUR) Easy Adhesive
with heat, flame, or solvent. May
cause hazardous vapor or fire.
Important: For additional health
and safety information see product
lable and Material Safety Data Sheet
for Scotch-Weld Adhesive used.
! Caution
Do not connect the applicator to
air supply with greater than 80
psi air pressure. May cause
hazardous conditions or
damage the applicator.
Important: For disposal of adhesive
or adhesive components, please read
and follow information found on the
selected 3M™ Scotch-Weld™
Polyurethane Reactive (PUR) Easy
Adhesive MSDS.
12
3M™ Scotch-Weld™ Polyurethane Reactive (PUR) Easy Adhesive Applicator User’s Manual
©3M 2005 October
! Caution
Loading and dispensing with partially used adhesive cartridge:
Avoid contact with hot
adhesive, cartridge, applicator
tip, and metal components.
May cause burns.
If applicator has been shut down with a partially used
cartridge of adhesive, use the following steps to
restart adhesive flow:
Important: Wear heat resistant
gloves and safety glasses when
using.
1. Make sure applicator is plugged into
electrical outlet and air is connected per
instructions in “Setup and Installation”
section of manual.
2. Push the on/off switch to the “ON”
position, indicated by visible red portion of
the switch.
On
On/Off
Switch
Off
3. Let the applicator heat for approximately 10 minutes.
™
eld
h-W
otc
Sc
4. Remove end cap from applicator by unscrewing end cap
counterclockwise and removing adhesive cartridge and nozzle.
5. While holding the adhesive cartridge with heat resistant gloves, turn
nozzle tip counterclockwise to remove, and discard nozzle with cured
adhesive.
6. Select and install a fresh nozzle and thread it clockwise until the base
of the nozzle is tight and or flush with the cartridge.
™
eld
h-W
otc
Sc
7. Insert adhesive cartridge complete with nozzle in the applicator as shown.
8. Tighten applicator end cap clockwise to
ensure a positive seal. Allow cartridge
to warm for a minimum of 35 minutes.
Follow “Dispensing” procedure for
trouble free operation.
©3M 2005 October
3M™ Scotch-Weld™ Polyurethane Reactive (PUR) Easy Adhesive Applicator User’s Manual
13
Reloading Applicator (continued)
Preheated
Cartridge Reload
! Caution
Avoid contact with hot
adhesive, cartridge, and metal
components. May cause burns.
Important
Adhesive will resist flowing through applicator if
total heat history of adhesive cartridge at application
temperature exceeds 40 hours (total time in
preheater and in applicator). Properly discard any
adhesive cartridge that has been heated longer than
40 hours and replace with a new, heated cartridge.
1. If applicator is cold, turn it on and allow to heat for five (5) minutes.
2. Unscrew and remove end cap from applicator.
Important: Wear heat resistant
gloves and safety glasses when
using.
3. Remove empty cartridge with attached nozzle assembly from
applicator and discard.
3M™ Scotch-Weld™
Polyurethane Reactive (PUR)
Easy Adhesive Cartridges
should be preheated or used in
3M Scotch-Weld PUR Easy
Adhesive Preheater or 3M
Scotch-Weld PUR Easy
Adhesive Applicator only. Do
not preheat 3M Scotch-Weld
PUR Easy Adhesive Cartridges
in ovens or other heating
devices or use in other
applicators. May cause
hazardous conditions.
14
5. Before loading pre-heated cartridge into applicator, retighten
disposable nozzle to prevent adhesive leakage.
6. Insert adhesive cartridge complete with disposable nozzle into the
applicator as shown.
™
eld
W
hotc
Sc
! WARNING
4. Remove heated 3M™ Scotch-Weld™ Polyurethane Reactive (PUR)
Easy Adhesive Cartridge complete with attached nozzle from 3M™
Scotch-Weld™ Polyurethane Reactive (PUR) Easy Preheater. (Follow
“Cartridge Heating Procedure” found in the 3M™ Scotch-Weld™
Polyurethane Reactive (PUR) Easy Preheater User’s Manual.)
3M™ Scotch-Weld™ Polyurethane Reactive (PUR) Easy Adhesive Applicator User’s Manual
©3M 2005 October
Preheated
Cartridge Reload
7. Tighten applicator end cap by turning clockwise as shown.
! Caution
Avoid contact with hot
adhesive, cartridge, and metal
components. May cause burns.
Important: Wear heat resistant
gloves and safety glasses when
using.
8. Dispense adhesive by following the procedure found in the
“Dispensing” portion of the User’s Manual found on page 8.
Applicator Shutdown
! Caution
Avoid contact with hot
adhesive, cartridge, and metal
components. May cause burns.
Important: Wear heat resistant
gloves and safety glasses when
using.
Important
Do not remove cartridge from applicator! Cartridge
must remain sealed during applicator shutdown.
Failure to do so will allow moisture to cure the adhesive
in the cartridge and render it unusable.
1. Push on/off switch to “off” position. The red portion of the switch
will no longer be visible.
On
©3M 2005 October
On/Off
Switch
Off
3M™ Scotch-Weld™ Polyurethane Reactive (PUR) Easy Adhesive Applicator User’s Manual
15
Nozzle Removal/Replacement
! WARNING
Use only 3M™ Scotch-Weld™
Polyurethane Reactive (PUR)
Easy Adhesive Cartridges. Use
with any other material may
cause hazardous conditions.
To remove old Nozzle Warmer:
1. Warm applicator for five to ten minutes.
2. Turn off switch and disconnect plug
3. Remove adhesive cartridge.
4. Loosen set-screw (A) and remove Nozzle Shroud (B) Note: Save
Nozzle Shroud to reinstall or replace with a new one (62-9845-0029-8).
B
! WARNING
3M™ Scotch-Weld™
Polyurethane Reactive (PUR)
Easy Adhesive Cartridges
should be preheated or used in
3M Scotch-Weld PUR Easy
Adhesive Preheater or 3M
Scotch-Weld PUR Easy
Adhesive Applicator only. Do
not preheat 3M Scotch-Weld
PUR Easy Adhesive Cartridges
in ovens or other heating
devices or use in other
applicators. May cause
hazardous conditions.
! WARNING
Use only 3M-specified
replacement parts. Use of
other replacement parts may
cause hazardous conditions
or damage the applicator.
! Caution
Avoid contact with hot
adhesive, cartridge, applicator
tip, and metal components.
May cause burns.
Important: Wear heat resistant
gloves and safety glasses when
using.
A
To remove old Nozzle Warmer:
5. Using a 13/16 or adjustable wrench rotate nozzle warmer until Pin (C)
is aligned with slot (D).
C
D
6. Push Nozzle warmer into adhesive cartridge chamber and remove from
rear of applicator.
To install new Nozzle Warmer:
7. Insert Nozzle into rear of applicator.
8. Align pin with slot in the aluminum casting
Note: use a Scotch-Weld Adhesive cartridge with
disposable nozzle to help locate the Nozzle warmer
To install new Nozzle Warmer:
9. Using a 13/16 or adjustable wrench rotate nozzle warmer until Pin (C)
secures the Nozzle Warmer as shown
C
D
To install Nozzle Shroud:
10. With a Scotch-Weld PUR Easy adhesive cartridge and Disposable
Nozzle loaded in the applicator, insert Nozzle Shroud (A) into Nozzle
Warmer (E) allowing Approximately 1/16” of the Disposable Nozzle
protruding as shown and tighten set screw (B) to secure
A
E
B
16
3M™ Scotch-Weld™ Polyurethane Reactive (PUR) Easy Adhesive Applicator User’s Manual
©3M 2005 October
Applicator Diagram and Replacement Parts List
End Cap (4)
Nozzle Housing
(7)
End
Cap
Seal (5)
Shroud (12)
Swivel
(10)
Wire
Stand
(6)
Air Valve/
Assembly
(2)
On/Off
Switch (8)
Air Supply
Line (1)
Coupler
Filter (3)
Disposable
Nozzle
(11)
Power
Cord (9)
! WARNING
Use only 3M-specified
replacement parts. Use of other
replacement parts may cause
hazardous conditions or
damage the applicator.
©3M 2005 October
All 3M™ Scotch-Weld™ Polyurethane Reactive (PUR) Easy Adhesive
Replacement Parts contain replacement procedure.
(1) Air Supply . . . . . . . . . . . . . . . . . . . . . . . . . . . . . . . . . . 62-9895-0005-3
(2) Air Valve/Kit . . . . . . . . . . . . . . . . . . . . . . . . . . . . . . . . .62-9845-0009-0
(3) Coupler Filter . . . . . . . . . . . . . . . . . . . . . . . . . . . . . . . 62-9895-0001-2
(4) End Cap . . . . . . . . . . . . . . . . . . . . . . . . . . . . . . . . . . . . 62-9895-0003-8
(5) End Cap Seal . . . . . . . . . . . . . . . . . . . . . . . . . . . . . . . . 62-9895-0004-6
(6) Wire Stand . . . . . . . . . . . . . . . . . . . . . . . . . . . . . . . . . . 62-9895-0033-5
(7) Nozzle Housing . . . . . . . . . . . . . . . . . . . . . . . . . . . . . .62-9845-0030-6
(8) On/Off Switch . . . . . . . . . . . . . . . . . . . . . . . . . . . . . . . 62-9895-0024-4
(9) Power Cord . . . . . . . . . . . . . . . . . . . . . . . . . . . . . . . . . 62-9895-0021-0
(10) Swivel Connector . . . . . . . . . . . . . . . . . . . . . . . . . . . . 62-9845-9934-0
(11) Disposable Nozzles . . . . . . . . . . . . . . . . . . . . . . . . . . . 62-9845-0031-4
(12) Nozzle Shroud . . . . . . . . . . . . . . . . . . . . . . . . . . . . . . . 62-9845-0029-8
3M™ Scotch-Weld™ Polyurethane Reactive (PUR) Easy Adhesive Applicator User’s Manual
17
3
Scotch-Weld™ Polyurethane Reactive (PUR) Easy Adhesive
Applicator REPLACEMENT PARTS and ACCESSORIES
DESCRIPTION
STOCK NO.
Disposable Replacement
Nozzles
(50/Case)
62-9845-0031-4
Shroud
62-9845-0029-8
CONTENTS
3/bag
18
Main Nozzle
Assembly
62-9845-0030-6
Swivel Connector
62-9845-9934-0
Wire Stand
62-9895-0033-5
End Cap Seal
62-9895-0004-6
End Cap
62-9895-0003-8
Coupler Filter
62-9895-0001-2
62-9895-0004-6
3M™ Scotch-Weld™ Polyurethane Reactive (PUR) Easy Adhesive Applicator User’s Manual
©3M 2005 October
DESCRIPTION
STOCK NO.
Air Valve Kit
62-9845-0009-0
On/Off Switch
Kit
62-9895-0024-4
Power Cord Kit
62-9895-0021-0
Air Supply Line
Kit
62-9895-0005-3
©3M 2005 October
CONTENTS
3M™ Scotch-Weld™ Polyurethane Reactive (PUR) Easy Adhesive Applicator User’s Manual
19
Operating Productivity and Comfort
Avoid positions that can product irritation of nerves, muscles, tendons,
and cartilage of shoulder, elbow, wrist, hand, and back.
Avoid:
• Raised elbow
• Bent wrist
• Reaching
• Bending over
Adjust your workstation so you can:
• Stand or sit erect.
• Keep your elbows close your sides.
• Hold the applicator with a straight wrist.
20
3M™ Scotch-Weld™ Polyurethane Reactive (PUR) Easy Adhesive Applicator User’s Manual
©3M 2005 October
Troubleshooting
! WARNING
Use only 3M-specified
replacement parts. Use of other
replacement parts may cause
hazardous conditions or
damage the applicator.
This part of the User’s Manual is divided into five sections to assist in
evaluating possible problems with your 3M™ Scotch-Weld™ Polyurethane
Reactive (PUR) Easy Adhesive Applicator.
If the applicator is heating refer to:
Condition 1:
No or Low Adhesive
Flow/Audible Air Leak
Condition 2:
No or Low Adhesive
Flow/No Audible Air
Leak
Condition 3:
Nozzle Drip
Condition 4:
Slow Adhesive Shut Off
Page 22
Page 27
Page 31
Page 31
If the applicator will not heat, refer to:
Condition 5:
Applicator Will Not
Heat
Page 31
An applicator diagram and replacement parts list can be found on page 17.
Should your applicator require repair, replacement parts can be ordered
from your local authorized 3M™ Scotch-Weld™ Polyurethane Reactive
(PUR) Easy Adhesive distributor. If, after following these procedures, a
problem still exists, contact your local 3M sales representative. For
telephone numbers of the nearest 3M location refer to the back cover of
this manual.
Important
Service on this applicator should only be performed
by a qualified electrician or service person.
©3M 2005 October
3M™ Scotch-Weld™ Polyurethane Reactive (PUR) Easy Adhesive Applicator User’s Manual
21
Troubleshooting (continued)
Condition 1:
No or Low Adhesive
Flow/Audible Air Leak
Perform the following steps until adhesive flow is achieved.
1. Tighten applicator end cap to ensure positive seal. If this does not
produce adhesive flow, proceed to next step.
! Caution
Avoid contact with hot
adhesive, cartridge, applicator
tip, and metal components.
May cause burns.
2. Remove end cap by rotating end cap counterclockwise.
Important: Wear heat resistant
gloves and safety glasses when
using.
3. Inspect inside of end cap for improperly seated or damaged seal.
Reposition or replace seal if necessary with end cap seal
62-9895-0004-6. If this does not produce adhesive flow, proceed to
next step.
Pierce Tube
End Cap Seal
22
3M™ Scotch-Weld™ Polyurethane Reactive (PUR) Easy Adhesive Applicator User’s Manual
©3M 2005 October
! Caution
Avoid contact with hot
adhesive, cartridge, applicator
tip, and metal components.
May cause burns.
Important: Wear heat resistant
gloves and safety glasses when
using.
4. Inspect the 3M™ Scotch-Weld™ Polyurethane Reactive (PUR) Easy
Adhesive Cartridge for dents or damage and replace with an
undamaged cartridge. Dented or damaged cartridges will not allow a
proper seal and air will leak past the cartridge.
5. If air leak occurs at connections on the end cap, disconnect air service
and tighten connections.
6. If the connections or air line is damaged or broken, replace with air
valve assembly 62-9845-0009-0.
7. If air supply line has been cut or damaged, replace air supply line
62-9895-0005-3.
8. If air leak occurs inside the handle, the two handle halves must be
separated by following the disassembly procedure, page 24.
©3M 2005 October
3M™ Scotch-Weld™ Polyurethane Reactive (PUR) Easy Adhesive Applicator User’s Manual
23
Troubleshooting (continued)
! WARNING
Disconnect air and electrical
power and make sure applicator
has cooled to room temperature
before servicing. Failure to
disconnect air and electrical
power or failure to allow
applicator to cool before
servicing may cause electrical
shock or burns. Read User’s
Manual before servicing.
Disassembly Procedure
9. Remove power cord from grounded electrical outlet and disconnect air
supply.
10. Remove wire stand by pulling one side just enough to clear wire out
of its pivot hole. Let the wire settle into the recess just forward of the
pivot hole location.
11. Repeat the above procedure on the opposite side of the applicator.
12. Pull either side of the wire stand over the housing, preferably at the
lowest point – which is the small groove at the front. Remove the
wire stand and set aside.
13. Remove end cap by turning it counterclockwise.
14. If possible, remove cartridge with attached nozzle from applicator.
15. Lay applicator on side so screw heads face upward.
16. Unscrew all twelve (12) Phillips head screws.
24
3M™ Scotch-Weld™ Polyurethane Reactive (PUR) Easy Adhesive Applicator User’s Manual
©3M 2005 October
17. Gently pull to separate the two housing halves.
18. Hold the trigger in the upper housing and lift off.
©3M 2005 October
3M™ Scotch-Weld™ Polyurethane Reactive (PUR) Easy Adhesive Applicator User’s Manual
25
Troubleshooting (continued)
19. Lift and rotate the housing 180 degrees clockwise so both sides are
open and all components are visible.
! WARNING
Use only 3M-specified
replacement parts. Use of other
replacement parts may cause
hazardous conditions or
damage the applicator.
20. Reconnect air supply set at 30-40 psi maximum to help locate air leak.
21. Inspect connections and retighten if necessary. If air valve is leaking
or air line going to end cap is leaking or has been damaged, replace
with air valve assembly 62-9845-0009-0.
22. If air supply line has been punctured, cut or has been disconnected
from air valve assembly, replace or reconnect air supply lines or
replace with air supply line 62-9895-0005-3.
23. After inspecting, tightening loose fittings, or replacing parts,
reassemble handle halves by following Reassembly Instructions. See
page 37.
26
3M™ Scotch-Weld™ Polyurethane Reactive (PUR) Easy Adhesive Applicator User’s Manual
©3M 2005 October
Condition 2:
No or Low Adhesive
Flow/No Audible Air
Leak
Conduct the following tests if there is NO audible air leak but the
applicator heats.
1. Check air supply for a pinched line.
2. Remove applicator end cap by turning counterclockwise. Point the end
cap away from you and others in the work area, and pull trigger. A
steady air stream flowing from the pierce tube indicates air valve and
air source are in working order. Proceed to next step. If there is no air
flow, proceed to page 29. step 8.
! Caution
Do not connect the applicator to
air supply with greater than 80
psi air pressure. May cause
hazardous conditions or
damage the applicator.
Important: For disposal of
adhesive or adhesive
components, please read and
follow information found on the
selected 3M™ Scotch-Weld™
Polyurethane Reactive (PUR)
Easy Adhesive MSDS.
©3M 2005 October
3. Replace and tighten end cap, turning it in a clockwise direction.
Increases air pressure to approximately 80 psi. If adhesive begins to
flow, readjust to desired pressure. If there is still no or low-adhesive
flow, continue to next step.
3M™ Scotch-Weld™ Polyurethane Reactive (PUR) Easy Adhesive Applicator User’s Manual
27
Troubleshooting (continued)
! WARNING
Do not clean or remove 3M™
Scotch-Weld™ Polyurethane
Reactive (PUR) Easy Adhesive
with heat, flame, or solvent.
May cause hazardous vapors
or fire. For additional health
and safety information, see
product label and Material
Safety Data Sheet for ScotchWeld Adhesive used.
28
4. Cured adhesive in the disposable nozzle could cause adhesive flow to
become slow or stop.
5. Remove old plugged disposable nozzle and install new disposable
nozzle 62-9845-0031-4.
6. If air flow to end cap does not occur when trigger is pulled, check to
see that applicator is properly connected to a pressurized air regulator.
If connections are properly made and pressure is at 30 psi minimum,
proceed to next step.
7. Remove end cap from applicator. Place a 7/16-inch open end wrench on
swivel fitting. Hold fitting with wrench and turn end cap in direction of
arrow in diagram. Remove end cap and set aside.
3M™ Scotch-Weld™ Polyurethane Reactive (PUR) Easy Adhesive Applicator User’s Manual
©3M 2005 October
8. Hold swivel and point in a direction away from you and others in the
work area and actuate the trigger. If a steady stream of air flows from
the quick exhaust valve, replace the end cap 62-9895-0003-8. If no air
flows from the quick exhaust valve, proceed to next step.
9. Remove swivel from air line fitting by holding the fitting with a
7/16-inch wrench while rotating the quick exhaust valve as shown
in the diagram, using a 1/2-inch wrench.
10. Hold the air line fitting and point in a direction away from you and
others in the work area. Actuate the trigger. If a steady stream of air
flows from the fitting, replace swivel connector 62-9845-9934-0.
11. Inspect end cap to make certain opening through the pierce tube is
clean and free of obstruction. If obstruction in opening has occurred,
replace end cap 62-9895-0003-8.
If no air flows from the air line fitting, reassemble fitting onto swivel
using reverse procedure found in step 9.
Pierce
Tube
12. If no air flows from the air line fitting, reassemble fitting into swivel
connector using reverse procedure found in step 11.
©3M 2005 October
3M™ Scotch-Weld™ Polyurethane Reactive (PUR) Easy Adhesive Applicator User’s Manual
29
Troubleshooting (continued)
13. Reconnect end cap onto quick swivel connector using reverse
procedure found in step 7.
14. Disconnect main air line from air source.
15. While holding the brass fitting with a 7/16-inch open end wrench,
loosen and remove the air coupler filter using a 9/16-inch open end
wrench.
Brass Fitting
Air Coupler
Filter
16. Connect the brass fitting to air source. With end cap removed from
applicator and pointed in a direction away from you and others in the
work area, pull the trigger. If steady stream of air flows from the
pierce tube, replace coupler filter 62-9895-0001-2. If no air flows
from the pierce tube, proceed to next step.
17. By conducting the above tests, all problems other than the air valve
assembly have been eliminated. Replace air valve/trigger assembly
62-9845-0009-0.
Note
If after replacing air valve assembly, the applicator fails to
operate properly, contact your local 3M representative.
30
3M™ Scotch-Weld™ Polyurethane Reactive (PUR) Easy Adhesive Applicator User’s Manual
©3M 2005 October
Condition 3:
Nozzle Drip
Condition 4:
Slow Adhesive Shut Off
Condition 5:
Applicator Will Not
Heat
This problem may occur after a several day shutdown period because the
material around the plunger in the rear of the cartridge has begun to cure.
This problem should be eliminated after a short period of use or when a
new adhesive cartridge is introduced. If dripping continues, replace
disposable nozzle (62-9845-0031-4).
If after releasing the trigger on the applicator, adhesive continues to flow
from the tip for a few seconds before shutting off, the air valve kit
(62-9845-0009-0) may need replacement. This can occur as a result of
moist, oily or dirty air partially plugging the exhaust system.
Important
Troubleshooting steps should be conducted by a
qualified electrician or service person.
1. Check electrical outlet. If no power, contact electrician; if outlet has
power, proceed to next step.
2. Push on/off switch to “on” position indicated by visible red portion of
switch. If no heat, proceed to next step.
! WARNING
Disconnect air and electrical
power and make sure applicator
has cooled to room temperature
before servicing. Failure to
disconnect air and electrical
power or failure to allow
applicator to cool before
servicing may cause electrical
shock or burns. Read User’s
Manual before servicing.
©3M 2005 October
On
On/Off
Switch
Off
Important
Remove power cord from grounded electrical outlet
and disconnect air supply before conducting any
further evaluations or repairs.
3M™ Scotch-Weld™ Polyurethane Reactive (PUR) Easy Adhesive Applicator User’s Manual
31
Troubleshooting (continued)
Disassembly Procedure
3. Remove wire stand by pulling one side just enough to clear wire out
of its pivot hole. Let the wire settle into the recess just forward of the
pivot hole location.
4. Do the same with the opposite side of the wire stand.
5. Pull either side of the wire stand over the housing, preferably at the
lowest point – which is the small groove at the front. Remove the wire
stand and set aside.
! WARNING
Disconnect air and electrical
power and make sure applicator
has cooled to room temperature
before servicing. Failure to
disconnect air and electrical
power or failure to allow
applicator to cool before
servicing may cause electrical
shock or burns. Read User’s
Manual before servicing.
6. Remove end cap by turning counterclockwise.
7. If possible, remove cartridge and nozzle.
8. Lay applicator on side so screw heads face upward.
32
3M™ Scotch-Weld™ Polyurethane Reactive (PUR) Easy Adhesive Applicator User’s Manual
©3M 2005 October
9. Unscrew all twelve (12) Phillips head screws.
10. Gently pull to separate the two housing halves.
11. Hold the trigger in the upper housing and lift off.
! WARNING
Disconnect air and electrical
power and make sure applicator
has cooled to room temperature
before servicing. Failure to
disconnect air and electrical
power or failure to allow
applicator to cool before
servicing may cause electrical
shock or burns. Read User’s
Manual before servicing.
©3M 2005 October
3M™ Scotch-Weld™ Polyurethane Reactive (PUR) Easy Adhesive Applicator User’s Manual
33
Troubleshooting (continued)
! WARNING
12. Lift and rotate the housing 180 degrees clockwise so both sides are
open and all components are visible.
Disconnect air and electrical
power and make sure applicator
has cooled to room temperature
before servicing. Failure to
disconnect air and electrical
power or failure to allow
applicator to cool before
servicing may cause electrical
shock or burns. Read User’s
Manual before servicing.
13. Inspect all wire connections for loose or disconnected wires by
making certain screws in all connector blocks are securing the wires
properly. If any connections are loose and have pulled out of
connector blocks, reconnect and tighten connection per wiring
diagram.
Connector Block
Connector Block
34
3M™ Scotch-Weld™ Polyurethane Reactive (PUR) Easy Adhesive Applicator User’s Manual
©3M 2005 October
14. Use volt/ohm meter to check the heat tube assembly. Place one probe
in upper left position of two pole connector blocks. With the other
meter probe, touch the connector on upper right side of two pole
connector.
Two Pole
Connector
15. If no continuity exists and applicator is still within the 12 month
warranty period. Contact your nearest 3M sales representative or
authorized 3M™ Scotch-Weld™ Polyurethane Reactive (PUR) Easy
Adhesive distributor. If applicator is past the 12 month warranty
period, contact your nearest 3M sales representative or authorized
3M™ Scotch-Weld™ Polyurethane Reactive (PUR) Easy Adhesive
distributor to inquire about a “refurbish” program.
! WARNING
Disconnect air and electrical
power and make sure applicator
has cooled to room temperature
before servicing. Failure to
disconnect air and electrical
power or failure to allow
applicator to cool before
servicing may cause electrical
shock or burns. Read User’s
Manual before servicing.
If continuity does exist, proceed to the next step.
16. Using a volt/ohm meter to check on/off switch, first push switch to
“on” position indicated by visible red portion of switch. Place one
probe in upper left position of three pole connector block. With the
other meter problem, touch the connector on upper side right of three
pole connector block.
Three Pole
Connector
17. If no continuity exists, replace on/off switch assembly
62-9895-0024-4. If continuity exists, proceed to next step.
©3M 2005 October
3M™ Scotch-Weld™ Polyurethane Reactive (PUR) Easy Adhesive Applicator User’s Manual
35
Troubleshooting (continued)
18. Using a volt/ohm meter to check power cord, place one probe in lower
left position of three pole connector containing black wire. Connect
the other probe to the left side of the electrical plug.
Three Pole
Connector
Move the cord back and forth to insure there is not a partial or
intermittent connection.
! WARNING
Disconnect air and electrical
power and make sure applicator
has cooled to room temperature
before servicing. Failure to
disconnect air and electrical
power or failure to allow
applicator to cool before
servicing may cause electrical
shock or burns. Read User’s
Manual before servicing.
19. If no or intermittent continuity exists, replace power cord assembly
62-9895-0021-0.
20. If continuity exists place one probe of the volt/ohm meter into lower
right position of three pole connector containing white wire. Connect
the other probe to the neutral side of the electrical plug. Move the
cord back and forth to insure there is not a partial or intermittent
connection.
Three Pole
Connector
21. If no or intermittent continuity exists, replace power cord assembly
62-9895-0021-0.
22. If power cord has continuity but unit still does not heat, repeat
troubleshooting steps or contact your local 3M representative.
36
3M™ Scotch-Weld™ Polyurethane Reactive (PUR) Easy Adhesive Applicator User’s Manual
©3M 2005 October
Applicator Reassembly Procedure
The housing assembly is generally in reverse order of the disassembly
procedure with the following precautions:
1. Make sure the trigger is on the valve button before locating the valve
in position. Position the valve so the fittings are pointing away from
you and down along the inside surface of the housing. The flat portion
of the hex on the valve should be positioned as shown.
Valve Button
! WARNING
Valve
2. If thermal standoffs have been removed or have come out of housing,
push the standoffs into position on the heat tube. Make sure they are
fully engaged with the keys in the heat tube and there is not a gap
between the opposing standoffs.
Use only 3-prong grounded plug
and properly grounded outlet.
Failure to use properly grounded
plug and outlet may cause
electrical shock.
Important: If you are not sure
of proper connections, get help
from a qualified electrician or
service person.
! Caution
Do not connect the applicator to
air supply with greater than 80
psi air pressure. May cause
hazardous conditions or
damage the applicator.
Important: For disposal of
adhesive or adhesive
components, please read and
follow information found on the
selected 3M™ Scotch-Weld™
Polyurethane Reactive (PUR)
Easy Adhesive MSDS.
©3M 2005 October
3. Hold air line in its groove at the bottom of the handle when placing
the air side onto the electrical side.
4. Do not force the housing halves together. Recheck position of trigger
and valve if they will not mate properly. Make sure heat tube is in its
proper position if it has been removed.
5. Replace twelve (12) screws and tighten. Do not overtighten screws.
6. Connect electrical and air supplies.
7. After sufficient heating (up to 35 minutes may be required) check for
proper operation.
3M™ Scotch-Weld™ Polyurethane Reactive (PUR) Easy Adhesive Applicator User’s Manual
37
Warranty/Important Notice/Limitation of Remedies/Limitation of Liability
During Warranty Period
Contact your authorized 3M™ Scotch-Weld™ Polyurethane Reactive (PUR) Easy
Adhesive distributor.
After Warranty Period
The 3M™ Scotch-Weld™ Polyurethane Reactive (PUR) Easy Adhesive
Applicator has been engineered to be durable and reliable. Recognizing that it will
eventually need maintenance, we have made it easy to disassemble and repair.
Should your 3M Scotch-Weld PUR Easy Adhesive Applicator require repair, you
can contact your local 3M representative to order replacement parts, or inquire
about a refurbish program.
Important Notice
User is responsible for determining whether the 3M™ Scotch-Weld™ Polyurethane
Reactive (PUR) Easy Adhesive Applicator is fit for a particular purpose and
suitable for user’s method of application.
Warranty
With respect to the 3M™ Scotch-Weld™ Polyurethane Reactive (PUR) Easy
Adhesive Applicator, 3M warrants for 12 months from the date of purchase or use,
whichever occurs first that this applicator will be free from defects in material and
manufacture. With respect the 3M™ Scotch-Weld™ Polyurethane Reactive (PUR)
Easy Refurbished Adhesive Applicator, 3M warrants for 30 days from the date of
purchase or use, whichever occurs first that this applicator will be free from
defects in material and manufacture. 3M MAKES NO OTHER WARRANTIES,
EXPRESS OR IMPLIED, INCLUDING, BUT NOT LIMITED TO, ANY
IMPLIED WARRANTY OF MERCHANTABILITY OR FITNESS FOR A
PARTICULAR PURPOSE OR ANY IMPLIED WARRANTY ARISING OUT OF
A COURSE OF DEALING, CUSTOM, OR USAGE OF TRADE. This warranty
does not cover routine maintenance, normal wear and tear, or damage resulting
from accident, misuse, alteration, corrosion, lack of reasonable care, service
performed by an unauthorized repair service, use of unauthorized replacement
parts or accessories, or installation, use, operation, or maintenance not in
accordance with 3M recommended procedures, or use of adhesive cartridges not
manufactured by 3M or not subject to 3M quality standards.
Limitation of Remedies
If the 3M™ Scotch-Weld™ Polyurethane Reactive (PUR) Easy Adhesive
Applicator is proven to be defective within the warranty period stated above, THE
EXCLUSIVE REMEDY, AT 3M’S OPTION, SHALL BE TO REFUND THE
PURCHASE PRICE OF OR TO REPAIR OR REPLACE THE DEFECTIVE 3M
APPLICATOR, provided that the defective applicator is, at 3M’s choice, returned
immediately to 3M or an authorized service representative designated by 3M, or
made available at user’s premises in a location suitable for servicing.
Limitation of Liability
3M shall not otherwise be liable for loss or damages, whether direct, indirect,
special, incidental, or consequential, regardless of the legal or equitable theory
asserted, including contract, negligence, warranty, or strict liability.
38
3M™ Scotch-Weld™ Polyurethane Reactive (PUR) Easy Adhesive Applicator User’s Manual
©3M 2005 October
Notes:
©3M 2005 October
3M™ Scotch-Weld™ Polyurethane Reactive (PUR) Easy Adhesive Applicator User’s Manual
39
3
Industrial Business
Industrial Adhesives and Tapes Division
3M Center, Building 21-1W-10, 900 Bush Avenue
St. Paul, MN 55144-1000
800-362-3550 * 877-369-2923 (fax)
www.3M.com/industrial
Recycled Paper
40% pre-consumer
10% post-consumer
Printed in U.S.A.
©3M 2005 78-8132-7766-8 (11/05)