1
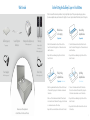
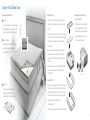
user guide
Help is just a click or phone call away
If you need help finding your ideal comfort or troubleshooting, please
visit us at sleepnumber.com/chat to chat with a live representative
7 a.m. – 11 p.m. (Central Standard Time) daily.
To speak to a representative by phone, call
1.800.472.7185 (Central Standard Time):
Monday-Friday
8 a.m. – 8 p.m.
Saturday
8:30 a.m. – 5 p.m.
SundayClosed
SLEEP NUMBER, SELECT COMFORT and the Double Arrow design
are registered trademarks of Select Comfort Corporation.
9800 59 th Avenue North, Minneapolis, MN 55442
120267
©2014 Select Comfort 6/14
Welcome to
Our DualTemp™ layer features active air technology
that allows each of you to select your ideal
temperature at the simple touch of a button.
So you both can sleep exactly the way you like.
Let’s get started.
3
What’s Inside
Before Putting the DualTemp™ Layer on Your Mattress
Position the secure fit bands under your mattress to keep the layer firmly in place. This step varies depending upon your base.
If you have an adjustable base, raise the head and foot slightly so it’s easier to place the bands. When finished, return to flat position.
DualTemp™ Layer (1)
*layer may vary
Secure Fit System
Bands (2-4)
Heating and Cooling Source (2)
Remote(s)
Twin Extra-Long receives 1
Batteries included
*remote may vary
Twin Extra-Long receives 1
Power Supply (2)
Power Cord (2)
Twin Extra-Long receives 1
Twin Extra-Long receives 1
26"
38"
Measure secure fit band placement
26 and 38 inches from the head of the bed.
Modular base
or box spring
Queen/King
adjustable base
(2 long bands)
(2 long bands)
• Slide the first band under the mattress 38 inches from the
head of the bed until the rigid portion of the band is centered
under the mattress.
• Slide the first band under the mattress 38 inches from the
head of the bed until the rigid portion of the band is centered
under the mattress.
• Repeat with the second band, placing it 26 inches from the
head of the bed.
• Repeat with the second band, placing it 26 inches from the
head of the bed.
FlexTop™ King
adjustable base
Split King
adjustable base
(1 long band, 2 short bands)
(4 short bands)
• Slide the long band under the mattress 38 inches from the head
of the bed until the rigid portion of the band is centered under
the mattress.
• Slide one of the bands under the width of the mattress
38 inches from the head of the bed until the rigid portion
of the band is centered under one side of the mattress.
• Slide one of the short bands under the width of the mattress 26
inches from the head of the bed until the rigid portion of the band
is centered under one side of the mattress.
• Repeat with the second band, placing it 26 inches from the
head of the bed.
• Repeat with the second short band on the other side of the bed.
• Repeat at both the 26- and 38-inch marks on the other side
of the mattress.
5
Assembly
1
4
Place the DualTemp™
layer on your bed with
the hoses toward the
head of the bed and
the lighter gray side
facing up.
Connect the power cord
to the power supply.
Plug it into a grounded
outlet or surge protector.
2
5
Secure the bands to
the metal loops on
the DualTemp™ layer
on each side of the
mattress (and in the
middle between
each mattress for
Split King and FlexTop™
King mattresses).
Attach the connector to
the heating and cooling
source by aligning the
round opening on the
connector to the silver
ball on top of the air
outlet. Push together
until you hear a click.
3
6
Place the heating and
cooling source on
the floor next to or
underneath your bed
on a level surface.
Plug the power supply
into the first heating
and cooling source
with the flat side of
the plug facing down.
7
For Queen and King size
beds, repeat steps 3 - 6
on the other side with
the second heating
and cooling source.
7
Setting the timer
Using Your 3-Button
Sleep Number® Remote
The DualTemp™ layer can be set to turn off in
1-9 hours. Once it reaches 9 hours, the next
increment goes back to 0. If you do not set
the timer, the layer will automatically shut off
after 10 hours.
Press the side button
to select one side of the layer.
Press the Menu/Select button
. In the Home menu,
select DualTemp™, then select Adjust Temperature to turn on
the DualTemp™ layer and adjust to the desired temperature.
Warmer
To set the timer, press the Menu/Select
button
, choose Timers, then use the
up/down arrows to select the time. Press
the Menu/Select button
.
Cooling
Fan
Heating
To enjoy cooler, more comfortable sleep, press the down arrow to
select from three levels of cooling: low, medium or high. You’ll notice
the fan speed increasing as the setting gets cooler.
Room-temperature air
circulates underneath
you. It may feel cool.
For warmer, cozier sleep, press the up arrow to select from three levels
of warmth: low, medium or high. You’ll notice the fan speed increasing
as the setting gets warmer.
Cooler
Use the up/down buttons
to control the warming
and cooling levels.
Sleep Number® 3-Button Remote
low
medium
high
low
medium
high
Sleep Number® 3-Button Remote
9
Setting the timer
Using Your 7- or 9-Button
Sleep Number® Remote
The DualTemp™ layer can be set to turn off in
1-9 hours. Once it reaches 9 hours, the next
increment goes back to 0. If you do not set
the timer, the layer will automatically shut off
after 10 hours.
Press the side button
to select one side of the layer. Press the
Home button
. In the Home menu, select DualTemp™, then
select Adjust Temperature to turn on the DualTemp™ layer and
adjust the temperature.
Warmer
To set the timer, press the Timer button
,
choose DualTemp,™ then then use the up/
down arrows to set the time. Press the
Enter button
.
Cooling
Fan
Heating
To enjoy cooler, more comfortable sleep, press the down arrow to
select from three levels of cooling: low, medium or high. You’ll notice
the fan speed increasing as the setting gets cooler.
Room-temperature air
circulates underneath
you. It may feel cool.
For warmer, cozier sleep, press the up arrow to select from three levels
of warmth: low, medium or high. You’ll notice the fan speed increasing
as the setting gets warmer.
Cooler
Use the up/down buttons
to control the warming
and cooling levels.
Sleep Number® 7-Button Remote
low
medium
high
low
medium
high
Sleep Number® 9-Button Remote
11
Using Your DualTemp™ Layer
Create your ideal microclimate
Optimize heating and cooling performance
• You must keep your home at 72° or cooler to
optimize cooling.
• You must keep your home at 72° or cooler to
optimize cooling.
• Turn on the DualTemp™ layer 20 minutes before going
to bed.
• The DualTemp™ layer is not a replacement for airconditioning or heating your home.
• To maintain desired temperature, always keep the layer
covered with a blanket/comforter/quilt.
• The temperature of the air circulating in the layer is
dependent on your room temperature. In a cool room,
the settings will be cooler than in a warmer room.
• If you wake up too warm or too cold, try setting the layer’s
timer to turn off after 3-5 hours.
• For more airflow to the lower portion of your bed, place the
connectors at the foot of the bed. Be sure the lighter gray
side of the layer is facing up.
NOTE: For FlexTop beds connectors may not be placed
at foot.
™
Bedding tips for your DualTemp™ layer
• The DualTemp™ layer should be used on top of your
mattress and mattress pad, and underneath a fitted
sheet only.
• Do not place a mattress pad on top of the DualTemp™ layer.
Doing so will greatly reduce its performance.
• Use sheets made from a breathable material that will
allow for airflow. Flannel and micro-fleece sheets are
not recommended.
• If you have a bed skirt you may need to place the heating
and cooling source next to the bed rather than underneath,
or consider removing your bed skirt.
• If you store items under your bed, ensure you have at least
one foot of space around the heating and cooling source.
• Clean or replace filters on the heating and cooling source
every 6 months. See page 15 for details.
NOTE: When using the cooling mode in a higher humidity
environment, water can collect in the bottom of the heating
and cooling source. The water will automatically be removed
during the refreshing system cycle. Do not unplug or move
the heating and cooling source until the cycle is complete.
Warning
• The connectors at the head of the bed should not be
pinched against a wall or nightstand as this will interfere
with performance.
13
Caring for Your DualTemp™ Layer
Replacing the filters
Cleaning your DualTemp™ layer
1
NOTE: It is recommended that you clean or replace the
filters on the heating and cooling source every 6 months.
Outer cover
The top of the layer’s outer cover can be zipped
off. Machine wash only the top portion of the
cover on gentle cycle in cold water. Line dry.
2
Top filter
• Remove the magnetic filter frame from the top of the heating
and cooling source. Next, remove the used filter and replace
it with the new filter. Replace the magnetic filter frame.
Foam Comfort Layer
If necessary, spot clean foam with a warm,
soapy solution using a mild detergent.
Do not saturate. Air dry.
Cleaning your heating and cooling
source and remote(s)
• Wipe with a clean cloth dampened with
a mild soap and water solution. Do not
immerse in water or place in dishwasher.
• Wipe the display screen of the remote
with a clean, dry, lint-free cloth.
Front/side filter
• Remove the magnetic filter frame from the front/side of
the heating and cooling source. Remove the used filter
and replace it with the new filter. Replace the magnetic
filter frame.
1
2
• Replacement filters can be ordered at a SLEEP NUMBER®
store, online at sleepnumber.com or by telephone at
1.800.472.7185.
*remotes may vary
Cleaning the filters
3
Active Layer
If necessary, spot clean with a warm,
soapy solution and damp cloth using a
mild detergent. Do not saturate. Air dry.
3
• Remove the magnetic filter frame from the top of the heating
and cooling source, then remove the (shorter) filter. Remove
the magnetic filter frame from the front/side of the heating
and cooling source and remove the second (longer) filter.
• Hand wash filters with a mild liquid soap.
Air dry completely.
• Insert the clean filters and replace the magnetic filter frames.
15
Troubleshooting
My heating and cooling source will not turn on.
• Make sure the power supply cord is securely plugged
into the heating and cooling source and the power
cord is securely plugged into a working grounded
outlet or surge protector.
NOTE: A grounded electrical surge protection device
is recommended. Test outlet by plugging in another
working appliance.
• Check to make sure the outlet is not controlled by a
wall dimmer switch.
• Verify that the power supply light is illuminated.
My DualTemp™ layer is not getting warm/cool.
• Your room must be kept at 72° or cooler.
• It is important to turn on the DualTemp™ layer 20 minutes
before going to bed to achieve the desired temperature.
• Check to ensure the connector is attached to the heating
and cooling source.
• Create your ideal microclimate by covering the bed with
a blanket/comforter/quilt to keep the warm or cool air
from escaping.
• The DualTemp™ layer is not a replacement for airconditioning or heating your home. You must run
heating or air conditioning for optimal performance.
• The layer warms/cools based on the air temperature of
your room. If your room is extremely cold or hot, it may
affect the layer’s performance. Increasing or decreasing the
temperature of your bedroom will help achieve the desired
temperature level.
My remote does not work.
• Check for low battery symbol
and replace batteries
if illuminated. If screen is black, replace batteries.
• Verify that you are using the correct remote for the
appropriate side of the bed.
My heating and cooling source does not shut off.
• The refreshing system cycle may run the drying fans up
to 14 hours after use. Once the system has completed
refreshing it will shut off on its own.
One or both heating and cooling sources turn off while
in use.
• The DualTemp™ layer is designed to automatically shut off
after 10 hours.
• Verify that the timer was not set.
The layer has a new foam smell.
My remote is displaying “ER”.
• Your DualTemp layer may have a new product scent when
it arrives. This non-toxic scent is perfectly normal and is
associated with the production of the foam.
• An “ER” indicates there is an error. The heating and cooling
source may not have power, or the remote and heating
and cooling source may have lost communication with
one another.
™
• To reduce the scent, allow the layer to air out in a wellventilated, shaded, open space for up to 48 hours.
I hear white noise from the heating and cooling source.
• The heating and cooling source generates white noise while
operating. Most people find white noise soothing.
• Wood or tile floors may create slightly more white noise.
Reduce it by placing a square of carpet or other sound
absorbing material directly beneath the heating and
cooling source.
• Operate at a lower setting to reduce white noise.
• Follow on-screen instructions.
• Make sure the heating and cooling source is firmly plugged
into a working outlet and is receiving power. Check to make
sure the outlet is not controlled by a wall switch.
• Make sure that the power supply cord is plugged into the
heating and cooling source.
• Wait for the display to shut off (about 10 seconds). Then try
to adjust temperature again.
• If the “ER” persists call Customer Service at 1.800.472.7185.
• Another option is to position the layer with the connectors at
the foot of the bed. Be sure the lighter gray side of the layer
is facing up.
NOTE: For FlexTop™ beds connectors may not be placed
at foot.
My connector is not long enough or my heating and
cooling source does not touch the floor.
• Place the heating and cooling source on a book or box.
17
Trial, Warranty & Notification
100-Day In-Home Trial
Claims This Warranty Does Not Cover:
We are confident that you will be completely satisfied with
your SLEEP NUMBER® DualTemp™ system. Please take into
consideration that it may take several weeks to adjust and
get completely comfortable. Within 100 days, if for any reason
you decide to return the system, contact Customer Service
to authorize its return. All merchandise being returned must
be in good condition and be given a Return Merchandise
Authorization number from Customer Service, which will expire
30 days from date of issue. Upon receipt, we’ll reimburse the full
purchase price less your initial shipping or Home Delivery and
Setup fees. You pay return shipping. Refunds will be issued to
the original method of payment within approximately
15 business days after all products have been received at
SLEEP NUMBER. All shipping and incidental charges to return
the DualTemp™ system are the customer’s responsibility.
Your warranty excludes claims for conditions arising from normal
wear and tear including but not limited to cover compression,
foam compression, discoloration of parts or normal body
indentations. This warranty does not provide coverage for claims
related to comfort preference. The warranty does not provide
coverage and will become void if claims are a result of damage
caused by tampering with or modifications to any component
including the opening of the heating and cooling source or
remote control. Damage caused from laundering or dry-cleaning
the product or any part as well as damage caused by misuse or
abuse including but not limited to stains, soil, burns, cuts, tears
or spills or factors other than a product defect are also excluded
under and will void this warranty. This warranty does not provide
coverage and will become void if damage is caused by acts of
nature or relating to forces outside of Select Comfort’s control
including but not limited to fire, flood or lightning damage or for
damage caused by power surges.
3 Year Limited Warranty on DualTemp™ Layer
What We Will Do:
At our option, Sleep Number will repair or replace the warranted
product or part provided that it is returned to us as provided
herein. Any covered repairs or replacement parts will be at
no cost to you. Sleep Number reserves the right to substitute
products or parts of comparable quality and value or, where
permissible by law, to use or deliver refurbished products or
parts in the repair or replacement of any product or part that
does not come into contact with the sleep surface under this
limited warranty.
Who This Warranty Provides Coverage To:
Your warranty is non-transferrable and sale, transfer or disposal
of the warranted product or part will void this warranty. For the
purposes of this warranty, an “original purchaser” is an individual
who purchases the product directly from Sleep Number or an
authorized reseller for personal, consumer use and not with the
intent to resell the product or use for commercial purposes.
This warranty does not apply to products purchased either with
the intent to resell or through unauthorized resellers including,
without limitation, third party websites such as Craigslist, eBay
or Amazon. If you are not the original purchaser, you take the
product “as is” and with any and all faults.
Costs This Warranty Does Not Cover:
In connection with your warranty claim, you are responsible
for returning the warranted product or part to us. Shipping
of products or parts related to your warranty claim will be at
your expense in both directions. In either case, you remain
responsible for bringing your authorized return to your nearest
UPS facility or drop-off location. This warranty does not provide
coverage for or the cost associated with the transportation,
inspection, removal or installation of any product or parts except
as provided above. The responsibility for the installation of any
product or part replaced under this warranty and any related
installation costs are yours regardless of whether there is any
cost to you for the repaired or replaced product or part.
What You Must Do To Keep The Warranty In Effect:
Keep your original receipt. You may be required to provide your
original receipt at the time of any warranty claim.
Do not remove the law label. Do not remove any label that may
be attached to your SLEEP NUMBER® DualTemp™ layer.
This label identifies your product as being a genuine
SLEEP NUMBER® product and may be required to establish
warranty coverage.
Keep the DualTemp™ layer in a sanitary condition. This
warranty shall not apply to any product or part found to be
in an unreasonably unsanitary condition. A product is in an
unreasonably unsanitary condition if it is so pervasively soiled
that an inspection is unable to be conducted due to the
presence of body fluids, blood borne pathogens, insects or
other substances that otherwise suggest that the product has
been subjected to misuse or abuse beyond ordinary wear and tear.
What Is The Warranty On Repaired Or Replaced
Products Or Parts?
No new warranty is provided with any DualTemp™ layer or any
component part that is repaired or replaced under this warranty.
The warranty for any replacement layer or component part
runs from the date of your original purchase or invoice date,
whichever is later. Any layer or component part that is replaced
under this warranty will be required to be returned to
Sleep Number at the time of replacement.
What Are The Limitations On This Warranty?
Your exclusive remedy, in lieu of all incidental, special or
consequential damages, including for negligence, is limited to
repair or replacement of any product or component deemed
to be defective under the terms and conditions stated in this
warranty. SLEEP NUMBER SHALL NOT BE LIABLE IN ANY
CASE FOR INCIDENTAL OR CONSEQUENTIAL DAMAGES
RESULTING FROM THE USE OF THIS PRODUCT OR ARISING
OUT OF ANY BREACH OF THIS WARRANTY EVEN IF IT HAS
BEEN ADVISED OF THE POSSIBILITY OF SUCH DAMAGES.
ARE THERE ANY IMPLIED WARRANTIES? EXCEPT TO THE
EXTENT PROHIBITED BY APPLICABLE LAW, ANY IMPLIED
WARRANTY OF MERCHANTABILITY OR FITNESS FOR
A PARTICULAR PURPOSE APPLICABLE TO YOUR SLEEP
NUMBER® DUALTEMP™ LAYER IS LIMITED IN DURATION TO
THREE YEARS. EXCEPT AS OTHERWISE MAY BE REQUIRED
BY LAW, THERE ARE NO OTHER EXPRESS OR IMPLIED
WARRANTIES OTHER THAN THE WARRANTY DESCRIBED
HEREIN. Sleep Number does not make any warranty and
specifically disclaims any warranty that your Sleep Number
DualTemp™ layer is suitable for any particular medical condition.
No express or implied warranties are extended to any persons
who purchased the product from anyone other than
SLEEP NUMBER or its authorized retailers and all such warranties
are hereby excluded. Sleep Number does not authorize any
person or entity to create for it any other obligation or liability in
connection with this warranty.
Important Instructions
How State Law Relates To This Warranty:
• Read all instructions before using the DualTemp™ layer.
Some states do not allow the exclusion or limitation of incidental
or consequential damages or limitations on how long an implied
warranty lasts so the foregoing limitations may not apply to you.
This warranty gives you specific legal rights. You may also have
other rights. These rights may vary from state to state.
How To File A Warranty Claim:
You must contact our Customer Service department at the
phone number printed on the back cover of your user guide
to obtain a Return Merchandise Authorization (RMA) number
prior to returning any products or parts to us. You may be asked
to undertake certain steps to troubleshoot the product or
part for which a claim is being made. These steps are essential
to determining whether your warranty claim is covered and
ensuring shipment of the correct replacement product or
part. Products or parts returned to us without an RMA will be
destroyed and no warranty claim will be honored. You may also
contact us by email at [email protected] or in
writing to: Sleep Number Customer Service, 9800 59th Avenue
North, Minneapolis, MN 55442.
Important Safety Instructions
• The remote is not a toy and should only be used under
adult supervision.
When using electrical appliances, basic precautions should
always be followed to reduce the risk of fire, electric shock,
and injury to persons, including the following:
• WARNING - Do not use the DualTemp layer with an infant,
a disabled person, a person with diminished capacity or
anyone insensitive to heat, such as a person with poor
blood circulation.
™
• WARNING - Do not use the DualTemp™ layer with any
other heated blanket, comforter, quilt, sheet, mattress pad,
mattress, foot warmer, throw blanket or similar heated or
cooled bedding.
Electrical components are rated for 110/120 voltage, 60Hz, 3.9
amp. Components meet Class B digital device rating (Part 15,
FCC rules) for residential use.
• Do not operate the heating and cooling source with a
damaged cord or plug or after the heating and cooling source
malfunctions, has been dropped or damaged in any manner.
Discard heating and cooling source, or return to authorized
service facility for examination and/or repair.
Per FCC 15.19(a)(3) and (a)(4) This device complies with part
15 of the FCC Rules. Operation is subject to the following two
conditions: (1) This device may not cause harmful interference,
and (2) this device must accept any interference received,
including interference that may cause undesired operation.
• Do not use outdoors.
• Do not run cord under carpeting. Do not cover cord with
throw rugs, runners, or similar coverings. Do not route cord
under furniture or appliances. Arrange cord away from traffic
area and where it will not be tripped over.
• Keep the heating and cooling source and remote(s) away
from heat sources such as radiators, heat registers, etc.
• Do not insert or allow foreign objects to enter any ventilation
or exhaust opening as this may cause an electric shock or fire,
or damage the heating and cooling source.
WARNING: There are no user serviceable parts inside the
heating and cooling source. Any attempt to do so shall void
the warranty.
• SAVE THESE INSTRUCTIONS.
FCC Compliance
• Turn off power or unplug when not in use.
• To disconnect heating and cooling source, turn controls to off,
then remove plug from outlet.
• To reduce risk of electrical shock, unplug unit before cleaning.
• Always plug heating and cooling source directly into a
grounded outlet/receptacle. Never use with an extension
cord or relocatable power tap (outlet/power strip).
Warning: Any attempt to make changes or modifications to
the remote (e.g., an intentional radiator) could void the user’s
authority to operate the remote according to FCC
certification (section 15.231).
• Let power cord hang free. Do not place between mattress
and foundation. Do not allow the power cords to be pinched.
• Do not open heating and cooling source or remote(s) (with
the exception of the battery compartment). The warranty is
void if these units are tampered with.
• Heating and cooling source and remote(s) are not water
resistant. Do not use or store near water — for example, in a
wet basement, near an open window, etc.
• Use this heating and cooling source only as described
in this manual. Any other use not recommended by the
manufacturer may cause fire, electric shock, or injury
to persons.
• Connect to properly grounded outlets only.
• To prevent a possible fire, do not block air intakes or exhaust
in any manner. Do not use on soft surfaces, like a bed, where
openings may become blocked.
• Do not use in areas where gasoline, paint, or flammable
liquids are used or stored.
19