1
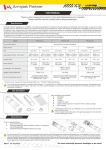
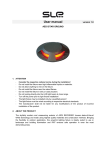
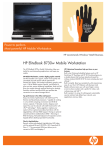
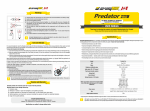
Armytek Partner www.armytek.com USER MANUAL Thank you for choosing the products of Armytek Optoelectronics Inc., Canada. Please read this manual carefully before using the flashlight. Specification Armytek Optoloelectronics Inc. is a Canadian manufacturer that produces powerful and reliable flashlights designed especially for your needs applying in them components made in USA and Japan. 10years no-hassle warranty. Comfort light of excellent brightness 390 (700) lm and beam distance 100 meters perfectly suits for everyday tasks Compact size and widespread AA batteries for easy application wherever and whenever you need Comfortable grip, tactical button for momentary switching on and simple modes' operation for convenient use Durable and impact-resistant construction ensurestheflashlightefficiency even after fallingsand impacts The highest standard of water-resistance for work in the rain and under water at the depth up to 10 meters 3 perfectly selected brightness modes for multipurpose application Model Partner À1 XM-L2 Partner À2 XM-L2 Partner C1 XM-L2 Reverse (for one-hand operation) Type of clicky switch Power source 1xAA 2xAA 1xCR123A LED Cree XM-L2 Cree XM-L2 Cree XM-L2 Light output for Max / Min mode [runtimes were measured for Sanyo Eneloop 2000 mAh / CR123A 1500mAh batteries] 390lm/45min 100lm/3h40min 390lm/1h25min 100lm/7h45min 390lm/1h5min 100lm/6h10min Hotspot/Spill 20î / 80î 20î / 80î 20î / 80î Beam distance 100 m 100 m 100 m Size (length x max. diameter) 97 mm x 24 mm 148 mm x 24 mm 80 mm x 24 mm Weight (without batteries) 57g 85g 44g Recommended power source 1 x AA / 1 x 14500 Li-Ion 2 x AA 1 x CR123A / 1 x RCR123 Li-Ion You cannot use rechargeable Li-Ion batteries with voltage 2.7-4.2V [RCR123 or 14500) more than 30 minutes without active cooling. These batteries can make small flashlight much brighter and hotter. This can bring the flashlight out of operation and damage the batteries. And battery damage can cause combustion or explosion. Set description l nua r Ma Use Items included in the package: Flashlight Holster Lanyard 2 spare O-rings Spare rubber button (not included in Mini models' package) User manual õ2 1. Depending on the model, your flashlight can inconsiderably differ from the pictures in the manual. 2. The producer reserves the right to change the package at his own discretion without modifying this manual. Initial Service To set/replace batteries: 1. Unscrew the tailcap. 2. Place the batteries with the positive contact (+) facing the head of the flashlight. 3. Adjust the tailcap and tighten it as far as it can go. We recommend NOT to leave power sources inside the flashlight for a long storage period, as batteries (especially, non-rechargeable) can leak for various reasons and damage the inner parts of the flashlight. If you want to keep your flashlight in a stand-by state with batteries in, use new and quality batteries, store the flashlight in acceptable for batteries operational temperature and revise the batteries' state at least once a month. If you have noticed any signs of batteries' defects, withdraw them from the flashlight and take out of operation. It is also recommended to replace discharged batteries with new ones before the storage as the chance of leakage is higher with discharged batteries. Born to exceed. The most technically advanced flashlights in the world Armytek Partner www.armytek.com Operation Armytek Partner flashlight has two operation modes: maximal brightness / minimal brightness. Mode are switched by turning the flashlight off and on quickly. off on max min Operating the flashlight with a switch button: To turn the flashlight on / off press the button to the click and release it. There are two ways to switch between the modes: press the button slightly for a short period of time (half-press till the light goes out, no click], then release the button; turn the flashlight off and on quickly with two full pressing of the button. Care and Storage In case the rubber button is damaged, it should be replaced. Replacement order: 1. Unscrew the tailcap. 2. Unscrew the thread ring gage, which holds the rubber button in the cap. To do so you should use needle-nose pliers [round nose pliers or anothertool: most suitable will be expansion pliers). Use the tool as it is shown at the picture. 1. The ring has a left thread and is unscrewed in the way most of the threads are tightened up. 2. Do not disassemble the flashlight except for unscrewing the thread ring gage and replacing the rubber button. There are no other parts in the flashlight that can be replaced by the user. 1. 2. It is recommended to clean the threads and O-ring off dirt and old grease. Remember that secure protection from water and dust cannot be provided by worn out sealing. And fouling as well as lack of lubricant cause fast wear-out of threads and sealing rings. To clean the thread do the following: 1. Unscrew the tailcap and remove the sealing ring carefully with a toothpick (do not use sharp metal things as they can damage the ring). 2. Wipe the sealing ring thoroughly with a soft cloth (or tissue). Do not use solvents. If the sealing ring is worn out or damaged replace it by a new one. 3. Clean the metal threads with a brush using ethanol. Be careful not to allow applied liquid to get inside the flashlight or tailcap as it can cause fails in functionality of the flashlight. After cleaning lubricate the thread and the sealing ring with polyalphaolefin-based silica grease, e.g. Nyogel 760G. The application of automotive and other improper grease can cause swelling and damage of the sealing rings. In case of active operation and exploitation in dusty environments it is recommended to perform cleaning and lubricating of the parts as often as required, even if it is more than twice a year. Warnings 1. 2. 3. 4. 5. 6. 7. 8. 9. Always follow the instructions from this manual and recommendations on battery usage. Apply only the recommended power sources. Do not reverse battery polarity. Do not use different power sources together, i.e. old ones with new ones, charged with discharged. Do not use different types of batteries combined as the element with less capacity can be damaged. Do not modify or recast the flashlight and its components as it will deprive you of the warranty. Do not allow water or any other liquid to leak into the flashlight. Do not aim a turned-on flashlight at people's or animals' eyes — it can cause temporary blindness. Do not allow children to use the flashlight without your assistance. Be careful during the long-time flashlight operation as some parts of the body may heat up. Armytek Optoelectronics Inc, Canada shall not be liable for any harm done to the user if it was caused by improper use of the product. Service and Warranty Armytek provides free warranty repair for 10 years from the purchase. Warranty doesn't cover damage caused by: 1. Improper usage. 2. Attempts to modify or repair the flashlight by nonqualified specialists. 3. Longtime application in chlorinated or polluted water, or other liquids (other than water). 4. High temperatures and chemicals' exposure [including the exposure of liquid from defected batteries). 5. Usage of low-quality batteries. Armytek Optoelectronics Inc. Web: www.armytek.com Email: service®armytek.com Address: 67 Vandervoort Dr, Richmond Hill, Ontario, L4E 0C7, Canada Specifications are subject to change without notice. Born to exceed The most technically advanced flashlights in the world