1
RustyGecko - Developing Rust on
Bare-Metal
An experimental embedded software
platform
Håvard Wormdal Høiby
Sondre Lefsaker
Master of Science in Computer Science
Submission date: June 2015
Supervisor:
Magnus Lie Hetland, IDI
Co-supervisor:
Antonio Garcia Guirado, IDI
Marius Grannæs, Silicon Labs
Norwegian University of Science and Technology
Department of Computer and Information Science
Preface
This report is submitted to the Norwegian University of Science and Technology
in fulfillment of the requirements for master thesis.
This work has been performed at the Department of Computer and Information
Science, NTNU, with Prof. Magnus Lie Hetland as the supervisor, Antonio Garcia
Guirado (ARM), and Marius Grannæs (Silicon Labs) as co-supervisors. The initial
problem description was our own proposal and further developed in co-operation
with our supervisors.
Acknowledgements
Thanks to Magnus Lie Hetland, Antonio Garcia Guirado, and Marius Grannæs
for directions and guidance on technical issues and this report. Thanks to Silicon
Labs for providing us with development platforms for us to develop and test our
implementation on. Thanks to Antonio Garcia Guirado for the implementation
of the CircleGame application for us to port to Rust and use in our benchmarks.
Thanks to Itera w/Tommy Ryen for office space. A special thanks to Leslie Ho
and Siri Aagedal for all the support and for proofreading the thesis.
Sondre Lefsaker and Håvard Wormdal Høiby
i
2015-06-14
Project Description
The Rust programming language is a new system language developed by Mozilla.
With the language being statically compiled and built on the LLVM compiler infrastructure, and because of features like low-level control and zero-cost abstractions,
the language is a candidate for use in bare-metal systems.
The EFM32 series of microcontrollers focuses on energy efficiency and for their
ability to function in power constrained environments. The tool suite by the vendor,
Silicon Labs, includes energy monitoring tools to analyze energy consumption at
the source code level. The series is based on the ARM Cortex-M processor family.
With ARM’s move towards using LLVM in their own toolchain, a back-end for the
Cortex-M series is already available.
The goal of the project is to explore programming for the EFM32 series of microprocessors with the Rust Programming Language. This should be realized by using
as much of the features and tools available in the Rust ecosystem as deemed fit.
This whole platform should be evaluated and compared to the existing C platform
provided by Silicon Labs.
iii
Abstract
Embedded computer systems are an invisible, ever-growing part of our lives. Through
market trends, like the Internet of Things, these computers are brought to new domains. These constrained systems set different requirements to the tools used to
develop software, compared to the conventional systems found in mobile, desktop,
and server computers.
In recent decades, the number of programming languages have flourished on conventional computer systems. The traditional categorization of high-level languages
have shifted from static and hardware platform-agnostic languages like C, to the
dynamic and highly managed languages like JavaScript. The safety mechanisms
provided by these new high-level languages come at a cost of the low-level control
found in low-level languages.
Rust is an emerging programming language that has a new take on this trade-off between control and safety. This language takes a static approach for guaranteeing the
safety, which a high-level language needs to ensure with dynamic checking.
In this thesis, we present our experiments and evaluate the result of bringing Rust
to a bare-metal computer system. We describe the design and implementation
of our bare-metal platform called RustyGecko, which encompasses libraries for
controlling the hardware device. On this platform, we developed and evaluated
several programs and abstract libraries.
To support our platform, we have developed and presented an extension to the Rust
standard package manager, which facilitates building Rust applications for nonstandard targets. The extension was ultimately contributed back to the package
manager project.
We have evaluated the platform based on performance, energy consumption, and
code size. These results were compared to the existing C platform for the target
chip, the ARM Cortex-M3 based EFM32GG called Giant Gecko. Our evaluation
shows that Rust performs equally well when considering performance and energy
consumption. However, we find that the code size can increase substantially, especially when building the applications in debugging mode.
v
Sammendrag
Innvevde datasystemer blir gradvis en større del av vår hverdag. Disse datamaskinene må stadig tilpasse seg nye domener, slik som tingenes internett. Sammenlignet med andre konvensjonelle datasystemer (mobile-, personlige-, og tjenestesystemer), er mange begrensninger i disse systemene som setter krav til hvilke
utviklingsverktøy som kan brukes.
I nyere tid har det kommet mange nye programmeringsspråk som er tilrettelagt
for konvensjonelle datasystemer. Kategoriseringen av høyere-nivå programmeringsspråk har endret seg i løpet av de siste tiårene, fra å handle om statiske,
maskinvare-agnostiske språk som C, til å dreie seg om dynamiske språk med kjøretidssytemer, slik som JavaScript. Sikkerhetsmekanismene som er tilgjengelige i
disse høyere-nivå språkene kommer ofte på bekostning av lav-nivå kontroll, som er
tilgjengelig i lav-nivå programmeringsspråk.
Rust er et nytt og voksende programmeringsspråk, som gjør et forsøk på å skape et
nytt kompromiss mellom kontroll og sikkerhet. Dette språket kan garantere sikkerhet ved statisk analyse, som i andre høyere-nivå språk blir løst dynamisk.
I denne avhandlingen presenterer vi vår metode for å benytte Rust i et innvevd
datasystem, og en evaluering av denne. Vi beskriver designet og implementasjonen
av vår operativsystemløse plattform kalt RustyGecko, som omfatter biblioteker
for å kontrollere maskinvaren. Vi vister i tilleg flere programmer og abstrakte
biblioteker som er blitt bygget på denne plattformen.
For å støtte plattformen har vi også implementert og presentert en utvidelse til
Rust sin standard pakkebehandler. Denne utvidelsen gjør det enklere å bygge
Rust-applikasjoner for ikke-standard plattformer, og har også blitt inkludert i det
opprinnelige prosjektet som utvikler pakkebehandleren.
Vi har evaluert plattformen basert på ytelse, energieffektivitet og kodestørrelse,
ved bruk av en ARM Cortex-M3-basert EFM32-brikke kalt Giant Gecko. Disse
resultatene har blitt sammenlignet med den allerede eksisterende C plattformen.
Våre evalueringer viser at Rust har tilsvarende ytelse og energieffektivitet som
C. Vi har imidlertid oppdaget at kodestørrelsen kan øke betraktelig, særlig for
applikasjoner som er bygget for feilsøking.
vii
Contents
Preface
i
Project Description
iii
Abstract
v
Sammendrag
vii
Contents
ix
List of Tables
xiii
List of Figures
xv
List of Listings
xviii
List of Abbreviations
xix
1 Introduction
1.1 Motivation . . . . . . . . . . . .
1.2 Embedded Computer System . .
1.2.1 Abstraction Level . . . . .
1.2.2 Programming Model . . .
1.2.3 Programming Language .
1.3 Benefits of the Rust language . .
1.4 The RustyGecko Platform . . . .
1.5 Interpretation of Assignment . .
1.6 Project Outline . . . . . . . . . .
1.6.1 Phase 1 - Hello World . .
1.6.2 Phase 2 - Platform Design
1.6.3 Phase 3 - Development . .
1.6.4 Phase 4 - Measurement .
1.6.5 Phase 5 - Evaluation . . .
1.7 Contributions . . . . . . . . . . .
1.8 Report Outline . . . . . . . . . .
ix
.
.
.
.
.
.
.
.
.
.
.
.
.
.
.
.
.
.
.
.
.
.
.
.
.
.
.
.
.
.
.
.
.
.
.
.
.
.
.
.
.
.
.
.
.
.
.
.
.
.
.
.
.
.
.
.
.
.
.
.
.
.
.
.
.
.
.
.
.
.
.
.
.
.
.
.
.
.
.
.
.
.
.
.
.
.
.
.
.
.
.
.
.
.
.
.
.
.
.
.
.
.
.
.
.
.
.
.
.
.
.
.
.
.
.
.
.
.
.
.
.
.
.
.
.
.
.
.
.
.
.
.
.
.
.
.
.
.
.
.
.
.
.
.
.
.
.
.
.
.
.
.
.
.
.
.
.
.
.
.
.
.
.
.
.
.
.
.
.
.
.
.
.
.
.
.
.
.
.
.
.
.
.
.
.
.
.
.
.
.
.
.
.
.
.
.
.
.
.
.
.
.
.
.
.
.
.
.
.
.
.
.
.
.
.
.
.
.
.
.
.
.
.
.
.
.
.
.
.
.
.
.
.
.
.
.
.
.
.
.
.
.
.
.
.
.
.
.
.
.
.
.
.
.
.
.
.
.
.
.
.
.
.
.
.
.
.
.
.
.
.
.
.
.
.
.
.
.
.
.
.
.
.
.
.
.
.
.
.
.
.
.
.
.
.
.
.
.
.
.
.
.
.
.
1
. 1
. 2
. 3
. 3
. 4
. 4
. 5
. 6
. 8
. 8
. 8
. 9
. 9
. 9
. 9
. 10
x
CONTENTS
2 Background
2.1 The Rust Programming Language . . . . . .
2.1.1 Hello World . . . . . . . . . . . . . . .
2.1.2 Language Features . . . . . . . . . . .
2.1.3 Organization . . . . . . . . . . . . . .
2.1.4 Zero-cost Abstractions . . . . . . . . .
2.1.5 Guaranteed memory safety . . . . . .
2.1.6 Concurrency Model . . . . . . . . . .
2.1.7 Unsafe Code . . . . . . . . . . . . . .
2.2 The Cargo Package Manager . . . . . . . . .
2.2.1 Project Structure . . . . . . . . . . . .
2.2.2 Building and testing . . . . . . . . . .
2.3 Hardware Platform . . . . . . . . . . . . . . .
2.3.1 EFM32 . . . . . . . . . . . . . . . . .
2.3.2 Evaluation boards . . . . . . . . . . .
2.3.3 Peripherals . . . . . . . . . . . . . . .
2.4 Software Libraries . . . . . . . . . . . . . . .
2.4.1 CMSIS . . . . . . . . . . . . . . . . .
2.4.2 Emlib . . . . . . . . . . . . . . . . . .
2.4.3 Emdrv . . . . . . . . . . . . . . . . . .
2.4.4 Newlib . . . . . . . . . . . . . . . . . .
2.5 The Zinc Project . . . . . . . . . . . . . . . .
2.6 Microcontroller Startup . . . . . . . . . . . .
2.6.1 Prelude . . . . . . . . . . . . . . . . .
2.6.2 Executable and Linkable File Format .
2.6.3 Before main . . . . . . . . . . . . . . .
.
.
.
.
.
.
.
.
.
.
.
.
.
.
.
.
.
.
.
.
.
.
.
.
.
.
.
.
.
.
.
.
.
.
.
.
.
.
.
.
.
.
.
.
.
.
.
.
.
.
.
.
.
.
.
.
.
.
.
.
.
.
.
.
.
.
.
.
.
.
.
.
.
.
.
.
.
.
.
.
.
.
.
.
.
.
.
.
.
.
.
.
.
.
.
.
.
.
.
.
.
.
.
.
.
.
.
.
.
.
.
.
.
.
.
.
.
.
.
.
.
.
.
.
.
.
.
.
.
.
.
.
.
.
.
.
.
.
.
.
.
.
.
.
.
.
.
.
.
.
.
.
.
.
.
.
.
.
.
.
.
.
.
.
.
.
.
.
.
.
.
.
.
.
.
.
.
.
.
.
.
.
.
.
.
.
.
.
.
.
.
.
.
.
.
.
.
.
.
.
.
.
.
.
.
.
.
.
.
.
.
.
.
.
.
.
.
.
.
.
.
.
.
.
.
.
.
.
.
.
.
.
.
.
.
.
.
.
.
.
.
.
.
.
.
.
.
.
.
.
.
.
.
.
.
.
.
.
.
.
.
.
.
.
.
.
.
.
.
.
.
.
.
.
.
.
.
.
.
.
.
.
.
.
.
.
.
.
.
.
.
.
.
.
.
.
.
.
.
.
.
.
.
.
.
.
.
.
.
.
.
.
.
.
.
.
.
.
.
.
.
.
.
.
.
13
13
13
14
21
21
23
27
27
29
29
31
32
33
33
36
37
38
38
39
39
39
41
41
41
41
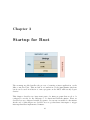
3 Startup for Rust
3.1 Booting Rust on the Gecko .
3.1.1 Minimal Rust program
3.1.2 Storage qualifiers . . .
3.1.3 Bootstrapping startup
3.2 Handling Interrupts in Rust .
. . . . .
to boot
. . . . .
. . . . .
. . . . .
.
.
.
.
.
.
.
.
.
.
.
.
.
.
.
.
.
.
.
.
.
.
.
.
.
.
.
.
.
.
.
.
.
.
.
.
.
.
.
.
.
.
.
.
.
.
.
.
.
.
.
.
.
.
.
.
.
.
.
.
.
.
.
.
.
.
.
.
.
.
.
.
.
.
.
.
.
.
.
.
.
.
.
.
.
43
44
44
45
46
47
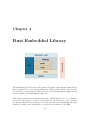
4 Rust Embedded Library
4.1 The Core Library . . . . . . .
4.2 The Allocation Library . . . .
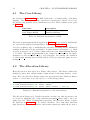
4.3 The Collection Library . . . .
4.4 The Rust Embedded Library
.
.
.
.
.
.
.
.
.
.
.
.
.
.
.
.
.
.
.
.
.
.
.
.
.
.
.
.
.
.
.
.
.
.
.
.
.
.
.
.
.
.
.
.
.
.
.
.
.
.
.
.
.
.
.
.
.
.
.
.
.
.
.
.
.
.
.
.
.
.
.
.
49
50
50
51
51
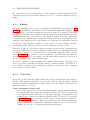
5 Binding Libraries
5.1 Object-oriented Embedded Programming
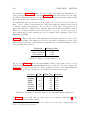
5.1.1 Memory Mapped I/O . . . . . . .
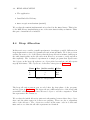
5.1.2 Memory Layout of Objects . . . .
5.1.3 Adding Object Functionality . . .
5.1.4 Instantiating a MMIO object . . .
.
.
.
.
.
.
.
.
.
.
.
.
.
.
.
.
.
.
.
.
.
.
.
.
.
.
.
.
.
.
.
.
.
.
.
.
.
.
.
.
.
.
.
.
.
.
.
.
.
.
.
.
.
.
.
.
.
.
.
.
.
.
.
.
.
.
.
.
.
.
.
.
.
.
.
53
54
54
55
56
57
.
.
.
.
.
.
.
.
.
.
.
.
.
.
.
.
CONTENTS
5.2
xi
Library Bindings . . . . . . . . . . . . . . . . . .
5.2.1 The Libraries . . . . . . . . . . . . . . . .
5.2.2 Defining the Bindings . . . . . . . . . . .
5.2.3 Exposing Static Inline Functions to Rust
5.2.4 Naming Conventions . . . . . . . . . . . .
5.2.5 Testing . . . . . . . . . . . . . . . . . . .
5.2.6 Discussion . . . . . . . . . . . . . . . . . .
6 Build System
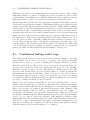
6.1 Manual Makefile . . . . . . . .
6.2 Transitioning to Cargo . . . . .
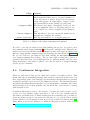
6.3 Conditional linking with Cargo
6.4 Continuous Integration . . . . .
6.5 Contributing to Cargo . . . . .
6.6 Final Library Build Artifacts .
6.6.1 Discussion . . . . . . . .
.
.
.
.
.
.
.
.
.
.
.
.
.
.
.
.
.
.
.
.
.
.
.
.
.
.
.
.
.
.
.
.
.
.
.
.
.
.
.
.
.
.
.
.
.
.
.
.
.
.
.
.
.
.
.
.
.
.
.
.
.
.
.
.
.
.
.
.
.
.
.
.
.
.
.
.
.
58
58
62
63
65
66
68
.
.
.
.
.
.
.
.
.
.
.
.
.
.
.
.
.
.
.
.
.
.
.
.
.
.
.
.
.
.
.
.
.
.
.
.
.
.
.
.
.
.
.
.
.
.
.
.
.
.
.
.
.
.
.
.
.
.
.
.
.
.
.
.
.
.
.
.
.
.
.
.
.
.
.
.
.
.
.
.
.
.
.
.
.
.
.
.
.
.
.
.
.
.
.
.
.
.
.
.
.
.
.
.
.
.
.
.
.
.
.
.
.
.
.
.
.
.
.
.
.
.
.
.
.
.
.
.
.
.
.
.
.
.
.
.
.
.
.
.
71
72
73
75
76
77
78
79
7 Application Layer
7.1 Porting GPIO Interrupt Driver . .
7.1.1 Presenting the Problem . .
7.1.2 Analysis of Assembly . . . .
7.1.3 Proposed solution . . . . .
7.1.4 Discussion . . . . . . . . . .
7.2 Handling interrupts with Closures
7.2.1 Motivation . . . . . . . . .
7.2.2 Implementation . . . . . . .
7.2.3 Discussion . . . . . . . . . .
7.3 Rust Embedded Modules . . . . .
7.3.1 USART . . . . . . . . . . .
7.3.2 GPIO . . . . . . . . . . . .
7.3.3 DMA . . . . . . . . . . . .
7.4 Projects . . . . . . . . . . . . . . .
7.4.1 Project I - Sensor Tracker .
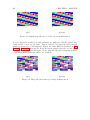
7.4.2 Project II - Circle Game . .
.
.
.
.
.
.
.
.
.
.
.
.
.
.
.
.
.
.
.
.
.
.
.
.
.
.
.
.
.
.
.
.
.
.
.
.
.
.
.
.
.
.
.
.
.
.
.
.
.
.
.
.
.
.
.
.
.
.
.
.
.
.
.
.
.
.
.
.
.
.
.
.
.
.
.
.
.
.
.
.
.
.
.
.
.
.
.
.
.
.
.
.
.
.
.
.
.
.
.
.
.
.
.
.
.
.
.
.
.
.
.
.
.
.
.
.
.
.
.
.
.
.
.
.
.
.
.
.
.
.
.
.
.
.
.
.
.
.
.
.
.
.
.
.
.
.
.
.
.
.
.
.
.
.
.
.
.
.
.
.
.
.
.
.
.
.
.
.
.
.
.
.
.
.
.
.
.
.
.
.
.
.
.
.
.
.
.
.
.
.
.
.
.
.
.
.
.
.
.
.
.
.
.
.
.
.
.
.
.
.
.
.
.
.
.
.
.
.
.
.
.
.
.
.
.
.
.
.
.
.
.
.
.
.
.
.
.
.
.
.
.
.
.
.
.
.
.
.
.
.
.
.
.
.
.
.
.
.
.
.
.
.
.
.
.
.
.
.
.
.
.
.
.
.
.
.
.
.
.
.
.
.
.
.
.
.
.
.
.
.
.
.
.
.
.
.
.
.
.
.
.
.
.
.
81
82
82
83
84
85
86
86
88
91
91
91
92
93
95
95
99
8 Results
8.1 Performance . . . . . . . .
8.1.1 Measurement . . .
8.1.2 Measurement Bias
8.1.3 Results . . . . . .
8.2 Energy Consumption . . .
8.2.1 Measuring . . . . .
8.2.2 Parameter . . . . .
8.2.3 Results . . . . . .
8.3 Code Size . . . . . . . . .
8.3.1 Measuring Size . .
.
.
.
.
.
.
.
.
.
.
.
.
.
.
.
.
.
.
.
.
.
.
.
.
.
.
.
.
.
.
.
.
.
.
.
.
.
.
.
.
.
.
.
.
.
.
.
.
.
.
.
.
.
.
.
.
.
.
.
.
.
.
.
.
.
.
.
.
.
.
.
.
.
.
.
.
.
.
.
.
.
.
.
.
.
.
.
.
.
.
.
.
.
.
.
.
.
.
.
.
.
.
.
.
.
.
.
.
.
.
.
.
.
.
.
.
.
.
.
.
.
.
.
.
.
.
.
.
.
.
.
.
.
.
.
.
.
.
.
.
.
.
.
.
.
.
.
.
.
.
.
.
.
.
.
.
.
.
.
.
.
.
.
.
.
.
.
.
.
.
.
.
.
.
.
.
.
.
.
.
.
.
.
.
.
.
.
.
.
.
103
103
103
104
105
106
106
107
107
111
111
.
.
.
.
.
.
.
.
.
.
.
.
.
.
.
.
.
.
.
.
.
.
.
.
.
.
.
.
.
.
.
.
.
.
.
.
.
.
.
.
.
.
.
.
.
.
.
.
.
.
.
.
.
.
.
.
.
xii
CONTENTS
8.4
8.3.2 Parameters . . . . . . . . . . . . . . . . . . . . . . . . . . . . 111
8.3.3 Binary Sizes . . . . . . . . . . . . . . . . . . . . . . . . . . . . 112
Heap Allocation . . . . . . . . . . . . . . . . . . . . . . . . . . . . . . 115
9 Discussion
9.1 Rust for Embedded Systems . . . . . . .
9.1.1 The Standard Library . . . . . .
9.1.2 Using and Distributing Libraries
9.1.3 Language Challenges . . . . . . .
9.2 Avoiding Mutable Aliases to Hardware .
9.2.1 Identifying the Problem . . . . .
9.2.2 Limitations with Our Approach .
9.2.3 Alternative Approaches . . . . .
9.3 Project Evaluations . . . . . . . . . . .
9.3.1 Projects and methods . . . . . .
9.3.2 Performance . . . . . . . . . . .
9.3.3 Energy . . . . . . . . . . . . . . .
9.3.4 Code Size . . . . . . . . . . . . .
9.3.5 Rust in Embedded Systems . . .
.
.
.
.
.
.
.
.
.
.
.
.
.
.
.
.
.
.
.
.
.
.
.
.
.
.
.
.
.
.
.
.
.
.
.
.
.
.
.
.
.
.
.
.
.
.
.
.
.
.
.
.
.
.
.
.
.
.
.
.
.
.
.
.
.
.
.
.
.
.
.
.
.
.
.
.
.
.
.
.
.
.
.
.
.
.
.
.
.
.
.
.
.
.
.
.
.
.
.
.
.
.
.
.
.
.
.
.
.
.
.
.
.
.
.
.
.
.
.
.
.
.
.
.
.
.
.
.
.
.
.
.
.
.
.
.
.
.
.
.
.
.
.
.
.
.
.
.
.
.
.
.
.
.
.
.
.
.
.
.
.
.
.
.
.
.
.
.
.
.
.
.
.
.
.
.
.
.
.
.
.
.
.
.
.
.
.
.
.
.
.
.
.
.
.
.
.
.
.
.
.
.
.
.
.
.
.
.
.
.
.
.
.
.
.
.
.
.
.
.
.
.
.
.
117
117
118
118
119
120
121
121
123
124
124
124
125
125
126
10 Conclusion
127
10.1 The RustyGecko Platform . . . . . . . . . . . . . . . . . . . . . . . . 127
10.2 Requirements . . . . . . . . . . . . . . . . . . . . . . . . . . . . . . . 128
10.3 Future Work . . . . . . . . . . . . . . . . . . . . . . . . . . . . . . . 128
Bibliography
131
List of Tables
1.1
1.2
1.3
1.4
1.5
Requirements from Project Description . . . . . . . . . .
Language challenges in providing a bare-metal platform in
Phases of the project . . . . . . . . . . . . . . . . . . . . .
Projects developed in development phase . . . . . . . . .
Contributions of the Thesis . . . . . . . . . . . . . . . . .
. . .
Rust
. . .
. . .
. . .
.
.
.
.
.
.
.
.
.
.
. 7
. 7
. 8
. 9
. 10
2.1
2.2
2.3
2.4
2.5
2.6
2.7
2.8
2.9
2.10
Rust’s primitive datatypes . . . . . . . . . . . . . . . . .
Unsafe operations exposed through an unsafe block . .
Common cargo commands . . . . . . . . . . . . . . . . .
Cargo flags to alter the package library and executables
Example output of features . . . . . . . . . . . . . . . .
Cortex-M family of processor cores . . . . . . . . . . . .
EFM32 Product Family [21] . . . . . . . . . . . . . . . .
Hardware devices . . . . . . . . . . . . . . . . . . . . . .
EFM32 software stack . . . . . . . . . . . . . . . . . . .
Sections of elf file format . . . . . . . . . . . . . . . . .
.
.
.
.
.
.
.
.
.
.
.
.
.
.
.
.
.
.
.
.
.
.
.
.
.
.
.
.
.
.
.
.
.
.
.
.
.
.
.
.
4.1
External dependencies of Rust Core Library (RCL) . . . . . . . . . . 50
5.1
5.2
5.3
5.4
5.5
Examples that demonstrates how the bindings work . . .
Peripheral bindings for emlib . . . . . . . . . . . . . . . .
Bindings progress for emlib . . . . . . . . . . . . . . . . .
Examples that demonstrate how to use the flash bindings
Driver bindings for emdrv . . . . . . . . . . . . . . . . . .
.
.
.
.
.
59
60
61
61
62
6.1
6.2
6.3
6.4
Source files included in the first build for the ARM Cortex-M . . . .
Early build routine . . . . . . . . . . . . . . . . . . . . . . . . . . . .
Rust libraries conditionally compiled for the Cortex-M3 architecture
Flags for the cargo-linkargs subcommand . . . . . . . . . . . . . .
72
73
74
76
7.1
7.2
7.3
7.4
Requirements for the SensorTracker . .
Operation modes for the SensorTracker
Sensors used by the SensorTracker . .
Requirements for the CircleGame . . . .
xiii
.
.
.
.
.
.
.
.
.
.
.
.
.
.
.
.
.
.
.
.
.
.
.
.
.
.
.
.
.
.
.
.
.
.
.
.
.
.
.
.
.
.
.
.
.
.
.
.
.
.
.
.
.
.
.
.
.
.
.
.
.
.
.
.
.
.
.
.
.
.
.
.
.
.
.
.
.
.
.
.
.
.
.
.
.
.
.
.
.
.
.
.
.
.
.
.
.
.
.
.
.
.
.
.
.
.
.
.
.
.
.
.
.
.
.
.
.
.
.
15
28
31
32
32
33
34
36
37
41
96
97
97
100
xiv
LIST OF TABLES
8.1
8.2
8.3
8.4
8.5
8.6
8.7
Interrupt Interval Parameter . . . . . . . . . . . . . . . . . .
Cache hit ratio for optimized C binaries . . . . . . . . . . . .
Cargo.toml parameters and their effects . . . . . . . . . . . .
Compilation settings . . . . . . . . . . . . . . . . . . . . . . .
Rust code size relative to C . . . . . . . . . . . . . . . . . . .
Breakdown of binary sizes for the SensorTracker application
Object sizes . . . . . . . . . . . . . . . . . . . . . . . . . . . .
.
.
.
.
.
.
.
.
.
.
.
.
.
.
.
.
.
.
.
.
.
.
.
.
.
.
.
.
107
110
112
112
114
114
115
List of Figures
1.1
1.2
Survey of language used on current embedded system project by
VDC Research . . . . . . . . . . . . . . . . . . . . . . . . . . . . . .
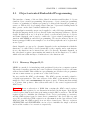
The contents of the RustyGecko platform . . . . . . . . . . . . . . .
2.1
2.2
2.3
2.4
2.5
2.6
2.7
Some of the modules in the collections crate . . . . . . . . . .
Abstractions of a Vector of Strings in Java . . . . . . . . . . . . .
Abstractions of a Vector of Strings in Rust and C++ . . . . . . .
The Giant Gecko Starter Kit - EFM32GG-STK3700 [18] . . . .
The Giant Gecko Development Kit - EFM32GG-DK3750 [17] . .
The Biometric-EXP Evaluation Board - BIOMETRIC-EXP-EVB
Giant Gecko block diagram [20] . . . . . . . . . . . . . . . . . . .
4.1
Rust Embedded Library . . . . . . . . . . . . . . . . . . . . . . . . . 51
5.1
5.2
5.3
Subsection of ADC0 Memory map for the Gecko . . . . . . . . . . . 55
Memory layout of objects . . . . . . . . . . . . . . . . . . . . . . . . 56
Flowchart for test framework . . . . . . . . . . . . . . . . . . . . . . 68
6.1
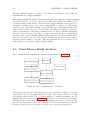
The organization files of libraries . . . . . . . . . . . . . . . . . . . . 78
7.1
7.2
7.3
7.4
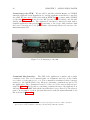
Sample collection phase . . . . . . . . . . . . . . . . . . . .
Connecting to the STK . . . . . . . . . . . . . . . . . . . . .
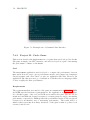
Example run of Command Line Interface . . . . . . . . . .
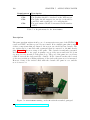
CircleGame running on the DK with the attached gamepad
.
.
.
.
.
.
.
.
.
.
.
.
.
.
.
.
.
.
.
.
97
98
99
100
8.1
8.2
8.3
8.4
8.5
8.6
8.7
8.8
8.9
The on screen Frames per Second (FPS) on the DK
Frame/Second achieved by Rust and C code . . . .
Comparison between Rust and C for each workload
Rust vs C relative comparisons for best builds . . .
Current of 50ms workload . . . . . . . . . . . . . .
Code size for project binaries . . . . . . . . . . . .
Code size for minimal program . . . . . . . . . . .
Initial heap allocation of 128 objects in Rust and C
Heap allocation after processing in Rust and C . .
.
.
.
.
.
.
.
.
.
.
.
.
.
.
.
.
.
.
.
.
.
.
.
.
.
.
.
.
.
.
.
.
.
.
.
.
.
.
.
.
.
.
.
.
.
104
105
108
109
110
113
113
116
116
xv
.
.
.
.
.
.
.
.
.
.
.
.
.
.
.
.
.
.
.
.
.
.
.
.
.
.
.
.
.
.
.
.
.
.
.
.
.
.
.
.
.
.
.
.
.
. .
. .
. .
. .
. .
[19]
. .
4
6
21
22
23
34
35
35
36
List of listings
2.1
2.2
2.3
2.4
2.5
2.6
2.7
2.8
2.9
2.10
2.11
2.12
2.13
2.14
2.15
2.16
2.17
2.18
2.19
2.20
2.21
2.22
2.23
2.24
2.25
3.1
3.2
3.3
3.4
3.5
3.6
4.1
5.1
Hello World written in Rust . . . . . . . . . . . . . . . . . . . . . .
Variable bindings . . . . . . . . . . . . . . . . . . . . . . . . . . . .
Definition of Option . . . . . . . . . . . . . . . . . . . . . . . . . .
Struct definition and implementation . . . . . . . . . . . . . . . . .
Slice representation . . . . . . . . . . . . . . . . . . . . . . . . . . .
Definition of Linked List . . . . . . . . . . . . . . . . . . . . . . . .
Matching an Option . . . . . . . . . . . . . . . . . . . . . . . . . .
Definition of the Iterator trait . . . . . . . . . . . . . . . . . . . . .
An iterator for loop . . . . . . . . . . . . . . . . . . . . . . . . . .
Rust’s for loop de-sugared to a loop . . . . . . . . . . . . . . . . .
Using a closure to filter the entries of a vector . . . . . . . . . . . .
Example of an owned handle . . . . . . . . . . . . . . . . . . . . .
Example of borrowing . . . . . . . . . . . . . . . . . . . . . . . . .
Lifetime analysis . . . . . . . . . . . . . . . . . . . . . . . . . . . .
Function with inferred lifetime specifier . . . . . . . . . . . . . . .
Attempting to return an invalid reference from an unsafe block . .
Minimal Cargo project structure . . . . . . . . . . . . . . . . . . .
Expanded Cargo project structure . . . . . . . . . . . . . . . . . .
Example usage of features . . . . . . . . . . . . . . . . . . . . . . .
Standalone functions to configure the GPIO . . . . . . . . . . . . .
Real Time Counter (RTC) module treated as a Singleton object .
Timer module configured in C Object Oriented fashion . . . . . . .
Simplified example usage of Zinc’s Platform Tree . . . . . . . . . .
The Microcontroller Unit (MCU) ResetHandler . . . . . . . . . .
C runtime start routine . . . . . . . . . . . . . . . . . . . . . . . . .
Standard ‘Hello World’ in Rust . . . . . . . . . . . . . . . . . . . .
Bare-metal ‘Hello World’ in Rust . . . . . . . . . . . . . . . . . . .
Rust static initialization . . . . . . . . . . . . . . . . . . . . . . . .
Bare-metal Hello World bootstrapped with the startup library . .
Defining the SysTick Interrupt Handler in C . . . . . . . . . . . . .
SysTick Interrupt Handler in Rust . . . . . . . . . . . . . . . . . .
External dependencies of the alloc library . . . . . . . . . . . . .
Definition of an Analog to Digital Converter (ADC) in Java, Rust,
and C . . . . . . . . . . . . . . . . . . . . . . . . . . . . . . . . . .
xvii
.
.
.
.
.
.
.
.
.
.
.
.
.
.
.
.
.
.
.
.
.
.
.
.
.
.
.
.
.
.
.
.
14
15
16
17
18
18
19
19
20
20
20
25
26
26
27
29
30
30
32
38
38
39
40
42
42
44
45
46
46
47
47
50
. 55
xviii
5.2
5.3
5.4
5.5
5.6
5.7
5.8
5.9
5.10
5.11
5.12
5.13
7.1
7.2
7.3
7.4
7.5
7.6
7.7
7.8
7.9
7.10
7.11
7.12
7.13
7.14
7.15
7.16
LIST OF LISTINGS
Member methods for C and Rust, respectively . . . . . . . . . . . .
Instantiating a Memory Mapped I/O (MMIO) in C and Rust . . .
Initializing a Timer in C . . . . . . . . . . . . . . . . . . . . . . . .
Timer interrupt handler . . . . . . . . . . . . . . . . . . . . . . . .
Initializing a Timer in Rust . . . . . . . . . . . . . . . . . . . . . .
Exposing a static inline function to Rust . . . . . . . . . . . .
Defining and using a function through the Rust Foreign Function
Interface (FFI) . . . . . . . . . . . . . . . . . . . . . . . . . . . . .
Part of a Timer enum defined in C . . . . . . . . . . . . . . . . . .
The enum ported to Rust . . . . . . . . . . . . . . . . . . . . . . .
Rust side of ADC Init test . . . . . . . . . . . . . . . . . . . . . . .
C side of ADC Init test . . . . . . . . . . . . . . . . . . . . . . . . .
Test case for ADC Init with default values . . . . . . . . . . . . . .
GPIO Dispatcher from emlib . . . . . . . . . . . . . . . . . . . . .
GPIO Dispatcher naively ported to Rust . . . . . . . . . . . . . . .
GPIOINT Dispatcher in assembly with O0 . . . . . . . . . . . . . .
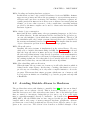
GPIOINT Dispatcher in assembly with O1 . . . . . . . . . . . . . .
GPIOINT Dispatcher without data race . . . . . . . . . . . . . . .
GPIOINT Dispatcher for proposed solution at O0 . . . . . . . . . .
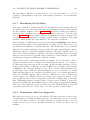
Analog sampler with global buffer . . . . . . . . . . . . . . . . . .
Analog sampler with local buffer . . . . . . . . . . . . . . . . . . .
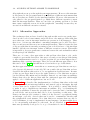
Storing a raw pointer to the closure globally . . . . . . . . . . . . .
Safe abstraction over global raw pointer . . . . . . . . . . . . . . .
ADC abstraction over an Event Hub . . . . . . . . . . . . . . . . .
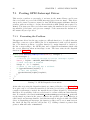
Example usage of Rust Embedded Modules (REM)’s Universal Synchronous Asynchronous Receiver/Transmitter (USART) module .
Example usage of REM’s General Purpose Input/Output (GPIO)
module . . . . . . . . . . . . . . . . . . . . . . . . . . . . . . . . . .
Traits used for Direct Memory Access (DMA) transfers . . . . . .
DMA transfer utilizing the trait abstractions . . . . . . . . . . . .
Pseudo code of the CircleGame . . . . . . . . . . . . . . . . . . . .
.
.
.
.
.
.
57
58
62
63
64
64
.
.
.
.
.
.
.
.
.
.
.
.
.
.
.
.
.
64
65
66
67
67
67
82
83
83
84
85
85
86
87
88
89
90
. 92
.
.
.
.
93
94
95
101
List of Abbreviations
ABI Application Binary Interface. 2, 45, 47, 63, 65, 82, 119
ACMP Analog Comparator. 60
ADC Analog to Digital Converter. xvii, xviii, 37, 38, 54–58, 60, 67, 86, 87, 90,
93, 94, 97
API Application Program Interface. 38, 58, 63, 73, 76, 81, 94, 127, 130
CLI Command Line Interface. 91, 98
CMSIS Cortex Microcontroller Software Interface Standard. 38, 39, 58, 59, 129
CMU Clock Management Unit. 60
CPU Central Processing Unit. 3, 33, 37, 38, 41, 42, 59, 60, 92, 93, 99
CSE Common Subexpression Elimination. 84
CUT Code Under Test. 68
DAC Digital to Analog Converter. 37, 38, 93
DCE Dead Code Elimination. 114
DMA Direct Memory Access. xviii, 36–38, 60, 62, 93, 94
EBI External Bus Interface. 60
EMU Energy Management Unit. 60
FFI Foreign Function Interface. xviii, 27, 28, 55, 58, 64–68, 73, 74, 122
FPS Frames per Second. xv, 99–101, 103–105, 124
GPIO General Purpose Input/Output. xviii, 37, 39, 40, 60, 82, 91–93
HAL Hardware Abstraction Layer. 37, 38
xix
xx
LIST OF ABBREVIATIONS
I2 C Inter-Integrated Circuit Interface. 36, 59, 60, 62, 97
IoT Internet of Things. v, 1, 3, 33
IRQ Interrupt Request. 59
ITM Instrumentation Trace Macrocell. 38
LCD Liquid-crystal Display. 34, 60, 99, 100
LESENSE Low Energy Sensor Interface. 60
LEUART Low Energy Universal Asynchronous Receiver/Transmitter. 60
LTO Link Time Optimization. 65, 112
MCU Microcontroller Unit. xvii, 3, 5, 6, 8, 11, 32, 34, 36, 37, 39, 40, 42–44, 47,
53, 63, 72, 77, 81, 91, 92, 117, 120, 121
MMIO Memory Mapped I/O. xviii, 54–58, 120, 122
NVIC Nested Vector Interrupt Controller. 38, 59, 63
OS Operating System. 3, 8, 14, 51, 118
RAM Random Access Memory. 8, 42, 54, 86, 94, 96, 97
RCL Rust Core Library. xiii, 14, 15, 39, 49, 50, 72, 73, 118
REL Rust Embedded Library. 6, 49, 51, 71, 74, 79, 81, 115, 118, 120, 129
REM Rust Embedded Modules. xviii, 91–93
RNG Random Number Generator. 104, 116
ROM Read Only Memory. 41
RSL Rust Standard Library. 14, 44, 45, 50, 51, 79, 117–119, 127
RTC Real Time Counter. xvii, 37, 38, 60, 97
UART Universal Asynchronous Receiver/Transmitter. 36, 37, 59, 60
USART Universal Synchronous Asynchronous Receiver/Transmitter. xviii, 36,
37, 60, 61, 67, 68, 91–93, 96, 98, 121
Chapter 1
Introduction
Embedded computer systems constitute a vast majority of the computers we use today. These systems are not as visible as desktop and laptop systems, and they have
different requirements when it comes to their programmers and the languages they
use. Applications written for these computers control the hardware more directly,
thus, the language requires low-level control. Modern compiler infrastructures have
made great advances in recent years. These advances enable high-level abstraction
to avoid coming at the cost of not providing the low-level control needed in these applications. The Rust programming language is one example of a language built on
such an infrastructure, and it targets this combination of abstractions and low-level
control. In the years to come, many of these computer systems will be connected
to the Internet to facilitate the Internet of Things. This development will expose more programmers to embedded systems. Introducing Rust to these systems
is potentially beneficial if applications can be developed with higher programmer
productivity.
1.1
Motivation
Rust is a new programming language that reached a stable 1.0 in May 2015. Like
most programming languages, it aims to solve a few specific problems better than
other languages. Mainly, its goal is “to design and implement a safe, concurrent,
practical, static systems language” [8]. With these goals in mind, Rust focuses
on being a memory safe language without sacrificing performance. The language
implements a few paradigms to provide a solid concurrency model that is suited
for many modern applications that run on the Internet.
C has become the industry standard for developing on embedded systems. It is
a small, low-level language, at least considering today’s standards, that has been
adapted to virtually every target platform that exists on the market. It is an
1
2
CHAPTER 1. INTRODUCTION
easy language without many language constructs, which makes it easy to adapt
to different platforms. It also has a minimal runtime system and does not require
an operating system to utilize the underlying hardware. Rust has adapted many
of the features that are available in C. Among them are a minimal runtime, full
control over the memory and an opt-in Application Binary Interface (ABI), which
is exactly the same as C’s [5].
Gradually, while the Rust programming language started to take shape, a few
people in the community took notice to Rust’s low level of implementation and
how it could be a suitable programming language for embedded systems. Combined
with its strong guarantees about memory safety, absence of data races, and other
common errors like stack- and buffer-overflows, it makes for an interesting language
to run on embedded systems. Early projects that experimented with running Rust
bare-metal on ARM microcontrollers had to do a few workarounds in order to make
it work. As the language is implemented in the open, with great influence from the
community, it is now easy to rely on only the core functionality of the language
that is platform independent.
The purpose of this project has been to try and give a rough comparison of Rust
and C on a bare-metal system. In the process of doing this, we decided that the
EFM32 microcontrollers from Silicon Labs would be well suited for the task. This
platform gives us a couple of metrics where we can compare the two languages.
Mainly, we want to compare the performance of the two languages against each
other on a small system with limited computing power. In addition, we want to
compare energy consumption of programs written in the two languages. Typically,
the two problems go hand-in-hand, and the best way to save power is to shut down
the hardware. In order to shut down the processor, the programs need to finish
quickly - basically, executing as few instructions as possible. Rust claims to provide
zero-cost abstractions, meaning that its high-level abstractions do not come at the
cost of performance and program overhead. This claim is especially important to
verify in an embedded system where excess resources are limited.
1.2
Embedded Computer System
An embedded computer system is a special purpose computer system where the
computer is embedded in the device it controls. These computers are much smaller
than a conventional server, desktop, and laptop computer, but are by far more numerous. A regular household contains embedded systems in devices like microwave
ovens, dishwashers, and alarm systems. In a car, one finds embedded computers
that are controlling the brakes of the car, the automatic windows, and navigation
and entertainment systems.
In recent years, a trend of devices called wearables are emerging, which also has an
embedded computer at its core. The Internet is growing, and according to Gartner
[2] the number of connected devices will increase from ∼5 billion in 2015 to ∼25
1.2. EMBEDDED COMPUTER SYSTEM
3
billion by 2020. A vast majority of this increase is due to the embedded computer
systems known as the Internet of Things (IoT) [27].
1.2.1
Abstraction Level
In most computer systems, the hardware interaction and resource management is
abstracted away with an Operating System (OS). This abstraction layer makes
it possible for the programmers of these systems to write portable programs built
with higher level languages. The added overheads of using a high-level language are
small enough compared to the added productivity and convenience for the programmer. Some embedded systems are also based on an OS, projects like Raspberry
PI1 and Tessel2 employs reduced Linux versions to run Python and JavaScript
respectively.
In some embedded systems, these complexities that lead to lower performance and
higher memory usage, makes it hard to benefit from an OS. With the absence
of an OS, applications for embedded system are usually written in a lower level
languages. These languages must provide the low-level control that is needed by
the programmer to interact directly with the hardware. A well-known project running without an OS is the electronic prototyping platform Arduino3 . The EFM32
emlib library used in this thesis is also a platform for C programming without an
OS.
In this thesis we use bare-metal to refer to execution of code directly on the hardware, without the abstraction of an OS. This is the only execution mode that we
have targeted in this project.
1.2.2
Programming Model
A common programming model used in embedded systems is the Event-driven
programming model. In this model, the program is controlled by events which
triggers actions to be executed. Within an embedded system, these events are
hardware interrupts, and the actions are handler functions. A typical example of
this event-action pair is the interrupt that is issued by pressing a button and the
action of turning on a LED.
Other events that trigger interrupt handlers to be executed in an embedded system is timers, sensors with available data, and communication peripherals ready
to receive or send data. This programming model is successful in these systems
because the peripherals controlled by the MCU usually requires time to perform
its operation. The asynchronous nature of the model lets the Central Processing
1 https://www.raspberrypi.org/
2 https://tessel.io/
3 http://www.arduino.cc/
4
CHAPTER 1. INTRODUCTION
Unit (CPU) avoid the busy-waits that are implied when using a more synchronous
model.
1.2.3
Programming Language
Lower-level languages have usually been the preferred ones for programming of
embedded systems. Traditionally, a large portion of code bases consists of C,
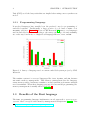
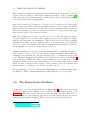
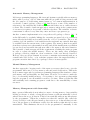
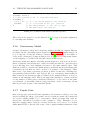
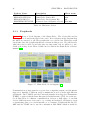
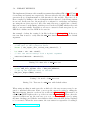
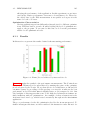
Assembly, and C++. Figure 1.1 shows a VDC Research [10] survey over languages
used in embedded systems. According to the survey, the usage of C and assembly
are on the way down in favor of higher level languages like C++, Java, and C#.
Figure 1.1: Survey of language used on current embedded system project by VDC
Research
The runtime system for managed languages like Java, Python, and C#, features
automatic memory management. This memory management lets the language
ensure memory safety, but incurs a runtime cost and can make performance analysis
non-deterministic. When these languages are used for bare-metal programming, the
memory management is usually altered [24] [13] 4 .
1.3
Benefits of the Rust language
The Rust programming language implements a novel approach to memory management based on region based memory management from Cyclone [14, 26]. This
4 http://en.wikipedia.org/wiki/.NET_Micro_Framework
1.4. THE RUSTYGECKO PLATFORM
5
kind of memory management substitutes the runtime checks, performed by an automatic memory manager, with static analysis performed by the compiler [12].
This approach lets the Rust language ensure memory safety without the runtime
cost of automatic memory management.
One of the design goals for Rust is to provide Zero-Cost Abstractions. One implication of this goal is that abstractions in Rust should not have worse performance
than the same, less abstracted, code in other low-level languages. This design goal
makes the language a good fit for embedded systems as costly abstractions could
have rendered parts of the language useless.
Rust has a distinction between safe and unsafe code. For this, Rust provides a
concept of unsafe sections where the compiler relies on the programmer to ensure
that the safe invariants are maintained. This section can be used when building
abstractions in Rust, as the compilers rules for ensuring safety can sometimes
become too strict. Containing these sections in unsafe sections makes it easier for
the programmer to reason about the safety of the code.
The Rust language is developed by the Mozilla Foundation. With this foundation,
comes a range of Open Source projects and a vibrant community. This makes the
community around Rust an open and inviting space for sharing knowledge and
code. The Rust language and compiler is developed in the open, on the GitHub5
code collaboration platform. The openness makes for a low entry cost both in
learning from the project and contributing to it. Throughout the work for this
thesis, we have both had a huge benefit of the openness of the development, and
had the chance to contribute code back to the Rust project.
One particularly good tool for sharing and building Rust projects is the Cargo package manager. This tool makes sharing and reusing libraries of code very easy.
1.4
The RustyGecko Platform
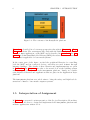
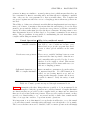
In this thesis, we develop and evaluate the RustyGecko6 platform, a bare-metal
platform for Rust on the EFM32 series of MCUs. The platform is described by
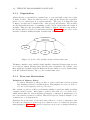
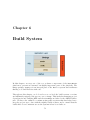
Figure 1.2. The blue colored sections describe the Rust modules that were developed or fitted for the platform, and the brown yellow sections show the base C
libraries that the platform utilizes. The red section denotes the build system.
5 https://github.com/
6 https://github.com/RustyGecko/
6
CHAPTER 1. INTRODUCTION
Figure 1.2: The contents of the RustyGecko platform
Figure 1.2 is described in a bottom-up perspective throughout Chapter 3 to Chapter 6 of this thesis. The startup module deals with the minimal requirements for
booting a Rust application on the MCU and is described in Section 3.1. In Section 4.4, we define Rust Embedded Library (REL), the subset of the Rust standard
library that is applicable for bare-metal systems.
In the center part of the figure, we find the peripheral libraries for controlling
both the MCU and its connected devices, and these are used in Rust through
language bindings. The details of these libraries and implementations are given
in Section 5.2. In Chapter 6, we take a detour and look at the building system
used to support development on the RustyGecko platform. Lastly, we consider
some high-level libraries and applications that we place in the Application Layer
platform.
The RustyGecko platform as a whole aims to bring the safety and high-level abstractions of Rust to bare-metal computer systems.
1.5
Interpretation of Assignment
In Table 1.1 we presented our interpretation of the Project Description. From these
requirements, we chose to design and implemented the RustyGecko platform and
measure applications written for it.
1.5. INTERPRETATION OF ASSIGNMENT
Requirement
R1
R2
R3
7
Description
Identify and describe the requirements for a baremetal platform in Rust
Prototype a bare-metal software platform for Rust
on the EFM32
Evaluate code size, performance and energy consumption
Table 1.1: Requirements from Project Description
Challenges related to R1 was identified in a Kickoff meeting with Silicon Labs
and are given in Table 1.2. These challenges are important to consider to provide
a bare-metal platform in Rust.
Language Challenge
LC1
LC2
LC3
LC4
LC5
LC6
Description
Volatile read and write
Handling interrupts
Reading and writing hardware registers
Static object construction
Heap allocation
Error handling without allocation
Table 1.2: Language challenges in providing a bare-metal platform in Rust
In a regular program, the values of variables do not change without the program
directly modifying the values. Compilers exploit this assumption and might remove
redundant access to the same variables to improve performance. In multi-threaded
code with global mutable state, this assumption does not hold. Access to these
variables must be marked as volatile (LC1) to ensure the compiler genereates code
to reread the value in case it was updated.
To program efficiently, both when it comes to performance and energy, embedded
system makes extensive use of interrupts (LC2). These interrupts must execute
quickly and will require support in the language.
In an embedded system, like the one considered in this thesis, a given portion of
the memory space is used to represent hardware registers. The language needs a
facility to read and write these registers (LC3).
Some languages allow object construction of statically allocated objects (LC4).
These objects are constructed before the main entry point of the application. Thus,
errors that occur while constructing these objects are challenging to handle.
Allocation of heap memory is a convenient mechanism for creating data structures
with dynamic size. In an embedded system with no excess memory, the performance of heap allocation, with respect to the reuse of deallocated memory, is an
important challenge (LC5).
8
CHAPTER 1. INTRODUCTION
On a system with an OS and large memory hierarchy, a technique called swapping
can be used when the number of heap allocations exceed the capacity of the Random
Access Memory (RAM) storage. In an embedded system, these facilities do not
exist. When the application is out of memory, there is no way to allocate more. A
subtle problem identified here is that when the error has occurred, the mechanism
handling this condition cannot allocate memory, as this will also fail and trigger
the mechanism in an infinite loop (LC6).
These language challenges are revisited as a part of the discussion of our platform
in Section 9.1.3.
1.6
Project Outline
In this section, we break down the project into five phases. Table 1.3 presents each
of the phases with their primary goals, and the rest of this section will describe
how each phase was carried out, in more detail. In addition to the main phases of
the project, the build system has evolved continuously.
Phase
Hello World
Platform Design
Development
Measurement
Evaluation
Goal
Blink LED with Rust
Implement support libraries
Develop projects for measurements
Measuring the projects
Evaluating the platform
Finished
2015-01-09
2015-03-13
2015-04-09
2015-05-20
2015-06-08
Table 1.3: Phases of the project
1.6.1
Phase 1 - Hello World
The initial phase of the project defined two main activities. Firstly, the direction
of the project along with some major challenges was identified in a meeting with
Marius Grannæs and Mikael Berg from Silicon Labs. Secondly, the milestone of
running the first Rust application on the MCU was reached.
1.6.2
Phase 2 - Platform Design
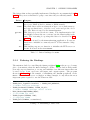
After the initial compilation process was in place, the focus shifted towards developing the platform for writing larger applications. Throughout this phase, we
developed the support libraries for the MCU, which are described in Section 4.4
and Section 5.2. Early in this phase, technical challenges guided the choice of
which part of the platform to develop. The platform evolved continuously during
the development phase.
1.7. CONTRIBUTIONS
1.6.3
9
Phase 3 - Development
The goal of the development phase was to create applications that would provide
enough empirical data to evaluate the platform in phase 4. The two complementary
projects in Table 1.4 were specified and implemented as part of this phase.
Project I
Project II
Name
SensorTracker
CircleGame
Emphasis
Energy Efficiency
Performance
Table 1.4: Projects developed in development phase
Both of these projects were implemented in Rust, using the platform developed for
this thesis, and in C, using the libraries provided by Silicon Labs.
1.6.4
Phase 4 - Measurement
During the measurement phase, the platform was evaluated based on the following
metrics:
• Performance
• Energy Consumption
• Code Size
The results of the evaluation are presented and compared with the existing C platform in Chapter 8.
1.6.5
Phase 5 - Evaluation
Throughout this phase, we investigated the results that were gathered in the previous phase. These results provided a basis for a discussion of the project as a
whole, which is presented in Chapter 9. In this discussion, we look at the viability
of using Rust in a bare-metal system and present the thoughts we had, and the
experiences we made, during the work for this thesis.
1.7
Contributions
The contributions of this thesis are given in Table 1.5.
10
CHAPTER 1. INTRODUCTION
Contribution
C1
C2
C3
C4
C5
C6
C7
Description
The RustyGecko platform
Build process
The Cargo rustc Subcommand
Methods for using Rust abstractions
Minor bugfix in a Silicon Labs library
Evaluation of Rust for a bare-metal system
Identifying binaries sizes as a problem
Table 1.5: Contributions of the Thesis
The design and implementation of the RustyGecko platform (C1), in addition to
examples for using the platform.
The implemented build process (C2) is, to our knowledge, the first standard build
process using the Rust package manager, Cargo, for bare-metal systems. Other
projects have resorted to custom Makefiles to handle the build process and dependencies.
In order to develop the build process (C2), Cargo had to be modified. This resulted
in implementing and contributing the subcommand (C3) to the Cargo package
manager.
Throughout the development phase of the project, the high-level abstractions of
Rust were tested out in a bare-metal environment. These experimentations resulted
in a few successful and promising patterns (C4).
By porting a driver in one of Silicon Labs’ software libraries from C to Rust, a minor
bug was found and reported with a suggested patch (C5) to fix the issue.
The results reported and discussed in this thesis provides an evaluation (C6) of
the Rust platform in a bare-metal system.
Considering the evaluation (C6), we have identified the size of the binaries produced by Rust are large for debugging a highly resource constrained embedded
system (C7).
1.8
Report Outline
Chapter 1 Introduction introduces and gives motivation for using Rust in a baremetal system. The interpretation of the assignment and an outline of the project
is presented along with a summary of the contributions of the project.
Chapter 2 Background provides background material for the rest of the thesis.
The Rust programming language is introduced along with the bundled package
manager, Cargo. Further, the existing hardware platform, EFM32, and software
libraries used for developing bare-metal applications are presented.
1.8. REPORT OUTLINE
11
Chapter 3 Startup for Rust presents what happens in order for a Rust program
to start executing on the MCU.
Chapter 4 Rust Embedded Library gives an overview over the Rust standard
library for bare-metal systems.
Chapter 5 Binding Libraries goes into detail on the bindings developed for the
peripheral libraries used to control the MCU.
Chapter 6 Build System looks at the build system used to build application for
the RustyGecko platform.
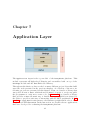
Chapter 7 Application Layer present some high level libraries and some application build on the core RustyGecko functionality.
Chapter 8 Results present how the platform was evaluated and the results from
the evaluation. The platform was evaluated by considering code size, performance
and energy efficiency.
Chapter 9 Discussion provides a discussion of the platform and the results
presented in Chapter 8.
Chapter 10 Conclusion presents a conclusion based on the discussion of the
platform and outlines possible extensions and suggests further work based on this
project.
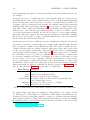
Chapter 2
Background
This section contains all the background information that is deemed necessary in
order to understand the content of the next chapters. We start by presenting the
Rust programming language and some of its more prominent features, as well as the
most important goals of the language. We assume that the reader is familiar with
common programming languages like Java, C, and C++ in order to understand some
of the fundamental differences with memory management between these languages
and Rust. After presenting Rust, we move on to the hardware and microcontrollers
that we have used in this project, including their software suite called emlib.
2.1
The Rust Programming Language
Rust1 is a new open source systems programming language developed with backing from the Mozilla Foundation2 . It is a strongly and statically typed, multiparadigm programming language that incorporates features from the functional,
object-oriented, and imperative paradigms. The language borrows many constructs
and features from other programming languages, some of which are described in
the following sections. Over the course of Rust’s development, the language has
set out to solve two major problems concerning both safety and concurrency, as
well as taking full utilization of the underlying hardware.
2.1.1
Hello World
In Listing 2.1 we see the canonical ’Hello World’ program implemented in Rust.
We see that in Rust the program entry point is the main function which is defined
in the top level scope of the application. The body of the function contains an
1 http://www.rust-lang.org/
2 https://www.mozilla.org/en-US/foundation/
13
14
CHAPTER 2. BACKGROUND
invocation of the println! macro3 . This macro has similar functionality to the C
printf function, but verifies the usage of the function at compile time.
1
2
3
fn main() {
println!("Hello, World!");
}
Listing 2.1: Hello World written in Rust
2.1.2
Language Features
This section starts by describing Rust’s standard library and its type-system, before moving on to presenting some of the language features that make Rust so
different from C. Because Rust is a multi-paradigm language it offers a wider range
of language constructs that are not present in the procedural paradigm usually
found in embedded programming.
The Rust Standard Library
The Rust Standard Library (RSL) is included into all Rust programs and is an
abstraction layer to write portable applications. The library consists of a collection
of OS dependent implementations and a facade. The facede provides a thin wrapper
which reexports a stable interface for libraries like alloc (for memory allocation),
collections (general purpose data structures), and core (described in the next
section). These OS dependent implementations renders the RSL unusable in a
bare-metal system, as this dependency will not be met. It is, however, possible to
opt-out of using the library.
It is important to note that there is a distinction between the actual software
component called std, and the library we refer to as RSL. The RSL encompasses
the standard library as a whole, i.e. alloc is a part of RSL. On the other hand,
std is just the actual software component, i.e. alloc is not a part of std, even
though it is reexported by std.
The Rust Core Library
RCL defines the platform independent part of the language. This library is not
intended to be directly interfaced with by the application programmer; instead a
stable interface is reexported through RSL. In this way, RCL is not interfaced with
directly in normal Rust programs. This gives the developer the ability to modify
the library while the RSL interface stays the same.
3 Macros
are distigiushed from functions by the leading ! symbol.
2.1. THE RUST PROGRAMMING LANGUAGE
15
Table 2.1 lists the primitive datatypes available in Rust. RCL defines many functions and abstractions that are used to manage and manipulate these datatypes.
The table shows that Rust is explicit about the size and signedness of integer data
types, and that in addition to the Pointer/Array distinction made by C, Rust also
provides slices, strings and tuples.
Type
bool
char
f32, f64
u8, u16, u32, u64
i8, i16, i32, i64
isize, usize
Pointer
Array
slice
str
Tuple
Description
Either true or false
A UTF-8 scalar value
Floating point number of single and double precision
Unsigned integers
Signed integers
‘Pointer-sized’ Integers
Raw unsafe4 pointers (*const T, *mut T)
Fixed-length array type, denoted with [T]
A view into a array, denoted with &[T]
UTF-8 encoded byte array
Finite ordered list of elements
Table 2.1: Rust’s primitive datatypes
Variables and Bindings
Rust features a handful of different data types, all of which can be assigned to a
variable using a binding. The most important types are described in the following
sections, but we will first look at how variables work. A value gets bound to a
variable by utilizing the let keyword. A variable in Rust has a name and a value,
much like other programming languages, but there is a distinct difference between
the mutability of those variables.
With a mutable variable binding, it is possible to change the value of the variable.
However, if we try to alter the value of an immutable variable binding, Rust will give
us a compile-time error. The example code in Listing 2.2 shows how to declare both
mutable and immutable variables and how to modify their values. The example will
not work because we attempt to change the value of an immutable variable.
1
2
3
4
5
6
// bind the value ‘5’ to the immutable variable ‘a’
let a: i32 = 5;
// bind the value ‘10’ to the mutable variable ‘b’
let mut b = 10;
b = a; // change the value of ‘b’
a = b; // <- compiler error: re-assignment of immutable variable ‘a’
Listing 2.2: Variable bindings
16
CHAPTER 2. BACKGROUND
An important part of variable bindings is Rust’s ability to automatically infer the
data type of the variables. We can see from the example that a is defined as a
32-bit integer with the value 5, and because the variable b later gets assigned to
a’s value, Rust will automatically infer b to be of the same type.
Enums
An enum in Rust (otherwise known as a sum type, or a tagged union, from type
theory), is a data structure that is used to hold only one out of a small set of
possible values. Rust’s enum construct is a class of algebraic data types that are
common in functional programming languages, which means that its actual type
is formed by combining other types together. This makes the enum a powerful
feature of the language that can be used to deterministically limit the set of possible
outcomes for a type. Listing 2.3 shows the definition of Option, taken from the
standard library. This type is one of Rust’s most commonly used types and is
used extensively throughout its standard library and other third party libraries
and applications.
1
2
3
4
pub enum Option<T> {
Some(T),
None,
}
Listing 2.3: Definition of Option
Every Option variable is an enum that can either have the algebraic value Some
or the named value None. If the variable is Some, the definition also says that it
needs to contain a value of type T. This T can be anything and is how Rust defines
a generic type. The Option type can be used to encode the same programming
pattern as pointers with a sentinel value of 0 (e.g. 0 for representing no value or
the end of a datastructure), but in a fundamentaly safer way. The null-pointer
dereference problem caused by using this pattern is called the billion dollar bug
by its inventor Tony Hoare. For this reason, safe Rust does not allow for them
to be used at all. In order to use a potential pointer which is contained within
a Option, the programmer must unwrap the value and explicitly handle the case
when the Option holds the value None. If it holds the value Some, the programmer
is guaranteed by Rust’s memory safety guarantees, discussed later in this section,
that the pointer is valid and safe to use. Even though the Option can be used
analogous to a C pointer, it is important to note their differences. It acts more like a
wrapper around a potential value, where its internal value is not directly accessible,
which forces the programmer to handle the cases where it can be None. The usage
of enum types described in this section become very expressive in combination with
match expressions, as discussed in Section 2.1.2.
2.1. THE RUST PROGRAMMING LANGUAGE
17
Structs
A struct in Rust is similar to that of C and is a way of creating more advanced data
types than primitives or enums. With a struct, it is possible to combine multiple
variables into a single type, each of them identified by its name. An example of
defining a Book is shown in Listing 2.4. Anyone that is familiar with C will see
the similarity of the struct definition, but there is also a couple of extra things
to notice from the example. Everything in Rust is private by default, but the pub
keywords on type definitions and member fields make them publicly accessible. The
impl keyword allows us to implement member functions for the Book, similar to
class-declarations in C++ and other object-oriented languages.
1
2
3
4
pub struct Book {
pub name: String,
pub pages: u32,
}
5
6
7
8
9
10
impl Book {
pub fn info(&self) {
println!("{} has {} pages.", self.name, self.pages);
}
}
Listing 2.4: Struct definition and implementation
Pointers
Rust’s core library exposes two pointer types that are considered unsafe by the
language, which Section 2.1.7 explains. Pointers in Rust are a fundamental part of
the language, but they are not used much outside of low-level code and bindings.
Instead, the library offers higher-level structures as an abstraction between the raw
pointers and their data.
Slices
The Slice type is simply a view into an array, and it is represented by a pointer
and a length, as shown in Listing 2.5. Slices like the arrays comes with bounds
checking, although this can be circumvented for performance reasons. The length
is used to determine how many elements the slice represents. Note that the representation given here is internal to the compiler and the length property is not
directly accessible. Slice syntax is denoted by &[T], which reads like ‘a slice of a
finite array with type T.’
18
1
2
3
4
CHAPTER 2. BACKGROUND
pub struct Slice<T> {
pub data: *const T,
pub len: usize
}
Listing 2.5: Slice representation
Boxed values
Listing 2.6 shows an example of how a linked list can be represented with an enum.
Each list item is either a value and a pointer to the next item, as in Cons, or a
termination value, as in Nil. The Cons is a name given by us, just like the name
List. One important thing to notice in this example is the usage of a Box<...>
instead of the mentioned pointer. As discussed earlier, Rust provides abstractions
on top of its raw pointers, and the Box is an example of this in action. A boxed
value is simply a value that is stored on the heap, with its owning handle stored in
a Box structure. The Box pointers are managed by Rust’s ownership mechanisms
(described in Section 2.1.5). They are, unlike raw pointers, guaranteed to be safe
to use. This structure implements the same operators that are otherwise associated
with pointers, so they are semantically the same for this piece of code.
1
2
3
4
enum List<T> {
Cons(T, Box<List>),
Nil,
}
Listing 2.6: Definition of Linked List
Pattern Matching and Destructuring
Pattern matching is a powerful language construct of Rust that resembles the
switch statement from C. It is possible to match against any value or variable in the
language, and branch to different blocks of code based on the outcome of the match.
Another important feature of the match statement is that it needs to be exhaustive,
which means that all possible outcomes of a match need to be considered, otherwise
Rust will issue an error during compilation. This is contrary to C, where only
primitive values can be used in a switch statement, and there is no requirement
to cover all switch cases, i.e. the default keyword is not required.
An example of pattern matching on the Option type is given in Listing 2.7. We
can see from the example that the match can be used to destructure the matching
value in order to get hold of its enclosing value. We can also see that both Some
and None, i.e. all possible outcomes of the Option, are being considered in the
example.
2.1. THE RUST PROGRAMMING LANGUAGE
1
2
19
// Bind the value ‘Some(42)’ to the variable ‘num’
let num: Option<u32> = Some(42);
3
4
5
6
7
8
9
10
match num {
// Bind the Option’s enclosing value to the variable
// ‘number’ and print its value
Some(number) => println!("{}", number),
// Otherwise do nothing
None => (),
}
Listing 2.7: Matching an Option
Traits
Traits in Rust are similar to Interfaces in Java - they are used to facilitate code
reuse and polymorphism. A trait can define a set of methods that other objects
can implement, and in contrast to Java’s Interfaces, a trait also supports default
implementations for its methods that an object can inherit directly. The definition of one of Rust’s more integral traits is the Iterator trait, which is shown
in Listing 2.8. An iterator can be used to manipulate stream- or list-like data
structures, where the trait implements functions like e.g. map, zip, and filter,
which are modifier functions that are commonly found in functional programming
languages.
1
2
3
4
5
6
pub trait Iterator {
type Item;
fn next(&mut self) -> Option<Self::Item>;
fn size_hint(&self) -> (usize, Option<usize) { ... }
// ...
}
Listing 2.8: Definition of the Iterator trait
Loops
Rust provides the two loop constructs known from C, for and while, in addition
to loop for infinite loops. The for loop is not the conventional for (initialize;
condition; increment) that is common in other languages. In Rust the for loop
operates on iterators. Rust’s for statement is merely syntactic sugar for a loop
with an internal match around the iterator’s next() function. Listing 2.9 shows
how a for loop is used to loop over a vector of numbers. This code is de-sugared
by Rust into the equivalent (simplified) code shown in Listing 2.10.
20
CHAPTER 2. BACKGROUND
1
1
let values = vec![1, 2, 3];
2
3
2
3
4
5
for x in values {
println!("{}", x);
}
4
5
6
7
Listing 2.9: An iterator for loop
let mut it = values.into_iter();
loop {
match it.next() {
Some(x) => println!("{}", x),
None => break,
}
}
Listing 2.10: Rust’s for loop de-sugared
to a loop
Closures
A closure is an anonymous function that closes around the environment that it is
defined within. Any freestanding variables that are defined in this environment
are accessible to the closure. A closure can be used as an argument to another
function, or be returned from a maker function.
1
2
3
4
5
6
7
fn main() {
let (nums, limit) = (vec![1, 2, 3, 4], 3);
let filtered: Vec<&u32> = nums.iter()
.filter(|&el| *el < limit)
.collect();
println!("{:?}", filtered); // prints: ‘[1, 2]’
}
Listing 2.11: Using a closure to filter the entries of a vector
Listing 2.11 shows how a closure can be used to filter a list of numbers. It also
demonstrates one of the Iterator trait’s many use cases. The example initializes
a vector with four numbers and makes an iterator by calling the iter() function.
Once the iterator is acquired, the filter() function is called with a closure as an
argument. The expression |&el| *el < limit defines the closure, which takes an
argument el and returns a bool. The limit is a free variable that is found in the
scope of the main function; this variable is part of the environment that is enclosed
by the closure. When the collect() function is called, the closure is executed
with every element in the vector, and they are collected into a new vector if the
closure’s condition is satisfied.
2.1. THE RUST PROGRAMMING LANGUAGE
2.1.3
21
Organization
A Rust library or executable is organized into a crate, and such a crate can consist
of many modules. These modules are used to split up the library into separated
pieces of code, which gives it a logical structure. The crate is a shareable part
of Rust code that can be included into other projects and libraries. The modules
are the hierarchical means of organizing a crate, and it ensures that the design is
modular. This gives the programmer the ability to import only the components of
the library that is needed for a particular program. Figure 2.1 shows a few of the
modules contained within the Rust collections crate.
Figure 2.1: Some of the modules in the collections crate
The Rust compiler comes bundled with a handful of standard libraries that are used
as a basis for almost all third party libraries and executables. By default, every
Rust application is linked with the Rust std library, which re-exports functionality
from the standard libraries, like e.g. the collections crate.
2.1.4
Zero-cost Abstractions
Definition of Memory Safety
To achieve full memory safety, we have to remove all forms for memory leaks
and dangling pointers to invalid memory. This implies one memory deallocation for every respective memory allocation.
One of Rust’s goals is to achieve performance similar to C and C++ while providing
complete memory safety. Rust aims to achieve this with zero-cost abstractions,
which means that the various high-level language constructs it implements does
not come with an execution overhead. This section gives a detailed example of one
of Rust’s zero-cost abstractions.
Abstractions, in the form of references and pointers to objects or structures, and
how they are structured on the heap, is a common source of overhead in programming languages. Figure 2.2 shows how Java lays out a vector of strings in memory.
22
CHAPTER 2. BACKGROUND
Figure 2.2: Abstractions of a Vector of Strings in Java
Fundamentally, a reference to the heap-allocated vector is placed on the stack, and
the vector itself stores internal references to different strings that are placed elsewhere on the heap. If we want to access the first character of a string stored in the
vector, we would have to go through four levels of indirection - two objects need
to be both dereferenced and indexed. If the nesting of objects is deep, it can result
in many heap-lookups in order to get the desired data.
An important part of zero-cost abstractions is the ability to define new abstractions,
like a vector, that optimizes away to the bare minimum. Rust introduces the
same zero-cost abstractions that are present in C++, among other programming
languages. This is both important for performance, and for general purposes in
order to have a deterministic and a common understanding of how the structures
are laid out in the memory. Figure 2.3 shows how C++ places a vector of strings in
memory. The main difference is that the vector itself is placed on the stack, and the
string data is placed directly inside the memory block owned by the vector. The
important part of this example is that we are exposing the same level of abstraction
to the programmer, but there are only two layers of indirection between the vector
and the character data.
There is still one vital difference between the two vector abstractions. We can
safely have multiple references into our vector in Java without worrying about
what would happen if its reallocated. This happens when a vectors content grows
over its capacity. However, we can end up with dangling pointers if we happen to
have multiple references to our vector in C++, and it grows and reallocates while
we are holding such a reference. This is the case because, when the vector grows
and gets reallocated, references into the vector will not be updated to the newly
allocated storage. These references will instead be dangling pointers into the now
old and deallocated storage.
In Rust’s case, all structures are allocated directly on the stack, if not explicitly
told otherwise, which generally allows for faster access of data. References to such
stack-allocated variables can be passed around and accessed, just like in C++, but
Rust also introduces a set of rules that have to be followed to safely use these
references. These rules are based upon variable ownership and lifetimes, which are
2.1. THE RUST PROGRAMMING LANGUAGE
23
Figure 2.3: Abstractions of a Vector of Strings in Rust and C++
discussed in Section 2.1.5. A Rust program will not successfully compile if the
programmer fails to properly maintain these rules.
2.1.5
Guaranteed memory safety
One of Rust’s key features is its ability to maintain full memory safety without
sacrificing performance. The memory safety boils down to how Rust manages
variables and memory throughout the course of a program. Rust introduces a
few concepts that are all centered around the ownership of these variables, how
references to these variables can be borrowed, and their lifetimes. These concepts
are defined in Rust, but much of the inspiration behind those rules come from other
type-safe languages, like Haskell and OCaml, and, in particular, Cyclone’s [14, 26]
region-based memory management. They are defined here:
Ownership
A value can only have one owning handle at any given moment. This ownership can be transferred to another owner. The owner is responsible for
deallocating the bound value.
Lifetime
A lifetime is a static approximation of the span of execution during which
the pointer is valid. It always corresponds to some expression or block within
the program.
Borrowing
A value can be borrowed for a limited duration. In this case the owner still
retains ownership and cannot deallocate the value while it is borrowed.
The ownership system is one of the zero-cost abstractions in Rust. It can be considered zero-cost because all borrow-checking and ownership- and lifetime-analysis
are done statically during compilation. This makes Rust interesting to consider in
a bare-metal system, as it can provide memory management without the runtime
cost of a garbage collector.
24
CHAPTER 2. BACKGROUND
Automatic Memory Management
Modern programming languages, like Java and Python, typically achieves memory
safety with a garbage collector that runs while the program is being executed with
the sole purpose of deallocating unused memory. A common implementation is
a reference counted garbage collector [28] that keeps a count of the number of
references to the variables and deallocates them when there are no valid references
to them. The downside of such an approach to memory safety is the continuous use
of resources it requires to keep track of all the references. The variables’ reference
counts must be altered every time they enter and leave a program scope.
Another common implementation is a stop-the-world garbage collector [28]. It
works differently by regularly halting the executing program before it recursively
traces all references that are accessible from the root set of variables. The root set
consists of global variables, local variables in the stack and any variable that may
be available from the current state of the registers. The memory that is accessible
from these references are then marked as valid, and all the invalid memory will then
become freed and accessible through new calls to the memory allocation function.
The downside of such an approach is the requirement of halting the entire program
in order to release the invalid memory. There are also many other techniques
of garbage collection, which are often a variation of the ones already described.
However, they are all problematic in resource constraint environments such as on
a small embedded device, or in real-time systems where the unpredictability of
program execution introduced by a garbage collector is unacceptable.
Manual Memory Management
Another approach to keeping track of the memory resources has been to give the
programmer full control of every memory allocation and deallocation. This is the
most common approach for systems programming languages like C and C++, where
performance and predictability are important. However, it is easier to make the
error of referencing invalid memory, or forgetting to free up memory that might
lead the program to use all available resources over time. Memory leaks like this
will eventually lead a running program to crash due to the unavailability of extra
resources.
Memory Management with Ownership
Rust operates differently from C when it comes to freeing memory. Any variables
holding a reference to stack- or heap-allocated memory will automatically be freed
when it leaves the scope it lives in. This is done statically without any interference
by the programmer. When the compiler sees that the variable (also called the
owning handle) for the allocated memory leaves its scope, it knows that it is also
lost to the program, so it will insert a call to free the memory right after it becomes
unreachable. This eliminates the need for the programmer to manually do the
2.1. THE RUST PROGRAMMING LANGUAGE
1
2
3
25
fn read_book(b: Book) {
println!("You just read {} pages", b.pages);
}
4
5
6
7
8
9
10
11
12
13
fn main() {
// ‘b’ is the owning handle to a Book
let b = Book { name: "Gecko’s".to_string(), pages: 150 };
// when this line is reached, ‘read_book’ takes ownership of ‘b’
read_book(b);
// when ‘read_book’ returns, the book is also deallocated
// this makes it impossible to read the book two times
read_book(b); // <- compiler error: use of moved value: ‘b’
}
Listing 2.12: Example of an owned handle
memory bookkeeping. These two aspects of memory allocation and deallocation
are combined into the concept of ownership that Rust incorporates. When a handle
that owns a reference to a data segment on the heap leaves its scope, Rust knows
that it can safely free the memory that is referenced by it because it is the owning
handle to that memory.
An example of this ownership is shown in Listing 2.12. Only one owning handle
can exist for any heap- or a stack-allocated variable at any time during program
execution. This means that if the handle gets passed as an argument to a function,
this function will take ownership of the variable by moving it to the new scope
defined by the function. This move prevents any further use of the handle in its
original scope and is necessary because Rust only allows one owned handle to any
memory segment at any time. If two or more handles to the memory had existed
at the same time, it would have resulted in several calls to free, one for every time
the handle left the different scopes. The only way to continue using the handle in
its original scope would have been to give the ownership back after using it.
Borrowing
Borrowing is introduced as an alternative to moving the ownership of the value.
Rust allows the programmer to lend away access to handles by passing a reference
to the variable around instead of the actual handle. Multiple references can exist
to the same place in memory, as long as there is only one owner of the actual
handle, and that the owner does not deallocate the memory before all borrowers
are finished. A reference is denoted with an & in front of the handle, which will tell
Rust that we are working with a reference to the handle, or that we are borrowing
the handle, to the end of the active scope. Consider a modification of the previous
example shown in Listing 2.13. Here, the read book function is modified to accept
a reference to a book instead of overtaking its ownership, thus allowing us to lend
26
1
2
3
CHAPTER 2. BACKGROUND
fn read_book(b: &Book) {
println!("You just read {} pages", b.pages);
}
4
5
6
7
8
9
10
11
12
13
fn main() {
// ‘b’ is the owning handle to a Book
let b = Book { name: "Gecko’s".to_string(), pages: 150 };
// only a reference to the book is given to ‘read_book’
read_book(&b);
// it is possible to read the book two times, because ‘b’
// still lives in the scope defined by the ‘main’ function
read_book(&b);
}
Listing 2.13: Example of borrowing
out the book to be read as many times as we want. Since the book’s owning handle
lives in the scope defined by the main function, the memory will be deallocated
when the program exits.
Lifetimes
The Rust compiler will assign a lifetime to every value in a program. This lifetime
is used by the compiler to prevent problems like use-after-free by failing the compilation process if such errors are discovered. The lifetimes are, for many uses cases,
inserted automatically by the compiler. This is done with a process called lifetime
elision. Listing 2.14 provides a lifetime analysis for a simple program.
1
2
3
4
5
6
7
fn main() {
let a = 42;
// ‘a’
{
let b = &a; // ‘b’
}
// The
}
// The
// and
is an owning handle to the value 42.
is a reference to ‘a’, thus ‘a’ is borrowed.
lifetime of the ‘b’ reference ends here.
owning handle ‘a’ goes out of scope
deallocates the value 42.
Listing 2.14: Lifetime analysis
In Listing 2.15 we consider a function that takes a reference as a parameter. This
shows how the compiler infers a lifetime for the function parameter. In the comment
on line 1 we have included the explicit lifetime specifier (’a) as it would be inserted
by the compiler.
2.1. THE RUST PROGRAMMING LANGUAGE
1
2
3
4
5
6
7
8
27
// foo<’a>(x: &’a u32) { // lifetime specifier inferred by the compiler
fn foo(x: &u32) {
} // The lifetime of the ‘x’ reference ends here.
fn main() {
let a = 42; // ‘a’ is an owning handle to the value 42.
foo(&a);
// ‘a’ is borrowed by the ‘foo’ function.
}
// The owning handle ‘a’ goes out of scope
// and deallocates the value 42.
Listing 2.15: Function with inferred lifetime specifier
The reader is encouraged to see the Rust Book [7] for a more in-depth explanation
of ownership and lifetimes.
2.1.6
Concurrency Model
Solving both memory safety and concurrency might sound like two entirely different
problems, but the ownership system described in Section 2.1.5 actually turned out
to go a long way of being the solution of them both [1]. While we do not utilize or
focus on the concurrency of Rust in this project, it is still a very important feature
for the language, so it will be shortly introduced in this section.
As already mentioned, Rust’s ownership system helps us to reason about the liveliness of variables, and it helps us to catch errors like use-after-free, and data races
by not allowing us to have multiple references to the same mutable data. This
makes it possible to describe and utilize many powerful idioms and paradigms, and
concurrency models that are based on these core features of the language. Thus,
Rust’s way of providing concurrency is made possible because the ownership system guarantees that it will be safe. Indeed, the core concurrency functionality in
Rust is merely an abstraction that is defined in the standard library, is is not a
feature in the language itself. This is an important distinction, because it allows
for any number of third party concurrency libraries to evolve based on the same
core principle of ownership, without being dependent on the concurrency idioms
that are provided as part of the standard library.
2.1.7
Unsafe Code
Rust’s strong type system and static guarantees about memory safety goes a long
way in verifying the safety of programs, but for certain programs, the restrictions
set by the compiler might be too conservative. Many programs that exist are
indeed safe, but still not possible for the compiler to verify. Examples of code
that the compiler cannot verify is code that dereference raw pointers, or code that
utilize Rust’s FFI or directly call on any of the compiler intrinsics functions. Raw
28
CHAPTER 2. BACKGROUND
pointers in Rust are similar to normal pointers in C, which means that they are
not constrained by Rust’s ownership rules, and thus allows for aliasing to mutable
data - they are not even guaranteed to have non-null values. The compiler can
not protect against use-after-free errors or dangling pointers when raw pointers are
involved.
The ability to define new abstractions with efficient implementations is an important goal of Rust. Sometimes, this means that the underlying code needs direct
memory access and the ability to dereference raw pointers or call into external libraries. For these tasks, Rust provides the keyword unsafe. It is important to note
that this unsafe keyword is introduced to keep Rust’s semantics about memory
safety. The programmer is responsible for maintaining the safe invariants of the
compiler when using an unsafe block.
Unsafe Operation
Access and update static
mutable variables
Why it is considered unsafe
Writing and reading to and from global state
can lead to race conditions because every
thread and scope in the program has direct
access to these global variables at the same
time.
Dereference raw pointers
There are no variable bindings between a raw
pointer and the data it points to; thus the normal ownership rules provided by the borrowchecker does not apply to them. This means
that Rust cannot resolve issues with race conditions or dangling pointers.
Call unsafe functions, e.g.
FFI or compiler intrinsics
Rust can make no guarantees about the safety
of unsafe functions. If a FFI function is
called, we are leaving Rust’s scope and entering another language domain, and it is not
possible for Rust to verify the safety of such
code.
Table 2.2: Unsafe operations exposed through an unsafe block
Table 2.2 summarizes the three things that are possible to do in an unsafe block,
and some examples of why the operations are considered unsafe. Compiler Intrinsics
are functions that are provided by the compiler itself, not Rust and are functions
that are closely related with raw pointers. These are all considered unsafe, as they
provide core functionality to e.g. access and modify volatile data, transform the
data of one type into another, or perform atomic operations.
It is important to note that Rust’s borrow-checker is still active across the unsafe
code and that normal ownership rules still apply even though the code is unsafe.
The borrow-checker can never be disabled, but for certain operations it will simply
2.2. THE CARGO PACKAGE MANAGER
29
not work. Listing 2.16 demonstrates this with the same example that was used
in Section 2.1.5. We can see from this example that it is not allowed to return a
reference to something that is allocated within an unsafe block, as this can result
in use-after-free issues. This also tells us that using an unsafe block is not the
same as disabling all the checks in the compiler, it is merely a mechanism for the
programmer to take responsibility for safety in the parts of the program where the
compiler is unable to.
1
2
3
4
5
6
7
8
9
fn main() {
let name = unsafe {
let b = Book { name: "Gecko’s".to_string(), pages: 150 };
// If the last statement in a block does not contain a ‘;’
// then the block is turned into an expression that
// evaluates to the value of this statement
&b.name // <- compiler error: ‘b.name’ does not live long enough
};
}
Listing 2.16: Attempting to return an invalid reference from an unsafe block
2.2
The Cargo Package Manager
Cargo is Rust’s package manager, it is an application that automates the process of
building and distributing Rust programs. It comes bundled with the default installation of Rust. Cargo comes with a collection of tools that make building, testing,
and running Rust programs much easier than invoking rustc directly. Cargo also
defines a standard Rust project layout, in addition to downloading and maintaining package dependencies. This section will cover the most important features of
Cargo and how it works, enough of what is required in order to understand the
work that is described later in this project report.
2.2.1
Project Structure
Every crate, or package, built by Cargo requires a Cargo.toml file to be present in
the root directory. This file is interpreted by Cargo and is used to determine the
name of the library and executables to be built in the package. Any dependencies
that the package might depend on are also specified in this file, and Cargo will
automatically download, compile, and link these dependencies with the project.
It also includes information that tells Cargo how the package can be compiled
for different target architectures, and it is used to define different features of a
package - a way to conditionally compile certain parts of the code present in the
library.
30
CHAPTER 2. BACKGROUND
hello world
Cargo.lock
Cargo.toml
src
main.rs
Listing 2.17: Minimal Cargo project structure
Listing 2.17 shows a standard Cargo project structure for an executable target. If
a project contains a main.rs file, it will be compiled into an executable with the
same name as the project (hello world for this example). Cargo requires that this
file also contains the main function for the program. Finally, Cargo also generates
a Cargo.lock file that contains specific information about all packages that are
used in the project. This information includes the name and version of the package
and its dependencies, including any transitive dependencies they might have. This
file helps Cargo determine if packages need to be re-downloaded, updated, or recompiled in order for the project to be built consistently - independent on the
target architecture it is built on and for.
cargo
Cargo.lock
Cargo.toml
src
bin
build.rs
test.rs
...
lib.rs
compile.rs
...
tests
test cargo build.rs
test cargo test.rs
...
Listing 2.18: Expanded Cargo project structure
Listing 2.18 shows an example of a library project structure, and it is in fact a
simplified version of Cargo’s actual structure. If the intended use of a project is to
be utilized as a library for other applications, they include a lib.rs. This file, including its submodules like src/compile.rs, as presented in this example, will be
compiled into a Rust crate. In this case, the the crate name will be cargo.rlib.
Any files found under the src/bin directory will also be compiled into its own
executables, and Cargo will automatically link the library and all of the its depen-
2.2. THE CARGO PACKAGE MANAGER
31
dencies with these executables. In Cargo’s case, every command shown in Table 2.3
has its own dedicated executable target in this directory.
A package can also contain a tests directory with integration tests, as shown
above, and an examples directory with different executables that demonstrate
how to use the library (this has not been included in the above example). A
package can also have it’s own build-routine by specifying a build script in the
Cargo.toml. This file is executed prior to building the package itself, and provides
the possibility to e.g. compile and link third party C libraries, or generate code
prior to compilation.
2.2.2
Building and testing
As previously mentioned, Cargo comes with a collection of tools that make it easy to
build and test Rust projects. The most common commands are shown in Table 2.3.
Most of these tools are self explanatory, but the build and the test commands
will be described a little more thoroughly in this section.
Command
build
clean
doc
new
run
test
bench
update
Description
Compile the current project
Remove the target directory
Build this project’s and its dependencies’ documentation
Create a new cargo project
Build and execute src/main.rs
Run the tests
Run the benchmarks
Update dependencies listed in Cargo.lock
Table 2.3: Common cargo commands
By invoking the cargo build command, Cargo will download and resolve all package dependencies and trigger rustc to compile and link them with each other in
the correct order. When all dependencies have been built, the build script will
be invoked (if it is present in the package) before the library itself is compiled.
Lastly, the projects executables will be compiled if the project contains a main.rs
or sources in the src/bin directory.
The cargo test command will also trigger rustc to compile the library in the
same manner as cargo build, but it will leave out compilation of the project executables. When the library is compiled, any function that is marked with #[test]
will be included and treated like a unit test - this is a feature from Rust itself.
Cargo also treats all the sources found in the examples directory as tests together
with all the integration tests. When Cargo finishes compiling the library and its
executables, it will run all the unit tests, including the integration tests, but it will
not run the examples.
32
CHAPTER 2. BACKGROUND
Flag
--target TRIPLE
--features FEATURES
Description
Build for the target triple
Space-separated list of features to also build
Table 2.4: Cargo flags to alter the package library and executables
Both of these commands support several optional build-specific flags that are passed
further on to the invocation of rustc. We will take extra notice to the two flags
shown in Table 2.4. The --target flag is used if the project will be compiled for a
different target architecture than the machine it is invoked on - this is necessary for
our project in order to cross-compile libraries from x86 to ARM. The list following
the --features flag will be used by Cargo and rustc to conditionally compile code
that is present in the project. Consider the example shown in Listing 2.19 and its
output shown in Table 2.5. From this example we can see that the definition
of the num function will be different based on the feature flag that is passed to
Cargo.
1
2
3
// src/main.rs
#[cfg(feature = "one")]
fn num() -> u32 { 1 }
4
5
6
#[cfg(feature = "two")]
fn num() -> u32 { 2 }
7
8
9
10
fn main() {
println!("num() + num() = {}", num() + num())
}
Listing 2.19: Example usage of features
Command
$ cargo build --features one
$ cargo build --features two
Output
num() + num() = 2
num() + num() = 4
Table 2.5: Example output of features
2.3
Hardware Platform
This project targets the EFM32GG MCU developed by Silicon Labs. The following
sections present the EFM32 family of microcontrollers and a couple of development
kits that utilize the Giant Gecko MCU, soldered with a handful of different peripherals.
2.3. HARDWARE PLATFORM
2.3.1
33
EFM32
ARM Cortex-M is a family of 32-bit RISC processor cores, which is intended to
be used by applications that require low cost and energy-usage. These factors
are crucial in modern systems and applications where energy efficiency is of great
importance. For example, with the IoT [27], where it is predicted that tens of
billions of devices will be connected to the Internet in the future, ranging from
Super Computers down to small embedded devices that might be used to power
up and control everything from cars to light bulbs via the Internet. The different
processor cores of the Cortex-M family are summarized in Table 2.6.
Name
Cortex-M0
Cortex-M0+
Cortex-M1
Cortex-M3
Cortex-M4
Cortex-M7
Target features
Lowest cost and lowest area
Lowest power
Designed for implementation in FPGAs
Performance efficiency
DSP, SIMD, FP
Cache, TCM, AXI, ECC, double + single FP
Table 2.6: Cortex-M family of processor cores
The EFM32 family of microcontrollers are all based on different Cortex-M processors, and some of their features are summarized in Table 2.7. The focus of
these microcontrollers is energy efficiency and low power-consumption in resourceconstrained environments. The EFM32GG, usually referred to with the name
Giant Gecko, is a versatile chip that is in the upper end in the Cortex-M series.
This is the processor core that is targeted in this project, and for the sake of
simplicity, this chip will be referred to as Gecko.
The microcontrollers implement several different methods for reducing the power
consumption. The most important way to achieve low power consumption is by
turning off the different parts of the chip that are inactive so that these parts no
longer draw any power from the overall system. The EFM32 processors feature five
different energy modes, or sleep modes, ranging from EM0 (Energy Mode 0), where
the CPU is on, to EM4, where the processor only wakes up on specific interrupt
signals. The different peripherals provided with the EFM32’s operate in different
energy modes. This system allows applications to utilize many different peripherals
for data collection, while the processor itself is turned off. The peripherals then
have the opportunity to wake up the processor on different interrupt-signals and
transfer data to it in order to do general processing.
2.3.2
Evaluation boards
Silicon Labs provides a wide range of development-kits and -boards that are targeted for general development and testing of applications based on the EFM32
34
CHAPTER 2. BACKGROUND
series. Two of these boards are available with the Gecko, and we have used both of
them in this project. The simplest of the two is the Giant Gecko Starter Kit, which
is depicted in Figure 2.4. This board contains a few LEDs and buttons, a couple
of sensors to demonstrate a wide range of use-cases, and a segment Liquid-crystal
Display (LCD) display. It also includes an expansion header that can be used to
connect with third party devices and peripherals, and a JLink debug interface over
USB.
Figure 2.4: The Giant Gecko Starter Kit - EFM32GG-STK3700 [18]
As shown in Figure 2.5, the Giant Gecko Development Kit is a more complex
board. It features a TFT touch Display, which is a prototyping board that exposes
all the MCU pins on headers. The MCU itself is also soldered on a pluggable
board, which makes the development kit a suitable system for testing a wide range
of different applications. In addition to the two mentioned boards, we have also
used the Biometric-EXP Evaluation board. This board was used to provide additional sensors to the SensorTracker application described in Section 7.4.1. The
Biometric-EXP Evaluation board is shown in Figure 2.6 and connects directly with
the Expansion Header available on the Starter Kit.
Name
Zero Gecko
Tiny Gecko
Gecko
Leopard Gecko
Giant Gecko
Wonder Gecko
Processor
ARM Cortex-M0+
ARM Cortex-M3
ARM Cortex-M3
ARM Cortex-M3
ARM Cortex-M3
ARM Cortex-M4
Speed (MHz)
24
32
32
48
48
48
Flash Memory (KB)
4, 8, 16, 32
4, 8, 16, 32
16, 32, 64, 128
64, 128, 256
512, 1024
64, 128, 256
Table 2.7: EFM32 Product Family [21]
2.3. HARDWARE PLATFORM
35
Figure 2.5: The Giant Gecko Development Kit - EFM32GG-DK3750 [17]
Figure 2.6: The Biometric-EXP Evaluation Board - BIOMETRIC-EXP-EVB [19]
Table 2.8 summarizes the different hardware devices that are referred to throughout this report. The original device-names are shortened in order to simplify reading.
36
CHAPTER 2. BACKGROUND
Product Name
EFM32GG990
EFM32GG-STK3700
EFM32GG-DK3750
BIOMETRIC-EXP-EVB
Description
The Giant Gecko Microcontroller
Giant Gecko Starter Kit
Giant Gecko Development Kit
Biometric Sensor Expansion Board
Short name
Gecko
STK
DK
BIO-EXP
Table 2.8: Hardware devices
2.3.3
Peripherals
Figure 2.7 shows a block diagram of the Giant Gecko. The Cortex-M3 and its
memory can be found in the upper left corner. It is evident from the diagram that
the MCU is connected to all other peripherals over a 32-bit bus. This section will
briefly introduce the peripherals that are relevant in this project. We will describe
what they can be used for and why they are important, but we will not go into
detail on how they work. These details can be found in the Giant Gecko reference
manual [20].
Figure 2.7: Giant Gecko block diagram [20]
Communication is important in every modern computing system, and the Gecko
supports a handful of different serial communication protocols through different
peripherals. The USART, and the Universal Asynchronous Receiver/Transmitter
(UART), together with the Inter-Integrated Circuit Interface (I2 C), are serial protocols that allow for efficient communication between a high range of external
devices. Different areas of use can be e.g. reading and writing to SD memory cards
or transferring data over a serial interface to a computer. Peripherals like the USART and the UART can be used in combination with DMA, which is useful for
2.4. SOFTWARE LIBRARIES
37
energy constrained applications. This combination makes it possible to implement
applications that can gather data from a range of external sensors, and transfer or
store it to other peripherals with minimal interaction from the CPU.
GPIO is used for pin configuration and manipulation of the MCU pins, and it
is often used to configure the pins that are required by other peripherals. Simple
Push Buttons and LEDs are configured with the GPIO, and e.g. the USART needs
to have configured at least two GPIO pins for both receiving and transmitting
data.
Many applications are used to gather data by measuring different sensors and
signals. The ADC is a peripheral that is used to measure analog signals, like
e.g. sound or light intensity, and convert them to digital signals. Oppositely, the
Digital to Analog Converter (DAC) can be used to convert digital signals back to
e.g. analog sound signals.
Timers are another important peripheral type; the Gecko supports a number different timers that operate with different frequencies and at different energy levels.
The Timer peripheral is used to generate signals at specified frequencies. These
signals can be software interrupts to the CPU or other peripherals, which in turn,
without intervention from the CPU, can be used to e.g. initiate a DMA transfer
over UART at timed intervals. The RTC is another timer that works at low energy
levels, which is useful for energy constraint applications.
2.4
Software Libraries
This section presents the different software libraries that we have utilized and interfaced with throughout this thesis. These are libraries written specifically for
the EFM32’s (or the Cortex-M’s) to increase the level of productivity when programming the MCUs. Table 2.9 shows the software stack that is provided with the
Gecko, which is presented throughout the following sections.
Library
CMSIS
emlib
emdrv
newlib
Description
The Cortex-M Hardware Abstraction
Layer (HAL)
The Energy Micro Peripheral Support
library
The Energy Micro energyAware Drivers
C library for embedded systems
Source
ARM
Silicon Labs
Silicon Labs
GNU ARM Toolchain
Table 2.9: EFM32 software stack
38
2.4.1
CHAPTER 2. BACKGROUND
CMSIS
The Cortex Microcontroller Software Interface Standard (CMSIS) library is a HAL
provided by ARM for their Cortex-M CPUs. It is divided into a few modules,
namely, Core, DSP, RTOS and SVD. Most of these modules are not relevant for
this project, only the Core module is. It provides functionality to control interrupts
though Nested Vector Interrupt Controller (NVIC), manages the system clocks, and
provides program tracing through Instrumentation Trace Macrocell (ITM). The different peripherals that come with ARM’s CPUs are memory mapped, which means
that reading and writing to certain addresses can be used to modify the peripheral’s
internal registers. This is explained in greater detail in Section 5.1.
2.4.2
Emlib
The emlib peripheral Application Program Interface (API) by Silicon Labs is a
general library written in C that provides functionality to control the vast range
of peripherals that are supported by the EFM32’s. It provides a thin layer of
abstraction over each of the peripherals’ registers, which are memory-mapped as
described in Section 5.1, and it is built on ARM’s CMSIS.
The API is divided into separate files that define interfaces for modules such as
ADC, DAC, Timer, and DMA, and it provides functions to easily control sleep
modes and interrupt handlers. The library functions are exposed in three different
API patterns, either as standalone utility methods, singleton object methods, or C
object oriented fashion. Examples of these patterns are shown for the gpio module
in Listing 2.20, the RTC in Listing 2.21, and the timer in Listing 2.22.
1
2
3
4
5
void GPIO_PinModeSet(GPIO_Port_TypeDef port, unsigned int pin,
GPIO_Mode_TypeDef mode, unsigned int out);
void GPIO_PinOutSet(GPIO_Port_TypeDef port, unsigned int pin);
unsigned int GPIO_PinOutGet(GPIO_Port_TypeDef port,
unsigned int pin);
Listing 2.20: Standalone functions to configure the GPIO
1
2
3
4
void RTC_Init(const RTC_Init_TypeDef *init);
void RTC_Enable(bool enable);
uint32_t RTC_CompareGet(unsinged int comp);
void RTC_CompareSet(unsigned int comp, uint32_t value);
Listing 2.21: RTC module treated as a Singleton object
2.5. THE ZINC PROJECT
1
2
3
4
5
39
void TIMER_Init(TIMER_TypeDef *timer,
const TIMER_Init_TypeDef *init);
void TIMER_Enable(TIMER_TypeDef *timer, bool enable);
void TIMER_TopGet(TIMER_TypeDef *timer);
void TIMER_TopSet(TIMER_TypeDef *timer, uint32_t val);
Listing 2.22: Timer module configured in C Object Oriented fashion
2.4.3
Emdrv
Another library provided by Silicon Labs is called emdrv, and it provides higherlevel drivers for some of the more general EFM32 peripherals. Commonly used
modules with common usage patterns usually have their own drivers that make
them easier to initialize and use. Examples of modules that have their own drivers
are the flash memory, which features a common read-write pattern, and the GPIO
module, which exposes a common pattern for registering handler functions to be
executed when an event is triggered.
2.4.4
Newlib
newlib is a C library that is implemented specifically to be used by embedded
devices. Most notably, this library defines heap memory management facilities
through malloc, realloc and free. These base functions are needed in order to
compile both emlib and emdrv, and Rust’s alloc library. The functions in newlib
are used directly by the C libraries, or in Rust through RCL, which exposes the
memory management symbols mentioned above. This library is distributed as a
part of the GNU ARM Toolchain [3], which is a C compiler targeting the ARM
architecture.
2.5
The Zinc Project
The Zinc [11] project tries to write a complete ARM stack, similar to that of
CMSIS, but written completely in Rust and assembly, and with no interference of
C. Zinc is an attempt at applying Rust’s safety features to bare-metal systems, but
it is still in early development. The project have primarily focused on supporting
two different ARM development boards, the EFM32 are not part of these.
One of Zinc’s main features is the ability to safely initialize a program’s peripherals
with a Platform Tree specification, which has the ability to statically catch any
mis-configured MCU pins or peripherals during compilation. This setup-routine
guarantees that all the peripherals gets initialized correctly. This Platform Tree
is realized with a Rust compiler plugin, which means that Zinc can hook on to
40
CHAPTER 2. BACKGROUND
rustc’s internal compilation routine, and verify the correctness of the platform
specification that it is currently attempting to compile.
An example program that demonstrates the Platform Tree is shown in Listing 2.23.
We have left out parts of the clock and os specifications to make the example more
clear. We can see from this example that we define a platform for the LPC17 MCU,
and initialize the main MCU clock, a Timer peripheral, and configure a GPIO pin
as a LED. If Zinc notices that e.g. a LED and a Timer is configured to use the
same MCU pin, it will exit the compilation with an error message. In the os block
we specify that we want access to the Timer as timer and the LED as led1, Zinc
will handle the task of initializing the peripherals and pass them as arguments to
the run function.
1
2
3
4
5
6
7
8
9
10
11
12
13
14
15
platformtree!(
lpc17xx@mcu {
clock { source = "main-oscillator"; /* ... */ }
timer { timer@1 { counter = 25; divisor = 4; } }
gpio { 1 { led1@18 { direction = "out"; } } }
}
os {
args { timer = &timer; led1 = &led1; }
/* ... */
}
);
// Blink the LED every second
fn run(args: &pt::run_args) {
args.led1.set_high();
args.timer.wait(1);
16
args.led1.set_low();
args.timer.wait(1);
17
18
19
}
Listing 2.23: Simplified example usage of Zinc’s Platform Tree
Although the Zinc project did not end up as part of our platform, we have used
it for inspiration during design and development. In Chapter 9 we discuss the
problem that arises with mutable aliases to hardware peripherals, and look at how
Zinc’s approach of handling peripheral initialization can help to provide a safer
abstraction layer over the hardware, with respect to our platform.
2.6. MICROCONTROLLER STARTUP
2.6
41
Microcontroller Startup
This section describes the process of starting a program on a bare-metal system.
The main function is typically considered as the starting point of a program. While
this can be true from the programmer’s point of view, in this section, it is evident
that that is not usually the case. This section will present the reader with what
occurs prior to the program reaching the main function.
2.6.1
Prelude
Before we look at the start of execution, lets look at the process between compilation and execution. The compiler outputs object-files which the linker combines
into a elf file. This file is loaded into the microcontrollers Read Only Memory
(ROM) Flash memory. Then, the reset signal is sent to the CPU to start execution.
2.6.2
Executable and Linkable File Format
elf is a file format for storing code and data for a program. This file format can be
loaded onto a microcontroller and executed. For our purposes, this format defines
three interesting sections, namely .text, .data, and .bss. Table 2.10 describes the
content of the these sections.
ELF Header
.bss
.text
.data
Header describing size of sections
Logical section for zero-initialized data
Read-only section for code and constants
Section containing values for non-zero initialized data
Table 2.10: Sections of elf file format
The .text section contains the program code and any read-only data defined in
the code. Strings are, for instance, stored in the .text section as read-only. The
.data section contains the values for non-zero initialized data. The .bss section
is a logical section so it is not really stored in the file. The header specifies the
size of the .bss section, which describes the size of the zero-initialized data in the
program.
2.6.3
Before main
All static data must be initialized before the main function starts executing. The
data is divided into two categories; zero and non-zero initialized. The non-zero
initialized data is contained either in the .text (read-only-data) or .data sections
42
CHAPTER 2. BACKGROUND
of the elf binary. On the chip, the .data section resides in flash memory, as these
data structures might change at runtime they must be copied into RAM. The .text
section contains the instructions and read-only data, this data does not need to
be copied as they can be read directly from flash at runtime. All zero-initialized
data is represented by the .bss section in the elf binary. A portion of RAM
corresponding to the size of the .bss section must be set to zero.
Copying the .data section into RAM is handled by the ResetHandler function
shown in Listing 2.24. Before the RAM is initialized, the ResetHandler calls a
SystemInit routine, which can be used to set up the external RAM for the Gecko.
The function is the real entry point of the program and is executed when the CPU
receives the reset signal.
1
2
3
4
5
6
7
8
9
10
11
// Variables set in linker script
extern etext;
// address of .data segment in FLASH
extern data_start; // start of .data segment in RAM
extern data_end;
// end of .data segment in RAM
void ResetHandler() {
SystemInit();
for (i=0; i<data_end - data_start; i++){
RAM[data_start + i] = FLASH[etext+i];
}
_start();
}
Listing 2.24: The MCU ResetHandler
After the ResetHandler has copied the non-zero initialized data into RAM, it calls
the start function in the C runtime. The start function finds the size of the
.bss section, which describes the size of zero-initialized area in RAM. It then calls
on the memset function to zero out the RAM, before it goes on to call the main
function defined by the programmer.
1
2
3
// Variables set in linker script
bss_start; // start of .bss segment in RAM
bss_end;
// end of .bss segment in RAM
4
5
6
7
8
void _start() {
memset(bss_start, 0, bss_end - bss_start);
main(); // User defined main function
}
Listing 2.25: C runtime start routine
Chapter 3
Startup for Rust
The startup module handles the process of starting a Rust application on the
Microcontroller Unit. This module is a foundation for the RustyGecko platform,
but it can be used in isolation to run a program on the MCU without any dependencies.
This chapter describes two important parts of a Rust program that needs to be
configured correctly for the language to be functional with the Gecko. First, we
describe how we configured a Rust program to become an executable for the Gecko.
At the end of this chapter we describe how we get hardware interrupts to trigger
interrupt handlers implemented in Rust.
43
44
3.1
CHAPTER 3. STARTUP FOR RUST
Booting Rust on the Gecko
The contents of this section explains how the startup process described in Section 2.6 is implemented for a Rust program. The process for Rust is identical to
the process in C because Rust only allows constant initialization before the main
function. Therefore, we are able to reuse standard runtime components that are
available in the C embedded toolchain.
Silicon Labs’ software suite provides the ResetHandler and a linker script for
the EFM32 microcontrollers. The linker script defines the memory layout for the
Gecko, and this is initialized when the elf binary is flashed to the MCU. The
arm-none-eabi-gcc toolchain provides an implementation of the start routine
that is defined in the C runtime. This routine is called from the ResetHandler, as
described in Section 2.6, which in turn calls into the main function defined in the
Rust executable.
3.1.1
Minimal Rust program to boot
There are a few modification which have to be applied to the default ‘Hello World’
program in order to get it to boot in a bare-metal environment. Let us first revisit
the canonical version from Section 2.1 given in Listing 3.1. We can see that all we
have to define is the main function.
1
2
3
fn main() {
println!("Hello, World!");
}
Listing 3.1: Standard ‘Hello World’ in Rust
A Rust program will by default include Rust Standard Library automatically. As
explained in Section 2.1.2, this library is not usable in a bare-metal program,
and the changes to the ‘Hello World’ program mostly deals with removing the
RSL.
The bare-metal ‘Hello World’ program, as given in Listing 3.2, does not print out
the “Hello, World!” text because this would have required additional setup, and we
are only concerned with the boot process in this example. In addition to removing
the RSL, the main function is exported to be callable from the C runtime.
3.1. BOOTING RUST ON THE GECKO
1
2
3
4
45
// Annotations
#![no_std]
#![no_main]
#![feature(no_std, core, lang_items)]
5
6
7
// Crate import
extern crate core;
8
9
10
11
12
13
// Define main function
#[no_mangle]
pub extern fn main() {
loop {}
}
14
15
16
17
18
// Define three functions which are needed by core but defined in std
#[lang= "stack_exhausted"] extern fn stack_executed() {}
#[lang= "eh_personality"] extern fn eh_personality() {}
#[lang= "panic_fmt"] fn panic_fmt() -> ! { loop {} }
Listing 3.2: Bare-metal ‘Hello World’ in Rust
#[no std] on line 2 in Listing 3.2 tells the Rust compiler not to include the standard
library. Line 3 must be analyzed in conjunction with lines 10 and 11. Firstly, we
must guarantee that the function can be called by the start function. This is
done by defining the main function to be a publicly exported symbol denoted by
pub extern. The second change is to ensure that the function is callable by a C
function. extern makes this possible by making the function use the C ABI. The
last thing is to disable the Rust name mangling so that the C code can refer to the
function by the unmangled name main. Now that the main function is altered to
be callable by C, the function does not resemble the function the Rust compiler
expects to find. Therefore we have to tell the compiler that the program does not
contain a main function, hence the #[no main] on line 3.
The last three lines are a complication due to error handling in Rust. These functions are used by the core library, but implemented in the standard library. Since
we are not using RSL in this example we have to define the functions ourselves.
The implementation shown here just ignores all error handling.
3.1.2
Storage qualifiers
As described in Section 2.6, the startup procedure initializes all global variables.
In this section we look at how each storage qualifier, applicable to global variables
in Rust, map to different sections of the elf binary.
46
1
2
3
4
5
6
CHAPTER 3. STARTUP FOR RUST
const
RUST_CONST_ZERO: u32 = 0;
const
RUST_CONST: u32 = 0xFEED;
static
RUST_STATIC_ZERO: u32 = 0;
static
RUST_STATIC: u32 = 0xDEAD;
static mut RUST_STATIC_MUT_ZERO: u32 = 0;
static mut RUST_STATIC_MUT: u32 = 0xBEEF;
//
//
//
//
//
//
not allocated
not allocated
.text
.text
.bss
.data
Listing 3.3: Rust static initialization
In Listing 3.3, the three different types of declaring globals in Rust are shown. Rust
divides between two types of global declarations, constants and statics.
A constant declaration, shown in lines 1 and 2 of Listing 3.3, represents a value.
There is no need to allocate memory for globals declared as const, as the values
can be directly inserted where they are used by the compiler.
The static globals are immutable by default, but can be made mutable by the mut
keyword. The variables on line 3 and 4 are declared to be static. As these are
immutable, they are allocated in the read-only section called .text.
On line 5 and 6 the declarations are marked with static mut. Here we see that
the zero initializes variable is assigned to the .bss section in the elf file. On line 6
we have a non-zero value that has to be stored in Flash memory prior to execution
and is copied to RAM in the ResetHandler.
3.1.3
Bootstrapping startup
The Rust program that was presented earlier in Listing 3.2 is quite obscure. For
this reason the startup 1 library was developed in order to minimize the effort of
making a new Rust program for the Gecko. This library makes the startup process
more intuitive and hides all the details that were presented in Section 3.1.1.
A minimal ‘Hello World’ program using the startup crate is given in Listing 3.4.
We still have to annotate the program with #[no std], but the main function is
now much more similar to the one that was presented at the start of this section.
This is due to the inclusion of the startup library.
1
2
3
#![no_std]
#![feature(no_std)]
extern crate startup;
4
5
fn main() { loop {} }
Listing 3.4: Bare-metal Hello World bootstrapped with the startup library
1 https://github.com/RustyGecko/startup/
3.2. HANDLING INTERRUPTS IN RUST
3.2
47
Handling Interrupts in Rust
Interrupts are an integral part of embedded programs, and having a native way of
handling the interrupts provides a great benefit and flexibility for a programming
language.
To handle interrupts on the Gecko, one have to register a function in the interrupt
vector. This vector is defined in the startup file provided by Silicon Labs and
is simply a list of function pointers defined in the .isr vector section of the elf
binary. This is the first section in the text segment of the binary which ensures
that it is located at memory address 0x0 when the MCU starts executing. When
an interrupt occurs, the microcontroller will inspect the interrupt vector and find
the address of the handler function for the interrupt which occurred. Both the
interrupt vector and the default interrupt handlers are defined in the startup file
for the Gecko. The default implementations are simply infinite loops defined as
weak symbols. These weak symbols allows the programmer to redefine the symbol
elsewhere in the code in order to override this default implementation.
Listing 3.5 shows how the SysTick Handler can be overridden in C. The Gecko
can be triggered to cause interrupts that occur at a timely basis, e.g. once every
second. This function will then be called when these interrupts occur.
1
void SysTick_Handler(void) { /* Handler code */ }
Listing 3.5: Defining the SysTick Interrupt Handler in C
Defining an interrupt handler in Rust is just as easy as in C because of the focus on interoperability with C code. In Rust, a function can easily be defined to
use the C Application Binary Interface required to be called as an interrupt handler. Listing 3.6 shows how to override the same SysTick Handler function in
Rust.
1
#[no_mangle] pub extern fn SysTick_Handlder() { /* Handler code */ }
Listing 3.6: SysTick Interrupt Handler in Rust
Chapter 4
Rust Embedded Library
The Rust Embedded Library module defines the subset of the standard Rust library
that is applicable for bare-metal applications. This module builds on the foundation laid out by the startup module and is used by the bindings and Application
Layer modules of the RustyGecko platform.
This chapter starts with presenting the parts of RCL that needs to be configured
in order for the library to work for a new platform. We then move over to describe
the standard Rust libraries that provide heap allocation and dynamically allocated
structures. At the end of this chapter, we present our definition of the REL.
49
50
4.1
CHAPTER 4. RUST EMBEDDED LIBRARY
The Core Library
As described in Section 2.1.2, the RCL defines the core functionality of the Rust
language. The RCL does not have any library dependencies, but in order to use
the library without RSL, a few definitions are needed. These definitions are given
in Table 4.1.
Functions
memcpy, memcmp, memset
rust begin unwind
Description
Basic memory management
Handles panicking
Table 4.1: External dependencies of RCL
The memory management functions given in Table 4.1 are provided by newlib and
are exposed through the startup library described in Section 3.1.3.
Panicking is Rust’s way of unwinding the currently executing thread, ultimately
resulting in the thread being terminated. A panic in Rust can happen, e.g. when
an array is indexed out of bounds, which causes the rust begin unwind function
to be called. The rust begin unwind is also defined in startup, but the implementation is only an infinite loop to aid debugging. In contrast, the definition
of rust begin unwind given in RSL will abort the program and print an error
message.
4.2
The Allocation Library
Heap allocation is introduced in a library called alloc. The library defines the
managed pointer, Box, which is Rust’s main means of allocating memory on the
heap. Also, the allocation library defines the types Rc and Arc, which are Rust’s
reference counted and atomically reference counted heap pointers.
1
2
3
fn rust_allocate(usize, usize) -> *mut u8;
fn rust_deallocate(*mut u8, usize, usize);
fn rust_reallocate(*mut u8, usize, usize, usize) -> *mut u8;
Listing 4.1: External dependencies of the alloc library
The allocation library is by default dependent on libc, but this dependency can
be broken by supplying the --cfg feature="external funcs" flag to the compilation process. When breaking this dependency, the allocation library requires
the functions in Listing 4.1 to be defined elsewhere. Note that these functions
map directly to the alloc, dealloc, and realloc functions, which all are part of
4.3. THE COLLECTION LIBRARY
51
newlib. This design makes it easy to include the alloc library for new platforms
like RustyGecko.
4.3
The Collection Library
The Rust collections library provides general purpose data structures. Out of
these data structures the Vector (a growable heap allocated list) and the String
(heap-allocated mutable strings) are the most notable.
As one would expect, the collections library depends on the alloc library, as it
needs to allocate memory on the heap. collections also depends on the unicode
library because all strings in Rust are UTF-8 encoded.
4.4
The Rust Embedded Library
The libraries mentioned in the previous sections provides core language constructs
and dynamic heap allocation. Together they form a strong foundation for new
Rust programs, without depending on an OS. We have composed these libraries
into what we refer to as the REL, and the dependencies of these libraries are is
shown Figure 4.1.
Figure 4.1: Rust Embedded Library
It is important to note that REL is just a way to provide a well-defined definition
of the Rust language for a bare-metal system. REL is, unlike RSL, not built as a
facade, it is nothing but a collection of freestanding Rust libraries that are suited
for a bare-metal system. However, the libraries that make up REL needs to be
conditionally compiled for the Cortex-M3 architecture, and this is described in
Chapter 6.
Chapter 5
Binding Libraries
The bindings module includes the peripheral libraries provided by the MCU vendor Silicon Labs, and the architecture designer ARM. In order to make use of
these libraries in Rust, we developed binding libraries to expose the underlying C
implementation to the Rust language.
We start this chapter with a section that maps the object-oriented paradigm to
hardware peripherals, which lays a foundation for how we think about the hardware
throughout this thesis. In the last section of this chapter, we describe how we
structured, implemented, and tested the library bindings.
53
54
5.1
CHAPTER 5. BINDING LIBRARIES
Object-oriented Embedded Programming
The interface of many of the modules defined in emlib resembles that of objects
found in object-oriented programming. In its essence, object-oriented programming
focuses on organizing a computer program by looking at the data the program operates on. This is done by grouping related data into objects and defining methods
that operate on the data contained within the objects.
The paradigm’s essential concept can be applied to embedded C programming, even
though the language itself does not directly define any language features to aid the
design. In this section, we look at how control over the memory layout of objects,
and static dispatch, can be used to enable the object-oriented paradigm in conjunction with MMIO in embedded programming. We use the memory layout of a
memory-mapped ADC as an example to see how this peripheral can be represented
as an object.
Static dispatch, as opposed to dynamic dispatch, is the mechanism in which the
function to be called can be decided statically by the compiler, and a call instruction to the function can be inserted into the code directly. Dynamic dispatch, on
the other hand, requires extra runtime information about the function to be called,
which adds an additional layer of indirection to the function call.
5.1.1
Memory Mapped I/O
MMIO is a method for interfacing with peripheral devices in a computer system.
The method entails connecting the control registers of hardware devices to the same
address bus as RAM. This results in a programming model where the programmer
can use common memory operations to control the devices.
Let us consider the ADC on the Gecko. The ADC converts an analog signal to
a digital representation. The base address of the ADC on the Gecko is memory
mapped to the location 0x40002000 in the memory space. This means that writing
to a pointer that points to this address will write to the control registers in the
ADC device.
Figure 5.1 shows a subsection of RAM that contains the ADC control register.
Only the relevant registers for our discussion in included in the figure. It shows the
control register that is used when performing a single ADC conversion. The CTRL
register is used to initialize the hardware device before performing a conversion,
and the CMD register is used to issue direct commands to the device like stop and
start. We see that the CTRL register is at offset 0x0 from the base address of the
ADC and that the CMD register is at an offset of 0x4 bytes. The two registers,
SINGLECTRL and SINGLEDATA, are in order to initialize the single conversion
and read the results of a conversion, respectively.
5.1. OBJECT-ORIENTED EMBEDDED PROGRAMMING
Location
0x40002000
Offset
...
0x0
0x4
...
0xC
...
0x24
...
55
Name
...
CTRL
CMD
...
SINGLECTRL
...
SINGLEDATA
...
Figure 5.1: Subsection of ADC0 Memory map for the Gecko
5.1.2
Memory Layout of Objects
The traditional memory layout of an object in an object-oriented language is an
implementation detail. This is because the fields of the object might have different
sizes, and optimizations can rearrange the memory layout to optimize for size.
The layout is also an implementation detail of Rust for the same reasons, but
by annotating a struct with #[repr(C)], it will ensure that it is compatible with
C’s FFI. Objects in a language like Java also includes a tag field at the base of
the object as a reference to the class of the object in order to provide dynamic
dispatch.
1
2
3
4
5
6
7
8
9
class ADC {
int CTRL;
int CMD;
// ...
int SINGLECTRL;
// ...
int SINGLEDATA;
// ...
}
1
2
3
4
5
6
7
8
9
typedef struct {
uint32_t CTRL;
uint32_t CMD;
// ...
uint32_t SINGLECTRL;
// ...
uint32_t SINGLEDATA;
// ...
} ADC;
1
2
3
4
5
6
7
8
9
10
#[repr(C)]
struct ADC {
CTRL: u32,
CMD: u32,
// ...
SINGLECTRL: u32,
// ...
SINGLEDATA: u32,
// ...
}
Listing 5.1: Definition of an ADC in Java, Rust, and C
In C, where classes and objects are not part of the language, structs are used to
create the representations for objects. By using structs, the programmer has full
control over the layout of the object in memory. The object-oriented concepts
used for MMIO uses static dispatch, and the structs do not include tag fields or
references to virtual tables. Listing 5.1 shows how to define a Java class, and Rust
56
CHAPTER 5. BINDING LIBRARIES
and C structs for the ADC on the Gecko. The memory layout of these objects is
given in Figure 5.2.
0x0
0x4
0x8
...
0x10
...
0x28
...
Object tag
CTRL
CMD
...
SINGLECTRL
...
SINGLEDATA
...
0x0
0x4
...
0xC
...
0x24
...
CTRL
CMD
...
SINGLECTRL
...
SINGLEDATA
...
0x0
0x4
...
0xC
...
0x24
...
(b) C
(a) Java
CTRL
CMD
...
SINGLECTRL
...
SINGLEDATA
...
(c) Rust
Figure 5.2: Memory layout of objects
By comparing Figure 5.1 and Figure 5.2, we see that the memory layout of a
struct defined in Rust and C has the exact same layout as the memory mapped
control register of the ADC. This suggests that, if a pointer to the MMIO device
is considered as a reference to an ADC object, the object-oriented pattern can be
used to directly interface with the MMIO.
The layout of the Java object in Figure 5.2a could imply that the same analysis can
be applied by adding an offset, equal to the size of the object tag, to the reference.
This is not the case as this would map the object tag to the base address of the
ADC minus 4 bytes. This location is, in the case for the Gecko, an unmapped
memory section used to add padding between the ADC and the previous MMIO.
Java uses this object tag to store a reference used to dynamically dispatch method
calls to the object. Moreover, using the reference in place of a regular Java object
would cause the method dispatch mechanism to fail.
5.1.3
Adding Object Functionality
This section shows how we add functionality called methods to the MMIO objects.
Both C and Rust uses static dispatch. This ensures that C and Rust provide the
same zero-cost abstractions when interacting with the MMIO.
Static Dispatch in C
Implementing objects with static dispatch is a straightforward process in C. Here,
we define a function which takes a reference to the object as the first parameter.
The function then uses the object reference in the same manner as the implicit
this parameter in conventional object-oriented languages such as Java.
5.1. OBJECT-ORIENTED EMBEDDED PROGRAMMING
1
2
1
2
3
4
5
6
7
8
// ADC Member function with
3
// explicit object reference
4
uint32_t ADC_DataSingleGet(
5
ADC *const adc) {
6
// The adc pointer is used as a 7
// reference to the this object 8
return adc.SINGLEDATA;
9
}
10
9
10
11
12
13
14
15
16
17
18
11
void main() {
// The next section describes
// how to instantiate MMIOs
ADC adc;
// Call the member function
// passing in an explicit
// reference to the object
ADC_DataSingleGet(&adc);
}
57
impl Adc {
// Rust lets the programmer
// specify how to accept the
// object when invoked with
// the dot notation
pub fn data_single_get(&self)
-> u32 { // self is a reference
// to the ADC MMIO
self.SINGLEDATA
}
}
12
13
14
15
16
17
18
19
20
21
22
fn main() {
// Instantiation of MMIOs is
// handled in the next section
let adc = Adc;
// The Rust compiler issues
// a static call to the
// member method and passes in
// the reference to the MMIO
adc.data_single_get();
}
Listing 5.2: Member methods for C and Rust, respectively
Listing 5.2 shows how to define a getter function for the ADC single conversion
register, as a member method using an object-oriented pattern. We use the impl
block to define the same behavior in Rust, but the methods are called with the dot
notation known from object-oriented languages.
5.1.4
Instantiating a MMIO object
Now that we have shown that MMIOs can be represented as objects defined by
structs, we consider how to instantiate them. Usually, an object in the objectoriented paradigm is created with a constructor and deallocated with a destructor.
The constructor is responsible for allocating the object and initializing the fields
with values. Analogously, the destructor is responsible for deallocating the object
and any other member objects that it owns. MMIO devices have a fixed position in
the memory and do not need to be allocated, and they also generally do not have
any owned members. Therefore the constructor-destructor pattern is not applicable
for MMIOs, but we still need to instantiate the variable that holds the reference
58
CHAPTER 5. BINDING LIBRARIES
to the MMIO and cast it to the desired type. Listing 5.3 shows how to instantiate
a MMIO as an object in both C and Rust.
1
1
#define ADC0_BASE 0x40002000
2
const ADC0_BASE: *mut Adc
= 0x40002000 as *mut Adc;
3
2
3
4
5
void main() {
ADC* adc0 = (ADC*)ADC0_BASE;
}
4
5
6
7
8
fn main() {
let adc0 = unsafe {
ADC0_BASE.as_mut().unwrap()
};
}
Listing 5.3: Instantiating a MMIO in C and Rust
5.2
Library Bindings
This section describes the different bindings libraries that was developed as part
of the RustyGecko platform. The FFI available in Rust has been used to interface
with Silicon Labs’ suite of C libraries used to control the Gecko. This way, we have
been able to create wrappers around the API for the different peripherals that we
have used in the project, without porting the core logic itself. These wrappers are
called language bindings. The following sections explain the process of defining and
implementing the FFI in Rust that is used to access and control the peripherals on
the Gecko.
5.2.1
The Libraries
In Section 2.4 we presented the three libraries that we have created partially binding
support for; CMSIS, emlib and emdrv. Here, we will take a closer look at which
modules from these libraries that we have written bindings for, and our reasoning
for choosing each one.
We have also written many example applications in Rust that utilize the bindings
for many of the Gecko’s peripherals. These examples have been a driving factor for
defining new bindings. As an example, if we were to need some functionality for the
ADC, we would define these bindings alongside the development of the examples.
In this way, the bindings have been defined incrementally during the development
of either the examples that demonstrate our libraries, or the applications described
in Section 7.4.1 and Section 7.4.2.
5.2. LIBRARY BINDINGS
59
CMSIS
Interrupt support through NVIC was the only interesting part of the CMSIS library
that we have written bindings for. Most of the examples use one or several Interrupt Request (IRQ) handlers for the peripheral bindings that they demonstrate.
NVIC provides utility functions for enabling and disabling the interrupt handling
mechanisms of the Cortex-M3 processor.
Emlib
When we first set out to make the bindings for emlib, our priority was to define
a viable platform for writing Rust applications, which we could use to evaluate
the language on the bare-metal system. A list of examples that demonstrates how
the bindings work is shown in Table 5.1. These are either written from scratch, or
directly or partially ported from emlib’s examples.
Table 5.2 summarizes the modules from emlib that we have written bindings for,
and why we wanted these bindings. A complete overview of the progress of binding
emlib is given in Table 5.3.
Example
buttons int
rtc blink
energy modes
uart
leuart
i2c
joystick
dma
light sense
boxes
vec
Purpose
Demonstrates interrupts by lighting a led on the STK
when the respective button has been pressed.
Toggle a led with an interval of 2 seconds.
Demonstrates the four stages of sleep on the Gecko.
Demonstrates serial communication over UART by
echoing back every byte it receives.
Similar example as uart, but the CPU is turned off
and the functionality is moved to an interrupt handler instead.
Sends and receives a data-buffer between two devices
that supports I2 C.
Reads analog signals generated by a Joystick that is
connected to the STK.
Transfer a data-buffer from one memory location to
another.
Uses the STK’s light sensor to measure the light intensity, and lights a LED when the intensity goes
below a threshold
Demonstrates dynamic memory allocation with
Box’es, provided by the Rust alloc library.
Demonstrates dynamically allocated strings and vectors from the collections library.
Table 5.1: Examples that demonstrates how the bindings work
Ported
3
3
3
3
3
3
3
3
60
CHAPTER 5. BINDING LIBRARIES
Module
cmu
dma
ebi
emu
gpio
lesense
acmp
adc
usart
leuart
i2c
rtc
timer
Purpose
The Clock Management Unit (CMU) provides functions to manage the different clocks and oscillators on the Gecko. This module
is necessary in order to configure the clocks that are required by
other peripherals to function.
We wanted to try to use DMA for the SensorTracker application
because it can be used to transfer data without using the CPU.
This device was also used for our experiments with higher-level
abstractions in Section 7.3.
The External Bus Interface (EBI) is used to memory map external
devices connected to bus on the Gecko. This simplifies the process
of writing data to e.g. the LCD on the DK.
The Energy Management Unit (EMU) module controls the different energy modes on the Gecko. We needed this functionality for
the SensorTracker application.
The GPIO was one of the first modules to be ported. It is used
extensively throughout the bindings and in the applications.
The Low Energy Sensor Interface (LESENSE) can be configured
to automatically collect data from multiple sensors, which we
needed for the a initial version of the SensorTracker.
The Analog Comparator (ACMP) was ported alongside
LESENSE, and is used to compare two analog signals and tell
which one is greater.
The ADC was needed by the SensorTracker, and has been used
to get the internal temperature of the CPU.
Primarily we wanted the USART for easy debugging and I/O from
a computer.
The Low Energy Universal Asynchronous Receiver/Transmitter
(LEUART) was ported a while after the USART. It has the same
functionality, but it works with a lower-frequency clock and requires less energy than the USART.
The I2 C protocol has many of the same use cases as the different
UART types, but it works at lower energy levels. It is used by the
SensorTracker.
The RTC was an easy module to write bindings for. It is
used in several examples for timing purposes, as well as in the
SensorTracker.
The Timer was one of the first modules to be ported. It worked
as a proof-of-concept for the design of the bindings, as described
later in this section.
Table 5.2: Peripheral bindings for emlib
5.2. LIBRARY BINDINGS
Module
acmp
adc
aes
assert
bitband
burtc
chip
cmu
common
dac
dbg
dma
ebi
emu
gpio
i2c
idac
int
#C
15
16
19
0
4
28
1
45
0
16
4
22
42
24
33
17
0
2
#R
3
6
0
0
0
0
1
7
0
0
0
8
9
17
31
6
0
2
61
Ported
20.00%
37.50%
0.00%
N/A
0.00%
0.00%
100.00%
15.56%
N/A
0.00%
0.00%
36.36%
21.43%
70.83%
93.94%
35.29%
N/A
100.00%
Module
lcd
lesense
letimer
leuart
mpu
msc
opamp
part
pcnt
prs
rmu
rtc
system
timer
usart
vcmp
version
wdog
total
# C - Number of functions exposed by emlib
# R - Number of functions bound by bindings
#C
51
52
14
19
3
19
2
0
23
4
6
14
11
27
26
29
0
5
593
#R
0
21
0
12
0
0
0
0
0
1
0
13
0
24
6
0
0
0
167
Ported
0.00%
40.38%
0.00%
63.16%
0.00%
0.00%
0.00%
N/A
0.00%
25.00%
0.00%
92.86%
0.00%
88.89%
23.08%
0.00%
N/A
0.00%
28.16%
Table 5.3: Bindings progress for emlib
Emdrv
As with emlib, it was not a goal to fully support all available peripheral drivers
that are available in emdrv. The project includes two examples that demonstrate
how to use the flash driver, they are explained in Table 5.4.
Example
flash
light measure
Purpose
Demonstrates reading and writing to the STK’s flash
memory.
Based on the light sense example from Table 5.1.
The results from measuring the light intensity is
saved to flash. When the user presses a button the
STK will initiate a transfer that reeds all the data
stored to flash and transmits it over a USART connection.
Ported
3
Table 5.4: Examples that demonstrate how to use the flash bindings
3
62
CHAPTER 5. BINDING LIBRARIES
The drivers that we have partially implemented bindings for are summarized in Table 5.5. They are not that hard to grasp or use since they are all fairly small.
Driver
dmactrl
flash
gpioint
i2c
tft
Purpose
This binding only exports one function to return a standard DMA
Descriptor which is used to initiate a DMA transfer.
The flash driver adds an abstraction layer over a flash memory,
and exposes functions to initialize, read, write and get the device
info. The Driver is used by the SensorTracker.
This driver is ported from C to Rust. The implementation differs slightly between the two versions, but the functionality is the
same. The reasoning for porting this driver is described in Section 7.1.
This driver is used by the SensorTracker application. It exposes
functions to initialize a commonly used I2 C data transfer configuration.
This binding exposes one function to initialize the TFT screen on
the DK. It is used in the CircleGame.
Table 5.5: Driver bindings for emdrv
5.2.2
Defining the Bindings
The emlib module for controlling the Timer peripheral [22] works as a good example to demonstrate what the Rust bindings look like. The module is fairly small,
it mostly exposes functions to set up and initialize four different timers that can
be used for up, down, up/down, and input- and output-capture. The program
shown in Listing 5.4 is an example of initializing the Timer0 peripheral on the
Gecko. Note that this is not a complete working example, it only shows the most
important parts required to use the Timer module.
1
2
3
4
5
6
7
8
9
10
// Select TIMER0 parameters
TIMER_Init_TypeDef timerInit = TIMER_INIT_DEFAULT;
// Enable overflow interrupt
TIMER_IntEnable(TIMER0, TIMER_IF_OF);
// Enable TIMER0 interrupt vector in NVIC
NVIC_EnableIRQ(TIMER0_IRQn);
// Set TIMER Top value
TIMER_TopSet(TIMER0, TOP);
// Configure TIMER
TIMER_Init(TIMER0, &timerInit);
Listing 5.4: Initializing a Timer in C
5.2. LIBRARY BINDINGS
63
First, an initialization structure for the Timer module is acquired. This structure
has fields to configure many different properties of the Timer, in the same way as
described in Section 5.1.1. The next lines enable interrupts for the Timer, and the
NVIC interrupt vector is set up to call the function shown in Listing 5.5 every time
an interrupt it triggered by the Timer. Note that this function is called implicitly by
the runtime as Section 3.2 describes. All this function does is to clear the interrupt
signal and toggle the value of a LED. We can imagine an application where the
Timer is configured to trigger an interrupt every minute to toggle the LED, and
in between the interrupts the MCU can be put to sleep in order to save power.
Interrupts like this are an important part of programming the Gecko. They can
be used for an asynchronous programming model where the application is defined
by the code in the different interrupt handlers, and like in the example above, the
MCU can be put to sleep in between interrupts.
1
2
3
4
5
6
void TIMER0_IRQHandler(void) {
// Clear flag for TIMER0 overflow interrupt
TIMER_IntClear(TIMER0, TIMER_IF_OF);
// Toggle LED ON/OFF
GPIO_PinOutToggle(LED_PORT, LED_PIN);
}
Listing 5.5: Timer interrupt handler
The equivalent program written in Rust is shown in Listing 5.6. Semantically, they
are the same, but the usage differs slightly, which is natural since we are using a
higher level programming language. Instead of calling functions that are included
through a C header file, we are calling functions that are available through a Rust
module. For example, the enable irq function is part of the nvic module. This
modularization of peripherals can help to make the code less verbose by partially
including modules. It is also worth to notice the difference between how the Timer0
structure can be treated like an object with its own member methods in Rust,
instead of being passed as the first parameter to every function that requires it,
like in C.
5.2.3
Exposing Static Inline Functions to Rust
In order to work with structures and enums originally defined in C, we had to
redefine them in Rust and mark them with #[repr(C)] so that Rust can guarantee
that the data-elements are C compatible. The header files in the peripheral API also
define many functions as static inline, which only make the functions accessible
to the program that includes the header file. Since it is not possible to include C
header files directly in Rust, we had to expose these functions through one extra
layer of C code. As an example, the TIMER IntEnable function is defined as static
inline in em timer.h. In order to call this function through the C ABI in Rust,
we had to expose it through the file timer.c, as shown in Listing 5.7.
64
1
2
3
4
5
6
7
8
9
10
11
CHAPTER 5. BINDING LIBRARIES
// Select TIMER0 parameters
let timer_init = Default::default();
// Enable overflow interrupt
let timer0 = timer::Timer::timer0();
timer0.int_enable(timer::TIMER_IF_OF);
// Enable TIMER0 interrupt vector in NVIC
nvic::enable_irq(nvic::IRQn::TIMER0);
// Set TIMER Top value
timer0.top_set(TOP);
// Configure TIMER
timer0.init(&timer_init);
Listing 5.6: Initializing a Timer in Rust
1
#include "en_timer.h"
2
3
4
5
6
void STATIC_INLINE_TIMER_IntEnable(TIMER_TypeDef *timer,
uint32_t flags) {
TIMER_IntEnable(timer, flags);
}
Listing 5.7: Exposing a static inline function to Rust
In the Rust module definition of Timer, the function has to be made available
through an extern block, as shown in Listing 5.8. As described in Section 2.1.7,
every function available through the FFI are considered unsafe because Rust knows
nothing about the function, other than its parameters and its return value. Thus, in
order to make it practical to use the library in a seemingly safe manner, we wrap
the calls to the foreign functions in an unsafe block in the respective function
defined in Rust.
1
2
3
4
5
impl Timer {
pub fn int_enable(&self, flags: u32) {
unsafe { STATIC_INLINE_TIMER_IntEnable(self, flags) }
}
}
6
7
8
9
extern {
fn STATIC_INLINE_TIMER_IntEnable(timer: &Timer, flags: u32);
}
Listing 5.8: Defining and using a function through the Rust FFI
If we compare the call-stacks between calling the timer0.int enable function in
Rust, and calling the TIMER IntEnable function in C, we can see that every function
5.2. LIBRARY BINDINGS
65
call through the FFI requires two extra function calls. These are simple wrappers
that require extra unconditional jumps in the code, and performance-wise it is a
very unnecessary overhead to have one or two extra stack frames allocated for every
function call through the FFI. However, this overhead can be removed completely
by optimizing the code during compilation so that the C code can be called with
no overhead [5]. The extra function call due to the static inline wrapper on the
C side of the interface will be removed by a trivial function inlining, as the only
contents of the wrapper is a call to the actual function. Additionally, by enabling
Link Time Optimization (LTO) during the compilations, LLVM will inline the C
implementation into the code for the timer0.int enable function in Rust. This
results in the same performance and similar call-stacks for both C and Rust. This is
a working example of one of Rust’s many zero-cost abstractions, enabled through
the interoperability with the C ABI and exploiting features given by LLVM.
5.2.4
Naming Conventions
We have tried to keep emlib’s naming convention across the layer of bindings. This
makes it easy for anyone reading either the C- or the Rust-code to translate and
understand the code between the two languages. Since every constant, enum-field,
or struct-name is directly accessible by name in C, if the corresponding header file
is included, it is important that names of such fields can be separated from each
other and do not cause a naming collision.
1
2
3
4
5
typedef enum {
timerCCModeOff
= _TIMER_CC_CTRL_MODE_OFF,
timerCCModeCapture = _TIMER_CC_CTRL_MODE_INPUTCAPTURE,
// ...
} TIMER_CCMode_TypeDef;
Listing 5.9: Part of a Timer enum defined in C
As an example, two fields of an enum from em timer.h are shown in Listing 5.9.
From each field in the enum we can extract 1) its module name timer, 2) its typedef
name CCMode and 3) its field name Off or Capture. Rust allows us to keep the
same naming convention at the same time as utilizing its modularity. Listing 5.10
shows the enum ported to Rust, where both the module name and the typedef
name has been left out, and only the field names have remained. However, the
naming convention remains the same when the fields are used, e.g. the expression
“let mode = timer::CCMode::Capture;” in Rust shows the similarity with the
equivalent expression in C: “int mode = timerCCModeCapture;”.
66
1
2
3
4
5
CHAPTER 5. BINDING LIBRARIES
pub enum CCMode {
Off
= _TIMER_CC_CTRL_MODE_OFF,
Capture = _TIMER_CC_CTRL_MODE_INPUTCAPTURE,
// ...
}
Listing 5.10: The enum ported to Rust
5.2.5
Testing
Verification of correctness is an important part of all software, whether it is done
manually or with an automated test framework. This section describes a small unit
test framework that was developed for testing the bindings for emlib.
Why Unit testing
Early on in the development phase of the emlib bindings we saw the need for a
testing framework. This was provoked by the fact that testing software on an embedded system is a time consuming and tedious task. More often than not you find
yourself running the code in the debugger, inspecting the call stack and function
arguments, to ensure that the bindings are calling the correct functions, with the
correct arguments. The fact about arguments has a subtle point to it.
We are working in two statically typed languages that lead the compiler to statically
ensure that the correct types are passed around. However, there are no checks to
ensure that the memory layout of the datatypes in C and Rust match at the borders
between the two languages. Currently, the Rust FFI requires the programmer to
redefine the C datatypes in Rust, like structs and enums, in order to call into the
C functions that takes these datatypes as arguments. The process of verifying this
manually proved to be both error prone and time consuming, which suggested the
need for an automated system to verify the correctness of the bindings.
Framework
To meet this problem, a lightweight testing framework was developed which enabled
this verification to be automated. The goal of the framework was to initialize the
data on the Rust side, call functions via the FFI, and verify that the correct
functions were called with the exact data as supplied. In order to do this, we made
a framework that could replace emlib’s code with statically generated test mocks,
before calling these mocked functions from Rust and then verify that the functions
where called correctly in C.
5.2. LIBRARY BINDINGS
67
The implemented framework is a small test runner that utilizes CMock1 and Unity1 ,
for mocking and assertions, respectively. Given a C header file, the CMock library
generates an mock implementation of the interface for the module. The test code is
then compiled by linking to the mock implementation instead of the library, emlib
in our case. In the test case, the mock can be configured to verify that our bindings
are using the mock as expected. All of the unit tests were compiled into a binary
that was executed on the Gecko, which reported back via USART whether the tests
failed or ran successfully. In addition, an easy to assess feedback was given by one
LED lit for failure and two LED lit for success.
An example of what the testing looks like is shown in Listing 5.13. It shows a
test case that is used to verify that the ADC Init function is called with a default
argument.
1
2
3
fn test_init_called_with_default() {
// FFI call to the C function below
unsafe { adc_expect_init_called_with_default(); }
4
let adc0 = adc::Adc::adc0();
// Call the emlib bindings with a default argument
adc0.init(&Default::default());
5
6
7
8
}
Listing 5.11: Rust side of ADC Init test
1
2
3
4
5
void adc_expect_init_called_with_default() {
static ADC_Init_TypeDef init = ADC_INIT_DEFAULT;
// Set up the expected value on the Mock
ADC_Init_Expect(ADC0, &init);
}
Listing 5.12: C side of ADC Init test
Listing 5.13: Test case for ADC Init with default values
When using mocking in unit tests, the workflow for the user seems reversed compared to standard unit tests. First, you set up the expected results by calling the
ADC Init Expect function on the mock, as shown in Listing 5.12. This method is
called through FFI right at the top of the test case in Listing 5.11. Then, after the
expected result is set up, the test case goes on to create an ADC object by using
the Rust bindings, and calls the init function that causes the FFI library bindings
to be executed. When the test returns, the test runner is responsible for calling a
1 http://www.throwtheswitch.org/
68
CHAPTER 5. BINDING LIBRARIES
Verify function on the mock object. This function causes the program to fail and
report its status over USART if the expected result was not met.
Figure 5.3 shows a diagram of the program flow between the Test Runner, the Test
Case, the emlib bindings as Code Under Test (CUT), and the emlib mock, for when
the test case above is executed. We see that the two boxes marked with Test Case
are the pieces of code the user of the framework, presented in Listing 5.13, writes.
The stippled vertical line shows the separation between Rust and C code, all the
three function calls which cross this line is implemented using the Rust FFI.
Figure 5.3: Flowchart for test framework
Rust libtest
The Rust programming language contains a testing framework within the standard
library. The reasons for not using it to test the bindings is that we needed to run the
tests on the Gecko. The rationale for this is that the tests are mostly checking that
the datatypes used on the Rust and C side of the bindings are compatible. Therefore
we need to use the proper compilers and compile the test targets for the ARM
platform. Verifying that the platform-specific gcc and rustc have compatible types
does not help in respect to this. Consequently, Rust’s standard testing framework
relies heavily on Rust’s own std library, which renders the framework unusable for
our bare-metal platform.
5.2.6
Discussion
Writing the bindings for the different peripherals was a tedious work, that required
careful review of the emlib source code in order to correctly port enum- and structdefinitions from C to Rust. Additionally, we had to redefine many constants, like
the names of memory-mapped register bit-fields like the ones presented earlier in
Figure 5.1, or values calculated from various C macros defined in header files that
are used throughout the library. If they were only implicitly defined in the header
5.2. LIBRARY BINDINGS
69
files, we had to retrieve the value of the constants by debugging the source code
and explicitly look up the value of these constants.
Since we have constrained our library to only support the Giant Gecko devices,
we chose to manually write the bindings for the library instead of generating the
bindings through some kind of automated process. There were already a couple
of tools available for generating such C-bindings automatically, that could possibly
have made the process quicker. However, we chose not to utilize such tools because
of the reasons described below.
• It was quick and easy to get started with code for a new peripheral. This
argument was especially important when the project started out, because we
still had no clue of how the project would evolve and what it was going to
look like.
• It was an advantage to depend on as few third party tools as possible, since
both Rust and all available libraries would be unstable until the 1.0 release
of the language.
• We wanted to keep the naming convention of our bindings as similar to emlib
as possible. This would not have been easy to keep consistent with an automated process, partly because there are exceptions where these conventions
do not fully hold. It is however an interesting problem that would have a
higher priority if the library were ever to support more than one EFM32
device.
• We could focus on writing bindings for smaller parts of each module separately
when we first needed them, which would split the work into smaller workpackages.
Chapter 6
Build System
In this chapter, we step out of the core software components of the RustyGecko
platform to present an external, but highly important, part of the platform. The
Cargo package manager is an integral part of the Rust ecosystem and facilitates
sharing code and libraries with ease.
Throughout this chapter, we look at how we evolved the build system over time
and ultimately migrated the process over to Cargo. This includes managing project
dependencies and building REL and the bindings modules for the ARM architecture. We have also utilized a continuous integration system that has helped us to
keep the project up to date with the nightly builds of Rust, and to ensure that the
builds have been consistent across the systems it has been built on.
71
72
CHAPTER 6. BUILD SYSTEM
6.1
Manual Makefile
When the project first started out it was based upon the armboot1 project available
on GitHub. armboot is a small template project for running Rust bare-metal on
a STM32 ARM MCUs. These are, similarly with the EFM32 series, also based on
the Cortex-M series of ARM processor cores. We looked at armboot’s Makefile to
figure out what flags to pass to rustc in order to cross-compile Rust programs for
the ARM architecture.
File
thumbv7m-none-eabi.json
zero.rs
blinky.rs
efm32gg.ld
startup efm32gg.s
system efm32gg.c
Description
Target specification for rustc’s LLVM backend.
Minimal Rust runtime requirements.
The executable program, it toggles the LEDs
on the STK.
EFM32 linker script.
Defines the ResetHandler and the interrupt
vector.
Used to manage the MCU Clocks.
Table 6.1: Source files included in the first build for the ARM Cortex-M
Table 6.1 lists the files included in the initial successful build2 for the Gecko. The
compilation process consisted of compiling the blinky.rs file to assembly by passing the target specification to the rustc compiler. This file was then, along with the
startup efm32gg.s and system efm32gg.c files, compiled into object files with
arm-none-eabi-gcc, and linked into an executable with the efm32gg.ld linker
script, using arm-none-eabi-ld.
After we had a working Rust program for the Gecko we included the RCL, crosscompiled for ARM, and started to define peripheral bindings for emlib. The build
system was later modified to generate the final executable with rustc only, instead
of generating an assembly file and compile it with arm-none-eabi-gcc. We could
then use arm-none-eabi-gcc to separately compile the emlib source files into an
archive, and link it with the final executable. The three steps of this build routine
is listed in Table 6.2.
1 https://github.com/neykov/armboot/
2 https://github.com/havardh/geckoboot.rs/tree/v1.0.0
6.2. TRANSITIONING TO CARGO
Build Step
1) Build emlib, system, and startup with
arm-none-eabi-gcc.
2) Cross-compile RCL for ARM with rustc.
3) Build the Rust bindings and the executable,
link it with the static libraries, generated from 1)
and 2), with the linker script.
73
Output
Static C archive.
Static Rust crate.
Executable elf file for the
Cortex-M3.
Table 6.2: Early build routine
6.2
Transitioning to Cargo
It was always a goal to use Cargo for building, distributing, and managing the
packages and dependencies that would become part of this project. An obvious
reason for this was to lower the bar for other potential users of the library, and
to make our project as standalone as possible, so that it is easier to include and
extend it as a part of other potential projects. By letting Cargo handle as much
as possible in its build routine, it would automate a lot of the work that every
programmer using the library would otherwise have to do manually.
When the project first started out it was built by compiling Rust’s core library
and the emlib C sources separately, and then linking them with the FFI bindings
by hand, as described in the previous section. While this approach worked, it was
far from optimal for a number of reasons:
• Rust was in active development and many of its unstable APIs were going
through rapid changes. Ensuring that versions of rustc and the Rust source
code stayed up to date across different systems was not easy.
• Compiling and ensuring that all dependencies were consistent across builds
and systems for the bindings were a tedious task. A lot of the troubles
concerning this came back to the point above.
• Linking dependencies with the library required each system to have set up
several different $PATHS to point to the right directories. What worked for
one developer on one system might not work for a different developer on
another system.
• The Cargo package manager was developed for exactly these purposes among
others.
As already described, Cargo is a tool that provides many operations to build Rust
projects that have a certain project structure. It is designed to integrate with
other existing tools, like GNU Make, which has been important in building this
project. When the transition to Cargo started, we focused on structuring the main
library and its modules into the directory structure described in Section 2.2.1. By
invoking the cargo build --verbose command, it was possible to see the output
74
CHAPTER 6. BUILD SYSTEM
from what Cargo attempted to build when it failed, and then structure the project
accordingly.
A big priority was to to shrink the size of the makefiles that were in the project
by making them a part of the standard build process for the RustyGecko platform
instead. Doing this would help us get a long way of ensuring that the builds done
by Cargo could be consistent across systems. By defining a Rust build script and
utilizing a Rust build-dependency called gcc3 , we were able to compile the C sources
from Silicon Labs’ emlib and link them with our bindings directly as part of the
build process. Note that the gcc build-dependency is used as a shell to merely
invoke the underlying C-compiler. In our case it is used to cross-compile with the
arm-none-eabi-gcc compiler. By removing the dependency of manually compiling
the C sources, it was easier to start to automatically fetch the other dependencies,
like the core and collections libraries.
Because this project is for a different processor architecture than the system that
it is built on, we had to conditionally cross-compile all the standard Rust libraries
that we wanted to utilize for the ARM Cortex-M3. We could not utilize the precompiled libraries that are already included with rustc, since these only works
for the current system architecture. This problem was solved by implementing
a new Cargo build-dependency, called rust-src4 , whose purpose is to download
the entire Rust source code that is compliant with the instance of rustc that
is currently compiling the library. By making it a task for each build to fetch
its own source code, we were guaranteed that the dependencies we used for the
project would always compile, independent of the current instance of rustc that
was installed on the system. The crates that we have fetched from Rust’s standard
library that make up what we call REL are already described in Section 4.4, but
they are also shown in Table 6.3 for the sake of completeness.
Rust library
core
libc
alloc
collections
unicode
rand
Purpose
Rust’s core library that declares basic types.
Types to use with Rust’s FFI.
Allows for heap-allocated variables.
Provides common collections like dynamically allocated Strings and Vectors.
Required by collections for e.g. Strings.
Generate random values.
Table 6.3: Rust libraries conditionally compiled for the Cortex-M3 architecture
By design, Cargo only supported passing two flags further on to rustc; -L and
-l. The purpose of these flags is to tell rustc to link with an external library, by
looking in a directory (specified with the -L flag), for a library with the specified
name (specified with the -l flag). The last step in the build process involved linking
the bindings and the other libraries with an actual executable for the Cortex-M3.
3 https://crates.io/crates/gcc
4 https://github.com/sondrele/rust-src
6.3. CONDITIONAL LINKING WITH CARGO
75
This was not possible to do with Cargo since it required us to pass a couple of extra
linker-flags further on to rustc. The flags were needed by rustc in order to tell it
to link with an external library for a different architecture and to include a separate
linker-script that took care of booting up the executable on this architecture.
Another issue that was introduced by automatic compilation with Cargo, was how
it structured the packages it compiled. When Cargo builds a project and its dependencies, it structures all the generated metadata and the compiled libraries within a
target directory, and an extra filename gets appended to all of these libraries. This
extra filename is part of a hash that is generated based on the code in the library.
It ensures that each and every build is consistent and it resolves any problems that
might arise if several dependencies within a project depend on different versions of
the same library. This works when Cargo handles the entire build process. In it
our case, where we had to manually compile the final executable, it turned out to
be a problem because the name of the library would change every time some of its
content changed. We worked around this problem by modifying the build script
to store the hash generated by Cargo for emlib to a separate file, every time the
library was built, and then included it in the makefile for the project.
6.3
Conditional linking with Cargo
The build process described in the previous section made it simpler to use third
party libraries, but it did not solve all of our issues. The main problem that
persisted was to have a good way of making the bindings themselves portable.
With the setup that we had, it was easy to create new executables within the
project, but it was hard to create new executables that depended on the bindings.
Basically, because we had to work around Cargo in the final part of the build
process, it also meant that every project that wanted to depend on emlib also
had implement the same workarounds. Thus, we needed to solve the problem of
knowing where Cargo would store the project metadata, and a way to get Cargo
to compile the final executables with the extra linker-arguments needed by rustc
in order to compile the binary for the Cortex-M3.
Cargo does not have much documentation over how its internal works, or how to
interfere with the build process, but the documentation does mention that Cargo
can be extended with additional plugins. If Cargo is to be invoked with a command
that it does not have by default, it will query the system for this command. This
means that if Cargo is invoked with e.g. the command cargo foo <args>...,
it will query the system for an executable with the name cargo-foo and it will
invoke this command with the trailing arguments if it exists. By looking at Cargo’s
source code, we could see that every triggered build included a structure called
CompileOptions. The arguments passed to Cargo’s different build commands are
then used to compose this structure and trigger an internal compilation process.
This process handles the compilation of all dependencies and generates all the
different binaries for the current package to be compiled.
76
CHAPTER 6. BUILD SYSTEM
Flags
[<args>]
--examples NAME
--build-examples
--print-link-args
Purpose
The trailing argument to the command was the
linker-arguments that were to be passed further on
to the invocation of rustc. If any args are present,
Cargo will append -C link-args="<args>" when
any executables from the package is being built.
The library had many executables located in the
projects examples directory. This flag made it easier to compile one of these examples by specifying its
name.
This flag filtered out every executable marked as an
example and compiled all of them.
This flag was included for debugging purposes.
Table 6.4: Flags for the cargo-linkargs subcommand
In order to solve the problems we had with building the project, we created a new
subcommand called cargo-linkargs5 that depends on Cargo itself. This subcommand was created specifically with RustyGecko in mind, and supports all the flags
that the cargo-build command supports, including the flags shown in Table 6.4.
We got rid of the two problems we had with building the RustyGecko platform
once cargo-linkargs was working. The problem with resolving the location of
generated metadata was solved implicitly just by utilizing Cargo, and the extra
linker-arguments could easily be passed on to the invocation of cargo-linkargs
via the project’s makefile.
6.4
Continuous Integration
When we first started this project, Rust had reached a 1.0-alpha version. This
meant that the programming language had reached a relatively stable state, but
there was still big parts of the language and its standard libraries that were marked
as unstable and up for review before the planned 1.0 release. The standard libraries,
and third-party Rust libraries that have evolved in the Rust community, have made
small guarantees about their stability, and the APIs have been subject to change
without much notice.
Continuous Integration refers to the practice of testing the whole system continuously, for every smaller change introduced to the code base, usually with an
automated test framework. Continuous Integration is advantageous to normal regression testing because it can reduce the amount of code rework that is needed
in later phases of development, as well as speed up overall development time [23].
Many Rust projects have utilized a continuous integration system called Travis
5 https://github.com/RustyGecko/cargo-linkargs/
6.5. CONTRIBUTING TO CARGO
77
CI6 for ensuring that the code in the project has been compatible with the nightly
builds of Rust. By registering our projects with Travis CI, and a communitydeveloped service called Rust CI7 , we had automatic, daily builds of our projects
on a third-party server. Builds were triggered every time we released a change to
the code on GitHub, and every time a new nightly release of Rust was published.
And if a build failed we would get notified of the error. By making continuous
integration part of the normal build routine and review process for new project
code, we had an extra step of verification that the project would build on other
systems then the one it was developed on.
It is important to note that continuous integration only helped us to verify that
the project could be built, it could not help us to prove that the compiled code
would actually work for its target architecture. To verify that the code would work
for the Cortex-M3, we had to run in on one of the MCUs that we had available
for this project. An experimental process of testing and mocking the RustyGecko
bindings is described in greater detail in Section 5.2.5.
6.5
Contributing to Cargo
As already mentioned, the ability to pass arbitrary flags further on to the invocation
of rustc was by design not supported by Cargo. However, many people in the
Rust community have wanted the ability to do so. The reasoning for not allowing
arbitrary flags to be passed down is described in this section.
A compilation can go awry very quickly if it is up to the package author what flags
should be passed to rustc. Instead, it should be up to the user of the package.
This will give the author the ability to set a restriction for the library, and limit
the possibilities of what a user can do with it. Different systems do not necessarily
support all flags and possibilities. Thus, if a package dependency says that it is
to be built in a particular way, it might not work on the system it is being built
for.
On the Cargo project’s issue tracker, several related issues concerning passing arbitrary flags further on to rustc, was open. All these were formalized in one issue8 for
implementing a new subcommand (called cargo-rustc) for the package manager.
This subcommand would have allowed for passing these flags on to rustc, but with
the restriction of only compiling a single binary at a time. This means that only
either the library, a binary, an example or a test (or a package dependency), may
be compiled with the extra flags, and not the entire package.
These rules are restrictive enough to get libraries to not depend on a set of extra flags, but loose enough so that specialized projects, like our bindings, can
depend on it for completing the build. Indeed, the functionality proposed with
6 https://travis-ci.com/
7 http://rust-ci.org/
8 https://github.com/rust-lang/cargo/issues/595
78
CHAPTER 6. BUILD SYSTEM
this subcommand would be enough to cover all the cases that we solved with our
implementation of cargo-linkargs.
After gaining insight into Cargo’s internals during the development of cargo-linkargs,
it was interesting to see if we could get this same functionality into Cargo itself,
by implementing cargo-rustc. Even though cargo-linkargs worked great for
its purpose, it was not very ergonomic for RustyGecko to depend on a third-party
plugin to work. Especially if Cargo could natively support this functionality. Not
only would it benefit our project, it would also give many other Rust projects the
ability to use Cargo for the entire compilation process. Since both Rust and Cargo
are open source projects, it was easy to get in contact with the project maintainers
about the issue, and eventually submit a patch with the new subcommand. After
it had been reviewed by one of the project maintainers, the patch was accepted
and merged into Cargo’s code base. The subcommand developed as part of our
build system is now a part of Rust’s nightly builds.
6.6
Final Library Build Artifacts
The resulting files of compiling the libraries are presented in Figure 6.1.
Figure 6.1: The organization files of libraries
The figure shows that all of the libraries except for modules consists of both a C
static archive (*.a) and a Rust library (*.rlib). The modules library is a high
level library that is built on top of the bindings for emlib and emdrv, and its
implementation is described in Section 7.3. The rest of the libraries provides Rust
bindings in the *.rlib part and the C implementations in the *.a portion. We
also see the dependencies, denoted by the arrows, between the libraries, generally
flowing from the top level abstraction down to the lower level abstractions.
6.6. FINAL LIBRARY BUILD ARTIFACTS
6.6.1
79
Discussion
The final version of the build system for the RustyGecko platform is as standardized as we set out to achieve. This achievement ensures that the platform is easily
reusable for anyone that is familiar with the standard Cargo build process. However, there are a few deficiencies in the current design. These are related to the
discussion made in Section 9.1, but are discussed here in the context of the build
system.
The Rust project is, at the time of writing, not directly targeting the bare-metal
environment that we are considering in this thesis. As a result of this, we have to
cross-compile each of the crates in REL separately for the ARM architecture. This
process requires us to create a separate proxy project for each of the libraries that
we are using. These proxies depends on the Rust source code to be downloaded
with the rust-src project, as described in Section 6.2. This leads to duplicate
copies of the Rust source code, one for each of the crates used in REL. Another
problem with this, is the slight increase in build time introduced because the same
source code is downloaded multiple times. There have, however, been discussion
of providing an official crate for each of the libraries in RSL available on Cargo’s
package repository, which would resolve this issue.
The project layout for a RustyGecko project is not identical to that of an ordinary
Rust project. Both the ARM target specification and the linker script must currently be present in the top level directory for every project targeting RustyGecko.
We would like to provide these as part of the platform in the future, to make the
project layout identical to that of ordinary projects. This would further lower the
bar for making use of the platform in new projects.
Chapter 7
Application Layer
The Application Layer is the top module of the RustyGecko platform. This
module represents all higher-level libraries and executables built on top of the
bindings module and the Rust Embedded Library.
Throughout this thesis, we have worked on many different project ideas that build
upon the work presented in the previous chapters. A collection of the more interesting projects are presented in this chapter. First, we describe a library that
was ported from C to Rust, which shows how Rust’s concept of unsafe can guide
the programmer to write more secure code. In Section 7.2, we describe a library
that provides a Rust-idiomatic way to handle interrupts, which is motivated by
the desire to provide a safer way of interacting with the MCU peripherals. In Section 7.3, we apply Rust’s trait system to the hardware peripherals in order to build
a higher-level API than emlib. In the last section, we describe the two applications
that were developed for evaluating the RustyGecko platform.
81
82
7.1
CHAPTER 7. APPLICATION LAYER
Porting GPIO Interrupt Driver
This section considers a case-study of an issue in the emdrv library, and it was
discovered while we ported the GPIO interrupt driver from C to Rust. This driver
was ported to Rust because we wanted to issue GPIO interrupts with Rust function
pointers, without needing to declare them with the C ABI (which was required by
emdrv). The issue was discovered when annotating the unsafe blocks for referencing mutable global state, and gives an example of the awareness the inclusion of
the unsafe keyword provides.
7.1.1
Presenting the Problem
The gpioint driver lets the user register a callback function to be called when an
interrupt occurs at a given GPIO pin. It is implemented with a global mutable
list of 16 function pointers, a register function to assign functions to indices of
the list corresponding to the GPIO pins, and a dispatch mechanisms which calls
the correct functions when an interrupt occurs. The issue arises in the dispatch
function in Listing 7.1.
1
2
3
4
5
6
7
8
9
10
11
12
13
static void GPIOINT_IRQDispatcher(uint32_t iflags) {
while(iflags) {
// Utility for iterating through all active interrupt signals
uint32_t irqIdx = GPIOINT_MASK2IDX(iflags);
// Mark interrupt as handled
iflags &= ~(1 << irqIdx);
// Check if the interrupt has a callback
if (gpioCallbacks[irqIdx]) {
// Call the callback
gpioCallbacks[irqIdx](irqIdx);
}
}
}
Listing 7.1: GPIO Dispatcher from emlib
A first take at porting the dispatcher function to Rust yields the code in Listing 7.2.
It is quite easy to see that the mutable global state is read twice exposed by the
compiler requirement to include the unsafe keyword (lines 10 and 15). This means
that there is a possibility of the second reference to return a different value than the
first. For instance, the function GPIOINT CallbackUnRegister(uin32 t pin) will
set the function pointer in the array to 0x0 for the specified pin. If this function is
called inside an interrupt handler, and this interrupt is triggered while the GPIO
driver is dispatching an interrupt, the function pointer can be set to 0x0 between
the check (at line 10) and the call (at line 15). Calling a function pointer that
points to 0x0 will cause a HardFault.
7.1. PORTING GPIO INTERRUPT DRIVER
1
83
static mut GPIO_CALLBACKS: [Option<Fn(u8)>; 16] = [None; 16];
2
3
4
5
6
7
8
9
10
11
fn dispatcher(iflags: u32) {
while(iflags) {
// Utility for iterating through all active interrupt signals
let irq_idx = mask_to_index(iflags);
// Mark interrupt as handled
iflags &= !(1 << irq_idx);
// Check if the interrupt has a callback
if (unsafe { GPIO_CALLBACKS[irq_idx] }.is_some()) {
// Window of opportunity
12
// Unwrap the callback and call the function
unsafe { GPIO_CALLBACKS[irq_idx] }.unwrap()(irq_idx);
13
14
}
15
}
16
17
}
Listing 7.2: GPIO Dispatcher naively ported to Rust
7.1.2
Analysis of Assembly
To dive a bit further into the issue and to prove that it is only present at optimization level O0 we consider the assembly code, generated by compiling the C source,
for the dispatcher function. The subsection of the GPIOINT IRQDispatcher in assembly generated by arm-none-eabi-gcc -O0 -S is reproduced in Listing 7.3.
1
2
3
4
5
6
7
8
9
10
11
12
13
14
15
GPIOINT_IRQDispatcher:
;; ...
ldr r3, .L34
ldr r2, [fp, #-8]
ldr r3, [r3, r2, asl #2]
; start interrupt window
cmp r3, #0
beq .L30
ldr r3, .L34
ldr r2, [fp, #-8]
; end interrupt window
ldr r3, [r3, r2, asl #2]
;; ...
bx r3
;; ...
;;
;;
;;
;;
;;
;;
;;
;;
;;
;;
;;
;;
;;
;;
r3 = gpioCallbacks
r2 = irqIdx
r3 = gpioCallbacks[irqIdx]
if (r3 == 0) {
r3 = gpioCallbacks
r2 = irqIdx
r3 = gpioCallbacks[irqIdx]
(*r3)();
call the function
}
Listing 7.3: GPIOINT Dispatcher in assembly with O0
84
CHAPTER 7. APPLICATION LAYER
Here we see a window of 4 instructions where the proposed harmful interrupt can
occur. It is the ldr instruction just before the window opening and the one just
after that causes the issue. These two loads must load the same address for the
logic to be valid, although the second one is just required to not load 0x0 in order
not to cause a HardFault. If we look at the same assembly generated by compiling
the code with arm-none-eabi-gcc -O1 -S in Listing 7.4, we see that the issue has
been eliminated.
1
2
3
4
5
6
7
8
9
10
11
GPIOINT_IRQDispatcher:
;; ...
;;
ldr r5, .L5
;; r5 = gpioCallbacks
;; ...
;;
and r3, r0, #255
;; r3 = irqIdx
;; ...
;;
ldr r3, [r5, r3, asl #2] ;; r3 = gpioCallbacks[irqIdx]
cmp r3, #0
;; if (r3 == 0) {
;; ...
;;
bxne
r3
;;
(*r3)()
;; ...
;; }
Listing 7.4: GPIOINT Dispatcher in assembly with O1
At O1 the compiler has performed Common Subexpression Elimination (CSE) to
remove the duplicate load present in Listing 7.3. This can be eliminated with the
assumption that the gpioCallbacks will not be changed by any external code.
But as the Rust version in Listing 7.2 suggests this code can lead to a data race
because it is referencing a global mutable variable.
7.1.3
Proposed solution
The solution to this problem is quite straightforward by performening the CSE
manually. Listing 7.5 contains the implementation proposed to Silicon Labs to
resolve this issue.
7.1. PORTING GPIO INTERRUPT DRIVER
1
2
3
4
5
6
7
8
9
10
85
static void GPIOINT_IRQDispatcher(uint32_t iflags) {
while(iflags) {
uint32_t irqIdx = GPIOINT_MASK2IDX(iflags);
iflags &= ~(1 << irqIdx);
GPIOINT_IrqCallbackPtr_t callback = gpioCallbacks[irqIdx];
if (callback) {
callback(irqIdx);
}
}
}
Listing 7.5: GPIOINT Dispatcher without data race
We again consult the generated assembly code, given in Listing 7.6, to verify that
this resolved the issue at all optimization levels.
1
2
3
4
5
6
7
8
9
10
GPIOINT_IRQDispatcher:
;; ...
;;
ldr
r3, .L34
;; r3 = gpioCallbacks
ldr
r2, [fp, #-8]
;; r2 = irqIdx
ldr
r3, [r3, r2, asl #2] ;; r3 = gpioCallbacks[irqIdx]
;; ...
;;
cmp
r3, #0
;; if (r3 == 0) {
;; ...
;;
bx
r3
;;
(*r3)()
;; ...
;; }
Listing 7.6: GPIOINT Dispatcher for proposed solution at O0
7.1.4
Discussion
The issue presented in this section is a minor one and will probably never cause
a HardFault in a real world application. Nevertheless, it serves as an example of
how the unsafe keyword in Rust makes the programmer think twice about the
code in these unsafe sections.
This discussion also points to the gains that can be achieved by using Rust to
prototype subsets of a C library. It can be interesting to see if more issues like
this one will arise, just by introducing the patterns and constructs from the Rust
language and the strict rustc compiler.
86
7.2
CHAPTER 7. APPLICATION LAYER
Handling interrupts with Closures
This section describes an experimental approach to handling interrupts with closures. The motivation for using this pattern is to make the code more Rust idiomatic and to make use of the ownership rules applied to closures. The Rust
programming language frowns upon using global variables, especially when the
variables are mutable. Using such variables forces the programmer to use unsafe
blocks, thus transferring the responsibility of the safety analysis from the compiler
to the programmer. Therefore, avoiding mutable global state is a goal of any Rust
program.
7.2.1
Motivation
Let us consider a simple example for motivating the use of closures to handle
interrupts. The example application samples an analog signal and saves the result
to a memory buffer. An example of such an application is an audio filter, which
samples an audio input connected to the ADC and stores a window of samples in
RAM for further processing.
1
2
3
4
// Declaring a Circular Buffer Type globally
const N: usize = 1024;
static mut IDX = 0;
static mut BUFFER: [u32; N] = [0; N];
5
6
7
8
9
10
11
12
13
14
15
16
17
fn main() {
let adc = adc0();
// Using BUFFER requires unsafe
// e.g.: unsafe { &BUFFER[..] }
loop { /* ... */ }
}
pub extern fn ADC0_IRQHandler() {
let adc = adc0();
let sample = adc.get_single_data();
// Writing to the buffer is considered unsafe
unsafe { BUFFER[IDX % N] = sample; IDX += 1; }
}
Listing 7.7: Analog sampler with global buffer
Listing 7.7 shows the proposed example with a conventional interrupt handler.
The interrupt handler is in the global scope, so it can only access global variables
and therefore the buffer must be declared as static mut. This require all read
and writes to the buffer to be handled within unsafe blocks. A huge restriction on
variables defined in the global scope in Rust, is that they can only be of types which
7.2. HANDLING INTERRUPTS WITH CLOSURES
87
has constant-expression constructors. This is a fact which we praised in Section 3.1,
as it provides a very simple startup procedure, but it limits the datatypes which
can be shared between interrupt handlers and the rest of the code.
1
2
3
4
5
6
7
8
fn main() {
let mut adc = adc0();
let buffer = CircularBuffer::new();
let mut ch = buffer.in();
// Register a closure on the ADC. The closure will be called each
// time a new sample is ready with the sample as an argument. The
// ‘move’ keyword is used to move ownership of the ‘ch’ variable.
adc.on_single(move |sample| ch.send(sample));
9
// Reading from buffer is safe
// e.g.: &buffer[..];
loop { /* ... */ }
10
11
12
13
}
Listing 7.8: Analog sampler with local buffer
In Listing 7.8 we present an example implementation using a closure as an interrupt
handler. The global state is now replaced with a buffer that is owned by the main
function stack frame. In this discussion, we consider the main stack frame, the
stack frame for the main function, to be a special frame. This comes from the fact
that the main function contains an infinite loop causing it to never terminate, and
the frame will not get deallocated. On a bare-metal system, this is true as long as
a fatal error does not occur. So we can rely on variables owned by the main stack
frame to live for the duration of the application. This ensures that the buffer,
for practical purposes, has the same lifetime as the BUFFER from Listing 7.7, but
because the variable is not a static mut, it lets the programmer avoid unsafe
blocks and let the compiler ensure safety.
One implementation detail here is the imagined CircularBuffer type. The type
is based on the same principle as the Rust standard library channel type, which
provides a facility for interprocess communication. The channel has one read end
and one write end enabling the producing process to send a stream of messages to
the consuming process. This is required for the ADC callback to be able to write to
the buffer while the main function retains ownership of the buffer. In the example
the in function creates the write end of the circular buffer.
The core of this example is the line adc.on single(move |sample| ch.send(sample));.
This creates a closure that takes ownership over the write end for the circular buffer.
The closure is passed as an argument to the on single method on the ADC ensuring that the closure is called each time a new sample is ready with the sample
as an argument.
88
7.2.2
CHAPTER 7. APPLICATION LAYER
Implementation
This section looks at how we built an abstraction for exposing the behavior that was
presented in the previous section. The implementation shows how we can use the
unsafe keyword to build this safe abstraction. As we desribed in Section 2.1.7, by
using this keyword we take on the responsibility of ensuring that our code satisfies
the invariants the compilers safety analysis is built on. Because of this, we include
a discussion of what makes the building blocks we use here unsafe and how we
can verify that the final abstraction is safe to use.
The process of handling an interrupt was described in Section 3.2. In short, a
public function with a specific name handles the corresponding interrupt. To implement the pattern above, we need to get the globally defined interrupt handler
ADC0 IRQHandler to call a closure created in the main function.
As already discussed, the interrupt handlers can only access global variables, which
requires us to store the closure value in a static variable. We can not do this directly
because closures do not have static initializer functions, thus, we need to use raw
pointers. Listing 7.9 shows what a raw pointer to a closure looks like in Rust, note
that we put the pointer inside an Option to avoid using a null pointer.
1
static mut CLOSURE: Option<*const Fn()> = None;
Listing 7.9: Storing a raw pointer to the closure globally
This CLOSURE variable is unsafe to use because it is a static mutable variable. Listing 7.10 shows a safe abstraction to register and dispatch events with this handle.
Notice how the responsibility of handling the ownership of the closure is transferred
from the compiler to the programmer in the unsafe block in the register function. This is done with the from raw and the into raw functions, which converts
between managed and raw pointers. Respectively, these functions tell the compiler
to start and stop the borrow-checker for the pointer that is returned from the two
functions.
7.2. HANDLING INTERRUPTS WITH CLOSURES
1
2
3
4
5
6
7
8
9
10
11
12
13
14
15
16
17
18
19
20
21
22
23
24
25
26
27
28
29
30
31
32
33
34
35
36
89
// Registers an interrupt handler
fn register(f: Box<Fn()>) {
unsafe {
// Deallocate old handler if existing
if let Some(old) = CLOSURE {
// Remove the global reference
CLOSURE = None;
// Return the ownership of the pointer to a managed Box.
// This transfers the responsibility of deallocating the
// closure back to the compiler.
let _ = boxed::Box::from_raw(old);
// Omitting the above line will not trigger compilation
// error, but the old closure value will be leaked.
}
// Consume the Box pointer and return a raw pointer to the
// closure. This transfers the responsibility of deallocating
// the closure from the compiler to the programmer
let raw = boxed::into_raw(f);
// Save the closure pointer in the global reference
CLOSURE = Some(raw);
}
}
// Dispatch an event by calling the closure if it is registered
fn dispatch() {
// The closure is stored in a global mutable variable,
// so the access to this variable is unsafe
unsafe {
// Unwrap the closure value
if let Some(func) = CLOSURE {
// The closure is stored behind a pointer which must
// be dereferenced, it is called with its environment
// by invoking the ‘call’ function
(*func).call(())
}
}
}
Listing 7.10: Safe abstraction over global raw pointer
The above listing use unsafe code in order to provide a safe abstraction to interact with the globally stored closure. The functionality is described throughout
the comments. In the listing, we see all of the three operations which were defined as unsafe in Section 2.1.7. These are mutating a static mutable variable
(the CLOSURE), calling unsafe functions (into raw and from raw), and dereferencing a raw pointer (the func variable in the dispatch function). The unsafe
90
CHAPTER 7. APPLICATION LAYER
functions deal with transferring the ownership of the heap allocated pointer from
the compiler, to the callee, and back to the compiler. If these functions are used
improperly, it can lead to different memory related problems like double-free, useafter-free, and memory leaks. Dereferencing the func pointer is considered unsafe
because it might point to invalid memory, the register function makes sure that
this pointer is valid.
Listing 7.11 implements the interface that was presented in Listing 7.8 for the ADC,
by utilizing the register and dispatch functions from Listing 7.10. Notice that
the implementation detail of the unsafe blocks in the register and dispatch
functions does not affect the user of the abstraction.
1
2
3
4
5
6
7
8
9
10
11
12
13
14
15
16
17
18
19
20
21
22
23
24
25
26
27
impl Adc {
// This constructor is defined in ‘emlib’
pub fn adc0() -> &’static Adc { /*...*/ }
pub fn on_single(&’static self, callback: Box<Fn(u32)>) {
// Make sure the callback for a single conversion is enabled
self.int_enable(IEN_SINGLE);
// Call the utility to register an interrupt handler.
// The ‘move’ keyword is used to move ownership of
// the callback function into the closure
register(Box::new(move || {
// Clear the interrupt signal to mark it as handled
self.int_clear(IF_SINGLE);
// Call the interrupt handler with the ADC sample
callback(self.data_single_get())
}));
}
// Clears interrupt signals
pub fn int_clear(&self, flag: u32) { /*...*/ }
// Triggers an ADC conversion and returns the result
pub fn data_single_get(&self) -> u32 { /*...*/ }
}
// The ADC0 Interrupt handler
// This is defined as a part of the library
#[allow(non_snake_case)]
fn ADC0_IRQHandler() {
dispatch();
}
Listing 7.11: ADC abstraction over an Event Hub
As discussed in Section 3.2, the Gecko provides a vector of interrupt handlers.
To minimize the boilerplate code for this method, the registering and dispatch
mechanisms are implemented as part of an event hub in the actual library. This
7.3. RUST EMBEDDED MODULES
91
hub contains a map from event, corresponding to the interrupt names, to the
interrupt handler closure. We have left out the implementation of the event hub
in this section, in order to focus more on explaining how we have handled the
ownership of the closures.
7.2.3
Discussion
The method for handling interrupts with closures discussed in this section provides
a nice facility to use idioms that are common in Rust code. They proved a means to
avoid explicit use of unsafe static mut variables and, as we showed in Listing 7.11,
let us build higher level abstractions. We revisit this section as part of a larger
discussion concerning ownership to hardware in Section 9.2.
7.3
Rust Embedded Modules
This section describes a separate project, which we refer to as REM. REM have
been developed alongside the various binding libraries, and it contains a couple
of higher-level modules for the different peripheral bindings that are part of the
RustyGecko platform.
We have looked to other projects like Zinc, arduino, and ARM mbed for inspiration
to this library. The peripheral abstractions that have been implemented as part
of REM are still in very early development, and most of them are not yet general
enough to be adapted to all new projects.
7.3.1
USART
The USART have many different use-cases. It is a peripheral that is used for
transferring of data, but it is also a very convenient tool to use for simple debugging
of programs. It can be used to send single strings of text between a PC and the
MCU, which is convenient for “println”-debugging, and it is a good tool for defining
Command Line Interface (CLI) programs.
The Gecko has a total of three different USARTs which can be configured to run
on a total of eleven different locations (i.e. GPIO Ports and Pins). If the GPIO
configuration for a USART is not specified correctly, the peripheral will not function
correctly either. The goal of the USART abstraction was to make it easy to initialize
the peripheral, as well as providing simple methods to read and write strings, and
transfer data between two end-points.
The Usart module has an initialization procedure that takes care of initializing its
required GPIO pins based on a specified location. This is similar to the approach
made by Zinc, but instead of failing with a compilation-error if it is incorrectly
configured, as in Zinc, it will fail at run-time. A minimal example that shows how
92
CHAPTER 7. APPLICATION LAYER
to initialize a USART, and send and receive strings, is shown in Listing 7.12. Note
that the example is simplified slightly, we have trimmed away some extern and
use statements to make the important parts clearer. The point of this example is
to demonstrate a program that initializes and uses a USART with only four lines
of code.
1
2
3
extern crate emlib;
// Include ‘emlib’ bindings
extern crate modules; // Include ‘REM’
use modules::Usart;
// The Usart module
4
5
6
7
8
9
fn main() {
// Acquire a USART with default configuration...
let mut usart: Usart = Default::default();
// ... and initialize its GPIO.
usart.init_async();
10
loop {
// Perform a blocking read operation...
let name = usart.read_line();
// ... and echo back with a nice message.
usart.write_line(&format!("Thank you, {}!", name));
}
11
12
13
14
15
16
17
}
Listing 7.12: Example usage of REM’s USART module
7.3.2
GPIO
The GPIO peripheral are used extensively as a dependency for many other peripherals throughout emlib. The microcontroller’s CPU pins are configurable as
GPIO, all these pins are ordered into ten ports (Port A - Port H) with up to 16
pins each (Pin 0 - Pin 15). The pins can be configured individually to be used as
input, output, or both, to the MCU.
The GPIO module in REM consists of a GpioPin structure, and two traits for
Button’s and Led’s, respectively. The GpioPin is an abstraction on top of emlib’s
GPIO definition, and the two traits implements a few convenient methods that
abstracts away the underlying GpioPin. An example that shows how to initialize
and use a button and a LED on the STK is shown in Listing 7.13. Notice from the
code that we only ever interfere directly with the two traits, and that we do not
care about the underlying GpioPin, apart from when we define the button and the
LED.
It is important to note the current limitations of this module. The two implemented traits provides an intuitive abstraction layer for their purposes, but GPIO
in general, is so much more than just buttons and LEDs. The module was first
7.3. RUST EMBEDDED MODULES
93
developed for buttons and LEDs because they are easy to interface with, but it will
require some alteration to be more ‘general purpose’.
1
2
3
4
5
6
7
8
extern crate emlib;
// Include ‘emlib’ bindings
extern crate modules; // Include ‘REM’
use emlib::gpio::Port;
use modules::{GpioPin, Button, Led};
// Define a button and a LED. The ’static lifetime tells
// us that BTN and LED are alive for the whole program
const BTN: &’static Button = &GpioPin { port: Port::B, pin: 9 };
= &GpioPin { port: Port::E, pin: 2 };
const LED: &’static Led
9
10
11
12
13
14
15
16
17
18
19
20
21
fn main() {
// Initialize the underlying GPIO pins
BTN.init();
LED.init();
// Register a callback function for the button
BTN.on_click(blink_led);
loop {}
}
// This function gets called when the button is pressed
fn blink_led(_pin: u8) {
LED.toggle();
}
Listing 7.13: Example usage of REM’s GPIO module
7.3.3
DMA
The DMA peripheral on the Gecko is used for transferring data from one location
to another, without intervention from the CPU. The interface to the DMA provided by emlib is a low-level API, which deals with hardware descriptors and raw
pointers for controlling the DMA. Here we look at a higher level abstraction over
the DMA module, which considers devices and buffers and the specification of the
flow between these devices.
The core of the approach defines two types of endpoints which can be interacted
upon with DMA, readable and writable. In this classification, an ADC is readable
as it produces samples and, the DAC is writable as it can consume samples. A
USART fits both descriptions; this is because data can both be written to and
read from the peripheral. Both descriptions do also apply to memory allocated
buffers.
94
CHAPTER 7. APPLICATION LAYER
These abstractions are modeled by providing the two traits, Readable and Writable,
as shown in Listing 7.14. It is important to note that, even though the two traits
define the same methods, they have a semantic difference.
1
2
3
4
5
6
7
8
9
10
11
12
trait Readable {
fn as_ptr(&self) -> *mut c_void;
fn inc_size(&self) -> DataInc;
fn size(&self) -> DataSize;
fn n(&self) -> Option<u32>;
}
trait Writable {
fn as_ptr(&self) -> *mut c_void;
fn inc_size(&self) -> DataInc;
fn size(&self) -> DataSize;
fn n(&self) -> Option<u32>;
}
//
//
//
//
Base pointer to device
Increment in bytes
Element size in bytes
Number of elements to transfer
Listing 7.14: Traits used for DMA transfers
Both traits defined in Listing 7.14 requires the same set of methods. These methods
are required by the underlying DMA implementation and are described in the emlib
documentation for DMA [16]. As mentioned, both traits can be applicable for some
peripherals, and this demonstrates Rust’s facility to do method resolution when a
type implements multiple traits that can result in function name collisions.
Listing 7.15 shows an example of using the DMA abstraction to transfer samples
from the ADC to RAM. The start basic function relies on the two traits to set up
the hardware specifiers with the low-level API. Both the Readable and Writable
traits are implemented for the memory buffer. In this use case, the type of the dst
parameter in the start basic function ensures that the correct implementation is
chosen.
The DMA abstraction described here is only implemented for the simplest DMA
transfers from the emlib DMA API. The emlib API provides more complex facilities (e.g. scatter-gather) which can cause the interfaces to change if they are to be
supported. However, there exists facilities for registering closures to handle reactivation of long running DMA transfers; the closure will be called on the interrupt
signal given by the DMA controller when the transfer is finished. This facilitates
a programming model which is similar to the one presented in Section 7.2.
7.4. PROJECTS
1
2
95
// Create a static RAM buffer
static mut BUFFER: [u8, 4] = [0; 4];
3
4
5
6
fn main() {
// Initialization omitted. Assume instead
// that ‘adc0’ and ‘dma0’ hold references to the peripherals
7
// Start a DMA transfer from
dma0.start_basic(
&adc0,
//
unsafe { &mut BUFFER }, //
AdcSingle
//
);
loop {}
8
9
10
11
12
13
14
15
the ADC to RAM
The ‘adc0’ implements ‘Readable’
The RAM buffer implements ‘Writable’
Reference to the interrupt signal
}
16
17
18
19
20
21
// The signature for the start_basic is included for the discussion
impl Dma {
pub fn start_basic(&mut self,
src: &Readable, dst: &Writable, on: Signal);
}
Listing 7.15: DMA transfer utilizing the trait abstractions
7.4
Projects
This section describes two applications that were developed as part of the evaluation
process of the RustyGecko platform. The two applications have been implemented
in both Rust and C, and we have gathered results from energy measurements, code
size, and execution performance for all of the applications. We use these findings
to give a qualitative evaluation of Rust for a bare-metal system. The results are
presented in Chapter 8 and discussed in Chapter 9, respectively.
7.4.1
Project I - Sensor Tracker
The Gecko is well suited for applications that focus on low energy consumption.
Examples of such applications are wearable devices, like the fitbit1 activity
tracker.
The following sections describes an interrupt driven sensor application that was
developed for the STK, we refer to this application as the SensorTracker. The
1 https://www.fitbit.com/
96
CHAPTER 7. APPLICATION LAYER
project has an emphasis on low energy consumption and it uses sleep modes to
save energy during execution.
Goal
The SensorTracker application was developed to compare the Rust and C languages against each other, with an emphasis on energy consumption on a baremetal system. An energy efficient application is largely concerned with performing
its task quick and going to sleep. Different parts of the Gecko gets switched off,
depending on the sleep mode the chip is in, and the key to low power consumption
is to do as much of the data processing at the lower sleep modes.
Requirements
The requirements for the SensorTracker application are summarized in Table 7.1.
We wanted the application to demonstrate the usage of a wide range of sensors;
the required peripherals are available on the two given boards in ST1. The sensors
from ST2 were chosen to be the internal temperature sensor on the Gecko, and
the humidity sensor and the external temperature sensor that are available on the
BIO-EXP. ST3 and ST4 was chosen because they demonstrate two different usecases for the SensorTracker. The first mode demonstrates a self-contained system
that collects data, and the second mode shows that the application can be used to
provide data to external devices.
Requirement
ST1
ST2
ST3
ST4
Description
The application should be made for the STK and utilize the BIO-EXP for additional sensors.
The application should collect samples of temperature and humidity from various peripherals at timed
intervals.
The samples should be collected and stored internally in the Gecko’s RAM.
The sample data should be made available to an external application with the USART.
Table 7.1: Requirements for the SensorTracker
Implementation
The application has two modes of operation, sample collection and sample transfer.
The buttons on the STK are used to switch between the two operation modes of
the SensorTracker, these modes are shown in Table 7.2, and described in the
paragraphs below.
7.4. PROJECTS
Current Mode
Collect
Collect
Transfer
Transfer
97
Button Pressed
PB0
PB1
PB0
PB1
Action
Go to Transfer
Stay in Collect
Stay in Transfer
Go to Collect after current transfer
Table 7.2: Operation modes for the SensorTracker
Figure 7.1: Sample collection phase
Sample Collection The main part of the application, which consists of gathering the samples, was implemented as described in Figure 7.1. The RTC clock is
set up to generate interrupts each n milliseconds. On each interrupt, a new sample
is created by the sensors and pushed into a circular buffer structure. The main
loop, which is executed once after each interrupt has been handled, extracts all the
sample currently in the circular buffer and stores them in RAM.
The sensors2 used in the application are shown in Table 7.3. We can see from this
table that two additional peripherals need to be configured for the SensorTracker,
for the sensors to work properly. The ADC is used to convert the internal temperature to a digital value, while the external sensors available on the BIO-EXP is
retrieved via the Gecko’s I2 C interface.
#
0
1
2
Name
Internal Temperature
Humidity Relative
Temperature
Connection
ADC0
I2C1
I2C1
Measured Data
CPU Temperature
Room Humidity
Room Temperature
Table 7.3: Sensors used by the SensorTracker
2 Sensor #1 and #2 are the same sensor, but they are exposed as two different ones by the
application.
98
CHAPTER 7. APPLICATION LAYER
Connecting to the STK We use a PC to interface with the Gecko over USART
when the application is in Transfer mode, and the application can then be controlled
via a CLI. We have used a USB cable with an FTDI chip3 to connect with a USART
on the STK. Figure 7.2 shows how the RX (green), the TX (white), and Ground
(black) wires are connected. The application can then be interacted with, with a
terminal application like picocom4 . Connecting to the device with baudrate 9600
and error correction set to 8-1 (the defaults of picocom) will provide access to the
SensorTracker CLI.
Figure 7.2: Connecting to the STK
Command Line Interface The CLI of the application contains only a single
command; read. The read command takes one argument, and it is on the format
r n, where n is the integer 0, 1 or 2. The command is terminated with a carriage
return (i.e. the ASCII symbol \r). All non-conforming commands are ignored by
the application. The n parameter is used to select one of the sensors that was presented in Table 7.3. Every time a conforming command is sent to the application, it
will respond over USART with all the data that have been collected by the selected
sensor. A screenshot over how program interaction with the SensorTracker looks
like is shown in Figure 7.3.
3 Future
Technology Devices International provides chips for serial to USB conversion
is a serial terminal commonly found in many Unix-like systems
4 picocom
7.4. PROJECTS
99
Figure 7.3: Example run of Command Line Interface
7.4.2
Project II - Circle Game
This section describes the implementation of a game that was developed for the DK.
The game is simple, but CPU intensive, and was developed as a part of measuring
the performance of Rust on the Gecko.
Goal
The CircleGame application was developed to compare the performance between
Rust and C. It is not easy to give a performance metric, and compare two languages
directly against each other based on only one application like this. However, an
application like this gives us a good indication of whether the two languages differ
or have roughly the same performance.
Requirements
The requirements that were made for the game are summarized in Table 7.4. CG1
and CG2 sets the hardware requirements for the application; we chose to restrict
it to the DK because of its on-board LCD screen and header pins. The two modes
mentioned in CG3 was deemed necessary for testing purposes and for measuring
performance, respectively. CG4 specifies the performance metric, FPS was chosen
because it is an intuitive way of measuring performance. The result will be a
number that represents how many iterations of the game’s main loop have been
executed each second.
100
CHAPTER 7. APPLICATION LAYER
Requirement
CG1
CG2
CG3
CG4
Description
The game should be made for the DK.
The graphics should be rendered on the LCD screen.
The game should support two modes, it should be
controlled with a gamepad, or be self-playable.
The performance should be measured in the number
of FPS.
Table 7.4: Requirements for the CircleGame
Description
The game was first written in C by one of our supervisors as part of the TDT4258 5
course at NTNU, and later ported by us to Rust. It is a simple game that consists
of three components that are drawn to the screen; two circles and an obstacle. The
two circles can be controlled with a gamepad that is connected to the DK’s header
pins, Figure 7.4 shows a setup of the game. The obstacle is randomly generated
and has either one or two gaps, it spawns on top of the screen and is moved down
one step for every iteration of the game loop. The goal of the game is to avoid any
collision between the circles and the obstacle. If the obstacle reaches the bottom
of the screen without colliding with any of the circles the game score is increased.
However, if any of the circles collide with the obstacle, the game is over, and the
score is reset to 0.
Figure 7.4: CircleGame running on the DK with the attached gamepad
5 http://www.ntnu.edu/studies/courses/TDT4258
7.4. PROJECTS
101
The game consists of three phases; initialization, reset, and the game loop. Pseudo
code for the game is shown in Listing 7.16, as the code suggest, most of the work is
done in the game loop. We calculate the FPS for the game by increasing a counter
for every iteration of the loop. An interrupt is also set up to be triggered once
every second, which consecutively updates the FPS and resets the counter.
The game also has support for playing by itself. This mode is necessary because the
optimized versions of the game run with several hundreds of iterations each second,
and it makes it easier to collect the results from the performance test.
1
2
static mut FRAME_COUNT = 0;
static mut LAST_FRAME_COUNT = 0;
3
4
5
6
7
8
9
10
11
12
13
14
15
16
17
18
19
20
21
22
23
24
fn main() {
init(); // Run Microcontroller initialization
reset(); // Reset the Game Environment
loop {
// Game Loop
let input = get_user_input(); // Get input from user buttons
player.move(input);
// Move Player according to input
obstacle.move();
// Move obstacle
// Check if collision occurred
if check_collision(player, obstacle) {
game_over(); // Report game is over to player
reset();
// Reset the Game Environment
}
redraw_screen(); // Update contents on the LCD
FRAME_COUNT += 1;
}
}
// Interrupt handled once each second
extern fn SysTick_Handler() {
LAST_FRAME_COUNT = FRAME_COUNT;
FRAME_COUNT = 0;
}
Listing 7.16: Pseudo code of the CircleGame
Chapter 8
Results
In this chapter, we present the results after conduction measurements of the applications written for the RustyGecko platform. We focus mainly on the SensorTracker
and CircleGame applications but include some smaller applications to look at concepts in isolation. The three metrics chosen for measurements are as follows:
• Performance
• Energy Consumption
• Code Size
These metrics are integral to embedded computing systems and are somewhat
related to each other. In the last section of this chapter, we look at how the heap
allocation is performed in Rust and C.
8.1
Performance
This section describes the performance measurement of the system performed on
the DK. The game application was implemented as described in Section 7.4.2 in
both C and Rust. The performance was measured by recording FPS performance
metric. This metric measures the amount of work/second, and it is simple and
commonly used when measuring the relative performance of realtime graphic applications.
8.1.1
Measurement
The measurement was done by executing the application on a DK board and visually
recording the on screen FPS, as seen in Figure 8.1. The recorded number was
gathered by letting the application run past the initialization loop and waiting
103
104
CHAPTER 8. RESULTS
for the metric to stabilize. When the FPS was stable, the lowest and the highest
number reached within a 5 second time-period was sampled. The mean of the two
samples is presented in the results below. The largest variance in the presented
samples were 5 FPS. This process was repeated on two different DK boards.
Figure 8.1: The on screen FPS on the DK
8.1.2
Measurement Bias
When measuring performance, one has to consider a number of biases that can
occur while performing the measurement. A bias is an arbitrary external noise
that might distort the result of the measurements. Some of these biases can and
should be eliminated before measuring, while others are harder or impossible to
remove.
The following biases were found when analyzing the game application:
User Input
The game application was developed as a human playable game. When measuring performance, deterministic results are preferable. This bias was removed by implementing a simple deterministic artificial intelligence which
emulates the user input.
Random Number Generator
A Random Number Generator (RNG) is used to generate a stream of seemingly random numbers. To avoid performance impacts from the different
RNG implementations for C and Rust, a simple deterministic RNG was implemented and used.
Measurement Overhead
Often when measuring the performance of an application at a course granularity, the measurement adds to the execution time. This is largely the case
when measuring FPS, as it adds profiling code to the actual application, thus
8.1. PERFORMANCE
105
affecting the performance of the application. In this experiment, we are interested in the relative performance between C code and Rust code. Therefore,
the added bias by the FPS measurement is acceptable as long as it is the
same for both code bases.
Optimization Characteristics
Various applications perform differently when subjected to different optimizations. This fact leads to a trade-off when deciding the level of optimization to
apply to the program. To account for this bias, we look at the performance
metric for all optimization levels.
8.1.3
Results
In this section, we present the results obtained when measuring performance.
Figure 8.2: Frame/Second achieved by Rust and C code
Figure 8.2 graphs the results for the performance measurements. The Y-axis shows
the number of Frames Per Seconds achieved by running the game on the optimization level given by the X axis. We see that the C code is 1̃0x faster on O0 and O1,
but Rust equates by providing a 1.07x speedup over C at O2. C achieves the best
performance at level O2 while Rust is slightly faster on O3 compared to O2. Our
brief analysis of this suggests that some of the high-level abstractions in Rust are
fairly inefficient without optimizations. An example of these abstractions is the
Iterator-based for loop, which is used extensively throughout the CircleGame
application.
The poor performance for the O3 optimization level for the C was unexpected. To
further investigate this issue, we first considered the instruction cache hit ratio for
106
CHAPTER 8. RESULTS
the O3 and O2 binaries. We did not find an explanation in the results, as the hit
ratios were close to equal.
The optimization levels considered here, defines a set of individual optimizations
which can be activated or deactivated by passing flags to the compiler. Next we,
looked at the change in performance due to each individual optimization flag in
the set difference of O3 − O2. By adding each flag, one-by-one, from the set difference to an O2 base build, we managed to identify the source of the performance
degradation. The source was the -ftree-loop-distribute-patterns flag. This
flag is used to collect common initializations of variables from different loop iterations and substitute these initializations with library routines like memset. We refer
the reader to the gcc documentation [9] for further explanation of the flag. The
CircleGame application contains a fair amount of loops with initialization code, so
if this optimization for our use-case is degrading the performance, it is quite natural
for the overall performance to take a big hit. For completeness; the performance of
an O3 binary without the mentioned flag is equal in performance to the O2 binary
for this application.
8.2
Energy Consumption
In this section, we look at the energy consumption of the SensorTracker application described in Section 7.4.2. The measurements was performed using the STK
and BIO-EXP boards. The SensorTracker is an interrupt driven application and
has two modes of operation from an energy consumption perspective. It turns On
for each interrupt to perform the measurement and turns Off when the measuring
is complete.
8.2.1
Measuring
The measurement was performed with the Energy Profiler application supplied
by Silicon Labs as a part of their Simplicity Studio software suite. The profiler
measures on board current at a sample frequency of 6250Hz. Power, measured in
Watt (J/s), is given by the formula P (J/s) = V ∗ I, where V is voltage and I is
current. By accumulating the Power over time, we get the energy consumption
given in Joule. This metric is reported by the Energy Profiler.
Each measurement, called a run, was gathered manually by executing the sample
collection process (see Section 7.4.1) for 30s and recording the energy reported by
the profiler. This process was repeated four times for each data point, and an
average was calculated after removing the sample with the highest variance. This
process was introduced to remove human error from the manual collection. The
number of collected and discarded samples were based upon the stability of the
results, and the largest variance in the collected samples were 0.174%.
8.2. ENERGY CONSUMPTION
8.2.2
107
Parameter
The energy consumption was recorded for the SensorTracker, which was configured with different workloads. The workload is dependent on how many interrupts
are trigger per run, and how much work is performed during each interrupt. To
vary the workload, the number of triggered interrupts were varied by configuring
the length of the interval between each interrupt while the work was held constant
for each interrupt. Table 8.1 gives the interrupt interval and the corresponding
number of interrupts per run used for the measurement.
Interval
25ms
50ms
100ms
500ms
1000ms
# of Interrupts/run
1200
600
300
60
30
Execution time
30s
30s
30s
30s
30s
Table 8.1: Interrupt Interval Parameter
The measurement was performed at all the standard optimization levels provided
by the compilers. This was done to remove the bias where different applications
have better performance using different optimization levels. As noted in Section 8.3
these are O0, O1, O2, O3 and Os (only available for C). As we will see in the
results below, by including all the optimization levels, we uncovered another bias
related to energy consumptions. The O0 levels were only evaluated with debugging
symbols.
8.2.3
Results
In this section, we look at the results of the energy consumption measurement.
We first look at the whole picture by presenting all the measurements produced
by the set of possible parameters. Later, we will consider the best configuration
for C application together with the best configured Rust application for each workload.
108
CHAPTER 8. RESULTS
(a) 25ms
(b) 50ms
(c) 100ms
(d) 500ms
(e) 1000ms
Figure 8.3: Comparison between Rust and C for each workload
Figure 8.3 shows the energy consumption for each of the workloads and compares
the optimization levels for Rust and C. We see that Rust and C have comparable
consumption in each of the workload configurations. It is also evident that an
external bias, investigated below, accounts for the variance between the various
optimization levels.
Now we look at the relative performance comparing the version with lowest energy
consumption for each workload. For the C code, we can easily see from Figure 8.3
that this is produced by the Os level. The Rust versions, on the other hand, are
either O1, O2 or O3, although the difference is never larger that 1%.
8.2. ENERGY CONSUMPTION
109
Figure 8.4: Rust vs C relative comparisons for best builds
Figure 8.4 shows the relative energy consumption by setting the consumption of
the C Os build to 1 for each of the workload. The Rust line plots the best performing Rust builds relative to this C build. For reference, the results for the O3
optimization level of the C build is included. We see that the Rust code always
performs within ∼15% of the C code and is always better than the O3 line.
The variance between the different optimization levels of C code in Figure 8.3
was unexpected. In this application, we anticipated that higher optimization levels
would result in faster interrupt handlers and thus lower energy consumption. When
the initial results did not meet this expectation, we used the Energy Profiler to
plot the instantaneous current drawn by the application.
110
CHAPTER 8. RESULTS
Figure 8.5: Current of 50ms workload
Figure 8.5 plots the current drawn by the Gecko while handling an interrupt and
the idle state between interrupts. The first thing to notice about the plot is that
the time it takes to handle an interrupt is constant for the various optimization
levels. The second point is the difference in current drawn by the Gecko while
handling the interrupts. We can see the O3 level draws more current compared to
the Os level; we found the reason for this when we looked at the instruction cache
hit ratio.
Level
O3
Os
Hits
110969
162029
Misses
43429
614
Hit Ratio
71.9%
99.6%
Table 8.2: Cache hit ratio for optimized C binaries
Table 8.2 shows the cache hit ratios recorded for binaries presented in Figure 8.5.
We see that the cache hit ratio for the binary compiled with O3 has a hit ratio
of ∼72% while the Os level has as high as ∼99%. The lower instruction cache hit
ratio causes the Gecko to load instructions from flash more frequently and thus
consumes more energy. This effect was not studied any closer, but can possibly
8.3. CODE SIZE
111
be explained by the O3 level producing code which is to large for the instruction
cache to contain.
8.3
Code Size
This section looks at the size of the compiled binaries for three Rust programs.
These programs are the two projects, SensorTracker and CircleGame, and a Minimal Main program. A comparison between functionally equivalent programs in C
and Rust are provided.
Code size is an important factor in an embedded system. The systems are more
restricted than conventional systems, especially when it comes to storage. For the
EFM32 line of microcontrollers the code is stored in flash memory. In Section 2.3,
we showed that the flash memory in the EFM32 family of microcontrollers ranges
from 4KB to 1MB. As Section 2.6.3 explains, the flash memory should not only
contain the program code but also the constant data defined in the program. This
limits the code size even further.
Another concern that makes code size a priority in embedded system is price.
When putting embedded systems into production, the volume of microprocessors
are usually large. Moreover, as the size of the flash correlates with the price of the
microprocessors, being able to choose a smaller version can save large amounts of
money.
Each program was compiled with optimization levels O0, O1, O2, and O3, and
the O0 level was compiled both with and without debugging symbols. Compiling
executable programs results in an elf binary file. The size was calculated by
executing the arm-none-eabi-size program.
8.3.1
Measuring Size
The arm-none-eabi-size program accepts an elf binary as argument. The program then reads the file and reports the size of the .text, .data and .bss segments
described in Section 2.6.2.
8.3.2
Parameters
The various files were compiled by setting the compiler optimization flags in the
Cargo.toml file. The parameters used are shown in Table 8.3 with their effects.
112
CHAPTER 8. RESULTS
Parameter
debug
debug-assertions
opt-level
lto
Values
true, false
true, false
0, 1, 2, 3
true, false
Effect
Sets the -g flag on the compilers
A way to remove assertion statements
Sets the optimization flag on the compilers
Sets the LTO flag on the linker
Table 8.3: Cargo.toml parameters and their effects
Each program in this section is compiled with 6 different settings, as given by
Table 8.4.
Parameter
debug
debug-assertions
opt-level
lto
(c code Os)
1
true
true
0
false
false
2
false
false
0
true
false
3
false
false
1
true
false
4
false
false
2
true
false
5
false
false
3
true
false
6
false
false
3
true
true
Table 8.4: Compilation settings
For each of the optimization levels the underlying C sources are compiled at the
same level as the Rust code. Notice that for the 6th optimization setting, the
underlying C sources are compiled with the Os flag, while the Rust sources are
compiled at O3.
8.3.3
Binary Sizes
This subsection considers the code size of programs. Functionally equivalent versions were written in both Rust and C, and here we compare the size of the binaries
produced at each optimization level presented in Table 8.4. Figure 8.6 presents the
sizes of the generated binaries for the two projects described in Section 7.4.
8.3. CODE SIZE
113
Figure 8.6: Code size for project binaries
We see here that the largest variation is between unoptimized and optimized Rust
code. The sizes varies less for the other optimization levels. Notice that the O2 level
provides a smaller binary than the O3 version, and that the Os level consistently
produces the smallest binaries.
Figure 8.7 shows the code size of a minimal program to boot the Gecko. Both
implementations contains only an infinite loop, and we evaluate these to examine
the overhead of the languages.
Figure 8.7: Code size for minimal program
114
CHAPTER 8. RESULTS
As explained in Section 3.1, Rust does not require any additional initialization or
setup compared to C. This is evident in Figure 8.7, where the binaries are the same
size when optimizations have been applied. The debug and unoptimized Rust build
is 10x larger than the optimized version.
To explain this increase in size, we look at the zero-cost abstractions provided by
Rust. Some of these abstractions are built with numerous function invocations
to handle complex use-patterns. To be able to debug these abstractions, it is
important that the compiler keeps all these functions in the unoptimized binary.
When one of these abstractions are used in the code (e.g. a for loop) most of
these functions becomes superfluous, and be inlined after applying Dead Code
Elimination (DCE).
Table 8.5 compares the size of the smallest C and Rust binaries for each of the
evaluated programs. The number reported is generated by dividing the size of the
Rust binary by the size of the C binary, giving the factor of which the Rust version
is larger than the C version.
Program
CircleGame
SensorTracker
MinimalMain
Relative Size
1.22x
2.20x
1.00x
Table 8.5: Rust code size relative to C
We see from Table 8.5 that the CircleGame binary comes quite close to the C
binaries in size. The Rust MinimalMain shows no increase over the C binary. In
Table 8.6, we break down the size of the optimized binary of the SensorTracker
to see which portions of the Rust code makes the binary size increase.
Section
app
binding
emlib
REL
newlib
system
unwind
C (B)
1776
0
4348
0
2372
460
0
Rust (B)
3964
184
4376
3516
792
896
3820
Relative
2.23x
N/A
1.01x
N/A
0.33x
1.95x
N/A
Table 8.6: Breakdown of binary sizes for the SensorTracker application
In Table 8.6, we see that there are three major non-constant contributors1 to the
increased size for the Rust binary:
1 The system section increased with ∼2x, but this section will remain constant as the complexity of the application increases.
8.4. HEAP ALLOCATION
115
• The application
• Rust Embedded Library
• Rust exception mechanism (unwind)
We see that the newlib implementation is reduced in the Rust binary. This is due
to the REL library implementing some of the same functionality as newlib. Thus,
this part of newlib is not included.
8.4
Heap Allocation
In this section we consider a small experiment to investigate possible differences in
heap fragmentation caused by dynamic allocation in C and Rust. We do know, from
reading the source code of the library, that the heap allocation in Rust builds upon
the same functionality as the allocation in C. However, we want to verify and show
this explicitly. The conducted experiment is a simple program that 1) allocates
128 objects on the heap, 2) replaces one object picked at random, and 3) repeats
step 2) 1024 times. The objects are of the three sizes given in Table 8.7.
Name
A
B
C
Size (32-bit words)
2
3
6
Color
Green
Red
Blue
Table 8.7: Object sizes
The heap allocation pattern was recorded after the first phase of the program,
and are given in Figure 8.8. The figure shows a 4KB subsection of the heap with
normalized addressing to the first allocated object to aid the comparison. Each
line represents 64B of memory.
We see that the initial allocation pattern is alternating between these three object
sizes, and the white spaces in between are padding. These are due to alignment
rules of the allocator. The objects are created in the same order in both C and
Rust and we see that the allocation patterns are identical.
116
CHAPTER 8. RESULTS
(a) C
(b) Rust
Figure 8.8: Initial heap allocation of 128 objects in Rust and C
To get comparable results for both C and Rust, we make sure that the pseudo randomly picked objects are the same. This is controlled by using the same random
number generator for both languages (this is the same RNG as discussed in Section 8.1). Figure 8.9 presents the heap allocation pattern after the second phase
has been executed. From this figure, we see that the allocation patterns in Rust,
on the RustyGecko platform, and C, are identical.
(a) C
(b) Rust
Figure 8.9: Heap allocation after processing in Rust and C
Chapter 9
Discussion
This project has covered a lot of implementation-level details involved with applying Rust to a bare-metal system, as well as presenting the ecosystem for building
and distributing packages written in Rust. In this chapter, we look at how well
the current state of Rust is suited for bare-metal development on embedded systems. Additionally, we revisit the language challenges that was first identified
in Section 1.5 and discuss how they were solved for the RustyGecko platform.
In Section 9.2 we discuss our investigation of the possibility of applying Rust’s
ownership-semantics directly to hardware to avoid mutable aliasing to the peripherals. Towards the end of this chapter, we evaluate and discuss the results that were
gathered as part of the SensorTracker and the CircleGame applications.
9.1
Rust for Embedded Systems
Prior to beginning this thesis, we were already aware that there were a couple of
other projects that were running Rust bare-metal on ARM MCUs. We did not,
however, know how easy it would be to get up and running with Rust on the
EFM32. It took us less than one day to implement and execute a Rust blinkdemo on the STK. The Rust documentation was sufficient for figuring out how to
define Rust programs without using RSL (i.e. the ones that are annotated with
#[no std]), and projects like armboot helped us build the project for the ARM
architecture. Rust’s runtime is comparable to C’s because the startup requirements
in the two languages are the same, but Rust’s core library is larger and provides
more functionality than the C standard library, which we consider to be an added
bonus of Rust.
117
118
9.1.1
CHAPTER 9. DISCUSSION
The Standard Library
Rust has a rich standard library that offers a strong foundation for most Rust
programs. As we described in Section 2.1.2, the std crate acts like an abstraction
over all the different libraries in RSL and the rustc compiler is itself dependent
on a couple of traits to be present in this module. This crate is not applicable
to all domains because it requires an OS. In our domain, we have found the dual
responsibility of the std crate, of both providing a facade to RSL and OS-dependent
functionality, to be limiting. In principle, the facade applies to our platform, but
the added functionality does not. This prevents us from using the facade, and thus
also all libraries that depends on std.
RCL does provide us with enough functionality to write idiomatic Rust code, but
we had to implement a few workarounds in order to get support for Rust’s standard constructs for dynamic memory allocation. Currently, Rust does not have
functionality to provide, or automatically compile, any of its standard libraries for
target architectures other than the ones it supports by default. It was hard to
handle these dependencies before we introduced the Cargo build process to the
project. First when Cargo was introduced, was it easy to stay up to date with the
nightly releases of the Rust compiler and its standard libraries.
Because our project targets an ARM processor architecture, we have to conditionally download and compile the libraries (like alloc and collections) that
have functionality that we want to utilize, as described in Section 6.2. This is
not necessarily a big problem in itself, as it does not complicate the process much
more than the need to explicitly define the libraries as custom dependencies in the
Cargo.toml. We do, however, think that the distinction between standard and
non-standard programs make it considerably harder to enable us to use the great
ecosystem that Rust is surrounded by.
9.1.2
Using and Distributing Libraries
We have described Cargo and its ability to manage package dependencies, and
a package repository closely associated with Cargo is called crates.io1 . This
repository stores, at the time of writing, a couple of thousand different Rust crates,
all made available for anyone who builds Rust programs with Cargo. The vast
majority of these crates are, to the best of our knowledge, linked to std and utilize
some part of it, either directly or transitively through a package dependency. That
being said, they do not necessarily use any functionality that we have not already
made available through REL in our project. This simple fact renders nearly all
(if not all) packages available through crates.io unusable for our project, even
though the functionality that many of these packages depend on might already be
available through REL.
1 https://crates.io
9.1. RUST FOR EMBEDDED SYSTEMS
119
As an example to demonstrate this problem, we look to the lazy-static2 project
available on crates.io. This project allows the programmer to declare static
variables that get initialized at runtime. It provides some of the same functionality
that we implemented for the event-hub described in Section 7.2. We can not use
this project directly because it depends on std. With a closer look at the project,
we can see that the project author at some point did prototype an alternate (and
outdated) version which was only dependent on core. Another example is the
smallvec3 project, which provides a handful of optimized versions of Rust’s vector
structure that have a length-limit of 32 entries. Similar to the lazy-static project,
all the dependencies for smallvec are included from std, but are also available in
core. We have implemented a structure that is similar to smallvec as part of the
SensorTracker application, but it feels like an unnecessary addition because it is
already available on crates.io and it only depends on features from core.
This distinction between std and RSL feels somewhat contradictory to Rust’s focus
on modularization and package distribution with Cargo. It also feels destructive for
non-standard projects like ours, because we would either have to re-implement or
modify the already existing projects in order to get them to work for our platform.
We hope that it will get easier in time to define non-standard projects, while
simultaneously being able to utilize many of the great open-source libraries that
are already available.
9.1.3
Language Challenges
In Section 1.5 we identified six language challenges that must be considered when
using a language in a bare-metal system. Here, we revisit each challenge and discuss
how they were solved for the RustyGecko platform.
LC1 - Volatile read and write
Rust exposes two intrinsics for handling volatile read and write. These makes
the code more verbose compared to the mechanism in C, where a variable is
marked with the volatile keyword. In Rust, the intrinsic functions must
be used each time a variable is read or written. This, however, gives the
programmer more fine-grained control as a variable can be used both as
volatile and non-volatile.
LC2 - Handling interrupts
Interrupt handlers, in the RustyGecko platform, must use the C ABI, because the interrupts are dispatched from the C runtime. This makes the code
more verbose, but it is easily achievable in Rust. As discussed in Section 9.2,
a downside to the interrupted programming model found in embedded programming for Rust is the reliance on global mutable state. In these circumstances, the compiler is limited in its ability to statically verify safety because
accesses to these variables must be contained inside unsafe blocks.
2 https://crates.io/crates/lazy_static
3 https://crates.io/crates/smallvec
120
CHAPTER 9. DISCUSSION
LC3 - Reading and writing hardware registers
In this thesis, we have only considered hardware devices as MMIOs. As Rust
supports raw pointers and allows the programmer to access arbitrary memory
addresses and cast these as structs, the handling of hardware registers are
equally practical in Rust as in C. Given a more mature bare-metal platform
in Rust, we foresee that even more of the compile-time ownership analysis
provided by the Rust compiler can be used to ensure safer interactions with
hardware registers.
LC4 - Static object construction
Rust (and C) have, unlike many other programming languages, no life before
the main function. In this statement lies the fact that in the global scope,
one can only initialize objects which have constant initializers. Therefore, all
the initializers will only contain constant data and these can be handled by
the startup mechanisms described in Section 2.6. This implies that the static
object construction problem is non-existent in Rust programs.
LC5 - Heap allocation
Dynamic allocation in Rust is implemented in the alloc library. We were
easily able to include this functionality in REL. In Section 8.4, we showed
that the heap allocation in Rust and C are identical. This is due to the
allocation algorithm in Rust being directly dependent on the newlib malloc
implementation, and therefore the memory fragmentation is equal to that of
the existing C platform. Note that this does not strictly hold true for all Rust
platforms because they can use different allocation algorithms.
LC6 - Error handling without allocation
When the Rust allocator runs out of memory, it will call a function which is
defined in the alloc library. At the time of writing, this function does not
provide any error handling, as it only calls a compiler intrinsic to abort the
program. This means that a Rust program, which runs out of memory, will
not end up in an infinite error handling loop, but the program ends up with
a HardFault.
9.2
Avoiding Mutable Aliases to Hardware
The problem that arises with aliasing to mutable data [6], also known as shared
mutable state, are not always obvious. This is, however, often the root to problems like data races and other write-after-write issues. One of the initial problems
that we wanted to investigate during this project was to see if we could apply
Rust’s ownership-semantics directly to hardware. As described in Section 5.1,
ARM MCUs, like the EFM32 that we have targeted in this project, often comes
bundled with a wide range of memory-mapped hardware peripherals. Obscure
problems can occur if these peripherals are accessed from different parts of a program at the same time. The section below describes a detailed example of how
9.2. AVOIDING MUTABLE ALIASES TO HARDWARE
121
this can happen. Further on in this section, we look towards Rust to see if it is
possible to gain assistance from some of the language features to prevent this issue
statically.
9.2.1
Identifying the Problem
It is quite common to declare mutable global variables in C programs; these are
accessible from every stack-frame throughout the running program. Such variables
are also available in Rust, but as Section 2.1.7 describes, reading and writing to
and from these variables are considered to be unsafe operations. We have also
seen, in Section 5.1, that the MCUs different peripherals are memory-mapped. We
can get access to a peripheral by casting a specific memory address to a program
structure, which is then used as a handle to the respective peripheral.
As an example, a USART is located at memory address 0x4000C000 on the Gecko,
and the bindings that we have implemented for emlib provide functions to easily initialize new handles to addresses like this. This means that every peripheral
(that we have written bindings for) are accessible through common library routines.
Ultimately, this also means that multiple handles to the same USART can be acquired. Note that acquiring two handles to the same peripheral will not necessarily
cause any wrongdoing in a program, but problems can occur if handles to the same
peripheral are acquired in different execution contexts.
This problem can be demonstrated with an example. Let us say that we have a
program in which we have configured two interrupts, I1 and I2, to be triggered
at differently timed intervals in the program. In the interrupt handler for I1 we
initiate a data transfer of 0x1111 over the USART, and we initiate a data transfer
of 0xFFFF in the interrupt handler for I2. Now, consider what happens if the
I2 interrupt occurs while the interrupt handler for I1 is executing. If I2 has
higher priority than I1, the execution will change scope to I2’s interrupt handler,
and a new USART transfer will be initiated. Effectively, a race-condition has
occurred where two different execution contexts have acquired a handle to the
same peripheral, and both are using this peripheral to transfer data at the same
time. This might result in corrupted data to be sent over the USART, so maybe the
output is something like 0x111F1FFF instead of the expected output 0x11111FFFF.
Even worse, the application at the receiving end of the USART might end up with
a program crash if it relies on the data to be delivered in a certain format.
9.2.2
Limitations with Our Approach
After the previous section, we are left with the following questions. Is there a way
to apply Rust’s ownership-semantics directly to the hardware? Moreover, is there
a way for the Rust compiler to determine whether a peripheral is safe to use? As
it turns out, there is no easy or straightforward way to do this, at least not by our
findings.
122
CHAPTER 9. DISCUSSION
Our approach to define a software library for the Gecko has been to utilize what
already exists. We decided to write Rust-bindings for emlib because it would get
the project up and running fairly quickly. This choice also meant that we were
able to quickly use a wide range of peripherals and implement a couple of projects
to test Rust in a bare-metal setting. It turns out, however, that this approach has
introduced a few limitations to our system:
1) We access the peripherals through C-bindings, which mean that Rust has no
control over what happens on the other side of the FFI.
2) Each peripheral structure that is used throughout the program is essentially
a reference to a singleton MMIO. This means that the peripherals can be
treated as static mutable objects, which by definition is unsafe in Rust.
The biggest problem with both 1) and 2) is that the bindings hide away the fact
that something unsafe is happening underneath the function calls, and that some
of the functions expose internal mutable state. An immediate proposal to fix some
of the flaws in this design is:
1) Mark the Rust-bindings that instantiate and return a handle to a peripheral
as unsafe.
2) Modify the bindings that write to (i.e. mutates) the peripheral control registers to require a mutable reference to the respective peripheral.
By implementing 1) across the bindings library, we will enforce the programmer
to wrap every piece of code that is used to instantiate access to a peripheral with
an unsafe block. This does not solve any problems directly, but it provokes the
programmer to take extra caution when using the library, by taking on the responsibility of analyzing where there is a chance for mutable aliasing to occur.
This additional caution to unsafe code has, as we described in Section 7.1, already
helped us uncover a bug in emdrv. If we implement 2) across the library, Rust’s
borrow-checker will be able to help us discover potential data races within a code
block, but it will not be able to assist us across different execution contexts.
Another attempt would be to hide the hardware initialization process from the
programmer and let it be completed automatically by the compiler, similar to what
Zinc does, as described in Section 2.5. Zinc uses the Platform Tree to specify the
hardware, which does the process of initializing the peripherals and saves them into
a run args structure that acts as their owner. This approach of initialization has
two advantages:
1) Compile-time verification can guarantee that the peripherals get initialized
correctly.
2) The peripherals are owned by a variable, and access to these peripherals can
be controlled by Rust’s borrow-checker.
Point 1) is indeed a very interesting feature of Zinc, but it does not help us solve
the problem that we are discussing in this section. Point 2) can help us ensure that
9.2. AVOIDING MUTABLE ALIASES TO HARDWARE
123
all peripheral access goes through the run args structure. However, this structure
is only passed to the program’s main loop, which has a different environment than
the scopes that are defined by the interrupt handlers. However, this structure is
only passed to the program’s main loop, which has a different execution context
than the interrupt handlers. Thus, we can defer our primary problem to be that
Rust cannot statically reason about the peripherals’ ownership because they are
accessed from different execution contexts.
9.2.3
Alternative Approaches
The weaknesses that we have described throughout this section are partly introduced at the border between Rust and C. However, the main problem with data
races that can occur in interrupt handlers are present in both languages. Thus,
there is no obvious way that Rust’s ownership semantics can be used directly to
discover and prevent data races across interrupt handlers. This is because the part
of the program that is currently executing is put on hold in favor of the interrupt
handler, and the new interrupt defines a different execution context. This makes
it impossible to keep program state consistent between the various handlers unless
it is kept in global variables.
There are, of course, other approaches to this problem other than to rely on the
compiler to prevent the data races. One way to try and prevent this problem during
or after implementation can be to test the program for errors that happen due to
simultaneously occurring interrupts. There are several different approaches to how
this can be done [15, 25], but this has not been in the scope of this thesis.
Another approach can be to treat this as a concurrency problem that we can try to
solve dynamically instead of statically. We can consider the problem that we have
described throughout this section to be an application-dependent issue. Because
of this, we can argue that it is not the right decision to solve this issue as part a
low-level library like emlib and its bindings. Instead, we can define an auxiliary
library that can solve this problem with an opinionated approach, which might
apply to a lot of different applications, but not to all.
In Section 7.2, we described the implementation of a library that takes on the task
of hiding the various interrupt handlers and instead expose interrupts through
closures that can be registered at runtime. It is possible to extend this library
to make it safe to dispatch new interrupts at runtime. E.g. by identifying the
different possibilities of states the program can be in at the time of an interrupt,
as well as the various actions that can be done depending on this state. The
library can then provide routines to either lock the access to a peripheral during
an interrupt or provide channels that can be used to communicate directly with
the peripheral in a safe manner. Note that this is not an issue that can only be
solved with Rust, it can be implemented in any language, but Rust might prove
to be exceptionally well-suited for the task. As we described in Section 2.1.6,
Rust was specifically developed to be a good foundation for modern applications
124
CHAPTER 9. DISCUSSION
that require concurrency. Additionally, it becomes evident that Rust’s notion of
ownership was the key to make it both safe and efficient to implement different
concurrency-paradigms. Unfortunately, due to time restrictions, we could not look
into the details of how this library can be expanded to handle this problem. Instead,
we propose it as part of the future work, described in Section 10.3.
9.3
Project Evaluations
This section discusses the results that were gathered as part of the SensorTracker
and CircleGame projects and presented in Chapter 8. First, we will look at the
choice of projects and method of evaluation. Then, we will discuss each of the
separated metrics performance, energy efficiency, and code size in isolation, before
we wrap up this section by discussing the current state of Rust programming on a
bare-metal system in light of our results.
9.3.1
Projects and methods
For the platform evaluation of this project, we chose to develop two main example
applications, one to evaluate performance and one for energy efficiency. These two
qualitative studies were chosen in order to focus on evolving the platform guided
by these metrics. The reason for not choosing a more quantitative study with a
larger number of applications was due to the focus on platform development and
because there was benchmark suite written for Rust that existed for bare-metal
systems. The quantitative approach would produce a larger set of results, which
would provide a better foundation to evaluate the platform. Our focus here was
to create the platform and to include some preliminary evaluations to validate the
feasibility for further development and evaluation.
For this purpose, the qualitative project approach provided us with a few driving
metrics and feature sets to motivate the development. At the same time, we kept
the total code base small enough to facilitate rapid changes in case a better better
approach was discovered, like the build system described in Chapter 6.
A third option could have been to develop a suite of micro benchmarks. This option
was not chosen since we wanted to create larger projects to stress the programmability and code organization of the platform.
9.3.2
Performance
In Section 8.1, we looked at the performance of the graphical game application,
CircleGame. It is evident, from our results, that the performance of the Rust
version is comparable and even greater than that of equivalent C code. Although
a graphical game application and the FPS performance metric is not typical for
9.3. PROJECT EVALUATIONS
125
the embedded processors targeted here, this qualitative result suggests that the
abstractions provided by the Rust language are zero cost when considering performance.
9.3.3
Energy
We must emphasize that energy consumption measurements presented in Section 8.2 are preliminary, and that the focus for the SensorTracker application was
primarily used to provide an application in this domain. The main problem with
reading too much into these results is that the Rust and C implementations share
a substantial amount of the library code, which is written in C. The application
code here is just a thin wrapper around the libraries. When we dug deeper into the
analysis of the application, we found that most of the time, the application spends
its time in a busy-wait state, waiting for sensor data to become available. In these
circumstances, the difference between the two languages are not evident.
From the results, we can deduce that the variance in the energy consumption in
the tested applications are larger within the different levels of optimization in the
C compiler, compared to the introduction of the Rust application layer. As we
saw in Section 8.2 the variance is more correlated to the cache hit ratio than the
programming language we are using. At least this result points in the direction of
the two language being equal in this domain.
In order to evaluate the Rust language thoroughly in this domain, a larger portion
of the code that constitutes the library must be written in Rust. In addition, a
more suitable example must be employed, where the actual code is the dominant
factor and not the busy-waits.
9.3.4
Code Size
From our code size analysis, we have made three discoveries which are important to
discuss. This discussion should be read in light of the fact that the Rust compiler
is a newly released compiler and is being compared to a C compiler, which has been
used in production for years.
Large unoptimized Rust build
As seen throughout all of our measurements in Rust, the unoptimized binaries
are significantly larger than the optimized binaries. The cause for this seems
to be that the many abstractions of the Rust language are implemented by
adding levels of indirection through function calls. The for loop described
in Section 2.1.2 is an example of this. These extra functions, which are
eliminated when optimized, make the compiler produce substantially larger
binaries without the optimizations. This shows that the zero-cost abstractions
of Rust are not zero-cost when analyzed from this angle.
126
CHAPTER 9. DISCUSSION
Rust code can be significantly larger than C equivalents
The optimized SensorTracker application written in Rust proved to be several times the size of the C version. This was further analyzed to reveal that
the increase in size is due to three factors, reiterated here:
• The application code itself
• The Rust Library
• Rust exception mechanism (unwind)
There is a proposal make the exception mechanism optional with a compiler
flag, this would provide a substantial reduction in code size. Even though
it might be useful to keep the mechanism in a production environment, this
reduction can be helpful to reduce the size of the debug binaries.
There is zero size overhead of using optimized Rust
The Minimal Main application shows that using Rust by itself does not incur
an increase in size. It is the size of the software libraries, in our results, that
increases the size of the Rust binaries.
9.3.5
Rust in Embedded Systems
The results discussed here are positive for further exploration of Rust in the embedded domain. One critical task in an embedded system is to meet a strict
deadline imposed by timely interrupts. Both the SensorTracker and CircleGame
expose similar performance for both language implementations,which provides an
important result.
On the other hand, when we look at code size, we see a larger challenge for the
Rust language. The focus on Zero-cost Abstractions does not seem to take into
account the size of the end binary, especially in the builds where optimizations are
not applied. This does not cause any problems in a system where storage for code
and data is plenty, but this is not the case in an embedded system. By comparing
the smallest processors of the EFM32 Product Family given in Section 2.3.1 and
the size of the debug builds presented in Section 8.3, we see that a debug build
of the Minimal Main example will not fit in the smallest models. The inability to
debug an application on the actual target hardware can be a significant problem in
not only development and testing stages, but also for tracing bugs in production
systems.
Chapter 10
Conclusion
In this chapter, we draw conclusions derived from the discussion of the RustyGecko
platform. We also look back at the requirements that were defined in Chapter 1,
and give an evaluation of the project’s success. Finally, we give our thoughts
on further developments to improve the RustyGecko platform, and suggest some
changes that could make Rust more suited for bare-metal systems.
10.1
The RustyGecko Platform
In this thesis, we have presented the RustyGecko platform for programming a baremetal system by using the Rust programming language. This platform consists
of a subset of the Rust standard library and a handful of libraries that define
bindings for the EFM32 peripheral API. In total, we have been able to utilize many
great aspects that surround the Rust programming language in the RustyGecko
platform.
One of the tools we were able to incorporate is the Cargo package manager. This
enabled us to give the RustyGecko platform a modular design, which makes the
different parts of the platform reusable as isolated units of code. However, the RSL
is an implied dependency for all standard Rust projects. Because of this, and given
the current design of RSL, it is hard for non-standard projects to utilize third-party
libraries.
Rust implements many interesting features, among these are its ability to statically
prevent data-races. We attempted to apply these concepts directly to the hardware
peripherals but found the resulting programming model to be too limited. Instead,
we propose to explore this idea further by considering a more dynamic approach
for future work.
127
128
CHAPTER 10. CONCLUSION
From our measured results, we showed that on the RustyGecko platform, we can
still make applications that perform as well as the existing C platform. This conclusion is derived from our qualitative study of performance and energy consumption
for the two applications that was developed on this platform. However, we did find
indications that the platform produces larger binaries, which make Rust applications more expensive in terms of hardware costs. The binaries are stored in flash
memory and the size of this memory correlates with the cost of the microcontroller.
The increased cost in hardware can be expensive for resource constrained applications, which are shipped in the millions. This, consequently, can turn out to be a
hindrance for applications in the industry.
10.2
Requirements
In Chapter 1, we presented three requirements as interpreted from the Project Description for this thesis. In this section, we describe how each of these requirements
were fulfilled.
R1 - Identify and describe the requirements for a bare-metal platform in Rust
We identified six language challenges that was important to solve to get Rust
to work on a bare-metal system. These challenges were all handled in the
implementation of the RustyGecko platform.
R2 - Prototype a bare-metal software platform for Rust on the EFM32
We consider the RustyGecko platform to fulfill this requirement. The prototype provides the same functionality as the existing C platform in principal,
and needs only be fleshed out to have full support.
R3 - Evaluate code size, performance and energy consumption
Throughout Chapter 8, we presented our results of measuring the RustyGecko
platform, and our evaluation of the measurements are given in Chapter 9 to
satisfy this requirement.
Based on these requirements and their solutions, we consider the project as a whole
to solve the problems deduced from the Project Description. This conclusion leads
us to further conclude that the project was successful.
10.3
Future Work
We have worked on many different projects on the RustyGecko platform throughout this thesis. In this section, we suggest some of these projects as future work.
We also suggest some new project ideas based on our experiences during the development of the RustyGecko platform.
Bindings
As we presented in Section 5.2, the RustyGecko platform consists of partially
10.3. FUTURE WORK
129
finished bindings. An obvious extension to our project is to continue and
finalize the binding libraries for the emlib, emdrv and CMSIS libraries. The
foundations for these bindings have been laid out, so the implementations here
are not challenging, only time-consuming. An alternative approach is to use a
bindings generator, such as bindgen1 , to generate the bindings automatically.
Note that the binding effort might be redundant altogether, as the Rust
roadmap states that the project wants to develop better integration with C
and C++ code [4]. This might eventually lead to bindings like these being
made obsolete and that C libraries can be called into based on their header
files alone.
Trait-based Peripheral Access
An aspect that we did not go into in this project is Rust’s ability to, by using
traits, redefine the semantics when using values. This concept can possibly
be applied to remove the verbosity of the volatile loads and store of peripheral
control register operations, as discussed in Section 9.1.3.
The Standard Library
As discussed in Section 9.1, we found the current basis for writing reusable
libraries to be limiting for our platform. One of the major problems is the
interoperability between standard and non-standard libraries, which limits
the amount of third-party libraries that can be utilized for the RustyGecko
platform. We leave it as future work to go into detail on ways to solve this
problem, by either applying a different approach or to modify the blocking
obstacle in the std crate.
Rust Embedded Library
In Section 7.3, we looked at a library that provided higher-level abstractions
by using the language features of Rust. This library can be further developed
to include better initialization procedures for the peripherals, as in Zinc, and
extended to provide abstractions for more peripherals.
Safe Access to Hardware
The interrupt-driven programming model that is used to programming of embedded systems did not prove to be as applicable to Rust and its ownershipsemantics as we had hoped. Rust’s ownership system helps to rule out data
races in programs [7]. We believe that the ownership system can be utilized
in a new framework, based on the one that was described in Section 7.2 and
further discussed in Section 9.2, for initializing and dispatching interrupts. It
will be interesting to see if Rust’s ownership-semantics can help to apply a
more dynamic approach to this framework, in order to ensure safe access to
hardware peripherals.
Using Rust at the Library Layer
Throughout this thesis, we have only worked with the Rust language at the
application layer language and binding to C for library support. It can be
interesting to do this the other way around. Concretely, parts of the emlib
1 https://crates.io/crates/bindgen
130
CHAPTER 10. CONCLUSION
library can be replaced with a Rust implementation and still expose the same
API to the user and be callable from a C application.
Rust-only Solution
We chose to base the RustyGecko platform on the software libraries that
were already available for the Gecko. This enabled us to quickly shape the
platform and explore many different project ideas. However, we argued in
Section 9.3 that to make a more thoroughly comparison of the C and Rust
languages in this domain, more of the platform have to be implemented in
Rust. A new direction for the platform can be to adapt the Zinc project for
the Gecko, and to port the actual implementations of the emlib library to
Rust. This approach can provide a better basis for an evaluation of Rust. It
is also possible that Rust’s unsafe-semantics can help to uncover more bugs
in the C-implementation of emlib.
Bibliography
[1] Fearless Concurrency with Rust. Available: blog.rust-lang.org/2015/04/
10/Fearless-Concurrency.html. [Accessed: 2015-05-05].
[2] Gartner. Available: http://www.gartner.com/newsroom/id/2905717. [Accessed: 2015-06-09].
[3] GCC ARM Embedded.
Available:
gcc-arm-embedded. [Accessed: 2015-06-09].
https://launchpad.net/
[4] Priorities After 1.0. Available: https://internals.rust-lang.org/t/
priorities-after-1-0/1901. [Accessed: 2015-06-10].
[5] Rust Once, Run Everywhere. Available: http://blog.rust-lang.org/
2015/04/24/Rust-Once-Run-Everywhere.html. [Accessed: 2015-04-27].
[6] The Problem With Single-threaded Shared Mutability.
Available:
http://manishearth.github.io/blog/2015/05/17/
the-problem-with-shared-mutability/. [Accessed: 2015-06-02].
[7] The Rust Programming Language. Available: http://doc.rust-lang.org/
book. [Accessed: 2015-05-26].
[8] The Rust Project FAQ.
Available:
https://doc.rust-lang.org/
complement-project-faq.html. [Accessed: 2015-04-27].
[9] Using the GNU Compiler Collection (GCC). Available: https://gcc.gnu.
org/onlinedocs/. [Accessed: 2015-06-11].
[10] VDC Research. Available: http://www.oracle.com/us/technologies/
java/java-embedded-market-wp-2179018.pdf. [Accessed: 2015-06-09].
[11] zinc.rs. Available: http://zinc.rs/. [Accessed: 2015-06-09].
[12] Dinakar Dhurjati, Sumant Kowshik, Vikram Adve, and Chris Lattner. Memory safety without garbage collection for embedded applications. ACM Transactions on Embedded Computing Systems, 4(1):73–111, 2005.
131
132
BIBLIOGRAPHY
[13] Jan Vitek Filip Pizlo, Lukasz Ziarek. Real Time Java on resource-constrained
platforms with Fiji VM. 2009.
[14] Dan Grossman, Greg Morrisett, Trevor Jim, Michael Hicks, Yanling Wang,
and James Cheney. Region-based memory management in cyclone. ACM
SIGPLAN Notices, 37:282, 2002.
[15] Makoto Higashi, Tetsuo Yamamoto, Yasuhiro Hayase, Takashi Ishio, and Katsuro Inoue. An effective method to control interrupt handler for data race
detection. Proceedings of the 5th Workshop on Automation of Software Test AST ’10, pages 79–86, 2010.
[16] Silicon Labs. DIRECT MEMORY ACCESS - Application Note. pages 1–7,
2004.
[17] Silicon Labs. User manual - Development Kit EFM32GG-DK3750. 2013.
[18] Silicon Labs. User manual - Starter Kit EFM32GG-STK3700. 2013.
[19] Silicon Labs. Biometric EXP Evaluation Board User’s Guide. 2014.
[20] Silicon Labs. EFM32GG Reference Manual. 2014.
[21] Silicon Labs. Mixed-Signal 32-bit Microcontrollers. 2014.
[22] Silicon Labs. TIMER - Application Note. 2014.
[23] Alessandro Orso and Gregg Rothermel. Software Testing: A Research Travelogue (2000–2014). pages 117–132, 2014.
[24] Alexandre Petit-Bianco. No Silver Bullet - Garbage Collection for Java in
Embedded Systems.
[25] John Regehr. Random testing of interrupt-driven software. Proceedings of
the 5th ACM international conference on Embedded software, pages 290–298,
2005.
[26] Nikhil Swamy, Michael Hicks, Greg Morrisett, Dan Grossman, and Trevor
Jim. Safe manual memory management in Cyclone. Science of Computer
Programming, 62(2):122–144, 2006.
[27] Ca Valhouli. The Internet of things: Networked objects and smart devices.
The Hammersmith Group research report, (february):1–7, 2010.
[28] Paul R. Wilson. Uniprocessor garbage collection techniques. Memory Management, (September):1–42, 1992.