1
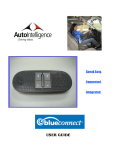
Bluetooth® Hands Free
Phone System by
BlueConnect®
USER GUIDE
TABLE OF CONTENTS
INTRODUCTION
WHAT IS BLUECONNECT®?
WHAT CELL PHONES WORK?
CUSTOMER CONTACT INFORMATION
WARNINGS – PLEASE READ
GETTING STARTED
BLUECONNECT® UIB (USER INTERFACE BOARD)
FUNCTION OVERVIEW
SET UP
PHONE PAIRING
CLEAR PAIRED PHONE(S)
LIST PAIRED PHONE(S)
CONFIRMATION PROMPTS
SELECT PHONE
Pg
2
2
2
3
4
5
6
7
8
8
9
10
USING THE CALL FEATURE
USING THE DIGIT STRING DIAL FEATURE
USING THE REDIAL FEATURE
PHONEBOOK
ADDING A NEW NAME
ADDING A NEW LOCATION
EDITING A NUMBER
LISTING NAMES
DELETE A NAME OR LOCATION
ERASE ALL
TROUBLESHOOTING
MY PHONE WILL NOT PAIR
A PAIRED PHONE WILL NOT LINK / CONNECT
I CANNOT RECEIVE INCOMING CALLS
I CANNOT PLACE A CALL
I CAN HEAR BUT THEY CAN NOT HEAR ME
THE AUDIO GOES MUTE BOTH WAYS DURING A
CALL
THE AUDIO QUALITY IS POOR
I AM TOLD THAT I SOUND BAD
THE VOICE RECOGNITION IS NOT WORKING
IT WILL NOT CALL THE NAME GIVEN TO IT
I CANNOT SELECT A PHONE
HELP
GETTING HELP
Pg
DEFECTIVE / DAMAGED MERCHANDISE
WHAT TO DO
PRODUCT RETURNS
MISCELLANEOUS
REGISTERING YOUR PRODUCT
CONTACTING CUSTOMER SERVICE
PRODUCT COMPLIANCE
PRODUCT WARRANTY
PRODUCT FUNCTIONS
CALL REJECT
CALL WAITING
DIGIT STRING DIALING
11
11
11
12
12
13
13
13
14
14
15
15
15
16
16
16
16
17
17
17
17
18
19
19
19
19
20
INCOMING CALLS
MUTE A CALL
REDIAL A NUMBER
THREE WAY CALLING
TRANSFER A CALL
(VR) VOICE RECOGNITION BUTTON
21
21
21
21
21
21
21
21
21
21
INDEX
22
EMERGENCY
MAKING A CALL
1
2
What is BlueConnect®? BlueConnect® is a state-of-the-art, integrated, hands free
phone communication system for your vehicle. BlueConnect® utilizes Bluetooth®
wireless technology and Bluetooth® hands free profiled cell phones to improve cell
phone use and convenience. BlueConnect® eliminates the need to hold a handheld cell
phone, wear a headset or earpiece, or use an in-vehicle mounted handset adapter while
making or receiving phone calls. BlueConnect® is easy to use because it is voice
activated and it can be installed in almost any vehicle, new or used.
What cell phones will work with BlueConnect®? Due to the versatility of Bluetooth®
wireless technology, not all cell phones share the same Bluetooth® “profile” and may
not work properly with BlueConnect®. Only cell phones that are Bluetooth® enabled
and support a “hands free” profile are compatible with BlueConnect®. You can go to
www.jciblueconnect.com to see a list of compatible cell phones. You can also contact
your local cell phone provider.
Customer Contact Information
Reference
USA
Phone / BlueConnect
Support
BlueConnect
1-888-528-7930
Technical Support
AI
1-800-406-7132
Web Site
www.jciblueconnect.com
www.autointelligence.com
3
WARNINGS – PLEASE READ
Be Safe. When using a hands free cellular device in a vehicle, the vehicle
operator is solely responsible for operating the vehicle in a safe manner. Vehicle
operators must maintain full surveillance of all pertinent driving conditions at all
times. An accident or collision resulting in damage of property, personal injury or
death could occur if the operator of the vehicle fails to pay attention to travel
conditions and vehicle operation while the vehicle is in motion.
DO NOT program, attempt to program, adjust, or set up your BlueConnect® unit
while the vehicle is moving. Your vehicle should be in park with the ignition
turned to the on or “acc” (accessory) position.
DO NOT program, attempt to program, adjust, or set up your BlueConnect® unit
while the vehicle is inside and the engine is on.
Failure to follow these precautions could result in property damage, serious
injury, and death for yourself, pets, or other people near the vehicle from carbon
monoxide (for example, if the vehicle's engine is running in a garage with the
garage door closed), or from physical impact.
Getting Started
Fully charge your cell phone's battery before programming your BlueConnect® unit to
ensure that the wireless electronic connection will be established with minimal difficulty.
Try to maintain a fully charged cell phone battery when using BlueConnect®.
BlueConnect® will not increase or decrease your cell phone’s signal strength because it
operates using the same signal as your cell phone.
Keep your cell phone “on” and inside of your vehicle's interior cabin so it can transmit
properly to BlueConnect®.
Do not place your cell phone in a metal box or similar container.
Your vehicle may require that the ignition switch be turned to either the “acc” or “on”
position for programming and operation of BlueConnect®.
This BlueConnect® version is programmed for English translation only.
When using BlueConnect® face the windshield and speak in your normal voice clearly
without shouting. Do not speak slowly or pronounce words more distinctly than you
normally would.
BlueConnect® will automatically prompt you for a verbal response when the
confirmation prompt feature is turned “on.”
Make sure the prompt feature is turned “on” on your BlueConnect® unit before
programming or when following any “prompted” instructions outlined in this user guide.
You can say "cancel" to return to the main menu or "help" to hear a list of available
options anytime BlueConnect® prompts you for a response.
When using BlueConnect®, wait to speak until after the beep is heard which follows the
appropriate prompt.
If no response is given to a BlueConnect® prompt, it will repeat the prompt two more
times until the user selects an option. If there is still no option selected, BlueConnect®
will power down.
4
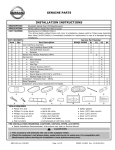
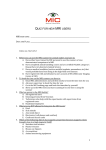
BlueConnect® UIB (User Interface Board)
1
6
2
5
4
3
1.
o
o
o
o
Phone Button or Activation / Deactivation Button
Push to set up and program unit
Push to make a call if not on a call.
Push to end a call.
Push to accept or reject an incoming call when on another call.
2.
o
o
o
Volume Up & Down Buttons
Push (+) to increase the volume.
Push (-) to decrease the volume.
Push either button to the desired volume level when the unit is not activated. Audible beeps
indicate the current volume level.
3. Speaker
4. Blue L.E.D. Light
o A blue light comes on indicating that the unit is activated or when there is an incoming call. It
also comes on when you are on a call.
5. VR (Voice Recognition) Button or Barge-in Button
o Push to input a command without having to listen for a prompt.
o Push to transfer a call. This allows you to transfer your call back to your cell phone in the
event you want privacy or are exiting the vehicle.
o Push to mute the phone.
o Push to send DTMF tones.
6. Directional Microphone
5
6
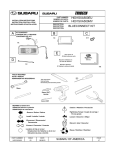
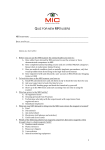
Function Overview
COMMAND 1
COMMAND 2
Call <Name>
<Location>
<Name> in
Phonebook
CALL
Dial <Number>
DIAL
PHONEBOOK
<Number>
NEW ENTRY
EDIT
LIST NAMES
DELETE
ERASE ALL
REDIAL
EMERGENCY
SET UP
PHONE PAIRING
CONFIRMATION
PROMPTS
SELECT PHONE
HELP
COMMAND 3
<Location>
<Name><Location><Number>
<Name><Location><Number>
Call <Location>
Edit<Location><Number>
Delete<Location>
Previous
Continue
<Name><Location><ALL>
Pair a Phone
Delete a Phone
List Paired Phones
<Phone ID Number>
7
Phone Pairing
You must first pair BlueConnect® (establish a communication link) to your Bluetooth®
hands free profile cell phone. Please refer to your cell phone’s operation manual for
instructions on how to place your cellular phone into a pairing mode before starting the
pairing process. In order to complete successful pairing, both your cell phone and the
BlueConnect® module must be in a pairing mode at the same time. BlueConnect® will
remain in a pairing mode for about 3 minutes before timing out.
1
2
3
4
5
6
7
8
9
Press and release the BlueConnect® PHONE button and say "Set Up".
For example, say, "Set Up" at the Main menu and BlueConnect® prompts
"Select one of the following: phone pairing, confirmation prompts, select
phone or say cancel to return to the main menu." If there is no response to
the prompts, BlueConnect® reminds you of the selection two more times
until you select an option. If there is no option selected after two repeats,
BlueConnect® will power down.
Say, "Phone Pairing."
After the system prompts you, say “Pair a Phone.” The system will remind
you that pairing should only be completed while the vehicle is in park.
When the vehicle is in park say "Continue."
The system will then ask you for a 4-digit PIN. This can be any number you
choose as long as you enter the same number on the phone later.
Say your four-digit PIN. For example: "One-Two-Three-Four"
Follow your cell phone manufacturer's instructions for placing your cell
phone in a pairing mode.
Select BlueConnect® on the phone. Then, on the phone's numeric keypad,
enter the same PIN number as entered in step 4.
BlueConnect® will prompt you for a phone name. Name it something easy
to remember. Say the phone name, for example, "Jacob's phone.”
To complete the pairing process, BlueConnect® will now ask you for a
phone priority from 1 to 7. Number 1 is the highest priority. If two phones
are paired, BlueConnect® will use the higher priority phone when both
phones are within range. Say the phone priority, for example, "One."
When complete, BlueConnect® will indicate "Pairing Complete.”
8
Clear Paired Phones
You must clear a paired phone from BlueConnect® in order to remove it from being
paired. BlueConnect® will respond with "Phone not available" if you attempt to use a
previously cleared phone to make a call. If you make a mistake during the clearing
process or decide not to clear a phone, press the BlueConnect® PHONE button, or the
VR button and say “cancel,” to exit the clearing mode. To re-prioritize cell phones you
must first clear the phone(s) paired with BlueConnect® and then re-pair the phones with
the new desired priorities.
1
2
3
4
5
6
If you are not currently in a VR session or on a phone call, press and release
the PHONE button and say, "Set Up”, otherwise go to the main menu and
say, “Set Up”.
Say "Phone Pairing."
After BlueConnect® prompts you, say, "Delete a phone.”
BlueConnect® prompts you for the number associated with the priority of the
phone you would like to clear. For Example, “Say ‘one’ for Jacob’s phone’,
say ‘two’ for ‘Robin’s mobile’.” Say the number of phone you wish to delete.
BlueConnect® responds with a verification to clear the selected phone. If
correct, say "yes" (say "no" to start the delete process over).
When complete, BlueConnect® indicates the phone or phones have been
"Deleted."
List Paired Phones
1
2
3
4
5
6
Press and release the BlueConnect® PHONE button and say "Set Up."
BlueConnect® will prompt you with available options.
Say "Phone Pairing."
After BlueConnect® prompts you, say "List Paired Phones.”
BlueConnect® lists the names of the cellular phones that are currently
paired with the BlueConnect® module.
BlueConnect® asks if you want to start the list over again.
Say "Yes" or "No."
9
Confirmation Prompts
Confirmation prompts confirm your commands with BlueConnect® before they are
carried out. When the BlueConnect® Confirmation Prompts feature in ON,
BlueConnect® will repeat the last command received and ask whether the command
received was correct before proceeding with the command execution.
Example with the confirmation prompts on and off.
PROMPTS
1
ON
You say, "Dial five-five-five-onetwo-one-two."
2
BlueConnect® says, "Dialing fivefive-five-one-two-one-two, is this
correct?"
3
You say, "yes" and BlueConnect®
places the call. You say, "no" and
BlueConnect® asks you to repeat
the number.
OFF
You say, "Dial five-five-fiveone-two-one-two."
BlueConnect® dials the
number as recognized. For
example; "Dialing five, five,
five…" and then dialing the
number.
Turning the confirmation prompts ON and OFF
1
2
3
4
5
6
Go to the BlueConnect® main menu and say, "Set Up."
BlueConnect® prompts you with available options.
Say, "Confirmation prompts."
If the confirmation prompts are ON, BlueConnect® will ask if you
want to turn them OFF.
Say, "Yes." BlueConnect® will tell you that they are OFF and says,
"Ready." Or
If the confirmation prompts are OFF, BlueConnect® will tell you that
they are OFF and will ask if you want them to be turned ON.
Say, "Yes" to turn them ON. BlueConnect® will then return to the
main menu.
10
Select A Phone
This option is used to over-ride the phone priority given during pairing. For example, if
you wish to use phone three to make an outgoing call, you would select phone three
and make the call. This over-ride only works the current ignition “on” cycle for one call.
BlueConnect® switches back to the highest priority phone once the ignition is turned
“off”. You can select a phone using the VR button during a phone listing, or by the
select phone command.
Select phone by name.
1
2
3
4
5
At the main menu say "Set Up Phone Pairing.” BlueConnect®
prompts you with available options.
Say "List Paired Phone."
BlueConnect® lists all phones that are paired to it.
When the name of the desired phone is heard, press and release
the VR button and say, “Select.”
BlueConnect® sets this phone to the highest priority for the rest of
the current ignition on cycle. BlueConnect® temporarily overrides
the phone priorities for the rest of the current ignition on cycle.
Select phone by number.
1
2
3
4
5
At the main menu say, "Set Up." The system prompts you with
available options.
Say, "Select Phone."
The system lists the available phones and asks for the number of the
phone. Say the number of the phone.
BlueConnect® verifies the selected phone name and asks if it is
correct. Say, "Yes" if correct, or "No" if not.
BlueConnect® sets this phone to the highest priority for the rest of the
current ignition “on” cycle. This temporarily overrides the phone for
rest of current ignition on cycle only.
11
Using the Call Feature
Calling a name or a name / location from the phonebook.
1
2
3
At the main menu say, "Call (any phone book entry name)." If the
name has more than one location, BlueConnect® will ask for the
location to call.
If just “call” was used, BlueConnect® will say, “Name Please.”
Say the “Name.”
Say the Location.
Using the Digit String Dialing Feature
Dialing a phone number that is not in the phonebook.
1
2
At the main menu say, "Dial (immediately followed by the phone
number such as 6163948888) or just say “dial” then speak the
phone number when prompted.
BlueConnect® says what number it is dialing and verifies that this is
correct (if confirmation prompts are on). If it is, it says "Dialing" and
dials the number.
Using the Redial Feature
1
2
At the main menu say, "Redial.”
BlueConnect® says "Dialing" and calls the phone number that was
dialed last on the phone.
12
Phonebook
BlueConnect® can store up to 32 names and 128 phone numbers. Each name has 4
locations (Home, Work, Mobile, and Pager) associated with it.
Adding a new name and phone number to your phonebook.
1
2
3
4
5
6
7
At the main menu say, "Phonebook." BlueConnect® prompts you
for a new entry, edit, list names, delete or erase all or say cancel
to return to the main menu. Say, “New Entry.”
Say the Name of the user to add. BlueConnect® responds with the
name it heard and checks to see if it is correct before proceeding.
BlueConnect® asks for a location to go with the name.
Say the location of the name; "Home," "Work,” "Mobile," or
"Pager.” BlueConnect® checks to see if it heard the location
correctly.
BlueConnect® asks for the telephone number for the name.
Say the phone number for the name and location.
BlueConnect® says the phone number and asks if it is correct. If
so, it adds the phone number for this name and location to the
phonebook and then asks… "Number stored. Would you like to
add another number for this entry?"
Say "Yes" to add another number for this entry or say "No" if you
are finished.
Adding a new location for an existing name in your phonebook.
1
2
3
4
5
6
At the main menu say "Phonebook," "Edit,” When prompted, say the
name that you want to edit. The system responds with "Home, Work,
Mobile, or Pager.”
Say the Location ("Home", "Work", "Mobile", or "Pager") and the
phone number to enter in the phonebook for this name and location.
BlueConnect® verifies that it heard the location correctly and asks
for the phone number for that location.
Say a phone number like "6163998888."
BlueConnect® verifies that it heard the number correctly and stores
the number. It will then say, "Number changed. Would you like to call
this number, edit another entry, or return to main menu?"
Say, "Call," "Edit," or "Return to Main Menu.”
13
Phonebook (Continued)
Editing a phone number for an existing name / location.
1
2
3
4
At the main menu say "Phonebook," "Edit." When prompted, say the
name, and then the Location whose phone number you want to edit.
BlueConnect® will tell you the current phone number.
Say the new phone number like "6163998888."
BlueConnect® verifies that it heard the number correctly and stores
the number. It will then say, "Number changed. Would you like to call
this number, edit another entry, or say cancel to return to main menu?"
Say, "Call," "Edit," or "Cancel” to Return to Main Menu.
Listing names in BlueConnect® phonebook.
1
2
3
4
5
6
7
At the main menu say "Phonebook,” ” List Names.” The phonebook
entries are listed.
At the end of the list, BlueConnect® asks "End of list, would you like to
start from the beginning?" Say,"Yes" to hear the phonebook entry list
again or "No" if you do not want to hear it again. Or,
After you hear the phonebook entry that you want to call, press the
BlueConnect® VR button to stop the list process.
Say, "Call" to call the last name listed.
BlueConnect® gives the selected name and its locations. It then asks
for the location you want to call.
Say the location you want to call.
BlueConnect® says who and where it is calling and asks if this is
correct (Y/N). If it is, BlueConnect® responds with “Dialing" and dials
the selected number.
Deleting a phonebook name or location.
1
2
3
At the main menu say "Phonebook," "Delete". When prompted, say the
Name to delete.
If only one location exists for the name, BlueConnect® will verify that
you want to delete the name and location and then deletes it. Or,
If that name exists and there are more than one location for the name,
BlueConnect® reads you a list of locations for the name.
Say the location to delete or say "All " to delete all locations for this
name. BlueConnect® verifies that you want to delete the location (Y/N)
and then deletes it.
Phonebook (Continued)
14
Erasing all phonebook records.
Use this command only if you want to erase (delete) the entire phonebook.
BlueConnect® prompts you two times to be sure you do want to delete the phonebook.
1
2
3
4
At the main menu say, "Phonebook,” “ Erase All" to delete all
phonebook records.
BlueConnect® responds "Are you sure you want to erase everything
from your system phonebook?" Say, "No" if you do not want to delete all
phonebook records. BlueConnect® exits the Erase All process or,
Say, "Yes" to delete all phonebook records. BlueConnect® responds,
"You are about to delete everything from your system phonebook. Do
you want to continue?"
Say, "No" if you do not want to delete all phonebook records.
BlueConnect® exits the Erase All process or Say, "Yes" to delete all
phonebook records. BlueConnect® deletes all phonebook records and
says "Phonebook Erased.”
Troubleshooting
My Phone will not pair.
CHECK
Phone and BlueConnect® have power.
Phone is designed to work with BlueConnect®.
Phone was paired properly.
On certain phone models you need to tell the phone
to connect (after initiating the pairing process on some
models only.)
Bluetooth® option on your phone was turned ON.
Phone is not outside of the vehicle while trying to pair
it to BlueConnect®.
Phones that require a SIM card
4 digit PIN number entered in the phone matches the
BlueConnect® PIN number.
POSSIBLE SOLUTIONS
Make sure that the phone and vehicle ignition is ON. Also make
sure that your phone battery is charged.
Your phone may not work with BlueConnect®. Only phones with
Bluetooth® capability and a hands free profile will work with
BlueConnect®. Phones that support the use of a wireless
headset should work with BlueConnect®. You can go to
www.jciblueconnect.com and view a list of approved
BlueConnect® Bluetooth® hands free profile phones.
Refer to the phone’s pairing instructions and the BlueConnect®
pairing instructions. Try the pairing process again.
Try pairing again and tell the phone to connect.
Turn the Bluetooth® option to “ON” on your phone.
Place phone inside the vehicle in the front seat area during the
pairing process.
Make sure that it is installed. If not, install a SIM card.
Reprogram using the same four-digit PIN for both PIN requests.
Troubleshooting
A Paired Phone Will Not Link/Connect
CHECK
POSSIBLE SOLUTIONS
Phone and BlueConnect® have power.
Phone and BlueConnect® have had adequate time to
“find” each other.
BlueConnect® was not “barred” from the phone.
Phone is set to automatically link/connect to the
BlueConnect®.
BlueConnect® was not inadvertently set back to the
default (is not set to automatically link / connect to the
BlueConnect®).
Make sure that the phone and vehicle ignition is ON. Also
make sure that your phone battery is charged.
Allow at least 60 seconds for the link to take place.
Use the BlueConnect® “Set Up,” command at the main
menu and then “Select Phone” command to link to the
desired phone.
See your phone’s user guide for Bluetooth® settings.
See your phone’s user guide for Bluetooth® settings.
I Can’t Receive Incoming Calls
CHECK
POSSIBLE SOLUTIONS
Vehicle’s ignition is ON.
You are pressing the correct button on BlueConnect®
to answer the call.
Phone is paired and linked to BlueConnect®.
Phone is not outside of the vehicle.
Turn your vehicle ignition to the ON position.
Press the PHONE button to answer an incoming call and
not the VR button on BlueConnect®.
Use the BlueConnect® ‘Set Up’ command at the main
menu and then “Select Phone” command to link to the
desired phone.
Place the phone inside of the vehicle to ensure a good
connection.
I Can’t Place a Call
CHECK
Phone is turned ON.
The vehicle ignition is in the ON position.
You have an adequate cell phone signal.
Phone is paired and properly linked to BlueConnect®
You are inside of your coverage area.
Mobile account is still active and has not been
cancelled.
POSSIBLE SOLUTIONS
Turn your phone ON. BlueConnect® will only work when
the paired cell phone is turned ON.
Turn your vehicle ignition to the ON position.
Check the signal icon on your phone for signal. You may
have to wait until you are in an area that provides you with
a stronger signal before making a call. BlueConnect®
uses the signal going to the paired cell phone. It does not
increase or decrease cell phone signal strength.
Your phone may not be paired properly. See your phone
user guide for pairing instructions and try to pair your
phone again. Use the ‘Set Up’ command on your
BlueConnect®’s main menu and then give the ‘Select
Phone’ command to link to the desired phone.
Most calls can’t be made if you are outside of your
coverage area. Your BlueConnect® unit uses the same
coverage area as the paired cell phone. Try making a call
again when you are in your coverage area. Check with
your phone provider if you are unsure about your
coverage area.
Contact your cell phone service provider.
15
16
Troubleshooting
I Can Hear But They Can’t Hear Me
CHECK
POSSIBLE SOLUTIONS
The phone’s signal strength.
Call is not “muted” on the BlueConnect® unit.
Avoid using your phone and BlueConnect® in areas
where the signal strength is poor and unable to
provide a good conversation in both directions.
Turn mute off by saying, “mute off” while in use.
The Audio Goes Mute Both Ways During a Call
CHECK
POSSIBLE SOLUTIONS
You have not accidentally muted BlueConnect®.
Press the PHONE button to return to the call.
The Audio Quality is Poor
CHECK
POSSIBLE SOLUTIONS
The audio quality of your cell phone while not using it
with BlueConnect®.
Phone has adequate cell signal strength.
Phone is in the vehicle.
If the audio quality is good then try it again with
BlueConnect®. If the audio quality is still poor with
BlueConnect® then contact AutoIntelligence. If the
audio quality is poor on your cell phone then contact
your phone provider/carrier to verify that your phone
has the latest firmware.
Check the signal strength icon on your phone. Avoid
using the phone and BlueConnect® in areas where
the signal strength is poor and unable to provide a
good conversation in both directions.
Place phone closer to BlueConnect® module, ie.the
center of front seat area of the vehicle.
I Am Told That I Sound Bad
CHECK
There is not an abnormal amount of noise inside of
the vehicle while using BlueConnect®.
If they hear a lot of distortion.
POSSIBLE SOLUTIONS
Try eliminating any additional noise by rolling up the
windows, turning the heater/ac blower fan down and
reducing any loud noises or talking while using
BlueConnect®. Your BlueConnect® unit may also pick
up road noise. Try to avoid using BlueConnect® when
traveling on extremely rough roads.
You may have a firmware issue. Verify the latest
phone firmware is being used. Contact your phone
provider / carrier.
17
Troubleshooting
The Voice Recognition is Not Working
CHECK
POSSIBLE SOLUTIONS
There is not an abnormal amount of noise inside of
the vehicle while using BlueConnect®.
You are not speaking at the same time or before the
BlueConnect® beep is heard.
You are not speaking to slow, too loud or too soft.
Try eliminating any additional noise by rolling up the
windows, turning the heater/ac blower fan down and
reducing any loud noises or talking while using
BlueConnect®. Your BlueConnect® unit may also pick
up road noise. Try to avoid using BlueConnect® when
traveling on extremely rough roads.
Wait until the beep sounds before speaking.
Try speaking in a normal voice when giving a
command or response to BlueConnect®.
It Will Not Call The Name Given To It
CHECK
POSSIBLE SOLUTIONS
The name you called is stored in the BlueConnect®
phone book
Store the name in BlueConnect® phonebook, not in the
phone.
I Can’t Select a Phone
CHECK
Phone is paired to BlueConnect®.
Phone is turned ON.
Phone is LINKED to BlueConnect®.
POSSIBLE SOLUTIONS
Pair the phone and LINK to BlueConnect®.
Turn the phone ON.
Say, “set up” in main menu and then say “Select Phone”
in order to select the desired paired phone to LINK.
Help
Using the HELP feature to get BlueConnect® to give you the available commands.
1
2
Press and release the BlueConnect® Phone button.
After the beep, say, “Help” or during any time BlueConnect® is “on,” press the VR
button and say, “Help.” The module lists the available commands for the current
menu. For example, say, “Help” at the main menu and BlueConnect® prompts
“available options are: Call, Dial, Phonebook, Redial, Emergency or Set Up.”
18
Defective Product
WHAT TO DO?
If you suspect that you have defective product:
1. Before returning to your Hyundai Dealer, refer to the “Troubleshooting” sections
as outlined in this document and perform the checks and solutions listed.
2. If you are still having difficulty, contact AutoIntelligence Technical Support @
1.800.406.7132.
3. Our technicians will then help you determine if a repair is required.
If it is determined that repair is required please return to an authorized Hyundai
Dealer for service.
Miscellaneous
19
Contacting Customer Service
Before contacting support, please have the following information available (as listed
below) before calling technical support the first time.
Customer Name
Purchase Date
Detailed description of problem
We reserve the right to make changes or improvements in our products from time to
time without incurring the obligation to install such improvements or changes on
equipment or items previously manufactured.
To receive product support, contact AutoIntelligence at 800-406-7132 or
www.autointelligence.com
Product Compliance
This device complies with FCC rules part 15. Operation is subject to the following two conditions: (1) This device
may not cause harmful interference, and (2) This device must accept any interference that may be received
including interference that may cause undesired operation. WARNING: The transmitter has been tested and
complies with FCC and IC rules. Changes or modifications not expressly approved by the party responsible for
compliance could void the user's authority to operate the device. The term "IC:" before the
certification/registration number only signifies that Industry Canada technical specifications were met.
IC: 279B-UCONNCS JCI MODEL/FCC ID: CB2-UCONNCS
20
LIMITED WARRANTY
Hyundai Motor America warrants this product against defects in material and workmanship under normal
use and services for:
o
A period of Three years or 36,000 miles, if installed in your new vehicle at the time of the vehicle
purchase by your selling dealer. Or,
o
A period of one year, parts and labor, if purchased after vehicle delivery from a Hyundai Dealer.
HYUNDAI WARRANTS this Hyundai Accessory, if installed on 2008 model year vehicle by a Hyundai
dealer, at the time of or prior to the vehicles date of first use, for 36 months / 36,000 miles, whichever
occurs first from the date of first use.
Accessories installed by a Hyundai dealer after the vehicle’s date of first use, are covered for 12 months
or 12,000 miles, whichever occurs first from the date of purchase or installation.
Product Functions
Incoming Calls
1. If you are not on a call, the BlueConnect® blue LED light will come “on” and the system will
announce the incoming call verbally.
2. If you are on a call, BlueConnect® will announce the incoming call with a double-beep.
Call Waiting
1. Use this feature to place a call on hold.
2. Press and hold the Phone button until you hear one beep to place a call on hold.
3. Press and hold the Phone button again until you hear one beep to retrieve the call.
Redial
1. Press and release the VR button and say, “Redial.” BlueConnect® will redial the last number
called on the cell phone.
Digit String Dialing
1.
2.
3.
4.
BlueConnect® will allow you to send <digits> to far-end as touch-tones (DTMF).
Use this feature in the event you need to dial into voice mail or an automated system.
Push VR button, say number sequence and then say, “Send.”
Example: 1-2-3-4-5-#-# - “Send”
VR Voice Recognition Button
1. Pressing and releasing the VR button interrupts the system and tells BlueConnect® to listen for a
command.
2. Pressing and releasing the VR button does not interfere with the person on the other end of the
call.
Transfer a Call
1. Press and release the VR button during a call and say, “Transfer Call.” This transfers the call from
BlueConnect® to your cell phone.
2. Press and release the VR button again and say, “Transfer Call” to transfer the call from your cell
phone back to BlueConnect®.
Three Way Calling
1. This feature will not work unless your cell phone has three way calling capability.
2. Make your first call. Once connected press the VR button and say dial or call. This places the first
call on hold.
3. Make the second call. When connected press and hold the Phone button until you hear two
beeps. This joins the two calls. You can switch between calls by pressing and holding the Phone
button until you hear one-beep.
When on a call you can connect a second incoming call by pressing and holding the Phone
button until you hear two beeps.
Mute a Call
1. Press and release the VR button during the call and say “Mute” to turn the mute feature on. This
mutes the in-car activity from the person on the other end of the call.
2. Press and release it again and say, “Mute Off” to turn the mute feature off.
Call Reject
1. Use this feature when on a call to reject a second incoming call.
2. Let the double-beep play three times.
Emergency
1. THIS IS NOT A SAFETY, LIFE SAVING OR AUTOMATIC EMERGENCY RESPONSE
FEATURE OR SYSTEM.
2. This feature, in order to function properly, requires that a “911” service is available and that
BlueConnect® is paired to a cell phone which is “on” and in the vehicle. It also requires that the
cell phone is able to receive and transmit properly at the time this feature is used.
21
Index
F
A
Adding A Name
12
Adding A New Location
12
Audio Quality
16
Function Overview
Prompts
6
G
Getting Started
4,9
Q–R
Redial feature
4
Return Authorization
H
Hands Free Profile
B
Barge-In Button
5
Beeps
4,5
Blue LED Light
5
BlueConnect® Commands
6
BlueTooth®
2
Button Functions
5
C
Help
11,21
S
2
Safety & Warnings
4,17 Select A Phone
Hold Call
21
I
Incoming Calls
19
21
3
10,17
Set Up Command
7
SIM Card
14
Speaker
5
T
J
Johnson Controls
2
K-L
Table of Contents
1
Three way Call
21
Transfer A Call
21
Call Feature
11
Call Waiting
21
Legal Rights
20
Troubleshooting
Cancel
4
List Paired Phones
8
U
Cell Phone Battery
4
Listing Names
13
Cell Phone Firmware
16
Cell Phone Requirements
2, 4
M
UIB
5
UIB Buttons
5
Unit Power Down
4
User Interface Board
5
Cell Phone Signal
4
Microphone
Clear Paired Phones
8
Mute
Confirmation Prompts
9
Contact - Sales
2
Contact – Service & Warranty
2
Contact – Technical Support
2
Pairing Mode
7
Customer Contact Information
2
Phone Button
5
Warranty
20
Customer Service
19
Phone Compatibility
2
Warranty Period
20
Phone Not Available
8
Web Site
2
7
D
6
14-17
16,21
N-O
Original Sales Receipt
21
P
5
Phone Operational Manual
Defective or Damaged Merchandise
18
Phone Pairing
Definition – BlueConnect®
2
Phone Priority
Delete A Phone
8
Phonebook
Deleting A Location
13
PIN
Deleting A Name
13
Precautions
3
Dial Feature
11
Product Compliance
19
DTMF Tones
11, 21 Product Functions
5
E
Vehicle Compatibility
2
Volume Buttons
5
VR (Voice Recognition)
Deactivation Button
Digit String Dialing
V
7,14,1
5
7,10
12
7,14
21
Product Phone Support
19
Product Registration
19
Editing A Number
13
Product Returns
19
Emergency
21
Product Serial Number
21
Erase All Names
14
Programming Safety
3
5,17,21
W
22
Notes
SD – 1045 REV 08/1/07