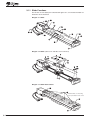
1
HL-0120-3
EZS Series Slider
EZC Series Cylinder
INSTALLATION MANUAL
ORIENTAL MOTOR CO., LTD.
Notes to the User
● This product must be handled by qualified personnel with expert knowledge of elec-
trical and mechanical engineering. Before using the product, please read Chapter
1, “Safety ”, carefully to ensure correct use.
● This product is designed and manufactured for use as an internal component for
general industrial equipment. Do not use the product for any other purpose. Oriental
Motor shall not be liable whatsoever for any damage arising from a failure to observe this warning.
● Should you require the inspection or repair of internal parts, please contact the
Oriental Motor branch or sales office from which you purchased the product.
● The figures and tables provided in this document are intended to help you understand the content of the text. They should not be construed in any way as guaranteeing the resultant operation.
● Oriental Motor shall not be liable whatsoever for any patent-related problem arising in connection with the use of any information, circuit, equipment or device described in this document.
● The technical specifications are subject to change without prior notice for the purpose of improvement in product performance.
● This document is protected under the applicable copyright laws. No part of this
document may be reproduced, stored, changed, duplicated or transmitted digitally
(via printing, copying, microfilming or any other manner) without prior written consent from Oriental Motor.
●
and
are trademarks of Oriental Motor Co., Ltd.
● Other product names and company names are the trademarks or registered trademarks of their respective companies. The products by other manufacturers referred
to in this installation manual are mentioned for reference purposes only; their use
is not enforced in any way. Oriental Motor shall not be liable whatsoever for the
performance of another manufacturer’s product or any problem arising from the use
thereof.
© Copyright ORIENTAL MOTOR CO., LTD. 2002
Table of Contents
Introduction
………………………………………………………… iv
Intended Reader of the Manual……………………………… iv
Purpose of the Manual ……………………………………… iv
Receipt, Storage and Disposal of the Product …………… iv
Product Support ……………………………………………… iv
Technical Assistance Regarding the Product ……………… iv
Structure and Contents of This Manual …………………… v
Contents of the Manual ……………………………………… v
Rules of Notation ……………………………………………… v i
Chapter
1 Safety
………………………………………………… 1-1
1.1 Safety Precautions …………………………………… 1- 1
1.2 Potential Dangers ……………………………………… 1- 1
1.2.1 Electric Shock ………………………………… 1- 1
1.2.2 Electrical Fire …………………………………… 1- 1
1.2.3 Danger Posed by the Machine ……………… 1- 2
1.2.4 Electromagnetic Disturbance ………………… 1- 2
1.3 General Safety Guidelines …………………………… 1- 3
Chapter
2 Unpacking, Inspection
and Storage
…………………………………… 2 -1
2.1 Unpacking the Slider / Cylinder ……………………… 2- 1
2.2 Explanation of Unit Model …………………………… 2- 2
2.2.1 Slider …………………………………………… 2- 2
2.2.2 Cylinder ………………………………………… 2- 2
2.3 Inspection Procedure ………………………………… 2- 3
2.4 Storing the Slider / Cylinder …………………………… 2- 3
Chapter
3 Slider / Cylinder Overview
……… 3 -1
3.1 Slider …………………………………………………… 3- 1
3.1.1 Slider Functions………………………………… 3- 2
3.2 Cylinder ………………………………………………… 3- 4
3.2.1 Cylinder Functions …………………………… 3- 4
3.3 Operating Requirements ……………………………… 3- 6
3.3.1 Maximum Thrust Force ……………………… 3- 6
3.3.2 Allowable Overhang Length ………………… 3- 6
3.3.3 Maximum Acceleration………………………… 3- 6
3.3.4 Temperature Range and
Maximum Load Weight ……………………… 3- 6
EZS Series Slider / EZC Series Cylinder
i
Chapter
4 Installation
……………………………………… 4-1
4.1 Required Installation Conditions …………………… 4-1
4.2 Installing the Slider …………………………………… 4-1
4.2.1 Installing from the Table Surface …………… 4-2
4.2.2 Installing from the Base Surface …………… 4-3
4.2.3 How to Use the Mounting Reference Surfaces … 4-4
4.2.4 Affixing a Load to the Table ………………… 4-5
4.2.5 Installing the Sensors ………………………… 4-6
4.3 Installing the Cylinder ………………………………… 4-10
4.3.1 Installation Using Cylinder Mounting Holes … 4-10
4.3.2 Installation Using Cylinder Flange (optional) … 4-11
4.3.3 Securing a Load to the Rod ………………… 4-12
4.4 Wiring …………………………………………………… 4-13
4.4.1 Wiring the Cables ……………………………… 4-13
4.4.2 Cable Wiring Length…………………………… 4-13
4.4.3 Protecting the Motor …………………………… 4-13
4.4.4 Emergency Stop ……………………………… 4-13
4.5 Compliance with the EC Directives ………………… 4-14
4.5.1 EMC Directives (89 / 336 / EEC, 92 / 31/ EEC) … 4-14
Chapter
5 Maintenance
…………………………………… 5 -1
5.1 Slider …………………………………………………… 5-1
5.1.1 Inspection Items and Timing ………………… 5-1
5.1.2 External Check ………………………………… 5-1
5.1.3 External Cleaning ……………………………… 5-1
5.1.4 Internal Check / Cleaning and Greasing …… 5-2
5.1.5 Re-Tensioning the Stainless Sheet ………… 5-6
5.2 Cylinder ………………………………………………… 5-8
5.2.1 Inspection Items and Timing ………………… 5-8
5.2.2 External Check ………………………………… 5-8
5.2.3 External Cleaning ……………………………… 5-8
5.2.4 Greasing ………………………………………… 5-9
Chapter
6 Repair
6.1
6.2
6.3
6.4
ii
………………………………………………… 6-1
Scope of Warranty Repair …………………………… 6-1
Warranty Period ……………………………………… 6-1
How to Receive Repair ……………………………… 6-1
Repair Following Expiration of the Warranty Period … 6-1
Appendix
A Specifications
………………………………… A -1
A.1 Combination List ……………………………………… A-1
A.1.1 Slider …………………………………………… A-1
A.1.2 Cylinder ………………………………………… A-3
A.2 Slider Specifications …………………………………… A-4
A.2.1 Performance Specifications ………………… A-4
A.2.2 General Specifications ………………………… A-6
A.2.3 Speed and Load Weight ……………………… A-6
A.2.4 Allowable Overhang Length ………………… A-6
A.3 Cylinder Specifications………………………………… A-8
A.3.1 Performance Specifications ………………… A-8
A.3.2 General Specifications …………………………A-10
A.3.3 Speed and Thrust Force ………………………A-10
A.3.4 Push Current and Push Force ………………A-10
Appendix
B Optional Parts and
Accessories
B.1
B.2
B.3
B.4
B.5
…………………………………… B -1
Cable Set ……………………………………………… B -1
Stainless Sheet ………………………………………… B -2
Cylinder Flange ………………………………………… B -2
Sensor Set ……………………………………………… B -3
Sensor Cable …………………………………………… B -3
EZS Series Slider / EZC Series Cylinder
iii
Introduction
Please read this “Introduction ” section and familiarize yourself with the key aspects
of the manual.
This section covers the following:
● Intended reader of the manual
● Purpose of the manual
● Receipt, storage and disposal of the product
● Product support by Oriental Motor
● Rules of notation used in the manual
Intended Reader of the
Manual
This manual is intended for qualified personnel with expert knowledge of electrical
and mechanical engineering.
Those in charge of the design, installation, wiring, maintenance and troubleshooting
of EZS / EZC Series products should read this manual.
Purpose of the Manual
This manual explains the installation and maintenance procedures for EZS/EZC Series
sliders and cylinders.
Receipt, Storage and
Disposal of the Product
The customer should inspect the exterior of the equipment before accepting the product. Check the delivered product by verifying it against the specification on the order
sheet. If the product is damaged, please contact the Oriental Motor branch or sales
office from which you purchased the product.
Leave the product in the packing carton until immediately before installation. If the
product is not to be used for an extended period of time, store it in a place that satisfies the following conditions:
● A clean place not subject to excessive humidity or salt
● A place away from direct sunlight
● An ambient temperature of 0°C to +50°C (+32˚F to +122˚F ) (nonfreezing)
● A relative humidity of 85% or below (noncondensing)
● A place not exposed to corrosive gases
● A place not subject to continuous vibration
When disposing of the product, treat it as industrial waste.
Engage a certified waste-disposal service to carry out the disposal.
The product uses nickel-cadmium batteries. Dispose of the used batteries in accordance with local laws and regulations. If you have any questions regarding disposal
of the product, please contact any Oriental Motor branch or sales office.
Product Support
Should you require any of the following services, please contact any Oriental Motor
branch or sales office.
● Sales information and assistance for product selection
● Technical support regarding the product
● Warranty repair
Technical Assistance
Regarding the Product
iv
Should you require technical assistance from Oriental Motor, please call our Technical
Support Line. So that we can promptly respond to your inquiry, please have the product model ready when you call.
Introduction
Structure and Contents
of This Manual
This manual serves as a user’s guide for EZS / EZC Series sliders and cylinders.
Operating any EZS / EZC Series slider or cylinder requires the controller supplied with
the slider/cylinder, as well as the setup of an optional teaching pendant or data editing software and the programming of operating data. Please refer to the following
manuals for the EZS / EZC Series, and follow the instructions:
● EZS / EZC Series Slider/Cylinder Installation Manual (this document)
● EZS / EZC Series Controller User Manual
This manual explains the installation, wiring, I/O, setting and troubleshooting of the
controller.
● EZS / EZC Series Controller Data Setting Manual
This manual explains the process of creating operation data, setting parameters
and performing troubleshooting using the teaching pendant.
● Teaching Pendant EZT1 User Manual
This manual explains the key layout of the teaching pendant.
● Data Editing Software EZED1
This manual explains the installation and operating method of the data editing software.
Contents of the Manual
Chapter
This manual consists of chapters 1 through 6 and appendixes A and B. The table below gives a brief explanation of the content of each chapter and section. The rules
of notation, as well as warnings and precautions specific to the sliders / cylinders, are
also explained.
Description
Chapter 1
Safety
Read this chapter carefully in order to understand the safety precautions. The information
provided in this chapter is designed to ensure safety at the customer’s site and protect the
slider/cylinder against damage.
Chapter 2
Unpacking, Inspection
and Storage
This chapter lists the items included in the slider/cylinder package and explains the basic
inspection procedure to be performed prior to installation or storage.
Chapter 3
Slider/Cylinder Overview
This chapter explains the basic functions of the slider/cylinder and requirements regarding
their use.
Chapter 4
Installation
This chapter explains how to install the slider/cylinder in the machine and affix a load and
sensors to the slider/cylinder.
Chapter 5
Maintenance
This chapter explains the minimum maintenance required for the slider/cylinder.
Chapter 6
Repair
This chapter explains the warranty repair period and scope of repair for the slider/cylinder.
Appendix A
Specifications
This section explains the specifications of the different sliders and cylinders.
Appendix B
Optional Parts and
Accessories
This section introduces the optional parts and accessories used with different sliders and
cylinders.
EZS Series Slider / EZC Series Cylinder
v
Rules of Notation
The following symbols are used throughout this manual to indicate safety warnings,
precautions, important notes and tips:
Warning
Handling the product without observing the instructions that accompany a “Warning” symbol
may result in death or serious bodily injury.
Caution
Handling the product without observing the instructions that accompany a “Caution” symbol
may result in bodily injury or property damage.
Note
These notes appear throughout the manual and
describe items that must be observed by the
user in certain situations to ensure correct use
of the product.
Notation
The description of text in this manual follows the notation rules specified below:
● A sentence starting with a filled circle provides information, not an operating pro-
cedure.
● A sentence starting with a number indicates an operating procedure or a step in a
procedure.
● Referenced titles are denoted in italics.
● Slider and cylinder models are sometimes abbreviated by using xx to represent the
stroke, such as in “ EZS4-xxM ”.
vi
Chapter
1 Safety
Chapter 1 Safety
Read this manual before installing or wiring the slider / cylinder. By reading the manual you can better understand the installation methods and procedures and gain an
understanding of how to operate the slider / cylinder both safely and effectively.
Always observe the items listed under “General Safety Guidelines ” on p. 1-3. Warnings
and precautions specific to the slider / cylinder are explained in connection with the
relevant items throughout this manual.
1.1 Safety Precautions
The EZS/EZC Series products are designed for use in an electrical system or machine as an internal component. During operation and immediately after the power
supply is cut off, the parts continue to operate and remain hot, thus posing a risk of
bodily injury or property damage.
It is prohibited to start the slider / cylinder ( i.e., to operate the device in accordance
with the specified purpose) when the machine does not satisfy any relevant safety
standards.
The factory safety manager or safety personnel in charge of the applicable machine
must ensure that the machine is operated only by qualified personnel who are familiar with the operation of electronic equipment, and thereby prevent injury or damage
to the equipment.
The term “qualified personnel” refers to persons who have received the necessary
training or education and have pertinent experience; who are familiar with the relevant standards, regulations, accident-prevention rules and inspection conditions; who
are authorized by the factory safety manager to engage in the necessary activities;
and who have the ability to discern and prevent potential dangers.
1.2 Potential Dangers
Dangers that may arise in connection with the use of this product are as follows:
● Electric shock
● Electrical fire
● Danger posed by the machine
● Electromagnetic disturbance
These dangers must be controlled properly by providing safety design for the machine,
adopting specific local regulations, and observing the standard safety guidelines and
specific precautionary notes supplemental thereto. This product poses no danger associated with chemical products or radiation.
1.2.1 Electric Shock
To prevent electric shock, as the power supply for your EZS/EZC Series product use
a DC power supply that passes the necessary tests and provides reinforced insulation on the primary and secondary sides.
1.2.2 Electrical Fire
Electrical fire can be avoided by conforming to the general procedures implemented
in industrial power-equipment works. It is essential that appropriate qualified personnel
conduct the electrical work. Please note that a safe distance must be ensured from
the machine in which the slider/cylinder is installed, so that only appropriate qualified
personnel can access the slider/cylinder.
EZS Series Slider / EZC Series Cylinder
1-1
1.2.3 Danger Posed by the Machine
Danger posed by the machine relates to unexpected movement of the slider table or
cylinder rod in an uncontrolled situation. If the machine is subject to such an unexpected movement of parts, the slider/cylinder must be electrically disconnected from
the controller using an appropriate preventive measure whenever the operating part
of the machine is to be accessed by a person. Note that the mounting parts of the
slider/cylinder must under all circumstances not be loose.
Provide a safety measure external to the controller so that the entire machine will operate safely when an abnormality occurs due to a failure in the slider/cylinder or controller, or due to any other external factor.
● The controller cuts off the motor’s output current and stops the slider/cylinder when
its protective function is actuated or upon the occurrence of a CPU error.
If the slider/cylinder is equipped with an electromagnetic brake, the electromagnetic
brake is actuated in order to produce the necessary holding brake force. Provide
a measure on the machine side so that it will operate safely if the slider/cylinder
stops.
1.2.4 Electromagnetic Disturbance
Appropriate measures must be taken to suppress the EMI ( Electromagnetic
Interference ) caused by the slider/cylinder, controller and teaching pendant in the nearby control systems equipment and to address the EMS (Electromagnetic Susceptibility)
of the slider/cylinder, controller and teaching pendant. Failure to do so may result in
a serious impairment of the machine’s performance.
Provide EMC ( Electromagnetic Compatibility ) measures when installing/wiring the
product.
The safety precautions described above are by no means comprehensive.
Please contact Oriental Motor concerning any question or problem you might have.
1-2
Chapter 1 Safety
1.3 General Safety Guidelines
This section explains the general safety guidelines applicable to the EZS/EZC Series.
Safety information specific to the slider/cylinder is provided in connection with the relevant items throughout the manual.
To prevent bodily injury, please observe the following points.
Warning
● Be sure that personnel with expert knowledge of elec-
trical and mechanical engineering perform the installation, connection, operation, maintenance and troubleshooting. Failure to do so may result in fire, electric shock or injury.
● Always turn off the power supply before connecting or
disconnecting the product to/from the machine. Failure
to do so may result in electric shock.
● If the controller’s protective function has been actuated, remove the cause and then reconnect the power
source. If the slider/cylinder operation is continued
without removing the cause, the controller may malfunction and cause injury or equipment damage.
● Always turn off the power supply to the controller before performing maintenance or repair of the machine.
Failure to do so may result in injury.
● Do not disassemble or modify the slider/cylinder. When
maintaining the slider, do not disassemble parts other
than those specified in this manual. Doing so may result in injury.
● When the product is used in a lifting application, choose
a type equipped with an electromagnetic brake.
Without an electromagnetic brake the slider/cylinder will
lose its holding brake force when the power is cut off
or upon actuation of the controller’s protective function
or emergency stop function. When this happens, the
moving part may drop, causing injury or equipment
damage.
● Do not use the electromagnetic brake to decelerate,
nor use it as a safety brake. The electromagnetic brake
is designed to hold the slider/cylinder position. Failure
to observe this precaution may result in injury or equipment damage.
● If the product is of the absolute type, perform a returnto-home operation or absolute positioning operation
immediately after recovery of the power supply. Failure
to do so may result in injury or equipment damage.
● If an incremental positioning operation is performed
immediately after recovery of the power supply, the
following accidents may occur:
● If the moving part of the slider/cylinder has shifted during the battery backup period due to an
external force, the new position of the moving
part will be recognized as the origin in the positioning operation and the stopping position will
deviate accordingly.
EZS Series Slider / EZC Series Cylinder
1-3
Caution
● Do not use the slider/cylinder and controller beyond
their specified values. Doing so may result in injury or
equipment damage.
● No one should come close to the slider/cylinder beyond the safety distance, except for qualified personnel. To do so may result in injury.
● When transporting the slider/cylinder, do so by holding the body of the slider/cylinder. Holding the slider/cylinder by the cables, table or rod may result in injury.
● Do not supply power to the machine when the slider/cylinder covers are not installed in their specified positions. Doing so may result in electric shock or injury.
● Do not touch the table or rod while the slider/cylinder
is in operation. To do so may result in injury.
● Connect the slider/cylinder cables to the appropriate
connectors on the controller. Failure to do so may result in equipment damage.
● Precautionary note on emergency stop
When the emergency stop button on the teaching pendant is pressed or an EMG input to the controller is detected, the controller cuts off the motor’s output current and stops the motor. If the slider/cylinder is
equipped with an electromagnetic brake, the brake is
actuated and the position is held. However, if there is
no electromagnetic brake, the holding brake force is
lost and it may take longer to stop. If the load installed
on the table or rod is likely to contact other equipment
during this period, provide a safety mechanism on the
machine side. Failure to do so may result in injury or
equipment damage.
● Precautionary note on static electricity
Static electricity may cause the controller to malfunction or sustain damage. Do not touch the controller
while the power is being supplied. When adjusting the
controller’s axis-number setting switch, brake-release
switch, pendant switch or DIP switches while the power supply is active, always use an insulated screwdriver.
1-4
Inspection
2 Unpacking,
and Storage
Chapter 2 Unpacking, Inspection and Storage
Chapter
This chapter explains the receiving procedures that must be carried out in order to
ensure that the slider/cylinder will function as specified.
These procedures include the following:
● Unpacking the EZS/EZC Series slider/cylinder
● Inspecting the slider/cylinder for damage sustained during shipment
● Checking the combination of slider/cylinder and controller
● Storage guidelines for the slider/cylinder
2.1 Unpacking the Slider /Cylinder
Each EZS/EZC Series product comes with a slider or cylinder and a controller packed
in the same carton.
1. Remove the EZS/EZC Series slider/cylinder from the shipping carton and remove
all packing materials from around the product. You may keep the packing materials and shipping carton for storage or shipment of the slider/cylinder at a later time.
2. Check all items in the carton against the packing list. The nameplate on the product indicates the following information:
●
●
●
Product model
Serial number
Manufacture date code
Packing list
EZS Series
● Slider 1 unit
● Controller 1 unit
● Installation manual 1 copy (this document)
● User manual for controller 1 copy
● Data setting manual for controller 1 copy
● Hexagonal socket-head screw 4 pcs. (M5)∗
● I / O connector (plug) 1 set
● Power cable 1 pc.
● Battery 1 pc. (absolute type only)
● Battery holder 2 pc. (absolute type only)
∗EZS4 and EZS6 only
EZC Series
● Cylinder 1 unit
● Controller 1 unit
● Installation manual 1 copy (this document)
● User manual for controller 1 copy
● Data setting manual for controller 1 copy
● Hexagonal nut 1 pc.
● I / O connector (plug) 1 set
● Power cable 1 pc.
● Battery 1 pc. (absolute type only)
● Battery holder 2 pc. (absolute type only)
EZS Series Slider / EZC Series Cylinder
2-1
2.2 Explanation of Unit Model
The unit-model codes for the EZS/ EZC Series are shown in figures 2-1 and 2-2.
However, a given combination of these numbers and letters does not always provide
a valid unit model. Refer to “Combination List ” on p. A-1.
2.2.1 Slider
■ Figure 2-1 Unit Model of Slider
EZS4 - 05 M C A
EZS3: Maximum transportable mass
in the horizontal direction: 5 kg (11 lb.)
EZS4: Maximum transportable mass
in the horizontal direction: 15 kg (33 lb.)
EZS6: Maximum transportable mass
in the horizontal direction: 30 kg (66 lb.)
Stroke
05: 50 mm (1.97 inch)
10: 100 mm (3.94 inch)
15: 150 mm (5.91 inch)
20: 200 mm (7.87 inch)
25: 250 mm (9.84 inch)
30: 300 mm (11.81 inch)
40: 400 mm (15.75 inch)
50: 500 mm (19.69 inch)
Electromagnetic brake
None: Without electromagnetic brake
M: With electromagnetic brake
C: With controller
A: Absolute type
I: Incremental type
2.2.2 Cylinder
■ Figure 2-2 Unit Model of Cylinder
EZC4 - 05 M C A
EZC4: Maximum transportable mass
in the vertical direction : 4.5 kg (9.9 lb.)
EZC6: Maximum transportable mass
in the vertical direction : 10 kg (22 lb.)
Stroke
05: 50 mm (1.97 inch)
10: 100 mm (3.94 inch)
20: 200 mm (7.87 inch)
30: 300 mm (11.81 inch)
Electromagnetic brake
None : Without electromagnetic brake
M: With electromagnetic brake
C: With controller
A: Absolute type
I: Incremental type
2-2
Chapter 2 Unpacking, Inspection and Storage
2.3 Inspection Procedure
It is recommended that you check the following points upon receipt of the product:
● Inspect the slider/cylinder for any physical damage sustained during shipment.
● Check the combination of the slider or cylinder and the controller.
● Check the slider/cylinder operation by conducting an operation test.
To check the combination, see “Combination List ” on p. A-1 and check the unit model and corresponding models of individual slider/cylinder and controller.
If the product is found to be damaged during the unpacking process, or if the combination is wrong or the slider/cylinder does not operate properly when tested, please
contact the Oriental Motor branch or sales office from which you purchased the product.
Report problems to Oriental Motor as soon as possible after your receipt of the product.
For the warranty period of the slider/cylinder and whether or not the applicable defect qualifies for a warranty repair, see “Repair ” on p. 6-1.
2.4 Storing the Slider / Cylinder
Use the product packing materials to wrap the slider/cylinder and put it back into the
shipping carton. Store the slider/cylinder in a place that satisfies the following conditions:
● A clean place not subject to excessive humidity or salt
● A place away from direct sunlight
● An ambient temperature of 0°C to
+50°C (+32˚F to +122˚F ) (nonfreezing)
● A relative humidity of 85% or below (noncondensing)
● A place not exposed to corrosive gases
● A place not subject to continuous vibration
Note
The slider and cylinder are pieces of
precision equipment. The table, rod and
ball screw are particularly vulnerable to
damage during storage and installation,
so do not subject those parts to excessive force. Further, do not hold the slider/cylinder by the cables, table or rod
when transporting it. The accuracy of
the product may be reduced if the slider/cylinder is not handled with care.
Applying sudden impact or unnecessary
force to the slider/cylinder may also result in a damaged bearing or ball screw.
EZS Series Slider / EZC Series Cylinder
2-3
2-4
3 Slider / Cylinder Overview
Chapter 3 Slider / Cylinder Overview
Chapter
This chapter explains the basic slider/cylinder functions and operating requirements
that must be understood and observed in order to ensure correct use of the slider/cylinder.
3.1 Slider
The EZS Series slider is a ball-screw-drive type slider that uses a stepping motor with
an encoder as its power unit. The resolution of the slider table is 0.015 mm (0.0006
inch), and the table moves 12 mm (0.47 inch) per revolution of the motor.
The encoder constantly feeds back the table position to the controller. The controller
monitors the encoder signal and controls the motor so as to prevent any deviation in
the table position. There are two controller types: the incremental type and absolute
type. If your controller is of the incremental type, return the table to the home position after power is input.
The slider’s limit stroke range is set by the controller’s softlimits. The motor stops
once the set softlimits are exceeded.
The encoder has a built-in temperature sensor to prevent damage to the encoder or
motor due to an abnormal increase in motor temperature. Since the allowable temperature of the encoder is lower than that of the motor, the temperature inside the encoder is detected.
Sliders equipped with electromagnetic brakes are available to provide a holding brake
function.
The electromagnetic brake is released when the power is supplied to the controller,
and is actuated (producing a holding brake force) when an EMG input is detected or
a protective function is actuated.
EZS Series Slider / EZC Series Cylinder
3-1
3.1.1 Slider Functions
The function of each slider part is illustrated in figures 3-1, 3-2 and 3-3 and Table 3-1.
Illustration shows the EZS4.
■ Figure 3-1 Slider
14
1
11
6
7
8
2
3
9
4
11
14
8
17
5
■ Figure 3-2 Slider ( table cover and side covers removed )
13
12
10
■ Figure 3-3 Slider Base Surface
18
15
∗ With the EZS3, one mounting
hole is provided at each center.
16
18
3-2
Chapter 3 Slider / Cylinder Overview
■ Table 3-1 Slider Functions
No.
Name
Function
1
Power unit
Houses a stepping motor with encoder or a stepping motor with encoder and
electromagnetic brake.
2
Motor cable
A cable of 7.2 mm (0.28 inch) in outer diameter and 250 mm (9.84 inch) in
length. The connector (plug) on the cable end connects to the controller.
3
Encoder cable
A cable of 7.7 mm (0.30 inch) in outer diameter and 250 mm (9.84 inch) in
length. The connector (plug) on the cable end connects to the controller.
4
Bracket
5
Flange
6
Side cover
A sensor set (optional) can be installed.
7
Top cover
A protective cover for the table.
8
Load mounting holes
Used to install a load onto the table.
The applicable thread sizes are
shown in Table 3-2.
■ Table 3-2 Thread Size
Slider
EZS3
EZS4
EZS6
Thread size
4-M4 P0.7 tap hole
4-M5 P0.8 tap hole
9
Stainless sheet
A protective cover for the mechanical part of the slider.
Re-tension the sheet if slack is observed after operation.
10
Table
Has a resolution of 0.015 mm (0.0006 inch) and moves 12 mm (0.47 inch) per
revolution of the motor.
11
Sheet retainer
Secures the stainless sheet.
12
Sheet holder
Lifts and holds the stainless sheet in order to assist with table movement.
13
Coil spring
Supports the sheet holder and assists with table movement.
14 ∗
Mounting hole
[4-ø5.5 mm (ø0.22 inch) ]
Through-holes used to install the slider from the table side.
15
Mounting hole
Tap holes used to install the slider from
the base side.
The number of holes varies, depending
on the stroke.
The applicable thread sizes are
shown in Table 3-3.
■ Table 3-3 Thread Size
Slider
Thread size
EZS3
M4 P0.7 tap hole
EZS4
EZS6
M5 P0.8 tap hole
16
Base
The slider installation surface.
17
Positioning pinhole
These holes help maintain positional repeatability when the work must be removed and then installed again for the purpose of maintenance, etc.
18
Mounting reference surface
These surfaces help maintain positional repeatability when the slider must be
removed and then installed again for the purpose of maintenance, etc.
∗ EZS4 and EZS6 only
EZS Series Slider / EZC Series Cylinder
3-3
3.2 Cylinder
The EZC Series cylinder is a ball-screw-drive type cylinder that uses a stepping motor with an encoder as its power unit. The resolution of the cylinder rod is 0.015 mm
(0.0006 inch), and the rod moves 12 mm (0.47 inch) per revolution of the motor.
The encoder constantly feeds back the rod position to the controller. The controller
monitors the encoder signal and controls the motor so as to prevent any deviation in
the rod position. There are two controller types: the incremental type and absolute
type. If your controller is of the incremental type, return the rod to the home position
after power is input.
The cylinder’s limit stroke range is set by the controller’s softlimits. The motor stops
once the set softlimits are exceeded.
The encoder has a built-in temperature sensor to prevent damage to the encoder or
motor due to an abnormal increase in motor temperature. Since the allowable temperature of the encoder is lower than that of the motor, the temperature inside the encoder is detected.
Cylinders equipped with electromagnetic brakes are available to provide a holding brake
function.
The electromagnetic brake is released when the power is supplied to the controller,
and is actuated (producing a holding brake force) when an EMG input is detected or
a protective function is actuated.
The cylinder can be used for a push-motion operation, in which the load is pushed
with a fixed thrust force. In this mode, the load is pushed continuously for the distance set by the push distance.
3.2.1 Cylinder Functions
The function of each cylinder part is illustrated in figures 3-4 and 3-5 and Table 3-3.
1
■ Figure 3-4 Cylinder
2
3
8
7
4
■ Figure Figure 3-5 Detail View of Rod
4
6
5
3-4
Pilot section
Chapter 3 Slider / Cylinder Overview
■ Table 3-4 Cylinder Functions
No.
Name
Function
1
Power unit
Houses a stepping motor with encoder or a stepping motor with encoder and
electromagnetic brake.
2
Motor cable
A cabtyre cable of 7.2 mm (0.28 inch) in outer diameter and 250 mm (9.84 inch)
in length. The connector (plug) on the cable end connects to the controller.
3
Encoder cable
A cabtyre cable of 7.7 mm (0.30 inch) in outer diameter and 250 mm (9.84 inch)
in length. The connector (plug) on the cable end connects to the controller.
4
Rod
The moving part of the cylinder.
The rod has a resolution of 0.015 mm (0.0006 inch) and moves 12 mm (0.47 inch)
per revolution of the motor.
5
Male screw
6
Wrench point
7
Flange
Used to install a load onto the rod.
The applicable thread sizes are shown in Table 3-5.
■ Table 3-5 Thread Size
Cylinder
Thread size
EZC4
M14
EZC6
M18
When affixing the load to the rod, apply a wrench to this area to prevent
turning torque from being applied to the rod.
The cylinder installation surface.
Pilot sections of the dimensions shown in Table 3-6 are provided as guides
for engagement.
■ Table 3-6 Dimensions of Pilot Section
Cylinder
8
Mounting hole
Outer diameter [mm (inch)] Height [mm (inch)]
(
)
2 (0.08)
(
)
2 (0.08)
EZC4
+0.0024
35 +0.061
+0.034 1.378 +0.0013
EZC6
+0.0027
48 +0.069
+0.034 1.890 +0.0013
Tapped holes used to install the cylinder from the rod side.
Install an optional cylinder flange when installing the cylinder from the side
opposite the rod.
The applicable thread sizes are shown in Table 3-7.
■ Table 3-7 Thread Size
Cylinder
Thread size
EZS4
4-M5 P0.8 tap hole
EZS6
4-M6 P1 tap hole
EZS Series Slider / EZC Series Cylinder
3-5
3.3 Operating Requirements
3.3.1 Maximum Thrust Force
Operate the slider/cylinder so that the sum of the load thrust force and external force
does not exceed the maximum thrust force. The slider/cylinder may be damaged if
operated under a load exceeding the maximum thrust force, or when the table or rod
remains locked for a prolonged period.
3.3.2 Allowable Overhang Length
Operate the slider within the allowable overhang length. The slider’s service life may
be reduced if the slider is operated continuously at an overhang exceeding the allowable value.
Use a linear guide or similar mechanism to prevent loads other than those in the axial direction from being applied to the cylinder rod.
3.3.3 Maximum Acceleration
Start and stop the slider/cylinder at a rate of acceleration that is within the maximum
limit. The slider/cylinder may be damaged if operated at a rate exceeding the maximum limit of acceleration.
3.3.4 Temperature Range and Maximum Load Weight
The load weight of the slider/cylinder decreases as the speed increases. Operate
the slider/cylinder within a maximum load weight appropriate for a given speed range.
3-6
Chapter
4 Installation
Chapter 4 Installation
This chapter explains how to install the slider/cylinder and install a load.
● To prevent injury, turn off the power supply to the con-
Warning
troller before installing the product to the machine or
wiring the product.
● To prevent injury or equipment damage, strictly observe the following items when carrying a vertical load
using the slider/cylinder:
● Always use a slider / cylinder with an electromagnetic brake. If the slider / cylinder is not
equipped with an electromagnetic brake, the load
will drop when the power is cut off, upon an emergency stop or when an alarm is generated.
● Always set the brake-release switch on the controller to “ON”. If this switch is set to “OFF ”, the
load cannot be held by the electromagnetic brake
and will drop upon an emergency stop or when
an alarm is generated.
● Do not perform direct teaching. Doing so causes the load to drop due to a loss of holding force
of the motor and electromagnetic brake.
● Do not activate the controller’s C.OFF input. To
do so will cause the load to drop.
4.1 Required Installation Conditions
● Install the slider/cylinder onto a flat metal surface satisfying the following conditions:
Vibration:
Altitude:
Temperature:
Humidity:
Atmosphere:
Not subject to continuous vibration or excessive shock
1000 m (3280 ft.) or below
0°C to +40°C ( +32°F to +104°F ) (nonfreezing)
85% or below (noncondensing)
Indoor
Free from explosive or toxic gases (e.g., sulfuric gas) or
liquids
Free from contact with water or oil
Away from direct sunlight
Not exposed to air with high salt content
Installation condition: Built-in component
Overvoltage category: I
Pollution degree: 2
Protection against electric shock: Class III equipment
4.2 Installing the Slider
Install the slider onto a flat metal plate providing excellent vibration resistance.
Adjust the flatness of the metal plate to 0.06 mm (0.002 inch) or less [EZS3: 0.035 mm
(0.001 inch) or less] per 200 mm (7.87 inch). If the flatness is insufficient, the slider’s mounting surface may become deformed, resulting in noise or a reduction in service life.
Slider mounting holes are provided in both the table surface and base surface.
If a large inertial moment is applied to the slider body or when the slider is wall-mounted or installed vertically or upside down, we recommend that you follow the procedure specified in 4.2.2, “Installing from the Base Surface ”. Select an appropriate installation method in accordance with the application.
● To prevent fire, do not place flammable objects around
Caution
the slider/cylinder.
● To prevent injury or equipment damage, secure the
slider/cylinder using the specified installation method.
EZS Series Slider / EZC Series Cylinder
4-1
4.2.1 Installing from the Table Surface
Affix the slider to the mounting plate using the supplied hexagonal socket-head screws
(M5 x 4 pcs.) and the mounting holes (through-holes) provided in the slider bracket
and flange.
Figure 4-1 shows the slider installation method.
Figure 4-2 shows the slider’s installation dimensions.
■ Figure 4-1 Installation Method
Slider
Mounting hole [ø5.5 mm (ø0.22 inch), 4 locations]
Hexagonal socket-head screw (M5; supplied)
Bracket
Flange
Thread size
EZS4-xxM
EZS4-xx
EZS6-xxM
EZS6-xx
Mounting plate
thickness and material
Across-flats Tightening
size of wrench
torque
M 5 P0.8
4 mm
(0.16 inch)
5 mm (0.20 inch) or thicker iron plate
5 N·m
(710 oz-in) 10 mm (0.40 inch) or thicker aluminum plate
M 5 P0.8
4 mm
(0.16 inch)
5 N·m
5 mm (0.20 inch) or thicker iron plate
(710 oz-in) 10 mm (0.40 inch) or thicker aluminum plate
■ Figure 4-2 Installation Dimensions
0.1 ( 0.0039)
4-M5 P0.8
26
( 1.024
0.1
L
Unit: mm (inch)
0.0039 )
Slider
Slider
4-2
L
Slider
-
L
EZS4-05M
EZS4-05
242 (9.528)
EZS4-10M
EZS4-10
292 (11.496)
EZS6-10M
EZS6-10
342 (13.465)
EZS4-15M
EZS4-15
342 (13.465)
EZS6-15M
EZS6-15
392 (15.433)
EZS4-20M
EZS4-20
392 (15.433)
EZS6-20M
EZS6-20
442 (17.402)
EZS4-25M
EZS4-25
442 (17.402)
EZS6-25M
EZS6-25
492 (19.370)
EZS4-30M
EZS4-30
492 (19.370)
EZS6-30M
EZS6-30
542 (21.339)
EZS4-40M
EZS4-40
592 (23.307)
EZS6-40M
EZS6-40
642 (25.276)
EZS4-50M
EZS4-50
692 (27.244 )
EZS6-50M
EZS6-50
742 (29.213)
-
Chapter 4 Installation
4.2.2 Installing from the Base Surface
Affix the slider to the mounting plate using hexagonal socket-head screws (not supplied) and the tapped holes provided in the slider base.
Figure 4-3 shows the slider installation method.
Figure 4-4 shows the slider’s installation dimensions.
■ Figure 4-3 IInstallation Method
Illustration shows the EZS4.
Slider
Tapped hole
(The number of M5 P0.8 holes varies,
depending on the stroke length.)
Note
The length of engagement of the slider’s mounting screw with the slider
tapped hole must not exceed 6 mm
(0.24 inch) [EZS3: 5 mm (0.20 inch)].
Contact with the slider body may occur
if the engagement length exceeds 6 mm
(0.24 inch) [EZS3: 5 mm (0.20 inch)], resulting in a malfunction or damage.
Base
Hexagonal socket-head screw (M5 P0.8)
Across-flats Tightening
torque
size of wrench
Mounting plate
thickness and material
Slider
Thread size
EZS3-xxM
M 4 P0.7
Effective depth: 5 mm (0.20 inch)
3 mm
(0.12 inch)
2.4 N·m 5 mm (0.20 inch) or thicker iron plate, or
(341 oz-in) 10 mm (0.40 inch) or thicker aluminum plate
M 5 P0.8
Effective depth: 6 mm (0.236 inch)
4 mm
(0.16 inch)
5 N·m
5 mm (0.20 inch) or thicker iron plate, or
(710 oz-in) 10 mm (0.40 inch) or thicker aluminum plate
EZS3-xx
EZS4-xxM
EZS4-xx
EZS6-xxM
EZS6-xx
■ Figure 4-4 Installation Dimensions
● EZS3
● EZS4, EZS6
m x 100 (3.94) = L
0.1 (0.984 0.0039 )
100
(3.937
0.1
n- 5.5 ( 0.22)
0.0039 )
26
(1.024
0.1
n- 4.5 ( 0.18)
0.0039 )
m x 100 (3.94) = L
25
Unit: mm (inch) except for n and m
Slider
L
Slider
n
m
n
m
Slider
L
n
EZS3-05M
EZS3-05 100 (3.94)
5
1
EZS4-05M
EZS4-05 100 (3.94)
4
1
-
-
- -
EZS3-10M
EZS3-10 150 (5.91)
7
1.5
EZS4-10M
EZS4-10 200 (7.88)
6
2
EZS6-10M
EZS6-10 200 (7.88)
6
2
EZS3-15M
EZS3-15 200 (7.88)
9
2
EZS4-15M
EZS4-15 200 (7.88)
6
2
EZS6-15M
EZS6-15 300 (11.82)
8
3
EZS3-20M
EZS3-20 250 (9.85) 11 2.5
EZS4-20M
EZS4-20 300 (11.82)
8
3
EZS6-20M
EZS6-20 300 (11.82)
8
3
EZS3-25M
EZS3-25 300 (11.82) 13
EZS4-25M
EZS4-25 300 (11.82)
8
3
EZS6-25M
EZS6-25 400 (15.76) 10 4
EZS3-30M
EZS3-30 350 (13.78) 15 3.5
EZS4-30M
EZS4-30 400 (15.76) 10 4
EZS6-30M
EZS6-30 400 (15.76) 10 4
EZS3-40M
EZS3-40 450 (17.72) 19 4.5
EZS4-40M
EZS4-40 500 (19.70) 12 5
EZS6-40M
EZS6-40 500 (19.70) 12 5
EZS3-50M
EZS3-50 550 (21.66) 23 5.5
EZS4-50M
EZS4-50 600 (23.64) 14 6
EZS6-50M
EZS6-50 600 (23.64) 14 6
3
L
m
EZS Series Slider / EZC Series Cylinder
4-3
4.2.3 How to Use the Mounting Reference Surfaces
Use the “mounting reference surfaces” provided on the slider base to ensure positional repeatability when the slider must be removed and then installed again for purposes of maintenance, etc.
Figure 4-5 shows the positions of the mounting reference surfaces.
■ Figure 4-5 Positions of Mounting Reference Surfaces
Lengthwise mounting
reference surface
Crosswise mounting reference
surface on bracket side
Crosswise mounting reference
surface on flange side
Crosswise Positioning
Drive positioning pins into the slider installation surface until the pins contact the notch
located on the flange/ bracket side.
Lengthwise Positioning
Drive positioning pins into the slider installation surface until the pins contact the notch
located on the bracket side.
4-4
Chapter 4 Installation
4.2.4 Affixing a Load to the Table
Install a load using the load mounting holes provided in the table (four locations) and
screws (not supplied ).
Figure 4-6 shows the load installation method.
Figure 4-7 shows the load’s installation dimensions.
■ Figure 4-6 Installation Method
Load
Note
The length of engagement of the load’s
mounting screw with the table load
mounting hole must not exceed 8 mm
(0.32 inch). Contact with the slider body
may occur if the engagement length exceeds 8 mm (0.32 inch), causing the
load mounting hole to be damaged.
Mounting screw
Tightening
torque
M 4 P0.7
Effective depth: 8 mm (0.315 inch)
2.4 N·m
(340.8 oz-in)
M 5 P0.8
Effective depth: 8 mm (0.315 inch)
5 N·m
(710 oz-in)
Slider
EZS3-xxM
EZS3-xx
EZS4-xxM
EZS4-xx
EZS6-xxM
EZS6-xx
■ Figure 4-7 Installation Dimensions
a
Note
Unit: mm (inch)
0.2 ( 0.0079)
4- d
e
b
c
0.02( 0.0008)
load side. Driving the pin into the
table will generate an impact or excessive moment, which may damage
the ball screw.
● Use the positioning pin only when removing and reinstalling a given load
to/from the same product. The positioning pinholes vary from one product to another.
0.2 ( 0.0079)
● Always fix the positioning pins to the
Positioning pinhole
Slider
a
b, c
d
e
EZS3-xxM
24
(0.945)
27
(1.063)
4.5
(0.18)
5
(0.19)
42
(1.654)
46
(1.811)
4.5
(0.18)
8
(0.31)
75
(2.953)
46
(1.811)
5.5
(0.22)
15
(0.59)
EZS3-xx
EZS4-xxM
EZS4-xx
EZS6-xxM
EZS6-xx
EZS Series Slider / EZC Series Cylinder
4-5
4.2.5 Installing the Sensors
Install the sensors included in the PAEZ-S sensor set in the slots provided in the side
cover.
The sensors can be installed on either the right or left side cover of the slider.
Figure 4-8 shows the recommended sensor installation positions.
■ Figure 4-8 Recommended Sensor Installation Positions Unit: mm (inch)
● EZS3, EZS4
3(
5 (0.20)
32 (1.26) [20(0.79)]
1 L1
2 L2
126) (4.96) [79.5 (3.13)]
4 21 (0.83)
31.5 (1.24) [27 (1.06)]
+LS sensor
67 (2.64)∗
[42 (1.65)]
HOME sensor
21 (0.83)∗
∗Recommended sensor installation position
EZS3 values are indicated in [ ].
Note
1 L1 indicates the effective stroke when two sensors are used.
2 L2 indicates the effective stroke when three sensors are used.
The EZS3-05, EZS3-05M, EZS4-05 and EZS4-05M do not
accommodate the use of three sensors.
3 Home position when two sensors are used
4 Home position when three sensors are used
5 Install the shield plate onto the work.
[Use the two supplied mounting screws: M3 x 5 mm (0.20 inch)]
Only two sensors can be installed on the
EZS3-05, EZS3-05M, EZS4-05 and
EZS4-05M.
With these models, use the -LS sensor and +LS sensor.
2
L1
L2
45
EZS -05M (1.77)
EZS -10
74
95
EZS -10M (3.74) (2.91)
EZS -15
124
145
EZS -15M (5.71) (4.88)
EZS -20
174
195
EZS -20M (7.68) (6.85)
Slider
17 (0.67)
[15 (0.59)] EZS -05
HOME sensor-detection
table position
-LS sensor-detection table
+LS sensor-detection table
position
position
Table limit position
Table limit position
5 Shield plate
-LS sensor
74 (2.91)∗
[48.5 (1.91)]
1
5 (0.20)
EZS
EZS
EZS
EZS
EZS
EZS
EZS
EZS
-25
-25M
-30
-30M
-40
-40M
-50
-50M
224
245
(9.65) (8.82)
274
295
(11.61) (10.79)
374
395
(15.55) (14.72)
474
495
(19.49) (18.66)
The square box in the slider will
contain 3 or 4.
● EZS6
3
5 (0.20)
32.5
(1.28)
4 21 (0.83)
-LS sensor-detection table position
Table limit position
5 (0.20)
17 (0.67)
HOME sensor-detection table position
-LS sensor
92 (3.62)∗
32.5 (1.28)
1 L1
2
L2
(162)
(6.38)
+LS sensor-detection table position
5 Shield plate
Table limit position
HOME sensor
21 (0.83)∗
+LS sensor
85 (3.35)∗
∗Recommended sensor installation position
1
2
3
4
5
Caution
4-6
L1 indicates the effective stroke when two sensors are used.
L2 indicates the effective stroke when three sensors are used.
Home position when two sensors are used
Home position when three sensors are used
Install the shield plate onto the work.
[Use the two supplied mounting screws: M3 x 5 mm (0.20 inch)]
● To prevent injury or equipment damage, do not use the
sensor set as a safety part.
1
2
L1
L2
EZS6-10
95
74
EZS6-10M (3.74) (2.91)
EZS6-15
145
124
EZS6-15M (5.71) (4.88)
EZS6-20
195
174
EZS6-20M (7.68) (6.85)
EZS6-25
224
245
EZS6-25M (9.65) (8.82)
Slider
EZS6-30
274
295
EZS6-30M (11.61) (10.79)
EZS6-40
395
374
EZS6-40M (15.55) (14.72)
EZS6-50
495
474
EZS6-50M (19.49) (18.66)
Chapter 4 Installation
1. Install the sensor onto the sensor mounting bracket and affix it with screws.
■ Figure 4-9 Securing of Sensor to Sensor Mounting Bracket
Mounting screw
M3 x 5 mm (0.17 inch)
Tightening torque: 0.6 N·m (85 oz-in)
2. Remove the mounting screw from the side cover on the flange side.
3. Install nuts in the slots located in the side cover.
4. Install screws [M3 x 5 mm (0.17 inch)] and nuts (M3) to the sensor mounting bracket.
Move the sensor to the recommended installation position and tighten the screws
to secure the sensor in position.
■ Figure 4-10 Installation of Sensor
2
3
4
Mounting screw
M3 x 5 mm (0.17 inch)
Tightening torque: 0.6 N·m (85 oz-in)
5. Tighten the mounting screw, which was earlier removed, onto the side
cover.
Note
● Do not install or remove the connec-
tor with cable while the power is being supplied. Doing so may damage
the sensor.
● When removing the connector with a
cable, do not pull it by the cables. Pull
out the connector while pressing it
firmly from the top and bottom.
6. Plug the connector with cable into the sensor.
Hold the connector with the tab facing down and insert it into the sensor terminal.
■ Figure 4-11 Connection of Connector with Robot Cables
Sensor
terminal
Lead color of connector
with cable
L
OUT
+
Brown
-
L
Pink
OUT
Black
-
Blue
Connector
Sensor
+
EZS Series Slider / EZC Series Cylinder
4-7
7. Install the shield plate onto the load.
Figure 4-13 shows the machining dimensions of the shield plate for installation.
■ Figure 4-12 Installation of Shield Plate
Hexagonal socket-head screw
M3 x 5 mm (0.17 inch)
Tightening torque: 0.8 N·m (113 oz-in)
■ Figure 4-13 Machining Dimensions of Shield Plate for Installation
Unit: mm (inch)
a
Note
b
● Always install the shield plate onto
d
the load. The shield plate cannot be
installed onto the slider.
● There are three types of shield plates:
the EZS3 type, EZS4 type and EZS6
type. The two plates vary slightly in
size. Always use a shield plate appropriate for the slider. Using a shield
plate of an unmatched size may disable the sensor detection or damage
the sensor due to contact between
the shield plate and sensor.
c
9
(0.36
0.1
0.0039)
2-M3 P0.5, depth 5 (0.20) min.
Slider
a
b
c
d
EZS3-xxM
24
(0.94)
27
(1.06)
7.5
(0.30)
13.8
(0.54)
42
(1.65)
46
(1.81)
16.5
(0.65)
18
(0.71)
75
(2.95)
46
(1.81)
33
(1.30)
18
(0.71)
EZS3-xx
EZS4-xxM
EZS4-xx
EZS6-xxM
EZS6-xx
■ Figure 4-14 Sensor Setting Details
The PAEZ-S sensor set consists of the following parts:
Photomicrosensor 3 pcs.
EE-SX674A (Omron)
Connector with
cables 3 pcs.
Sensor mounting
bracket 3 pcs.
EE-1010-R (Omron)
Shield plate 1 pc. each
( for EZS3, EZS4 and EZS6)
Nut (M3) 6 pcs.
Screw (M3) 12 pcs.
Hexagonal socket-head screw (M3) 2 pcs.
4-8
Chapter 4 Installation
■ Figure 4-15 External View of Photomicrosensor
7
3 6.95
(0.12) (0.27) (0.28)
7
(0.28)
2- 3.5 ( 0.14) hole
Light-reception indicator lamp
■ Terminal Arrangement
1
2
3
4
3 (0.12)
3.8 (0.15)
6.2
(0.24)
Vcc
L
L
OUT
OUTPUT
-
GND (0V )
1 2 3 4 2.54 (0.1)
0.8 (0.03)
2.6 (0.10)
0.3 (0.01)
0.7 (0.03)
Optical axis symbol
0.6 (0.02)
6.2 (9.3)
(0.24) (0.37)
Optical axis
0.1 (0.004)
2 (0.08)
5 (0.02)
2.1 (0.08)
(2.9)
(1.14)
13
(0.51)
13.6
(0.54)
2.54 (0.1)
■ Figure 4-16 External View of Connector with Cable
13.5
(0.53)
2-C1 (0.04)
20
(0.79
5
0.20)
Unit: mm (inch)
2000
(78.74)
25
(0.99
5
0.20)
15
(0.59
5
0.20)
5
(0.20)
7.62
(0.3)
13 (0.51)
+
15.5 (0.61)
21.5
(0.85)
2-R1(0.04)
Unit: mm (inch)
1.4 (0.06)
4 0.6 (0.02)
(0.16)
2.5 (0.10)
■ Figure 4-17 External View of Shield Plate
15 (0.59)
3.
5
(0
10
(0.40)
.1
4)
9 0.1
(0.354 0.20)
3.5 (0.14)
2-
L
Unit: mm (inch)
Slider
L
EZS3
29.5 (1.16)
EZS4
27 (1.06)
EZS6
33 (1.30)
EZS Series Slider / EZC Series Cylinder
4-9
4.3 Installing the Cylinder
Install the cylinder onto a flat metal plate providing excellent vibration resistance.
● When performing a push-motion operation, confirm
Warning
that the thrust force achieved with the set push current
is sufficient to perform the push-motion operation properly without causing the load to drop.
4.3.1 Installation Using Cylinder Mounting Holes
Use the mounting holes provided in the cylinder end face on the rod side to secure
the cylinder to the mounting plate with four screws (not supplied).
Figure 4-18 shows the cylinder installation method.
Figure 4-19 shows the cylinder’s installation dimensions.
■ Figure 4-18 Installation Method
Cylinder
Tapped hole
Spring washer
Hexagonal socket-head screw
Cylinder
EZC4-xxM
EZC4-xx
EZC6-xxM
EZC6-xx
Thread size
Effective
depth
Across-flats Tightening
size of wrench
torque
M 5 P0.8
15 mm
(0.60 inch)
4 mm
(0.16 inch)
5 mm (0.20 inch) or thicker iron plate, or
5 N·m
(710 oz-in) 10 mm (0.40 inch) or thicker aluminum plate
M 6 P1
15 mm
(0.60 inch)
5 mm
(0.20 inch)
5 N·m
5 mm (0.20 inch) or thicker iron plate, or
(710 oz-in) 10 mm (0.40 inch) or thicker aluminum plate
■ Figure 4-19 Installation Dimensions
45
.0
( 0
min
.
Unit: mm (inch)
45
)
039
D2
D1
0.1
Cylinder
D1
D2
d
EZC4-xxM
43
(1.70)
36
(1.42)
5.5
(0.22)
57
(2.24)
49
(1.93)
6.5
(0.26)
EZC4-xx
EZC6-xxM
4- d
4-10
Mounting plate
thickness and material
EZC6-xx
Chapter 4 Installation
4.3.2 Installation Using Cylinder Flange (optional)
1. Use the four supplied screws to secure the cylinder flange to the cylinder end face
on the rod side.
■ Figure 4-20 Installation of Cylinder Flange
Cylinder
Cylinder flange
Hexagonal socket-head screw
(supplied with cylinder flange)
Cylinder
EZC4-xxM
EZC4-xx
EZC6-xxM
EZC6-xx
Cylinder flange Thread size
Across-flats Tightening
size of wrench
torque
PAEZ4-F
M 5 P0.8
4 mm
(0.16 inch)
5 N·m
(710 oz-in)
PAEZ6-F
M 6 P1
5 mm
(0.20 inch)
5 N·m
(710 oz-in)
2. Use the cylinder flange mounting holes and four screws (not supplied) to secure
the cylinder to the mounting plate.
Figure 4-21 shows the cylinder installation method.
Figure 4-22 shows the cylinder’s installation dimensions.
■ Figure 4-21 Installation Method
Cylinder flange
Cylinder
Tap hole
Hexagonal socket-head screw
Through-hole
Cylinder
EZC4-xxM
EZC4-xx
EZC6-xxM
EZC6-xx
Thread size
Across-flats Tightening
size of wrench
torque
Mounting plate
thickness and material
M 5 P0.8
4 mm
(0.16 inch)
5 mm (0.20 inch) or thicker iron plate, or
5 N·m
(710 oz-in) 10 mm (0.40 inch) or thicker aluminum plate
M 6 P1
5 mm
(0.20 inch)
5 N·m
6 mm (0.40 inch) or thicker iron plate, or
(710 oz-in) 12 mm (0.47 inch) or thicker aluminum plate
EZS Series Slider / EZC Series Cylinder
4-11
■ Figure 4-22 Installation Dimensions
45
Unit: mm (inch)
45
)
039
D2
min
.
D1
0.1
.0
( 0
Cylinder
D1
D2
Thread size
EZC4-xxM
63
(2.480)
30
(1.18)
M 5 P0.8
80
(3.150)
42
(1.65)
M 6 P1
EZC4-xx
4-thread size
EZC6-xxM
EZC6-xx
4.3.3 Securing a Load to the Rod
Use a linear guide or similar mechanism to prevent loads other than those in the axial direction from being applied to the cylinder rod.
Note
Avoid using the cylinder in such a way
that the rod receives an overhang load
or angular load moment. It may cause
the cylinder to malfunction or shorten
its service life.
Installing a Load
Install a load using the supplied nut and the male screw at the tip of the rod.
Figure 4-23 shows the load installation method.
■ Figure 4-23 Installation Method
1. Cause the rod to retract to the end.
Note
When securing a load, apply a wrench
to the wrench point on the rod to prevent the rod from being subjected to
turning torque. If the rod is subjected
to turning torque, the internal mechanism may be damaged.
2. Apply a wrench to the wrench point on the rod and secure the load with the nut.
Use a wrench with a size of 32 mm (1.26 inch) (EZC6) or 22 mm (0.87 inch) (EZC4).
Note
Always remove the load from the rod
when shipping the equipment with the
cylinder installed.
4-12
Chapter 4 Installation
4.4 Wiring
Follow the instructions in “ EZS/EZC Series Controller User Manual ” regarding the
slider/cylinder wiring methods.
4.4.1 Wiring the Cables
Plug the connectors (plugs) at the ends of the motor cable and encoder cable of the
slider/cylinder into the corresponding connectors (sockets) on the controller.
4.4.2 Cable Wiring Length
Note
● Do not modify the motor/encoder ca-
bles in any way. Do not extend the
motor/encoder cables by connecting
two or more optional cables or allowing the overall extension length to exceed 10 m (32.8 ft.). Doing so may
cause a malfunction.
● Do not allow the connectors (plugs)
at the ends of the cable and connectors (sockets) on the controller side
to receive any mechanical stress such
as bending or tensile force.
● When extending the cable, cover the
connector with a tube to protect it
against dust, water and oil.
● When extending the cable, fix it in
place so the connector does not
move.
To extend the wiring length of the slider/cylinder, always use the optional cable set or
flexible cable set.
Keep the overall extension length to 10 m (32.8 ft.) or less.
● Cable set
● Flexible cable set
Motor/Encoder Cables: Set of two cables
Motor/Encoder Cables: Set of two cables
Model
Cable length
Model
Cable length
CC02EZ1
2 m (6.6 ft.)
CC02EZ1R
2 m (6.6 ft.)
CC05EZ1
5 m (16.4 ft.)
CC05EZ1R
5 m (16.4 ft.)
CC10EZ1
10 m (32.8 ft.)
CC10EZ1R
10 m (32.8 ft.)
4.4.3 Protecting the Motor
The controller provides motor protection functions that operate under the conditions
specified below:
Overheat Protection
When actuated, the overheat protection function stops the motor.
● When a signal from the encoder’s built-in temperature sensor has been output to
the controller.
Overload Protection
When actuated, the overload protection function stops the motor.
● When a load exceeding the maximum thrust force has been applied for five seconds or more in an operating mode other than the push-motion operation or returnto-home operation.
4.4.4 Emergency Stop
Upon detection of an EMG input to the controller, or when the emergency stop button on the teaching pendant has been pressed, the motor’s output current is cut off
and the slider/cylinder is stopped (stop category 0: non-controlled stop).
If the slider/cylinder is equipped with an electromagnetic brake, the electromagnetic
brake is actuated, producing a holding brake force.
The stop action is specified in 9.2.2 and 9.2.5.3 of EN60204-1.
The following three stop actions are available:
Category 0: The power supply to the drive device is stopped by direct means (e.g.,
non-controlled stop ).
Category 1: The power supply to the drive device continues during the stopping action and stops when the stopping action is complete. Controlled stop
mode.
Category 2: The power supply to the drive device continues. Controlled-stop mode.
EZS Series Slider / EZC Series Cylinder
4-13
4.5 Compliance with the EC Directives
The EZS/EZC Series sliders/cylinders and controllers bear the CE mark indicating
their compliance with the following EC directives.
The installation conditions needed to satisfy the EC directives are as follows:
1. For the power supply to the controller, use an EMC-compliant DC power supply
with reinforced insulation provided on the primary and secondary sides.
2. Install a mains filter on the input side of the DC power supply.
When a power transformer is used, always connect an AC line filter on the AC input side of the power transformer.
3. Use optional cables for slider/cylinder connection.
4. Install the slider/cylinder and controller in an industrial-grade enclosure so that only appropriate qualified personnel can access these parts.
The EZS/EZC Series controllers, sliders/cylinders and teaching pendants use an input power-source voltage of 24 VDC and thus are excluded from the scope of the
Low-Voltage Directive. However, it is recommended that the following precautions be
observed when installing and wiring the product.
● Protect the product within an enclosure during use.
● For the controller’s power supply, use a DC power supply with reinforced insulation
provided on the primary and secondary sides.
4.5.1 EMC Directives (89/336/EEC, 92/31/EEC)
Follow the instructions in “EZS/EZC Series Controller User Manual ” regarding the
installation/wiring methods.
The EZS/EZC Series controllers, sliders/cylinders and teaching pendants have been
confirmed to comply with the EMC directives by conducting EMC measurements in
accordance with 4.11.3, “Example of EMC-Compliant Wiring ”, on p. 4-35 of the above
manual.
The degree of EMC compliance with respect to a given machine depends on the configuration, wiring, installation condition and hazard level of other control systems equipment and electrical parts used with the controller and slider/cylinder. Therefore, it is
the customer’s responsibility to perform EMC measurements and confirm EMC compliance with respect to a given machine.
Applicable Standards
EMI
Emission Tests
Radiated Emission Test
EN50081-2
EN55011
EMS
Immunity Tests
Radiation Field Immunity Test
Electrostatic Discharge Immunity Test
Fast Transient / Burst Immunity Test
Conductive Noise Immunity Test
EN61000-6-2
IEC61000-4-3
IEC61000-4-2 ∗1
IEC61000-4-4 ∗2
IEC61000-4-6
∗1 Pendant: 10 kV both in air and in the contact state
Controller: Malfunction or damage may occur due to static electricity.
When touching the controller, cut off the power supply or provide an
antistatic measure. Always use an insulated screwdriver when adjusting the controller’s axis-number setting switch, brake-release switch,
pendant switch or DIP switches.
∗2 Injection to pendant cable through clamp: 1 kV
Injection to the encoder, motor, power and I / O cables through clamp: 2 kV
4-14
Chapter
5 Maintenance
Chapter 5 Maintenance
This chapter explains the maintenance items that must be performed to ensure safe,
efficient operation of the slider / cylinder.
Should you encounter any abnormality, immediately stop using the product and contact your nearest Customer Service Center.
5.1 Slider
5.1.1 Inspection Items and Timing
● To prevent injury, turn off the power supply to the con-
Warning
troller before inspecting the slider.
● To prevent injury or equipment damage, remove the
load from the table before checking the internal parts.
Perform maintenance after each applicable period specified in Table 5-1.
The schedule assumes that the slider is operated eight hours a day.
Reduce the maintenance intervals accordingly if the operation rate is high, such as
when the slider is operated continuously day and night.
■ Table 5-1 Inspection Items and Timing
Maintenance intervals
External check
Internal check
When operated for the first time
One month after initial operation
∗
∗
∗
Six months after initial operation
One year after initial operation
Every six months thereafter
∗ Add grease if signs of degradation (change to brown color, loss of gloss)
are observed during the internal inspection. See 5.1.4, “ Internal
Check/Cleaning and Greasing ”, on p. 5-2 for the greasing method.
5.1.2 External Check
Check the items specified in Table 5-2.
■ Table 5-2 Inspection Items and Contents
Item
What to check
Action if problem is found
Are there any loose mounting screws ?
Tighten the screws securely.
Is there any cracking or slack in the stainless sheet ?
Re-tension or replace the sheet.
Cables
Are there any scratches or areas under stress,
or is the cable slack at the controller connection ?
Disconnect and reconnect the connector or replace the cable.
Operation
Is there any abnormal noise or vibration from the bearings, etc. ? Check the installation of the load and operating speed again.
Slider
5.1.3 External Cleaning
● Clean the exterior surface of the slider whenever necessary.
● Wipe off any dirt and stains using a soft cloth.
● Do not apply compressed air to prevent dust from entering through gaps.
● Do not use petroleum solvents, since they will damage the coated surface.
● To remove stubborn stains, wipe the area using a soft cloth moistened with neutral
detergent.
EZS Series Slider / EZC Series Cylinder
5-1
5.1.4 Internal Check /Cleaning and Greasing
Note
● Do not touch the encoder to prevent
product breakdown. The phase output of the encoder has been precisely adjusted through detection of rotation angle and home position.
● Clean the outside first in order to prevent any dust adhering to the outside
from entering when the component
parts are removed. The entry of dust
may result in abnormal noise or
breakdown during operation.
Remove the table cover, stainless sheet and side covers to check and clean the internal parts.
Product used in the explanation: EZS4-xxM
Required tool: Hex wrench [across-flats size: 1.5 mm (0.06 inch), 2.5 mm (0.10 inch)]
● To prevent injury, do not pull the stainless sheet with
Caution
unnecessary force or grab it strongly, nor touch the
sheet with bare hands.
1. Removing the covers
Remove the covers in the following order:
1-1 Table cover
Pull out the thin-head screws from the tabletop and remove the table cover. The number of screws varies, depending on the product.
The sheet holder contains coil springs. Be careful not to lose any of the coil springs
once they’re removed.
■ Table 5-3 Number of Thin-Head Screws
Model
EZS3-xxM, EZS3-xx
EZS4-xxM, EZS4-xx
EZS6-xxM, EZS6-xx
Number of screws
2 pcs.
4 pcs.
■ Figure 5-1 Removal of Table Cover
Thin-head screw
Table cover
Coil spring
Sheet holder
Use a hex wrench with an across-flats size of 1.5 mm (0.06 inch) when loosening the
thin-head screws.
5-2
Chapter 5 Maintenance
Sheet retainer
1-2 Sheet retainers (two pieces)
Pull out the thin-head screws (a total of four pieces) from the front and rear sheet retainers, and remove the sheet retainers.
■ Figure 5-2 Removal of Sheet Retainers
Sheet retainer
Thin-head screw
Bracket
Flange
Use a hex wrench with an across-flats size of 1.5 mm (0.06 inch) when loosening the
thin-head screws.
1-3 Sheet holder and stainless sheet
Lift the sheet holder and remove it together with the stainless sheet. Do not bend the
stainless sheet.
■ Figure 5-3 Removal of Sheet Holder and Stainless Sheet
Sheet holder
Stainless sheet
Table
1-4 Side covers (two pieces)
Pull out the hexagonal socket-head screws from the right and left side covers, and
remove the side covers.
■ Figure 5- 4 Removal of Side Covers
Side cover
Hexagonal socket-head screw
Side cover
Use a hex wrench with an across-flats size of 2.5 mm (0.10 inch)
when loosening the hexagonal socket-head screws.
EZS Series Slider / EZC Series Cylinder
5-3
2. Visual check of condition inside the slider
Check the items specified in Table 5-4.
■ Table 5-4 Inspection Items and Contents
Item
What to check
Action if problem is found
Are there any deposits of foreign matter such as dust ?
Remove the foreign matter.
Has the grease lost its gloss or been consumed ?
Clean the screw shaft with a soft cloth and apply grease to the
nut running groove.
Are there any deposits of foreign matter such as dust ?
Remove the foreign matter.
Has the grease lost its gloss or been consumed ?
Use a soft cloth to clean the ball rolling grooves on both sides of
the guide rail, and apply grease to the ball rolling grooves.
Ball-screw shaft
Guide rail
Even if the grease has turned brown, lubrication condition is deemed appropriate if
the running surface still appears glossy.
3. Greasing
If any of the following conditions applies, clean the inside using a soft cloth and add
grease.
● The grease has lost its gloss.
● The amount of grease is not sufficient.
■ Figure 5-6 Greasing Location (guide rail)
Guide rail: AFF grease (THK)
Guide block
Guide rail
Grease application
location (ball rolling groove)
■ Figure 5-5 Greasing Location (ball screw)
Ball screw: AFG grease (THK)
Grease application
location (nut running groove)
● Wear protective goggles when applying grease. Pay
Caution
5-4
due attention to safety, and handle the grease carefully by following the instructions provided with that
product. If grease gets into the eyes or comes in contact with the skin, immediately flush the area thoroughly
with water.
Chapter 5 Maintenance
4. Installing the covers
When the internal check and cleaning is complete, install the side covers, stainless
sheet and table cover by reversing the order in which they were removed.
4-1 Side covers (two pieces)
Install the side covers to the slider and secure them by tightening the hexagonal socket-head screws.
Use a hex wrench or torque wrench with an across-flats size of 2.5 mm (0.10 inch)
when tightening the hexagonal socket-head screws.
Tightening torque: 0.6 N·m (85 oz-in)
4-2 Stainless sheet and sheet holder
1. Place the stainless sheet and sheet holder on the table.
Bring the stainless sheet end face on the bracket side into contact with the bracket end face.
2. Install the sheet retainer on the bracket side and secure it by tightening the thinhead screws.
Use a hex wrench or torque wrench with an across-flats size of 1.5 mm (0.06 inch)
when tightening the thin-head screws.
Tightening torque: 0.6 N·m (85 oz-in)
■ Figure 5-7 Installation of Stainless Sheet (bracket side) and Securing of
Sheet Retainer
Sheet retainer
Stainless sheet
Sheet holder
Bracket
Table
3. Press the stainless sheet against the table and apply uniform tension to the sheet.
4. Install the sheet retainer on the flange side and secure it by tightening the thin-head
screws.
Use a hex wrench or torque wrench with an across-flats size of 1.5 mm (0.06 inch)
when tightening the thin-head screws.
Tightening torque: 0.6 N·m (85 oz-in)
■ Figure 5-8 Pressing of Stainless Sheet and Securing of
Sheet Retainer (flange side)
Sheet retainer
Stainless sheet
Flange
EZS Series Slider / EZC Series Cylinder
5-5
4-3 Table cover
Confirm that the coil springs ( four pieces) are installed within the sheet holder. Place
the table cover on the table and secure it by tightening the thin-head screws.
Use a hex wrench or torque wrench with an across-flats size of 1.5 mm (0.06 inch)
when tightening the thin-head screws.
Tightening torque: 0.6 N·m (85 oz-in)
■ Figure 5-9 Securing of Table Cover
Table cover
Coil spring
Table
Sheet holder
5. Checking the tension of the stainless sheet
Once the slider and controller are connected, perform an operation check to confirm
that the stainless sheet is straight and uniformly tensioned.
5.1.5 Re-Tensioning the Stainless Sheet
The stainless sheet has been tightly installed at the factory. However, if slack has
been generated due to operation or as a result of maintenance, re-tension the sheet
in the following order.
Product used in the explanation: EZS4-xx
Required tool: Hex wrench [across-flats size: 1.5 mm (0.06 inch)]
● To prevent injury, turn off the power supply to the con-
Warning
troller before inspecting the internal parts.
● To prevent injury or equipment damage, remove the
load from the table before checking the internal parts.
1. Push the table gently with a hand, and move it toward the bracket side.
■ Figure 5-10 Movement of Table
Note
● Disconnect the motor cable from the
controller to prevent damage to the
controller due to back EMF of the motor.
● If the slider is equipped with an electromagnetic brake, move the table toward the bracket side before commencing work.
5-6
Bracket
Table
Chapter 5 Maintenance
2. Loosen the screws of the sheet retainer on the flange side using a hex wrench with
an across-flats size of 1.5 mm (0.06 inch). Do not remove the screws.
■ Figure 5-11 Release of Sheet Retainer
Sheet retainer
Flange
3. Pull the stainless sheet toward the flange side to remove the slack in the sheet.
■ Figure 5-12 Re-Tensioning of Stainless Sheet
Stainless sheet
Flange
4. Tighten the thin-head screws to secure the sheet retainer.
Use a hex wrench or torque wrench with an across-flats size of 1.5 mm (0.06 inch)
when tightening the thin-head screws.
Tightening torque: 0.6 N·m (85 oz-in)
■ Figure 5-13 Securing of Sheet Retainer
Stainless sheet
Sheet retainer
Flange
5. Check the tension of the stainless sheet.
Once the slider and controller are connected, perform an operation check to confirm that the stainless sheet is straight and uniformly tensioned.
EZS Series Slider / EZC Series Cylinder
5-7
5.2 Cylinder
5.2.1 Inspection Items and Timing
Warning
● To prevent injury, turn off the power supply to the con-
troller before inspecting the cylinder.
Perform maintenance after each applicable period specified in Table 5-5.
The schedule assumes that the cylinder is operated eight hours a day.
Reduce the maintenance intervals accordingly if the operation rate is high, such as
when the cylinder is operated continuously day and night.
■ Table 5-5 Inspection Items and Timing
Maintenance intervals
External check
When operated for the first time
One month after initial operation
Two to three months after initial operation
Every two to three months thereafter
∗
∗
∗ Add grease if signs of degradation (change to brown color, loss of gloss)
are observed during the inspection. See 5.2.4, “Greasing ”, on p. 59 for the greasing method.
5.2.2 External Check
Check the items specified in Table 5-6.
■ Table 5-6 Inspection Items and Contents
Item
Cylinder
Cables
What to check
Action if problem is found
Are there any loose mounting screws ?
Tighten the screws securely.
Is there any looseness in the load mounting nut ?
Tighten the nut securely.
Is there any degradation in the greasing condition of the rod ?
Add grease.
Are there any scratches or areas under stress,
or is the cable slack at the controller connection ?
Disconnect and reconnect the connector or replace the cable.
Operation Is there any abnormal noise or vibration from the bearings, etc. ? Check the installation of the load and operating speed again.
5.2.3 External Cleaning
● Clean the exterior surface of the cylinder whenever necessary.
● Wipe off any dirt and stains using a soft cloth.
● Do not apply compressed air to prevent dust from entering through gaps.
● Do not use petroleum solvents, since they will damage the coated surface.
● To remove stubborn stains, wipe the area using a soft cloth moistened with neutral
detergent.
5-8
Chapter 5 Maintenance
5.2.4 Greasing
Add grease if signs of degradation (change to brown color, loss of gloss) are observed
during the inspection.
● Greasing Location
Rod: Multemp SRL (Kyodo Yushi)
Apply grease to the rod in the following order:
1. Pull out the rod.
2. Wipe off dirty grease.
3. Apply grease to the rod using a soft cloth, etc.
■ Figure 5-14 Greasing Location
Note
To prevent noise or malfunctioning during operation, do not use a brush to apply grease.
Apply grease here (rod)
● Wear protective goggles when applying grease. Pay
Caution
due attention to safety, and handle grease carefully by
following the instructions provided with that product. If
grease gets into the eyes or comes in contact with the
skin, immediately flush the area thoroughly with water.
EZS Series Slider / EZC Series Cylinder
5-9
5-10
Chapter
6 Repair
Chapter 6 Repair
Any problem with the slider/cylinder will be repaired free of charge if the following
conditions are met.
6.1 Scope of Warranty Repair
If a breakdown occurs during the warranty period specified in 6.2 and Oriental Motor
is clearly responsible for such a breakdown, the affected product or part will be repaired free of charge. However, this warranty does not cover any loss (including lost
profit) arising indirectly or consequently from the breakdown of a delivered product.
6.2 Warranty Period
The warranty period shall be one year from the delivery of the product.
6.3 How to Receive Repair
Contact the Oriental Motor branch or sales office from which you purchased the product and arrange a return.
6.4 Repair Following Expiration of the Warranty Period
Once the warranty period has expired, Oriental Motor will perform repair for a fee only when the product function can be recovered/maintained through such a repair.
EZS Series Slider / EZC Series Cylinder
6-1
6-2
Appendix
A Specifications
Appendix A Specifications
A.1 Combination List
A.1.1 Slider
Incremental Type
■ Without Electromagnetic Brake
Unit model
Slider model
EZS3-05CI
EZS3-10CI
■ With Electromagnetic Brake
Unit model
Slider model
EZS3-05
EZS3-05MCI
EZS3-05M
EZS3-10
EZS3-10MCI
EZS3-10M
EZS3-15CI
EZS3-15
EZS3-15MCI
EZS3-15M
EZS3-20CI
EZS3-20
EZS3-25CI
EZS3-25
EZS3-30CI
EZS3-40CI
Controller model
EZS3-20MCI
EZS3-20M
EZS3-25MCI
EZS3-25M
EZS3-30
EZS3-30MCI
EZS3-30M
EZS3-40
EZS3-40MCI
EZS3-40M
EZS3-50CI
EZS3-50
EZS3-50MCI
EZS3-50M
EZS4-05CI
EZS4-05
EZS4-05MCI
EZS4-05M
EZS4-10CI
EZS4-10
EZS4-10MCI
EZS4-10M
EZS4-15CI
EZS4-15
EZS4-15MCI
EZS4-15M
EZS4-20CI
EZS4-20
EZS4-20MCI
EZS4-20M
EZS4-25CI
EZS4-25
EZS4-25MCI
EZS4-25M
EZS4-30CI
EZS4-30
EZS4-30MCI
EZS4-30M
EZS4-40CI
EZS4-40
EZS4-40MCI
EZS4-40M
EZS4-50CI
EZS4-50
EZS4-50MCI
EZS4-50M
EZS6-10CI
EZS6-10
EZS6-10MCI
EZS6-10M
EZS6-15CI
EZS6-15
EZS6-15MCI
EZS6-15M
EZS6-20CI
EZS6-20
EZS6-25CI
EZS6-25
EZS6-30CI
EZS6-40CI
EZS6-50CI
EZMC36I
EZMC36I
EZS6-20MCI
EZS6-20M
EZS6-25MCI
EZS6-25M
EZS6-30
EZS6-30MCI
EZS6-30M
EZS6-40
EZS6-40MCI
EZS6-40M
EZS6-50
EZS6-50MCI
EZS6-50M
EZMC36I
Controller model
EZMC36I
EZMC36I
EZMC36I
EZS Series Slider / EZC Series Cylinder
A-1
Absolute Type
■ Without Electromagnetic Brake
A-2
Unit model
Slider model
EZS3-05CA
EZS3-05
■ With Electromagnetic Brake
Controller model
Unit model
Slider model
EZS3-05MCA
EZS3-05M
EZS3-10CA
EZS3-10
EZS3-10MCA
EZS3-10M
EZS3-15CA
EZS3-15
EZS3-15MCA
EZS3-15M
EZS3-20CA
EZS3-20
EZS3-25CA
EZS3-25
EZS3-30CA
EZS3-30
EZMC36A
EZS3-20MCA
EZS3-20M
EZS3-25MCA
EZS3-25M
EZS3-30MCA
EZS3-30M
EZS3-40CA
EZS3-40
EZS3-40MCA
EZS3-40M
EZS3-50CA
EZS3-50
EZS3-50MCA
EZS3-50M
EZS4-05CA
EZS4-05
EZS4-05MCA
EZS4-05M
EZS4-10CA
EZS4-10
EZS4-10MCA
EZS4-10M
EZS4-15CA
EZS4-15
EZS4-15MCA
EZS4-15M
EZS4-20CA
EZS4-20
EZS4-25CA
EZS4-25
EZS4-20MCA
EZS4-20M
EZS4-25MCA
EZS4-25M
EZS4-30CA
EZS4-40CA
EZS4-30
EZS4-30MCA
EZS4-30M
EZS4-40
EZS4-40MCA
EZS4-40M
EZS4-50CA
EZS4-50
EZS4-50MCA
EZS4-50M
EZMC36A
EZS6-10CA
EZS6-10
EZS6-10MCA
EZS6-10M
EZS6-15CA
EZS6-15
EZS6-15MCA
EZS6-15M
EZS6-20CA
EZS6-20
EZS6-25CA
EZS6-25
EZS6-20MCA
EZS6-20M
EZS6-25MCA
EZS6-30CA
EZS6-25M
EZS6-30
EZS6-30MCA
EZS6-30M
EZS6-40CA
EZS6-40
EZS6-40MCA
EZS6-40M
EZS6-50CA
EZS6-50
EZS6-50MCA
EZS6-50M
EZMC36A
Controller model
EZMC36A
EZMC36A
EZMC36A
Appendix A Specifications
A.1.2 Cylinder
Incremental Type
■ Without Electromagnetic Brake
Unit model
Cylinder model
EZC4-05CI
EZC4-05
EZC4-10CI
EZC4-10
EZC4-20CI
EZC4-20
EZC4-30CI
EZC4-30
Controller model
EZMC36I
Unit model
Cylinder model
EZC6-05CI
EZC6-05
EZC6-10CI
EZC6-10
EZC6-20CI
EZC6-20
EZC6-30CI
EZC6-30
Controller model
EZMC36I
■ With Electromagnetic Brake
Unit model
Cylinder model
EZC4-05MCI
EZC4-05M
EZC4-10MCI
EZC4-10M
EZC4-20MCI
EZC4-20M
EZC4-30MCI
EZC4-30M
Controller model
EZMC36I
Unit model
Cylinder model
EZC6-05MCI
EZC6-05M
EZC6-10MCI
EZC6-10M
EZC6-20MCI
EZC6-20M
EZC6-30MCI
EZC6-30M
Unit model
Cylinder model
Controller model
EZMC36I
Absolute Type
■ Without Electromagnetic Brake
Unit model
Cylinder model
Controller model
EZC4-05CA
EZC4-05
EZC6-05CA
EZC6-05
EZC4-10CA
EZC4-10
EZC6-10CA
EZC6-10
EZC4-20CA
EZC4-20
EZC6-20CA
EZC6-20
EZC4-30CA
EZC4-30
EZC6-30CA
EZC6-30
EZMC36A
Controller model
EZMC36A
■ With Electromagnetic Brake
Unit model
Cylinder model
EZC4-05MCA
EZC4-05M
EZC4-10MCA
EZC4-10M
EZC4-20MCA
EZC4-20M
EZC4-30MCA
EZC4-30M
Controller model
EZMC36A
Unit model
Cylinder model
EZC6-05MCA
EZC6-05M
EZC6-10MCA
EZC6-10M
EZC6-20MCA
EZC6-20M
EZC6-30MCA
EZC6-30M
Controller model
EZMC36A
EZS Series Slider / EZC Series Cylinder
A-3
A.2 Slider Specifications
A.2.1 Performance Specifications
The following specifications are common to all models, regardless of the stroke:
■ EZS3
Slider
With electromagnetic brake
Without electromagnetic brake
Motor type
Stepping motor with encoder
Stepping motor with encoder
Drive method
Maximum speed
mm/s ( in/sec)
Ball screw
Ball screw
300 (11.81)
300 (11.81)
5 (11)
Maximum transportable
mass
kg (lb.)
Horizontal direction
5 (11)
Vertical direction
2 (4.4)
-
Maximum
acceleration m/s2 (ft/sec2 )
Horizontal direction
2 (6.56)
2 (6.56)
Vertical direction
2 (6.56)
-
N (lb.)
23 (5.1)
23 (5.1)
Power ON
23 (5.1)
23 (5.1)
Maximum thrust force
Maximum holding
brake force
N (lb.)
Power OFF
Electromagnetic brake
0
0
23 (5.1)
-
Repetitive positioning accuracy
mm ( inch)
± 0.02 ( ± 0.0008)
Resolution
mm ( inch)
0.015 (0.0006)
Lead
mm ( inch)
Stroke
mm ( inch)
12 (0.472)
50 (1.97), 100 (3.94), 150 (5.91), 200 (7.87), 250 (9.84), 300 (11.81),
400 (15.75), 500 (19.69)
Stroke
50 (1.97): 1.5 (3.3) [1.7 (3.74)]
100 (3.94): 1.6 (3.52) [1.8 (3.96)]
150 (5.91): 1.7 (3.74) [1.9 (4.18)]
200 (7.87): 1.8 (3.96) [2.0 (4.4)]
250 (9.84): 1.9 (4.18) [2.1 (4.62)]
300 (11.81): 2.0 (4.4) [2.2 (4.84)]
400 (15.75): 2.2 (4.84) [2.4 (5.28)] 500 (19.69): 2.4 (5.28) [2.6 (5.72)]
Slider weight
Numbers in [ ] are values for the
electromagnetic brake type.
kg (lb.)
Ambient temperature
°C (°F)
0 to +40 (+32 to +104), nonfreezing
dB (A)
58
Noise level (reference value)*
■ EZS4
Slider
With electromagnetic brake
Without electromagnetic brake
Motor type
Stepping motor with encoder
Stepping motor with encoder
Ball screw
Ball screw
Drive method
100 (3.94)
200 (7.87 )
300 (11.81)
100 (3.94)
200 (7.87 )
300 (11.81)
Maximum transportable
mass
kg (lb.)
Horizontal direction
15 (33 )
10 (22 )
5 (11)
15 (33 )
10 (22 )
5 (11)
Vertical direction
4.5 (9.9)
4 (8.8)
2 (4.4)
-
-
-
Maximum
acceleration m/s2 (ft/sec2 )
Horizontal direction
2 (6.56)
2 (6.56)
Vertical direction
2 (6.56)
-
Maximum speed
mm/s ( in/sec)
Maximum thrust force
Maximum holding
brake force
N (lb.)
N (lb.)
40 (9)
23 (5.1)
45 (9.9)
45 (10.1)
Power OFF
Electromagnetic brake
40 (9)
23 (5.1)
45 (10.1)
0
0
45 (10.1)
-
Repetitive positioning accuracy
mm ( inch)
± 0.02 ( ± 0.0008)
Resolution
mm ( inch)
0.015 (0.0006)
Lead
mm ( inch)
12 (0.472)
Stroke
mm ( inch)
50 (1.97), 100 (3.94), 150 (5.91), 200 (7.87), 250 (9.84), 300 (11.81),
400 (15.75), 500 (19.69)
Stroke
50 (1.97): 2.3 (5.06) [ 2.5 (5.5) ]
150 (5.91): 2.7 (5.94) [ 2.9 (6.38) ]
250 (9.84): 3.1 (6.82) [ 3.3 (7.26) ]
400 (15.75): 3.7 (8.14) [ 3.9 (8.58) ]
100 (3.94): 2.5 (5.5) [ 2.7 (5.94) ]
200 (7.87): 2.9 (6.38) [ 3.1 (6.82) ]
300 (11.81): 3.3 (7.26) [ 3.5 (7.7) ]
500 (19.69): 4.1 (9.02) [ 4.3 (9.46) ]
Slider weight
Numbers in [ ] are values for the
electromagnetic brake type.
kg (lb.)
Ambient temperature
°C (°F)
0 to +40 (+32 to +104), nonfreezing
dB (A)
56
Noise level (reference value)*
A-4
45 (10.1)
Power ON
Appendix A Specifications
■ EZS6
Slider
With electromagnetic brake
Without electromagnetic brake
Motor type
Stepping motor with encoder
Stepping motor with encoder
Ball screw
Drive method
Maximum speed
100 (3.94)
mm/s ( in/sec)
Ball screw
200 (7.87 )
300 (11.81)
100 (3.94)
200 (7.87 )
300 (11.81)
Maximum transportable
mass
kg (lb.)
Horizontal direction
30 (66)
20 (44)
10 (22 )
30 (66)
20 (44)
10 (22 )
Vertical direction
10 (22 )
8 (17.6)
3 (6.6)
-
-
-
Maximum
acceleration m/s2 (ft/sec2 )
Horizontal direction
100 (22)
N (lb.)
94 (21.1)
35 (7.8)
100 (22)
100 (22)
Power ON
Maximum holding
brake force
N (lb.)
-
2 (6.56)
Vertical direction
Maximum thrust force
2 (6.56)
2 (6.56)
Power OFF
Electromagnetic brake
94 (21.1)
35 (7.8)
100 (22)
0
0
100 (22)
-
Repetitive positioning accuracy
mm ( inch)
± 0.02 ( ± 0.0008)
Resolution
mm ( inch)
0.015 (0.0006)
Lead
mm ( inch)
12 (0.472)
Stroke
mm ( inch)
100 (3.94), 150 (5.91), 200 (7.87), 250 (9.84), 300 (11.81), 400 (15.75), 500 (19.69)
Stroke
100 (3.94): 4.0 (8.8) [ 4.4 (9.68)]
200 (7.87): 4.5 (9.9) [ 4.9 (10.78)]
300 (11.81): 5.0 (11.0) [ 5.4 (11.88)]
500 (19.69): 5.9 (12.98) [ 6.3 (13.86)]
150 (5.91): 4.3 (9.46) [ 4.7 (10.34)]
250 (9.84): 4.7 (10.34) [ 5.1 (11.22)]
400 (15.75): 5.5 (12.1) [ 5.9 (12.98 )]
Slider weight
Numbers in [ ] are values for the
electromagnetic brake type.
kg (lb.)
Ambient temperature
°C (°F)
0 to +40 (+32 to +104), nonfreezing
dB (A)
61
Noise level (reference value)*
* Noise level is indicated by a value measured in A range at 1 m (3.3 ft.) from the power unit during
a reciprocating operation at the maximum speed and stroke.
■ Figure A-1 Noise Measurement Method
Power unit
1m
(3.3
ft.)
* Microphone
Slider or cylinder
EZS Series Slider / EZC Series Cylinder
A-5
A.2.2 General Specifications
Insulation Resistance
An insulation resistance of 100 MΩ or more has been confirmed via a 500-VDC megger at the following locations:
● Between motor coil and case
● Between case and electromagnetic brake coil (electromagnetic brake type only)
Dielectric Strength
No abnormality was found after the applicable voltage was applied for one minute at
the following locations:
● Between motor coil and case
● Between case and electromagnetic brake coil (electromagnetic brake type only)
EZS3
EZS4
EZS6
AC 0.5 kV 50 Hz
AC 0.5 kV 50 Hz
AC 1.0 kV 50 Hz
A.2.3 Speed and Load Weight
The relationships between slider speed and load weight limit are shown in the diagrams below:
■ Figure A-2
Correlation Diagram of Speed
and Load Weight ( horizontal direction )
■ Figure A-3
Correlation Diagram of Speed
and Load Weight ( vertical direction )
16 (35.2)
35 (77)
EZS6
EZS4
EZS3
30 (66)
12 (26.4)
Load weight [kg (lb.)]
25 (55)
Load weight [kg (lb.)]
EZS6
EZS4
EZS3
14 (30.8)
20 (44)
15 (33)
10 (22)
10 (22)
8 (17.6)
6 (13.2)
4 (8.8)
5 (11)
2 (4.4)
0
300
200
100
(7.87) (11.81)
(3.94)
Speed [mm/s (in/sec)]
0
300
100
200
(3.94)
(7.87) (11.81)
Speed [mm/s (in/sec)]
A.2.4 Allowable Overhang Length
The allowable overhang lengths from the center of the load’s mounting surface to the
center of gravity of the object being carried are shown in the tables below:
Z
Horizontal Installation
X
■ Figure A-4
■ Table A-1 Allowable Overhang Length (EZS3)
Unit: mm (inch)
Carried weight
1 kg (2.2 lb.)
Y
X
205 (8.07)
Z
300 (11.81) 300 (11.81)
2.5 kg (5.5 lb.)
75 (2.95)
136 (5.35)
5 kg (11 lb.)
32 (1.26)
58 (2.28)
Y
300 (11.81)
157 (6.18)
■ Table A-2 Allowable Overhang Length (EZS4)
■ Table A-3 Allowable Overhang Length (EZS6)
Unit: mm (inch)
A-6
Unit: mm (inch)
Carried weight
X
Y
Z
Carried weight
5 kg (11 lb.)
113 (4.45)
135 (5.34)
300 (11.81)
10 kg (22 lb.)
500 (19.69) 414 (16.30) 500 (19.69)
10 kg (22 lb.)
51 (2.01)
67 (2.64)
252 (9.92)
20 kg (44 lb.)
386 (15.20) 207 (8.15)
500 (19.69)
15 kg (33 lb.)
31 (1.22)
45 (1.77)
150 (5.91)
30 kg (66 lb.)
257 (10.12) 137 (5.40)
500 (19.69)
X
Y
Z
Appendix A Specifications
Installation by Wall Mounting
■ Figure A-5
X
■ Table A-4 Allowable Overhang Length (EZS3)
Unit: mm (inch)
Carried weight
Y
X
Z
155 (6.10)
300 (11.81) 300 (11.81)
2.5 kg (5.5 lb.)
62 (2.44)
300 (11.81) 105 (4.13)
5 kg (11 lb.)
22 (0.87)
106 (4.17)
1 kg (2.2 lb.)
Z
Y
31 (1.22)
■ Table A-5 Allowable Overhang Length (EZS4)
■ Table A-6 Allowable Overhang Length (EZS6)
Unit: mm (inch)
Unit: mm (inch)
Carried weight
X
Y
Z
Carried weight
X
5 kg (11 lb.)
28 (1.10)
135 (5.34)
237 (9.33)
10 kg (22 lb.)
100 (3.94)
10 kg (22 lb.)
14 (0.55)
67 (2.64)
99 (3.90)
20 kg (44 lb.)
50 (1.97)
245 (9.65)
179 (7.05)
15 kg (33 lb.)
9 (0.35)
45 (1.77)
53 (2.09)
30 kg (66 lb.)
33 (1.30)
163 (6.42)
100 (3.94)
Vertical Installation
Y
Z
490 (19.30) 414 (16.30)
X
■ Figure A-6
■ Table A-7 Allowable Overhang Length (EZS3)
Unit: mm (inch)
Carried weight
X
Y
Z
Z
0.5 kg (1.1 lb.) 300 (11.81) 257 (10.12) 300 (11.81)
1 kg (2.2 lb.) 142 (5.59)
2 kg (4.4 lb.)
62 (2.44)
129 (5.08)
142 (5.59)
62 (2.44)
52 (2.05)
Y
■ Table A-8 Allowable Overhang Length (EZS4)
■ Table A-9 Allowable Overhang Length (EZS6)
Unit: mm (inch)
Unit: mm (inch)
X
Y
Z
Carried weight
2 kg (4.4 lb.)
230 (9.06)
57 (2.24)
230 (9.06)
3 kg (6.6 lb.)
4 kg (8.8 lb.)
102 (4.02)
29 (1.14)
102 (4.02)
87 (3.43)
25 (0.98)
87 (3.43)
Carried weight
4.5 kg (9.9 lb.)
X
Y
8 kg (17.6 lb.) 500 (19.67) 104 (4.09)
10 kg (22 lb.)
Z
500 (19.67) 277 (10.90) 500 (19.67)
500 (19.67)
83 (3.27)
500 (19.67)
500 (19.67)
EZS Series Slider / EZC Series Cylinder
A-7
A.3 Cylinder Specifications
A.3.1 Performance Specifications
The following specifications are common to all models, regardless of the stroke:
■ EZC4
Cylinder
With electromagnetic brake
Without electromagnetic brake
Motor type
Stepping motor with encoder
Stepping motor with encoder
Ball screw
Drive method
Maximum speed
mm/s ( in/sec)
Maximum transportable
mass
kg (lb.)
Horizontal direction
Maximum
acceleration m/s2 (ft/sec2 )
Horizontal direction
Vertical direction
Push force
300 (11.81)
100 (3.94)
200 (7.87 )
300 (11.81)
-
-
-
-
-
-
4 (8.8)
2 (4.4)
-
-
-
-
-
2 (6.56)
N (lb.)
45 (10.1)
N (lb.)
40 (9)
23 (5.1)
45 (10.1)
40 (9)
23 (5.1)
45 (10.1) [6 mm/s (0.24 in/sec) or less]
45 (10.1) [6 mm/s (0.24 in/sec) or less]
Power ON
45 (10.1)
45 (10.1)
Power OFF
0
0
-
45 (10.1)
Electromagnetic brake
Repetitive positioning accuracy
mm ( inch)
± 0.02 ( ± 0.0008)
Resolution
mm ( inch)
0.015 (0.0006)
Lead
mm ( inch)
Stroke
mm ( inch)
12 (0.472)
50 (1.97), 100 (3.94), 200 (7.87), 300 (11.81)
Slider weight
Numbers in [ ] are values for the
electromagnetic brake type.
kg (lb.)
Ambient temperature
°C (°F)
0 to +40 (+32 to +104), nonfreezing
dB (A)
58
Noise level (reference value)*
A-8
Ball screw
200 (7.87 )
4.5 (9.9)
Vertical direction
Maximum thrust force
Maximum holding
brake force
N (lb.)
100 (3.94)
Stroke
50 (1.97): 1.6 (3.52)[1.8 (3.96)]
200 (7.87): 2.4 (5.28)[2.6 (5.72)]
100 (3.94): 1.9 (4.18)[2.1 (4.62)]
300 (11.81): 2.9 (6.38)[3.1 (6.82)]
Appendix A Specifications
■ EZC6
Cylinder
With electromagnetic brake
Without electromagnetic brake
Motor type
Stepping motor with encoder
Stepping motor with encoder
Ball screw
Drive method
Maximum speed
100 (3.94)
mm/s ( in/sec)
Maximum transportable
mass
kg (lb.)
Horizontal direction
Maximum
acceleration m/s2 (ft/sec2 )
Horizontal direction
Vertical direction
100 (3.94)
200 (7.87 )
300 (11.81)
-
-
-
-
-
-
8 (17.6)
3 (6.6)
-
-
-
-
-
2 (6.56)
N (lb.)
100 (22.5)
N (lb.)
-
94 (21.1)
35 (7.8)
100 (22.5)
94 (21.1)
35 (7.8)
100 (22.5) [6 mm/s (0.24 in/sec) or less]
100 (22.5) [6 mm/s (0.24 in/sec) or less]
Power ON
100 (22.5)
100 (22.5)
Power OFF
0
0
Push force
Maximum holding
brake force
N (lb.)
300 (11.81)
10 (22)
Vertical direction
Maximum thrust force
Ball screw
200 (7.87 )
-
100 (22.5)
Electromagnetic brake
Repetitive positioning accuracy
mm ( inch)
± 0.02 ( ± 0.0008)
Resolution
mm ( inch)
0.015 (0.0006)
Lead
mm ( inch)
Stroke
mm ( inch)
12 (0.472)
50 (1.97), 100 (3.94), 200 (7.87), 300 (11.81)
Slider weight
Numbers in [ ] are values for the
electromagnetic brake type.
kg (lb.)
Ambient temperature
°C (°F)
0 to +40 (+32 to +104), nonfreezing
dB (A)
65
Noise level (reference value)*
Stroke
50 (1.97): 3.2 (7.04) [3.6 (7.92) ]
200 (7.87): 4.5 (9.9) [4.9 (10.78) ]
100 (3.94): 3.6 (7.92) [4.0 (8.8)]
300 (11.81): 5.5 (12.1) [5.9 (12.98)]
* Noise level is indicated by a value measured in A range at 1 m (3.3 ft.) from the power unit during
a reciprocating operation at the maximum speed and stroke.
■ Figure A-7 Noise Measurement Method
Power unit
1m
(3.3
ft.)
* Microphone
Slider or cylinder
EZS Series Slider / EZC Series Cylinder
A-9
A.3.2 General Specifications
Insulation Resistance
An insulation resistance of 100 MΩ or more has been confirmed via a 500-VDC megger at the following locations:
● Between motor coil and case
● Between case and electromagnetic brake coil (electromagnetic brake type only)
Dielectric Strength
No abnormality was found after the applicable voltage was applied for one minute at
the following locations:
● Between motor coil and case
● Between case and electromagnetic brake coil (electromagnetic brake type only)
EZC4
EZC6
AC 0.5 kV 50 Hz
AC 1.0 kV 50 Hz
A.3.3 Speed and Thrust Force
The relationship between cylinder speed and thrust force limit is shown in the diagram below:
■ Figure A-8
Correlation Diagram of Speed and
Thrust Force
(horizontal / vertical directions)
100 (22.5)
EZC6
EZC4
90 (20.2)
80 (18)
Thrust force [ N (lb.)]
70 (15.7)
60 (13.5)
50 (11.2)
40 (9)
30 (6.7)
20 (4.5)
10 (2.2)
0
300
200
100
(7.87) (11.81)
(3.94)
Speed [mm/s (in/sec)]
A.3.4 Push Current and Push Force
The relationships between push current during horizontal operation and push force
at cylinder standstill are shown in the diagrams below:
● The accuracy of push force at standstill is not guaranteed.
● If the push force is smaller than the slide resistance of the load, a malfunction may
occur when the rod is pushed against it.
● When the cylinder is used in a lift, an external force calculated by multiplying the
weight of the carried object by the rate of gravitational acceleration is applied.
Therefore, the cylinder push force must be set so as to accommodate this external
force. Measure the push force using an actual load, and set an appropriate push
current.
■ Figure A-9 Push Force at Standstill (EZC4) ■ Figure A-10 Push Force at Standstill (EZC6)
100 (22.5)
Push force [N (lb.)]
Push force [ N (lb.)]
50 (11.2)
40 (9)
30 (6.7)
20 (4.5)
10 (2.2)
60 (13.5)
40 (9)
20 (4.5)
0
A-10
80 (18)
10
15
20
25
Push current [%]
30
0
10
15
20
25
Push current [%]
30
B Optional Parts and Accessories
Appendix B Optional Parts and Accessories
Appendix
B.1 Cable Set
These cables are used to extend the wiring length between the slider/cylinder and
controller.
Flexible cables offering excellent elasticity are also available.
A motor cable and an encoder cable are provided as a set. Each cable can be purchased individually.
● Cable Set
Motor cable/encoder cable: Set of two cables
Model
Cable length
CC02EZ1
2 m ( 6.6 ft.)
CC05EZ1
5 m ( 16.4 ft.)
CC10EZ1
10 m ( 32.8 ft.)
Individual Motor Cable
Model
Cable length
CC02EZ1-M
Individual Encoder Cable
Model
Cable length
2 m ( 6.6 ft.)
CC02EZ1-E
2 m ( 6.6 ft.)
CC05EZ1-M 5 m ( 16.4 ft.)
CC05EZ1-E
5 m ( 16.4 ft.)
CC10EZ1-M 10 m ( 32.8 ft.)
CC10EZ1-E 10 m ( 32.8 ft.)
● Flexible Cable Set
Motor cable/encoder cable: Set of two cables
Model
CC02EZ1R
Cable length
2 m ( 6.6 ft.)
CC05EZ1R
5 m ( 16.4 ft.)
CC10EZ1R
10 m ( 32.8 ft.)
Individual Motor Cable
Model
CC02EZ1R-M
Cable length
Individual Encoder Cable
Model
Cable length
2 m ( 6.6 ft.)
CC02EZ1R-E
CC05EZ1R-M
5 m ( 16.4 ft.)
CC05EZ1R-E
5 m ( 16.4 ft.)
CC10EZ1R-M
10 m ( 32.8 ft.)
CC10EZ1R-E
10 m ( 32.8 ft.)
2 m ( 6.6 ft.)
EZS Series Slider / EZC Series Cylinder
B-1
B.2 Stainless Sheet
This sheet serves as a protective cover for the mechanical part of the slider.
EZS3-xx / EZS3-xxM Type
Model
PAEZ3-5W
EZS4-xx / EZS4-xxM Type
Stroke
Model
PAEZ4-5W
50 mm ( 1.97 inch)
50 mm ( 1.97 inch)
PAEZ3-10W
100 mm ( 3.94 inch)
PAEZ4-10W
100 mm ( 3.94 inch)
PAEZ3-15W
150 mm ( 5.91 inch)
PAEZ4-15W
150 mm ( 5.91 inch)
PAEZ3-20W
200 mm ( 7.87 inch)
PAEZ4-20W
200 mm ( 7.87 inch)
PAEZ3-25W
250 mm ( 9.84 inch)
PAEZ4-25W
250 mm ( 9.84 inch)
PAEZ3-30W
300 mm ( 11.81 inch)
PAEZ4-30W
300 mm ( 11.81 inch)
PAEZ3-40W
400 mm ( 15.75 inch)
PAEZ4-40W
400 mm ( 15.75 inch)
PAEZ3-50W
500 mm ( 19.69 inch)
PAEZ4-50W
500 mm ( 19.69 inch)
EZS6-xx / EZS6-xxM Type
Model
Stroke
PAEZ6-10W
100 mm ( 3.94 inch)
PAEZ6-15W
150 mm ( 5.91 inch)
PAEZ6-20W
200 mm ( 7.87 inch)
PAEZ6-25W
250 mm ( 9.84 inch)
PAEZ6-30W
300 mm ( 11.81 inch)
PAEZ6-40W
400 mm ( 15.75 inch)
PAEZ6-50W
500 mm ( 19.69 inch)
B.3 Cylinder Flange
Each flange comes with hexagonal
socket-head screws (four pieces).
EZS4-xx / EZS4-xxM Type
B-2
Stroke
EZS6-xx / EZS6-xxM Type
Model
Model
PAEZ4-F
PAEZ6-F
Appendix B Optional Parts and Accessories
B.4 Sensor Set
These sensors are used to detect the position of the slider table.
They can be used when the controller is operated in the controller mode or driver mode.
● Set of three sensors
Model
PAEZ-S
B.5 Sensor Cable
Use this cable to connect the sensors and controller when the controller is operated
in the controller mode.
Model
Cable length
CC02EZ1-S
2 m ( 6.6 ft.)
EZS Series Slider / EZC Series Cylinder
B-3
●
Please contact your nearest ORIENTAL MOTOR office for further information.
ORIENTAL MOTOR U.S.A. CORP.
ORIENTAL MOTOR (EUROPA) GmbH TAIWAN ORIENTAL MOTOR CO., LTD.
Technical Support Line Tel:(800)468-3982
Available from 7:30 AM to 5:00 PM, P.S.T.
E-mail: [email protected]
www.orientalmotor.com
Headquarters and
Tel:0211-5206700
Munich Office
Tel:08131-59880
Hamburg Office
Tel:040-76910443
Düsseldorf Office
Fax:0211-52067099
Fax:08131-598888
Fax:040-76910445
ORIENTAL MOTOR (UK) LTD.
Tel:01252-519809
Fax:01252-547086
ORIENTAL MOTOR (FRANCE) SARL
Tel:01 47 86 97 50 Fax:01 47 82 45 16
ORIENTAL MOTOR ITALIA s.r.l.
Tel:02-3390541
Fax:02-33910033
Tel:(02) 8228-0707
Fax:(02) 8228-0708
SINGAPORE ORIENTAL MOTOR PTE LTD.
Tel:(6745) 7344
Fax:(6745) 9405
ORIENTAL MOTOR (MALAYSIA) SDN BHD
Tel:(03) 79545778
Fax:(03) 79541528
INA OM LTD.
KOREA
Tel:(032) 822-2042~3 Fax:(032) 819-8745
ORIENTAL MOTOR CO., LTD.
Headquarters
Tokyo, Japan
Tel:(03) 3835-0684
Fax:(03) 3835-1890
Printed on Recycled Paper