1
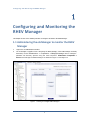
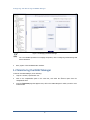
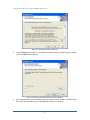
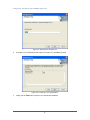
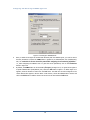
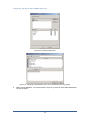
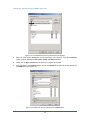
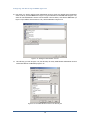
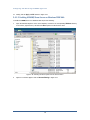
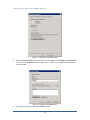
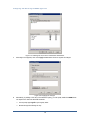
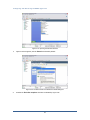
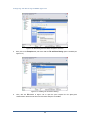
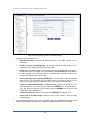
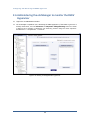
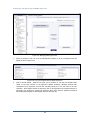
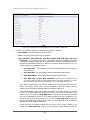
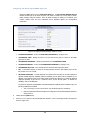
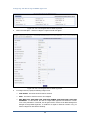
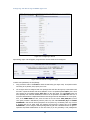
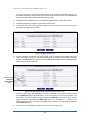
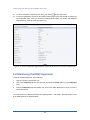
Configuring and Monitoring RHEV eG Enterprise v5.6 Restricted Rights Legend The information contained in this document is confidential and subject to change without notice. No part of this document may be reproduced or disclosed to others without the prior permission of eG Innovations, Inc. eG Innovations, Inc. makes no warranty of any kind with regard to the software and documentation, including, but not limited to, the implied warranties of merchantability and fitness for a particular purpose. Trademarks Microsoft Windows, Windows NT, Windows 2000, Windows 2003 and Windows 2008 are either registered trademarks or trademarks of Microsoft Corporation in United States and/or other countries. The names of actual companies and products mentioned herein may be the trademarks of their respective owners. Copyright © 2012 eG Innovations, Inc. All rights reserved. Table of Contents CONFIGURING AND MONITORING THE RHEV MANAGER ............................................................................ 1 1.1 Administering the eG Manager to monitor the RHEV Manager ....................................................................... 1 1.2 Monitoring the RHEV Manager ........................................................................................................................ 2 CONFIGURING AND MONITORING THE RHEV HYPERVISOR ...................................................................... 3 2.1 Pre-requisites for Monitoring RHEV ................................................................................................................ 3 2.1.1 General Pre-requisites ............................................................................................................................... 3 2.1.2 Pre-requisites for Obtaining the "Outside View" of VMs by connecting to the RHEV Manager ............. 3 2.1.3 Pre-requisites for Obtaining the "Inside View" of Windows VMs, using the eG VM Agent .................... 3 2.1.4 Pre-requisites for Obtaining the "Inside View" of VMs, without using the eG VM Agent ....................... 4 2.2 Configuring the eG Agent to use the RESTful APIs on the RHEV Manager to Obtain the “Outside View” ... 5 2.3 Configuring the Remote Agent to Obtain the Inside View of Windows VMs, using the eG VM Agent .......... 5 2.3.1 Communication between the eG Agent and the eG VM Agent ................................................................. 9 2.3.2 Licensing of the eG VM Agent ................................................................................................................. 9 2.3.3 Benefits of the eG VM Agent .................................................................................................................... 9 2.4 Configuring Windows Virtual Machines to Support the eG Agent’s Inside View without the eG VM Agent 10 2.4.1 Enabling ADMIN$ Share Access on Windows Virtual Guests ............................................................... 10 2.4.2 Configuring Windows Firewalls to Allow File and Print Sharing ........................................................... 20 2.5 Configuring an RHEV Manager to Use for Monitoring the RHEV Hypervisor ............................................. 23 2.6 Administering the eG Manager to monitor the RHEV Hypervisor ................................................................. 25 2.7 Configuring Users for VM Monitoring ........................................................................................................... 32 2.8 Monitoring the RHEV Hypervisor .................................................................................................................. 35 CONCLUSION ............................................................................................................................................................. 36 Table of Figures Figure 1.1: Viewing unmanaged RHEV Managers.................................................................................................................................. 1 Figure 1.2: Managing the RHEV Manager .............................................................................................................................................. 2 Figure 2.1: Welcome screen of the eG VM Agent installation wizard ..................................................................................................... 6 Figure 2.2: Accepting the license agreement ........................................................................................................................................... 7 Figure 2.3: Specifying the install directory of the eG VM Agent ............................................................................................................ 7 Figure 2.4: Specifying the VM agent port ............................................................................................................................................... 8 Figure 2.5: A summary of your specifications ......................................................................................................................................... 8 Figure 2.6: Finishing the installation ....................................................................................................................................................... 9 Figure 2.7: The ADMIN$ share does not exist ...................................................................................................................................... 11 Figure 2.8: Admin$ share pre-exists ...................................................................................................................................................... 11 Figure 2.9: Creating the ADMIN$ share ............................................................................................................................................... 12 Figure 2.10: Clicking the Add button .................................................................................................................................................... 13 Figure 2.11: Selecting the administrative user to whom access rights are to be granted ........................................................................ 13 Figure 2.12: The administrator account granted access permissions...................................................................................................... 14 Figure 2.13: Defining the Security settings for the ADMIN$ share ....................................................................................................... 14 Figure 2.14: Adding the administrator account ...................................................................................................................................... 15 Figure 2.15: The Administrator account in the Security list .................................................................................................................. 15 Figure 2.16: Selecting the Share option from the shortcut menu ........................................................................................................... 16 Figure 2.17: Clicking on Advanced Sharing .......................................................................................................................................... 17 Figure 2.18: Enabling the ADMIN$ share ............................................................................................................................................. 17 Figure 2.19: Clicking on the Add button ............................................................................................................................................... 18 Figure 2.20: Allowing a domain administrator to access the folder ....................................................................................................... 18 Figure 2.21: Allowing full access to the local/domain administrator ..................................................................................................... 19 Figure 2.22: Applying the changes ........................................................................................................................................................ 19 Figure 2.23: Selecting the guest OS....................................................................................................................................................... 20 Figure 2.24: Opening the Windows Firewall ......................................................................................................................................... 21 Figure 2.25: The General tab of the Windows Firewall dialog box ....................................................................................................... 21 Figure 2.26: Deselecting the 'Don't allow exceptions' check box........................................................................................................... 22 Figure 2.27: Enabling 'File and Printer Sharing' .................................................................................................................................... 22 Figure 2.28: Opening ports .................................................................................................................................................................... 23 Figure 2.29: Configuring the details of the RHEV Manager.................................................................................................................. 24 Figure 2.30: Viewing unmanaged RHEV Hypervisors .......................................................................................................................... 25 Figure 2.31: Managing RHEV Hypervisors........................................................................................................................................... 26 Figure 2.32: List of Unconfigured tests for RHEV Hypervisor ............................................................................................................. 26 Figure 2.33: Configuring the test parameters of for CPU Details – RHEV test ..................................................................................... 27 Figure 2.34: Adding the RHEV Manager details on-the-fly .................................................................................................................. 28 Figure 2.35: List of unconfigured tests for RHEV hypervisor ............................................................................................................... 29 Figure 2.36: List of unconfigured tests for RHEV hypervisor ............................................................................................................... 29 Figure 2.37: Configuring a VM test ....................................................................................................................................................... 33 Figure 2.38: The VM user configuration page ....................................................................................................................................... 33 Figure 2.39: Adding another user .......................................................................................................................................................... 34 Figure 2.40: Associating a single domain with different admin users .................................................................................................... 34 Figure 2.41: The test configuration page displaying multiple domain names, user names, and passwords ............................................ 35 Configuring and Monitoring the RHEV Manager Configuring and Monitoring the RHEV Manager This chapter focuses on the detailed procedure to configure and monitor the RHEV Manager. 1.1 Administering the eG Manager to monitor the RHEV Manager 1. Login to the eG administrative interface. 2. The eG manager is capable of auto- discovering the RHEV Manager. If the RHEV Manager is already discovered, use the Infrastructure -> Components ->Manage/Unmanage menu to manage it. Otherwise run discovery process using the menu sequence: Infrastructure ->Components -> Discover and manage the RHEV Manager as detailed in Figure 1.1 and Figure 1.2 Figure 1.1: Viewing unmanaged RHEV Managers 1 Configuring and Monitoring the RHEV Manager Figure 1.2: Managing the RHEV Manager For a more detailed procedure for managing components, refer to Configuring and Monitoring Web Servers document. 3. Next, signout of the eG administrative interface. 1.2 Monitoring the RHEV Manager To monitor the RHEV Manager, do the following: 1. Login as a monitor / supermonitor user. 2. Click on the components option in the menu bar, and select the Servers option from the components menu. 3. From the Components page that appears next, click on the RHEV Manager for which you wish to view measurements. 2 Configuring and Monitoring the RHEV Hypervisor Configuring and Monitoring the RHEV Hypervisor This chapter focuses on the configuring and monitoring procedure associated with the RHEV Hypervisor. 2.1 Pre-requisites for Monitoring RHEV 2.1.1 General Pre-requisites Enable the remote agent to communicate with the eG manager port (default: 7077). If VMs running on multi-byte operating systems are to be monitored (e.g., Windows Japanese), then the remote agent monitoring such VMs should also run on a multi-byte operating system. 32-bit VMs that are to be monitored in an agentless manner should be configured with at least 2 GB RAM, and 64-bit VMs require at least 4 GB RAM. If more than four RHEV Hypervisors are being monitored in an agentless manner, then the RAM capacity of the VMs should be increased proportionately. 2.1.2 Pre-requisites for Obtaining the "Outside View" of VMs by connecting to the RHEV Manager Ensure that the remote agent has IP connectivity to the RHEV Manager. Ensure that the remote agent has HTTP/HTTPS access to the port (port 8080/8443) at which the RHEV Manager listens All the tests that the remote agent executes should be configured with the name and password of a user with read-only access to the REST API of the RHEV manager. To know how to configure a read-only role on the RHEV manager and assign that role to a user, follow the steps detailed in Section 2.2 of this document. 2.1.3 Pre-requisites for Obtaining the "Inside View" of Windows VMs, using the eG VM Agent Install the eG VM Agent on each Windows VM. For details on how to install the eG VM Agent, refer to Section 1.2 of this document. Enable the remote agent to communicate with the port at which the eG VM Agent listens (default port: 60001). Set the INSIDE VIEW USING flag for all the “inside view” tests to eG VM Agent (Windows). 3 Configuring and Monitoring the RHEV Hypervisor 2.1.4 Pre-requisites for Obtaining the "Inside View" of VMs, without using the eG VM Agent Ensure that the remote agent has IP connectivity to at least one of the network interfaces of the VMs. The ADMIN$ share should be enabled for all Windows-based virtual guests being monitored and the administrative account must have permissions to this share drive. Refer to Section 1.3.1 of this document for a step-by-step procedure to achieve this. To enable the remote agent to communicate with the Windows VMs, an administrative account login and password (either a local account or a domain account) must be provided when configuring the eG monitoring capabilities. In case of VMs with the Windows XP/Windows 2003/Windows 2008/Windows Vista/Windows 7 operating systems, the firewall on the guest should be explicitly configured to allow Windows File and Print Sharing services which are required for the remote agent to communicate with the guest operating system. Refer to Section 1.1 of this document for a detailed procedure. For monitoring a Windows VM, TCP port 139 must be accessible from the remote agent to the VM. For monitoring a Linux VM, the SSH port (TCP port 22) must be enabled for communication between the remote agent and the VM being monitored. If the Linux VMs in your environment listen on a different SSH port, then, you can override the default SSH port of 22 using the steps provided below: Edit the eg_tests.ini file (in the <EG_INSTALL_DIR>\manager\config directory) on the eG manager host. In the [AGENT_SETTINGS] section of the file, set the JavaSshPortForVm parameter to an SSH port of your choice. By default, this parameter is set to 22. If your environment consists of multiple Linux VMs, each listening on a different SSH port, then, you can specify a comma-separated list of SSH ports against the JavaSshPortForVm parameter. For example: 7711,7271,8102 Login to the eG manager. Finally, save the file. For obtaining the "inside view" of VMs running Windows Vista/Windows 7/Windows 2008 operating systems, the eGurkhaAgent service of the eG remote agent should be configured to run using domain administrator privileges. Refer to the eG User Manual for the procedure. For obtaining the "inside view" of other Windows VMs however, the remote agent service requires no such privileges. Set the INSIDE VIEW USING flag for all the “inside view” tests to Remote connection to VM (Windows). 4 Configuring and Monitoring the RHEV Hypervisor 2.2 Configuring the eG Agent to use the RESTful APIs on the RHEV Manager to Obtain the “Outside View” The eG agent uses the RESTful APIs on the RHEV manager to report the outside view of performance of the VMs on the RHEV hypervisor. To be able to connect to the RESTful API, the eG agent should be configured with the credentials of a user with read-only access to the API. To create a read-only role and assign it to a user, do the following: 4. Open the RHEV manager. 5. In the top navigation bar, click Configure. The configuration window opens. 6. In the configuration window, click the Roles tab. 1. To create a role, click New. 2. In the New Role window, provide the name of the role. Select Admin as the account type and leave all the check boxes in the Check Boxes to Allow Action pane clear. Click OK. 7. In the configuration window, click the System Permission tab. To grant a user with the permission to access information about the virtual machines, click Add. In the Add System Permission to User pane, select the user to whom you want to grant the permission. From the Assign role to user list, select the role that you created in step 3 and click OK. 2.3 Configuring the Remote Agent to Obtain the Inside View of Windows VMs, using the eG VM Agent To provide the inside view of a Linux VM, the eG agent uses secure shell (SSH). To obtain the inside view of a Windows VM, the eG agent offers two options. The first option uses Windows File & Print Sharing services to push monitoring components to the VMs. These monitoring components are then executed on the VM to collect metrics from the VMs. To push monitoring components to the VM and to periodically invoke these components, the eG agent requires domain administrator privileges to all the VMs being monitored. In many production environments, strict security restrictions are enforced, and it may not be possible to configure a monitoring solution with domain administration privileges for each of the VMs. To handle such environments, the eG RHEV monitor uses a lightweight monitoring component called the eG VM Agent, which is installed inside each of the VMs to obtain metrics regarding the health of the VMs. The eG VM Agent can be best described as a software that can be installed on the Windows virtual machines of a virtual infrastructure to allow a single eG agent to obtain an inside view of these VMs, without domain administrator privileges. Users have multiple options to choose from when it comes to installing the eG VM Agent. These options have been discussed below: Manually install the eG VM Agent on every Windows VM using the executable that eG Enterprise includes; Bundle the eG VM Agent as part of a template VM, and use this template to create multiple VMs; this way, the eG VM Agent is automatically available in all the VMs that are created using the template; Use a software distribution solution such as Microsoft System Center to distribute the eG VM Agent software to existing VMs from a central location; 5 Configuring and Monitoring the RHEV Hypervisor Use the install procedure that is ideal for your environment, and quickly get the eG VM Agent up and running. The detailed manual installation procedure has been discussed hereunder: 8. To install the eG VM Agent on a 32-bit VM, double-click on the eGVMAgent.exe, and to install the same on a 64-bit VM, double-click the eGVMAgent_64.exe. 9. Figure 2.1 then appears. Click on the Next button in Figure 2.1 to continue. Figure 2.1: Welcome screen of the eG VM Agent installation wizard 3. When Figure 2.2 appears, click on Yes to accept the displayed license agreement. 6 Configuring and Monitoring the RHEV Hypervisor Figure 2.2: Accepting the license agreement 4. Use the Browse button in Figure 2.3 to indicate the location in which the agent should be installed, and click the Next button to proceed. Figure 2.3: Specifying the install directory of the eG VM Agent 5. Next, specify the port at which the VM agent listens for requests from the eG agent. The default port is 60001. After port specification, click on the Next button in Figure 2.4 to proceed. 7 Configuring and Monitoring the RHEV Hypervisor Figure 2.4: Specifying the VM agent port 6. A summary of your specifications then follows (see Figure 2.5). Click Next to proceed. Figure 2.5: A summary of your specifications 7. Finally, click the Finish button in Figure 2.6 to complete the installation. 8 Configuring and Monitoring the RHEV Hypervisor Figure 2.6: Finishing the installation 2.3.1 Communication between the eG Agent and the eG VM Agent At the time of the installation of the eG VM agent, a folder named eGVMAgent is created in the install destination specified. The setup program also creates a Windows Service named eGVMAgent on the Windows VM. This service must be running for the eG agent to obtain the inside view of the virtual machine. Upon successful installation, the eG VM agent starts automatically and begins listening for requests at default TCP port 60001. However, if, during the installation process, you have configured a different port for the eG VM agent, then, after completing the installation, follow the steps below to make sure that the eG agent communicates with the eG VM agent via the port that you have configured: Login to the eG manager host. Edit the eg_tests.ini file in the <EG_INSTALL_DIR>\manager\config directory. The WmiInsideViewPort parameter in the [AGENT_SETTINGS] section of the file is set to 60001 by default. If the eG VM agent’s port is changed at the time of installation, then you will have to ensure that this parameter reflects the new port. Therefore, change the default port specification accordingly. Save the file. At configured intervals, the eG remote agent issues commands to each of the eG VM Agents (using the TCP port configured during the VM agent installation). The eG VM Agent executes the commands, collects the “inside view” metrics from the Windows VM, and sends the output back to the eG agent. The eG agent then analyzes the metrics and informs the eG manager about the status of the Windows VMs. 2.3.2 Licensing of the eG VM Agent The eG VM Agent is not license-controlled. Therefore, you can install and use any number of VM agents in your infrastructure. 2.3.3 Benefits of the eG VM Agent The eG VM Agent offers several key benefits: Ideal for high-security environments: The eG VM Agent is capable of collecting “inside view” metrics from Windows VMs, without domain administrator privileges. It is hence ideal for high-security environments, where administrators might not be willing to expose the credentials of the domain administrators. 9 Configuring and Monitoring the RHEV Hypervisor Easy to install, configure: The eG RHEV Monitor offers users the flexibility to choose from multiple methodologies for installing the eG VM Agent on the target VMs. Even a manual installation procedure, would not take more than a few minutes. Moreover, since the eG VM agent communicates only with the eG agent and not the eG manager, no additional configuration needs to be performed on the VM agent to facilitate the communication. In addition, the VM agent starts automatically upon installation, thereby saving the time and trouble involved in manually starting each of the VM agents. License independent: Since the eG VM agent is not license-controlled, you can add any number of VM agents, as and when required, to your environment. 2.4 Configuring Windows Virtual Machines to Support the eG Agent’s Inside View without the eG VM Agent For the "inside" view, by default, the eG agent uses SSH/WMI (depending upon the virtual OS to be monitored) to communicate remotely with the virtual machines on the ESX server and collect metrics. To establish this remote connection with Windows VMs in particular, eG Enterprise requires that the eG agent be configured with domain administrator privileges. Besides, the INSIDE VIEW USING flag of all “inside view” tests should be set to Remote connection to a VM. In addition, the following pre-requisites need to be fulfilled: The ADMIN$ share will have to be available on the Windows guests The Windows Firewall should be configured to allow Windows File and Print Sharing The sections to come discuss the procedure to be followed for fulfilling the 2 requirements above. 2.4.1 Enabling ADMIN$ Share Access on Windows Virtual Guests 2.4.1.1 Enabling ADMIN$ Share Access on Windows 2000/2003 VMs If the ADMIN$ share is not available on any Windows-based virtual guest, create the share using the procedure detailed below: 10. Open the Windows Explorer on the virtual machine, browse for the corresponding Windows directory in the C drive, right-click on it, and select the Sharing option from the shortcut menu. 11. If the ADMIN$ share does not pre-exist on the Windows guest, then Figure 2.7 appears indicating the same. 10 Configuring and Monitoring the RHEV Hypervisor Figure 2.7: The ADMIN$ share does not exist On the other hand, if the ADMIN$ share pre-exists, Figure 2.8 appears. In such a case, first, remove the ADMIN$ share by selecting the Do not share this folder option from Figure 2.7 and clicking the Apply and OK buttons. After this, you will have to repeat step 1 of this procedure to open Figure 2.7. Then, proceed as indicated by step 3 onwards. Figure 2.8: Admin$ share pre-exists 3. To create (or re-create) the ADMIN$ share, select the Share this folder option from Figure 2.8, and provide ADMIN$ share against the Share name text box (see Figure 2.9). 11 Configuring and Monitoring the RHEV Hypervisor Figure 2.9: Creating the ADMIN$ share 4. Next, to enable the eG agent to communicate effectively with the Windows guest, you need to ensure that the permission to access the ADMIN$ share is granted to an administrative user (local/domain); also, the credentials of this user should be passed while configuring the eG monitoring capabilities i.e., while configuring the VMware tests. To grant the access permissions, click on the Permissions button in Figure 2.9. 5. By default, the ADMIN$ share can be accessed by Everyone (see Figure 2.10). To grant access rights to a specific administrative (local/domain) user, select the Add button in Figure 2.10. When Figure 2.11 appears, select the domain to search from the Look in list. The valid user accounts configured on the chosen domain then appear in the box below. From this box, choose the administrator's account and click on the Add button to add the chosen user account to the box below the Add button. 12 Configuring and Monitoring the RHEV Hypervisor Figure 2.10: Clicking the Add button Figure 2.11: Selecting the administrative user to whom access rights are to be granted 6. Finally, click the OK button. You will then switch to Figure 2.12, where the newly added administrator account will appear. 13 Configuring and Monitoring the RHEV Hypervisor Figure 2.12: The administrator account granted access permissions 7. Select the newly added administrator account from Figure 2.12, and then, using the Permissions section, grant the administrator Full Control, Change, and Read permissions. 8. Finally, click the Apply and OK buttons in Figure 2.12 to register the changes. 9. Once you return to the Properties window, click on the Security tab to define the security settings for the ADMIN$ share (see Figure 2.13). Figure 2.13: Defining the Security settings for the ADMIN$ share 14 Configuring and Monitoring the RHEV Hypervisor 10. Here again, you need to add the same administrator account, which was granted access permissions earlier. To do so, click the Add button in Figure 2.14, pick a domain from the Look in list of Figure 2.14, select the said administrator account from the domain users list below, and click the Add button (in Figure 2.14) to add the chosen account. Then, click the OK button in Figure 2.14. Figure 2.14: Adding the administrator account 11. This will bring you back to Figure 2.13, but this time, the newly added domain administrator account will be listed therein as indicated by Figure 2.15. Figure 2.15: The Administrator account in the Security list 15 Configuring and Monitoring the RHEV Hypervisor 12. Finally, click the Apply and OK buttons in Figure 2.15. 2.4.1.2 Enabling ADMIN$ Share Access on Windows 2008 VMs To enable the ADMIN$ share on a Windows 2008 VM, do the following: 1. Open the Windows Explorer on the virtual machine, browse for the corresponding Windows directory in the C drive, right-click on it, and select the Share option from the shortcut menu. Figure 2.16: Selecting the Share option from the shortcut menu 2. Figure 2.17 will then appear. Click on Advanced Sharing in Figure 2.17. 16 Configuring and Monitoring the RHEV Hypervisor Figure 2.17: Clicking on Advanced Sharing 3. Select the Share this folder check box in Figure 2.18 that appears, enter ADMIN$ against Share name, and click on the Permissions button in Figure 2.18, to allow only a local/domain administrator to access the folder. Figure 2.18: Enabling the ADMIN$ share 4. When Figure 2.19 appears, click on the Add button therein. 17 Configuring and Monitoring the RHEV Hypervisor Figure 2.19: Clicking on the Add button 5. To allow a domain administrator to access the folder, first, ensure that a valid domain is specified in the From this location box of Figure 2.20. If you want to grant access to a local administrator instead, ensure that the name of the local host is displayed in the From this location box. To change this specification, use the Locations button in Figure 2.20. Then, enter the name of the local/domain administrator in the Enter the object names to select text area, and click the OK button. Figure 2.20: Allowing a domain administrator to access the folder 6. The newly added user will be listed in the Group or user names section, as depicted by Figure 2.21. Select this user, and then, check all the three check boxes under Allow in the Permissions for <user> section in Figure 2.21. Then, click the Apply and OK buttons therein. 18 Configuring and Monitoring the RHEV Hypervisor Figure 2.21: Allowing full access to the local/domain administrator 7. When Figure 2.22 appears, click on the Apply and OK buttons therein to register the changes. Figure 2.22: Applying the changes 8. Alternatively, by adding a new entry in the Windows registry, you can quickly enable the ADMIN$ share. The steps for the same are discussed hereunder: In Run prompt type regedit to open registry editor. Browse through the following sub key: 19 Configuring and Monitoring the RHEV Hypervisor HKEY_LOCAL_MACHINE\SOFTWARE\MICROSOFT\WINDOWS\CURRENTVERSION\POLICIES\SYSTEM Create a new entry with the below information o Key Name : LocalAccountTokenFilterPolicy o Key Type : DWORD (32-bit) o Key Value : 1 Exit registry editor. As with any change to the registry, ensure that the above-mentioned change is also performed with utmost care, so as to avoid problems in the functioning of the operating system. 2.4.2 Configuring Windows Firewalls to Allow File and Print Sharing In the case of virtual machines operating on Windows XP/Windows 2003/Windows 2008/Windows Vista/Windows 7, the firewall on the guest should be explicitly configured to allow Windows File and Print Sharing services which are required for the eG agent on the ESX host to communicate with the guest operating system. To achieve this, do the following: 1. Open the Virtual Infrastructure Client console, and from the tree-structure in its left pane, select the guest OS (Windows XP/Windows 2003/Windows Vista/Windows 2008/Windows 7) on which the firewall should be configured (see Figure 2.23). Figure 2.23: Selecting the guest OS 2. Follow the menu sequence: Start -> All Programs -> Control Panel (see Figure 2.24), and then doubleclick on the Windows Firewall option within. 20 Configuring and Monitoring the RHEV Hypervisor Figure 2.24: Opening the Windows Firewall 3. Figure 2.25 then appears, with the General tab selected by default. Figure 2.25: The General tab of the Windows Firewall dialog box 4. Deselect the Don't allow exceptions check box as indicated by Figure 2.26. 21 Configuring and Monitoring the RHEV Hypervisor Figure 2.26: Deselecting the 'Don't allow exceptions' check box 5. Next, click on the Exceptions tab, and ensure that the File and Printer Sharing option is enabled (see Figure 2.27). Figure 2.27: Enabling 'File and Printer Sharing' 6. Then, click the Edit button in Figure 2.27 to open the ports required for the agent-guest communication. Ensure that at least one of the listed TCP ports are enabled. 22 Configuring and Monitoring the RHEV Hypervisor Figure 2.28: Opening ports 7. Finally, click the OK button to register the changes. Once the pre-requisites are fulfilled, you can proceed to use either of the monitoring models - RHEV Hypervisor or RHEV Hypervisor - VDI - to monitor the RHEV Hypervisor in your environment. The sections that follow will discuss to configure and monitor the RHEV Hypervisor monitoring model in detail. 2.5 Configuring an RHEV Manager to Use for Monitoring the RHEV Hypervisor The eG agent connects to the RHEV Manager that is managing the RHEV Hypervisor to be monitored via HTTP/HTTPS in order to collect metrics from the RHEV Hypervisor. Therefore, while running the auto discovery procedure, it is imminent to provide the credentials of the RHEV Manager in the Discovery >> RHEV MANAGER DISCOVERY page that appears when you try to discover the RHEV Manager using Infrastructure ->Components ->Discover menu sequence. To configure an RHEV Manager to monitor an RHEV Hypervisor, do the following: 23 Configuring and Monitoring the RHEV Hypervisor Figure 2.29: Configuring the details of the RHEV Manager 1. Specify the following in Figure 2.29: RHEV Manager Identify: Specify the IP address/host name of the RHEV manager in your environment. Use SSL to Connect to the RHEV Manager: Set this flag to Yes if the RHEV manager in your environment is SSL-enabled. Otherwise, set this flag to No. Manager Port: If the RHEV manager is SSL-enabled, then 8443 will be displayed here by default. On the other hand, if the manager is not SSL-enabled, the default Manager Port will be 8080. If the RHEV manager in your environment listens on a different SSL or non-SSL port, then make corresponding changes to the default setting. Discover RHEV Hypervisors using this RHEV Manager: If you also want to discover additional RHEV servers in your environment using this RHEV manager, set this flag to Yes. If you only want to use this RHEV manager to obtain the outside view of VMs, set this flag to No. Username to connect to RHEV Manager and Password for user: Specify the credentials (i.e., user name and password) of a user who has been assigned the RHEVMUser role. If no such user preexists, then create a special user for this purpose, assign the RHEVMUser role to this user, and provide his/her login credentials here. Confirm password for user: Confirm the password of the RHEVMUser by retyping it here. Domain name for the RHEV manager: Specify the name of the domain to which the RHEV manager belongs. 2. Once the details required by Figure 2.29 are provided, clicking on the Update button therein would discover all the RHEV Hypervisors that are managed by the RHEV Manager in your environment. 24 Configuring and Monitoring the RHEV Hypervisor 2.6 Administering the eG Manager to monitor the RHEV Hypervisor 12. Login to the eG administrative interface. 13. The eG manager is capable of auto- discovering the RHEV Hypervisors. If the RHEV Hypervisor is already discovered, use the Infrastructure -> Components ->Manage/Unmanage menu as shown in Figure 2.30 to manage it. Otherwise run discovery process using the menu sequence: Infrastructure ->Components -> Discover. Figure 2.30: Viewing unmanaged RHEV Hypervisors 25 Configuring and Monitoring the RHEV Hypervisor Figure 2.31: Managing RHEV Hypervisors 1. When you attempt to sign out of the eG administrative interface, a list of Unconfigured tests will appear as shown in Figure 2.32: Figure 2.32: List of Unconfigured tests for RHEV Hypervisor 4. Click on the CPU Details – RHEV test in Figure 2.32 to configure it. This test runs periodic usage checks on the CPU resources of the hypervisor. Besides proactively detecting abnormal CPU consumption by the hypervisor, the test also accurately points you to the root-cause of the CPU contention - did it happen because of CPU-hungry VMs on the hypervisor? Did it happen because of CPU-hungry user processes or system-level processes? Did it occur when the hypervisor performed Kernel Same-Page Merging? Or did it happen when the CPU was idle? 26 Configuring and Monitoring the RHEV Hypervisor Figure 2.33: Configuring the test parameters of for CPU Details – RHEV test 5. In Figure 2.33, specify the following to configure the CPU Details – RHEV test: TEST PERIOD - How often should the test be executed HOST - The host for which the test is to be configured RHEL MGR HOST, RHEL MGR PORT, RHEL MGR DOMAIN, RHEL MGR USER, RHEL MGR PASSWORD - To auto-discover the VMs on a target RHEV hypervisor and obtain the outside view of the performance of each VM, the eG agent needs to connect to the RHEV Manager that manages the target RHEV hypervisor. To enable the eG agent to obtain the outside view, you need to configure the test with the following: RHEL MGR HOST - The IP address/host name of the RHEV manager that the eG agent should connect to RHEL MGR PORT - The port number at which the said RHEV manager listens RHEL MGR DOMAIN - The domain to which the RHEL manager belongs RHEL MGR USER and RHEL MGR PASSWORD - Specify the credentials of the user with read-only access to the Restful API on the RHEV manager. To know how to create a read-only role and assign it to a user, refer Section 2.2. If the RHEV hypervisor being monitored was discovered via an RHEV manager, then the IP address, port number, domain name, and user credentials of the RHEV manager used for discovery will be automatically displayed against the respective parameters. If the RHEV hypervisor being monitored was not discovered via an RHEV manager, but you still want to use an RHEV manager for obtaining the outside view, then, you can select any IP address of your choice from the RHEL MGR HOST list. By default, this list will be populated with the IP addresses/host names of all the RHEV managers that were configured for the purpose of discovering the RHEV hypervisors. If you select an RHEL MGR HOST from this list, then the corresponding port number, domain name, and user credentials will be automatically displayed against the respective parameters. On the other hand, if the RHEV manager that you want to use for metrics collection is not available in the RHEL MGR HOST list, then, you can configure an RHEV manager on-the-fly by 27 Configuring and Monitoring the RHEV Hypervisor picking the Other option from the RHEL MGR HOST list. An ADD THE RHEV MANAGER DETAILS window will then pop up as shown in Figure 2.34. Refer to Section 1.4 to know how to add an RHEV manager using this window. Once the RHEV manager is added, its IP address, port number, domain name and user credentials will be displayed against the corresponding parameters. Figure 2.34: Adding the RHEV Manager details on-the-fly CONFIRM PASSWORD - Confirm the RHEL MGR PASSWORD by retyping it here. HYPERVISOR USER - Specify the name of a user who has the right to connect to the RHEV hypervisor via SSH. HYPERVISOR PASSWORD - Specify the password of the HYPERVISOR USER. CONFIRM PASSWORD - Confirm the HYPERVISOR PASSWORD by retyping it here. HYPERVISOR SSH PORT - Enter the SSH port at which the RHEV hypervisor listens. SSL - If the RHEV manager to which the eG agent should connect is SSL-enabled, then set this flag to Yes. If not, set it to No. DETAILED DIAGNOSIS - To make diagnosis more efficient and accurate, the eG suite embeds an optional detailed diagnostic capability. With this capability, the eG agents can be configured to run detailed, more elaborate tests as and when specific problems are detected. To enable the detailed diagnosis capability of this test for a particular server, choose the On option. To disable the capability, click on the Off option. The option to selectively enable/disable the detailed diagnosis capability will be available only if the following conditions are fulfilled: The eG manager license should allow the detailed diagnosis capability Both the normal and abnormal frequencies configured for the detailed diagnosis measures should not be 0. 6. Finally click the Update button. 7. When you try to signout of the eG administrative interface, a list of unconfigured tests will appear as shown in Figure 2.35. 28 Configuring and Monitoring the RHEV Hypervisor Figure 2.35: List of unconfigured tests for RHEV hypervisor 8. Click on the Disk Space – VM test to configure it. Figure 2.36 will now appear. Figure 2.36: List of unconfigured tests for RHEV hypervisor 9. To configure the test, specify the following in Figure 2.36: TEST PERIOD - How often should the test be executed HOST - The host for which the test is to be configured RHEL MGR HOST, RHEL MGR PORT, RHEL MGR DOMAIN, RHEL MGR USER, RHEL MGR PASSWORD - To auto-discover the VMs on a target RHEV hypervisor and obtain the outside view of the performance of each VM, the eG agent needs to connect to the RHEV Manager that manages the target RHEV hypervisor. To enable the eG agent to obtain the outside view, you need to configure the test with the following: 29 Configuring and Monitoring the RHEV Hypervisor RHEL MGR HOST - The IP address/host name of the RHEV manager that the eG agent should connect to RHEL MGR PORT - The port number at which the said RHEV manager listens RHEL MGR DOMAIN - The domain to which the RHEL manager belongs RHEL MGR USER and RHEL MGR PASSWORD - The credentials of a user to the RHEV manager who has been assigned the RHEVMUser role If the RHEV hypervisor being monitored was discovered via an RHEV manager, then the IP address, port number, domain name, and user credentials of the RHEV manager used for discovery will be automatically displayed against the respective parameters. If the RHEV hypervisor being monitored was not discovered via an RHEV manager, but you still want to use an RHEV manager for obtaining the outside view, then, you can select any IP address of your choice from the RHEL MGR HOST list. By default, this list will be populated with the IP addresses/host names of all the RHEV managers that were configured for the purpose of discovering the RHEV hypervisors. If you select an RHEL MGR HOST from this list, then the corresponding port number, domain name, and user credentials will be automatically displayed against the respective parameters. On the other hand, if the RHEV manager that you want to use for metrics collection is not available in the RHEL MGR HOST list, then, you can configure an RHEV manager on-the-fly by picking the Other option from the RHEL MGR HOST list. An ADD THE RHEV MANAGER DETAILS window will then pop up. Refer to Section 2.5 to know how to add an RHEV manager using this window. Once the RHEV manager is added, its IP address, port number, domain name and user credentials will be displayed against the corresponding parameters. CONFIRM PASSWORD - Confirm the RHEL MGR PASSWORD by retyping it here. SSL - If the RHEV manager to which the eG agent should connect is SSL-enabled, then set this flag to Yes. If not, set it to No. IGNORE VMS - Administrators of some high security RHEV environments might not have permissions to internally monitor one/more VMs. The eG agent can be configured to ignore such ‘inaccessible’ VMs using the IGNORE VMS parameter. Against this parameter, you can provide a comma-separated list of VM names, or VM name patterns, for which the inside view need not be obtained. For instance, your IGNORE VMS specification can be: *xp,*lin*,win*,vista. Here, the * (asterisk) is used to denote leading and trailing spaces (as the case may be). By default, this parameter is set to none indicating that the eG agent obtains the inside view of all VMs on an RHEV hypervisor by default. Note: While performing VM discovery, the eG agent will not discover the operating system of the VMs configured in the IGNORE VMS text box. IGNORE WINNT - By default, the eG agent does not support the inside view for VMs executing on Windows NT operating systems. Accordingly, the IGNORE WINNT flag is set to Yes by default. INSIDE VIEW USING - By default, this test communicates with every VM remotely and extracts “inside view” metrics. Therefore, by default, the INSIDE VIEW USING flag is set to Remote connection to VM (Windows). Typically, to establish this remote connection with Windows VMs in particular, eG Enterprise 30 Configuring and Monitoring the RHEV Hypervisor requires that the eG agent be configured with domain administrator privileges. In high-security environments, where the IT staff might have reservations about exposing the credentials of their domain administrators, this approach to extracting “inside view” metrics might not be preferred. In such environments therefore, eG Enterprise provides administrators the option to deploy a piece of software called the eG VM Agent on every Windows VM; this VM agent allows the eG agent to collect “inside view” metrics from the Windows VMs without domain administrator rights. Refer to Section 2.3 for more details on the eG VM Agent. To ensure that the “inside view” of Windows VMs is obtained using the eG VM Agent, set the INSIDE VIEW USING flag to eG VM Agent (Windows). Once this is done, you can set the DOMAIN, ADMIN USER, and ADMIN PASSWORD parameters to none. DOMAIN, ADMIN USER, ADMIN PASSWORD, and CONFIRM PASSWORD - By default, this test connects to each virtual guest remotely and attempts to collect “inside view” metrics. In order to obtain a remote connection, the test must be configured with user privileges that allow remote communication with the virtual guests. The first step towards this is to specify the DOMAIN within which the virtual guests reside. The ADMIN USER and ADMIN PASSWORD will change according to the DOMAIN specification. Discussed below are the different values that the DOMAIN parameter can take, and how they impact the ADMIN USER and ADMIN PASSWORD specifications: If the VMs belong to a single domain: If the guests belong to a specific domain, then specify the name of that domain against the DOMAIN parameter. In this case, any administrative user in that domain will have remote access to all the virtual guests. Therefore, an administrator account in the given domain can be provided in the ADMIN USER field and the corresponding password in the ADMIN PASSWORD field. Confirm the password by retyping it in the CONFIRM PASSWORD text box. If the guests do not belong to any domain (as in the case of Linux guests): In this case, specify "none" in the DOMAIN field, and specify a local administrator account name in the ADMIN USER below. Prior to this, you need to ensure that the same local administrator account is available or is explicitly created on each of the virtual machines to be monitored. Then, proceed to provide the password of the ADMIN USER against ADMIN PASSWORD, and confirm the password by retyping it in the CONFIRM PASSWORD text box. If key-based authentication is implemented between the eG agent and the SSH daemon of a Linux guest, then, in the ADMIN USER text box, enter the name of the user whose <USER_HOME_DIR> (on that Linux guest) contains a .ssh directory with the public key file named authorized_keys. The ADMIN PASSWORD in this case will be the passphrase of the public key; the default public key file that is bundled with the eG agent takes the password eginnovations. Specify this as the ADMIN PASSWORD if you are using the default private/public key pair that is bundled with the eG agent to implement key-based authentication. On the other hand, if you are generating a new public/private key pair for this purpose, then use the passphrase that you provide while generating the pair. For the detailed procedure on Implementing Key-based Authentication refer to the Troubleshooting section of the Monitoring the RHEV Hypervisor document. If the guests belong to different domains - In this case, you might want to provide multiple domain names. If this is done, then, to access the guests in every configured domain, the test should be configured with the required user privileges; this implies that along with multiple DOMAIN names, multiple ADMIN USER names and ADMIN PASSWORDS would also have to be provided. To help administrators provide these user details quickly and easily, the eG administrative interface embeds a special configuration page. 31 Configuring and Monitoring the RHEV Hypervisor To access this page, simply click on the Click here hyperlink that appears just above the parameters of this test in the test configuration page. To know how to use the special page, refer to Section 2.7 of this document. If the INSIDE VIEW USING flag is set to ‘eG VM Agent (Windows)’ - In this case, the inside view can be obtained without domain administrator privileges. Therefore, set the domain, admin user, and admin password parameters to none. REPORT BY USER - While monitoring a RHEV Hypervisor, the REPORT BY USER flag is set to NO by default, indicating that by default, the guest operating systems on the hypervisor are identified using the hostname specified in the operating system. On the other hand, while monitoring a RHEV Hypervisor - VDI, this flag is set to YES by default; this implies that in case of the VDI model, by default, the desktops will be identified using the login of the user who is accessing them. In other words, in VDI environments, this test will, by default, report measures for every username_on_virtualmachinename. REPORT POWERED OS - This flag becomes relevant only if the REPORT BY USER flag is set to ‘Yes’. If the REPORT POWERED OS flag is set to Yes (which is the default setting), then this test will report measures for even those VMs that do not have any users logged in currently. Such guests will be identified by their virtual machine name and not by the username_on_virtualmachinename. On the other hand, if the REPORT POWERED OS flag is set to No, then this test will not report measures for those VMs to which no users are logged in currently. 10. Finally click the Update button and signout of the administrative interface. 2.7 Configuring Users for VM Monitoring In order to enable the eG agent to connect to VMs in multiple domains and pull out metrics from them, the eG administrative interface provides a special page using which the different DOMAIN names, and their corresponding ADMIN USER names and ADMIN PASSWORDS can be specified. To access this page, just click on the Click here hyperlink in any of the VM test configuration pages. 32 Configuring and Monitoring the RHEV Hypervisor Figure 2.37: Configuring a VM test Upon clicking, Figure 2.38 will appear, using which the VM user details can be configured. Figure 2.38: The VM user configuration page To add a user specification, do the following: 1. First, provide the name of the Domain to which the VMs belong (see Figure 2.38). If one/more VMs do not belong to any domain, then, specify none here. 2. The eG agent must be configured with user privileges that will allow the agent to communicate with the VMs in a particular domain and extract statistics. If none is specified against Domain, then a local user account can be provided against Admin User. On the other hand, if a valid Domain name has been specified, then a domain administrator account can be provided in the Admin User text box. If key-based authentication is implemented between the eG agent and the SSH daemon of a Linux guest, then, in the ADMIN USER text box, enter the name of the user whose <USER_HOME_DIR> (on that Linux guest) contains a .ssh directory with the public key file named authorized_keys. The ADMIN PASSWORD in this case will be the passphrase of the public key; the default public key file that is bundled with the eG agent takes the password eginnovations. Specify this as the ADMIN PASSWORD if you are using the default private/public key pair that is bundled with the eG agent to implement key-based authentication. On the other hand, if you are generating a new public/private 33 Configuring and Monitoring the RHEV Hypervisor key pair for this purpose, then use the passphrase that you provide while generating the pair. For the detailed procedure on Implementing Key-based Authentication refer to the Troubleshooting section of the Monitoring the RHEV Hypervisor of this document. 3. The password of the specified Admin User should be mentioned in the Admin Pwd text box. 4. Confirm the password by retyping it in the Confirm Pwd text box. 5. To add more users, click on the button in Figure 2.38. This will allow you to add one more user specification as depicted by Figure 2.39. Figure 2.39: Adding another user 14. In some virtualized environments, the same Domain could be accessed using multiple Admin User names. For instance, to login to a Domain named egtest, the eG agent can use the Admin User name egitlab or the Admin User name jadmin. You can configure the eG agent with the credentials of both these users as shown by Figure 2.40. The same ‘Domain’ mapped to different ‘Admin Users’ Figure 2.40: Associating a single domain with different admin users When this is done, then, while attempting to connect to the domain, the eG agent will begin by using the first Admin User name of the specification. In the case of Figure 2.40, this will be egitlab. If, for some reason, the agent is unable to login using the first Admin User name, then it will try to login again, but this time using the second Admin User name of the specification - i.e., jadmin in our example (see Figure 2.40). If the first login attempt itself is successful, then the agent will ignore the second Admin User name. 2. To clear all the user specifications, simply click the Clear button in Figure 2.40. 34 Configuring and Monitoring the RHEV Hypervisor 15. To remove the details of a particular user alone, just click the button in Figure 2.40. 16. To save the specification, just click on the Update button in Figure 2.40. This will lead you back to the test configuration page, where you will find the multiple domain names, user names, and passwords listed against the respective fields (see Figure 2.41). Figure 2.41: The test configuration page displaying multiple domain names, user names, and passwords 2.8 Monitoring the RHEV Hypervisor To monitor the RHEV Hypervisor, do the following: 1. Login as a monitor / supermonitor user. 2. Click on the Components option in the menu bar, and select the Servers option from the Components menu. 3. From the Components page that appears next, click on the RHEV Hypervisor for which you wish to view measurements. You can proceed on to configure and monitor the RHEV Hypervisor – VDI model in the same manner as that of the RHEV Hypervisor as explained above. 35 Conclusion Conclusion This document has described in detail the steps for configuring and monitoring the RHEV Manager and Hypervisor. For details of how to administer and use the eG Enterprise suite of products, refer to the user manuals. We will be adding new measurement capabilities into the future versions of the eG Enterprise suite. If you can identify new capabilities that you would like us to incorporate in the eG Enterprise suite of products, please contact [email protected]. We look forward to your support and cooperation. Any feedback regarding this manual or any other aspects of the eG Enterprise suite can be forwarded to [email protected]. 36