1
USER MANUAL
INSTALLATION INSTRUCTIONS
WARRANTY REGISTER
GREENGLO MAINS PRESSURE INTEGRATED WATER HEATER
SINGLE COIL SERIES & DOUBLE COIL SERIES
GREENGLO SAVER
Customer
Congratulations for choosing a GreenGlo integrated water heater
We recommend you read page 1 to 5 of this manual.
It may save you time and trouble later.
Please register the product warranty as per page 20 of this manual
The other pages of the manual are intended for the installer.
For a further assistance or information contact our service desk
0800 447 336
[email protected]
IMPORTANT INFORMATION
GreenGlo are purposely-built heavy duty mains pressure cylinders. Installation
of GreenGlo could be different than other tanks.
GreenGlo water heaters must be installed by a registered plumber and in
accordance with these installation instructions, NZ.3500.4 National plumbing
regulations; municipal building codes other relevant statutory regulations.
Observation of these instructions and the associated component instructions is
most important and failure to do so could void the benefits of warranty.
The information contained in this manual, and all other information or advice
provided by GreenGlo Limited in connection with the purchase, installation use
and service of GreenGlo water heater is given in good faith. GreenGlo Limited
will not be liable for any person for any inaccuracy or omission in the
information arising through the fault of GreenGlo Limited directly or indirectly.
A pressure-limiting valve of 500kPa max rating must be fitted. Failure to install
a pressure limiting valve where required will void the warranty.
SAFETY
0
Scalding occurs at 50 C. This appliance is capable of providing hot water
above this temperature. All installers must advise customers of the potential
hazard of scalding in accordance with the relevant National standards
including NZS3500.4.
Young children should not play with the appliance.
A combination Temperature Pressure Relief valve with a maximum rating of
850kPa must be fitted.
Water may drip from the discharge pipe of this valve.
This pipe must be left open to the atmosphere.
For more information, please refer to the Regular Care section on page 5 of
this manual.
Also fitted to the water heater is a special auto reset thermostat.
These safety devices must not be tempered with or removed from the
appliance under any circumstances.
Use a separate circuit breaker for each of the electrical heating elements
1
© GreenGlo Limited
Version 05/2010
ABOUT YOUR WATER HEATER
1. GreenGlo & GreenGlo Saver is a high technology storage tank, backed up
by new manufacturing methods offering quality of goods to consumers.
2. The main goal of producing GreenGlo water heaters is heating and storing
potable hot water in a main pressure storage tank using electricity.
GreenGlo also offers optional heating equipment such as solar, gas and
wetback. Potable hot water is stored in the main water storage tank
separately from the heating fluids in the coils.
3. The heating fluid, which is heated in the heat source, is circulated
between the heat source and cylinder’s coil. The warmed fluid takes its
heat from the heat source and transmits to the water heater.
4. GreenGlo cylinders inner surface is enamelled. The process used is a
double enamelling process that coats the inside surface of the cylinder.
5. GreenGlo cylinders are protected by a magnesium anode rod in order to
prevent cathode corrosion. The magnesium anode rod ought to be
checked and replaced if required, every 36 months by a certified plumber,
and can be done by following this manual page 16.
6. GreenGlo exterior surface
is covered by 40 kg/m³ and 50 mm
polyurethane insulation (except 800D and 1000D) in order to diminish the
loss of the heat. The GreenGlo 800D and 1000D insulation is removable.
This convenience allows easy delivery and access through narrow
doorways. Do not remove covers unless essential and only after
receiving specific instructions from GreenGlo service desk
7. GreenGlo is an indoor tank and shall be install in a well vented space to
prevent condensation
8. There is a choice of double or single or double coil GreenGlo depending on
the application needed. I.E. if the cylinder will be heated with a wetback
or a solar system, GreenGlo single coil water heater would be appropriate.
On the other hand, if the cylinder will be heated with both wetback and a
solar system, GreenGlo double coil would be appropriate.
9. GreenGlo water heaters have been produced to suit a wide range of
applications and installations and are complying with NZS4606
In this manual we present the most common applications, however if you
require advice on any other application, please contact our service desk on
0800 447 336 or [email protected]
2
© GreenGlo Limited
Version 05/2010
PRODUCT INFORMATION
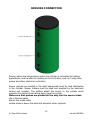
Note: 800D & 1000D foam insulation is removable
Do not remove cover unless essential
Contact GreenGlo service desk before removal of cover
All GreenGlo models have a soft blanket cover for extra insulation
GreenGlo Saver
Setup and usage instructions of the GreenGlo Saver controller are available with the
controller instructions book provided with the product.
The controller is pre-wired and therefore no special installation instructions are
necessary.
3
© GreenGlo Limited
Version 05/2010
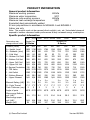
PRODUCT INFORMATION
General product information
Maximum working pressure
800kPa
Maximum water temperature
90°C
Maximum coils working pressure
800kPa
Maximum heat exchange temperature
95°C
Enamelled steel automatically welded
50 mm polyurethane in accordance to NZS4692.1 and NZS4692.2
Indoor use only
Note : The product must not be exposed direct sunlight, rain, etc. Uninsulated pipework
exposed to outdoor decrease heater performance & may increased energy consumption.
Specific product information
300D 300DS 400D
500D
Double Coil
D Series
800D
1000D
180
1650
520
180
280
500
570
855
740
1430
1585
240
935
300
1780
615
80
350
655
755
1210
920
1570
1720
290
1285
300 400
1240 1580
755
755
95
75
385
355
595
565
655
690
865 1040
730
790
940 1300
1100 1490
300
335
N/A 1060
500
1860
755
60
235
690
780
1320
1010
1580
1765
315
1395
800
1750
1060
395
495
870
965
1190
710
1270
1365
385
1260
1,000
2090
1060
395
495
920
1020
1510
1240
1610
1715
385
1580
2x
Element Rating (kW) 3.0
3.0
2.0
O - Ports Thread
1” F 1” F 1” F
Tank Thickness (mm)
3
3
3
Angle of ports
45°R 45°R 45°R
Max energy Bottom
coil (kW)
9.0 17.5 9.0
Max energy upper
coil (kW)
N/A N/A 13.6
2x
2.0
1” F
3
45°R
3.0
1” F
3
45°R
2x
2.0
1” F
3
45°R
2x
3.0
1” F
3
45°R
2x
4.8
2” F
4
90°R
2x
4.8
2” F
4
90°R
17.5
20.0
24.6
39.3
35.0
37.2
26.2
54.0
70.0
89.3
127
30.0
128
39.3
Weight (kG)
198
229
293
326
Dimensions may
change without notice
Volume (litres)
A – Height (mm)
B – Diameter (mm)
C - Cold Inlet
D - Bottom Coil Cold
E - Bottom Coil Hot
F - Upper Coil Cold
G - Upper Coil Hot
H -Service Circulation
I - TPR Valve
J - Hot Outlet
K - Bottom Element
L - Upper Element
180S 300S 180D
Single Coil
S Series
180
1650
520
180
280
500
N/A
N/A
740
1430
1585
240
N/A
90
300
1780
615
80
350
655
N/A
N/A
920
1570
1720
290
N/A
112
103
4
© GreenGlo Limited
Version 05/2010
WATER QUALITY
GreenGlo water heaters have been manufactured to deal with most local body
water supplies. Desired water quality levels:
pH Level
between 6.5 and 8.5
Chlorides:
up to 200 ppm
Total Dissolved Solids (TDS)
up to 1000 mg/L
Saturation Index
between -0.8 and +0.8
If your water quality or the heating liquids are outside the above range, you
should fit appropriate water filtration.
Caution:
If water TDS is above 600 mg/L, there is a possibility of hydrogen gas
accumulating in the top of the water heater during long periods of no use.
If the water heater has not been used for more than 2 weeks:
• Open the hot water tap and let water flow for 1 minute.
• Hydrogen gas is flammable; therefore make sure that there is no smoking,
sparks or naked flames near the tap.
• Do not operate any hot water appliance such as a washing machine or a
dishwasher prior to the above procedure.
REGULAR CARE
Six Monthly:
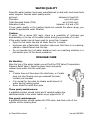
Near the top of the water heater you will find the TPR Valve (Temperature
Pressure Relief Valve). Raise the lower lever and gently
release some water into the relief pipe.
Note:
• If water does not flow down the relief pipe, or if water
does not stop flowing once you released the lever,
contact your plumber
• It is normal for the valve to release small amount of
water during heating cycles
• Never block the relief drain pipe
Three yearly maintenance:
A qualified plumber should check and if needed replace the
sacrificial anode in the water heater as per pages 16 & 17
Five yearly maintenance:
A qualified plumber should replace the TPR valve, and clean coils of the
cylinder via the clearing door
5
© GreenGlo Limited
Version 05/2010
PLUMBING CONNECTION
Delivering and mounting the GreenGlo cylinder
• The product should be kept away from sharp tools during loading or
delivering and ports should be protected.
• The product should not be left or placed where it’s exposed directly to
weather such as direct sunlight, rain snow etc.
• Chose a dry and well vented space. Access moisture may cause tank
condensation and may void the warranty.
• Mount the bottom of the tank clear of the floor. Usage of a drain tray is
highly recommended
• If the product is installed on the floor, the floor must be dry and moistureproof. Consider a drainage tray when required.
• If possible leave headroom of half water heater length so the anode can
be inspected or replaced. Remember you may have to remove the entire
water heater later for servicing as per pages 16 & 17.
• Cylinder must be strapped and mounted in accordance to NZS3500.4
• GreenGlo Limited does not accept any responsibility, if the product is
physically damaged or operates inefficiently due to wrong handling
• The product must be carried vertically – if in doubt, fasten the bolts of
the upper and lower dome prior to installation
Basic Plumbing connection of the Water heater
• The size of the GreenGlo tank needs to be chosen carefully in order to
maintain the hot water supply demand.
• Start with the Basic Diagram of page 7 before conducting any specific
application connection
• Fit the cold inlet valves prior to commissioning the cylinder
• Ensure that the TPR Valve is fitted and that the service circulation is
plugged off or connected prior to filling up the cylinder with water
• Lag all hot water pipes coming out of the water heater
Plumbing Connection of additional applications
• Simply follow the diagrams and the notes of page 8 to 12
• If you are in doubt or attempting to install an application outside the
below diagrams, please contact GreenGlo service desk for advice.
IMPORTANT NOTE:
When using brass fitting, use PTFE tape or a dialectic connector between
the brass fitting and the port thread to prevent electrolysis.
Hemp is not allowed.
© GreenGlo Limited
6
Version 05/2010
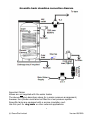
GreenGlo basic plumbing connection diagram
Important Notes:
Valves are not supplied with the water heater
The above diagram describes valves for a mains pressure arrangement;
however the cylinder could also be fitted to a low pressure system.
GreenGlo tanks are equipped with a service circulation port.
Use this port for ring main or other external applications.
7
© GreenGlo Limited
Version 05/2010
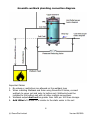
GreenGlo wetback plumbing connection diagram
Important Notes:
1. No valves or restrictions are allowed on the wetback loop
2. When installing Wetback and Solar using GreenGlo D Series, connect
wetback to upper coil and solar to bottom coil. Wetback should be
installed to the bottom coil with all other multiple connections
3. Wetback output shall not be greater than 1kW per 100 litres storage.
4. Add 100ml of Fernox F1 or similar to the static water in the coil
8
© GreenGlo Limited
Version 05/2010
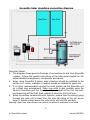
GreenGlo Solar plumbing connection diagram
Important Notes:
1. The diagram shows generic drawings of connections to and from GreenGlo
cylinder. Follow the specific instructions of the solar panel supplier for the
actual detailed arrangement, components and valves.
2. When using GreenGlo D series, solar collectors should be installed to the
bottom coil - boiler, wetback or heaters should be installed to upper coil.
3. It is highly recommended running the solar system via the GreenGlo coil
on a close loop arrangement. Open loop solar is also possible using the
Service Circulation port for the solar return instead of the Coil Hot port,
and branching off the Cold Inlet instead of using the Coil Cold port.
4. When connecting commercial solar systems, ensure that the energy going
through the solar coil is lower than the max kW rating of the coil as per
page 4. Excess energy above the coils rating will void the warranty.
Warning: Open loop solar carries frost risks to the panels if antifreeze is not used
9
© GreenGlo Limited
Version 05/2010
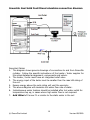
GreenGlo Gas/Solid Fuel/Diesel plumbing connection diagram
Important Notes:
1. The diagram shows generic drawings of connections to and from GreenGlo
cylinder. Follow the specific instructions of the heater / boiler supplier for
the actual detailed arrangement, components and valves.
2. The heater / boiler must have an integrated relief valve
3. The energy input of the boiler must be smaller than the max kW rating of
the coil.
4. Excess energy above the coils rating will void the warranty.
5. The above diagram will maximize hot water flow rate of water.
6. Instantaneous water heaters should be installed after hot water outlet for
temperature top up, in cases where high water flow is not required.
7. Add 100ml of Fernox F1 or similar to the static water in the coil
10
© GreenGlo Limited
Version 05/2010
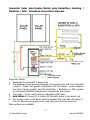
GreenGlo Solar plus Heater/Boiler plus Underfloor Heating /
Radiator / SPA - plumbing connection diagram
Important Notes:
1. Applicable for GreenGlo D series only
2. The diagram shows generic drawings of connections to and from GreenGlo
cylinder. Follow the specific instructions fof the heater / boiler supplier,
the Solar Panels supplier and the Underfloor / Radiators or SPA supplier
for the actual detailed arrangement, components and valves.
3. The heater / boiler must have an integrated relief valve
4. Add 100ml of Fernox F1 or similar to the static water in the boiler coil
5. The energy input of the boiler must be smaller than the max kW rating of
the coil. Excess energy above the coils rating will void the warranty.
More options are available
11
© GreenGlo Limited
Version 05/2010
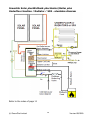
GreenGlo Solar plus Wetback plus Heater/Boiler plus
Underfloor Heating / Radiator / SPA - plumbing diagram
Refer to the notes of page 11
© GreenGlo Limited
12
Version 05/2010
COMMISSIONING
VERY IMPORTANT:
Prior to turning on the power supply and prior to turning on any
heating application such as solar, wetback or a heater, the cylinder
MUST BE FILLED UP WITH WATER
•
•
•
•
•
•
Open a hot water tap, making sure that all other hot water taps are shut
down
Open the inlet tap fully to fill up cylinder
Open each hot water tap till water flows freely
Check all pipes for leaks
Switch on the elements and set the timer/controller (if one is installed)
Attend to any other external heating applications
DRAINING THE WATER HEATER
•
•
•
•
•
•
Turn off the power supply to the elements
Turn off all external heating applications
Turn off cold inlet supply at the 3 in 1 valve or at the meter
Open a hot water tap to drain the pipework
Disconnect the hot water outlet union
Open to atmosphere Cold Water Expansion Valve to let water flow via the
drain pipe
13
© GreenGlo Limited
Version 05/2010
ELECTRICAL CONNECTION
NOTE: Power supply must be OFF until water heater filled with water
All electrical work must be carried out by a qualified person (per AS/NZS3000).
All water heaters are manufactured for 230VAC, 50HZ single phase.
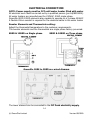
GreenGlo 800D 1000D elements also capable to operate on a 3-phase 400VAC
A flexible 20mm conduit is required for the electrical cable to the water heater
Booster Elements and Thermostats setting:
Adjust the thermostat temperature to the customer requirements.
The booster elements and the thermostats are single phase factory pre-wired.
800D & 1000D on Single phase
800D & 1000D on Three phase
GreenGlo 180S to 500D pre-wired diagram
The lower element can be connected to the Off Peak electricity supply.
14
© GreenGlo Limited
Version 05/2010
SENSORS CONNECTION
Sensors sense the temperatures when the cylinder is connected to heating
applications, and transfer the reading to the controllers, such as 3 way valve,
pumps and other electronic controllers.
Sensor pockets are located in the most appropriate level for heat distribution
in the cylinder. Sensor holders must be used and supplied by the electronic
control unit supplier. The holders attach the sensor to the surface which
prevents the sensors from falling down from the pocket.
Make sure that probes are pushed all the way into the sensor tubes.
Use a thermal paste.
Secure the probe cable
Locate sensors above the electrical elements when required
15
© GreenGlo Limited
Version 05/2010
REGULAR CARE – SERVICE PERSON
Anode Replacement GreenGlo 180S, 180D, 300S, 300D
1. Disconnect the power supply to the water
heater
2. Drain approximately 5 to 10 lt. from
cylinder as per page 13 instructions.
3. Unscrew service cap (11) gently
4. Take out the soft foam insulation (10) and
disassemble anode ground cable from
flanges cap (7).
5. Disassemble the flanges (7) and then
remove the flanges gasket (3).
6. Open the nut that is on the flanges (6) and
attach it to the anode rod.
7. Remove old anode rod (4) over flanges and
insulation gasket (5) and the washer (8).
8. Assemble new anode rod from the side of
enamelled flanges (7); with a new
insulation gasket (5) with a new washer (8)
on the other side, and fasten the anode nut
(6) over anode rod.
9. Return flange gasket (3) to position. Replace
gasket if needed
10. Locate flange exactly central side of the
cylinder flange. Fasten nuts in a cross
tightening order as per page 18. Don’t leave
out nut flakes (6) – it needs to be directly
opposite flange slots (1) as shown.
11. Conduct a pressure test and check for any
leaks or sweat
12. Assemble insulation; place the tail of
thermometer couple in the pocket, which is
on the flange. Locate the service cap on the
bush of top cap.
© GreenGlo Limited
16
Version 05/2010
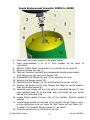
Anode Replacement GreenGlo 300DS to 1000D
6. Disconnect the power supply to the water heater.
7. Drain approximately 5 to 10 lt. from cylinder as per page 13
instructions.
8. 800D & 1000D: Drain entire water from cylinder as per page 13.
9. Remove cylinder top cap (1)
10. Take out insulation carefully and disassemble anode ground cable
from flanges cap (6) then from flanges (10).
11. Disassemble the flanges (6) and (3) by removing the nuts.
12. Remove the flanges gasket (8).
13. Disassemble the flanges nut (4) and attached the anode rod (9).
14. Remove old anode rod (9) over flanges and keep the anode isolation
bush and anode gasket (8).
15. Assemble new anode rod from the side of enamelled flanges (7) and
leave isolated bush (5) on the other side, and install nut over anode
behind the beam gear side.
16. Locate flange gasket through inlet of the cylinder. Replace gasket if
needed
17. Locate flange exactly central side of the cylinder flange. Fasten nuts in
a cross tightening order per page 18. Don’t leave out nut flakes (5) –
it needs to be opposite flange number (1) as shown.
18. Close the service cap on the bush of top cap.
© GreenGlo Limited
17
Version 05/2010
Cylinder Coils Cleaning via Clearing Door
Access door is located on the cylinder top for GreenGlo 180S to 300D models.
Access door is located on the cylinder side for GreenGlo 300DS to 1000D.
GreenGlo access door dimensions are designed to the European standards.
Over the years, cylinder coils become covered with lime and other mineral
deposit depending upon water quality. After a while, heat transfer will become
difficult and the cylinder’s efficiency reduces due to the deposits. Therefore,
clearing the coils should be periodically done thru the access door.
1.
2.
3.
4.
5.
Disconnect the power supply to the water heater
Drain entire water from cylinder as per page 13 instructions.
Remove nuts of access door and remove service door
Gently water blast coils removing the mineral deposits
Return access door ensuring that gasket is in place. Replace gasket if
required
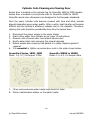
6. It is essential to tighten up access door nuts in the order shown below:
GreenGlo S Series, 180D, 300D
Order: 1-5, 3-7, 2-6 torque: 17Nm
GreenGlo 300DS to 1000D
Order: 1-4, 6-3, 2-5 torque: 8Nm
7. Fill up and pressurise water heater and check for leaks
8. Place a maintenance sticker on the water heater
18
© GreenGlo Limited
Version 05/2010
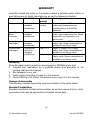
WARRANTY
GreenGlo Limited will repair or if necessary replace a defective water heater or
parts failure due to faulty manufacturing as per the following schedule:
Component Installation Warranty Coverage
period
All
All types of
standard
installations
First 12
months
GreenGlo
Saver
Controller
All types of
standard
installations
Year 2 to 3
Internal heat
exchanger
Domestic
standard
installations
Commercial
and other
standard
installations
Year 2 to 5
Internal heat
exchanger
Year 2 & 3
Year 4 & 5
Repair or replace 100% water
heater and components free
including labour at GreenGlo
discretion
Repair or replace 100% water
heater and components free. Owner
responsible for installation and
labour costs
Repair or replace 100% water
heater free. Owner responsible for
installation and labour costs
Repair or replace 100% water
heater free. Owner responsible for
installation and labour costs
Repair or replace 50% of water
heater value. Owner responsible for
installation and labour costs
Durability
GreenGlo water heaters meet the requirements of NZS4606 given that:
1. Installed and maintained by a qualified person and according to the
building code and this manual
2. Not damaged in any way
3. Water quality according to page 5 of this manual
4. Max kW Rating of all heater connections as per page 4 of this manual
Change of Ownership
This warranty extends beyond the original purchaser of the water heater.
Standard Installation
Standard installation includes all connections as per this manual and any other
connections that may be approved by GreenGlo service desk.
19
© GreenGlo Limited
Version 05/2010
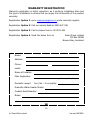
WARRANTY REGISTRATION
Warranty registration is highly important, as it confirms installation date and
the type of installation to ensure that you enjoy the full benefits of the product
warranty.
Registration Option 1: go to www.greenglo.co.nz under warranty register
Registration Option 2: Call our service desk on 0800 447 336
Registration Option 3: Fax the below form to 09 353 1445
Registration Option 4: Send the below form to
Solar Group Limited
PO Box 35588
Browns Bay, Auckland
Name:
Address:
Phone:
email:
Name of Installer:
Main Application:
e.g..Wetback, Solar, Gas, etc
Domestic usage?
Yes / No – if no specify:
GreenGlo Water Heater Model:
Product Serial Number:
Notes:
20
© GreenGlo Limited
Version 05/2010
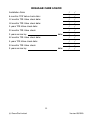
REGULAR CARE LOGON
Installation Date:
/
/
6 months: TPR Valve check date:
/
/
12 months TPR Valve check date:
/
/
18 months TPR Valve check date:
/
/
2 years TPR Valve check date:
/
/
30 months TPR Valve check:
/
/
/
/
42 months TPR Valve check date:
/
/
4 years TPR Valve check date:
/
/
54 months TPR Valve check:
/
/
/
/
date:
3 years service by:
5 years service by:
date:
21
© GreenGlo Limited
Version 05/2010
19. Warranty Exclusions:
GreenGlo warranty will not cover the following situations:
1. Failure because of misuse, damage or neglect
2. Product is not installed or serviced in accordance with this manual or the
NZ building code
3. Damage caused by an act of God
4. Water quality outside the range of page 5 of this manual
5. Connection of any associated heater with a max kW Rating higher than
the coil capacity as per page 4 of this manual
6. Installation of tanks in moisture environment
7. Use of water temperature or pressure, or coil temperature or pressure,
outside the restrictions of page 4 of this manual
8. Water hammer or negative pressure occurring in water pipework
9. Neglect to protect the coils with anti corrosive
Note:
• GreenGlo Limited is not liable for any sequential damages such as walls,
carpets, furniture etc.
• Replacement parts provided under this warranty does not carry a new
warranty. The unexpired warranty remains effective.
• GreenGlo Limited is only liable for the water heater and will not assume
directly or indirectly any other obligations in connection with the product
• GreenGlo Limited does not cover access labour replacement costs of
GreenGlo tanks installed: 30KM outside main centre, weekend charges,
labour due to difficult access to tank
• You may have other rights in addition to this warranty under the
Consumer Guaranty Act
© GreenGlo Limited
22
Version 05/2010
Installer / Service Provider details
www.greenglo.co.nz
© GreenGlo Limited
Version 05/2010