1
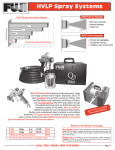
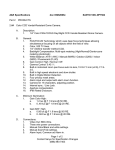
INSTALLATION INSTRUCTION FOR
THE AUTOMATIC DRAIN WITH
Y-STRAINER VALVE 130512
Drain outlet
1/4" NPT Female
The valve should not be installed on a system with more than
200 PSI. The valve must be installed so that the flow of the
condensate is in the same direction as the arrow on the valve.
Improper installation will cause the valve to leak and could
damage the valve seat. For optimum life and performance, a
strainer has been factory installed before the valve.
3.
Fully drained the vessel by opening an auxiliary by-pass valve (see
Diagram 1) or push the test button on the timer.
4.
When all of the condensate has drained, set the OFF TIME to
the maximum 45 minute setting and the ON TIME to the
maximum 10 second setting.
5.
Return prior to the time the drain is expected to open and check to see
how long it takes for the valve to exhaust the liquid. If at the end of the
drain open period, all the liquid has not be expelled, adjust the OFF TIME
downward and repeat steps 3, 4, and 5.
6.
Set the ON TIME equal to the amount of time it takes to drain the vessel.
We suggest increasing the time 20% to compensate for small fluctuations
in air usage or climatic changes.
7.
The drain should be checked periodically to ensure a proper setting was
achieved. In climates with large changes in humidity, the drain should be
checked and reset accordingly.
Filter screen
included
Introduction
The automatic drain is designed for trouble-free draining of unwanted
accumulations of condensate. It includes a timer/drain and a Y-strainer with
shut-off valve.
How The Automatic Drain Works
The automatic drain can be actuated in one of three ways. First, when power
is applied to the timer, the timer will immediately put power to the valve for the
amount of time indicated by the setting of the ON TIME. Removing and
reapplying power will again actuate the timing cycle. Second, pushing the test
button located on the front panel will actuate the valve for as long as the
button is depressed. Third, once the timer is plugged in the timing cycle will
begin. The valve will be actuated at the interval of time that is indicated by the
setting of the knob for the OFF Time.
WARNING
WHEN INSTALLING OR SERVICING
THE AUTOMATIC DRAIN MAKE SURE:
1. Power is TURNED OFF
2. Air system is drained (Zero Pressure)
Replaced SB-6-184-A
2.
Inlet
1/4" NPT Female
1/2" NPT Male
Shutoff
valve
SB-6-184-B
Timer Setting
Set INTERVAL time (T2) using right adjusting knob.
Set DISCHARGE time (T1) using left adjusting knob.
Set T1 to 2 seconds and T2 to 20 Minutes (Adjust as necessary)
Typical Installation
Drain can be mounted
in any position and can
be installed outside.
Installation and Adjustments
This automatic drain must be installed and operated in compliance with all
applicable codes.
Verify flow direction. (Stamped on valve body)
Valve can be mounted in any position.
Install a condensate drain on the outlet side of the drain valve
for proper collection and drainage of condensate.
1.
USE CAUTION: COMPRESSED AIR CAN BE DANGEROUS.
Be sure the pressure vessel on which the drain will be
installed is depressurized prior to any attempt to install
the automatic drain. DO NOT REMOVE the power cord or
timer from the valve while the automatic drain is plugged in. If
the drain does not seem to be working properly, contact
your distributor for return authorization. Any attempt to
repair the drain without authorization will VOID WARRANTY.
By-Pass Valve
Timer Drain
TEST
To
Wa
ste
Co
n
tai
ne
r
Condensate
Y-Strainer & Shut-Off Valve
Diagram 1 - Installation
Page 2
SB-6-184-B
Specifications
Maintenance
Timer
Interval time (T2)
Discharge time (T1)
Supply voltage
Current Consumption
Operating Temperature
Enviromental Protection
Case Material
TEST
.5 -45 minutes
.5 - 10 seconds
120v /60hz
4mA Max.
-14O F to 122O F
NEMA 4
ABS Plastic FR Grade
2
1
Valve
Type
In/Out Ports
Max. Working Pressure
Operating Temperature
Media Temperature
Valve Body
Mounting
2-way direct acting valve
1/4" NPT Female
230 PSI
36O F to 131O F Ambient
194OF Max.
Forged Brass
Any Position
(1) Unscrew bottom of strainer
(2) Pull out screen and rinse with water to clean. Place screen back in strainer body and
screw closed. (Make sure "o-ring" is present and not damaged).
Warranty
This product is covered by DeVilbiss' one year limited
warranty. See SB1-000, which is available upon request.
DEVILBISS WORLDWIDE SALES AND
SERVICE LISTING: www.devilbiss.com
DeVILBISS AUTOMOTIVE REFINISHING
DeVilbiss and Binks have authorized distributors throughout the
world. For equipment, parts and service, check the Yellow Pages
under "Automobile Body Shop Equipment and Supplies".
FOR TECHNICAL ASSISTANCE, CALL TOLL FREE
800-445-3988 (U.S.A. AND CANADA ONLY). FOR LOCAL
CALLS, SEE LISTING BELOW
U.S. Customer Service Office
11360 S. Airfield Road, Swanton, OH 43558
(419) 825-8100
Toll Free Fax No. 800-445-6643
8/12
C Copyright 2012, DeVilbiss All rights reserved.
Printed in U.S.A.