1
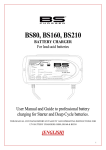
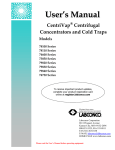
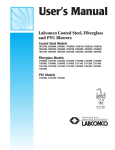
Fre e Z one ® Fre eze Dry Systems
Quick Guide to Installation
Note: This Quick Guide to Installation may not provide all the information for
your installation. Refer to the User’s Manual for details and precautions.
Preparations
Step 1. Proper Electrical Supply
•
•
115V models
o 20-Amp dedicated single phase circuit. Additional
appliances on the same circuit may cause the current to
exceed the rating of the circuit breaker or fuse.
o Receptacle is to accept a NEMA 5-20P plug.
o Frequency must agree with the serial tag rating. Improper
frequency will damage the compressor.
230V models
o 15-Amp dedicated single phase circuit. Additional
appliances on the same circuit may cause the current to
exceed the rating of the circuit breaker or fuse.
o Receptacle is to accept a NEMA 6-20P plug. Installations
outside the U.S. may require a new plug to fit the
available receptacle.
o Frequency must agree with the serial tag rating.
Improper frequency will damage the compressor.
NEMA 5-20P plug
NEMA 6-20P plug
Step 2. Rotary Vane Vacuum Pump Requirements
•
•
•
1 Liter, 2.5 Liter, 4.5 Liter models
o 88 liters per minute minimum displacement
o .002 mBar ultimate vacuum
6 Liter, 12 Liter, 18 Liter models
o 144 liters per minute minimum displacement
o .002 mBar ultimate vacuum
Plug Requirements on vacuum pump power cord
o 115V models- NEMA 5-15P plug
o 230V models- reverse IEC plug
NEMA 5-15P plug
Reverse IEC plug
Part Number 7389900, ECO D580
Page 1 of 5
•
Hose barb connection to fit .75-inch inside diameter hose
Install ation
Step 3. Vacuum Pump Set Up
•
•
Remove protective caps from inlet and outlet
ports.
Some vacuum pumps have inlet fittings that
screw into the inlet port. Make sure the O-ring
is on the sealing surface. Insert fitting into the
pump housing and tighten securely
•
Some vacuum pumps have inlet fittings that
clamp to the pump. Place the centering ring
with filter screen on the inlet fitting.
•
Place the hose barb fitting on top of the
centering ring.
Secure the fitting with the clamp.
•
Inlet Hose
Barb
•
Attach the exhaust filter to the exhaust port.
Some pumps have filters that screw in.
Others require that a centering ring is
placed on the fitting and then a clamp
secures it similar to the inlet fitting.
•
NOTE: Rotary vane vacuum pumps
must have an exhaust filter to prevent
oil mist from exiting the pump and
depleting the oil supply.
Part Number 7389900, ECO D580
Page 2 of 5
Inlet Fitting
Hose Barb
Clamp
•
•
•
•
Fill the pump with oil so the level is between the lines on the sight gauge on the end of
the pump housing.
Verify that the vacuum pump voltage setting agrees with the Freeze Dryer voltage
shown on the serial number label. Reconfigure if necessary. See pump instructions.
Turn the vacuum pump power switch ON.
Set the gas
ballast to
closed or
minimum
position.
Step 4. Vacuum Pump Connections
•
Benchtop models
o Position the vacuum pump within 2 feet
of the .75-inch diameter port on the
back of the cabinet.
o Attach one end of the vacuum hose to
the port on the Freeze Dryer and the
other end to the inlet port of the
vacuum pump. Clamp both ends
securely.
o Connect the vacuum pump power cord
into the receptacle on the back of the
Freeze Dryer.
.
•
Console models
o CAUTION - Make sure that power to
the Freeze Dryer is disconnected.
o Remove the front lower panel from the
Freeze Dryer by inserting a screw
driver into the slot below the center of
the front panel. Pivot the screwdriver
handle downward while pulling the
bottom of the panel outward.
Part Number 7389900, ECO D580
Page 3 of 5
Push down
Pull
o Place the vacuum pump inside the
cabinet.
o Connect the vacuum hose to the inlet
fitting of the vacuum pump. Clamp
securely.
o Reinstall the front panel by positioning the top edge
under the control panel and pushing the bottom
inward.
o CAUTION - Make sure that power to the
Freeze Dryer is disconnected before
removing the lower back panel. Do NOT
remove the upper back panel.
o Plug the vacuum pump power cord into
the receptacle in the junction box marked
Vacuum Pump.
o Replace the rear panel.
Vacuum Pump
Receptacle
Chamber Lid
Step 5. Installing a Chamber or Manifold
(except 4.5L models which have chamber
already attached)
•
1L and 2.5L Models
o Place the collector chamber lid on top of
the chamber.
o Center the flat rubber gasket on the hole
in the center of the chamber lid.
o Place the chamber or manifold over the
gasket.
Part Number 7389900, ECO D580
Page 4 of 5
Upper Back
Panel
•
6L, 12L and 18L Model Chambers
o Place the flat rubber gasket over the inlet port.
o Place the chamber over the gasket.
o Reaching into the chamber, set the stainless
steel ring over the port opening. Slide the lock pin
through the holes in the port and rotate over
center (stainless steel chamber only).
Lock Pin
Stainless Ring
•
6L, 12L and 18L Manifolds- see instructions
supplied with Manifolds.
Testing or Start Up
Step 6. Testing the System
•
•
•
•
•
Connect the power cord into the receptacle on the back of the Freeze Dryer and insert
the other end into a suitable wall receptacle.
Turn the power switch ON.
Vacuum check
o Make sure the lid is on the collector and either a manifold
or chamber is in place.
o Close all manifold valves.
o Set the vacuum level for .002 mBar (except 1L models
without vacuum control).
o Press the Vacuum button.
o Vacuum should reach .133 mBar or less within 15
minutes.
Refrigeration (leave the vacuum pump running)
o Press the Refrigeration button.
o Collector temperature should reach operating temperature
(-50°C or -84°C depending on the model) within 40
minutes.
If the Freeze Dryer fails to perform as expected, consult the User’s Manual for
troubleshooting information or call Labconco.
Labconco Corporation * 8811 Prospect Ave * Kansas City, MO 64132-2696 Web:www.labconco.com
800-821-5525 * 816-333-8811 * Fax 816-822-3785 * E-mail: Labconco@labconco,com
Part Number 7389900, ECO D580
Page 5 of 5