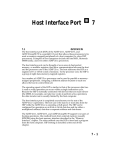
1
Getting Started
3
OVERVIEW
The EZ-KIT Lite contains the ADSP-2181 EZ-LAB evaluation board,
ADSP-2181 Development Software, IBM PC compatible host software,
example programs and demos, and documentation. You can obtain
additional information and documentation from your local Analog
Devices sales office or authorized distributor. You may find this
documentation useful if you are planning to do a significant amount of
ADSP-2181 code development. The following documents can be
obtained or purchased:
ADSP-2100 Family User’s Manual
ADSP-2100 Family Assembler Tools & Simulator Manual
ADSP-2181 User’s Manual
To fully utilize all the functions of the EZ-KIT Lite you will need to
install the provided software on to an IBM compatible PC and connect
the EZ-KIT Lite board to the PC as well as connect it to a power
supply, analog input source and amplified speakers.
3–1
3 Getting Started
QUICK START SOFTWARE INSTALLATION
This section contains a very brief description of the EZ-KIT Lite
software installation procedure. It is written for experienced PC users
familiar with installing software onto their PC.
The install utility for the EZ-KIT Lite should be run under Windows™.
1. Make sure Windows is running.
2. Insert EZ-KIT Lite Software disk into a floppy drive.
(usually A: or B:)
3. Open the Program Manager window, if it is not already open.
4. From the File menu, select Run. The Run dialog box should appear.
5. In the “Command line” box type A:\SETUP.EXE
( or B:\SETUP.EXE ).
6. Click on OK or press enter.
7. Follow the instructions on the screen.
Note: You will need to edit your AUTOEXEC.BAT file in the following
manner.
1. Add the environment variable SET ADI_DSP=C:\ADI_DSP
2. Append to the path variable C:\ADI_DSP\21XX\BIN
A detailed installation procedure is described in the next chapter.
3–2
Getting Started 3
REQUIREMENTS
To run the EZ-KIT Lite software, you will need:
• 386- (or higher) based PC with a hard disk, high-density floppy disk
drive, color video card and VGA monitor, and a minimum of 2 MB
extended RAM.
• 4 MB of free disk space to install the software.
• DOS 3.1 or higher.
• Microsoft Windows 3.1 or higher.
The setup program will create the following tree in the specified
destination path:
21XX\BIN
21XX\ETC
21XX\INCLUDE
21XX\LIB
21XX\EZKITL
21XX\EZKITL\2181\MONITOR
21XX\EZKITL\2181\DSP
Assembler, linker, simulator, and
splitter DOS executables
Error messages and simulator on-line
help
2181 header file
2181 architecture file
Windows host program and demo
.EXE files
Source code and batch file for creating
monitor program
Source code and batch files for
creating demo .EXE files
21XX\EZKITL\2181\DSP\ADPCM
21XX\EZKITL\2181\DSP\DTMF
21XX\EZKITL\2181\DSP\ECHO
21XX\EZKITL\2181\DSP\FIRDEMO
21XX\EZKITL\2181\DSP\LPC2K4
21XX\EZKITL\2181\DSP\LPC7K8
3–3
3 Getting Started
QUICK START HARDWARE INSTALLATION
The diagram below shows where connections for power, RS-232, audio
input, and audio output are made. After all connections are made,
apply power and press the reset button.
Expansion
Connectors
P3
Serial Port (RS232)
Connector
In-Circuit
Emulator
Connector
a
DC
Power Supply
Connector
Green
Power
LED
Pin 1
Stereo
Audio
Output
U3
ADSP-2181
Digital
Signal
Processor
Socketed EPROM
P1
J2
U7
EZ-ICE
AD1847
Stereo
Codec
J1
LINE
JP2
MIC
U2
Pin 1
P2
ADSP-2181
EZ-KIT LITE
EPROM
Configuration
Jumper
Pin 1
JP1
Processor
Interrupt
Button
Red
Flag Out
LED
ADSP-2181 EZ-LAB Board Diagram
A detailed installation procedure is described in the next chapter.
3–4
Input
Source
Selector
(Default Shown)
RESET INTERRUPT FL1
RESET
Button
Stereo
Audio
Input