1
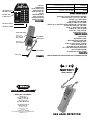
GAS LEAK DETECTOR
Specifications subject to change
without notice
©2008 GENERAL TOOLS & INSTRUMENTS™
NOTICE - WE ARE NOT RESPONSIBLE FOR TYPOGRAPHICAL ERRORS.
MAN#NGD7201 05/08
NGD7201 User’s Manual
e-mail: [email protected]
www.generaltools.com
GENERAL TOOLS & INSTRUMENTS™
80 White Street
New York, NY 10013-3567
PHONE (212) 431-6100
FAX (212) 431-6499
TOLL FREE (800) 697-8665
USER’S MANUAL
NGD7201
This latest handheld gas leak detector features the following functions:
DIAGRAM:
Sensor Cap
F E AT U R E S :
• Detects methane and propane gas
• Quickly pinpoint gas leaks
• Automatically calibrate when power is on
• Auto power off to save battery life
• 60 seconds warm-up time
• Response Time less than 10 seconds
• 5 level LED leak alarm
• Over 440 mm long flexible probe
• Built in earphone jack
• Mute function
S P E C I F I C AT I O N S :
• Sensor: Semiconductor
• Response Time: < 10 seconds
• Warm-up Time: < 60 seconds
• Operation Temp. Range: -5° to 45°C
• Power OFF: 10 minutes from power on
• Power Source: 4 “AA” batteries (alkaline suggested) or “9V” adaptor
• Battery Life: 14 hours (continuous)
• Minimum battery voltage: 4.8V
• Probe Length: 17.5" (447 mm)
• Size: 6.9" x 2.8" x 1.5" (175 x 70 x 38 mm)
• Indicator: Intermittent beep (Acoustic) / LED (Visual)
S P E C I F I C AT I O N TA B L E :
Filter included for high discrimination
Advantage
40 ppm (Propane)
Sensitivity
Methane: 120 to 1920 ppm
Propane: 40 to 640 ppm
Range
Flexible Probe
Earphone Jack
(Dia.: 3.5 mm)
Indicator LED
Adaptor Jack
“ON/OFF” Key
(Dia. outer: 4 mm/
inner: 1.3 mm)
Mute Slide Switch
Methane 5 level LED
Propane 5 level LED
I N D I C AT O R :
Please be reminded
that the left methane
number isn't equal
to the right propane
number.
So, make sure what
gas you measured,
then read the correct
corresponding
side value.
Power “ON” &
Batt. “OK” LED
Batt. “LOW” LED
Sensor “Ready” LED
M E A S U R E M E N T O P E R AT I O N :
1. Power ON/OFF
Press the “ON/OFF” key for more than 0.2 second to turn
the meter on. While the meter is on and there is enough
electrical power the Batt. “OK” LED will stay on.
MAINTENANCE:
1. If silicone vapors settle onto the sensor’s surface,
the sensor will be coated. So, avoid exposure where
silicone adhesives, hair grooming materials and silicone
rubber/putty may be present.
To ensure the accuracy, users must perform the
warm-up period in clean air.
2. High-density exposure to corrosive materials such as
H2S, SOx, Cl2, HCl, etc. may cause corrosion or
breakage of the lead wires or heater material.
Press the “ON/OFF” key again to turn the meter off.
The meter automatically turns off in 10 minutes.
2. Warm-up Status
While the meter is powered on but “Ready” LED is off,
it means the sensor is under warm-up process. The warm-up
time is less than 60 seconds. While “Ready” LED is on,
it means the meter is ready to measure.
During this phase, a special compensating circuit automatically
limits the effect of environmental change.
Even when you turn the meter off for a short time and turn it
back on again, it always needs 60 seconds to warm up.
3. Mute function
The meter beeps every one second to ensure the meter is
in normal working status. The “beep” frequency will speed up
as the detected gas concentration becomes higher.
When the user uses the earphone, the meter will
automatically mute, but the user can hear the
beeping through the earphone.
When the user is not using the earphone, the user can mute the
beeping by switching the mute to the “ON” position.
4. Leakage Checking
Move the sensor toward the pipe, slowly sliding the sensor
along the pipe. Repeat the procedure on the other side
of the pipe. When the sensor is near a leak, the LED
will light up and the beep frequency will increase.
It takes at least 2 minutes of waiting for the sensor to recover
after removing the sensor from the leak point.
BAT T E RY R E P L A C E M E N T:
When the battery “LOW” LED is on, it is suggested to change
the batteries to ensure the units accuracy. Open the battery
compartment of the meter on the rear side and replace
with 4 “AA” batteries.
TROUBLESHOOTING:
Meter does not turn on
a) Make sure the time of pressing the “ON/OFF” key
is more than 200 mS.
b) Check that the batteries are in place,
with good contact and correct polarity.
c) Replace with a new battery and try again.
“Ready” LED isn’t on after 60 seconds warm-up
a) Check that the sensor is making good contact.
3. Sensor drift may occur when the sensor is contaminated
by alkaline metals, especially salt water sprays.
4. Sensor drift may occur due to soaking or splashing
the sensor with water.
5. If water freezes on the sensing surface, the sensor
may crack and alter characteristics.
6. This meter is required to operate under around 21%
ambient oxygen environment in order to function
properly. This meter cannot work well in a zero
or low oxygen atmosphere.
Situations which must be avoided
1. Light condensation under indoor usage should
not be a problem for the sensor. However, if water
condenses on the sensor’s surface for a while,
the sensor characteristics may still drift.
2. Sensor performance may be also affected if exposed
to a high density gas for a long time, regardless
of the powering condition.
3. When meter is off for a long time, the sensor
may show a drift in resistance according to
the storage environment. So, the meter should
be stored in a sealed bag with clean air.
NOTE: While the unpowered time becomes longer,
a longer warm-up period is required to stabilize
the sensor before usage. Turn on the meter occasionally
to make the accumulative warm-up time shorter.
4. Regardless of the powering condition, if the sensor
is exposed to extreme conditions such as very
high humidity, extreme temperatures or high
contamination levels for a long period of time,
the sensor performance will be adversely affected.