1
Operating Instructions
Digital Wireless Earphones
Model No.
RP-BT10
Dear Customer
Thank you for purchasing this product.
Before connecting, operating or adjusting
this product, please read the instructions
completely. Please keep this manual for
future reference.
P
RQT8993-1P
2
1) Read these instructions.
2) Keep these instructions.
3) Heed all warnings.
4) Follow all instructions.
5) Do not use this apparatus near water.
6) Clean only with dry cloth.
7) Do not block any ventilation openings.
Install in accordance with the manufacturer’s
instructions.
8) Do not install near any heat sources such
as radiators, heat registers, stoves, or other
apparatus (including amplifiers) that produce
heat.
9) Do not defeat the safety purpose of
polarized or grounding-type plug. A polarized
plug has two blades with one wider than
the other. A grounding-type plug has two
blades and a third grounding prong. The
wide blade or the third prong are provided
for your safety. If the provided plug does not
fit into your outlet, consult an electrician for
replacement of the obsolete outlet.
10) Protect the power cord from being walked
on or pinched particularly at plugs,
convenience receptacles, and the point
where they exit from the apparatus.
11) Only use attachments/accessories specified
by the manufacturer.
12) Unplug this apparatus during lightning
storms or when unused for long periods
of time.
13) Refer all servicing to qualified service
personnel. Servicing is required when
the apparatus has been damaged in any
way, such as power-supply cord or plug
is damaged, liquid has been spilled or
objects have fallen into the apparatus, the
apparatus has been exposed to rain or
moisture, does not operate normally, or has
been dropped.
14) Do not operate the appliance which has a
damaged output cord or enclosure or plug.
15) Always unplug the appliance when not in
use.
WARNING:
16) The appliance is designed to supply Audio/
Video equipment, for indoor use only.
17) Do not cover the equipment when in use.
18) The main plug used as disconnect device
from the mains so the disconnect device
shall remain readily operable.
19) Do not expose to dripping or splashing and
do not place objects filled with liquids on
the apparatus.
20) Do not exceed the manufacturer ’s
specification when in use.
TO REDUCE THE RISK OF FIRE OR
ELECTRIC SHOCK,
● DO NOT EXPOSE THIS APPARATUS TO
RAIN OR MOISTURE. APPARATUS SHALL
NOT BE EXPOSED TO DRIPPING OR
SPLASHING AND NO OBJECTS FILLED
WITH LIQUIDS, SUCH AS VASES, SHALL
BE PLACED ON THE APPARATUS.
● U S E O N LY T H E R E C O M M E N D E D
ACCESSORIES.
● DO NOT REMOVE THE COVER (OR BACK);
THERE ARE NO USER SERVICEABLE
PARTS INSIDE. REFER SERVICING TO
QUALIFIED SERVICE PERSONNEL.
CAUTION!
DO NOT INSTALL OR PLACE THIS UNIT IN
A BOOKCASE, BUILT-IN CABINET OR IN
ANOTHER CONFINED SPACE. ENSURE
THE UNIT IS WELL VENTILATED. TO
PREVENT RISK OF ELECTRIC SHOCK OR
FIRE HAZARD DUE TO OVERHEATING,
ENSURE THAT CURTAINS AND ANY
OTHER MATERIALS DO NOT OBSTRUCT
THE VENTILATION VENTS.
RQT8993
RQT8993
IMPORTANT SAFETY INSTRUCTIONS
3
The socket outlet shall be installed near
the equipment and easily accessible. The
mains plug of the power supply cord shall
remain readily operable. To completely
disconnect this apparatus from the AC
Mains, disconnect the power supply cord
plug from AC receptacle.
CAUTION
Danger of explosion if battery is incorrectly
replaced. Replace only with the same or
equivalent type recommended by the
manufacturer.
Dispose of used batteries according to the
manufacturer’s instructions.
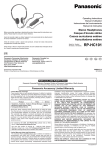
A nickel metal hydride battery
that is recyclable powers the
product you have purchased.
Please call 1-800-8BATTERY for information on
how to recycle this battery.
The receiver (handsfree unit) is certified under
FCC ID: ACJRPBT10R. The FCC ID is also
located on the battery cover and inside the battery
compartment.
-If you see this symbolInformation on Disposal in other
Countries outside the European Union
This symbol is only valid in the
European Union.
If you wish to discard this
product, please contact your
local authorities or dealer and
ask for the correct method of
disposal.
RQT8993
RQT8993
4
FCC Note:
This equipment has been tested and found to comply with the limits for a Class B digital device,
pursuant to Part 15 of the FCC Rules. These limits are designed to provide reasonable protection
against harmful interference in a residential installation. This equipment generates, uses and can radiate
radio frequency energy and, if not installed and used in accordance with the instructions, may cause
harmful interference to radio communications.
However, there is no guarantee that interference will not occur in a particular installation. If this equipment does
cause harmful interference to radio or television reception, which can be determined by turning the equipment
off and on, the user is encouraged to try to correct the interference by one or more of the following measures:
• Reorient or relocate the receiving antenna.
• Increase the separation between the equipment and receiver.
• Connect the equipment into an outlet on a circuit different from that to which the receiver is connected.
• Consult the dealer or an experienced radio/TV technician for help.
FCC caution: To maintain compliance with FCC regulations, shielded interface cables must be used
with this equipment. Operation with non-approved equipment or unshielded cables may result in
interference to radio and TV reception. Any changes or modifications not approved by the party
responsible for compliance could void the user’s authority to operate this equipment.
This device complies with Part 15 of the FCC Rules. Operation is subject to the following two conditions:
(1) This device may not cause harmful interference, and
(2) this device must accept any interference received, including interference that may cause undesired
operation.
Declaration of Conformity
Trade Name: Panasonic
Model No.:
RP-BT10
Responsible Party:
Panasonic Corporation of North America
One Panasonic Way
Secaucus, NJ 07094
Support Contact:
Panasonic Consumer Electronics Company
Telephone No.: 1-800-211-7262
5
The socket outlet shall be installed near
the equipment and easily accessible. The
mains plug of the power supply cord shall
remain readily operable. To completely
disconnect this apparatus from the AC
Mains, disconnect the power supply cord
plug from AC receptacle.
CAUTION
Danger of explosion if battery is incorrectly
replaced. Replace only with the same or
equivalent type recommended by the
manufacturer.
Dispose of used batteries according to the
manufacturer’s instructions.
A nickel metal hydride battery
that is recyclable powers the
product you have purchased.
Please call 1-800-8BATTERY for information on
how to recycle this battery.
The receiver (handsfree unit) is certified under
FCC ID: ACJRPBT10R. The FCC ID is also
located on the battery cover and inside the battery
compartment.
-If you see this symbolInformation on Disposal in other
Countries outside the European Union
This symbol is only valid in the
European Union.
If you wish to discard this
product, please contact your
local authorities or dealer and
ask for the correct method of
disposal.
RQT8993
RQT8993
4
FCC Note:
This equipment has been tested and found to comply with the limits for a Class B digital device,
pursuant to Part 15 of the FCC Rules. These limits are designed to provide reasonable protection
against harmful interference in a residential installation. This equipment generates, uses and can radiate
radio frequency energy and, if not installed and used in accordance with the instructions, may cause
harmful interference to radio communications.
However, there is no guarantee that interference will not occur in a particular installation. If this equipment does
cause harmful interference to radio or television reception, which can be determined by turning the equipment
off and on, the user is encouraged to try to correct the interference by one or more of the following measures:
• Reorient or relocate the receiving antenna.
• Increase the separation between the equipment and receiver.
• Connect the equipment into an outlet on a circuit different from that to which the receiver is connected.
• Consult the dealer or an experienced radio/TV technician for help.
FCC caution: To maintain compliance with FCC regulations, shielded interface cables must be used
with this equipment. Operation with non-approved equipment or unshielded cables may result in
interference to radio and TV reception. Any changes or modifications not approved by the party
responsible for compliance could void the user’s authority to operate this equipment.
This device complies with Part 15 of the FCC Rules. Operation is subject to the following two conditions:
(1) This device may not cause harmful interference, and
(2) this device must accept any interference received, including interference that may cause undesired
operation.
Declaration of Conformity
Trade Name: Panasonic
Model No.:
RP-BT10
Responsible Party:
Panasonic Corporation of North America
One Panasonic Way
Secaucus, NJ 07094
Support Contact:
Panasonic Consumer Electronics Company
Telephone No.: 1-800-211-7262
5
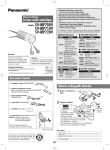
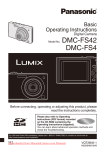
Please check and identify the supplied
accessories.
Use numbers indicated in parentheses when
asking for replacement parts. “As of June 2007”
To order accessories, refer to the “Panasonic
/ Technics Accessory Limited Warranty” on
page 29.
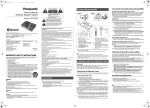
□ AC adaptor .................................................. 1
RQT8993
(RFX8772)
□ USB power cable......................................... 1
(RFX5956)
□ Earphones with ear pads............................. 1
White: (RFX5891), Black: (RFX5891-K)
• M size ear pads put on earphones
6
The model number and serial number of this
product can be found on either the back or
the bottom of the unit.
Please note them in the space provided
below and keep for future reference.
MODEL NUMBER
RP-BT10
SERIAL NUMBER
User memo:
DATE OF PURCHASE
DEALER NAME
DEALER ADDRESS
TELEPHONE NUMBER
Product service
Do not attempt to remove the cover(s)
repair the unit yourself. Refer servicing
qualified personnel only.
Product information
For product service, product information
assistance with product operation, refer
the servicenter directory.
or
to
or
to
Table of contents
IMPORTANT SAFETY INSTRUCTIONS ..................................................... 2
Supplied Accessories .................................................................................. 6
Features ...................................................................................................... 8
Precautions ................................................................................................. 9
Basic flow of operations ............................................................................ 11
Parts and their functions ............................................................................ 12
Preparations (prior to use) ......................................................................... 13
Listening to music on your iPod® ............................................................... 15
Talking on your cellphone .......................................................................... 18
Listening to music on your cellphone ........................................................ 21
List of lamp displays .................................................................................. 23
How to dispose of the unit and battery ...................................................... 24
Maintenance .............................................................................................. 24
Troubleshooting ......................................................................................... 25
Specifications ............................................................................................ 28
Warranty .................................................................................................... 29
RQT8993
Supplied Accessories
7
Please check and identify the supplied
accessories.
Use numbers indicated in parentheses when
asking for replacement parts. “As of June 2007”
To order accessories, refer to the “Panasonic
/ Technics Accessory Limited Warranty” on
page 29.
□ AC adaptor .................................................. 1
RQT8993
(RFX8772)
□ USB power cable......................................... 1
(RFX5956)
□ Earphones with ear pads............................. 1
White: (RFX5891), Black: (RFX5891-K)
• M size ear pads put on earphones
6
The model number and serial number of this
product can be found on either the back or
the bottom of the unit.
Please note them in the space provided
below and keep for future reference.
MODEL NUMBER
RP-BT10
SERIAL NUMBER
User memo:
DATE OF PURCHASE
DEALER NAME
DEALER ADDRESS
TELEPHONE NUMBER
Product service
Do not attempt to remove the cover(s)
repair the unit yourself. Refer servicing
qualified personnel only.
Product information
For product service, product information
assistance with product operation, refer
the servicenter directory.
or
to
or
to
Table of contents
IMPORTANT SAFETY INSTRUCTIONS ..................................................... 2
Supplied Accessories .................................................................................. 6
Features ...................................................................................................... 8
Precautions ................................................................................................. 9
Basic flow of operations ............................................................................ 11
Parts and their functions ............................................................................ 12
Preparations (prior to use) ......................................................................... 13
Listening to music on your iPod® ............................................................... 15
Talking on your cellphone .......................................................................... 18
Listening to music on your cellphone ........................................................ 21
List of lamp displays .................................................................................. 23
How to dispose of the unit and battery ...................................................... 24
Maintenance .............................................................................................. 24
Troubleshooting ......................................................................................... 25
Specifications ............................................................................................ 28
Warranty .................................................................................................... 29
RQT8993
Supplied Accessories
7
Features
Precautions
● Digital wireless earphones for iPod®*1
● Compatible with some cellphones which incorporate
Bluetooth wireless technology (answer call) and
also compatible with some music cellphones which
incorporate Bluetooth wireless technology*2
● High quality and Low noise sound
● 2-way battery charge (USB/AC adaptor)
● Custom fit with 3 sizes of ear pads (S/M/L)
AC adaptor
8
iPod nano 2nd G
iPod 5th G (Video)
iPod nano 1st G
iPod 4th G (color Display)
iPod 4th G
*G means generation
iPod mini
Note: The latest iPod® software versions are required.
*2 Do not work with all the cellphones which
incorporate Bluetooth wireless technology.
Battery
● The rechargeable battery can be recharged
about 300 times. If its operating time
becomes extremely short, you should
consult the dealer about exchange of the
rechargeable battery. (RP-BP65HP-1)
● Do not heat or expose to flame.
● Carry and store the rechargeable battery in
the battery carrying case to prevent contact
with metal objects.
● Do not peel off the covering on battery and do
not use if the covering has been peeled off.
Mishandling of battery can cause electrolyte
leakage which can damage items the fluid
contacts and may cause a fire.
● Keep the battery, out of the reach of children
to prevent them from being swallowed.
RQT8993
RQT8993
*1 Made for
Handle the AC adaptor carefully. Improper
handling is dangerous.
● Do not touch it with wet hands.
● Do not place heavy objects on top of it.
Be sure to use the supplied AC adaptor.
9
Basic flow of operations
The unit
RQT8993
This unit uses the 2.4 GHz radio frequency
band (Bluetooth). However other wireless
equipment may use the same frequency. Be
sure to take note of the following to prevent
radio wave interference from other equipment.
10
■ Restriction of use
For use only in your country.
■ Range of use
The range of use is up to approximately 10 m
(33 ft.). The range may be less depending on
the structure of the building, the environment
and any obstacles between the receiver and
the transmitter. Such obstacles as reinforced
concrete walls and metal doors, in particular,
obstruct the transmitter’s signals.
■ Interference from other equipment
Due to radio interference, malfunctions such as
sound distortion may occur if the unit is placed
too close to other equipment. We recommend
keeping the unit as far away as possible from
the following devices:
Bluetooth devices other than this unit, wireless
LAN, microwaves, office automation devices,
digital cordless telephones and other electronic
devices
The unit is designed to automatically avoid
radio interference from these household
devices. However the sound will be broken
when radio interference occurs.
■ Using the unit
● Do not drop, hit or otherwise subject the
transmitter or receiver to strong shocks of
any kind. This may cause damage.
● Do not expose the unit to water or other
liquids as it may cause damage.
● Do not use near microwave ovens,
pacemakers or other industrial, chemical or
medical equipment.
● Do not use inside an aircraft, as this may
compromise the safety of the aircraft.
● Keep the ear pads, out of the reach of children
to prevent them from being swallowed.
Listening to music
Connect the transmitter to the iPod®.
Connect it to the iPod®’s dock connector.
(Refer to page 15.)
• Prior to shipment from the
manufacturing plant, the
transmitter and receiver pair is
registered.
Talking on the phone
Registering the device pair
The receiver and Bluetooth cellphone must be registered
for the parties to be connected. Once they have been
registered, they need not be registered again.
(Refer to page 18.)
Setting the pair
Use a Bluetooth connection for the receiver and
transmitter that has been connected to the iPod®.
The pair setting is performed
automatically.
(Refer to page 15.)
Setting the pair
Use a Bluetooth connection for the receiver and
Bluetooth cellphone.
(Refer to page 19.)
Listening to music
• You can listen to the music played by the iPod® with
the receiver.
• You can play, pause and control the music in other
ways with the receiver.
(Refer to page 16.)
Talking on the phone
You can now operate the receiver and receive incoming
calls.
(Refer to page 20.)
RQT8993
Precautions
11
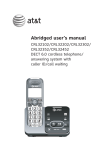
Parts and their functions
Preparations (prior to use)
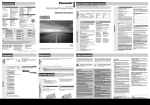
Transmitter
Charging (only the receiver)
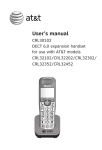
Connector: Connect this to the iPod ’s dock connector.
Lamp: This indicates the status of the device.
(Refer to page 23.)
Transmitter button: This is operated when setting
the pair.
RQT8993
12
: PLAY/PAUSE
: Forward
: Backward
: Use this to increase the volume level.
: Use this to reduce the volume level. Also use it
to register the pair.
Lamp: This indicates the status of the device.
(Refer to page 23.)
DC IN socket: Connect the accessory AC adaptor or
USB cable here.
(Be sure to use the AC adaptor or USB cables that
have been provided as an accessory. Trouble or
malfunctioning may result if a product such as one
with different plug polarities is used instead.
Reset switch: (Refer to page 25.)
AUDIO OUT (line out) connector:
Connect the earphones with the 3.5 mm plug to this
connector.
Microphone: The microphone used when talking on
the phone is built-in.
MIC button: Use this to turn the power on or off, start
talking when receiving an incoming call
or end talking to terminate the call, set
the pairing, etc.
Stereo earphones (L / R)
The unit (receiver) contains a rechargeable nickel-hydrogen battery.
Recharge this battery prior to use.
■ When using the AC adaptor to recharge the battery
Connect the AC adaptor to the receiver.
The receiver’s lamp (purple) lights up.
When charging is completed, the lamp goes off.
Caution: • Be sure to use the AC adaptor that is supplied as an accessory.
• Use the AC plug of the AC adaptor at a
90- or
180-degree angle. Do not use the AC plug bent at other
angles, as this will result in faulty contact.
■ When connecting the USB cable to a PC to recharge the battery
Connect one end of the USB cable to the receiver and the other end to the PC.
The receiver’s lamp (purple) lights up.
When charging is completed, the lamp goes off.
Caution: Be sure to use the USB power cable that is supplied as an accessory.
Notes: • During charging, the rechargeable battery will heat up: this is normal and not indicative of trouble.
• Charge the battery in an ambient temperature from 0 to 40°C. Otherwise, the battery may not fully charge.
• The transmitter receives its power from the iPod® so there is no need to recharge it.
• During charging, the receiver’s reception functions do not work.
• To prevent overcharging, repeated charging is not possible.
Before charging again after fully charging, use the unit for at least 20 to 30 minutes. (If charging is
restarted immediately after fully charging, charging will automatically stop after about 1 minute.)
■ Approximate charging times and charge retention times
Charging time
Approx. 3 hours
Audio playback time
Approx. 4.5 hours
Continuous standby time
Approx. 25 hours
• The continuous operating time of the transmitter depends on the charging capacity of the iPod®.
RQT8993
Receiver, microphone and earphones
®
13
Parts and their functions
Preparations (prior to use)
Transmitter
Charging (only the receiver)
RQT8993
Connector: Connect this to the iPod ’s dock connector.
Lamp: This indicates the status of the device.
(Refer to page 23.)
Transmitter button: This is operated when setting
the pair.
12
: PLAY/PAUSE
: Forward
: Backward
: Use this to increase the volume level.
: Use this to reduce the volume level. Also use it
to register the pair.
Lamp: This indicates the status of the device.
(Refer to page 23.)
DC IN socket: Connect the accessory AC adaptor or
USB cable here.
(Be sure to use the AC adaptor or USB cables that
have been provided as an accessory. Trouble or
malfunctioning may result if a product such as one
with different plug polarities is used instead.
Reset switch: (Refer to page 25.)
AUDIO OUT (line out) connector:
Connect the earphones with the 3.5 mm plug to this
connector.
Microphone: The microphone used when talking on
the phone is built-in.
MIC button: Use this to turn the power on or off, start
talking when receiving an incoming call
or end talking to terminate the call, set
the pairing, etc.
Stereo earphones (L / R)
The unit (receiver) contains a rechargeable nickel-hydrogen battery.
Recharge this battery prior to use.
■ When using the AC adaptor to recharge the battery
Connect the AC adaptor to the receiver.
The receiver’s lamp (purple) lights up.
When charging is completed, the lamp goes off.
Caution: • Be sure to use the AC adaptor that is supplied as an accessory.
• Use the AC plug of the AC adaptor at a
90- or
180-degree angle. Do not use the AC plug bent at other
angles, as this will result in faulty contact.
■ When connecting the USB cable to a PC to recharge the battery
Connect one end of the USB cable to the receiver and the other end to the PC.
The receiver’s lamp (purple) lights up.
When charging is completed, the lamp goes off.
Caution: Be sure to use the USB power cable that is supplied as an accessory.
Notes: • During charging, the rechargeable battery will heat up: this is normal and not indicative of trouble.
• Charge the battery in an ambient temperature from 0 to 40°C. Otherwise, the battery may not fully charge.
• The transmitter receives its power from the iPod® so there is no need to recharge it.
• During charging, the receiver’s reception functions do not work.
• To prevent overcharging, repeated charging is not possible.
Before charging again after fully charging, use the unit for at least 20 to 30 minutes. (If charging is
restarted immediately after fully charging, charging will automatically stop after about 1 minute.)
■ Approximate charging times and charge retention times
Charging time
Approx. 3 hours
Audio playback time
Approx. 4.5 hours
Continuous standby time
Approx. 25 hours
• The continuous operating time of the transmitter depends on the charging capacity of the iPod®.
RQT8993
Receiver, microphone and earphones
®
13
Preparations (prior to use)
Listening to music on your iPod®
Concerning the connection of the stereo earphones (L, R)
Setting the pair
Insert the input plug of the stereo earphones into the AUDIO OUT connector for use.
As soon as the receiver and transmitter power are turned on, the pair setting is performed automatically.
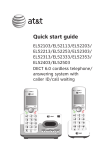
■ How to fit the stereo earphones into your ears properly
If the earpieces are not fitted snugly into your ears, you may not obtain a good seal or hear bass sounds. Fit them
into your ears snugly for a better sound quality listening experience.
Lift the upper part of your left ear lobe
using your right hand (and vice versa).
Twist slightly and gently push the
earphones in.
Connect the transmitter to the dock
connector on the bottom of the iPod®.
•The iPod®’s power is now automatically turned on.
Press and hold the MIC button on the
receiver for 2 seconds.
• The receiver’s power is now turned on, and the lamp
(red) blinks slowly.
RQT8993
• Discontinue use if you experience discomfort. Continued use may cause rashes or other allergic reactions.
• You could damage your ears if the volume is raised too high. Avoid listening for prolonged periods of time to
prevent hearing damage. (Refer to page 28.)
14
Press and hold the Transmitter button on
the transmitter for 2 seconds.
■ Concerning the ear pads
• The transmitter’s lamp (red) starts blinking rapidly, and
when the pair setting is completed, the lamps (blue)
on the transmitter and receiver start blinking slowly to
indicate that the pair setting has been completed.
Your earphones are fitted with M size ear pads at the time of their purchase.
If you feel that they are too small or too large for your ears, replace them with the S or L size pads.
Note: • To establish pairing again after pairing has been
released or the transmitter’s power was turned
off, press and hold the Transmitter button on
the transmitter for 2 seconds. The pair setting is
restored.
RQT8993
Notes:
15
Preparations (prior to use)
Listening to music on your iPod®
Concerning the connection of the stereo earphones (L, R)
Setting the pair
Insert the input plug of the stereo earphones into the AUDIO OUT connector for use.
As soon as the receiver and transmitter power are turned on, the pair setting is performed automatically.
■ How to fit the stereo earphones into your ears properly
If the earpieces are not fitted snugly into your ears, you may not obtain a good seal or hear bass sounds. Fit them
into your ears snugly for a better sound quality listening experience.
Lift the upper part of your left ear lobe
using your right hand (and vice versa).
Twist slightly and gently push the
earphones in.
Connect the transmitter to the dock
connector on the bottom of the iPod®.
•The iPod®’s power is now automatically turned on.
Press and hold the MIC button on the
receiver for 2 seconds.
• The receiver’s power is now turned on, and the lamp
(red) blinks slowly.
RQT8993
• Discontinue use if you experience discomfort. Continued use may cause rashes or other allergic reactions.
• You could damage your ears if the volume is raised too high. Avoid listening for prolonged periods of time to
prevent hearing damage. (Refer to page 28.)
14
Press and hold the Transmitter button on
the transmitter for 2 seconds.
■ Concerning the ear pads
• The transmitter’s lamp (red) starts blinking rapidly, and
when the pair setting is completed, the lamps (blue)
on the transmitter and receiver start blinking slowly to
indicate that the pair setting has been completed.
Your earphones are fitted with M size ear pads at the time of their purchase.
If you feel that they are too small or too large for your ears, replace them with the S or L size pads.
Note: • To establish pairing again after pairing has been
released or the transmitter’s power was turned
off, press and hold the Transmitter button on
the transmitter for 2 seconds. The pair setting is
restored.
RQT8993
Notes:
15
Listening to music on your iPod®
As soon as the pairing has been set, the iPod® can be operated by remote control.
: Each time this is pressed, the mode is
switched.
Next/Fast-forward : Press this once to skip to the next track;
Press and hold it down to fast-forward.
Previous/Rewind : Press this once to return to the beginning of
the previous track; Press and hold it down to
rewind.
Volume (up)
: Use this to adjust the volume level in 16 steps.
Volume (down)
: Use this to adjust the volume level in 16 steps.
• Some operations may not be supported depending on the player
you are using.
• When you pause operation using the receiver, the iPod® screen
flashes approximately every 20 seconds. This is to prevent the
power from automatically turning off, and it is not a malfunction.
• The earphone volume depends on the receiver side, so changing
the iPod® volume does not change the earphone volume.
• Even if you change the volume with the receiver, the iPod® volume
display does not change.
Lamp
Press and hold the MIC button on the receiver for 6 seconds.
The receiver’s power is turned off, the pairing setting is released, and the lamp
goes off.
• The iPod®’s power turns off automatically.
OFF
RQT8993
Play/pause
Winding up an operation session
16
RQT8993
Operating the receiver
If you also establish pairing with a Bluetooth cellphone, you can receive calls to
your Bluetooth cellphone while listening to music on your iPod®.
17
Talking on your cellphone
Registering the device pair
Setting the pair
In order to establish the wireless connection between the receiver and Bluetooth cellphone, the receiver and
cellphone pair must be registered.
In order to establish the wireless connection between the receiver and Bluetooth cellphone, the receiver and
cellphone pair must first be registered.
• Operations involving the receiver
Before operating the units, check the following points.
• Has the pairing of the receiver and cellphone you are about to use been registered? (Refer to page 18.)
Press and hold the MIC button on the receiver for 2 seconds.
The receiver’s power is turned on, and its lamp (red) starts blinking slowly.
Press and hold the [–] button on the receiver for 6 seconds.
Press and hold the MIC button on the receiver for 2 seconds.
The lamp (red) starts blinking rapidly.
Caution: While the lamp (red) blinks rapidly (for about 60 seconds), register the pairing of the
if the lamp (red) starts blinking
• Operations involving the Bluetooth cellphone
Using your cellphone, conduct a Bluetooth device search.
Caution: • A list of detected devices is displayed on the cellphone screen, and “RP-BT10R
RQT8993
Panasonic” is displayed for the receiver.
If “RP-BT10R Panasonic” is not displayed, repeat the procedure from step
• If you are requested to input the pass key, input “0000.”
18
Notes:
.
• For further details on conducting the Bluetooth device search, refer to the operating
instructions of your cellphone.
• Once the pairing has been registered, it need not be registered again.
• It may not be possible to register the pairing with some cellphones because they use
a different data transfer format.
Establish a “hands-free” connection by performing the Bluetooth
connection operation on your cellphone.
• When the pair setting is completed, the receiver’s lamp (blue) starts blinking
slowly.
• To establish pairing again after pairing has been released or the receiver’s
power was turned off, press the MIC button on the receiver once, then check the
connection with the cellphone.
Hands
-free
Note:
• For further details on the Bluetooth connection operation, refer to the operating instructions of your cellphone.
RQT8993
receiver and Bluetooth cellphone. Repeat step
slowly.
The receiver’s power is turned on, and its lamp (red) starts blinking slowly.
19
Talking on your cellphone
Registering the device pair
Setting the pair
In order to establish the wireless connection between the receiver and Bluetooth cellphone, the receiver and
cellphone pair must be registered.
In order to establish the wireless connection between the receiver and Bluetooth cellphone, the receiver and
cellphone pair must first be registered.
• Operations involving the receiver
Before operating the units, check the following points.
• Has the pairing of the receiver and cellphone you are about to use been registered? (Refer to page 18.)
Press and hold the MIC button on the receiver for 2 seconds.
The receiver’s power is turned on, and its lamp (red) starts blinking slowly.
Press and hold the [–] button on the receiver for 6 seconds.
Press and hold the MIC button on the receiver for 2 seconds.
The lamp (red) starts blinking rapidly.
The receiver’s power is turned on, and its lamp (red) starts blinking slowly.
Caution: While the lamp (red) blinks rapidly (for about 60 seconds), register the pairing of the
if the lamp (red) starts blinking
• Operations involving the Bluetooth cellphone
Using your cellphone, conduct a Bluetooth device search.
Caution: • A list of detected devices is displayed on the cellphone screen, and “RP-BT10R
RQT8993
Panasonic” is displayed for the receiver.
If “RP-BT10R Panasonic” is not displayed, repeat the procedure from step
• If you are requested to input the pass key, input “0000.”
18
Notes:
.
• For further details on conducting the Bluetooth device search, refer to the operating
instructions of your cellphone.
• Once the pairing has been registered, it need not be registered again.
• It may not be possible to register the pairing with some cellphones because they use
a different data transfer format.
Establish a “hands-free” connection by performing the Bluetooth
connection operation on your cellphone.
• When the pair setting is completed, the receiver’s lamp (blue) starts blinking
slowly.
• To establish pairing again after pairing has been released or the receiver’s
power was turned off, press the MIC button on the receiver once, then check the
connection with the cellphone.
Hands
-free
Note:
• For further details on the Bluetooth connection operation, refer to the operating instructions of your cellphone.
RQT8993
receiver and Bluetooth cellphone. Repeat step
slowly.
19
Talking on your cellphone
Listening to music on your cellphone
Talking on the phone
■ Receiving incoming calls
Setting the pair
■ Hanging up
Press the MIC button on the receiver. The call is now terminated.
Notes: • If you receive a call while music is playing on the iPod®, the iPod® music will be temporarily suspended,
and you will hear the incoming call tone.
• When the call is terminated, the iPod® music will resume.
Adjusting the call volume
RQT8993
The call volume can be adjusted by pressing the [+] and [–] buttons.
Notes: • The call volume cannot be adjusted during call standby.
• You can select separate settings for the call volume level and music play level.
20
Winding up an operation session
Disconnect the Bluetooth connection using your cellphone.
Note: • For further details on disconnecting the Bluetooth connection, refer to the operating
instructions of your cellphone.
Press and hold the MIC button on the receiver for 6 seconds.
The receiver’s power is turned off, and its lamp (red) goes off.
In order to establish the wireless connection between the receiver and Bluetooth cellphone, the receiver and
cellphone pair must first be registered.
Before operating the units, check the following points.
• Has the pairing of the receiver and cellphone you are about to use been registered? (Refer to page 18.)
Press and hold the MIC button on the receiver for 2 seconds.
The receiver’s power is turned on, and its lamp (red) starts blinking slowly.
Establish the “audio” connection by performing the Bluetooth
connection operation on your cellphone.
Perform the audio playback operation using the above cellphone.
When the pair setting is completed, the receiver’s lamp (blue) starts blinking slowly.
• Perform the operation for transmitting to the Bluetooth device.
• The receiver starts receiving, and the playback sound can be heard through
the earphones.
Note:
• For further details on the Bluetooth connection, refer to the operating
instructions of your cellphone.
Audio
RQT8993
You will hear the incoming call tone when someone calls
the number of your cellphone.
MIC
- To talk to the other party, Press the MIC button on the
receiver.
- To switch the call to your cellphone, Press and hold the
MIC button on the receiver for 2 seconds after the
call has been connected.
- To refuse the call, Press and hold the MIC button on the receiver for 2 seconds during the call tone.
21
Talking on your cellphone
Listening to music on your cellphone
Talking on the phone
■ Receiving incoming calls
Setting the pair
■ Hanging up
Press the MIC button on the receiver. The call is now terminated.
Notes: • If you receive a call while music is playing on the iPod®, the iPod® music will be temporarily suspended,
and you will hear the incoming call tone.
• When the call is terminated, the iPod® music will resume.
Adjusting the call volume
RQT8993
The call volume can be adjusted by pressing the [+] and [–] buttons.
Notes: • The call volume cannot be adjusted during call standby.
• You can select separate settings for the call volume level and music play level.
In order to establish the wireless connection between the receiver and Bluetooth cellphone, the receiver and
cellphone pair must first be registered.
Before operating the units, check the following points.
• Has the pairing of the receiver and cellphone you are about to use been registered? (Refer to page 18.)
Press and hold the MIC button on the receiver for 2 seconds.
The receiver’s power is turned on, and its lamp (red) starts blinking slowly.
Establish the “audio” connection by performing the Bluetooth
connection operation on your cellphone.
Perform the audio playback operation using the above cellphone.
When the pair setting is completed, the receiver’s lamp (blue) starts blinking slowly.
• Perform the operation for transmitting to the Bluetooth device.
• The receiver starts receiving, and the playback sound can be heard through
the earphones.
Note:
• For further details on the Bluetooth connection, refer to the operating
instructions of your cellphone.
Winding up an operation session
Disconnect the Bluetooth connection using your cellphone.
Note: • For further details on disconnecting the Bluetooth connection, refer to the operating
Audio
RQT8993
You will hear the incoming call tone when someone calls
the number of your cellphone.
MIC
- To talk to the other party, Press the MIC button on the
receiver.
- To switch the call to your cellphone, Press and hold the
MIC button on the receiver for 2 seconds after the
call has been connected.
- To refuse the call, Press and hold the MIC button on the receiver for 2 seconds during the call tone.
instructions of your cellphone.
20
Press and hold the MIC button on the receiver for 6 seconds.
The receiver’s power is turned off, and its lamp (red) goes off.
21
Listening to music on your cellphone
List of lamp displays
Operating the receiver
Receiver
ㄦ
Notes: • Some cellphones may cancel the pairing when
playback is stopped on the cellphone side while
listening to music.
• For further details on the operations after receiving
a call while listening to music, refer to the operating
instructions of your cellphone.
Winding up an operation session
Disconnect the Bluetooth connection using your cellphone.
Note:
• For further details on disconnecting the Bluetooth connection, refer to the
operating instructions of your cellphone.
RQT8993
Press and hold the MIC button of the receiver for 6 seconds.
22
The receiver’s power is turned off, and its lamp (red) goes off.
MIC
xxxxxxx
Lamp
Lights (purple)
Off
Lights alternately blue and red.
Off
Blinks slowly (red)
Blinks rapidly (red)
Blinks slowly (blue)
Blinks slowly (blue)
Blinks slowly (blue)
Device status
Now charging
Charging completed
Low battery charge
While power is off
While power is on (no pairing)
When pairing is being set (*1)
When pairing is set successfully
When an incoming call is received
While talking
Remarks
Under operation
Power turns off after 3 minutes.
*1 If the device that is trying to be connected cannot be found, the lamp blinks rapidly for a maximum of 60 seconds
or so, after which it blinks slowly again.
Transmitter
Lamp
Off
Blinks slowly (red)
Blinks rapidly (red)
Blinks slowly (blue)
Device status
While power is off
While power is on (no pairing)
When pairing is being set (*1)
When pairing is set successfully
Remarks
Power turns off after 3 minutes.
*1 If the device that is trying to be connected cannot be found, the lamp blinks rapidly for a maximum of 60 seconds
or so, after which it blinks slowly again.
RQT8993
Once the pairing is set, the music play functions of your
cellphone can be operated by remote control
.
(Same as for iPod®: page 16)
23
Listening to music on your cellphone
List of lamp displays
Operating the receiver
Receiver
Once the pairing is set, the music play functions of your
cellphone can be operated by remote control
.
(Same as for iPod®: page 16)
ㄦ
Notes: • Some cellphones may cancel the pairing when
playback is stopped on the cellphone side while
listening to music.
• For further details on the operations after receiving
a call while listening to music, refer to the operating
instructions of your cellphone.
Winding up an operation session
MIC
xxxxxxx
Lamp
Lights (purple)
Off
Lights alternately blue and red.
Off
Blinks slowly (red)
Blinks rapidly (red)
Blinks slowly (blue)
Blinks slowly (blue)
Blinks slowly (blue)
Device status
Now charging
Charging completed
Low battery charge
While power is off
While power is on (no pairing)
When pairing is being set (*1)
When pairing is set successfully
When an incoming call is received
While talking
Remarks
Under operation
Power turns off after 3 minutes.
*1 If the device that is trying to be connected cannot be found, the lamp blinks rapidly for a maximum of 60 seconds
or so, after which it blinks slowly again.
Disconnect the Bluetooth connection using your cellphone.
• For further details on disconnecting the Bluetooth connection, refer to the
operating instructions of your cellphone.
RQT8993
Press and hold the MIC button of the receiver for 6 seconds.
22
The receiver’s power is turned off, and its lamp (red) goes off.
Transmitter
Lamp
Off
Blinks slowly (red)
Blinks rapidly (red)
Blinks slowly (blue)
Device status
While power is off
While power is on (no pairing)
When pairing is being set (*1)
When pairing is set successfully
Remarks
Power turns off after 3 minutes.
*1 If the device that is trying to be connected cannot be found, the lamp blinks rapidly for a maximum of 60 seconds
or so, after which it blinks slowly again.
RQT8993
Note:
23
How to dispose of the unit and battery
Troubleshooting
The unit (receiver) uses a rechargeable nickel metal hydride battery. (RP-BP65HP-1)
To protect the environment and conserve valuable resources, when disposing of the unit, remove its rechargeable
nickel metal hydride battery and take it to a recycling center.
Before requesting service, make the below checks. If you are in doubt about some of the check points, or if the
remedies indicated in the chart do not solve the problem: refer to the “Panasonic / Technics Accessory Limited
Warranty” on page 29. Take the unit when you visit your dealer.
• When the rechargeable battery is to be replaced, consult with your dealer.
Use a screwdriver to undo the screw on the back panel of the
unit (receiver), and remove the battery lid.
Remove the rechargeable battery.
Caution: • Unless the unit is to be disposed of, do not remove the battery lid.
RQT8993
• Check that the rechargeable battery has completely discharged
before removing it.
24
Problem
•Something is wrong with the wireless communication.
•Is power being supplied to the unit and device connected to it? (Is the unit’s lamp
blinking in blue?)
•Have you temporarily suspended play using the receiver or iPod®?
•Has the transmitter been inserted all the way into the docking connector of the iPod®?
I can’t hear any sound.
•Is the transmitter’s connector dirty?
The sound is barely
•Has the input plug of the stereo earphones been inserted all the way (into the
audible.
AUDIO OUT connector)?
I hear a lot of noise.
The sound keeps breaking •Is the plug dirty?
•Noise may be heard due to the effect of the cellphone.
up.
•Depending on the specifications and settings of your cellphone, the sound may break
up or data communication may not be possible when you operate your cellphone.
•Is a Bluetooth-enabled device other than this unit being used? Do not use the two
devices at the same time.
The unit doesn’t work.
•Has the battery in the receiver or the device connected discharged? If it is, recharge it.
•No power is supplied while the unit is being charged.
•Connect the transmitter firmly to your iPod®, and reset the receiver. (The pairing
information is not erased by this operation.) Then perform the pair setting again.
* Reset operation: Insert a paper clip or other thin rod-type object into the hole on
the receiver and press until there is the feeling of a button being pressed.
I can’t register the (pairing
of the) device.
•Did you allow more than one minute to elapse after setting the unit to the device
registration mode? The pair setting is automatically released if you allow more than
one minute to elapse.
•Set the pairing with the unit and connected device placed as close to each other as possible.
I can’t use my cellphone
to communicate.
•Is your cellphone set to auto response or answering machine mode?
•Have you set the volume level for the incoming tone and for receiving calls too low?
Maintenance
To clean this unit, wipe with a soft, dry cloth.
• Never use alcohol, paint thinner, or benzine to clean this unit.
• Before using chemically treated cloth, read the instructions that came with the cloth carefully.
Possible cause and suggested remedy
RQT8993
■ How to remove the battery
25
Troubleshooting
Possible cause and suggested remedy
Problem
Possible cause and suggested remedy
I can use the unit only for
a short time even after
charging.
•The unit may be usable just for a short time when its battery is first charged or when
it is charged after the unit has not been used for a prolonged period. The battery’s
charging capability will be restored after a few charges.
•The battery will discharge if the power switch is kept at the “on” setting.
•If the play time available is extremely short even after the battery has been charged,
it means that the rechargeable battery has reached the end of its service life (after
about 300 charges). For more information on replacing the rechargeable nickelhydrogen battery, consult with your dealer.
The sound cut out while
music was playing.
•Did you receive mail or a message (R/F)? Check your cellphone.
Sound copyright-protected
by SCMS-T (a copy
protection technology)
cannot be played.
•This is not supported by the unit.
The rechargeable battery is The battery will become somewhat hot: this is normal and not indicative of trouble.
hot while it is being charged.
RQT8993
I can’t connect a device
even though I have
already registered it.
26
<iPod®>
•Re-register the transmitter and receiver pairing.
1, Connect the transmitter to the iPod®.
2, Press and hold the transmitter button for 2 seconds.
The transmitter’s lamp (red) starts blinking rapidly.
3, Press and hold the MIC button on the receiver for 2 seconds.
The receiver’s power is now turned on, and the lamp (red) blinks slowly.
4, Press and hold the [–] button on the receiver for 6 seconds.
The receiver and transmitter lamps (red) start blinking rapidly.
• When re-registering the pairing: Wait for about 7 seconds. Step 5 is not necessary.
• When registering the pairing for the first time (when replacing the unit with a
new one): Go to step 5.
5, Press the transmitter button twice quickly.
When the pair setting has been re-registered, the transmitter lamp (blue) and
receiver lamp (blue) will blink slowly.
If failed, power off both devices and try again.
<Cellphone>
Re-register the cellphone and receiver pairing. Refer to “Registering the device pair”
on page 18.
Charging is not terminated
even though the time for
a complete charging has
elapsed.
This process may take approximately 3 hours or so depending on the level of the
battery’s remaining charge.
Charging stops
immediately.
To prevent overcharging, repeated charging is not possible.
Before charging again after fully charging, use the unit for at least 20 to 30 minutes.
(If charging is restarted immediately after fully charging, charging will automatically
stop after about 1 minute.)
• iPod®: The latest iPod® software versions are required.
■If wireless communication is not possible or is disconnected, check the following.
a) Has the battery in the unit or connected device discharged?
b) Is power being supplied to the unit and device connected to it?
c) If there is an obstacle between the receiver and the transmitter or connected device, avoid or remove it.
d) Is a wireless device, microwave oven, etc. that operates on a frequency in the 2.4 GHz band being used near
the receiver, transmitter or connected device?
e) Place the receiver, transmitter and connected device as close to one another as possible.
f) Change the position or direction of the receiver, transmitter or connected device.
g) Have you registered the device with the cellphone and transmitter?
h) Are the registered cellphone, transmitter and unit set to the wireless communication standby status?
RQT8993
Problem
27
RQT8993
● Bluetooth specification : version 2.0
● Output : Power Class 2
● Carrier frequency : 2.4 - 2.483 GHz
● Operation distance : up to 10 m (33 ft.)
● Compatible Bluetooth Profiles : A2DP
(Advanced Audio Distribution Profile),
AVRCP (Audio Video Remote Control Profile),
HSP (Head Set Profile),
HFP (Hands Free Profile)
● Audio Codec : SBC
● Battery : Ni-MH (1.2 V, min 620 mAh)
● Playback time : 4.5 hours
● Charge time : 3 hours
● Total cord length : 0.6 m (2.1 ft.)
● Plug (Earphones) : 3.5 mm (1/8 in.)
● Dimensions (W × H × D) :
Receiver 24.0 mm × 54.0 mm × 24.1 mm
(15/16 in. × 2-1/8 in. × 15/16 in.)
Transmitter 62.3 mm × 31.0 mm × 11.0 mm
(2-7/16 in. × 1-1/4 in. × 7/16 in.)
● Mass (Weight) :
Receiver Approx. 30.4 (1.1 oz.)
Transmitter Approx. 11.4 (0.4 oz.)
28
● AC Adaptor :
Input
AC 120 V, 60 Hz
Output
DC 4.8 V, 720 mA
Power consumption 6 W
* Specifications are subject to change without
notice.
Listening caution
Panasonic Consumer Electronics Company, Division of
Panasonic Corporation of North America
One Panasonic Way Secaucus, New Jersey 07094
FOR U.S.A.
Panasonic Puerto Rico, Inc.
Ave. 65 de Infantería, Km. 9.5, San Gabriel Industrial Park,
Carolina, Puerto Rico 00985
Panasonic / Technics Accessory Limited Warranty
Do not play your earphones at a high volume. Hearing
experts advise against continuous extended play.
If you experience a ringing in your ears, reduce
volume or discontinue use.
Pay attention to the surrounding environment
(traffic) when using the earphones while walking.
Do not use while operating a motorized vehicle.
It may create a traffic hazard and is illegal in many
areas.
You should use extreme caution or temporarily
discontinue use in potentially hazardous situations.
Sound can be deceiving. Over time your hearing
“comfort level” adapts to higher volumes of sound.
So what sounds “normal” can actually be loud and
harmful to your hearing. Guard against this by
setting your equipment at a safe level BEFORE
your hearing adapts.
To establish a safe level:
• Start your volume control at a low setting.
• Slowly increase the sound until you can hear it
comfortably and clearly, and without distortion.
Once you have established a comfortable sound level:
• Leave it there.
Limited Warranty Coverage
If your product does not work properly because of a defect in
materials or workmanship,
Panasonic Consumer Electronics
Company or Panasonic Puerto Rico, Inc. (collectively referred to as
"the warrantor") will, for the length of the period as follows, which
starts with the date of original purchase ("warranty period"), replace it
with a new or a refurbished product.
not supplied by the warrantor, or failures which result from accidents,
misuse, abuse, neglect, mishandling, misapplication, alteration, faulty
installation, set-up adjustments, misadjustment of consumer controls,
improper maintenance, power line surge, lightning damage,
modification, rental use of the product, serviced by anyone other than
a Factory ServiCenter or other Authorized Sevicer, or damage that is
attributable to acts of Gods.
For assistance in U.S.A., please visit our Web Site at :
http://www.pstc.panasonic.com
THERE ARE NO EXPRESS WARRANTIES EXCEPT AS LISTED
UNDER "LIMITED WARRANTY COVERAGE". THE WARRANTOR
IS NOT LIABLE FOR INCIDENTAL OR CONSEQUENTIAL
DAMAGES RESULTING FROM THE USE OF THIS PRODUCT, OR
ARISING OUT OF ANY BREACH OF THIS WARRANTY,
INCLUDING WITHOUT LIMITATION, LOSS OF GOODWILL,
PROFITS OR REVENUE, LOSS OF USE OF THIS PRODUCT OR
ANY ASSOCIATED EQUIPMENT, COST OF SUBSTITUTE
EQUIPMENT, DOWNTIME COSTS, OR CLAIMS OF ANY PARTY
DEALING WITH BUYER FOR SUCH DAMAGES. (As examples, this
excludes damages for lost time, cost of having someone remove or
re-install an installed unit if applicable, travel to and from the servicer.
The items listed are not exclusive, but are for illustration only.) ALL
EXPRESS AND IMPLIED WARRANTIES, INCLUDING THE
WARRANTIES OF MERCHANTABILITY, ARE LIMITED TO THE
PERIOD OF THE LIMITED WARRANTY.
You may also contact us directly at : 1-800-211-7262 (Phone)
(Monday - Friday 9 am - 8 pm, EST.) Panasonic Exchange Center :
4900 B#12 George McVay Drive, McAllen Texas 78503
Some states do not allow the exclusions or limitations of incidental or
consequential damages, or limitations on how long an implied
warranty lasts, so the exclusions may not apply to you.
Product
Parts
Headphones, Earphones, Headset, Ninety (90) days
Microphone, Speaker System,
Cable, Rechargeable Battery
Service
Carry-in or
Mail-in
During the "Parts" warranty period, there will be no charge for parts.
You must carry-in or mail-in your product, during the warranty period.
If non-rechargeable batteries are included, they are not warranted.
This warranty only applies to products purchased and serviced in
U.S.A. or Puerto Rico. This warranty is extended only to the original
purchaser of a new product which was not sold "as is". A purchase
receipt or other proof of the original purchase date is required for
warranty service.
For assistance in Puerto Rico, please contact at : (787) 750-4300
(Phone) or (787) 768-2910 (Fax) Panasonic Puerto Rico, Inc.
Limited Warranty limits And Exclusions
The warranty ONLY COVERS failures due to defects in materials or
workmanship, and DOES NOT COVER normal wear and tear or
cosmetic damage. The warranty ALSO DOES NOT COVER damages
which occurred in shipment, or failures which are caused by products
This warranty gives you specific legal rights and you may also have
others rights which vary from state to state. If a problem with this
product develops during or after the warranty period, you may contact
your dealer or ServiCenter. If the problem is not handled to your
satisfaction, then write to the warrantor's Consumer Affairs
Department at the address listed for the warrantor.
PARTS AND SERVICE WHICH ARE NOT COVERED BY THIS
LIMITED WARRANTY ARE YOUR RESPONSIBILITY.
AVC200707
RQT8993
Specifications
29
RQT8993
● Bluetooth specification : version 2.0
● Output : Power Class 2
● Carrier frequency : 2.4 - 2.483 GHz
● Operation distance : up to 10 m (33 ft.)
● Compatible Bluetooth Profiles : A2DP
(Advanced Audio Distribution Profile),
AVRCP (Audio Video Remote Control Profile),
HSP (Head Set Profile),
HFP (Hands Free Profile)
● Audio Codec : SBC
● Battery : Ni-MH (1.2 V, min 620 mAh)
● Playback time : 4.5 hours
● Charge time : 3 hours
● Total cord length : 0.6 m (2.1 ft.)
● Plug (Earphones) : 3.5 mm (1/8 in.)
● Dimensions (W × H × D) :
Receiver 24.0 mm × 54.0 mm × 24.1 mm
(15/16 in. × 2-1/8 in. × 15/16 in.)
Transmitter 62.3 mm × 31.0 mm × 11.0 mm
(2-7/16 in. × 1-1/4 in. × 7/16 in.)
● Mass (Weight) :
Receiver Approx. 30.4 (1.1 oz.)
Transmitter Approx. 11.4 (0.4 oz.)
28
● AC Adaptor :
Input
AC 120 V, 60 Hz
Output
DC 4.8 V, 720 mA
Power consumption 6 W
* Specifications are subject to change without
notice.
Listening caution
Panasonic Consumer Electronics Company, Division of
Panasonic Corporation of North America
One Panasonic Way Secaucus, New Jersey 07094
FOR U.S.A.
Panasonic Puerto Rico, Inc.
Ave. 65 de Infantería, Km. 9.5, San Gabriel Industrial Park,
Carolina, Puerto Rico 00985
Panasonic / Technics Accessory Limited Warranty
Do not play your earphones at a high volume. Hearing
experts advise against continuous extended play.
If you experience a ringing in your ears, reduce
volume or discontinue use.
Pay attention to the surrounding environment
(traffic) when using the earphones while walking.
Do not use while operating a motorized vehicle.
It may create a traffic hazard and is illegal in many
areas.
You should use extreme caution or temporarily
discontinue use in potentially hazardous situations.
Sound can be deceiving. Over time your hearing
“comfort level” adapts to higher volumes of sound.
So what sounds “normal” can actually be loud and
harmful to your hearing. Guard against this by
setting your equipment at a safe level BEFORE
your hearing adapts.
To establish a safe level:
• Start your volume control at a low setting.
• Slowly increase the sound until you can hear it
comfortably and clearly, and without distortion.
Once you have established a comfortable sound level:
• Leave it there.
Limited Warranty Coverage
If your product does not work properly because of a defect in
materials or workmanship,
Panasonic Consumer Electronics
Company or Panasonic Puerto Rico, Inc. (collectively referred to as
"the warrantor") will, for the length of the period as follows, which
starts with the date of original purchase ("warranty period"), replace it
with a new or a refurbished product.
not supplied by the warrantor, or failures which result from accidents,
misuse, abuse, neglect, mishandling, misapplication, alteration, faulty
installation, set-up adjustments, misadjustment of consumer controls,
improper maintenance, power line surge, lightning damage,
modification, rental use of the product, serviced by anyone other than
a Factory ServiCenter or other Authorized Sevicer, or damage that is
attributable to acts of Gods.
For assistance in U.S.A., please visit our Web Site at :
http://www.pstc.panasonic.com
THERE ARE NO EXPRESS WARRANTIES EXCEPT AS LISTED
UNDER "LIMITED WARRANTY COVERAGE". THE WARRANTOR
IS NOT LIABLE FOR INCIDENTAL OR CONSEQUENTIAL
DAMAGES RESULTING FROM THE USE OF THIS PRODUCT, OR
ARISING OUT OF ANY BREACH OF THIS WARRANTY,
INCLUDING WITHOUT LIMITATION, LOSS OF GOODWILL,
PROFITS OR REVENUE, LOSS OF USE OF THIS PRODUCT OR
ANY ASSOCIATED EQUIPMENT, COST OF SUBSTITUTE
EQUIPMENT, DOWNTIME COSTS, OR CLAIMS OF ANY PARTY
DEALING WITH BUYER FOR SUCH DAMAGES. (As examples, this
excludes damages for lost time, cost of having someone remove or
re-install an installed unit if applicable, travel to and from the servicer.
The items listed are not exclusive, but are for illustration only.) ALL
EXPRESS AND IMPLIED WARRANTIES, INCLUDING THE
WARRANTIES OF MERCHANTABILITY, ARE LIMITED TO THE
PERIOD OF THE LIMITED WARRANTY.
You may also contact us directly at : 1-800-211-7262 (Phone)
(Monday - Friday 9 am - 8 pm, EST.) Panasonic Exchange Center :
4900 B#12 George McVay Drive, McAllen Texas 78503
Some states do not allow the exclusions or limitations of incidental or
consequential damages, or limitations on how long an implied
warranty lasts, so the exclusions may not apply to you.
Product
Parts
Headphones, Earphones, Headset, Ninety (90) days
Microphone, Speaker System,
Cable, Rechargeable Battery
Service
Carry-in or
Mail-in
During the "Parts" warranty period, there will be no charge for parts.
You must carry-in or mail-in your product, during the warranty period.
If non-rechargeable batteries are included, they are not warranted.
This warranty only applies to products purchased and serviced in
U.S.A. or Puerto Rico. This warranty is extended only to the original
purchaser of a new product which was not sold "as is". A purchase
receipt or other proof of the original purchase date is required for
warranty service.
For assistance in Puerto Rico, please contact at : (787) 750-4300
(Phone) or (787) 768-2910 (Fax) Panasonic Puerto Rico, Inc.
Limited Warranty limits And Exclusions
The warranty ONLY COVERS failures due to defects in materials or
workmanship, and DOES NOT COVER normal wear and tear or
cosmetic damage. The warranty ALSO DOES NOT COVER damages
which occurred in shipment, or failures which are caused by products
This warranty gives you specific legal rights and you may also have
others rights which vary from state to state. If a problem with this
product develops during or after the warranty period, you may contact
your dealer or ServiCenter. If the problem is not handled to your
satisfaction, then write to the warrantor's Consumer Affairs
Department at the address listed for the warrantor.
PARTS AND SERVICE WHICH ARE NOT COVERED BY THIS
LIMITED WARRANTY ARE YOUR RESPONSIBILITY.
AVC200707
RQT8993
Specifications
29
30
RQT8993
RQT8993
Memo
Memo
31
30
RQT8993
RQT8993
Memo
Memo
31
● The Bluetooth word mark and logos are owned by the Bluetooth SIG, Inc. and any use of such marks by
Matsushita Electric Industrial Co.,Ltd. is under license.
Other trademarks and trade names are those of their respective owners.
● iPod is a trademark of Apple Inc.,registered in the U.S. and other countries.
Panasonic Consumer Electronics
Company, Division of Panasonic
Corporation of North America
One Panasonic Way Secaucus,
New Jersey 07094
http://www.panasonic.com
© 2007 Matsushita Electric Industrial Co., Ltd.
Printed in China
Panasonic Puerto Rico, Inc.
Ave. 65 de Infantería, Km. 9.5
San Gabriel Industrial Park, Carolina,
Puerto Rico 00985
En
RQT8993-1P
M0607TK1077