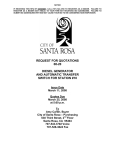
1
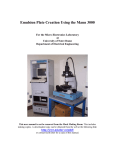
Tamarack Series 142 Vacuum Contact Printer Operation
For the Micro-Electronics Laboratory
At
University of Notre Dame
Department of Electrical Engineering
This user manual is not be removed from the Mask Making Room. This includes
making copies. A downloaded copy can be obtained from the web at the following link:
http://www.nd.edu/~ee/ndnf/
or contact Keith Darr for a copy of this manual.
Purpose
The Tamarack Series 142 Vacuum Contact Printer is used to produce a copy of a
master plate at a sizing ratio of 1:1. The Series 142 is able to image a patterned
emulsion plate to a photoresist coated chromium plate or from a patterned and
etched chromium plate to a photoresist coated chromium plate with an identical
pattern transfer. With filters installed, the Tamarack is capable of exposing
emulsion plates using either a patterned emulsion plate or a patterned chromium
plate as a master plate. If the user chooses to use the machine for this purpose,
then they should expect the resulting emulsion pattern to be a negative image of
the master plate.
Reference Documents
Tamarack Vacuum Contact Printer Series 142 Technical Manual Rev. 9/76
Operation instruction and procedural documentation provided by Tatyana Orlova
Additional Equipment Required
None
Materials Required
Emulsion coated plate 5” X 5” (127 X 127 mm)
Photoresist coated chrome reticle plates
5” X 5” (127 X 127 mm) or 4” X 4” (100 X 100 mm)
AZ917 Developer
CR-4 Chromium photomask etchant
PF-95 Photomask Fixer
PD-86 Photomask Negative Developer
Protective Equipment Required
Safety glasses
Latex Gloves
Engineering and/or Administrative Controls
Only authorized users may operate this piece of equipment
Training
To obtain training on this machine, please contact Keith Darr (office 221 Cushing,
phone 1-5497, email [email protected])
Problems
For problems, clarification of procedures, or general information pertaining to this
machine please contact one of the following personnel.
Keith Darr 631-5497
[email protected]
Mike Thomas 631-7493
[email protected]
Mark Richmond 631-6478 [email protected]
In Case of Emergency, Please Contact Notre Dame Security at
911
MSDS’s can be located in the EE Department office or in Room 244 near the door.
Keith Darr
Rev 1.5
10/31/2008
2
Table of Contents
Page
4-5
6-7
8
9
Keith Darr
Rev 1.5
10/31/2008
Contents
Authorized Users
Operations
Developing
Appendix
3
Authorized Users List
Name
Jie Wu
Minjun Huang
Diana Hou
Zach Gagnon
Wei He
Yong Tang
Ning Su
Wu Bin
John Timler
Jie Su
Sangeetha Swaminathan
John Baeton
Mike Coogan
Qing Liu
John Simon
David Deen
Wentao Luo
Siddhartta Maheshisaui
Qinxin Zhang
Aaron Prager
Juan Jiang
Loukas Tsagalas
Adams Tong
Tom Zimmerman
Jia Gao
Peter Hoffman
Zhen Wang
Xiangning Luo
Gilad Yossifon
Sagnik Basuray
Nishant Chetwani
Nan Sun
Prashant Deshlahra
Ireneusz Janki
Yenchun Lee
Lisa Cole
Xiu Xing
Andy Carter
Jason Kulick
Connor Griffith
Keith Darr
Rev 1.5
10/31/2008
Email
[email protected]
[email protected]
[email protected]
[email protected]
[email protected]
[email protected]
[email protected]
[email protected]
[email protected]
[email protected]
[email protected]
[email protected]
[email protected]
[email protected]
[email protected]
[email protected]
[email protected]
[email protected]
[email protected]
[email protected]
[email protected]
[email protected]
[email protected]
[email protected]
[email protected]
[email protected]
[email protected]
[email protected]
[email protected]
[email protected]
[email protected]
[email protected]
[email protected]
[email protected]
[email protected]
[email protected]
[email protected]
[email protected]
[email protected]
[email protected]
Advisor
Chang
Hall
Chang
Chang
Lieberman
Fay
Fay
Seabaugh
Seabaugh
Bernstein
Wu
Wu
Chang
Bernstein
Jena
Xing
Chang
Chang
McGiun
Snider
A.E. Miller
D.A. Hill
Snider
Xing
Liu
Zhu
Bohn
Jena
Chang
Chang
Chang
Ruggiero
Bernstein
Carmichael
Snider
Roeder
Fay
Bernstein
Bernstein
Porod
Date
04/29/04
05/05/04
05/27/04
05/27/04
10/05/04
01/20/05
01/20/05
02/28/05
02/28/05
04/14/05
06/16/05
06/16/05
08/12/05
9/14/05
09/30/05
10/19/05
10/24/05
10/24/05
10/25/05
10/25/05
10/25/05
06/23/06
08/31/06
02/14/06
12/21/06
3/22/07
4/11/07
10/04/07
06/08/07
10/08/07
10/08/07
12/19/07
02/04/08
04/30/08
06/04/08
06/18/08
06/18/08
07/01/08
07/01/08
07/01/08
4
Authorized Users List
Name
Shenqin Wang
Yu-chen Chang
Dan Ho
Qingling Hang
Keith Darr
Rev 1.5
10/31/2008
Email
[email protected]
[email protected]
[email protected]
[email protected]
Advisor
Zhu
Chang
Zhu
Jena
Date
04/25/08
07/28/08
09/15/08
09/19/08
5
Operations
1. Turn on the lamp power supply.
a. The lamp power supply is below and to the right of the copier.
b. The power switch is the left white switch.
2. On the lamp power supply, press and release the “start” switch.
a. The right switch should be pressed down and then released.
b. Allow 3-5 minutes for proper lamp warm up.
3. Press the “Power On” switch located on the copier’s main control console.
a. The switch will illuminate as well as the “Start/Ready” indicator switch.
4. Unlatch the door and open it.
5. If you need to change the plate holders are not trained to do so, contact lab staff.
a. If you have been trained and you need to change the master and copy plate
holders use the following steps
i. The two selected printing frames are secured in a diagonal
orientation by four screws on each.
ii. When installing the printing frame in the master chamber, orient
the two nylon-locating guides toward the lower right side.
iii. When installing the printing frame in the copy chamber, orient the
two guides toward the left and opposite the single guide on the
master frame.
1. In this manner, the white guides alternate and do not
interfere with each other when the door is.
6. Load master plate in master chamber with the pattern side out.
7. Press “Master” switch to apply a holding vacuum to the master plate.
a. The switch will illuminate.
8. Load copy plate in copy chamber with the chemical side up and raise the door a
little so the copy vacuum starts.
9. Check to see that the copy plate has good vacuum by trying to move it.
10. Carefully raised the door and latch the door shut.
11. Press the “Purge” switch. The switch will illuminate.
12. Wait 5 seconds and press the “Purge” switch again to stop the purge cycle. The
switch light will extinguish.
13. Apply and hold some pressure to the door and press the “Chamber Vacuum”
button. The switch will illuminate.
a. Look at the 3 gauges and make sure that they are all around 20 then let go
of the door. If there is no change on the gauge, then apply slightly more
pressure to ensure that the vacuum system seals.
Keith Darr
Rev 1.5
10/31/2008
6
14. Press the “Copy Force” switch to apply force to clamp the master and copy plates
together. The switch will illuminate.
a. The left vacuum gauge and the middle one will decrease in vacuum.
Make sure that they stabilize and read around 9.
15. Set desired exposure time on the Timer.
a. Emulsion plate
12.00 seconds.
b. Chromium plate 20.00 seconds.
16. Check the filters in the slots inside the printer. (Figure 1 in Appendix)
a. For a chrome copy, use only the rear filter.
i. It is difficult to see. It is behind the rubber and should always be
in.
b. To make an emulsion copy, use all three filters.
i. The emulsion plate filters will be inserted in the two slots on the
front side of the rubber.
17. Press “Exposure Start,” wait until you hear the shutter close.
a. “Shutter Open” switch will also illuminate but, during shutter open time
only.
18. Press the “Exposure Start” switch again.
a. The exposure lamp will extinguish, but the shutter will not open again.
19. Press the “Copy Force” switch to remove the forces clamping the plates together.
The switch light will extinguish.
20. Press the “Purge” button to separate the two plates.
21. Wait 5 seconds then press “Purge” again.
22. Wait 3-4 seconds then press the “Chamber vacuum.”
23. Unlatch and carefully open the door.
a. The vacuum holding the copy plate will be released automatically and the
“Copy” indicator light will extinguish.
24. Remove the copy plate.
25. While holding the master plate, depress the “Master” switch to remove the
vacuum on the master plate. The switch will extinguish.
26. Return the door to the closed position and latch it shut.
27. Press the “Power On” switch on the copier to turn the machine off.
28. Turn off lamp power supply.
29. Develop the copy plate.
Keith Darr
Rev 1.5
10/31/2008
7
Developing
Emulsion plate
1.
2.
3.
4.
5.
6.
Use PD-86 developer to develop the emulsion plate for 5 min.
Rinse the plate in DI water for 1 min.
Put the plate in fixer PF-95 for 3 min.
Rinse the plate in DI water for 1 min.
Rinse the plate with methanol.
Place the plate in the slotted Teflon plate holder and let air dry
a. Alternatively, blow dry the plate with nitrogen
Chromium plate
1. Develop the plate in AZ917 20-25 seconds to remove the exposed resist.
2. Rinse in DI water for 1 minute.
3. Etch the exposed chromium in CR-4 until the chromium is removed (average
time = 90 sec).
4. Rinse in DI water for 1 minute.
5. Rinse the plate with methanol to remove the remaining resist.
6. Strip any residual photoresist in the Drytech.
Keith Darr
Rev 1.5
10/31/2008
8
Appendix
Figure 1 Tamarack Filter Placement
Keith Darr
Rev 1.5
10/31/2008
9