1
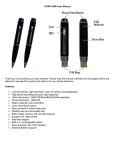
User Manual
1
Thank you for purchasing our pen recorder. Please read this manual carefully and thoroughly
before any attempt to operate this product and retain it for your future reference.
Features
. Low illumination, high resolution video and photo recording/taking
. High speed recording and quick light response
. Video Resolution:1280X720/640X480/352X288 selectable
. Photo Resolution:1280X720
. Motion detection auto recording
. Voice recording function
. Web camera for online video chat
. Flexible use as a removable disk
. Built-in flash memory, 2G /4G /8G optional
. Support AVI video format
. Real time disply
. Built-in Li rechargeable battery
. Can connect the recorder to the battery charger to carry on the long time video recording
Overview:
Record/Stop Button
LED
Indicator
Lens
MIC
Reset Hole
USB Plug
2
Operation Guide
1. Charge the battery:
The recorder has an internal, rechargeable battery. The battery can be charged by following
ways:
1), By connecting to PC:
2). By battery charger
During charging, the blue indicator will blink, when the battery’s power is full, the blue indicator
keeps on.
You may connect the recorder to the battery charger to carry on the long time video recording.
2. Power on and recording:
Press and hold the Record/Stop button for about 3 seconds till the blue indicator turns on,
after a while the green indicator will blink slowly, the recorder starts recording video & voice.
3. Video/Voice/Photo/Motion Detection mode switching:
Every time you turn the recorder on, it will start Video Recording automatically, the green
indicator blinkes slowly. Click the Record/Stop button once, will stop recording, the blue
indicator keeps on (Video Record Standby Mode).
Enter Voice Recording Mode: When the recorder is in Video Record Standby Mode (blue
indicator is on), click the Record/Stop button 2 times quickly, the recorder will enter Voice
Recording Mode, and start voice recording, the blue indicator will blink slowly.
To quit the voice recording mode, just click the Record/Stop button once, the recorder will
back to Video Record Standby Mode, the blue indicator keeps on.
Enter Photo Mode: When the recorder is in Video Record Standby Mode (blue indicator is
on), click the Record/Stop button 3 times quickly and continuously, the recorder will enter
Photo Standby Mode, and the blue and green indicators will blink alternately .
To quit the Photo mode, again click the Record/Stop button 3 times quickly and
continuously, the recorder will back to Video Record Standby Mode, the blue indicator keeps
on.
Enter Motion Detection Mode: When the recorder is in Video Record Standby Mode (blue
indicator is on), click the Record/Stop button 4 times quickly and continuously, the
recorder will enter Motion Detection Mode, and the blue and green indicators will blink slowly.
To quit the Motion Detection mode, again click the Record/Stop button 4 times quickly and
continuously, the recorder will back to Video Record Standby Mode, the blue indicator keeps
3
on.
4. Video recording:
In Video Record Standby Mode (blue indicator is on), Click the Record/Stop button once to
start video recording, the green indicator blinkes slowly. During recording, click the
Record/Stop button again, will stop recording, and start saving the recorded video data. After
data saving finished, the blue indicator turns on and waiting next recording.
If the continuous recording time is over 60 minutes, the recorder will save the current
recording data, and then restart video recording automatically.
Note: To obtain perfect video, please place the recorder under enough illumination. Keep the
recorder toward the target, and at least 50cm from the target.
5. Photo taking:
In Photo Standby Mode (blue and green indicators blink alternately), click the Record/Stop
button once to take photo, the blue indicator blinkes rapidly, and two photos will be taken and
saved each time. You may choose a satisfied picture from them.
Note: To obtain clear picture, please keep the recorder static and not shake during
photographing.
6. Motion detection auto recording:
In Motion Detection Mode (blue and green indicators blink slowly), when the object is moving
in front of lens, the recorder will start video recording automatically, blue and green indicators
blink faster. When the object stop moving, after a few seconds, the recorder will stop
recording and save video data. When the disk space is full, it will automatically cut the earliest
recorded video file, so as to preserve the new recorded video file.
Click the Record/Stop button once, will pause motion detecting, and the blue and green
indicators will keep on.
Suggestion: When use the motion detection function, for the purpose of long time monitor
recording, you better to set the resolution to 640x480 or 352x288 to save the memory space
(refer to the following instructions), and connect the recorder to battery charger to carry on the
power supply.
7. Setting time:
The recorder has the function of real-time display, the date and time will be shown on the the
image. To set or correct the date and time, follow the steps:
1), Edit a text file, the format is “20090806153000” (First 4 digits for the year, following 2 digits
for the month, 2 digits for the day, and others for hour, minute and second).
4
*A sample file “time.txt” is included in CD, you can use it to modify date and time directly.
2), Connect the recorder to computer, save the modified file to the root directory of the
recorder memory..
3), Disconnect the recorder from computer, turn the recorder on, the time will be set up
automatically.
8. Setting video resolution:
Three kinds of video resolution can be set according to the different needs: 1280x720,
640x480,352x288.
1), A sample file “framesize.txt” is included in CD, you can open it and change the digit for
different video resolution:
0 for 1280x720;
1 for 640x480;
2 for 352x288;
2), Connect the recorder to computer, save the modified file to the root directory of the
recorder memory.
4), Disconnect the recorder from computer, turn the recorder on, the new video resolution will
be set up automatically.
9. Connecting to PC:
. Connect the recorder to your computer: When the recorder is shut down, you can insert
the recorder into the USB port of computer. After a while, a removable disk symbol will appear
on the computer screen. The blue indicator will blink (charging battery), or keep on (battery
power is full).
Note: Please do not connect the recorder to your computer when the recorder is on working
status..
. Function as a removable disk: When connect the recorder to PC, you can copy, move, or
delete files stored in built-in memory.
. Function as a PC camera:
Connect the recorder with your computer, after the removable disks appeared on the screen,
press and hold the Record/Stop button for 3 seconds, the removable disks will disappear,
after a while, the USB video device will appear on screen, now you can use the recorder as a
PC camera.
10. Auto power off function:
The recorder will shut down automatically in following three conditions:
5
. The battery’s power is low. At this time, the blue indicator will blink for seconds, and then the
recorder will save data and shut down automatically .
. The memory is full. At this time, the blue and green indicators will blink for seconds, and then
the recorder will save data and shut down automatically.
. If no operation for 5 minutes in Standby Mode, the recorder will shut down to save power.
11. Turn off the recorder:
When the recorder is working or stand-by, press and hold the Record/Stop button down for
about 3 seconds, the recorder will shutt down.
12. Reset function:
In case of system broken down or hung up, please reset the recorder. There is a small Reset
hole on the pen, use a thin stick (e.g. toothpick) to press the Reset button inside the hole.
Restart the recorder, it will work normally again.
13.Specifications:
Dimension:
Weight:
View Angle:
Minimum Illumination:
Video Format:
Resolution:
Frame Rate:
Photo Image Format:
Voice Sampling:
Operation System:
USB Interface:
Battery Charge:
Store Temperature:
150mm×15mm×15mm(approx.)
45g(approx.)
62°
1 Lux
AVI
1280×720/640x480/352x288 selectable
≥20fps
JPG 1280x720
16bit
2000/XP/Vista
USB 2.0
DC 5V
-20°- 80°
(Specifications are subject to minor change with upgrade and update. Please base on real
object.)
14. Packing Contents:
1),Main Unit (1)
2),User Manual(1)
3),CD(1)
4),Battery Charger(1)
5),USB Cable(1)
6
Care and maintenance
Your device is a product of superior design and craftsmanship and should be
treated with care. The following suggestions will help you protect your warranty
coverage.
• Keep the device dry. Precipitation, humidity, and all types of liquids or moisture
can contain minerals that will corrode electronic circuits. If your device does get wet,
allow it to dry completely.
• Do not use or store the device in dusty, dirty areas. Its moving parts and
electronic components can be damaged.
• Do not store the device in hot areas. High temperatures can shorten the life of
electronic devices, damage batteries, and warp or melt certain plastics.
• Do not store the device in cold areas. When the device returns to its normal
temperature, moisture can form inside the device and damage electronic
circuit boards.
• Do not attempt to open the device.
• Do not drop, knock, or shake the device. Rough handling can break internal
circuit boards and fine mechanics.
• Do not use harsh chemicals, cleaning solvents, or strong detergents to clean the
device.
*Please follow State’s law. Do not use the recorder illegally.
7